USER MANUAL LAN Interface For - HFE POWER SUPPLIES with PMBUS Option (/S) - Manual Supplement Refer to HFE1600/2500 and HFE1600/2500-S1U ...
←
→
Page content transcription
If your browser does not render page correctly, please read the page content below
USER MANUAL
                          LAN Interface
                               For
                         HFE POWER SUPPLIES
                                with
                          PMBUS Option (/S)

Manual Supplement
Refer to HFE1600/2500 and HFE1600/2500-S1U Instruction Manual for installing
the power supplies, safety requirements and specifications.

                                                                IA817-04-01B
                                      1
Table of Content

1. GENERAL INFORMATION............................................................................ 4
    1.1 Introduction..........................................................................................................................................4
    1.2 Feature Summary................................................................................................................................4
    1.3 Front Panel View .................................................................................................................................8
2. SPECIFICATIONS........................................................................................10
3. CONNECT TO NETWORK...........................................................................13
    3.1 LAN Cable............................................................................................................................................ 13
    3.2 Type of Networks............................................................................................................................. 13
    3.3 Power-up the LAN Module........................................................................................................... 14
    3.4 IP Address............................................................................................................................................ 14
    3.5 Hostname............................................................................................................................................ 15
4. LAN SETUP.................................................................................................16
    4.1 View the IP and MAC Addresses................................................................................................. 16
    4.2 LAN Reset ........................................................................................................................................... 16
5. WEB PAGES................................................................................................17
    5.1 Benefit of Web Pages...................................................................................................................... 17
    5.2 Opening the HOME Page.............................................................................................................. 17
    5.3 The HOME Page................................................................................................................................ 18
    5.4 DC Power Page.................................................................................................................................. 19
    5.5 LAN Page............................................................................................................................................. 24
6. PROGRAMMING USING VISA DRIVERS....................................................30
    6.1 VISA Description............................................................................................................................... 30
    6.2 VXI-11 Compatibility....................................................................................................................... 30
    6.3 Opening the VISA Connection.................................................................................................... 30
    6.4 Communicating Using VISA......................................................................................................... 30
7. PROGRAMMING USING SOCKETS............................................................31
    7.1 Socket Description........................................................................................................................... 31
    7.2 Communicating Using Sockets .................................................................................................. 31
    7.3 Controller Access: Single and Multiple Clients...................................................................... 31
    7.4 Input Buffer Requirements........................................................................................................... 32
    7.5 Message Terminators ..................................................................................................................... 32
    7.6 Using TCP Sockets ........................................................................................................................... 32
    7.7 Using UDP Sockets ......................................................................................................................... 32

                                                                                 2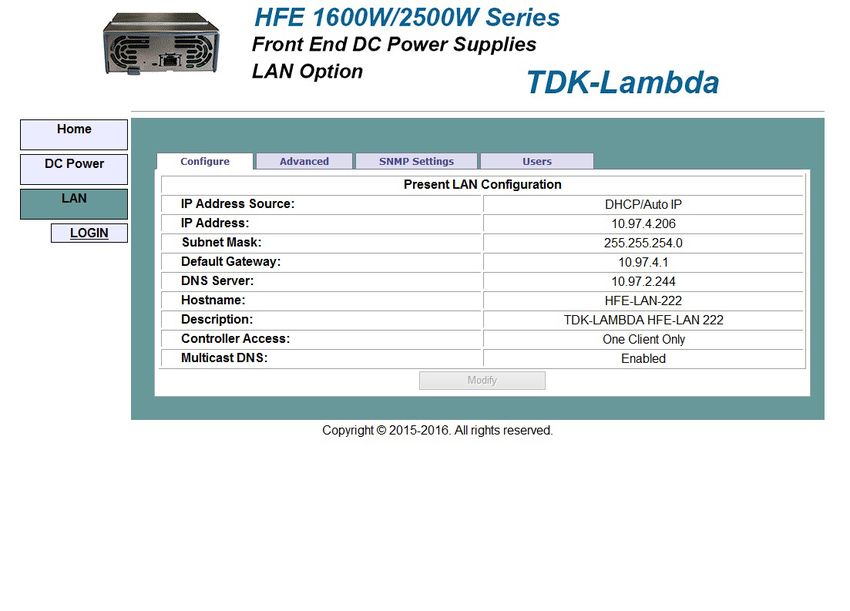
8. COMMAND SET..........................................................................................33
   8.1 Selecting an Individual Power Supply...................................................................................... 33
   8.2 Selecting a Group of Power Supplies........................................................................................ 33
   8.3 Output On/Off................................................................................................................................... 33
   8.4 Clear Faults......................................................................................................................................... 33
   8.5 Programming the Output Voltage............................................................................................. 34
   8.6 Programming the Current Limit (HFE2500/S only).............................................................. 34
   8.7 Programming the Maximum allowed Programmable Output Voltage........................ 34
   8.8 Output Voltage Monitoring.......................................................................................................... 35
   8.9 Output Current Monitoring.......................................................................................................... 35
   8.10 Temperature Monitoring............................................................................................................... 35
   8.11 Read Faults......................................................................................................................................... 35
   8.12 Enabling / Disabling the Monitoring Filter............................................................................. 36
   8.13 Programming and Monitoring Coefficients........................................................................... 36
   8.14 Inventory Details of the Power Supply..................................................................................... 36
   8.15 Inventory Details of the LAN Module....................................................................................... 37
   8.16 LAN Specific Commands............................................................................................................... 37
   8.17 Scan for Active Power Supplies................................................................................................... 37
9. TROUBLESHOOTING ................................................................................38

                                                                               3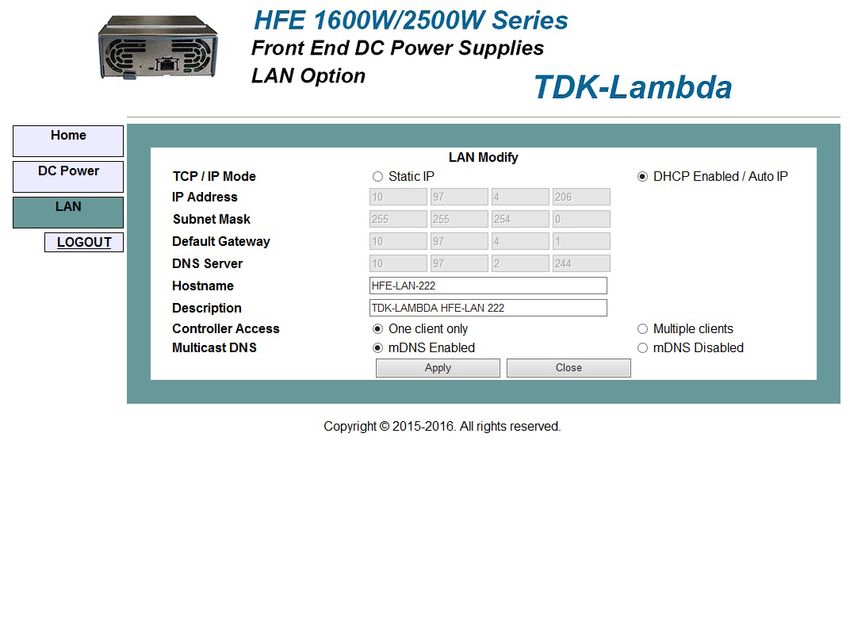
1. GENERAL INFORMATION
  1.1 Introduction
      The Local Area Network (LAN) option for the HFE series power supply allows the user to
      remotely program, measure and check status of the power supplies.
      The LAN option is designed to communicate with single or multiple supplies in a rack
      or with multiple racks housing HFE power supplies.
      The LAN option is also designed to communicate with multiple racks, each rack holding
      either HFE1600/S or HFE2500/S power supplies with PMBUS option.
      The user can install and remove the HFE LAN module with no disruption to the operation
      of the HFE power supplies.
      A computer’s web page browser can be used to operate the module through a built-in
      web page server. For applications including factory and test automation, communication
      may be done using several standard network protocols and instrument commands.
  1.2 Feature Summary
     *Communicate over standard TCP/IP networks
      a. LAN (Local Area Network)
      b. WAN (Wide Area Network)
      c. Communicate across the world using the Internet
     *Web page viewable with web page browsers, such as Internet Explorer
      d. Configure the network connection settings
      e. Graphical user Interface (GUI) that programs and reads the power supply output and status.
      f. Security settings to block multiple controllers and risky protocols.
      g. Optional password protection prevents unauthorized operation.
     *LAN Protocols
      h. VISA drivers, Telnet, TCP and UDP sockets are supported.
      i. VXI-11 Discovery and ping server are supported.
      j. SNMP is supported.
      k. Easily write custom automation programs.
     *Full remote programming functions
      l. Compatible with VISA drivers and all the test & measurement utilities.
      m. TCP and UDP sockets will support PLCs, Linux and other non-VISA controllers.
     *Front Panel features
      n. Ethernet RJ-45 connector.
      o. LAN Reset button.
      p. User may remotely “blink” the front panel to locate the LAN module.
      q. Link and Activity LED on RJ-45 connector.
      r. LAN Status LED’s.
     *I2C Multi-drop Chain
      s. Allows connecting up to 16 power supplies (or housing of 2 racks of HFE1600-S1U/TB
         or HFE2500-S1U/TB).
      t. One LAN IP address shared by all power supplies.
      u. Support up to 9 HFE1600/S or 7 HFE2500/S power supplies in 2 racks.

                                               4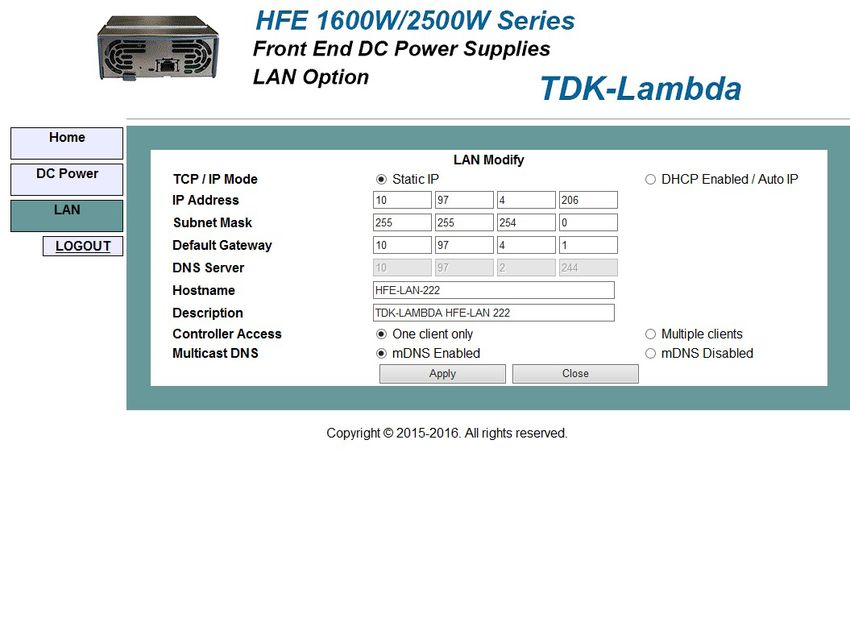
HFE 1600 LAN Outline Drawing
5
PIN No FUNCTION PIN No FUNCTION
A1 ~ A5 NC B12 NC
A6 ~ A10 NC B13 SCL (SERIAL CLOCK)
B1 SIGNAL RETURN B14 NC
B2 MODULE EXIST B15 NC
B3 +12V_AUX_IN B16 NC
B4 NC B17 SDA (SERIAL DATA)
B5 NC B18 NC
B6 NC B19 NC
B7 NC B20 SMB_ALERT
B8 NC B21 NC
B9 NC C1 NC
B10 NC C2 NC
B11 NC C3 NC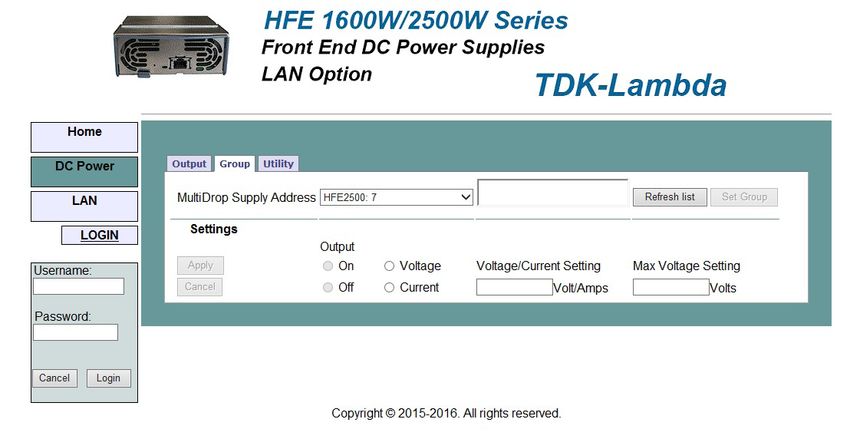
HFE 2500 LAN Outline Drawing
6
PIN No. FUNCTION PIN No. FUNCTION
A1~A10 NC B14 NC
A11~20 NC B15 NC
.
B1 SIGNAL RETURN B16 NC
B2 MODULE_EXIST B17 SDA (SERIAL DATA)
B3 +12V_AUX_IN B18 NC
B4 NC B19 NC
B5 NC B20 SMB_ALERT
B6 NC B21 NC
B7 NC B22 NC
B8 NC B23 NC
B9 NC B24 NC
B10 NC C1 NC
B11 NC C2 NC
B12 NC C3 NC
B13 SCL (SERIAL CLOCK)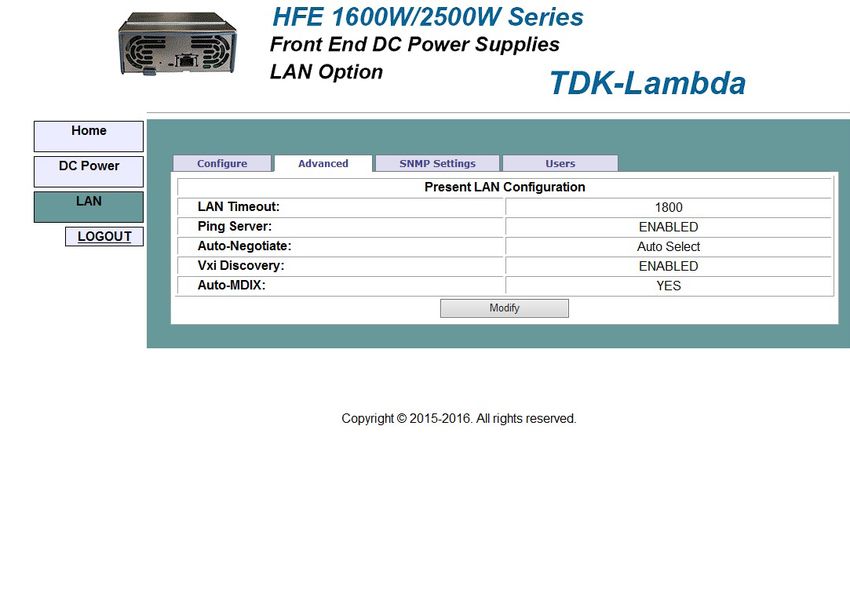
IN / OUT Connector Pin Assignment

HFE 1600 - LAN

Connector Position Signal Names        Description

B1                  SIGNAL RETURN      Return for PMBus signals: SCL, SDA, SMB ALERT

B2                  MODULE EXIST       Indicates that module is inserted into the shelf.
                                       “Active low” when connected to SIGNAL RETURN
B3                  +12V AUX IN        12V DC Input referenced to SIGNAL RETURN.
                                       (11.2 ~ 12.5V, 500mA max)
B13                 SCL                Serial Clock signal

B17                 SDA                Serial Data signal

B20                 SMB ALERT          PMBus INTERRUPT Signal

                          Table 1. HFE 1600-LAN Pin Assignment

Note - If HFE LAN module is installed in the rack, +12V_AUX (pin 38 of J1 connector
on HFE/S1U rack) cannot be used as an auxiliary supply.

HFE 2500 - LAN

Connector Position Signal Names        Description

B1                  SIGNAL RETURN      Return for PMBus signals: SCL, SDA, SMB ALERT

B2                  MODULE EXIST       Indicates that module is inserted into the shelf.
                                       “Active low” when connected to SIGNAL RETURN
B3                  +12V AUX IN        12V DC Input referenced to SIGNAL RETURN.
                                       (11.2 ~ 12.5V, 500mA max)
B13                 SCL                Serial Clock signal

B17                 SDA                Serial Data signal

B20                 SMB ALERT          PMBus INTERRUPT Signal

                          Table 2. HFE 2500-LAN Pin Assignment

Note - If HFE LAN module is installed in the rack, +12V_AUX (pin 38 of J1 connector
on HFE/S1U rack) cannot be used as an auxiliary supply.

                                           7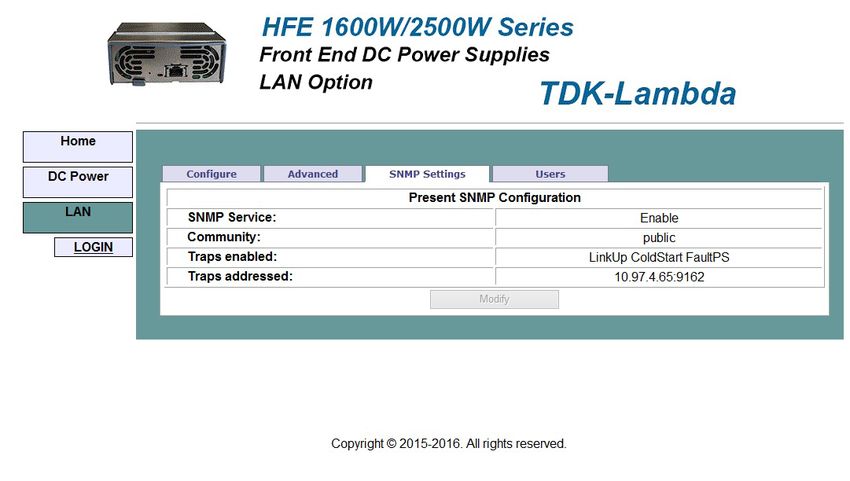
1.3 Front Panel View
The module front panel, is shown below.
Figure 1. LAN Front Panel
1. LAN Connector: RJ45, 8 pin, 10/100MBps and IEEE802.3 compliant.
2. Link/Activity LED: This LED, embedded in the RJ-45 socket, glows green and
blinks when the connection is made to an active network and packets are being
transmitted.
3. Speed LED: This Amber LED is ON at speed of 100MBps and OFF at speed of 10MBps.
4. LAN Status LED: There are two LED’s next to the RJ-45 connector. It shows:
• Normal Operation: Steady green. The module has an active LAN connection
• Device Identify: Blinking green. The identify function is turned on from a remote
computer using the web page or with command. It is used to identify one LAN
module in a rack of instruments. The led will also blink if there is a duplicate IP. The
blinking is turned off by the web page or by sending a LAN specific command.
• LAN Fault: Steady red. Shows the LAN mode is not enabled, the LAN connection
was never made, or that the LAN connection was made and then broken.
5. Reset Switch: This switch resets the LAN to its default settings.
8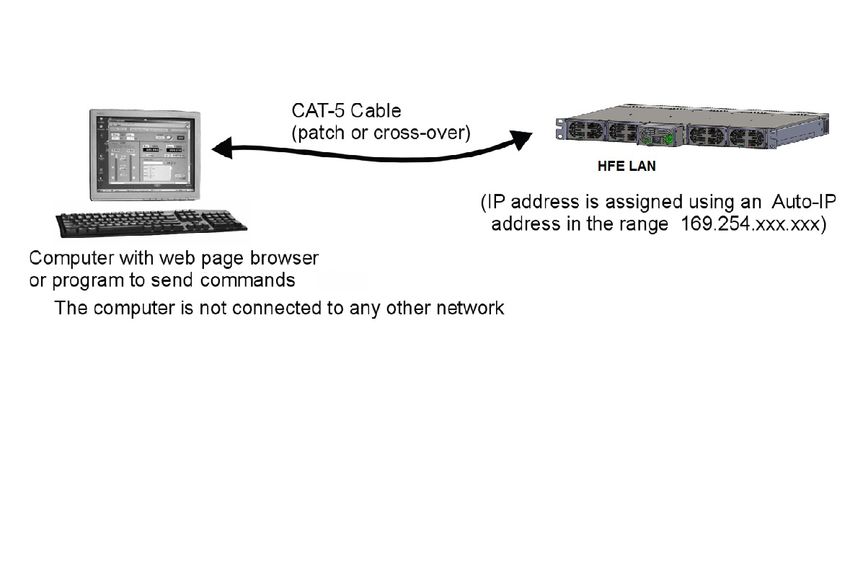
Safety Approvals

       1. Specification
        Applicable safety standards    IEC/EN/UL 60950-1
        Withstand voltage              I/O connector AC pins C2, C3 - 2000VAC/2828VDC
                                       Ground
                                       I/O connector AC pins C2, C3 - LAN/ 3000VAC/4242VDC
                                       Rear connector
                                       LAN/Rear connector - Ground         500VAC/707VDC

       2. Safety Approvals
       UL 60950-1 and CSA22.2 No.60950-1 - UL Recognized. C-UL for Canada.
       IEC 60950-1 - CB Report and Certificate.
       EN 60950-1 - CE mark.
       Marking by the CE Symbol indicates compliance to the Low Voltage Directive of the
       European Union.
       A “Declaration of Conformity” in accordance with the preceding directives and standards
       has been made and is on file at our EU representative: TDK-Lambda Germany GmbH,
       Karl-Bold-Str. 40, D-77855 Achern. A “Declaration of Conformity” may be accessed via
       company website www.emea.tdk-lambda.com/manual

  SAFETY INSTRUCTIONS
  CAUTION: The following safety precaution must be observed during all phases of operation,
  service and repair of this equipment. Failure to comply with the safety precautions or warnings
  in this document violates safety standards of design, manufacture and intended use of this
  equipment and may impair the built-in protections within. TDK Lambda shall not be liable
  for user’s failure to comply with these requirements.

  CAUTION: HFE1600/2500-LAN unit is not authorized for use as critical component in nuclear
  control systems, life support systems or equipment for use in hazardous environments without
  the express written approval of the managing director of TDK-Lambda.

  ENVIRONMENTAL CONDITIONS
  HFE1600/2500-LAN unit intended for use under following environments:
  *Indoor use
  * Pollution degree 2
  * Max. operational altitude: 3000m above sea level
  *Ambient temperature: -10°C ~ +70°C.

  PARTS SUBSTITUTIONS & MODIFICATIONS
  Parts substitutions and modifications are authorized TDK Lambda service personnel only.
  For repairs or modifications, the instrument must be returned to TDK Lambda service facility.

                                               9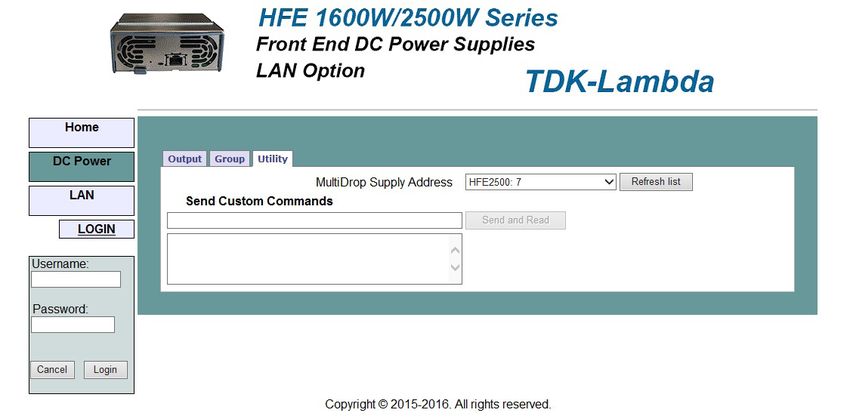
2. SPECIFICATIONS
2.1 GENERAL
    When using the HFE LAN, the ratings and accuracies are the same as for the programming
    and monitoring using PMBUS. Refer to the Instruction Manual for HFE power supply
    (/S option) for the specifications and calculations.
2.2 ELECTRICAL
    Ethernet                        Meets IEEE 802.3u specifications
    Auto-MDIX                       Accepts patch or cross-over cable connection
    Auto-Negotiate                  Selects fastest of 10Base-T or 100Base-T networks
                                    (10 or 100 Megabits per second)

2.3 NETWORK CONFIGURATION
    MAC Address            TDK-Lambda is assigned: 00:19:f9:xx:xx:xx
                           xx:xx:xx is the unique address for each unit
    IP Address             Can be detected with discovery tool
                           Discovery tool is available on
                           http://www.lxistandard.org/About/LXI-Discovery-Tools.aspx
                           IP can be changed via the Web Page or via SNMP
    DHCP                   Get address from network server, leasing services.
    Auto-IP                Create own IP address: 169.254.xxx.xxx
                           xxx.xxx is created by the module.
    Static IP              Any IP fixed by the operator.
    Hostname               NetBIOS. Operator settable name.
    Duplicate IP Detection Reject duplicate setting.
    Subnet Mask            Mask set by DHCP or static
    Default Gateway        Address set by DHCP or static
    DNS Server             Address set by DHCP
    LAN Reset              Reset configuration by front panel or a command
2.4 LAN PROTOCOLS
    TCP                    LAN packets follow Transmission Control Protocol
    IPv4                   Internet Protocol version 4
    Instrument Protocols:
    VXI-11                 Supports Core channel, not Abort or Interrupt channels
    VISA                   VXI-11 compliant, uses RPC and Port mapper.
    TCP Sockets            Send commands to port 8003
    UDP Sockets            Send commands to port 8005
    VXI-11 Discovery       Find connected instruments
    Ping Server            Verify LAN connection to instrument
    HTTP                   Web page server with Java scripts.
    SNMP                   Collects and manages information of devices connected to
                           the network.

2.5 COMMANDS                     Control, Measurement and Status
                                 (Refer to Section 8 for the full set)

                                            10
2.6 WEB PAGES
Multiple users Maximum 2 web pages can be open at once
Identity Identify power supply model, serial number, revision etc.
LAN Configuration View and set LAN configuration
Active Control GUI Program and read output settings
Send Commands Send commands, read errors
2.7 INDICATORS
Speed LED Indicates the speed at which the communication is running.
Lit –100MBps.
Non Lit - 10MBps.
Activity LED Indicates when LAN packets are detected.
LAN Status LED Red/green, indicates module has valid IP connection
Blink Identify Find the LAN Module by remotely blinking the front panel LED
2.8 SWITCHES
LAN Reset Reset LAN settings via front panel
2.9 SECURITY
Web Page Password Can set password to prevent unauthorized or accidental
changes to LAN module settings or suply settings
Single Client Only Set to prevent multiple programs from taking control
Block UDP Sockets Single client will block attacks through UDP sockets
Disable VXI-11 Discovery Stop intruders from finding the module
Disable Ping Server Stop intruders from finding the module
COMPLIANCE
1 Operating Temperature -10 ~ +70C
2 Storage Temperature -30 ~ +85C
3 Operating Humidity 10~90% RH, no condensation
4 Storage Humidity 10~95% RH, no condensation
5 Vibration Built to meet IEC60068-2-64(Basic Transportation)
6 Shock Built to meet IEC60068-2-27(Basic Transportation)
7 Immunity Built to meet IEC61000-4-2(Level 2,3), -3(Level 2), -4(Level 2),
-5 (Level 3,4), -6(Level 2), -8(Level 4), -11
8 Weight Max 0.8 Kg
9 Size (W*H*D) HFE1600 - 85 x 41 x 300mm
HFE2500 - 107 x 41 x 325mm
Table 3. Compliance
Specifications 5,6,7 in Table 3 are relevant only if the LAN module is installed in HFE1600/2500-
S1U racks
112.10 LAN Command Speed
The following communication speeds are typical values only. In addition to the variability
in the LAN interface, there are timing variations within the controller and the network
routing.
VISA Drivers Speed
Commands and queries sent using VISA drivers generally take 10 mSec longer than the
same message sent using TCP sockets.
TCP Sockets Speed
Typical Command or query speeds:
System Queries ~ 40mSec
Examples:
MEAS:VOLT?
MEAS:CURR?
MEAS:TEMP?
Instrument Select for Multi-drop ~ 40mSec
Example:
INST:NSEL?
123. CONNECT TO NETWORK
3.1 LAN Cable
The LAN cable must be supplied by the customer. It may be a standard straight “patch”
CAT-5 (or better) network cable or it may be a “crossover” cable where the pins are reversed
on one end. The cable type is auto-detected by the module.
3.2 Types of Networks
There are basically two types of networks that are discussed here:
1. NETWORK WITH A SERVER: this is the typical local area network with a computer
acting as a server and network administrator to keep it running. The server will assign
the IP address and other settings to the LAN module.
Figure 2. Server Network Connection
2. PEER-TO-PEER NETWORK: this is typically the situation when connecting the LAN
module directly to a computer that is not a network server. The LAN module will
configure its own IP address and settings.
Figure 3. Peer-to-Peer Connection
133.3 Power-up the LAN Module
The LAN module will automatically detect if it is connected to or disconnected from a
network. It will also automatically look for a network server and receive or create an IP
address. It will also broadcast its IP address and hostname to all other devices on the
network.
1. Insert the module into any slot of the HFE rack. The front panel LAN status LED will
initially be red.
2. The LAN cable may be connected before or after the module is inserted.
3. For a server network, wait about 10 seconds.
See that the front panel LAN Status LED turns green.
4. For a peer-to-peer network, wait about 60-90 seconds.
See that the front panel LAN Status LED turns green.
When the LAN Status LED turns green, the module has received an IP address.
Run the discovery tool to check the IP address received by the module.
If the LAN Status LED does not turn green, see troubleshooting section.
Note – There should be at least one HFE supply in the rack for the module to operate.
3.4 IP Address
The simplest and most reliable way to open a network connection is using the module’s IP
address. This is a group of four numbers separated by periods (for example: 10.1.15.123).
This IP address may be viewed by running the discovery tool.
There are three modes by which the module can get an IP address, as show in this table:
IP Address DHCP Auto-IP Static IP
Mode Select DHCP is default after Default after “LAN May be set in the “LAN Modify”
“LAN Reset” Reset” if no DHCP web page (see section 5.5.2)
server is used or by SNMP.
Assignment A s s i g n e d b y t h e Assigned by the LAN Assigned in the “LAN Modify” web
network server module. page (see section 5.5.2)
or by SNMP.
Range Any address 169.254.xxx.xxx Any address
Lifetime Address may change Address may change Fixed for the LAN module
as the DHCP server for the LAN module
assigns addresses
dynamically to many
instruments
Duplicate Th e D H C P s e r ve r Finds available auto- Returns to original IP (before
Addresses should prevent IP address change), LAN Status LED blinks.
duplicate IP addresses If duplicate IP is detected at AC ON,
the IP defaults to DHCP or Auto-IP,
LAN Status LED blinks.
Table 4: Assignment of IP address by different Protocols
143.5 Hostname
The hostname is an address in the form of text instead of numbers (for example: HFE-
LAN-222). In order to work with the Hostname, a naming service (such as NetBIOS) must
be running in the LAN computer.
A custom hostname can be created through the web page (see section 5.5.2) or SNMP.
For example, if the hostname is changed to “TDK-LAMBDA”, a control program can send
a command to “TDK-LAMBDA”.
The Hostname can be up to 15 characters. First character must be a letter. Last character
must be a letter or digit. Intervening characters must be either a letter, digit or hyphen.
After a “LAN Reset”, the module will create a default hostname based on the model and
serial number of the module.
The default hostname is in the following format:
HFE-LAN – < last 3 digits of serial number >
Hostname DHCP, Auto and Static IP
Default Hostname HFE-LAN-nnn
Hostname Protocol Hostname by NetBIOS
Hostname on Web Pages Shows Host name on “Home” page and “LAN Configure” page
Table 5 – Host Name format in different Protocols
154. LAN SETUP
4.1 View the IP and MAC Addresses
When the module is running, the IP and MAC addresses can be viewed by following
these steps:
To view the IP address-
1. Run the discovery tool. It will detect the module and show its IP Address, Manufacturer
Name, Serial Number and Firmware Revision. IP address can also be seen on the
“Home” page via a web browser and be read via a LAN specific command
To view the MAC address-
1. There is a label on the cover of the module indicating the MAC address.
2. MAC address can also be seen on the “Home” page via a Web browser and can be
read via a LAN specific command.
4.2 LAN Reset
LAN reset can be done via a LAN specific command or via the front panel reset switch.
The default LAN settings are:
o DHCP enabled
o If DHCP fails to get a lease, auto-IP settings will be obtained.
o Hostname: HFE-LAN-last 3 digits of Serial Number.
o Description: TDK-LAMBDA HFE-LAN Last 3 digits of Serial Number.
o Controller Access One Client Only
o Ping Server: Enabled
o Keep-Alive 1800 Seconds (30 minutes)
o Auto-Negotiate: Automatically select network speed
o VXI-11 Discovery: Enabled
o Password: None
o mDNS: Enabled
o DNS-SD: Enabled
165. WEB PAGES
Note – All figures in the web page section are examples only.
5.1 Benefit of Web Pages
The HFE LAN web pages are useful for:
• Reading the module’s model name, revision and LAN setup information
• Configuring the LAN connection
• Programming and reading the Power Supplies condition and reading the inventory
details
5.2 Opening the HOME Page
Once the front panel LAN Status LED has turned green (see Section 1.3), you may open
the HFE LAN web page.
1. Read the IP address of the module (see section 4.1)
2. Open a web page browser program such as Internet Explorer or Chrome. Type the
module’s IP address as shown below.
The module’s Home page will appear. If it does not, see Troubleshooting section.
3. Alternately, the hostname may be used for addressing the web page as shown below
(if the module is set for “DHCP/Auto-IP”, and NetBIOS naming service is running on
the computer). See Section 3.5 for a description of the hostname
The module’s Home page will appear. If it does not, see Troubleshooting section.
175.3 The HOME Page
The following page appears when the web page is first opened or when it is refreshed:
Figure 4. HOME Page
VISA Name Using IP Address: For automation programming, VISA is a type of
communication driver. For LAN instruments, the IP address may be used in the VISA
resource descriptor.
VISA Name Using Hostname: For automation programming, an alternate VISA resource
descriptor using the module’s hostname. See section 3.5
Hostname: A unique name for a device on a network. The default hostname is described
in section 3.5, it is configured in section 5.5.2.
Auto-MDIX: The LAN module will automatically detect if a patch or cross-over LAN
cable is used.
Auto-Negotiate: The LAN will automatically adjust its speed to the fastest available.
185.4 DC Power Page
When the “DC Power” tab is clicked, the following web page opens. This page and its
submenus allows the user to make operations on the power supplies.
5.4.1 DC Power ➔ Output Page
Figure 5. DC Power Page
Measurement Section
Multi Drop Supply Address: Power Supply address will be from 0 to 12 depending
on the slot in which the Power Supply is placed and the position of the DIP
switch on the rear of the rack. Please refer to HFE1600-S1U and HFE2500-S1U
user manuals for details on the slots and the DIP switch.
The address selected in this dropdown menu will correspond to the address of
the Power Supplies installed in the rack.
Please refer to the table below for a link between the address in the drop down
menu to address of the Power Supplies installed in the rack.
Drop Down Address Actual HFE Address
HFE 0 0010000
HFE 1 0010001
HFE 2 0010010
HFE 3 0010011
HFE 4 0010100
HFE 5 0010101
HFE 6 001 0110
HFE 7 0010111
HFE 8 0011000
HFE 9 0011001
HFE 10 0011010
HFE 11 0011011
HFE 12 0011100
Table 6. Multi Drop Supply Address
19Refresh List: When this button is clicked, the web page will make a scan to find connected HFE
Power Supplies and put the discovered addresses into the list box.
Every time the “DC Power” web page is opened, it will automatically scan for all connected Power
Supplies and display it in the drop down menu. If a Power Supply is added or removed after
opening the “DC Power” web page, the “Refresh List” button will have to be clicked.
Blink Identify: When this button is clicked, the LAN module LAN LED (Green) blinks. This function
allows the user to quickly identify which module is being communicated to in a rack of instruments.
The blink identify is turned OFF by clicking this button again or with a LAN specific command.
Measurements: This section displays the selected Power Supply’s actual output voltage and
current.
Please refer to HFE User Manual (/S option) for the range of Voltage, Current and Temperature
Measurements for each model.
Settings Section
To change the Power Supply settings or the LAN settings, a user must first log in.
Login Rules:
Only one web page user may be logged-in at a time to modify the power supply settings. Only
one additional web page user may view the web pages of a power supply at the same time.
If an automation program using VISA or socket connection is running, you may view the web
pages but you cannot login to change settings. Only one web page user may view the power
supply settings.
If a web page user is logged in, a VISA or socket connection cannot be opened by an automation
program.
Note - It is prohibited to run combinations other than that specified in login rules.
20Login: Click the “Login” button at the bottom-left side of the web page. Enter “admin” in the user
name box. By default, password is empty. Click “Login”.
A user may logout by clicking the “Logout” button, by closing the web browser or by leaving the
web browser idle for “LAN Keep-alive” seconds.
The password may be set or changed on the LAN -> Users web page (see section 5.5.6). A front
panel LAN reset or a LAN reset command will clear the password.
Check to Modify: Click this button to make the changes. If this button is not clicked, no changes
can be made.
After the changes are made, de-select the button.
Output: Click the On/Off button to make the Power Supply On or Off.
Voltage / Current Setting: In the case of HFE2500 supply, two programming buttons will be
seen – Voltage and Current. For first time entry in the Output section, the Voltage/Current setting
window will be blank. Click on Voltage or Current button to view the settings.
Enter the value in the window. Click “Apply”. Deselect “Check to Modify” button and the programmed
Voltage or Current setting will be seen in the Voltage/Current setting window.
Please refer to HFE User Manual (/S option) for the range of Voltage and Current programming
for each model (*1).
In the case of HFE1600 supply, there is voltage programming only, so only the voltage setting
will be seen in the Voltage/Current setting window.
Maximum Voltage Setting: Maximum voltage setting can be entered in the Max. Voltage setting
window. This is a protection window and will not allow programming voltage to go beyond the
value set in the window. (This will not create an OVP fault.)
Supply Maximum Voltage (*1)
12V 15V
24V 30V
32V 40V
48V 60V
Table 7. Maximum Voltage Setting Values
Ex - If the above value is set to 49V, the output voltage cannot be set above 49V.
If Current programming is selected, this value has to be at maximum.
Note - Any value programmed beyond the range will result in “Data out of Range” message on
the display.
If the current programming value is sent without the “%” sign, “Percentage Symbol missing” will
be seen on the display.
Note – If the “Check to Modify” button is not de-selected, the programmed values will not be seen
after a new value is set.
Settings through Web Page only: When this button is clicked, power supply settings and
LAN settings can be carried out via the web page only. Settings cannot be carried out via other
protocols. Only monitoring is available via other protocols.
The default setting is “disabled”.
21Faults Section
This section displays the selected power supply’s Fault register. If any fault occurs,
the “Fault” LED will lit. It will be required to scan all the supplies in the chain to
check which of the supply has generated the fault. If the supply is found, the
respective fault LED will be lit.
Indicator Faults
DC DC Fail
OTP Over Temperature Protection
OTA Over Temperature Alarm
FAN Fan Fail
AC AC Fail
OVP Over Voltage Protection
PVA Programmed Voltage more than Allowed
CE Command Error
Table 8. Faults Indicator
Clear Faults: If any of the fault occurs, the fault will get registered in the fault
register. It will not be cleared even if the fault is not present. With this button, the
fault register can be cleared. If the fault is present after the “Clear Faults” button
is clicked, the fault will be registered again in the fault register.
5.4.2 DC Power ➔ Group Page
Fig 6. Group Page
22This section can be used for programming a group of supplies. As soon as the
supplies are selected from the drop down menu, they will appear in the box
next to it. Click on “Set Group”. Select the operation – ON/OFF, Voltage or Current
Setting or Max Voltage Setting. Click “Apply”.
Note – This section must be used for supplies of the same type.
No other copy of web page should be open.
The user setting must be set to “One Client only”. Refer to Section 5.5.2
5.4.3 DC Power ➔ Utility Page
Fig 7. Utility Page
This page is used to send any command and see the response. It is a learning
tool for operations. It allows commands which are not present on the web pages.
Type any message into the top text box. Click the “Send and Read” button.
For commands, there is no response. For queries, the response is shown in the
bottom text box.
235.5 LAN Page
This page and its subpages allow you to view and configure the module’s LAN settings.
5.5.1 LAN ➔ Configure Page
When the “LAN” tab is selected, the “Configure” panel opens:
Fig 8. LAN Configuration
The following settings are shown on the “LAN ➔ Configure” web page:
IP Address Source: Displays the way the IP address was selected. Options are
DHCP/Auto-IP and Static IP.
IP Address: Displays the IP address assigned to the module through either DHCP,
Auto-IP or Static IP sources.
Subnet Mask: Displays the subnet mask assigned to the module through either
DHCP, Auto-IP or Static IP.
Default Gateway: Address of the network router to allow the module to
communicate outside of the local subnet.
DNS Server: Address of the server running the Domain Naming Service. This is
used for hostname addressing.
Hostname: The module hostname may be used instead of the IP address to
create a communication link. The default hostname is derived from the model
and serial number (see section 3.5) or it may be changed in the LAN ➔ Configure
➔ Modify web page (section 5.5.2).
Description: By default, this is “TDK-LAMBDA HFE-LAN last 3 digits of serial number”,
but it may be changed in the LAN ➔ Configure ➔ Modify web page (section 5.5.2).
Controller Access: The “One Client Only” setting is the default setting for the
highest networking security. This setting allows only one TCP socket or VISA
connection to be open at a time. It disables the connectionless UDP sockets.
See section 5.5.2.
24Multicast DNS: Resolves Host Name to IP Address in networks that do not include
a local server. By default, this is enabled.
Modify: Click this button to open the window shown below
5.5.2 LAN ➔ Configure ➔ Modify Page
If user is logged in, clicking the “Modify” button on the LAN ➔ Configure window,
the following window appears. On this window, you may enter new values for
the LAN settings. The available fields depend on the selection of “DHCP Assigned
/ AUTO IP” or “Static IP”
Changes to these setting will not take place until the “Apply” button is clicked
Note: After changing the LAN settings, the web browser will automatically close.
Re-open it using the new address
Fig 9. DHCP Settings
TCP/IP Mode: This selects how the module gets its network settings. Select either:
DHCP Assigned / AUTO IP: If this mode is selected, the network server uses
DHCP to assign the IP address, subnet mask, default gateway and DNS server.
Since the server assigns these, they are disabled (gray) on the web page. If the
server cannot make the assignment, the module shall revert to the Auto IP
method described in section 3.4
In this mode, the user may only change the hostname and description.
Static IP: If this mode is selected, the IP address, subnet mask and default gateway
must be entered in the window fields. The settings must be compatible with the
requirements of the network server. These settings do not change even if the
module is moved to different LAN connections.
In this mode, DNS server fields are disabled (gray)
In this mode, the user can also change the host name and description.
25Fig 10. Static IP Settings
Controller Access: Select the security feature for one client only or multiple
clients.
The multiple clients setting is needed to allow more than one controller connection
at a time and to enable UDP socket connections.
Multicast DNS: Enable or Disable the mDNS.
Apply: Click this button to save the new settings.
Close: Click this button to close the window.
5.5.3 LAN ➔ Advanced Page
Click the “LAN ➔ Advanced” button to view and set four advanced LAN settings:
Fig 11. LAN Advanced Page
26LAN Keep-Alive: If you are logged in, this is how many seconds the web pages
and all other protocols may be unused (idle) before the module automatically
logs the user out.
The default is 1800 seconds = 30 minutes.
Range is 30-60000 sec.
Ping Server: ‘Ping’ is a network utility that allows the computer to verify
communication with the LAN module. This service may be disabled in the
“Modify” panel.
Auto-Negotiate: This shows what network speed the LAN card is allowed to
operate at. Auto Select, 10MBps and 100MBps can be selected.
VXI Discovery: This is a protocol which allows the network server to detect
what instruments are connected to the LAN. It may be disabled in the “Modify”
panel for security reasons.
Note: Disabling VXI-11 discovery disables VXI-11 communication.
Auto-MDIX: This service is always enabled in the module. The module LAN
connection will always detect a patch or cross-over cable.
Modify: After logging in, click this button to open the window shown below
5.5.4 LAN ➔ Advanced ➔ Modify Page
In the window below, you may enter new values for the LAN settings. Changes
to these settings will take place when the “Apply” button is clicked.
Fig 12. LAN Advanced Page
275.5.5 SNMP Settings
Using SNMP, users can easily manage system performance and remotely find
and solve system problems. The HFE LAN serves as an SNMP Agent. A SNMP Host
system is used to communicate with this SNMP agent.
A key part of the SNMP protocol is the Management Information Base (MIB) that
describes all Agent variables that can be accessed. The MIB will be needed by any
SNMP Host that wishes to communicate with the HFE LAN and can be retrieved
from: https://uk.tdk-lambda.com/technical-centre/software-tools.aspx
HFE LAN utilizes four operations to respond to Host: Get, GetNext, Set and Trap
G et – Allows the Host to retrieve a value from the HFE LAN.
GetNext – Allows the Host to retrieve the next value from a list of variables
in HFE LAN.
Set – Allows the Host to set a value within the HFE LAN
Trap – Used by the HFE LAN to inform the Host of an event. The HFE LAN
must be configured with appropriate address of the Host.
Fig 13. SNMP
SNMP Service: Service can be enabled or disabled.
Community: Always public.
Traps Enabled: There are 3 types of traps
1. Link Up – Whenever a new link is made.
2. Cold Start – Whenever LAN settings are changed.
3. Faults PS - At any power supply fault.
Any of them can be enabled or disabled.
Traps Address: Address and port number of the Host where traps are received.
Note: AC Fail trap may not be detected at high load condition due to power
supply’s short hold up time.
28Note: If a power supply generates a trap, any further traps from the same or
other power supplies will not be seen until the fault register of the supply
which generates the trap is cleared.
Fig 14. SNMP Settings
5.5.6 LAN ➔ Users Page
This page allows the user to create password protection for the web pages.
There is no password protection for automation programming with VISA or
sockets.
By default, the “old password” is blank. The new password must be six or more
characters long. Characters allowed: a to z, A to Z and 0 to 9.
Reset the password: once a password is applied, it may be changed by using
this screen, but it can only be removed by performing the “LAN Reset” function
from the module front panel or by using LAN reset command.
Fig 15. User Settings
296. PROGRAMMING USING VISA DRIVERS
6.1 VISA Description
In the test and measurement industry, Virtual Instrument Software Architecture (VISA) is a
popular framework that includes hardware drivers, configuration utilities and connection
managers. A variety of communication busses are supported. VISA drivers are available
from several instrument vendors.
Any programming language that supports Windows COM or DLL libraries can call the
VISA functions. VISA drivers may be downloaded for Windows, Linux and MAC OS. Some
licensing issues may apply.
6.2 VXI-11 Compatibility
VXI-11 is a protocol that allows communications between a computer port and an
instrument. VISA is built upon the VXI-11 specification. The HFE LAN module is compatible
with the VXI-11 protocols.
o VXI–11 Device_link Open link to instrument
o VXI–11 Device_write Write text to the instrument
o VXI–11 Device_read Read text from an instrument
o VXI–11 Destroy_link Close link to instrument
6.3 Opening the VISA Connection
Test and automation programs may easily be written if they use the VISA libraries. The
supported VISA functions include Open, Read, Write and Close.
A VISA resource descriptor is used to describe a particular module. For HFE LAN module,
the descriptors are found on the module’s Home web page. The VISA resource may use
the module’s IP address or hostname.
Example VISA resource descriptors for the HFE LAN module are:
Format: TCPIP[board]::IP address/Host Name[::LAN device name][::INSTR]
[board] is the LAN card number, zero is optional
[::LAN device name] is by default “inst0”
[::INSTR] is optional
Examples: TCPIP::10.225.26.60::inst0::INSTR
TCPIP1::HFE-LAN-222::INSTR
6.4 Communicating Using VISA
The VISA Write function will send commands to the module, the VISA read will read the
response returned from a query.
307. PROGRAMMING USING SOCKETS
7.1 Socket Description
The VISA drivers for the HFE LAN module with LAN are popular in the Test and Measurement
world. However, some customers cannot use VISA because of installation or licensing
issues or because the controller (i.e.: industrial PLC) does not have support for VISA.
If you cannot use VISA drivers, then the HFE LAN offers socket connections. This is low-
level LAN protocol that is universally available in all operating systems and programming
environments.
7.2 Communicating Using Sockets
Communicating through sockets involves opening a socket connection, sending text
commands and reading the responses. The functions a programming language use to
manage the socket is called the TCP or UDP stack.
There are two types of socket protocols which may be used, TCP and UDP. Each has its
own port number.
7.3 Controller Access: Single and Multiple Clients
The web page has a security setting to limit or enable the types of connections and
numbers of control computers (called “clients”) that may be connected in parallel.
The rules for the One Client/Multiple Clients are:
One Client Only Multiple Clients
Web Page Max 2 copies of web pages may be open at any time.
Not logged-in You may view but cannot change the module operation.
Web Page You cannot log in if a VISA or socket port is already open.
Logged-in as “admin” If you are logged in, any other connections are blocked.
Only one additional copy of web page may be opened.
VISA Connection Only one VISA port may be open at one time.
Only one copy of web page may be opened.
TCP Socket TCP socket may be opened. Single connection of UDP or
UDP Socket UDP sockets are blocked. maximum 2 connections of
Only one copy of web TCP are allowed at the same
page may be opened. time.
Table 8: One client/Multiple clients rules.
Note - It is prohibited to run combinations other than that specified.
317.4 Input Buffer Requirements
With a controller using TCP or UDP sockets, the module can receive commands much
faster than it can process the commands. To make sure the HFE LAN is not overloaded, it
is required that the controller sometimes sends a query and then waits for the response.
The response is the acknowledgement from HFE LAN that it has finished processing all
commands.
It is recommended that your controller routinely sends “SYST:ERR?”. This query
takes little time, and it verifies that all commands have been accepted correctly.
7.5 Message Terminators
When using a program that sends separate commands out through a TCP socket,
the socket drivers may combine all the messages into one long packet. Therefore,
it is necessary to add a terminator character to the end of each command.
All SCPI commands must have a terminator character.
Terminator Character (and ASCII hex)
Commands One or more terminators required:
from the Controller Line-feed, Carriage-return
0x0A 0x0D
Responses All responses have Line-Feed at the end.
from the HFE LAN 0x0A
Table 9: Terminator
7.6 Using TCP Sockets
This is the most popular socket type. It features a managed connection, message
acknowledgements, transmission error detection and correction.
Open TCP socket port 8003 to send commands.
Responses to queries are sent back automatically with a line-feed terminator appended.
If the web page LAN controller access is set to “Multiple Clients”, then up to two controllers
may open TCP sockets to one module at the same time.
7.7 Using UDP Sockets
This is a simpler socket type with reduced network traffic. It is a ‘connectionless’ protocol
because messages are sent and there is no acknowledgement.
Open UDP socket port 8005 to send commands.
Responses to queries are sent back automatically with a line-feed terminator appended.
Before opening a UDP socket, it is required to open the web page and set the controller
access to “Multiple Clients” (see section 5.5.2).
328. COMMAND SET
8.1 Selecting an Individual Power Supply
This command can be used to select an individual power supply from a group of supplies.
If there is only 1 power supply in the entire chain, the command is not required.
Syntax: INST:NSEL
INST:NSEL?
Parameter: xx – address of the supply to be selected
Example: INST:NSEL 6
Query: INST:NSEL? Will return the address of the supply selected.
8.2 Selecting a Group of Power Supplies
This command can be used to select a group of supplies.
Syntax: INST:COUP
INST:COUP all
Parameter: x1, x2 – Supplies to be selected
all – All Supplies in the chain are selected
Example: INST:COUP 2,4
INST:COUP all
Query: None
Note – No copy of web page should be opened while operating with group commands.
To exit the group command, use INST:NSEL xx
8.3 Output On/Off
This command turns an individual power supply or a group of power supplies On or Off.
Syntax: OUTP
OUTP?
Parameter: 0 or OFF will set the power supply output to OFF
1 or ON will set the power supply output to ON
Example: OUTP 1 (or OUTP ON)
Query: OUTP? Will return ON in the example, otherwise OFF
Note – The Query returns the status of the command, not the status of the power supply.
8.4 Clear Faults
This command is used to clear the status register of the power supply after any fault occurs.
If the fault is still present after the “Clear Faults” command is sent, the fault will be
registered in the fault register again.
33Example: OUTP:PROT:CLE
8.5 Programming the Output Voltage
This command sets the Voltage Limit.
Syntax: VOLT
VOLT?
Parameter: nn.nn. Please refer to HFE User Manual (/S option) for the range of
Voltage programming for each model.
Example: VOLT 46.5
Query: VOLT? Will return 46.5 in the example.
Errors: SYSTEM:ERROR? May return:
“Data out of range”
8.6 Programming the Current Limit (HFE2500/S only)
This command sets the Current Limit.
Syntax: CURR%
CURR?
Parameter: nn.nn. Please refer to HFE User Manual (/S option) for the range of
Current programming for each model.
Example: CURR 90%
Query: CURR? Will return 90% in the example.
Errors: SYSTEM:ERROR? May return:
“Data out of range”
“Percentage Symbol Missing”
8.7 Programming the Maximum allowed Programmable Output Voltage
This command is used to set the maximum Allowed Voltage. This acts as a Voltage limiter
and does not allow the Voltage to be programmed to higher than this value. (refer to table 7)
Syntax: VOLT:PROT:LEV
VOLT:PROT:LEV?
Parameter: nn.nn - 12V Supply – 15V, 24V Supply – 30V
32V Supply – 40V, 48V Supply – 60V
These are maximum values.
Example: VOLT:PROT:LEV 46
Query: VOLT:PROT:LEV? Will return 46 in the example.
(Note: This does not create an OVP fault.)
34Errors: SYSTEM:ERROR? May return:
“Data out of range”
Note: If Current programming is done, the above setting has to be at maximum.
8.8 Output Voltage Monitoring
This query returns the measured voltage.
Syntax: MEAS:VOLT?
Example: MEAS:VOLT? May return 46.002
8.9 Output Current Monitoring
This query returns the measured current.
Syntax: MEAS:CURR?
Example: MEAS:CURR? May return 50.147
8.10 Temperature Monitoring
This query returns the internal temperature.
Syntax: MEAS:TEMP?
Example: MEAS:TEMP? May return 71.065
Note - Please refer to page HFE User Manual (/S option) for the range of Voltage, Current
and Temperature Measurements for each model.
8.11 Read Faults
This command is used to read the status of the Power Supply. The status information is stored
in the “STATUS REGISTER”. This command can read 8 different types of faults and warnings.
Syntax: STAT:QUES:COND?
Example: STAT:QUES:COND? May return 326, Output Fail:HFE7.
Fault Reply
DC Fail 326, Output Fail:”HFE Address”
Over Temperature Protection 322, Over Temperature Shutdown:”HFE Address”
Over Temperature Alarm 328, Over Temperature Alarm:”HFE Address”
FAN Fail 329, Fan Fail:”HFE Address”
AC Fail 321, AC Fail:”HFE Address”
Over Voltage Protection 324, Over Voltage Protection:”HFE Address”
Voltage more than allowed -330, Data more than allowed:”HFE Address”
Command Error -100, Command Error:”HFE Address”
Table 10: Faults
358.12 Enabling / Disabling the Monitoring Filter
Syntax: DISP:FILT ON / OFF
Parameter: ON will turn the filter ON.
OFF will turn the filter OFF.
Example: DISP:FILT ON
Query: DISP:FILT? Will return ON in this example
8.13 Programming and Monitoring Coefficients
These Coefficients are used internally by the LAN module. These are not required by the
end user. They are part of the HFE PMBUS command set.
Function Command
Voltage Monitoring Coefficient MEAS:VOLT:COEF?
Current Monitoring Coefficient MEAS:CURR:COEF?
Temperature Monitoring Coefficient MEAS:TEMP:COEF?
Voltage Programming Coefficient VOLT:COEF?
Current Programming Coefficient CURR:COEF?
Table 11: Coefficients
8.14 Inventory Details of the Power Supply
8.14.1 PMBUS Revision
Syntax: SYST:VERS?
Example: SYST:VERS? Will always return 1.1
8.14.2 Manufacturer Name
Syntax: SYST:ID?
Example: SYST:ID? Will always return TDK-LAMBDA
8.14.3 Model Name
Syntax: SYST:MDL?
Example: SYST:MDL? May return HFE1600-48/S
8.14.4 Nominal Output
Syntax: SYST:XVM?
Example: SYST:XVM? May return 48V
8.14.5 Software Revision
Syntax: SYST:REV?
Example: SYST:REV? May return 1.5
8.14.6 Manufacturing Location
Syntax: SYST:LOC?
Example: SYST:LOC? May return CHINA
368.14.7 Manufacturing Date
Syntax: SYST:DATE?
Example: SYST:DATE? May return 12/12/2016
8.14.8 Serial Number
Syntax: SYST:SER?
Example: SYST:SER? May return DOD705BED0171W
8.15 Inventory Details of the LAN Module
8.15.1 Software Revision
Syntax: SYST:COMM:LAN:VERS?
Example: SYST:COMM:LAN:VERS? May return 1.28.18
8.15.2 Serial Number
Syntax: SYST:COMM:LAN:SER?
Example: SYST:COMM:LAN:SER? May return 12345
8.16 LAN Specific Commands
8.16.1 Read the Hostname
Syntax: SYST:COMM:LAN:HOST?
Example: SYST:COMM:LAN:HOST? May return HFE-LAN-222
The hostname string is up to 15 characters long
8.16.2 Read the IP Address
Syntax: SYST:COMM:LAN:IP?
Example: SYST:COMM:LAN:IP? May return 10.97.4.233
The IP address string is up to 15 characters long
8.16.3 Read the MAC Address
Syntax: SYST:COMM:LAN:MAC?
Example: SYST:COMM:LAN:MAC? May return 00:19:f9:00:24:3b
The MAC address string, 17 characters long
8.16.4 Reset LAN Settings
WARNING: Sending this command will disable the LAN connection to the module
This command will reset the LAN settings to the factory default state. The effect
of this includes changing the IP address and hostname, so LAN communication
could be lost. Therefore, use this command as a diagnostic tool only.
Syntax: SYST:COMM:LAN:RES
Example: SYST:COMM:LAN:RES
Note: Reset does not affect SNMP enable/disable setting
8.16.5 Blinking the Blink Identity LED
Syntax: SYST:COMM:LAN:IDLED 1 or ON, 0 or OFF
Example: SYST:COMM:LAN:IDLED 1
8.17 Scan for active power supplies
This command scans for active power supplies, returns the location in the rack.
Syntax: SYST:SCAN?
Example SYST:SCAN? may return PS:0,2,4
379. TROUBLESHOOTING
LAN Status LED Stays Red
If LAN status LED stays red, then the module is not connecting to the network.
A. Verify the LAN cable is connected to an active network. Look at the front panel link LED
(part of the RJ-45 connector, see section 1 .3) and verify it is green. If the LED is not lit,
then the LAN cable is not connected properly.
B. Wait longer and try to read the IP address again. In the Auto-IP mode the module will
wait a full 60-90 seconds to assign an IP address after powerup.
Cannot Communicate to the Module
If the LAN Status LED is green and the module has a valid IP address, and you still cannot open
a web page, VISA or socket connection then try “pinging” the module. The ping utility verifies
the computer can send a message and get a response from the module over the network.
Open a command line window by:
A. Click the “Start” button, Select “Run…”
B. A “Run” window opens. Type: cmd . See the command window open
C. Type “ping ”
Verify the ping packets had successful responses
If the “ping” does not get responses from the module, then there is a mismatch between
the module and the computer LAN settings. Also, the ping function may be disabled in the
module. In this case, do a module “LAN Reset” and try to connect again
Cannot Open Web using Laptop or Dual-LAN Card Computer
If you have a computer with two network cards, the computer may not know which card to
use when trying to open the HFE web page. Verify the two cards do not have over-lapping
IP address ranges, otherwise it may be necessary to disable or disconnect the network card
that is not being used.
If you have a laptop computer with an Ethernet jack and a wireless network, it may be necessary
to disable the wireless LAN port.
Web Page “Refresh List” Does Not Find Slave Supplies
When you are using a LAN chain of supplies, the web page Refresh List button should detect
all the connected slave supplies. If it does not:
A. Verify all slave supplies are set for unique addresses.
LAN Status LED is blinking
While setting an IP Address, Duplicate IP has been detected. Stop the blinking by a LAN
specific command or by the Blink Identity command on the Web page and try assigning a
new IP Address.
3839
40
     IA817-04-01B

      Z0021418
You can also read