SWANN SECURITY APP USER MANUAL for iOS
←
→
Page content transcription
If your browser does not render page correctly, please read the page content below
SWANN SECURITY APP
USER MANUAL for iOS

English
                 1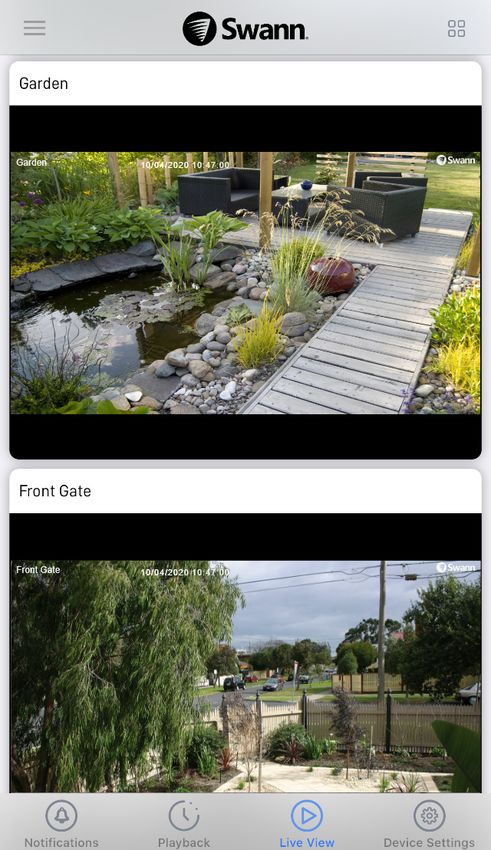
Contents

Getting Started
Installing the Swann Security App                                              5
Creating your Swann Security Account                                           6
Pairing the Device                                                             8
Pairing the Device - CCTV System                                               9
Pairing the Device - Alert Indoor Camera                                       11
Pairing the Device - Security Tracker Camera                                   15
Pairing the Device - Security Pan Tilt Camera                                  19
Pairing the Device - Spotlight Outdoor Camera                                  23
Pairing the Device - Wi-Fi Floodlight Security Camera                          27

About the App Interface
Navigation Bar                                                                 32
Live View Tab - CCTV System                                                    33
Single Camera View Mode - CCTV System                                          34
Live View Tab - Wi-Fi Cameras                                                  35
Single Camera View Mode - Alert Indoor Camera                                  36
Single Camera View Mode - Security Tracker Camera                              37
Single Camera View Mode - Security Pan Tilt Camera                             38
Single Camera View Mode - Security Pan Tilt Camera: Pan & Tilt Control Panel   39
Single Camera View Mode - Spotlight Outdoor Camera                             40
Single Camera View Mode - Wi-Fi Floodlight Security Camera                     41
Playback Tab                                                                   42
Notifications Tab                                                              43
Menu                                                                           44
Profile                                                                        45

                                                 2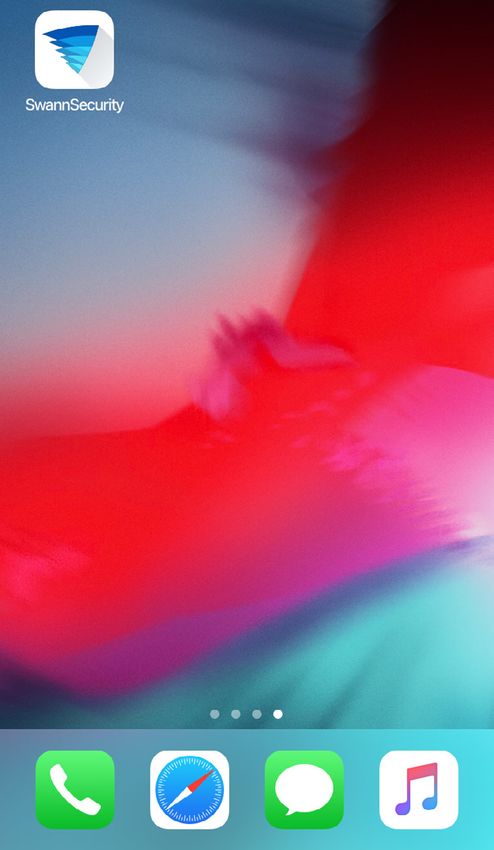
Device Settings
CCTV System - Settings Overview                               47
Alert Indoor Camera - Settings Overview                       48
Alert Indoor Camera - Camera Settings                         50
Alert Indoor Camera - Detection Settings                      51
Security Tracker Camera - Settings Overview                   52
Security Tracker Camera - Camera Settings                     54
Security Tracker Camera - Detection Settings                  55
Security Tracker Camera - Pan & Tilt Settings                 56
Security Pan Tilt Camera - Settings Overview                  57
Security Pan Tilt Camera - Camera Settings                    59
Security Pan Tilt Camera - Detection Settings                 60
Security Pan Tilt Camera - Pan & Tilt Settings                61
Spotlight Outdoor Camera - Settings Overview                  62
Spotlight Outdoor Camera - Camera Settings                    64
Spotlight Outdoor Camera - Detection Settings                 65
Wi-Fi Floodlight Security Camera - Settings Overview          67
Wi-Fi Floodlight Security Camera - Camera Settings            69
Wi-Fi Floodlight Security Camera - Detection Settings         70

Appendix
Viewing and Managing Manual Recordings                        73
Factory Resetting the Camera                                  74
Changing the Camera's Wi-Fi Network                           76
FAQs - General                                                77
FAQs - Alert Indoor, Spotlight Outdoor & Floodlight Cameras   78
FAQs - Security Pan Tilt Camera / Security Tracker Camera     80

                                                 3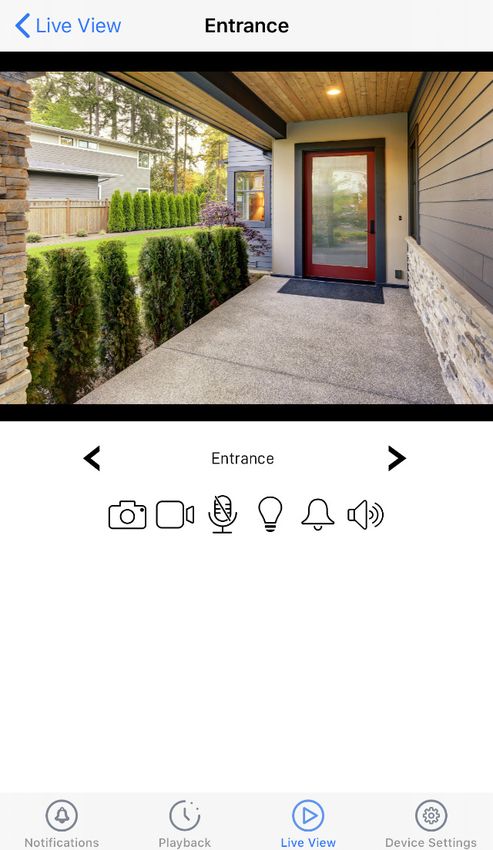
Getting Started

Installing the Swann Security App

Search and download the latest version of the       After the Swann Security app is installed, tap the
Swann Security app from the App store.              Swann Security icon on the Home screen to launch
                                                    the app.

                                                5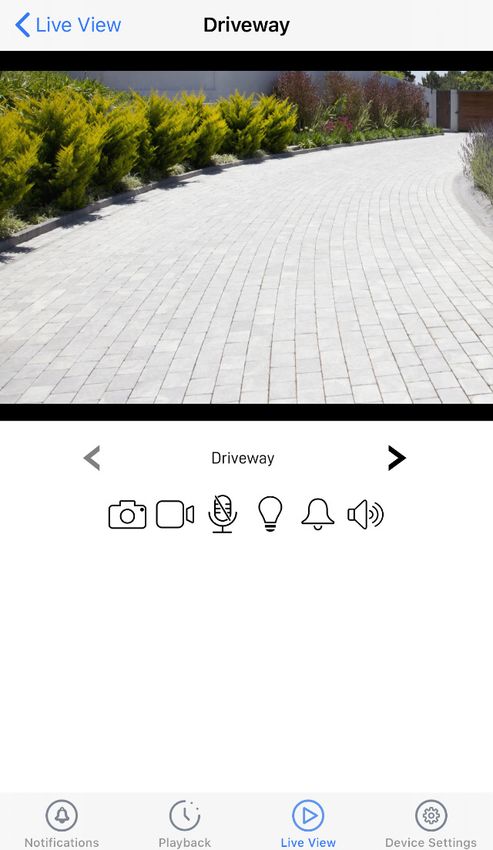
Creating your Swann Security Account

Open the Swann Security app and tap Not yet                 Enter your first and last names, email address,
registered? Register button.                                desired password (between 8 - 32 characters), and
                                                            confirm the password. Tap Next to continue.
                                                            This helps us verify your identity if you contact us for
                                                            assistance with your account or device.

Enter your address or tap Use my current location           Read the Terms of Service and Privacy Policy (links
to allow the app to automatically determine your            on the bottom of the screen), then select the "I
street address based on your phone's current                agree to the terms of service" option to agree to the
location. Your location allows us to personalize your       terms of service.
experience on Swann Security and other Swann                Tap the Register button to create your account.
services.
Tap Next to continue.                                                                  (Continued on the next page)
                                                        6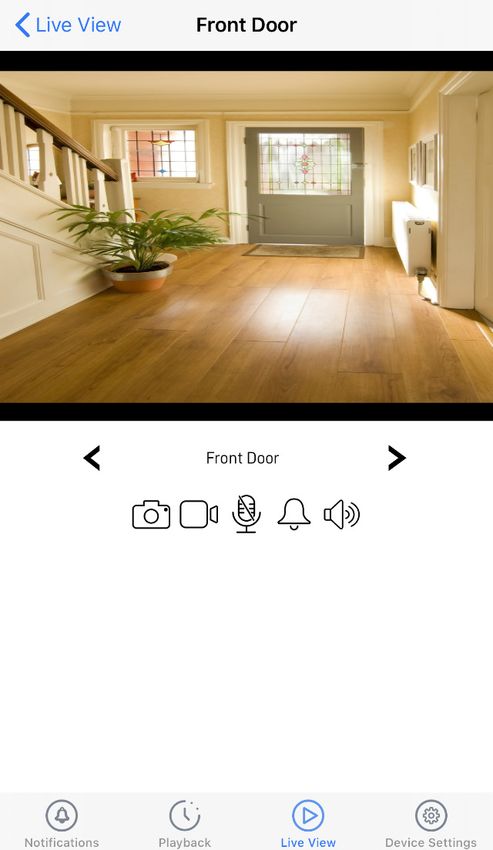
Creating your Swann Security Account

Go to your email inbox and open the link in the               After verifying your email address, you can sign
verification email from Swann Security to activate            into your Swann Security account. Enter the email
your account. If you can't find the verification email,       address and password you used to set up your
try checking the Junk folder. You can also tap                Swann Security account, then tap the Sign In
Resend Email Verification to receive another                  button.
verification email.                                           NOTE You can toggle the Remember Me option on
Tap the Login button to return to the Sign In                 to save your login credentials so you don't have to
screen.                                                       sign in every time you open the app.

                                                          7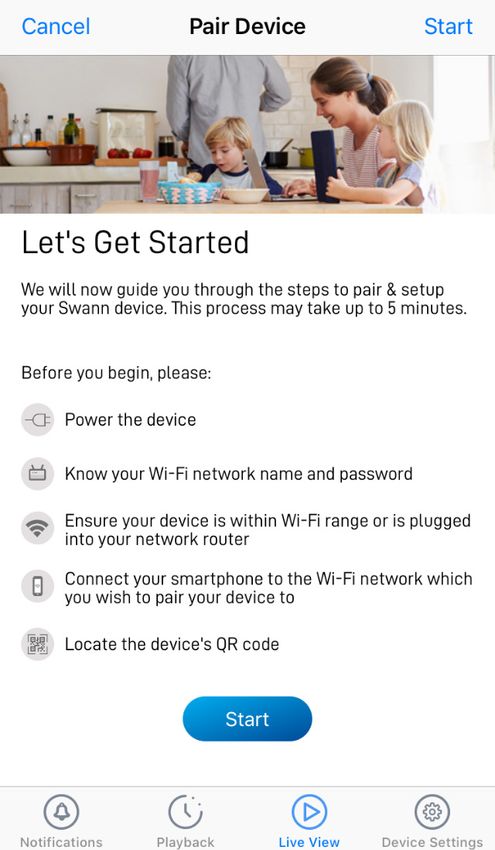
Pairing the Device

To pair your Swann device, open the Menu   , and       For specific instructions on how to pair your Swann
then tap Pair Device.                                  device, go to the following pages:
                                                       •   To pair your CCTV system such as the DVR or
                                                           NVR, see page 9.
                                                       •   To pair your Alert Indoor Camera (SWIFI-
                                                           ALERTCAM), see page 11.
                                                       •   To pair your Security Tracker Camera (SWIFI-
                                                           TRACKCAM), see page 15.
                                                       •   To pair your Security Pan Tilt Camera (SWIFI-
                                                           PTCAM), see page 19.
                                                       •   To pair your Spotlight Outdoor Camera (SWIFI-
                                                           SPOTCAM), see page 23.
                                                       •   To pair your Wi-Fi Floodlight Security Camera
                                                           (SWIFI-FLOCAM), see page 27.

                                                   8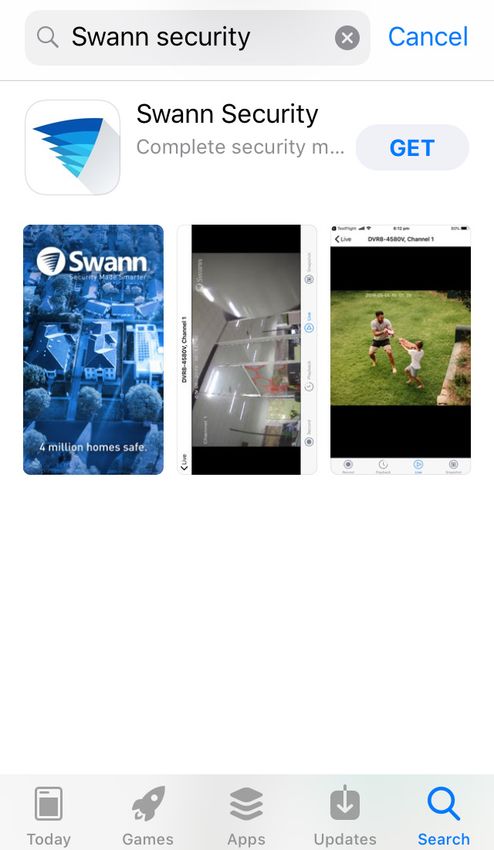
Pairing the Device - CCTV System

Before you start the pairing process, make sure          Scan the CCTV system's QR code. The QR code's
your CCTV system is powered and connected to             location is generally found on the top of the device.
the internet modem/router. Tap the Start button to       NOTE
proceed.                                                 If your phone can’t scan the QR code, tap the
NOTE                                                     Manual Entry button at the bottom of the QR code
If you need information on how to power and              scanning screen. You can type in the device's ID
connect your device to the internet, refer to the        located below the QR code which looks something
quick start guides that came with your device.           like this:

                                                                                   (Continued on the next page)

                                                     9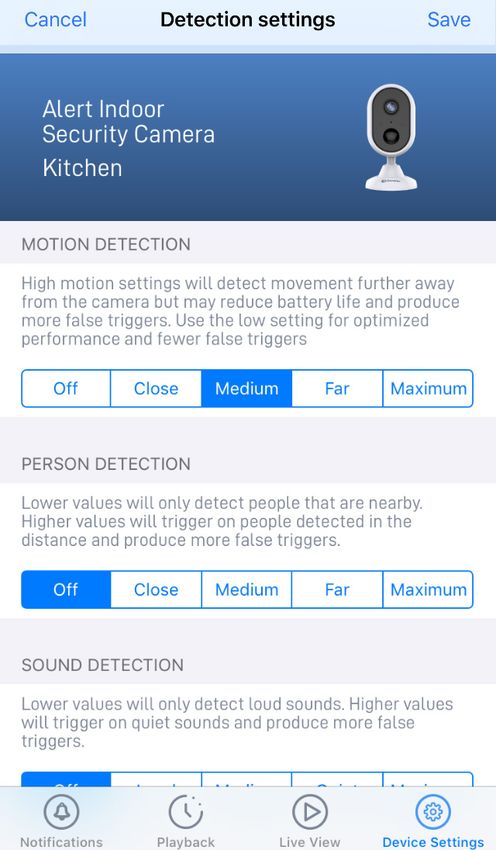
Pairing the Device - CCTV System

In the Username field, enter "admin".                                Tap the Next button. The app will establish a
In the Password field, enter the password of your                    connection with your CCTV system and link it to
CCTV system which is the same password you use                       your Swann Security account.
to unlock the system menu locally. This is normally
the password that you created when setting up your
DVR or NVR for the first time using the integrated
Startup Wizard.
NOTE Toggle     to make sure that you have
entered the password correctly.

                                                      Once pairing is complete, tap the Done button.
                                                      The camera channels associated with your CCTV system will
                                                      be displayed on the Live View tab.
                                                      NOTE
                                                      • Depending on the internet connection, it may take a few
                                                         moments for live feed to start streaming from all of the
                                                         camera channels connected to your CCTV system.
                                                      •        For more information about the Live View display, see
                                                               "Live View Tab - CCTV System" on page 33.

                                                          10
Pairing the Device - Alert Indoor Camera
Before you start the pairing process, make sure Scan the camera's QR code. The QR code's location
your camera is powered. If you need information on is generally found under the base of the camera, as
how to power your camera, refer to the quick start shown below.
guide that came with it.
At this point, you should also make sure that your
phone is connected to a 2.4GHz Wi-Fi network and
you have your Wi-Fi network password handy.
S/N:89052081900001
ID:990a1af6da5a
Tap the Start button to proceed.
If your phone can’t scan the QR code, tap the
Manual Pair button at the bottom of the QR code
scanning screen, select "Alert Indoor Security
Camera" from the product menu, and type in
the camera's ID (consists of 12 alphanumeric
characters) located on this sticker label.
(Continued on the next page)
11Pairing the Device - Alert Indoor Camera
Tap the Next button to continue. The Wi-Fi network name field is auto-filled with the
Wi-Fi network that your phone is currently using.
Your camera will join this Wi-Fi network by default.
NOTE
• Make sure the home Wi-Fi network your
camera will be joining is a 2.4GHz network.
• If you have multiple home Wi-Fi networks and
prefer to connect your camera to another Wi-Fi
network, simply tap the Wi-Fi name field and
enter the Wi-Fi network name manually.
• For best performance, use the Wi-Fi closest to
the final location of your camera.
(Continued on the next page)
12Pairing the Device - Alert Indoor Camera
Enter and confirm your Wi-Fi network password, Check if the LED indicator on your camera is
then tap the Next button and tap Yes on the blinking blue slowly as shown. If so, your camera is
confirmation popup. already in pairing mode (i.e., the camera's hotspot
NOTE is activated temporarily) and ready to pair.
Tap the Yes button.
• Your Wi-Fi network password is case sensitive,
so enter it exactly the same as it was created NOTE
or as found on your Wi-Fi router/access point. If your camera is not in pairing mode (LED is not
blinking blue slowly)
• Toggle to make sure that you have entered
Press and hold the Reset button (as shown below)
your Wi-Fi network password correctly.
on the back of your camera for 5 seconds until
• If you turn the "Remember credentials for the LED indicator starts blinking blue rapidly, and
this WiFi network" option on, the Password wait for about 30 seconds. When the LED indicator
and Confirm Password fields will be pre-filled starts blinking blue slowly, your camera is in
with what you have currently entered the pairing mode.
next time you pair a camera. This will make
device pairing more convenient if your phone is
always connected to the same Wi-Fi network
at home.
Location of Reset button
(Continued on the next page)
13Pairing the Device - Alert Indoor Camera
Tap the Start button, then tap Join on the Enter a name for your camera. You can also choose
confirmation popup. This allows the app to a name from the list of common camera locations.
automatically connect to the camera's hotspot Tap Next to continue.
(e.g., Swann-SWIFI-xxxxxx) and pair your camera
to your home Wi-Fi as well as link to your Swann
Security account.
NOTE
If, for any reason, the app fails to connect
automatically to the camera's hotspot, you can
manually connect to the camera's hotspot:
Go to the Wi-Fi settings on your phone and connect
to the camera's hotspot (e.g., Swann-SWIFI-xxxxxx).
Then, return to the app and continue setup.
Once pairing is complete, tap the Done button.
Your camera will be displayed on the Live View tab.
NOTE
• Depending on the internet connection, it may take a few
moments for your camera's live video to start streaming.
• To learn about the Live View display, see "Live View Tab - Wi-Fi
Cameras" on page 35.
• As the camera completes initialization for the first time, you
will get notifications that the device has been restarted and the
device is online.
• The camera will also automatically check for firmware updates.
If an update is available, the camera will download and install
the update. You can monitor the progress of the firmware
update through the popup box displayed in the app.
• You can check the status of your camera, change the camera
name, and adjust various camera settings such as the timezone
and motion detection via the tab. For more information, see
"Alert Indoor Camera - Camera Settings" on page 50.
14Pairing the Device - Security Tracker Camera
Before you start the pairing process, make sure Scan the camera's QR code. The QR code's location
your camera is powered. If you need information on is generally found under the base of the camera, as
how to power your camera, refer to the quick start shown below.
guide that came with it.
At this point, you should also make sure that your
phone is connected to a 2.4GHz Wi-Fi network and
you have your Wi-Fi network password handy.
Tap the Start button to proceed.
ID:990a1af6da5a
If your phone can’t scan the QR code, tap the
Manual Pair button at the bottom of the QR
code scanning screen, select "Security Tracker
Camera" from the product menu, and type in
the camera's ID (consists of 12 alphanumeric
characters) located on this sticker label.
(Continued on the next page)
15Pairing the Device - Security Tracker Camera
Tap the Next button to continue. The Wi-Fi network name field is auto-filled with the
Wi-Fi network that your phone is currently using.
Your camera will join this Wi-Fi network by default.
NOTE
• Make sure the home Wi-Fi network your
camera will be joining is a 2.4GHz network.
• If you have multiple home Wi-Fi networks and
prefer to connect your camera to another Wi-Fi
network, simply tap the Wi-Fi name field and
enter the Wi-Fi network name manually.
• For best performance, use the Wi-Fi closest to
the final location of your camera.
(Continued on the next page)
16Pairing the Device - Security Tracker Camera
Enter and confirm your Wi-Fi network password, Check if the LED indicator on your camera is
then tap the Next button and tap Yes on the blinking blue slowly as shown. If so, your camera is
confirmation popup. already in pairing mode (i.e., the camera's hotspot
NOTE is activated temporarily) and ready to pair.
Tap the Yes button.
• Your Wi-Fi network password is case sensitive,
so enter it exactly the same as it was created NOTE
or as found on your Wi-Fi router/access point. If your camera is not in pairing mode (LED is not
blinking blue slowly)
• Toggle to make sure that you have entered
Press and hold the Reset button (as shown below)
your Wi-Fi network password correctly.
on the back of your camera for 5 seconds until
• If you turn the "Remember credentials for the LED indicator starts blinking blue rapidly, and
this WiFi network" option on, the Password wait for about 30 seconds. When the LED indicator
and Confirm Password fields will be pre-filled starts blinking blue slowly, your camera is in
with what you have currently entered the pairing mode.
next time you pair a camera. This will make
device pairing more convenient if your phone is
always connected to the same Wi-Fi network
at home.
Location of Reset button
(Continued on the next page)
17Pairing the Device - Security Tracker Camera
Tap the Start button, then tap Join on the Enter a name for your camera. You can also choose
confirmation popup. This allows the app to a name from the list of common camera locations.
automatically connect to the camera's hotspot Tap Next to continue.
(e.g., Swann-SWIFI-xxxxxx) and pair your camera
to your home Wi-Fi as well as link to your Swann
Security account.
NOTE
If, for any reason, the app fails to connect
automatically to the camera's hotspot, you can
manually connect to the camera's hotspot:
Go to the Wi-Fi settings on your phone and connect
to the camera's hotspot (e.g., Swann-SWIFI-xxxxxx).
Then, return to the app and continue setup.
Once pairing is complete, tap the Done button.
Your camera will be displayed on the Live View tab.
NOTE
• Depending on the internet connection, it may take a few
moments for your camera's live video to start streaming.
• To learn about the Live View display, see "Live View Tab - Wi-Fi
Cameras" on page 35.
• As the camera completes initialization for the first time, you
will get notifications that the device has been restarted and the
device is online.
• The camera will also automatically check for firmware updates.
If an update is available, the camera will download and install
the update. You can monitor the progress of the firmware
update through the popup box displayed in the app.
• You can check the status of your camera, change the camera
name, and adjust various camera settings such as the timezone
and motion detection via the tab. For more information, see
"Security Tracker Camera - Settings Overview" on page 52.
18Pairing the Device - Security Pan Tilt Camera
Before you start the pairing process, make sure Scan the camera's QR code. The QR code's location
your camera is powered and contains a microSD is generally found on the bottom of the camera, as
card in the microSD card slot. If you need shown below.
information on how to install your camera, refer to
the quick start guide that came with it.
At this point, you should also make sure that your
phone is connected to a 2.4GHz Wi-Fi network and
you have the Wi-Fi network password handy.
Tap the Start button to proceed. ID:900a1af64589
S/N:10052081900001
If your phone can’t scan the QR code, tap the
Manual Pair button at the bottom of the QR
code scanning screen, select "Security Pan Tilt
Camera" from the product menu, and type in
the camera's ID (consists of 12 alphanumeric
characters) located on this sticker label.
(Continued on the next page)
19Pairing the Device - Security Pan Tilt Camera
Tap the Next button to continue. The Wi-Fi network name field is auto-filled with the
Wi-Fi network that your phone is currently using.
Your camera will join this Wi-Fi network by default.
NOTE
• Make sure the home Wi-Fi network your
camera will be joining is a 2.4GHz network.
• If you have multiple home Wi-Fi networks and
prefer to connect your camera to another Wi-Fi
network, simply tap the Wi-Fi name field and
enter the Wi-Fi network name manually.
• For best performance, use the Wi-Fi closest to
the final location of your camera.
(Continued on the next page)
20Pairing the Device - Security Pan Tilt Camera
Enter and confirm your Wi-Fi network password, Check if the LED indicator on your camera is
then tap the Next button and tap Yes on the blinking blue slowly as shown. If so, your camera is
confirmation popup. already in pairing mode (i.e., the camera's hotspot
NOTE is activated temporarily) and ready to pair. Tap the
Yes button.
• Your Wi-Fi network password is case sensitive,
so enter it exactly the same as it was created NOTE
or as found on your Wi-Fi router/access point. If your camera is not in pairing mode (LED is not
blinking blue slowly)
• Toggle to make sure that you have entered
Press and hold the Reset button (as shown below)
your Wi-Fi network password correctly.
on the back of your camera for 5 seconds until the
• If you turn the "Remember credentials for LED indicator starts blinking blue rapidly, and wait
this WiFi network" option on, the Password for about 30 seconds. When the LED indicator starts
and Confirm Password fields will be pre-filled blinking blue slowly, your camera is in pairing mode.
with what you have currently entered the
next time you pair a camera. This will make
device pairing more convenient if your phone is
always connected to the same Wi-Fi network
at home.
Location of Reset button
(Continued on the next page)
21Pairing the Device - Security Pan Tilt Camera
Tap the Start button, then tap Join on the Enter a name for your camera. You can also choose
confirmation popup. This allows the app to a name from the list of common camera locations.
automatically connect to the camera's hotspot Tap Next to continue.
(e.g., Swann-SWIFI-xxxxxx) and pair your camera
to your home Wi-Fi as well as link to your Swann
Security account.
NOTE
If, for any reason, the app fails to connect
automatically to the camera's hotspot, you can
manually connect to the camera's hotspot:
Go to the Wi-Fi settings on your phone and connect
to the camera's hotspot (e.g., Swann-SWIFI-xxxxxx).
Then, return to the app and continue setup.
Once the pairing process is complete, tap the Done button.
Your camera will be displayed on the Live View tab.
NOTE
• Depending on the internet connection, it may take a few
moments for your camera's live video to start streaming.
• To learn about the Live View display, see "Live View Tab - Wi-Fi
Cameras" on page 35.
• As the camera completes initialization for the first time, you
will get notifications that the device has been restarted and the
device is online.
• The camera will also automatically check for firmware updates.
If an update is available, the camera will download and install
the update. You can monitor the progress of the firmware
update through the popup box displayed in the app.
• You can check the status of your camera, change the camera
name, and adjust various camera settings such as the
timezone and motion detection via the Device Settings tab. For
more information, see "Security Pan Tilt Camera - Settings
Overview" on page 57.
22Pairing the Device - Spotlight Outdoor Camera
Before you start the pairing process, make sure Scan the camera's QR code. The QR code's location
your camera is powered. If you need information on is generally found on the camera's mounting base,
how to power your camera, refer to the quick start as shown below.
guide that came with it.
At this point, you should also make sure that your
phone is connected to a 2.4GHz Wi-Fi network and
you have your Wi-Fi network password handy.
Tap the Start button to proceed.
S/N:89052081900001
ID:990a1af6da5a
If your phone can’t scan the QR code, tap
the Manual Pair button at the bottom of the
QR code scanning screen, select "Spotlight
Outdoor Security Camera" from the product
menu, and type in the camera's ID (consists of
12 alphanumeric characters) located on this
sticker label.
(Continued on the next page)
23Pairing the Device - Spotlight Outdoor Camera
Tap the Next button to continue. The Wi-Fi network name field is auto-filled with the
Wi-Fi network that your phone is currently using.
Your camera will join this Wi-Fi network by default.
NOTE
• Make sure the home Wi-Fi network your
camera will be joining is a 2.4GHz network.
• If you have multiple home Wi-Fi networks and
prefer to connect your camera to another Wi-Fi
network, simply tap the Wi-Fi name field and
enter the Wi-Fi network name manually.
• For best performance, use the Wi-Fi closest to
the final location of your camera.
(Continued on the next page)
24Pairing the Device - Spotlight Outdoor Camera
Enter and confirm your Wi-Fi network password, Check if the LED indicator on your camera is
then tap the Next button and tap Yes on the blinking blue slowly as shown. If so, your camera is
confirmation popup. already in pairing mode (i.e., the camera's hotspot
NOTE is activated temporarily) and ready to pair.
Tap the Yes button.
• Your Wi-Fi network password is case sensitive,
so enter it exactly the same as it was created NOTE
or as found on your Wi-Fi router/access point. If your camera is not in pairing mode (LED is not
blinking blue slowly)
• Toggle to make sure that you have entered
Press and hold the Reset button on the camera
your Wi-Fi network password correctly.
cable (as shown below) for 5 seconds until the LED
• If you turn the "Remember credentials for indicator starts blinking blue rapidly, and wait for
this WiFi network" option on, the Password about 30 seconds. When the LED indicator starts
and Confirm Password fields will be pre-filled blinking blue slowly, your camera is in pairing mode.
with what you have currently entered the
next time you pair a camera. This will make
device pairing more convenient if your phone is
always connected to the same Wi-Fi network
at home.
Location of Reset button
(Continued on the next page)
25Pairing the Device - Spotlight Outdoor Camera
Tap the Start button, then tap Join on the Enter a name for your camera. You can also choose
confirmation popup. This allows the app to a name from the list of common camera locations.
automatically connect to the camera's hotspot Tap Next to continue.
(e.g., Swann-SWIFI-xxxxxx) and pair your camera
to your home Wi-Fi as well as link to your Swann
Security account.
NOTE
If, for any reason, the app fails to connect
automatically to the camera's hotspot, you can
manually connect to the camera's hotspot:
Go to the Wi-Fi settings on your phone and connect
to the camera's hotspot (e.g., Swann-SWIFI-xxxxxx).
Then, return to the app and continue setup.
Once pairing is complete, tap the Done button.
Your camera will be displayed on the Live View tab.
NOTE
• Depending on the internet connection, it may take a few
moments for your camera's live video to start streaming.
• To learn about the Live View display, see "Live View Tab - Wi-
Fi Cameras" on page 35.
• As the camera completes initialization for the first time, you
will get notifications that the device has been restarted and
the device is online.
• The camera will also automatically check for firmware
updates. If an update is available, the camera will download
and install the update. You can monitor the progress of the
firmware update through the popup box displayed in the app.
• You can check the status of your camera, change the camera
name, and adjust various camera settings such as the
timezone and motion detection via the Device Settings tab. For
more information, see "Spotlight Outdoor Camera - Settings
Overview" on page 62.
26Pairing the Device - Wi-Fi Floodlight Security Camera
Before you start the pairing process, make sure Scan the camera's QR code. The QR code's location
your camera is powered. If you need information on is generally found on the back of the camera, as
how to power your camera, refer to the quick start shown below.
guide that came with it.
At this point, you should also make sure that your
phone is connected to a 2.4GHz Wi-Fi network and
you have your Wi-Fi network password handy.
Tap the Start button to proceed.
ID:990a1af6da5a S/N:89052081900001
If your phone can’t scan the QR code, tap the
Manual Pair button at the bottom of the QR
code scanning screen, select "Wi-Fi Floodlight
Security Camera" from the product menu,
and type in the camera's ID (consists of 12
alphanumeric characters) located on this
sticker label.
(Continued on the next page)
27Pairing the Device - Wi-Fi Floodlight Security Camera
Tap the Next button to continue. The Wi-Fi network name field is auto-filled with the
Wi-Fi network that your phone is currently using.
Your camera will join this Wi-Fi network by default.
NOTE
• Make sure the home Wi-Fi network your
camera will be joining is a 2.4GHz network.
• If you have multiple home Wi-Fi networks and
prefer to connect your camera to another Wi-Fi
network, simply tap the Wi-Fi name field and
enter the Wi-Fi network name manually.
• For best performance, use the Wi-Fi closest to
the final location of your camera.
(Continued on the next page)
28Pairing the Device - Wi-Fi Floodlight Security Camera
Enter and confirm your Wi-Fi network password, Check if the LED indicator on your camera is
then tap the Next button and tap Yes on the blinking blue slowly as shown. If so, your camera is
confirmation popup. already in pairing mode (i.e., the camera's hotspot
NOTE is activated temporarily) and ready to pair. Tap the
Yes button.
• Your Wi-Fi network password is case sensitive,
so enter it exactly the same as it was created NOTE
or as found on your Wi-Fi router/access point. If your camera is not in pairing mode (LED is not
blinking blue slowly)
• Toggle to make sure that you have entered
Press and hold the Reset button on back of the
your Wi-Fi network password correctly.
camera (as shown below; remove flap to access
• If you turn the "Remember credentials for button) for 5 seconds until the LED indicator
this WiFi network" option on, the Password starts blinking blue rapidly, and wait for about 30
and Confirm Password fields will be pre-filled seconds. When the LED indicator starts blinking
with what you have currently entered the blue slowly, your camera is in pairing mode.
next time you pair a camera. This will make
device pairing more convenient if your phone is
always connected to the same Wi-Fi network
at home.
Location of Reset button
(Continued on the next page)
29Pairing the Device - Wi-Fi Floodlight Security Camera
Tap the Start button, then tap Join on the Enter a name for your camera. You can also choose
confirmation popup. This allows the app to a name from the list of common camera locations.
automatically connect to the camera's hotspot Tap Next to continue.
(e.g., Swann-SWIFI-xxxxxx) and pair your camera
to your home Wi-Fi as well as link to your Swann
Security account.
NOTE
If, for any reason, the app fails to connect
automatically to the camera's hotspot, you can
manually connect to the camera's hotspot:
Go to the Wi-Fi settings on your phone and connect
to the camera's hotspot (e.g., Swann-SWIFI-xxxxxx).
Then, return to the app and continue setup.
Once the pairing process is complete, tap the Done button.
Your camera will be displayed on the Live View tab.
NOTE
• Depending on the internet connection, it may take a few
moments for your camera's live video to start streaming.
• To learn about the Live View display, see "Live View Tab - Wi-Fi
Cameras" on page 35.
• As the camera completes initialization for the first time, you
will get notifications that the device has been restarted and the
device is online.
• The camera will also automatically check for firmware updates.
If an update is available, the camera will download and install
the update. You can monitor the progress of the firmware
update through the popup box displayed in the app.
• You can check the status of your camera, change the camera
name, and adjust various camera settings such as the timezone
and motion detection via the Device Settings tab. For more
information, see "Wi-Fi Floodlight Security Camera - Settings
Overview" on page 67.
30About the App Interface
Navigation Bar

                               1              2               3             4

     Tap to access the Notifications screen where you can view and manage device notifications from Swann
 1
     Security. For more information, see "Notifications Tab" on page 43.

     Tap to access the video activity timeline where you can search, view, and manage video clips of events
 2
     captured by your devices. For more information, see "Playback Tab" on page 42.

 3   Tap to access the Live View screen where you can view live video from your devices.

     Tap to access the Device Settings screen where you can configure the full range of settings available for your
 4
     devices as well as find detailed technical device information such as the firmware version and MAC address.

                                                      32
Live View Tab - CCTV System
1 2
3
4
Open the menu where you can edit your account profile, pair a new device, download the app manual, and
1
more. See "Menu" on page 44.
2 Toggle the layout of camera (channel) tiles in the viewing area between list and two-column grid views.
The camera (channel) name. By default, the camera name is retrieved from the CCTV system. You can easily
3
change the camera name via the Device Settings tab.
The viewing area.
4
• When you launch the app, you can view live video streaming from all of the cameras connected to the
CCTV system.
• Scroll up or down to see more camera (channel) tiles.
• Tap a camera tile to watch live video in single view mode. In single view mode, you can access additional
camera options such as taking quick snapshots or video clips, enabling 2-way talk, and controlling
spotlights and siren, if available. For more information, see "Single Camera View Mode - CCTV System"
on page 34.
33Single Camera View Mode - CCTV System
1
2
3
4 5 6 7 8 9 10 11
1 Return to the Live View tab camera dashboard.
The live video window. You can zoom in or out on the video — use two fingers to pinch and spread out to zoom
1
2
in on an area, and pinch back to zoom out. You can also turn your phone sideways for landscape view.
1
3 Tap the left or right arrow to display live video from the previous or next camera channel.
1
4 Tap to take a snapshot with the camera. You can find your snapshots in the Photos app on your phone.
Tap to start recording a video clip with the camera. Tap again to stop the recording.
5
You can find your manual recordings in the Recordings section (Menu > Recordings) of the app.
Tap to activate or deactivate the camera's 2-way audio mode. When activated, press and hold the Push to
6
talk button located below the control panel to talk. Release the Push to talk button to listen.
Note: This icon will not be shown if the camera is not capable of this function.
Tap to turn on or off the camera's built-in spotlight.
7
Note: This icon will not be shown if the camera is not capable of this function.
Tap to turn on or off the camera's built-in siren.
8
Note: This icon will not be shown if the camera is not capable of this function.
9 Tap to mute or unmute the live video.
Tap to toggle between live video quality settings. The High quality setting will display clear, sharp HD video,
10 but the bandwidth required to stream video will be much higher and you'll need high-speed internet on both
ends of the connection. Try the lower video quality setting if your Wi-Fi/Cellular connection is slow (e.g., your
phone is showing only 1 signal bar) as less bandwidth is used and may result in smoother video streaming.
Tap to toggle between different aspect ratios - Original (match the camera's aspect ratio), 16:9, 4:3,
11
Stretched (expand video to fill the entire video window)
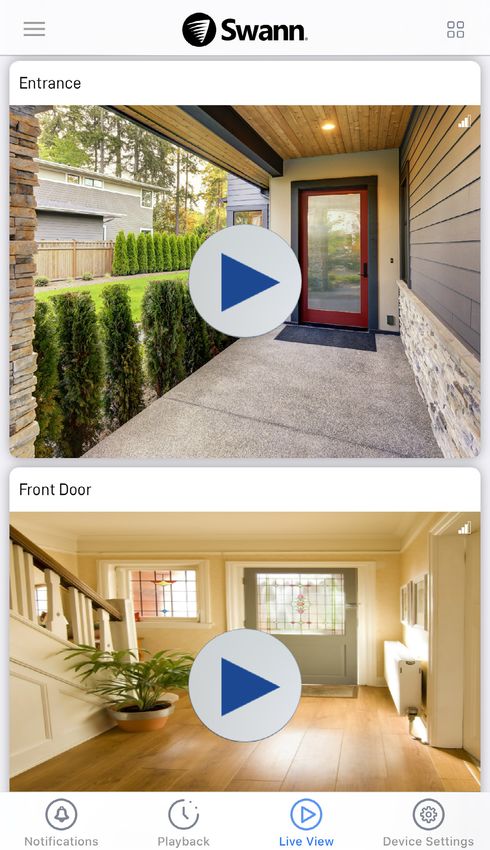
34Live View Tab - Wi-Fi Cameras
1 2
3
4
5
Open the menu where you can edit your account profile, pair another device, download the app manual, and
1
more. See "Menu" on page 44.
2 Toggle the layout of camera tiles in the viewing area between list and two-column grid views.
3 The camera name. You can easily change the name of your camera via the Device Settings tab.
The number of bars indicates the Wi-Fi signal strength of the camera. The more bars that are filled, the
4
stronger the Wi-Fi connection and the faster it will take to load the camera's live video stream. If showing
only 1 or 2 bars, try moving the camera to a few different spots to see if you can get a better signal for better
streaming performance.
The viewing area.
5
• Scroll up or down to see more camera tiles.
• Tap the Play button to start streaming live video from the camera in single view mode. In single
view mode, you can access additional camera options such as taking quick snapshots and video clips,
enabling 2-way talk as well as activating the camera's built-in siren and lights manually. For more
information, see the following pages:
- "Single Camera View Mode - Alert Indoor Camera" on page 36
- "Single Camera View Mode - Security Tracker Camera" on page 37
- "Single Camera View Mode - Security Pan Tilt Camera" on page 38
- "Single Camera View Mode - Spotlight Outdoor Camera" on page 40
- "Single Camera View Mode - Wi-Fi Floodlight Security Camera" on page 41
35Single Camera View Mode - Alert Indoor Camera
1
2
3
4 5 6 7 8
1 Return to the Live View tab camera dashboard.
The live video window. You can zoom in or out on the video — use two fingers to pinch and spread out to zoom
1
2
in on an area, and pinch back to zoom out. You can also turn your phone sideways for landscape view.
3 Tap the left or right arrow to display live video from the previous or next camera, if available.
4 Tap to take a snapshot with the camera. You can find your snapshots in the Photos app on your phone.
Tap to start recording a video clip with the camera. Tap again to stop the recording.
5
You can find your manual recordings in the Recordings section (Menu > Recordings) of the app.
6 Tap to turn on the 2-way audio and talk to visitors through the camera's speaker. Tap again to turn off.
Tap to turn on or off the camera's built-in siren.
7
Note: If the camera's built-in siren has been triggered automatically by a motion or sound event, you can
manually turn it off by tapping this icon twice.
8 Tap to mute or unmute the live video.
36Single Camera View Mode - Security Tracker Camera
1
2
3
4 5 6 7 8 9
1 Return to the Live View tab camera dashboard.
The live video window. Swipe left or right to display live video from the previous or next camera, if available.
1
2
• In Dual view, the top window shows the panoramic (180°) wide angle camera stream and the bottom window
shows the zoom camera stream which will track and focus on the movements of the detected person.
• You can go to camera's Pan and Tilt Settings in Device Settings and configure the video window to only show
the Panoramic view, the Zoom view or both (Dual). See "Security Tracker Camera - Pan & Tilt Settings" on
page 56.
• indicates that motion has been detected by the camera.
• You can turn your phone sideways to view the video window in landscape (fullscreen) mode.
3 Tap the left or right arrow to display live video from the previous or next camera, if available.
4 Tap to take a snapshot with the camera. You can find your snapshots in the Photos app on your phone.
Tap to start recording a video clip with the camera. Tap again to stop the recording.
5
You can find your manual recordings in the Recordings section (Menu > Recordings) of the app.
6 Tap to turn on the 2-way audio and talk to visitors through the camera's speaker. Tap again to turn off.
Tap to turn on or off the camera's built-in siren.
7
Note: If the camera's built-in siren has been triggered automatically by a motion or sound event, you can
manually turn it off by tapping this icon twice.
Tap to display the PTZ control panel. This feature allows you to digitally pan, tilt and zoom on the camera's
8
Zoom view window. Tap again to hide the PTZ control panel.
9 Tap to mute or unmute the live video.
37Single Camera View Mode - Security Pan Tilt Camera
1
2
3
4 5 6 7 8 9
1 Return to the Live View tab camera dashboard.
The live video window. You can zoom in or out on the video — use two fingers to pinch and spread out to zoom
1
2
in on an area, and pinch back to zoom out. You can also turn your phone sideways for landscape view.
3 Tap the left or right arrow to display live video from the previous or next camera, if available.
4 Tap to take a snapshot with the camera. You can find your snapshots in the Photos app on your phone.
Tap to start recording a video clip with the camera. Tap again to stop the recording.
5
You can find your manual recordings in the Recordings section (Menu > Recordings) of the app.
6 Tap to turn on the 2-way audio and talk to visitors through the camera's speaker. Tap again to turn off.
Tap to turn on or off the camera's built-in siren.
7
Note: If the camera's built-in siren has been triggered automatically by a motion or sound event, you can
manually turn it off by tapping this icon twice.
Tap to display the pan and tilt control panel. For more information, see "Single Camera View Mode -
8
Security Pan Tilt Camera: Pan & Tilt Control Panel" on page 39.
9 Tap to mute or unmute the live video.
38Single Camera View Mode - Security Pan Tilt Camera: Pan & Tilt Control Panel
3
2 6 5
1 7
4
Tap to turn on privacy mode. When the camera is in privacy mode, the icon will be highlighted. To use privacy
1
mode, you must first define the camera's privacy mode position in Camera Settings > Pan & Tilt Settings >
Camera Postion > Privacy Mode Settings. Tap again to turn privacy mode off. The camera will return to the
position it was at before privacy mode was turned on.
Tap repeatedly to move up incrementally. You can control the speed of the camera's tilt movement in Camera
2
Settings > Pan & Tilt Settings > Speed > Tilt.
Tap repeatedly to move left incrementally. You can control the speed of the camera's pan movement in
3
Camera Settings > Pan & Tilt Settings > Speed > Pan.
Tap repeatedly to move right incrementally. You can control the speed of the camera's pan movement in
4
Camera Settings > Pan & Tilt Settings > Speed > Pan.
Tap repeatedly to move down incrementally. You can control the speed of the camera's tilt movement in
5
Camera Settings > Pan & Tilt Settings > Speed > Tilt.
6 Tap to revert to the default starting (home) center position.
Tap to perform a scan of the scene once - the camera will automatically pan and tilt from side to side before
7
returning to the current position. You can control the speed of the camera's pan and tilt movements in
Camera Settings > Pan & Tilt Settings > Speed > Pan/Tilt.
39Single Camera View Mode - Spotlight Outdoor Camera
1
2
3
4 5 6 7 8 9
1 Return to the Live View tab camera dashboard.
The live video window. You can zoom in or out on the video — use two fingers to pinch and spread out to zoom
1
2
in on an area, and pinch back to zoom out. You can also turn your phone sideways for landscape view.
3 Tap the left or right arrow to display live video from the previous or next camera, if available.
4 Tap to take a snapshot with the camera. You can find your snapshots in the Photos app on your phone.
Tap to start recording a video clip with the camera. Tap again to stop the recording.
5
You can find your manual recordings in the Recordings section (Menu > Recordings) of the app.
6 Tap to turn on the 2-way audio and talk to visitors through the camera's speaker. Tap again to turn off.
7 Tap to turn on or off the camera's built-in spotlights.
Tap to turn on or off the camera's built-in siren.
8
Note: If the camera's built-in siren has been triggered automatically by a motion or sound event, you can
manually turn it off by tapping this icon twice.
9 Tap to mute or unmute the live video.
40Single Camera View Mode - Wi-Fi Floodlight Security Camera
1
2
3
4 5 6 7 8 9
1 Return to the Live View tab camera dashboard.
The live video window. You can zoom in or out on the video — use two fingers to pinch and spread out to zoom
1
2
in on an area, and pinch back to zoom out. You can also turn your phone sideways for landscape view.
3 Tap the left or right arrow to display live video from the previous or next camera, if available.
4 Tap to take a snapshot with the camera. You can find your snapshots in the Photos app on your phone.
Tap to start recording a video clip with the camera. Tap again to stop the recording.
5
You can find your manual recordings in the Recordings section (Menu > Recordings) of the app.
6 Tap to turn on the 2-way audio and talk to visitors through the camera's speaker. Tap again to turn off.
Tap to turn on or off the camera's built-in floodlights. When the floodlights are turned on, you can also
7
increase or dim the brightness using the slider displayed below the camera
functions panel.
Tap to turn on or off the camera's built-in siren.
8
Note: If the camera's built-in siren has been triggered automatically by a motion or sound event, you can
manually turn it off by tapping this icon twice.
9 Tap to mute or unmute the live video.
41Playback Tab
2 3 4 7
1
5
6
Tap the left or right arrow to view the previous or following day or month's video timeline of events for all of your
1
cameras currently online.
You can filter and sort events displayed on the video timeline to help you quickly find specific events that you want
2 to review by showing a smaller subset of events. Events can be filtered by device type and time period, and sorted
from oldest to newest (AM-PM) or newest to oldest (PM-AM).
(Wi-Fi camera models with cloud storage feature only) Tap to manage event clips in the camera's cloud storage.
3 • You can quickly select individual or multiple event clips on the video timeline for saving/sharing or deletion
using the toolbar that appears at the bottom of the screen.
• When an event clip is selected, a blue tick is displayed. You can deselect an event clip by tapping it.
• Deleting an event from the timeline will also delete the associated event clip from the cloud storage. Be sure
to save the video first if you'd like to keep it. Once an event has been deleted, the video cannot be recovered.
4 Tap to refresh the Playback tab for new events.
The timeline shows all of your cameras' event history, grouped according to hourly time periods.
5 Notes:
• For CCTV system cameras, generic preview thumbnails will be displayed for events.
• For Wi-Fi camera models with cloud storage feature, event video clips will be available for the length of time
determined by the subscription plan associated with the camera. To find out more about the cloud storage
subscriptions available for your cameras, visit subscriptions.swannsecurity.com
• For Wi-Fi camera models without cloud storage feature (for example, the Security Tracker Camera model), the
events displayed in the timeline are retrieved directly from the microSD memory card installed on the camera.
Tap the event thumbnail to view the recording as shown on the right. You can tap in the video playback control
6
panel to capture a snapshot when the video is playing.
(For Wi-Fi camera models with cloud storage feature only) You can tap or to save/share or delete this video
7
clip. Please note that deleting this video clip will also delete the corresponding event from the timeline and the
camera's cloud storage.
42Notifications Tab
1
2
3
1 Tap to clear all device activity history in the Notifications area below.
Tap to turn on or off push notifications from Swann Security. Depending on the type of device you have, you
2
can receive push notifications for:
• Motion detection
• Sound detection
• Human detection
• Device status (Online, Offline, Restart, Low Wi-Fi signal, Firmware upgrade)
Note: To receive push notifications from Swann Security, you must allow Swann Security to access
notifications on your phone (via Settings > Notifications > Swann Security > toggle Allow Notifications ON).
The Notifications area displays the history of device activity. Scroll up or down to view more notifications,
3
sorted by date and time.
43Menu
1
2
3
4
5
6
7
1 Update your profile name, account password, and location. See "Profile" on page 45.
Pair a new Swann device to your Swann Security account or re-pair an existing Swann device (to update the
2
Wi-Fi information).
View, share, and delete video clips that were captured manually during live view. See "Viewing and
3
Managing Manual Recordings" on page 73.
Download the app user manual (PDF file) to your phone. For best viewing experience, open the user manual
4
using Acrobat Reader (available on the App Store).
Display the application version information and access the terms of service and privacy policy relating to the
5
Swann Security app.
6 Open the Swann Support Center website on your phone's web browser.
7 Sign out of the Swann Security app.
44Profile
4
1
2
3
1 Tap to change your Swann Security account login password.
2 Tap to change your address.
Tap to delete your Swann Security account. A confirmation link will be sent to your registered email address.
3
Open the link to confirm that you want to permanently delete your account.
4 Tap to save any changes you've made to your Swann Security account password or address.
45Device Settings
CCTV System - Settings Overview

                                                                            4

                        1

                        2

                        3

                        4

     The name of the camera channel on your CCTV system. Tap to change it. If you rename the camera channel
 1
     on the app, it will also be automatically reflected on your CCTV system.

 2   The current connection state of your CCTV system.

     View technical information about your CCTV system such as the model name, software (firmware) version,
 3
     device ID, MAC address, and network IP address.
     Note: The CCTV system's MAC address (including colons) —a unique 12-character hardware ID (for example,
     BC:51:FE:12:34) assigned to the device—can be used as the recovery code to reset the password on your
     CCTV system locally via the CCTV system's Unlock screen > Forgot Password. Refer to your CCTV system's
     instruction manual for more information on resetting a forgotten password.
     Tap to remove (unpair) the CCTV system from your Swann Security account. In some cases, you might need
 4
     to unpair your CCTV system. For example, if you want to use your CCTV system with a different Swann
     Security account or if you give away your CCTV system to a family member, you need to unpair it first. Please
     note that once the CCTV system has been unpaired, all camera channels associated with the CCTV system
     will no longer be accessible on the app.

                                                     47
Alert Indoor Camera - Settings Overview
1
2
3
4
5
6
7
1 The current name of your camera. Tap to change it.
2 The current connection state of your camera.
The current timezone (GMT format) of your camera. The date and time stamp of camera recordings will
2
3
be based on the timezone you've selected. If this information is wrong, tap to update it. You can sync the
camera to your phone's timezone.
The name of the Wi-Fi network to which your camera is connected. If multiple networks are available in your
2
4
home, you can easily change the Wi-Fi connection the camera is using. Tap to enter the new Wi-Fi details.
For more information, see "Changing the Camera's Wi-Fi Network" on page 76. Note that, for best video
streaming performance, you should always connect your camera to the Wi-Fi access point or extender
nearest to it.
The Wi-Fi signal strength of the camera. In general, the closer the camera is to the home Wi-Fi router or
5
access point, the stronger the signal strength (higher % percentage), and the more reliable the wireless
connection between devices and the faster the live video stream will load.
Adjust the camera's settings such as the video stream quality, image flip, image mirror, microphone volume,
6
and speaker volume. See "Alert Indoor Camera - Camera Settings" on page 50.
Adjust the camera's detection settings such as the motion detection sensitivity and the siren duration. See
7
"Alert Indoor Camera - Detection Settings" on page 51.
(Continued on the next page)
48Alert Indoor Camera - Settings Overview
14 12
8
9
10
11
12
13
Access up to the last 2 days of event clips (space permitting) stored on the camera’s internal memory. When
8
the camera's internal memory is full, the oldest clips will be overwritten.
Note: You can also clear the camera's internal memory to permanently delete all local recordings. To do this,
tap the icon in the top right corner of the Storage screen or scroll all the way to the bottom and tap the
Format storage button.
Check for camera firmware updates. New firmware may from time to time be available for your camera to
9
improve the performance, fix bugs, or roll out new features and enhancements.
Perform general maintenance such as rebooting the camera, restoring default settings, and factory reset.
10
Note: Factory resetting your camera is usually only necessary for troubleshooting. It isn’t something to do
lightly as it will format the internal memory, wipe the current Wi-Fi information, and return all of the camera
settings to factory default. See "Factory Resetting the Camera" on page 74.
View technical information about the camera such as the model name, firmware version, MAC address, and
11
Wi-Fi IP address.
Tap to attempt to reconnect to the camera if the connection is lost (e.g., phone screen timeout, unstable
12
cellular or Wi-Fi network connection).
Tap to remove (unpair) the camera from your Swann Security account. In some cases, you might need to
13
unpair your camera. For example, if you want to use your camera with a different Swann Security account or
if you give away your camera to a family member, you need to unpair it first.
Note: When you remove the camera from your Swann Security account, all event clips on the camera's
internal memory are deleted.
49Alert Indoor Camera - Camera Settings
7
1
2
5
3
4
6
1 Select the mode according to where your camera is physically located.
If your camera is used in Indoor mode, you can set your camera's frequency to match with your country's
2
electrical frequency. This will help prevent video flicker caused by fluorescent lights.
• 50Hz (for Australia/UK)
• 60Hz (for North America)
2
3 Lets you horizontally reverse the orientation of the camera's video display.
Lets you turn the camera's video display upside down. This is useful if your camera has been mounted upside
2
4
down.
Adjust the camera's speaker volume. You can also turn the camera's speaker off by sliding the level all the
2
5
way to the left. Please note that decreasing the speaker volume level will also reduce the volume of the built-
in siren.
Adjust the camera's microphone volume. You can also turn the camera's microphone off by sliding the level
6
all the way to the left. Please note that decreasing the microphone volume level will also reduce the sound
detection sensitivity.
7 Apply any changes you've made to the settings.
50Alert Indoor Camera - Detection Settings
5
1
3
2
4
Select the motion sensitivity level to optimize motion detection recordings for your home environment.
1
Higher sensitivity settings will increase the distance at which motion events can be detected. Use lower
settings to reduce detection range and minimize unwanted recordings. Selecting Off turns off motion
detection completely.
Receive person detection alerts when the camera detects the presence of a person in the motion event. The
2
higher the person detection sensitivity, the more sensitive the camera is in distinguishing between human
shapes and other motion objects further away. Selecting Off turns off person detection completely. Please
note that, to use this feature, the Motion Detection sensitivity setting (above) must not be Off.
Select the sound detection sensitivity level needed to trigger recordings.
3
• The highest sensitivity level (Maximum) will detect most ambient sounds—even the quietest of sounds
like whispers or keyboard typing.
• The lowest sensitivity level (Loud) will only detect very loud noises like vacuum cleaners, smoke alarms
or baby crying.
• If you're getting too many sound detection alerts even on the lowest sensitivity available, you can
adjust the camera's microphone volume level, lowering it to 90 or below in Camera Settings > Audio >
Microphone volume. This will further reduce the camera's microphone sensitivity to background noise.
• Every home environment is unique, so we recommend experimenting with the sound sensitivity settings
to find out which works best for yours. You can also adjust and finetune the microphone volume level of
the camera to suit the location.
• To turn off sound detection completely, select Off.
Select how long the siren will sound when motion or sound is detected.
4
Note: Please exercise discretion and good judgment when deciding to activate the siren. Make sure to
comply with all local noise regulations.
5 Apply any changes you've made to the camera's detection settings.
51Security Tracker Camera - Settings Overview
1
2
3
4
5
6
7
8
1 The current name of your camera. Tap to change it.
2 The current connection state of your camera.
The current timezone (GMT format) of your camera. The date and time stamp of camera recordings will
2
3
be based on the timezone you've selected. If this information is wrong, tap to update it. You can sync the
camera to your phone's timezone.
The name of the Wi-Fi network to which your camera is connected. If multiple networks are available in your
2
4
home, you can easily change the Wi-Fi connection the camera is using. Tap to enter the new Wi-Fi details.
For more information, see "Changing the Camera's Wi-Fi Network" on page 76. Note that, for best video
streaming performance, you should always connect your camera to the Wi-Fi access point or extender
nearest to it.
The Wi-Fi signal strength of the camera. In general, the closer the camera is to the home Wi-Fi router or
5
access point, the stronger the signal strength (higher % percentage), and the more reliable and faster the
wireless connection between devices.
Adjust the camera's settings such as the video stream quality, image flip, image mirror, microphone volume,
6
and speaker volume. See "Security Tracker Camera - Camera Settings" on page 54.
Adjust the camera's detection settings such as the motion detection sensitivity and the siren duration.
7
See "Security Tracker Camera - Detection Settings" on page 55.
Adjust the video window layout on the live view screen. See "Security Tracker Camera - Pan & Tilt Settings"
8
on page 56.
(Continued on the next page)
52Security Tracker Camera - Settings Overview
14 13
9
10
11
12
13
14
Access event clips stored on the camera’s microSD memory card. When the memory card is full, the oldest
9
clips will be overwritten.
Note: You can also clear the camera's microSD memory card to permanently delete all local recordings. To do
this, tap the icon in the top right corner of the Storage screen or scroll all the way to the bottom and tap the
Format storage button.
Check for camera firmware updates. New firmware may from time to time be available for your camera to
10
improve the performance, fix bugs, or roll out new features and enhancements.
Perform general maintenance such as rebooting the camera, restoring default settings, and factory reset.
11
Note: Factory resetting your camera is usually only necessary for troubleshooting. It isn’t something to do
lightly as it will format the internal memory, wipe the current Wi-Fi information, and return all of the camera
settings to factory default. See "Factory Resetting the Camera" on page 74.
View technical information about the camera such as the model name, firmware version, MAC address, and
12
Wi-Fi IP address.
Tap to attempt to reconnect to the camera if the connection is lost (e.g., phone screen timeout, unstable
13
cellular or Wi-Fi network connection).
Tap to remove (unpair) the camera from your Swann Security account. In some cases, you might need to
14
unpair your camera. For example, if you want to use your camera with a different Swann Security account or
if you give away your camera to a family member, you need to unpair it first.
Note: When you remove the camera from your Swann Security account, all event clips on the camera's
microSD memory card are deleted.
53You can also read


