PT30 Omura mobile computer - user guide - Newland ID
←
→
Page content transcription
If your browser does not render page correctly, please read the page content below

SCANNING MADE SIMPLE

PT30 Omura
mobile computer
user guide
Disclaimer

© 2012-2017 Fujian Newland Auto-ID Tech. Co., Ltd. All rights reserved.

Please read through the manual carefully before using the product and operate it according to the manual. It is advised that you
should keep this manual for future reference.

Do not disassemble the device or remove the seal label from the device, doing so will void the product warranty provided by
Fujian Newland Auto-ID Tech. Co., Ltd.

All pictures in this manual are for reference only and actual product may differ. Regarding to the product modification and
update, Fujian Newland Auto-ID Tech. Co., Ltd. reserves the right to make changes to any software or hardware to improve
reliability, function, or design at any time without notice. The information contained herein is subject to change without prior
notice.

The products depicted in this manual may include software copyrighted by Fujian Newland Auto-ID Tech. Co., Ltd or third party.
The user, corporation or individual, shall not duplicate, in whole or in part, distribute, modify, decompile, disassemble, decode,
reverse engineer, rent, transfer or sublicense such software without prior written consent from the copyright holders.

This manual is copyrighted. No part of this publication may be reproduced, distributed or used in any form without written
permission from Newland.

Fujian Newland Auto-ID Tech. Co., Ltd. reserves the right to make final interpretation of the statement above.

Fujian Newland Auto-ID Tech. Co., Ltd.
3F, Building A, No.1, Rujiang West Rd., Mawei, Fuzhou, Fujian, China      350015
http://www.newlandaidc.com
Revision History

   Changes to the original manual are listed below:

   Version                                            Description                                   Date

     V1.0        Initial release.                                                                 2012-04-12

     V1.1        Corrected improper descriptions.                                                 2012-05-16

     V1.2        Updated the figures in Chapter 6.                                                2012-09-24

     V1.3        Updated the screenshots of the PT30.                                             2014-07-04

                 Updated the screenshots in the “Scan Engine Parameters Configuration” section
     V1.4                                                                                         2016-10-26
                 of Chapter 3 and added the Admin Settings feature in the same chapter.

     V1.5        Modified Chapter 3 and Chapter 5.                                                2017-05-27

                 1. Modified the “Scanner Settings” section and added the “Redefining Keyboard”

     V1.6        section in Chapter 3.                                                            2017-11-02

                 2. Modified Chapter 5.
Table of Contents
Chapter 1 About This Guide ........................................................................................................................................................ 1

                 Introduction ................................................................................................................................................................. 1
                 Documentation Set ..................................................................................................................................................... 1
                 Software Version......................................................................................................................................................... 2
                 Chapter Descriptions .................................................................................................................................................. 3
                 More Information......................................................................................................................................................... 3

Chapter 2 Getting Started ............................................................................................................................................................ 4

                 Introduction ................................................................................................................................................................. 4
                 Unpacking ................................................................................................................................................................... 4
                 Accessories ................................................................................................................................................................ 4
                 Getting Started ............................................................................................................................................................ 4
                         Installing the Main Battery .................................................................................................................................. 4
                         Charging the Battery .......................................................................................................................................... 5
                         Keypad ............................................................................................................................................................... 5
                         Power On, Suspend, Wake Up and Power Off ................................................................................................... 6
                         Calibrating the Screen ........................................................................................................................................ 6
                         Checking Battery Status ..................................................................................................................................... 7
                         Installing MicroSD Card ...................................................................................................................................... 8
                         Installing SIM Card ............................................................................................................................................. 9
                 Adjusting the Hand Strap ............................................................................................................................................ 9

Chapter 3 Using the PT30 Series .............................................................................................................................................. 10

                 Introduction ............................................................................................................................................................... 10
                 Status Icons .............................................................................................................................................................. 10
                 Programs Icons......................................................................................................................................................... 11
                 Settings Icons ........................................................................................................................................................... 13
                 Keypad ..................................................................................................................................................................... 15
                         Alphabetic Keypad ........................................................................................................................................... 16
                         Function Keys................................................................................................................................................... 16
                 Stylus ........................................................................................................................................................................ 16
                 Volume Control ......................................................................................................................................................... 17
                 Peripheral Module Power control .............................................................................................................................. 17
                 Backlight Settings ..................................................................................................................................................... 18
                 Memory Storage Management ................................................................................................................................. 18
                 Resetting the PT30 ................................................................................................................................................... 19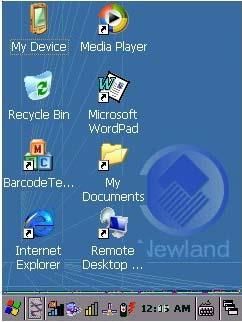
Warm Reset ..................................................................................................................................................... 19
                          Cold Reset ....................................................................................................................................................... 19
                  Locking the PT30 ...................................................................................................................................................... 20
                  Scanner Settings ...................................................................................................................................................... 21
                          Normal Settings ................................................................................................................................................ 21
                          Symbologies ..................................................................................................................................................... 25
                          Test................................................................................................................................................................... 26
                  Reading 1D Barcode ................................................................................................................................................ 27
                  Reading 2D Barcode ................................................................................................................................................ 28
                  Admin Settings.......................................................................................................................................................... 29
                  Redefining Keyboard ................................................................................................................................................ 30

Chapter 4 Using Bluetooth Communication ............................................................................................................................ 32

                  Bluetooth Config ....................................................................................................................................................... 32
                  Bluetooth Manager ................................................................................................................................................... 33

Chapter 5 Using WiFi Communication ..................................................................................................................................... 35

                  Connecting to a WiFi Network .................................................................................................................................. 35
                  WiFi Tool ................................................................................................................................................................... 37
                          Viewing WiFi Connection Details ...................................................................................................................... 37
                          Viewing WiFi Connection Status....................................................................................................................... 38
                          Setting WiFi Parameters .................................................................................................................................. 38
                          Diagnosing WiFi Connection Problems ............................................................................................................ 39

Chapter 6 Using GPRS Communication ................................................................................................................................... 40

                  Making New Connection ........................................................................................................................................... 40
                  Setting Up a Dial-Up Connection .............................................................................................................................. 42
                  Checking GPRS Connection Status.......................................................................................................................... 43

Chapter 7 ActiveSync ................................................................................................................................................................. 44

                  Introduction ............................................................................................................................................................... 44
                  Installing ActiveSync on PC ...................................................................................................................................... 44
                  Synchronizing Data ................................................................................................................................................... 44

Chapter 8 Accessories ............................................................................................................................................................... 45

                  Battery ...................................................................................................................................................................... 45
                  Cradle ....................................................................................................................................................................... 45
                          Inserting the PT30 into Cradle .......................................................................................................................... 45
                          Removing the PT30 from Cradle ...................................................................................................................... 45
                  Charging the Battery ................................................................................................................................................. 45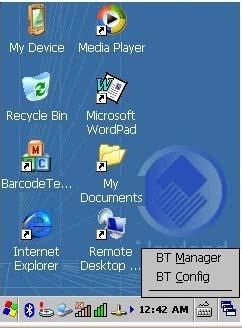
Charging with Cradle ........................................................................................................................................ 45
                        Charging with AC Adaptor ................................................................................................................................ 46
                Charging LED ........................................................................................................................................................... 46
                Scanning/Decoding/Communication LED ................................................................................................................. 46
                Communicating with PC Directly............................................................................................................................... 46
                Communicating with PC via Cradle .......................................................................................................................... 47

Chapter 9 Maintenance & Troubleshooting .............................................................................................................................. 48

                Introduction ............................................................................................................................................................... 48
                Important Safety & Handling Information .................................................................................................................. 48
                        Disassembly and Retrofit ................................................................................................................................. 48
                        External Power Supply ..................................................................................................................................... 48
                        Abnormal Situation ........................................................................................................................................... 48
                        Drop Damage ................................................................................................................................................... 48
                        LCD Screen ...................................................................................................................................................... 48
                        Stacking Heavy Objects ................................................................................................................................... 48
                        Mounting Location ............................................................................................................................................ 48
                        Wireless Functionalities .................................................................................................................................... 49
                        Use & Maintenance .......................................................................................................................................... 49
                        Battery Safety Guidelines ................................................................................................................................. 49
                Troubleshooting ........................................................................................................................................................ 50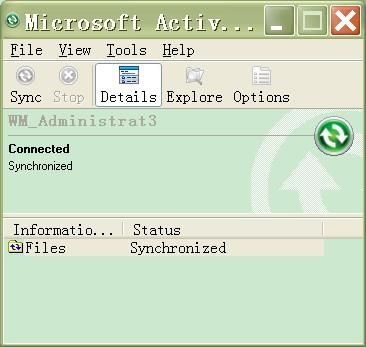
Chapter 1 About This Guide
Introduction
This guide provides information about using the NLS-PT30 series mobile computer (hereinafter referred to as “the
terminal” or “the PT30”) and accessories.
Documentation Set
The documentation set for the NLS-PT30 provides information for specific user needs and includes:
NLS-PT30 Series Quick Start Guide : Describes how to get the NLS-PT30 Series up and running.
NLS-PT30 Series User Guide : Describes how to use the NLS-PT30 Series.
.
1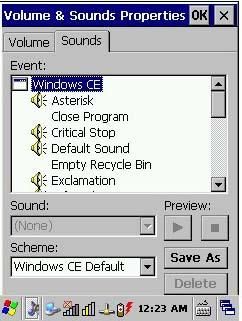
Software Version

   The program           can be used to view the terminal’s software and hardware version information which is helpful for
   future updates and maintenance.

   The user can obtain the following device information:
        A. System hardware & software version and build time.
        B. The version of WiFi module, and MAC addresses of WiFi and Bluetooth.
        C. The type and version of scan engine.
        D. Version of utility software.

   Tap “Start” → “Settings” → “Control Panel” → double click        .

                                              Figure 1.1: Device Information

                                                                                                                        2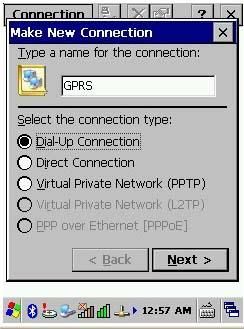
Chapter Descriptions
Chapter 1 About This Guide : Gives a general description of this manual.
Chapter 2 Getting Started : Provides information on getting the PT30 up and running for the first
time.
Chapter 3 Using the PT30 Series : Provides basic instructions for using the PT30.
Chapter 4 Using Bluetooth Communication : Explains how to use Bluetooth functionality.
Chapter 5 Using WiFi Communication : Explains how to use WiFi functionality.
Chapter 6 Using GPRS Communication : Explains how to use GPRS functionality.
Chapter 7 ActiveSync : Explains how to synchronize content between the PT30 and the host.
Chapter 8, Accessories : Describes the available accessories and how to use them with the PT30.
Chapter 9, Maintenance & Troubleshooting : Provides troubleshooting solutions for issues that might occur when
using the PT30.
More Information
For more product and support information, please visit our web site: http://www.newlandaidc.com.
3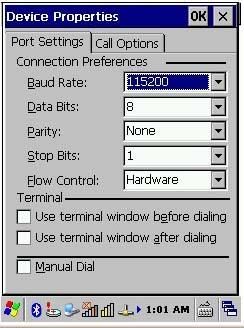
Chapter 2 Getting Started
Introduction
This chapter lists the parts and accessories for the PT30 Series and explains how to install, remove and charge the
batteries, and get the PT30 up and running.
Unpacking
Carefully remove all protective material from the pack.
Verify that you received the following:
PT30 Mobile Computer
USB cable
AC adapter
Li-Polymer battery
Tethered stylus
Hand strap
Quick Start Guide
Accessories
PT30 single slot cradle
PT30 cradle AC adaptor
USB cable
Getting Started
Installing the Main Battery
41. Figure 1 indicates the direction to unlock the latch.
2. Figure 2 indicates the direction to take out the battery cover.
3. Follow the instructions of figure 3 and 4 to insert the battery.
4. Follow the instructions of figure 5 to close the battery cover.
5. Push the latch to the locked position.
Charging the Battery
There are two ways to charge the battery:
Charge the terminal via USB connection to PC. Charging time: 6-8 hours.
Charge the terminal via AC adapter. Charging time: around 3.5 hours.
Charge the terminal for at least 8 hours before first use.
LED indication: red LED: charging in progress; green LED: fully charged.
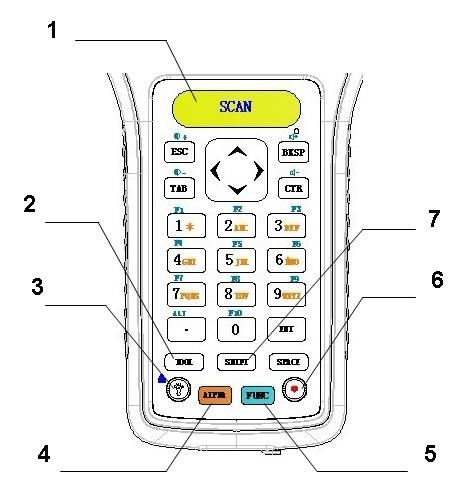
Keypad
8
1 SCAN key Barcode reading button.
Pop up the keyboard shortcuts menu (default), or execute the Admin Setting
2 TOOL key
application (when “Sys Shortcut Tools” is turned OFF).
Turn screen backlight on or off
3 Backlight key
*Press it down for 7.5s for a warm reset.
4 ALPHA key Switch between alpha and numeric input.
5 FUNC key Customize function keys.
6 Power key Power on/ suspend/ awaken the terminal.
7 SHIFT key Switch between upper and lower case alphabet entry.
Warm reset: Insert a straightened paper clip into the hole and press the Reset
8 Reset key key in.
Cold reset: Hold down the Reset and Power keys.
5Power On, Suspend, Wake Up and Power Off
Power On:
Press and hold the Power key for 2-3 seconds to turn the terminal on.
Suspend:
When the terminal is on, holding down the Power key for 2 seconds will suspend the terminal.
If no operation is performed on the terminal for some time, it will go into the suspend mode (in the case that auto
suspend is already enabled).
To set the timer for auto suspend, go to “Start”→“Settings”→“Control Panel”→ →“Schemes”.
Wake Up:
When the terminal in the suspend mode, press the Power key to wake it up.
Power Off:
Tap “Start”→“Shutdown”→“Shutdown” to turn off the terminal. The terminal will backup user data before it shuts down.
Calibrating the Screen
The calibration tool is for calibrating the touch screen.
Tap “Start”→“Settings”→“Control Panel”→ double-tap → tap ”Calibration”.
Click “Recalibrate” button then the screen becomes as shown in Figure 2.2. Carefully press and briefly hold the tip of
stylus on the center of each target that appears on the screen. Repeat as the target moves around the screen, then tap the
screen to continue.
Figure 2.1: Calibration Figure 2.2: Recalibrate
6Checking Battery Status
To check the battery status, tap “Start”→“Settings”→”Control Panel”→double click .
Figure 2.3: Power Properties - Battery Figure 2.4: Power Properties - Schemes
The system has four states: running, user idle, system idle and suspend:
When user operates on the keypad or taps the touch screen, the system is in the running state.
After a preset period of inactivity, the system enters the user idle state.
After being in the user idle state for a preset period of time, the system enters the system idle state.
After being in the system idle state for a preset period of time, the system enters the suspend state.
7Installing MicroSD Card
The terminal provides a MicroSD card slot for external storage. The slot is beneath the battery compartment. Follow the
instructions of the card manufacturer to use the card.
Insert the MicroSD card into the card slot, with its metal contacts facing down, as shown below.
Note that the MicroSD card may not function in any of the following conditions:
1. MicroSD card: It is infected with virus, damaged, or not formatted properly, or its metal contacts are dirty.
2. Card slot: It is squeezed or damaged, or its metal contacts are rusted or bent excessively.
3. Battery: The battery voltage is unstable.
8Installing SIM Card
The SIM card slot is beneath the battery compartment and it is available only to the PT30 with GPRS model.
1. Take out the battery. Push the cover release latch in the direction indicated in figure 1 to release the slot cover and
open the cover.
2. Insert the SIM card into the slot, with its metal contacts facing down.
3. Push the latch to lock the slot cover in place.
Adjusting the Hand Strap
A hand strap can be attached to the terminal. Adjust the hand strap to increase comfort when holding the terminal for
extended periods of time.
9Chapter 3 Using the PT30 Series
Introduction
This chapter provides the detailed instructions for using and setting the PT30.
Figure 3.1: Desktop Icons
Status Icons
The status bar at the bottom of the screen can contain the following status icons.
Icon Description
Bluetooth management tool.
Lowercase input. Press the ALPHA key to toggle between numeric and alphabetic (lowercase)
keypad.
Uppercase input. Press the SHIFT key to toggle between uppercase and lowercase.
Caps Lock. When alphabetic keypad is enabled, double press the SHIFT key to turn Caps Lock on.
FUNC key.
IP information.
10USB connection status.
Battery status.
WiFi not connected.
WiFi connected.
Clock.
Soft input panel.
Background running program selection window.
Programs Icons
Icon Program Name Description
Stylus Touch screen calibration tool.
Light Setting Screen and keyboard backlight setting tool.
Peripheral Switch Peripheral module power control.
Calculator Numeric calculation.
Unit Convertor Unit conversion tool.
11Microsoft WordPad Microsoft WordPad text editing tool.
LockConfig Keyboard and touch screen lock/unlock tool.
WiFi WiFi communication management and configuration tool.
Bluetooth Device
Bluetooth communication management and configuration tool.
Properties
Barcode Setting Barcode engine configuration tool.
Set the programs and parameters which need to boot automatically at
Autorun
startup.
Backup/restore system registry, configuration and data in storage
SysBackupRestore
memory.
Firmware Information Check the system firmware information and version.
Putty Telnet terminal emulation tool.
RegEdit System registry editing tool.
uEasyFileCE Bluetooth file transfer utility.
12Settings Icons
Icon Description
System volume control.
Internet options settings.
Enable/disable connections with host PC.
Memory storage management and configuration. (Use it with discretion)
Power properties (battery, schemes and device status) settings.
Passwords (power on password and screen saver password) settings.
System date, time and time zone settings.
Region, language and input method settings.
Dialing configuration.
13Remove programs installed on the terminal.
Input panel settings.
Owner properties settings.
GPRS connection configuration.
View system information.
Change your desktop background (wallpaper).
View the certificates installed on the terminal.
14Keypad
8
1 SCAN key Scan barcode key.
Pop up the Keyboard Shortcuts menu (default), or open the Admin Setting
2 TOOL key
application (when Sys Shortcut Tools is turned OFF).
Turn screen backlight on or off.
3 Backlight key
*Press and hold it for 7.5s for a warm reset.
4 ALPHA key Toggle between alphabetic and numeric keypad.
5 FUNC key Customize function keys.
6 Power key Power on/ suspend/ awaken the terminal.
Switch between uppercase and lowercase mode (effective only when
7 SHIFT key
alphabetic keypad is enabled).
Warm reset: Insert an appropriate pin into the hole and press the Reset key in.
8 Reset key
Cold reset: Hold down the Reset and Power keys.
15Alphabetic Keypad
ALPHA key locked ALPHA & SHIFT keys locked
Numeric Key 1st 2nd 3rd 4th 1st 2nd 3rd 4th
1 *
2 a b c A B C
3 d e f D E F
4 g h i G H I
5 j k l J K L
6 m n o M N O
7 p q r s P Q R S
8 t u v T U V
9 w x y Z W X Y Z
Function Keys
FUNC key + Backlight key: Lock/unlock the terminal.
After the FUNC key is pressed, it is locked; it becomes unlocked after another keypress is made.
The ALPHA key and FUNC key are independent from each other, so they do not override each other.
The SHIFT key works only when the alphabetic keypad is enabled (i.e. the ALPHA key is pressed and locked).
When the ALPHA key is pressed and locked, the SHIFT key’s intended functions are described as follows:
When the SHIFT key is not pressed, the lowercase mode is enabled with the status bar displaying .
When the SHIFT key is pressed once, the uppercase mode becomes enabled with the status bar displaying
until any key on the keypad is pressed, be it an alphabetic key or not.
When the SHIFT key is pressed twice within an interval of 0.5 seconds), Caps Lock is turned ON with the status
bar displaying . To switch to the lowercase mode, simply press the SHIFT key.
Long press or double press the TOOL key: Pop up the Keyboard Shortcuts menu (default).
TOOL key + a number key (1-9): Run the corresponding program on the Keyboard Shortcut menu.
Stylus
Use the stylus to select items and enter information. The stylus functions as a mouse.
Tap : Tap an item on the screen with the stylus to select it.
Tap and Hold : Tap and hold an item with the stylus to view a list of actions available for that item.
Drag : Hold the stylus on the screen and drag across the screen to select text. Drag multiple items in a list to
select them.
CAUTION: To prevent damage to the screen, only use the stylus provided by Newland.
16Volume Control
Tap “Start”→“Settings”→“Control Panel”→ double-click and move the slider to the right or left to raise or lower the
volume.
Figure 3.2: Volume Figure 3.3: Sounds
Peripheral Module Power control
The program is for users to quickly turn GPRS/3G/Bluetooth/WiFi module on or off.
Tap “Start”→“Settings”→“Control Panel”→double click to open the program.
Tap “ON” or “OFF” to turn the module on or off. By default, GPRS and WiFi are ON and Bluetooth is OFF.
Figure 3.4: Peripheral Switch
17Backlight Settings
Tap “Start”→“Settings”→“Control Panel”→double click .
Screen Backlight:
Normal Mode:
Normal mode applies when the system is in the running state. There are 11 levels (0-10) of screen brightness for
this mode.
Low-power Mode:
Low-power mode allows users to dim the screen to save power if no operation is performed on the screen and
keyboard for a preset period of time (switch timer). There are 8 levels (0-7) of screen brightness for this mode.
Brightness level for the normal mode must be greater than that for low-power mode.
Switch Timer
Users may set the period of inactivity required to automatically switch from normal mode to low-power mode.
Keyboard Backlight:
Users may set the period of keyboard inactivity required to automatically turn off keyboard backlight.
Figure 3.5: Backlight Setting
Memory Storage Management
Caution: When the settings are improperly configured on the memory storage management, system failures may
occur. Non-technical staff shall not make any change to it.
The program is a tool for managing the memory.
18 Format :Format the selected memory, the data in memory will be destroyed after memory is formatted.
Dismount :Dismount the selected memory.
New Partitions :Create a new partition in selected memory.
Delete Partitions :Delete an existing partition in selected memory.
Figure 3.6: Memory Configuration
Resetting the PT30
Warm Reset
Press the Reset button or hold down the Backlight key for 7.5 seconds to perform a warm reset on the terminal. It will take
6-10 seconds to restart the system. User data in memory will not be lost.
Cold Reset
Method 1: Hold down the Power key and then press the Reset button. Do not release the Power key until the terminal
displays the loading screen.
Method 2: Press and hold the Power and Backlight keys till the terminal displays the loading screen.
It will take 16-20 seconds for the terminal to reboot. After a cold reset, the terminal will restore factory default settings and
user data that is not in MicroSD card or flash disk will be lost. You can use backup/restore tool to restore backup data.
Note: The battery cover must be closed after the Reset button is pressed, otherwise the terminal will immediately
enter the suspend mode after restarting.
19Locking the PT30
User can lock or unlock the terminal using the program .
Tap “Start”→“Settings”→“Control Panel”→double click to run the program.
Figure 3.7: Auto Lock
Lock the keyboard and touch screen:
Method 1: If no operation is performed on the PT30 for some time (user programmable), the keyboard and touch screen
will be locked automatically.
Method 2: Press the FUNC and Backlight keys simultaneously.
Unlock the keyboard and touch screen:
Method 1: Press the FUNC and Backlight keys simultaneously.
Method 2: Press any key and then tap “Unlock” on the screen.
Figure 3.8: Unlock
20Scanner Settings
Tap “Start”→“Settings”→“Control Panel”→double tap . Then the following screen will be displayed.
Figure 3.9
Normal Settings
Output Mode
Figure 3.10 Figure 3.11
The PT30 provides three output modes:
Output via API : Application uses the API to get the barcode data.
Output via keyboard : Output the barcode data to keyboard buffer to simulate keyboard input.
Output via clipboard : Output the barcode data to clipboard.
21 Decode Mode
Figure 3.12 Figure 3.13
Decode mode
Level mode: Press the scan trigger to start a decode session which continues until the key is released.
Pulse mode: Press the scan trigger to start a decode session which continues until a barcode decodes or the decode
session timeout expires.
Continuous mode: Scan barcodes continuously until the scan mode is changed.
API mode: Start/stop scanning barcode by API software.
Timeout and Interval:
Timeout sets the maximum time decode session continues during a scan attempt, the default value is 4000ms. Interval
sets the time period between decode sessions, the default value is 100ms.
22 Scan Trigger:
Select a key (SCAN: Scan key; L-SCAN: Left Scan key; R-SCAN: Right Scan key) or key combination as scan trigger by
checking the item.
Figure 3.14 Figure 3.15
Barcode Editing
Figure 3.16 Figure 3.17
Prefix & Suffix
This feature allows you to append prefix/suffix to raw data. To set the prefix/suffix, enter the hexadecimal value of each
character in your desired prefix/suffix. For example, if you want to add “123” before each barcode, set the prefix to
“0x313233”; if you want to add a Carriage Return character after each barcode, set the suffix to “0x0D”.
23 Data Extraction
This feature allows you to output only a selected part of raw data. To enable it, check “Extraction enable”. For example, if
you want to output only “DE” in raw data “ABCDE”, enter “3” in the Start field and “4” in the End field.
String Replace
This feature allows you to replace characters in raw data (up to 4 pairs of character replacements: Mode 1 – Mode 4). To
set the replacement string and the string to be replaced, select one of the four modes, tap “Edit”, and then enter the
hexadecimal value of each character in the replacement string and the string to be replaced in the corresponding field (e.g.
if you want to replace “123” in raw data “12345” with “789”, enter “0x313233” in the String to be replaced field and
“0x373839” in the Replacement string field.
Figure 3.18
Good Read Notifier
Select one or more indicators for good read.
Figure 3.19 Figure 3.20
24 Image Debug (Only available on the PT30 equipped with 2D barcode scanner)
When multiple barcodes are placed closely together, you may specify the decoding area to narrow the scanner’s field of
view to make sure it reads only those barcodes intended.
To set the decoding area, check “Enable decode valid area” and then set the valid area.
Figure 3.21 Figure 3.22
Symbologies
Tap the “Barcode” tab on the Barcode Setting screen, then enable/disable the barcode symbologies and set other barcode
parameters as per your actual needs.
Supported symbologies may vary by product model.
To disable all 1D or 2D symbologies, select “1D All” or “2D All”.
Figure 3.23
25Test
You can use this feature to test your terminal’s barcode scanning feature. Tap the “Test” tab on the Barcode Setting screen,
then scan a barcode with your terminal. Decoded data will appear in the textbox after a good read.
Figure 3.24
26Reading 1D Barcode
Adjust the scan angle or the distance between the terminal and the target barcode to ensure the length of laser beam is
roughly 8mm greater than that of the barcode, as shown in the following figure.
Right and wrong way of reading:
27Reading 2D Barcode
Adjust the scan angle and the distance between the terminal and the target barcode to make them fall into the following
ranges:
A. Point the terminal’s focus lamp at the center of the barcode.
B. Optimum scan distances: 5-20cm.
C. Optimum scan angles:
Pitch (α)< 45° (0°preferably)
Skew (γ)< 45° (5°- 20°preferably)
Roll (β)= 0° - 360°
28Admin Settings
To run the Admin Setting application, long press or double press the TOOL key on the terminal to open the Keyboard
Shortcuts menu (default), and then double tap . Users will be asked to set the admin password when using it
for the first time.
Figure 3.25 Figure 3.26
Figure 3.27 Figure 3.28
My Device/Recycle Bin: Turn it on (default) or off to show or hide the icon on the desktop.
Menu->XX: Turn it on (default) or off to show or hide XX in the Start menu.
Sys Shortcut Tools: When it is On (default), double pressing the TOOL key will open the Keyboard Shortcuts menu;
when it is Off, double pressing it will open the Admin Setting application.
Shutdown Backup: Turn it on (default) or off to enable or disable automatic backup during the shutdown process.
29Redefining Keyboard
1. Long press or double press the TOOL key on the PT30 to open the Keyboard Shortcuts menu, locate and then double
tap .
Figure 3.29
2. Tap the “Key Value” field of your desired key then the arrow icon , and select “Redefine keyboard”.
Figure 3.30
3. Select a key value and then tap .
30Figure 3.31 Figure 3.32 31
Chapter 4 Using Bluetooth Communication

   This chapter describes how to connect the PT30 to other Bluetooth device.

Bluetooth Config

   Double click       in the status bar, or click this icon and then select “BT Config” to display the BT Configuration window
   (Figure 4.2).

                         Figure 4.1: Desktop                           Figure 4.2: BT Configuration (Basic)

   A.   Set device name and pin code as per your needs.
   B.   Tap the “Option” tab and then select “Discoverable mode”/ “Connectable mode” and “Authentication mode” as per
        your needs (Figure 4.3).

                                                                                                                            32
Figure 4.3: Option Figure 4.4: Service
C. Tap the “Service” tab and then select “Generic serial” as per your needs (Figure 4.4).
Bluetooth Manager
Click in the status bar and then select “BT Manager” to display the BT Manager window (Figure 4.5). You can search
for Bluetooth devices and services and pair & connect with a Bluetooth device as per actual needs. For an application
program using Bluetooth communication, the terminal will attempt to connect to the most recently connected Bluetooth
device automatically if no Bluetooth device is connected to it currently.
Figure 4.5: BT Manager (Pair & Link) Figure 4.6: Search for Bluetooth Devices
33Figure 4.7: Search Services Figure 4.8: Favorite Connections
34Chapter 5 Using WiFi Communication
This chapter describes how to connect the PT30 to a WiFi network, how to view WiFi connection details and status, how to
set WiFi parameters, and how to diagnose WiFi connection problems.
Connecting to a WiFi Network
1. Double tap on the desktop, or tap “Start” → “Settings” → “Control Panel” → double tap , to open the
“Peripheral Switch” program. On the “PeripheralSwitch” window, turn WiFi on. Skip this step if it is already turned on.
Figure 5.1 Figure 5.2
2. Double tap in the status bar.
Figure 5.3
353. Tap then the “Wireless Information” tab. Select a network and tap “Connect”
Figure 5.4 Figure 5.5
4. Manually enter the wireless settings for the network you want to connect to (Network name, Encryption, Authentication
and Network key). Then tap “OK”.
Figure 5.6
36WiFi Tool
To start the WiFi tool, long press or double press the TOOL key on the PT30 to open the Keyboard Shortcuts menu, locate
and then double tap .
Figure 5.7
Viewing WiFi Connection Details
You can check network connection information such as IP address, MAC address, gateway and DHCP here.
37Viewing WiFi Connection Status
You can check the current status of your network connection, SSID, AP MAC address, connection channel and signal
strength here.
Setting WiFi Parameters
You can turn WiFi on/off, set the power mode and WiFi protocol, and manage roaming settings here.
You can also quickly and conveniently open the WiFi Connection Settings screen by tapping “ZConfig”.
38Diagnosing WiFi Connection Problems
You can test network connectivity with ping and export diagnosis log here.
39Chapter 6 Using GPRS Communication
Ensure that an activated SIM card, from the phone service provider, is installed in the terminal. By default, a GPRS
connection is already created on the PT30. You can tap “Start ”→ “Settings” → “Control Panel” → “Network and Dial-up
Connections”, and then double click the GPRS icon to initiate GPRS communication if you are located in China. If you are
not located in China, you may either modify the existing GPRS connection or create a new connection by following the
instructions below.
Making New Connection
To create a new connection, follow the steps below:
A. Double click the “Make New Connection” icon (Figure 6.1).
B. Type “GPRS” or any desired name for the connection and then tap “Next” (Figure 6.2).
Figure 6.1: Make New Connection Figure 6.2: Name the connection
C. Select “Wireless modem Port” in the field of "Select a mode" and tap “Configure…” (Figure 6.3).
D. Leave the Port Settings at their default values (Figure 6.4).
40Figure 6.3: Modem Figure 6.4: Port Settings
E. Tap the “Call Options” tab. Type [+cgdcont=1,“IP”,“cmnet”] in the field at the bottom of the screen. “cmnet” is
an example of GPRS APN (access point name). Contact your GPRS service provider to obtain this information. Tap
“OK” at the top of the window.
Figure 6.5: Call Options
F. Enter the phone number in the corresponding field. Tap “Finish” (Figure 6.6).
G. Then the new connection will appear on the screen. Double click it if you want to initiate GPRS communication.
41Figure 6.6 Set phone number Figure 6.7: New connection created
Setting Up a Dial-Up Connection
To set up a dial-up connection, follow the steps below:
A. Click “Dial Properties…” in the window as shown in Figure 6.8.
B. Click “Edit…” in the window as shown in Figure 6.9.
Figure 6.8: Dial-up connection Figure 6.9: Dialing properties
C. Enter “G” in the three input fields in the window as shown in Figure 6.10 respectively, and click “OK” at the top of the
window. Then click “OK”.
D. Click “Connect” (Figure 6.11).
42E. Wait 3-5 seconds for the settings to complete.
Figure 6.10 Figure 6.11
Checking GPRS Connection Status
Click in the status bar at the bottom of the screen to view the GPRS connection status.
Figure 6.12: GPRS status
43Chapter 7 ActiveSync
Introduction
Microsoft ActiveSync (version 4.5 or higher) is required when you want to synchronize data between the terminal and PC.
Installing ActiveSync on PC
Download ActiveSync (version 4.5 or higher) from the Microsoft web site at http://www.microsoft.com and install it on your
PC.
Figure 7.1 ActiveSync Installation interface
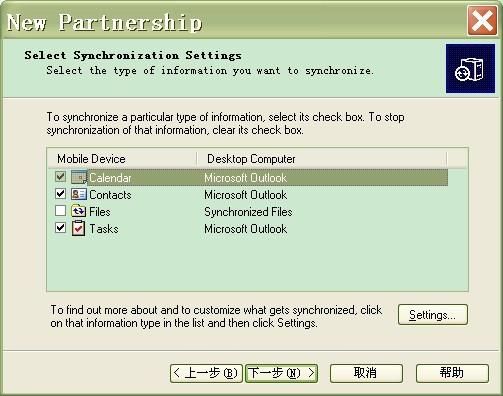
Synchronizing Data
Figure 7.2: Synchronize details Figure 7.3 Choose item(s) to synchronize
44Chapter 8 Accessories
Battery
Low battery may result in misoperation of the terminal. Before your first use, charge the battery for at least 8 hours to
ensure both the main and backup batteries are fully charged.
Cradle
Inserting the PT30 into Cradle
Removing the PT30 from Cradle
Charging the Battery
Charging with Cradle
45Charging with AC Adaptor
Charging LED
Red LED on: Charging in progress.
Green LED on: Fully charged.
Scanning/Decoding/Communication LED
Red LED on: The terminal is scanning barcode.
Green LED on: A barcode is decoded.
Blue LED flashes: BT/WiFi/GPRS/3G module in the PT30 is communicating.
Communicating with PC Directly
1. Open the USB port cover located at the bottom of the PT30.
2. Plug one end of the USB cable into the USB port on the PT30 and the other end of the cable into PC.
Note: Make sure Microsoft ActiveSync is already installed on the PC before performing data communication
between the terminal and the PC.
46Communicating with PC via Cradle
1. Insert the PT30 into the dedicated cradle.
2. Plug one end of the USB cable into the USB port on the cradle and the other end of the cable into PC.
Note: Make sure Microsoft ActiveSync is already installed on the PC before performing data communication
between the terminal and the PC.
47Chapter 9 Maintenance & Troubleshooting
Introduction
This chapter includes important safety and handling information and provides troubleshooting solutions for issues that
might occur when using the terminal.
Important Safety & Handling Information
Disassembly and Retrofit
Do not disassemble or retrofit the terminal by yourself. Artificial damages caused by failure to observe this precaution are
not covered by the warranty.
External Power Supply
Use only the supplied AC adapter. Otherwise there is a risk of damage to the terminal.
Abnormal Situation
Keep the terminal away from fire or heat sources. If there is unusual odor, overheating or smoke, immediately cut off the
power and disconnect the AC adapter, and contact your dealer or Newland customer service center. Continued use in this
case may result in fire or electric shock.
Drop Damage
If the terminal is damaged due to a drop from high place, immediately cut off the power and contact your dealer or
Newland customer service center.
LCD Screen
Do not press against or strike the LCD screen. Otherwise it may damage the screen. When handling a cracked or
shattered screen, do not touch the liquid that has leaked from it to avoid skin burn or infection.
Stacking Heavy Objects
Do not place heavy objects on the terminal as those objects may fall and cause injury.
Mounting Location
Do not place the terminal on unstable or uneven surfaces as it may fall and cause injury. Do not expose the terminal to
humidity, dust or direct sunlight.
48Wireless Functionalities
Do not use the terminal’s wireless functionalities where wireless device use is prohibited or where it may cause
interference or danger, such as in aircrafts, petrol stations.
Use & Maintenance
If the terminal cannot be switched on after experiencing a sudden or unexpected power loss or other abnormalities,
try performing a warm reset on the terminal by pushing the Reset button with a pin. For the location of the button,
please refer to the related chapter.
Do not throw, drop or strike the terminal. Doing so may damage the LCD display, interrupt running programs, cause
data loss in memory and result in malfunction.
Clean the scan window regularly. Do not touch it with hands. Scratched or smudged window may degrade reading
performance.
Do not tap the touch screen with sharp objects. Doing so may damage the screen or cause internal short circuits.
Use only a dry soft cloth to clean the terminal. Cleaning it with wet cloth or benzene/ thinner/ other volatile chemicals
may deform and shorten the useful life of the keyboard and shell of the terminal.
Do not place the terminal facedown on any surface, or there might be misoperations.
Sudden temperature drops may cause condensation on the shell which could cause malfunction. If condensation
occurs, dry the terminal before use.
Battery Safety Guidelines
Do not dispose of batteries in a fire as they may explode!
The battery can be charged and discharged over 500 times. If the battery life is unreasonably short, please replace
the battery with a new one.
Use only the manufacturer-approved battery and AC adapter.
Unplug the AC adapter when it is not in use. Do not continue to charge a battery that is fully charged. Overcharging
will shorten battery lifespan. If a fully charged battery is not used, it will discharge slowly, which does not affect its
normal use.
Do not use damaged or dysfunctional AC adapters and batteries.
Properly dispose of and recycle batteries. Do not dispose of them as household garbage.
49Troubleshooting
Problem
Possible Cause & Solution
Type Description
Keyboard failure or incorrect Unreliable cable connection between keyboard and mainboard or
Keyboard
response to any key entry. keyboard malfunction. Please contact Newland after-sales service.
Battery indicator is OFF
Ensure the AC adapter is plugged in and properly connected.
when charging.
1. Check the battery level. If the battery is almost depleted, recharge it.
Noticeably short battery life.
Battery 2. Replace the battery if it is dysfunctional.
Fully charged battery is
depleted after the terminal is Replace the battery.
switched on.
1. Ensure that the USB cable connections are secure.
USB USB communication failure. 2. Ensure that there is no contaminant inside the Micro USB port.
3. If the problem still remains, please contact the after-sales service center.
1. Ensure the terminal is switched on.
2. If the terminal is in suspend mode, press the Power key to wake it up.
LCD 3. Check the battery level. If the battery is almost depleted, recharge it.
No display.
Screen 4. Ensure that the battery is properly installed.
5. Replace the battery if it is dysfunctional.
6. If the problem still remains, please contact the after-sales service center.
1. Check the battery level. If the battery is depleted, recharge it.
2. Switch the terminal on after using the included AC adapter to connect it to
Cannot switch on. a power outlet. If the problem disappears, then continue to charge the
terminal. If the problem remains after charging the terminal for a while,
replace the battery with a new one.
System 1. The problem may be caused by downloaded apps. Ensure that only
reliable apps are used.
2. The problem may be caused by a sudden or unexpected power loss.
System halted.
Perform a warm reset on the terminal by pushing the Reset button with a pin.
3. If warm reset does not work, try cold reset to reset the terminal to factory
default settings.
50SCANNING MADE SIMPLE Newland EMEA HQ Need more info? Contact us or one of +31 (0) 345 87 00 33 our partners at newland-id.com/partners info@newland-id.com newland-id.com
You can also read