Applicant User Guide - Oriel
←
→
Page content transcription
If your browser does not render page correctly, please read the page content below
Applicant User Guide

Oriel is an online system designed to manage specialty recruitment and forms part of the Intrepid HR
software suite used to administer training, education and career progression in the healthcare sector.

                            System Version: 8.10 / July 2018 / Document Version 13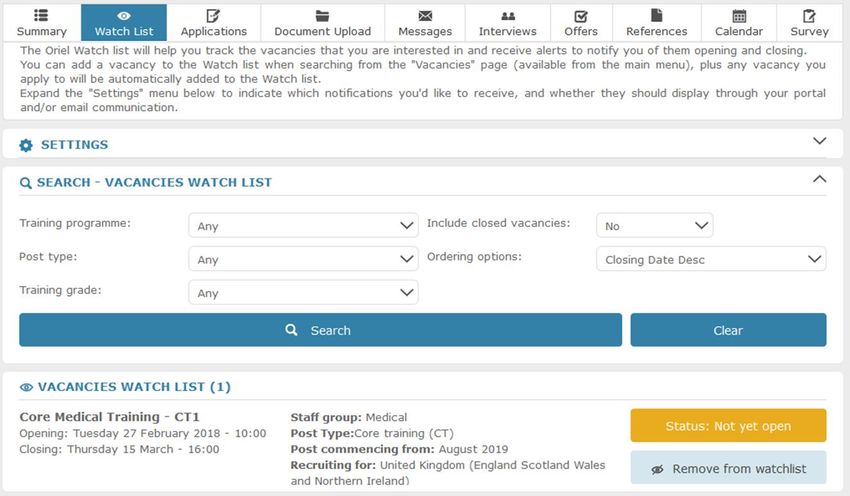
Applicant User Guide

Table of Contents
1     Introduction ........................................................................................................................................................................... 4

2     The Landing Page ............................................................................................................................................................... 5

3     The Oriel Home Page ........................................................................................................................................................ 6

    3.1            The Main Menu ...................................................................................................................................................... 7

4     Creating an Oriel Account ............................................................................................................................................... 8

    4.1            Selecting Your Staff Group and Receipt of SMS ....................................................................................... 9

    4.2            Account and Password Policy.........................................................................................................................10

5     Signing In to Oriel .............................................................................................................................................................11

    5.1            Forgotten Your Password? ..............................................................................................................................11

    5.2            The Main Menu after Sign In ..........................................................................................................................12

6     Understanding Your Dashboard .................................................................................................................................13

    6.1            Navigating Between Pages on Oriel ............................................................................................................15

7     Updating Your Account ..................................................................................................................................................16

    7.1            Applicant Registration .......................................................................................................................................16

      7.1.1            Updating Your Applicant Registration Pages ......................................................................................17

    7.2            Updating Your Profile ........................................................................................................................................19

8     Using Your Watch List .....................................................................................................................................................20

9     Searching for a Vacancy .................................................................................................................................................22

10         Applying for a Vacancy ..............................................................................................................................................23

    10.1           Entering an Address ...........................................................................................................................................24

    10.2           Saving Your Application Form .......................................................................................................................24

    10.3           Returning to an In Progress Application Form ........................................................................................25

    10.4           Reviewing Your Preference Rankings (Within an Application Form) ..............................................25

    10.5           Submitting Your Application ..........................................................................................................................26

11         Uploading Documents ...............................................................................................................................................28

    11.1           Uploading Documents via Your Dashboard .............................................................................................28

      11.1.1           Uploaded a Document in Error? ...............................................................................................................29

    11.2           Attaching Documents to, and Uploading a Document within, an Application ..........................30

    11.3           Attaching Additional Documents to a Submitted Application (If Requested) ............................31

12         Managing Your Applications ...................................................................................................................................33

13         Updating Your Programme Preferences or Sub-Preferences .....................................................................35

14         Messages .........................................................................................................................................................................37

                                                                                     Page 2 of 56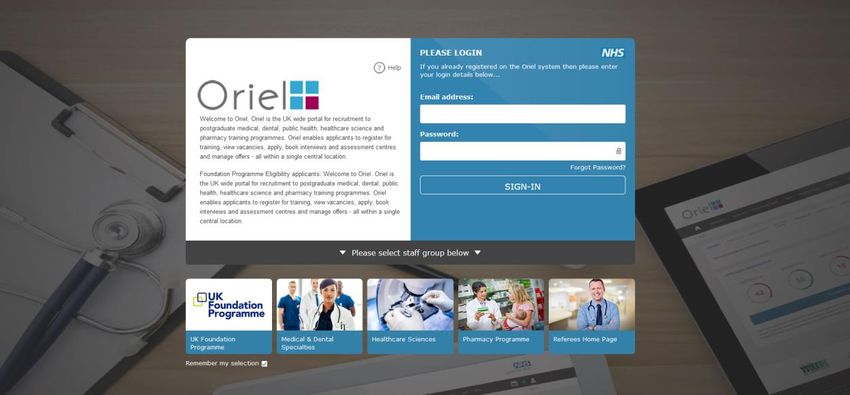
Applicant User Guide

15      Interviews .........................................................................................................................................................................38

 15.1           Booking an Interview .........................................................................................................................................39

 15.2           Cancelling an Interview Booking ...................................................................................................................39

16      Offers .................................................................................................................................................................................41

 16.1           What Happens to your Other Applications? ............................................................................................43

 16.2           Opting In/Out of Upgrades and Amending Preferences ....................................................................43

     16.2.1          Opting In and Out of Programmes .........................................................................................................44

     16.2.2          Re-Ranking Upgrade Preferences ............................................................................................................45

17      Allocations .......................................................................................................................................................................46

18      References .......................................................................................................................................................................47

 18.1           Nominating References ....................................................................................................................................47

 18.2           Changing Your Nominated Referee.............................................................................................................47

 18.3           Tracking References ...........................................................................................................................................47

19      Using Your Calendar ....................................................................................................................................................49

 19.1           Adding an Event to Your Calendar ...............................................................................................................50

 19.2           Viewing an Event .................................................................................................................................................51

 19.3           Enabling Calendar Alerts ..................................................................................................................................52

 19.4           Exporting Calendar Alerts ................................................................................................................................53

20      Troubleshooting ............................................................................................................................................................54

21      Who to Contact for Assistance ................................................................................................................................56

                                                                                     Page 3 of 56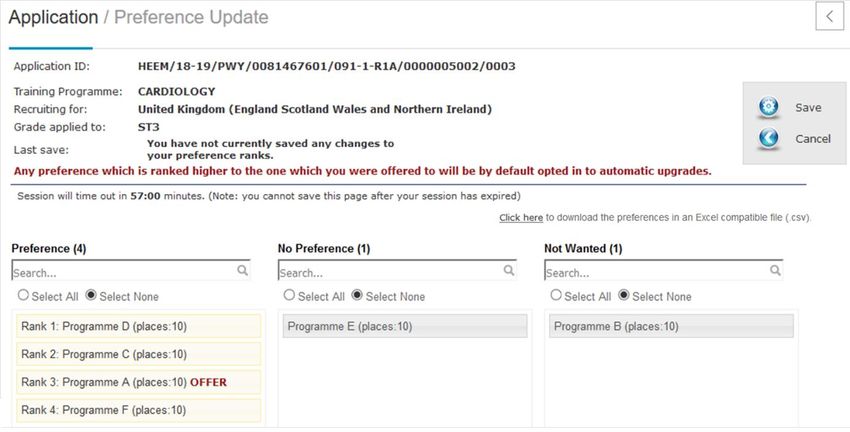
Applicant User Guide

1 Introduction
The objective of Oriel is to improve the journey of applicants who apply for medical and dental
training by introducing a single portal where they can register, view vacancies, apply, book interviews
and assessment centres and receive Offers.

The name 'Oriel' represents a window of opportunity and the progression of trainee doctors, dentists
and scientists throughout their training.

                                             Fig 1.1 Welcome to Oriel

                                                 Page 4 of 56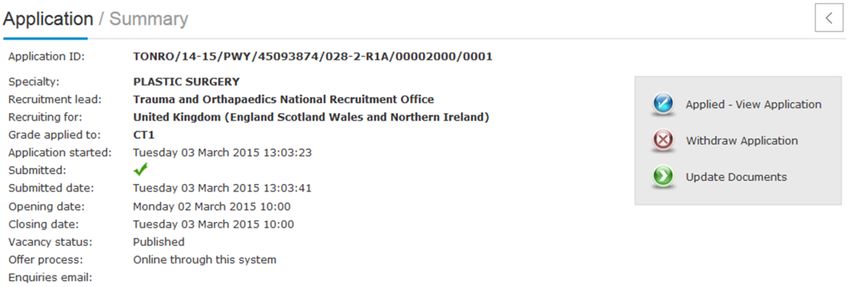
Applicant User Guide
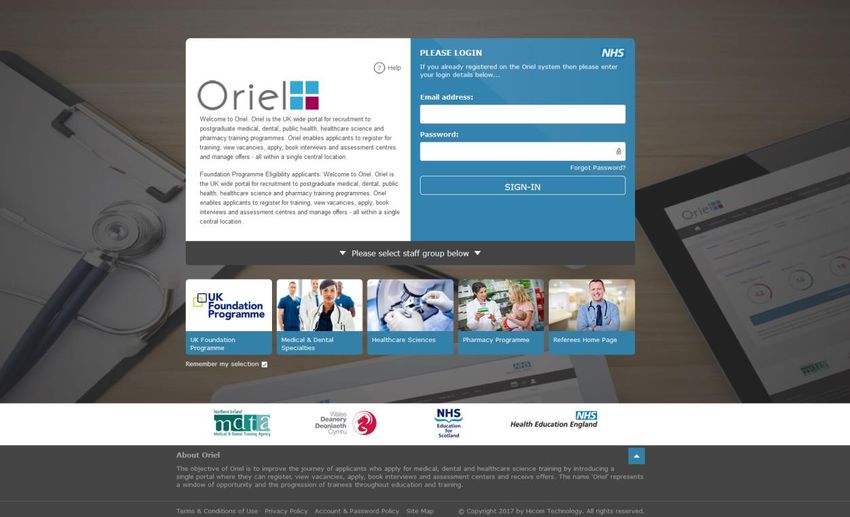
2 The Landing Page
The Oriel Landing page is the starting point of your application journey.
The Landing Page allows a user to log in, or select a Staff Group. Selecting a Staff Group will
determine what information and Vacancies are visible to you.
Fig 2.1 Landing page
Page 5 of 56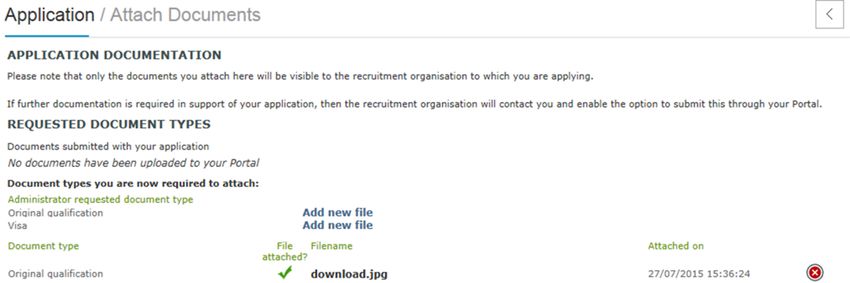
Applicant User Guide

3 The Oriel Home Page
The homepage will display Welcome text based on the Staff Group that you have selected.

                                                Fig 3.1 Oriel home page

From the homepage, the following options are available:

   1.   Sign-in
           o      Log in to an existing account and make your application(s), track the progress of
                  submitted applications, view messages from the recruitment leads, view and book
                  interviews and track offers
   2.   Account Registration
           o      You will need to create an account on the Oriel recruitment system before you can
                  apply to a vacancy. See section 3.1 for more information
   3.   User Guide(s)
           o      Download the Applicant User Guide to the Oriel recruitment system

               Prior to logging in, you will also see a banner displaying your selected Staff Group,
               which can be changed by clicking the Change Your Selection button. This will return
               you to the Landing Page where you can select a different Staff Group.

                                                    Page 6 of 56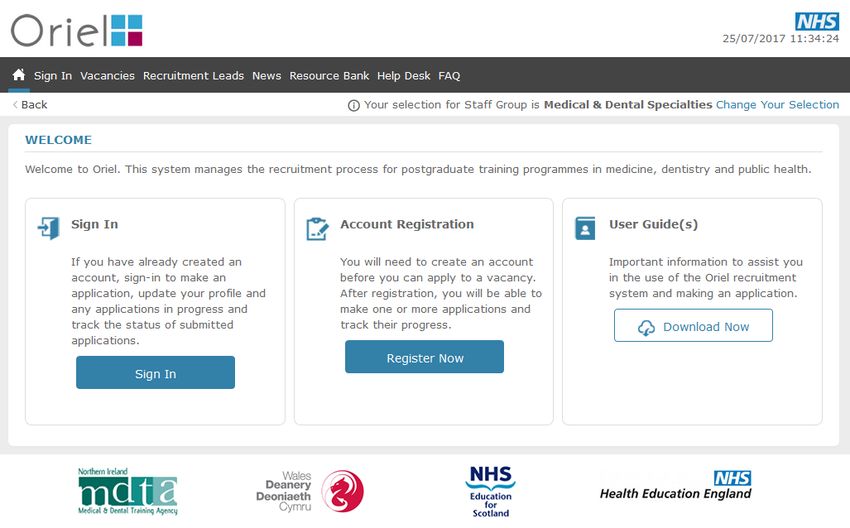
Applicant User Guide

3.1 The Main Menu
The Main Menu is displayed along the top of the screen throughout Oriel.

                                            Fig 3.2 Oriel main menu bar

Once you have selected a Staff Group or logged in to the system

The following options are available on your main menu.

    1. Sign In
            o    Log in to an existing account and make your application(s), track the progress of
                 submitted applications, view messages from the recruitment leads, view and book
                 interviews and track offers.
    2. Vacancies
            o    Search and apply for vacancies that have been advertised through Oriel. See Section
                 3.1 for more information on applying to a vacancy.
    3. Recruitment Leads
            o    View the profiles of the recruitment organisations within Oriel.
            o    You will be able to find out more about each organisation, such as contact details,
                 organisation description, social media links/feeds, news, Fitness to Practise
                 policy/contact details and current active vacancies.
    4. News
            o    Administered by HEE and Recruitment Leads, this section of the Oriel system allows
                 you to view and search the latest news items.
            o    Each news item can be opened to view further detail and any links/files that may have
                 been attached.
    5. Resource Bank
            o    Like News items, the Resource Bank is administered by HEE and is a repository for
                 information that will support you in the process of making an application.
            o    You can access a wide range of content such as person specifications, guides and
                 FAQs.
            o    You can search the resource bank by keywords, to find the required information.
    6. Help Desk
            o    Contact details in the event that you require technical and/or non-technical support
    7. FAQ
            o    Administered by HEE, this section of the Oriel system allows you to view and search
                 frequently asked questions.

You will also see the current date and time displayed below the Oriel logo throughout the Oriel
system. Prior to logging in, you will also see a banner displaying your selected Staff Group, which can
be changed by clicking the Change Your Selection button. This will return you to the Landing Page
where you can select a different Staff Group.

                                                  Page 7 of 56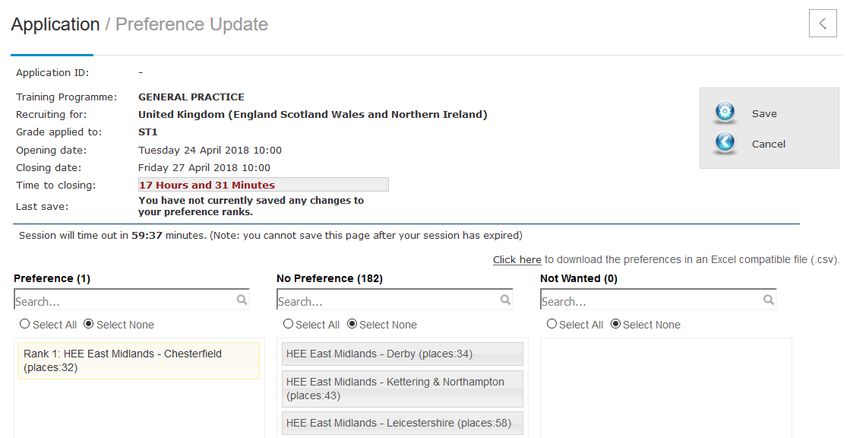
Applicant User Guide

4 Creating an Oriel Account
Before you can begin making applications on Oriel, you will need an Oriel Account. To create your
Oriel account, click on the ‘Account Registration’ link on the Oriel home page.

                                        Fig 4.1 Account registration button

You will be asked to provide a small amount of personal information, including your login details, and
to confirm that you agree to the Terms & Conditions and Privacy Policy of the Oriel recruitment
system. Links to read the Terms & Conditions and Privacy Policy are available on the right hand side of
this screen.

Mandatory fields are marked with a * symbol. You must complete these fields as a minimum in order
to proceed.

                                                  Page 8 of 56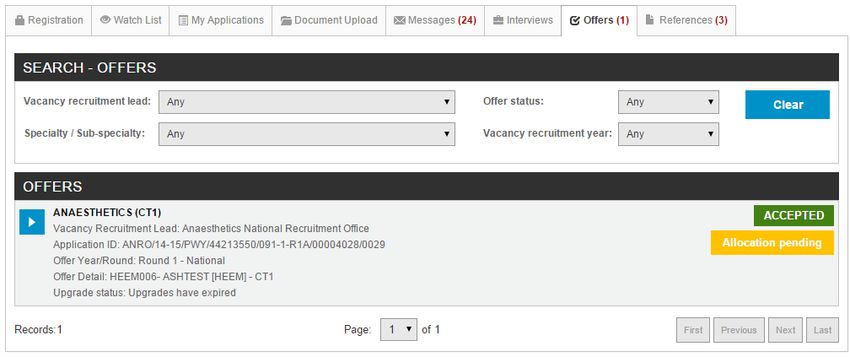
Applicant User Guide

                                          Fig 4.2 Oriel account registration

Upon successful creation of an account, you will receive an email confirming your details.

Most organisations will communicate with you via email. Please ensure that you register with a secure
and individual email address which you check regularly. You will only need to register once on Oriel to
make applications across multiple organisations and recruitment years.

4.1 Selecting Your Staff Group and Receipt of SMS
When registering, you will need to select your staff group. The purpose of Staff Groups is to ensure
that your experience is tailored to the vacancies you wish to apply to. You may belong to multiple
staff groups, in which case select all the staff groups to which you belong.

In addition, you are required to give your preferences regarding receiving updates by SMS on your
phone. If you do not wish to receive SMS notifications, select No.

You can edit these details later by clicking on the relevant options from the My Profile page of your
Oriel account.

                                                   Page 9 of 56
Applicant User Guide
4.2 Account and Password Policy
All passwords on the Oriel recruitment system must adhere to the following:
Your password must be at least 8 characters long
Your password must contain at least one upper case letter (A-Z)
Your password must contain at least one numeric value (0-9)
Your password must not be one of the previous 5 passwords you have used
Please note that your password will expire 365 days after its creation and must be
updated. If you attempt to log in after this period, the system will require you to update
your password.
You are strongly encouraged to use a secure password to reduce the risk of
unauthorised access to your Oriel account. In addition to the mandatory criteria above,
we would recommend following these guidelines when choosing a password:
Change your password regularly (e.g. every 3 months)
Do not share your password or leave on view
Do not re-use old passwords
Include as many different character types as possible (e.g. upper and lower case
letters, numbers and non-alphanumeric characters such as !, “, £, $ etc.)
If you believe your password has been compromised, change it at the earliest
opportunity and report it via the contact details under ‘Help Desk’.
Please ensure that you keep your password safe and secure.
Page 10 of 56Applicant User Guide
5 Signing In to Oriel
Sign-in to Oriel is made using the email address and password entered during registration. You can
sign in from the Landing page prior to selecting a Staff Group, or by clicking the Sign In button from
the Main Menu after selecting a Staff Group.
Fig 5.1 Oriel sign-in page
Enter your Email address and Password, and click Sign-in.
If you enter your password incorrectly 5 times, your account will be locked. If you have
locked your account, you will need to contact the Recruitment Lead for the vacancy you
are (or will be) applying to. Contact details can be found within the Recruitment Leads
option on the main menu header.
5.1 Forgotten Your Password?
If you have forgotten your password, use the ‘Forgotten your password?’ function that is available
on the right hand side of the Oriel Sign-In page. Enter your email address and click ‘Reset Password’.
You will also be required to enter a passcode generated on-screen. This is to prevent fraudulent use of
the system.
If the address entered has been registered on the system, an email will be sent containing a URL that
allows you to specify a new password. This URL is only valid for 24 hours. In addition, if you initiate a
new password reset, then any previous password reset links will be invalidated – that is, if you click
reset password a second time you will need to use the second URL that you are sent. If you fail to
enter a valid new password 3 times in succession, the link will be invalidated, and you will be required
to initiate a new password reset. When specifying a new password, ensure that it meets the
requirements as specified in Section 4.2.
Page 11 of 56Applicant User Guide
If you have not received the email within 60 minutes, please check your spam/junk folders. If there is
still no sign of the email then please contact the technical support team via the ‘Help desk’ option on
the main menu.
If your account is locked due to too many failed sign in attempts, you will be unable to reset your
password until your account has been unlocked. If you have locked your account, you will need to
contact the Recruitment Lead for the vacancy you are (or will be) applying to. Contact details can be
found within the Recruitment Leads option on the main menu header.
5.2 The Main Menu after Sign In
Once you have signed in, the Main Menu, as described in Section 3.1 has some additional items.
Fig 5.2 Main menu after login
1. Dashboard
a. You now have a link to your Applicant Dashboard, from where you can track the
progress of your applications, book Interviews, view your Offers and have access to
many other options.
b. For more information refer to section 6.
2. Calendar icon
a. On the right hand side three icons are displayed. The first is a calendar icon is
displayed. When you click on this, your calendar is displayed as a pop-up window.
This calendar contains recruitment events related to applications you have made and
vacancies on your watch list.
b. Refer to section 19.
3. Alerts Icon
a. The second icon is the Alerts icon (a bell). This will display any alerts, based on the
setting you have selected in your calendar.
b. Refer to section 19.
4. Profile Icon
a. The final icon is the My Profile icon. This will display the various details of your
account, and provide the ability to make changes to your Contact Details. For more
information, refer to section 7.2.
5. Logout
a. The Sign in option is removed and a Logout button is displayed below the main menu
bar on the right hand side. When you have finished your session on Oriel, be sure to
click log out to ensure that you have securely ended your session.
Page 12 of 56Applicant User Guide
6 Understanding Your Dashboard
After sign-in you will be taken to your applicant Dashboard. The main menu will remain available so
that you can access the vacancies, recruitment leads, news, resource bank and help desk sections, or
log out. You can return to the Dashboard at any point (provided you are signed in), by clicking the
‘Dashboard’ option in the main menu, which is available once you are logged in.
Fig 6.1 Oriel dashboard
From the Dashboard, you will find the following nine tab options:
1. Summary
o The Summary tab displays your name and Oriel PIN.
o The Summary tab also allows you to enter and update your Applicant Registration
details.
o The alert list displays key information to assist with the application process such as, in
progress applications and unread messages. This section can be expanded or hidden
by clicking the black bar.
o See section 7 for more information on Applicant Registration and Updating Your
Account
2. Watch List
o While browsing the vacancies list, you have the option to add a vacancy to your
Watch List. You can opt in to receive certain alerts or emails relating to the vacancies
on your watch list.
Page 13 of 56Applicant User Guide
o See section 8 for more information on this tab.
3. My Applications
o The My Applications tab will display all the applications you have in progress or
submitted. The list of applications will display summary information about each
(status, scores, rank etc.), with more detailed information available via each
application link.
o See section 12 for more information on this tab
4. Document Upload
o During the application process you may be asked to upload documentation to
support your application (most likely on the Competences page).
o This tab allows you to upload and maintain the list of documents that can be
associated with your applications.
o See section 11 for more information
5. Messages
o Throughout the course of the application process, you are likely to receive
communications from the recruitment organisations to which you have applied.
o The Messages tab will list the messages and/or emails that you receive.
o When you receive a new message, a count of the number of new messages will
display within the ‘Messages’ tab header, and you will receive an alert on the
‘Registration’ tab. Once you have opened the new messages, the count and alert will
be removed.
o See section 14 for more information on this tab
6. Interviews
o If you are successfully shortlisted, you may be invited to interview through Oriel.
o Interview invites and booking information will all be listed within the Interviews tab.
Follow the links to make a booking or view the full booking details. You may also
have the option to cancel an interview slot.
o See section 15 for more information on this tab
7. Offers
o If you are successful in one or more of your applications, any offers will appear within
your “Offers” section of Oriel.
o To assist with tracking the progress of your offers, you will find the latest status
reflected within the Oriel system.
o See section 16 for more information on this tab
8. References
o After you have accepted an offer or accepted an offer with upgrades, if references are
being collected online through the Oriel system, as soon as they have been
requested, you will be able to track the progress of the references via the references
tab in your applicant portal.
o See section 18 for more information on this tab
9. My Calendar
o In your My Calendar tab you can view all upcoming events related to applications you
have submitted, or vacancies on your watch list. You can also add your own events to
the calendar.
o For more information about the calendar see section 19.
Page 14 of 56Applicant User Guide
6.1 Navigating Between Pages on Oriel
On the top left hand side of the page, below the menu bar, you will see a ‘Back’ button.
Fig 6.2 Finding the back button
This is available on many pages throughout the Oriel system. Rather than using the back button on
the web browser to return to the previous page, use the back button provided within the Oriel pages.
Alternatively, use the items in the main menu bar to navigate to an area of Oriel, or click on one of the
tabs in your Dashboard.
When completing an Application you will see a Home option at the top of your application. You
should use this, avoiding using the browser back button, after having saved your progress. It is
important to do this, as using the back button on the browser itself may result in you losing some of
the information that you have already entered into the application form. There are also options to
navigate back and forth through the pages within the application form screen.
Fig 6.3 Application form navigation buttons
When completing your registration details, there are also options for navigating back and forth
through the pages, as well as an Exit button. Again, avoid using the browser back button in order to
avoid losing any changes that you have made.
Page 15 of 56Applicant User Guide
7 Updating Your Account
If you wish to change your account information (email address or password) at any point in the
application process please use the links on the Summary tab of your dashboard or the profile icon.
Fig 7.1 Registration tab in the dashboard
The sections below explain how you can update these details.
7.1 Applicant Registration
The Applicant Registration process is designed to reduce the time spent entering application data that
is common to all the applications you will make.
At the point of starting an application, the information you have entered on the registration form will
be copied across to that application. You will still be able to add or amend the data as part of an
individual application to a vacancy.
The Applicant Registration form consists of the following sections:
Personal Details;
Eligibility;
Qualifications (Note, this page will be visible only to the Healthcare Science Staff Group);
Fitness to Practise;
Employment History; and
Equality & Diversity
Page 16 of 56Applicant User Guide
An overall tracker is provided to track the completion of mandatory fields only.
Fig 7.2 Applicant registration tracker
You can click on the percentage complete displayed below an area of the Application Registration for
quick access to amend your details within that section.
Changing your Applicant Registration profile after you have started/submitted an
application will not update that application. Any new application you start will,
however, use the latest saved version.
7.1.1 Updating Your Applicant Registration Pages
Clicking on “Proceed to Applicant Registration” or any of the percentages displayed in the tracker
table on the Registration tab of your Dashboard, transfers you to the Registration pages.
Page 17 of 56Applicant User Guide
Fig 7.3 Applicant registration pages
Registration is considered complete when all mandatory fields have been completed in the Applicant
Registration form. Entering responses within any of the optional fields (i.e. those not indicated by a *)
will not affect the % complete.
Completion of Applicant Registration is optional; whichever Registration Pages have been completed
will be copied across when starting a new application.
Fig 7.4 Applicant registration page tracker
A page tracker is also provided on the Applicant Registration form to indicate the completeness of
mandatory fields on that page.
Where you see “Optional” displayed alongside a section of the registration pages, this denotes that no
mandatory fields are present on this page.
Page 18 of 56Applicant User Guide
7.2 Updating Your Profile
To access your Profile, click the Profile Icon on the Main Menu:
Fig 7.5 Profile page icon
This will display the My Profile page.
Fig 7.6 My profile page
In order to ensure that recruitment organisations to which you have applied are using your latest
contact details, the following are maintained within the ‘Profile’ page:
Title
Surname
Forenames
Email Address
Home telephone number
Mobile phone number
After saving changes to your email address or contact numbers, all applications
(whether new, in progress or submitted) will be updated. Please note that you cannot
edit these fields within an application form – they must be maintained within the Profile
page.
In the event that you submit an application without updating your Profile page, the
recruitment organisation(s) to which you have applied will only be able to contact you
via the email address you registered with. As soon as you update one or more of these
fields within Profile page, the recruitment organisation will have access to that
information.
Page 19 of 56Applicant User Guide
8 Using Your Watch List
Your Watch List allows you to keep track of vacancies that you are interested in, but have not
necessarily applied to. You can choose to receive notifications related to the vacancies on your watch
list.
When browsing the list of Vacancies, you are able to add a vacancy to your Watch List.
Fig 8.1 Adding a vacancy to the watch list
To add a vacancy to your Watch List, click on the watch list button displayed to the left of the vacancy:
Fig 8.2 Add to watchlist button
This adds the vacancy to your Watch List. Once added to the watch list, the icon changes to:
Fig 8.3 Added to watchlist button
You can now click on this new button to access the watch list tab of your Dashboard. Alternatively,
you can access your Watch List by clicking on the Watch List tab on your Dashboard.
Page 20 of 56Applicant User Guide
Fig 8.4 Watch list tab in the dashboard
In Watch List section of this screen, you can see all the vacancies that you have already added to the
watch list. Click on the ‘Remove from watchlist’ button displayed to the right of a vacancy to remove
it.
You can also use the search filters on this screen to find a specific vacancy.
At the top of the screen, you can use the Settings to select when you wish to receive notification or
alerts regarding these vacancies. The following options are available:
Communications:
o Receive email alert – if enabled, the required alerts will be sent to the applicant via
email
o Display on Alert List - if enabled, the required alerts are displayed on the 'Alert List'
on the 'Registration' tab
Alerts (you must have enabled one of the communication options above to receive alerts):
o Vacancy opening - if enabled, an alert is sent that a vacancy on the watch list has
opened, via the communication selection(s) above
o Vacancy closing - if enabled, an alert is sent that a vacancy on the watch list has
closed, via the communication selection(s) above
o 48 hours before closing - if enabled an alert is sent that a vacancy on the watch list
will be closing in 48 hours, via the communication selection(s) above
o 24 hours before closing - if enabled an alert is sent that a vacancy on the watch list
will be closing in 24 hours, via the communication selection(s) above
In addition to manually adding a vacancy to the watch list as describe above, any
vacancy to which you apply is added automatically to the watch list. That is, any
vacancy that you have clicked “Apply here” for is displayed in the watch list, along with
any that you have manually added.
Page 21 of 56Applicant User Guide
9 Searching for a Vacancy
In order to apply for a vacancy, you must be signed in to Oriel. Therefore, sign in and select
‘Vacancies’ from the main menu.
Search for a specific vacancy using any combination of the Specialty/Sub-specialty, Post type and
Training grade filters.
By default, the system will not show vacancies that have already closed. These can be displayed if the
“Include closed vacancies” filter is set to yes.
In addition to filtering the list, you can also select the order in which the vacancies are displayed. To
do this, select an alternative option from the “Order options” drop down.
Fig 9.1 Oriel vacancies list (signed in)
The Vacancy list shows key information about each vacancy, such as Specialty/Sub-specialty, Grade
and opening/closing times.
If you have signed in to Oriel you will see additional information. To the right of the vacancy, you will
see a status bar that informs you if you have an application in progress for that vacancy, or if you have
submitted an application to that vacancy. This information is not displayed if you have not yet signed
in.
Click on a vacancy to view the vacancy advert.
Page 22 of 56Applicant User Guide
10 Applying for a Vacancy
Once you have found the vacancy to which you wish to apply, click on it. This displays the vacancy
advert. From here, click on “Apply Here” to begin your application.
You will see an application screen, with a header similar to the image below.
Fig 10.1 Application window
This allows you to track your progress through the application form, as well as showing the vacancy
details for the application you are currently completing.
You can use the tick box displayed alongside PAGE TRACKER near the top of the application form to
mark a page as completed.
Use the “Next” and “Previous” buttons to navigate from page to page of the application form.
Each time you successfully complete a page of the application form and move on to the next page, a
green confirmation message box is displayed at the top of the screen to inform you that your
progress has been saved.
Fig 10.2 Confirmation message
Mandatory fields are marked with a * symbol. You must complete these fields as a minimum in order
to proceed.
You can also skip to a different section of the application form by clicking on the section name (in the
image above, the current selection is “Personal”).
Page 23 of 56Applicant User Guide
10.1 Entering an Address
When entering your address into your application, you will see an Address Lookup field. This is also
available on the Employment History pages when entering the addresses of your previous
employments,
Fig 10.3 Address lookup
This field uses Google Maps to help you quickly enter your address. Begin by entering the first line of
your address.
Fig 10.4 Finding your address
When Google Maps locates your address, the Address fields are populated automatically.
Note, you can search using post code. However, since post codes generally belong to multiple
addresses, your exact address will not be populated.
In addition, please note that this feature will not work when you are accessing Oriel on a network that
has blocked Google Maps functionality.
10.2 Saving Your Application Form
At any time during the completion of an application form, you can save your progress by clicking on
the Save button, which is displayed at the top of the application form.
Fig 10.5 Navigation, save, print and home buttons in application
When you have saved your progress, a green confirmation message box is displayed at the top of the
screen to inform you that your changes have been successfully saved.
Fig 10.6 Confirmation of saved changes
If you wish to exit your application, click on the Home button, which is also displayed at the top of the
screen.
Page 24 of 56Applicant User Guide
Remember, you should avoid using the browser back button to return to the rest of the Oriel system.
10.3 Returning to an In Progress Application Form
If you have saved an application form that you have not yet submitted, you can return to it to
continue completing the form at any time, until the vacancy closing date has passed.
There are two ways to access your application form:
1. From the My Applications list on your Dashboard. Click on an application that is in progress to
access the application/summary screen.
2. From the Vacancies list – any vacancy for which you have an in progress application will have
the In Progress box displayed alongside it (if you are signed in). Click on a vacancy to view the
vacancy details.
From either screen, you will see a button on the right hand side to “Continue Application”. Click on
this to resume completing your application.
10.4 Reviewing Your Preference Rankings (Within an
Application Form)
For some vacancies, you may be required to rank preference as part of the application form. If this is
the case, you will see preference to rank in the ‘Preferences’ page of the application form.
To understand the options available to you when ranking preference, refer to section 13 of this
document or guidance provided by the organisation to which you are applying.
Fig 10.7 Reviewing preferences
Page 25 of 56Applicant User Guide
You may find it helpful to review the ranks to which you have assigned each preference, or to review
the available preferences, in the form of a spreadsheet. To do this, click on the ‘Clear here’ link, shown
outlined in red in image Fig 10.7 above.
In addition to this, in order to submit your application you will need to have ticked the box alongside
the text ‘I confirm that I have reviewed my preference rankings’. Once you have ticked this box, if you
make any changes to your preference rankings, or download the preference export, the box will
become unticked and a validation message will be displayed, forcing you to re-tick the box.
You will not be able to submit your application if the ‘I confirm that I have
reviewed my preference rankings’ box has not been ticked.
10.5 Submitting Your Application
When you have completed all the pages of your application form, and have uploaded the relevant
documents, you can submit your application form.
Your application form will become read only once it has been submitted. You will
not be able to edit the majority of the information provided in your application
form once it has been submitted. The following will remain editable:
1. References – if the recruitment office for the vacancy you’ve applied to has
allowed the collection of references online via Oriel, you will be able to amend
the referee details that you’ve provided until the referee has submitted your
references (or the reference submission window has closed). For information
on how to do this, refer to section 18.2.
2. Contact details – you can update your email and phone numbers at any time.
This is done via your ‘Profile’ area (see section 7.2). Changes to these details
will be reflected in any application you’ve started or submitted. In some cases
you may also be able to edit your address after you’ve submitted your
application. This is dependent on the way the recruitment office has set up the
vacancy to which you have applied. If this is possible, you will see a link to
‘Update contact details’ from the application summary screen.
3. Preference ranks – if the vacancy you’ve applied to allows it, you may be able
to amend your preference rankings following application submission. If you’re
unsure whether this is possible for the vacancy you’re applying to you should
contact the recruitment office (contact details can be found on the recruitment
leads page within Oriel). For information on ranking preferences after
submitting your application (if enabled) refer to section 13 of this guide.
On the final page of the Application form, the Declaration page, a “Submit Application here” button is
displayed. Click on this to submit.
Once you have successfully submitted your application, a confirmation page is displayed.
Page 26 of 56Applicant User Guide
Fig 10.8 Confirmation of application submission
You will only be able to submit your application if all mandatory fields on all the pages of the
application have been completed. If not, the system displayed a list of all pages that you have not yet
completed when you try to submit.
Before you submit your application, ensure that you have uploaded any requested
documents against your application. For information on how to do this within the
Declarations page of your application, refer to section 11.2.
Remember that you will need to have completed all mandatory fields on all the pages
of the application form.
Additionally, remember that if you have been required to rank preferences as part
of the application form, you must have ticked the ‘I confirm that I have reviewed
my preference rankings’ box before you are able to submit your application. If
there are no preferences available to rank on the ‘Preferences’ page of the
application form, you are not required to tick this box.
Page 27 of 56Applicant User Guide
11 Uploading Documents
During the application process you may be asked to upload documentation to support your
application (most likely on the Competences page), for example:
Fig 11.1 Application competences page
The Oriel system provides you with a central repository to upload and store your supporting
documentation that can be used across all the applications you make. There is also an option to
upload documents on the Declaration page of an application.
11.1 Uploading Documents via Your Dashboard
From your Dashboard, click on Document Upload to access all your current documents and to upload
new documents.
Fig 11.2 Document upload screen
By default, this page will list all documents with the status of ‘current’. The use of the ‘archive’ status
is explained below.
To upload a new document, click the ‘Add’ button and you will be presented with the following
screen.
Page 28 of 56Applicant User Guide
Fig 11.3 Uploading a document
Select the appropriate file Category and use the Choose file option to browse your local machine and
locate the file you wish to upload. Leave the status on the default of ‘current’.
You must select the correct file Category otherwise your documentation may not be
available to the recruitment organisations you have applied to.
A successful upload will be indicated by the addition of your document within the file list.
Fig 11.4 Document displayed in file list
The system will allow you to add more recent versions of a document type that has been previously
uploaded. At the point you submit your application; you have the option to select which document to
submit (see section 11.2 of this document for details)
11.1.1 Uploaded a Document in Error?
If you find you upload a document in error, or you find yourself attaching several versions of a
particular document type over time, you can change the status of the old/incorrect documents to
‘archive’ to prevent them being visible to administrators in subsequent applications.
Select the file to be archived by clicking anywhere along the row for that file in the Document Upload
section of your Dashboard.
Page 29 of 56Applicant User Guide
Fig 11.5 Selecting a document from the file list
Change the status to ‘archive’ and save. This document is now removed from your default view.
Fig 11.6 Marking a file as archived
11.2 Attaching Documents to, and Uploading a Document
within, an Application
When you reach the Declarations section of your application, an Application Documentation section is
displayed. This provides you with a reminder of the documents that you are required to upload as part
of your application and the documents you have already uploaded. There is also an option to upload
new documents from here.
Page 30 of 56Applicant User Guide
Fig 11.7 Application declarations page
To add a new document, click “Attach other file”. This takes you to the document upload screen to
select your file to upload, described in section 11.1 above.
In addition to uploading a new file from the Declaration page, you can also select the files to submit
with this application by clicking the checkboxes to the right of the relevant documents.
For any document types that are mandatory for the application, you must select at least one
document.
11.3 Attaching Additional Documents to a Submitted
Application (If Requested)
After you have submitted your application, an administrator may request that you attach additional
documentation to support your application.
If this is the case, you will receive an alert on your Dashboard. Click on the alert and find the relevant
application from your My Applications list. A yellow triangle alert symbol is displayed alongside an
application that requires additional documents, with the text “Document update required”. Click on
the application.
Page 31 of 56Applicant User Guide
Fig 11.8 Application summary screen with update documents link
Within the Application/Summary screen, click on the link that is displayed on the right hand side with
the text “Update Documents”.
Fig 11.9 Attach additional documents to an application
Any document types for which the administrator has requested more documents be uploaded are
displayed on this screen, with a link that reads “Add new file”. When you click on this link, you are
taken to the document upload screen, where you can browse for your file to upload, described in
section 11.1 above.
If you upload a document in error, you can remove the document using the red cross icon displayed
on the right hand side alongside the document.
Any documents you add in this way are added solely to the selected application. They
are NOT added to you Dashboard document upload section, nor will they be attached
to any other application that you have started or start in future.
Page 32 of 56Applicant User Guide
12 Managing Your Applications
The “My Applications” area of the applicant dashboard displays all application activity associated with
your account.
Options are provided to filter your list of applications.
Fig 12.1 My applications list in the dashboard
The results list provides summary information about each of your applications, including:
Links to the full application summary
Links to the full vacancy information
Closing date of the vacancy
Your unique application ID
The recruitment lead for the vacancy you have applied to
The latest application status
Whether the application has been submitted or is in progress
The preference order (please note that if the vacancy does not require you to preference then
this will always display ‘1’)
Page 33 of 56Applicant User Guide
Your shortlist score for the application – only available if the lead recruitment organisation has
chosen to publish this information
Your interview score for the application – only available if the lead recruitment organisation
has chosen to publish this information
Your overall rank for the application – only available if the lead recruitment organisation has
chosen to publish this information
Click on the vacancy description, ‘View application summary’ link or blue arrow to view the complete
detail of that application status.
Page 34 of 56Applicant User Guide
13 Updating Your Programme Preferences or
Sub-Preferences
Updating Programme Preferences involves marking each option as being in one of up to three
different states, depending on how the vacancy has been set up.
1. Preference - If an option is marked as a “Preference” it means you wish to be considered for
posts within this programme. You must rank these options to specify an order of preference. If
you come to be made an offer you will be offered your highest ranked preference where
posts remain available.
2. No-Preference - If an option is marked as “No-Preference” it means you wish to be
considered for posts within this programme if there are no posts available in your preferenced
programme(s). If you come to be made an offer and there are no posts available in your
“Preference” options you will be offered any one of the “No Preference” options as they are
considered to have equal preference ranking.
3. Not Wanted – If an option is marked as “Not Wanted” it means you are not willing to accept
an offer for this programme under any circumstances and therefore do not wish to be
considered for these posts.
The recruitment office responsible for your offers will determine which columns are
available to you.
To update your preferences, find the relevant application in your My Applications list, and click on it.
You will see an option on the right hand side of the Application/Summary screen that read “Update
Preferences” if the preferencing window is currently open. Click on this option to access the
preferencing screen.
Fig 13.1 Update preferences screen
Page 35 of 56Applicant User Guide
To order your preferences you can click on an option you want to move then drag and drop it into
another column.
If you want to save the changes you have made click the “Save” button. If you wish to cancel the
changes click “Cancel” and your preferences will revert back to the last time you saved.
You can continue to amend and re-save your programme preferences until the end of the preference
window, which may be listed in the programme preference opening email you receive and on the
preferencing screen as per the screenshot below.
If you do not click the Save button then any changes you have made will not be recorded.
Whatever order you have saved your programme preferences in when the window is closed is the
order that will be used when matching applicants to available posts. It is advisable to review your
saved programme preferences prior to the deadline as they cannot be amended once the window is
closed.
You may find it helpful to review the ranks to which you have assigned each preference, or to review
the available preferences, in the form of a spreadsheet. To do this, click on the ‘Clear here’ link, shown
outlined in red in image Fig 13.1 above.
The use of mobile browsers is not supported for this page. Applicants should use a PC
browser for this function.
Page 36 of 56Applicant User Guide
14 Messages
Throughout the course of the application process, you are likely to receive communications from the
recruitment organisations to which you have applied.
The Messages tab will list the messages and emails that you receive. Please note SMS messages will
not be logged here.
When you receive a new message, a count of the number of new messages will display within the
‘Messages’ tab header, and you will receive an alert on the against the bell icon in the main menu bar
(outlined in orange in the image below). Once you have opened the new messages, the count and
alert will be removed.
Fig 14.1 Message tab in the dashboard
You can filter your messages by recruitment lead, training programme and whether the message has
been read or not. New messages are indicated by bold dark grey text, and a closed envelope icon.
Fig 14.2 Viewing a new message
Page 37 of 56Applicant User Guide
15 Interviews
If you are successfully shortlisted, you may be invited to interview through the Oriel system.
Any interview invites or pre-allocated bookings will be notified via the ‘Alert list’, with a count for
alerts displayed against the bell icon in the main menu bar. You may also receive an email from the
respective recruitment organisation.
Fig 15.1 Alert list on the main menu bar
To view your invites and bookings, click on the ‘Interviews’ tab.
Fig 15.2 Interviews tab of the dashboard
There will be a button alongside each interview that may be one of the following:
View (blue) – if there is more than one interview day for this vacancy a ‘View’ button will be
displayed. When you click on this button, a pop up will be displayed showing each of the
available interview days. Each day will have one of the remaining buttons displayed alongside
it, allowing you to book a day.
Book (yellow) – click on this button to be taken to the interview booking screen where you
can select a time slot.
Booked (green) – this indicates that you have booked onto this interview day.
Page 38 of 56Applicant User Guide
Full (red) – this indicates that there are no more slots available to be booked on this interview
day.
Closed (red) – this indicates that the booking deadline has passed so you will not be able to
book on this interview day.
15.1 Booking an Interview
From the Interview tab on your Dashboard, click the “Book” button alongside an interview day to
make a booking.
Fig 15.3 Booking an interview day
Either click Book now against the start time you would like to attend, after which you will need to
confirm your selection and enter any special arrangements you require. Finally, a confirmation screen
will be displayed, confirming your interview booking.
Alternatively, click Decline Interview to decline the interview.
If you choose to decline the interview, you will be taken to a confirmation screen, where
you must confirm that you wish to decline the interview. Once you have declined an
interview, your application is withdrawn from that application, and you will not progress
any further. You will not be able to re-apply for a vacancy once you have declined the
interview.
15.2 Cancelling an Interview Booking
You can cancel an Interview booking, provided the Booking Deadline date for the Interview day has
not passed.
Page 39 of 56Applicant User Guide
Having clicked on a Booked interview, click on the “Your Slot” link. From here you can update your
comments against the booking, and can also click the “Cancel Interview Slot” link to cancel your
current booking. You will then be able to re-book on another available booking slot.
In some cases if you cancel a booking that was made for you by the recruitment office,
you will be unable to re-book yourself through the system after having cancelled a slot.
In this situation, you will be presented with a message that explains this to you, and will
be required to contact the recruitment office in order to re-book an interview slot.
Page 40 of 56Applicant User Guide
16 Offers
If you are successful in one or more of your applications, any offers will appear within your “Offers”
section of Oriel. To assist with tracking the progress of your offers, you will find the latest status
reflected within the Oriel system.
Offers that have been made are displayed within the Offers tab of your Dashboard.
Fig 16.1 Offers tab of the dashboard
To respond/update/view your offer, click on the vacancy name to find out more about your offer.
Page 41 of 56Applicant User Guide
Fig 16.2 Offer details screen
To Accept, Decline or Hold an offer, click on the appropriate button from the Offer/Actions section of
the offer summary. You will be taken to a confirmation screen.
You must ensure that you tick the confirmation check box before you click the confirm button
in order to confirm your response.
A green confirmation message box is displayed at the top of the screen when you have successfully
submitted your response.
Note, depending on the rules stipulated by the recruitment office the options available may vary.
IMPORTANT NOTE
If you have not accepted, declined or held your offer, it will expire 48 hours after the
offer was made. Once your offer has expired, you will not receive another offer from
this vacancy. In addition, if you have held an offer during this 48 hour window, it will
expire after the hold deadline has passed. Again, once expired, you will not receive
another offer from this vacancy.
Page 42 of 56Applicant User Guide
16.1 What Happens to your Other Applications?
When you accept or hold an offer in Oriel, all other applications that you’ve made within the same
offer round are displayed under the ‘Active Applications + Offers in the Same Round’ heading.
Alongside each application, you’ll see details of what will happen to the application when you either
accept or hold this offer.
The information you’ll see will be one of the following:
Action on other active application What does this mean?
Withdrawn if above offer is You have not yet received an offer to this application and
ACCEPTED. No improvement on this the application is not for a post that is hierarchically higher
offer is available. than the current offer. This application will be withdrawn
and set to a status of “Application withdrawn – accepted
another post”.
Declined if the above offer is HELD This offer will be automatically declined. You will only see
this where the offer for the application in question has
been held and you are attempting to hold a second offer.
Declined if the above offer is This offer will be automatically declined.
ACCEPTED
Declined if the above offer is This offer will be automatically declined. You will only see
ACCEPTED OR HELD this where the offer for the application in question has
been held.
No action. “Potential” improvement You have not yet received an offer to this application.
on this offer is available. However, because it is hierarchically higher, this application
will not be withdrawn and you may still receive an offer if a
place becomes available.
16.2 Opting In/Out of Upgrades and Amending Preferences
If you have accepted or held your offer, you have the option to opt in to upgrades. If you opt in to
upgrades, and an upgrade becomes available, you do not have an option to decline the upgrade.
Upgrades automatically replace your initial offer.
If you have opted in to upgrades, you can amend the programme preferences for which you wish to
receive upgrade. You will see a link with the text “Upgrade preferences” within the ‘Actions’ section of
your offer:
Fig 16.3 Upgrade preferences after opting in to upgrades
Page 43 of 56You can also read