StyleEase for APA Style User's Guide
←
→
Page content transcription
If your browser does not render page correctly, please read the page content below
StyleEase for APA Style

     User’s Guide

StyleEase for APA Style

Table of Contents

Getting Started                                                                                                                                 1
      Enabling StyleEase . . . . . . . . . . . . . . . . . . . . . . . . . . . . . . . . . . . . . . . . . . . . . . . . . . . . . . . . . . . 2
           Trusting Our Certificate in Word 2003 or Earlier Versions . . . . . . . . . . . . . . . . . . . . . 2
           Trusting Our Certificate in Word 2007 . . . . . . . . . . . . . . . . . . . . . . . . . . . . . . . . . . . . . . 3
              Change Word 2007’s Macro Setting . . . . . . . . . . . . . . . . . . . . . . . . . . . . . . . . . . . . . 3
              Trust the StyleEase Digital Certificate . . . . . . . . . . . . . . . . . . . . . . . . . . . . . . . . . . . 3
      Creating a New Document. . . . . . . . . . . . . . . . . . . . . . . . . . . . . . . . . . . . . . . . . . . . . . . . . . . . . 4
      Using StyleEase Commands . . . . . . . . . . . . . . . . . . . . . . . . . . . . . . . . . . . . . . . . . . . . . . . . . . . 5
      Entering Document Content . . . . . . . . . . . . . . . . . . . . . . . . . . . . . . . . . . . . . . . . . . . . . . . . . . . 7
      Citing References . . . . . . . . . . . . . . . . . . . . . . . . . . . . . . . . . . . . . . . . . . . . . . . . . . . . . . . . . . . . . 9
      Changing Page Headers and Numbering . . . . . . . . . . . . . . . . . . . . . . . . . . . . . . . . . . . . . . . 14
      Preparing and Printing Documents . . . . . . . . . . . . . . . . . . . . . . . . . . . . . . . . . . . . . . . . . . . . 15

Using StyleEase                                                                                                                                 1
      Enabling StyleEase . . . . . . . . . . . . . . . . . . . . . . . . . . . . . . . . . . . . . . . . . . . . . . . . . . . . . . . . . . . 1
           Trusting Our Certificate in Word 2003 or Earlier Versions . . . . . . . . . . . . . . . . . . . . . 2
           Trusting Our Certificate in Word 2007 . . . . . . . . . . . . . . . . . . . . . . . . . . . . . . . . . . . . . . 2
               Change Word 2007’s Macro Setting . . . . . . . . . . . . . . . . . . . . . . . . . . . . . . . . . . . . . 2
               Trust the StyleEase Digital Certificate . . . . . . . . . . . . . . . . . . . . . . . . . . . . . . . . . . . 3
      Creating StyleEase Documents . . . . . . . . . . . . . . . . . . . . . . . . . . . . . . . . . . . . . . . . . . . . . . . . . 4
           Basic Document Types . . . . . . . . . . . . . . . . . . . . . . . . . . . . . . . . . . . . . . . . . . . . . . . . . . . . 6
           Document Setup Options. . . . . . . . . . . . . . . . . . . . . . . . . . . . . . . . . . . . . . . . . . . . . . . . . . 7
      Using the StyleEase Commands . . . . . . . . . . . . . . . . . . . . . . . . . . . . . . . . . . . . . . . . . . . . . . . . 7
           The StyleEase Commands . . . . . . . . . . . . . . . . . . . . . . . . . . . . . . . . . . . . . . . . . . . . . . . . . 9
      Formatting Existing Documents . . . . . . . . . . . . . . . . . . . . . . . . . . . . . . . . . . . . . . . . . . . . . . . 10
           Reformatting and Reference Entries. . . . . . . . . . . . . . . . . . . . . . . . . . . . . . . . . . . . . . . . 11
      Editing Title Pages. . . . . . . . . . . . . . . . . . . . . . . . . . . . . . . . . . . . . . . . . . . . . . . . . . . . . . . . . . . 11

Entering Content                                                                                                                              13
      Text Formatting with StyleEase Styles . . . . . . . . . . . . . . . . . . . . . . . . . . . . . . . . . . . . . . . . . . 13
           The StyleEase Text Styles . . . . . . . . . . . . . . . . . . . . . . . . . . . . . . . . . . . . . . . . . . . . . . . . . 15
      Adding Special Pages and Sections . . . . . . . . . . . . . . . . . . . . . . . . . . . . . . . . . . . . . . . . . . . . 16
      Adding Special Lists . . . . . . . . . . . . . . . . . . . . . . . . . . . . . . . . . . . . . . . . . . . . . . . . . . . . . . . . . 17

                                              StyleEase User’s Guide                                                                             3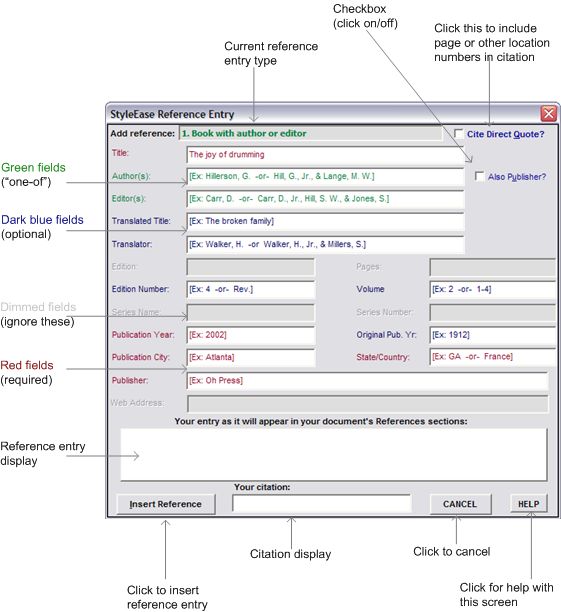
Inserting Figures . . . . . . . . . . . . . . . . . . . . . . . . . . . . . . . . . . . . . . . . . . . . . . . . . . . . . . . . . . . . 19
Inserting Tables . . . . . . . . . . . . . . . . . . . . . . . . . . . . . . . . . . . . . . . . . . . . . . . . . . . . . . . . . . . . . 20
Adding Captions . . . . . . . . . . . . . . . . . . . . . . . . . . . . . . . . . . . . . . . . . . . . . . . . . . . . . . . . . . . . 22
Useful Word Options and Tips . . . . . . . . . . . . . . . . . . . . . . . . . . . . . . . . . . . . . . . . . . . . . . . . 24
Citing References 26
Selecting the Reference Type . . . . . . . . . . . . . . . . . . . . . . . . . . . . . . . . . . . . . . . . . . . . . . . . . . 27
Using Reference Entry Screens. . . . . . . . . . . . . . . . . . . . . . . . . . . . . . . . . . . . . . . . . . . . . . . . . 28
Reference Entry Screen Components . . . . . . . . . . . . . . . . . . . . . . . . . . . . . . . . . . . . . . 29
Entering Online Access Information. . . . . . . . . . . . . . . . . . . . . . . . . . . . . . . . . . . . . . . 31
Color Coding . . . . . . . . . . . . . . . . . . . . . . . . . . . . . . . . . . . . . . . . . . . . . . . . . . . . . . . . . . 33
Navigating in Reference Entry Features . . . . . . . . . . . . . . . . . . . . . . . . . . . . . . . . . . . 33
Field Help and Sample Text. . . . . . . . . . . . . . . . . . . . . . . . . . . . . . . . . . . . . . . . . . . . . . 34
Previewing Your Entry . . . . . . . . . . . . . . . . . . . . . . . . . . . . . . . . . . . . . . . . . . . . . . . . . . 34
Checking Entry Completeness. . . . . . . . . . . . . . . . . . . . . . . . . . . . . . . . . . . . . . . . . . . . 35
Alphabetizing (Sorting) References. . . . . . . . . . . . . . . . . . . . . . . . . . . . . . . . . . . . . . . . . . . . . 35
Creating In-text Citations . . . . . . . . . . . . . . . . . . . . . . . . . . . . . . . . . . . . . . . . . . . . . . . . . . . . . 36
Using the References Database . . . . . . . . . . . . . . . . . . . . . . . . . . . . . . . . . . . . . . . . . . . . . . . . 38
Browsing the Database . . . . . . . . . . . . . . . . . . . . . . . . . . . . . . . . . . . . . . . . . . . . . . . . . . 38
Citing a Reference from the Database . . . . . . . . . . . . . . . . . . . . . . . . . . . . . . . . . . . . . 40
Modifying a Database Entry . . . . . . . . . . . . . . . . . . . . . . . . . . . . . . . . . . . . . . . . . . . . . 41
Deleting a Database Entry . . . . . . . . . . . . . . . . . . . . . . . . . . . . . . . . . . . . . . . . . . . . . . . 42
Fine-tuning Document Appearance 43
Changing Page Headers and Numbering . . . . . . . . . . . . . . . . . . . . . . . . . . . . . . . . . . . . . . . 43
Updating Your Document for Printing. . . . . . . . . . . . . . . . . . . . . . . . . . . . . . . . . . . . . . . . . . 45
Changing Style Definitions. . . . . . . . . . . . . . . . . . . . . . . . . . . . . . . . . . . . . . . . . . . . . . . . . . . . 47
Making Block Quotes Single-Spaced . . . . . . . . . . . . . . . . . . . . . . . . . . . . . . . . . . . . . . 47
Making References Single-Spaced. . . . . . . . . . . . . . . . . . . . . . . . . . . . . . . . . . . . . . . . . 50
Changing the Document Font . . . . . . . . . . . . . . . . . . . . . . . . . . . . . . . . . . . . . . . . . . . . 51
Editing StyleEase Title Pages . . . . . . . . . . . . . . . . . . . . . . . . . . . . . . . . . . . . . . . . . . . . . . . . . . 52
Creating a Second References Section. . . . . . . . . . . . . . . . . . . . . . . . . . . . . . . . . . . . . . . . . . . 52
Backup and Organization of Database Files 53
About Database Files . . . . . . . . . . . . . . . . . . . . . . . . . . . . . . . . . . . . . . . . . . . . . . . . . . . . . . . . . 54
Accessing Database File Commands. . . . . . . . . . . . . . . . . . . . . . . . . . . . . . . . . . . . . . . . . . . . 54
Opening an Existing Database . . . . . . . . . . . . . . . . . . . . . . . . . . . . . . . . . . . . . . . . . . . . . . . . . 56
Creating a New Database . . . . . . . . . . . . . . . . . . . . . . . . . . . . . . . . . . . . . . . . . . . . . . . . . . . . . 57
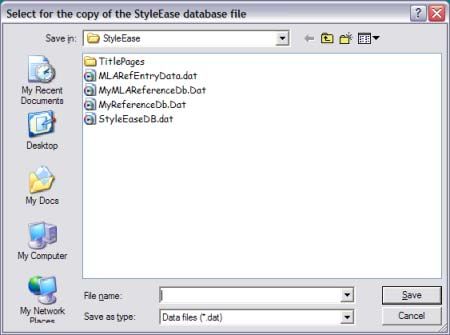
Copying or Backing Up a Database. . . . . . . . . . . . . . . . . . . . . . . . . . . . . . . . . . . . . . . . . . . . . 57
Printing the Database . . . . . . . . . . . . . . . . . . . . . . . . . . . . . . . . . . . . . . . . . . . . . . . . . . . . . . . . 58
StyleEase User’s Guide 4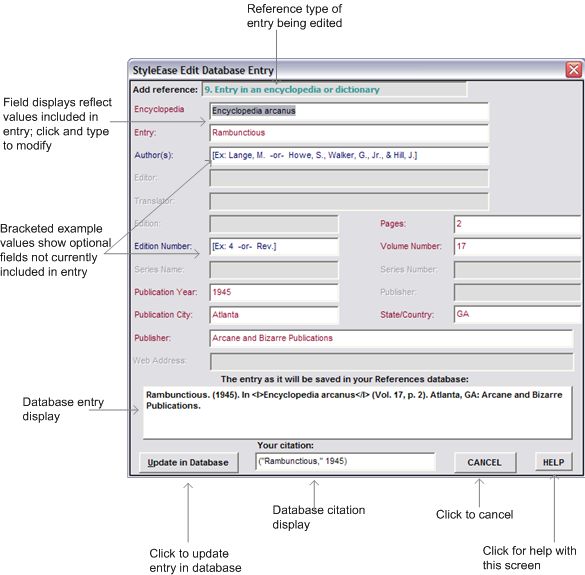
StyleEase for APA Style

Index                                     59

        StyleEase User’s Guide             5
StyleEase User’s Guide 6
StyleEase for APA Style

SECTION 1 •
   Getting Started
This section introduces you to StyleEase, and quickly gets you started using its basic
features. After reading this section, you’ll be able to create and edit StyleEase documents
effectively, and you’ll know where to find help with more advanced features of our
products.

StyleEase* is a software product packaged into a Microsoft Word template. You can
create documents based on this template and then use all of the product’s features for
delivering papers, theses, and dissertations in APA Style (based on the guidelines in the
6th Edition of the Manual of the American Psychological Association).

StyleEase simplifies many aspects of document creation and editing, including page
layout (numbering and headers/footers), text formatting, citing references, adding and
deleting special pages, and management of special lists like the Table of Contents and
List of Figures.

We recommend that you orient yourself with StyleEase by spending an hour or so
familiarizing yourself with the topics in this section:

• Enabling StyleEase

• Creating a New Document

• Entering Document Content

• Citing References

• Changing Page Headers and Numbering

• Preparing and Printing Documents

*
  StyleEase is an independently developed product and has not been endorsed by the American Psychological Association. StyleEase
Software, LLC is not affiliated with the American Psychological Association. StyleEase is not intended to function as a substitute for
the Publication Manual of the American Psychological Association.
®
    StyleEase is a registered trademark of StyleEase Software, LLC.
®Microsoft    Word is a registered trademark of Microsoft Corporation.

                                              StyleEase User’s Guide                                                                 1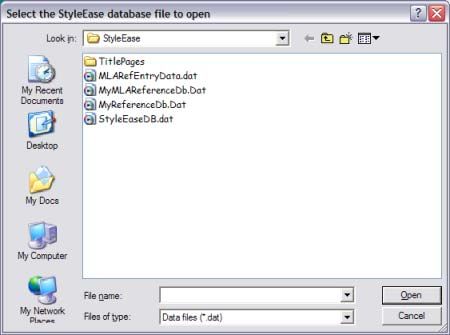
Enabling StyleEase
Whenever you open a StyleEase document, Microsoft Word detects that the document
contains macros (the StyleEase software), and determines if it’s safe to allow that
software to run. StyleEase signs its software with a digital certificate from Thawte; such
certificates are issued only after Thawte verifies the identity and validity of the signer.

If you tell Word to trust our certificate, then StyleEase can run without intervention;
otherwise, Word needs to ask you about our safety each time it opens a document.

Different versions of Word use different methods to allow you to trust our certificate:

Trusting Our Certificate in Word 2003 or Earlier
Versions
Word displays a security warning when you first create a StyleEase document, as shown
in Figure 1-1.
  Figure 1-1: Trusting the StyleEase Certificate in Word 2003

Select the Always trust macros from this publisher box, and then click Enable Macros.

                                    StyleEase User’s Guide                                    2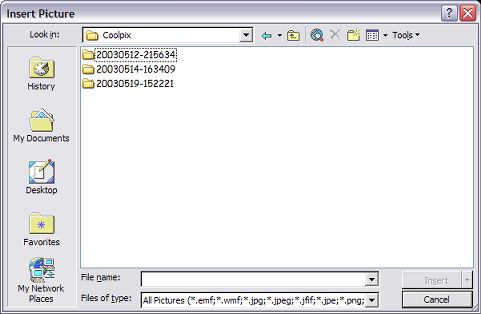
Trusting Our Certificate in Word 2007
You must enable our macros to use StyleEase. We recommend that you set Word 2007’s
security settings to only enable macros that have been digitally signed, and to then trust
our certificate. You need to follow these steps:
1. Change Word 2007’s Macro Setting to Disable all macros except digitally signed macros.
2. Create a new StyleEase document from the Windows Start Menu.
3. Trust the StyleEase Digital Certificate.

You only need to perform these steps one time on your computer; thereafter, Word will
automatically allow any StyleEase documents to run without requiring extra steps.

Change Word 2007’s Macro Setting
1. Click the Office button in the top-left corner of a Word 2007 document window.
2. Click the Word Options button at the bottom of that screen.
3. Click Trust Center and then click Trust Center Settings.
4. Select the option to Disable all macros except digitally signed macros, as shown in Figure
   1-2.
  Figure 1-2: Changing the macro settings in Word 2007

5. Click OK to save this change.

Trust the StyleEase Digital Certificate
When you first create a StyleEase document after you’ve changed the macro settings,
Word will initially disable the macros and display both a message screen and a Security
warning, which is shown in Figure 1-3.
  Figure 1-3: The Word 2007 security warning

                                   StyleEase User’s Guide                                       3
To allow StyleEase to run, follow these steps:
1. Close the message screen.
2. Click the Options button in the security warning. Word displays the security options
   screen shown in Figure 1-4.
  Figure 1-4: The Word 2007 security options screen

3. Select the Trust all document from this publisher and click OK. Thereafter all documents
   signed with our certificate will be trusted by Word 2007.

Creating a New Document
To create a new StyleEase document:
  a. Click the Windows Start button, then click All Programs, and then click StyleEase.
  b. Click APA Style Document.

                                   StyleEase User’s Guide                                     4
c. Select options for your document in the StyleEase Document Setup screen, as shown
in Figure 1-5.
Figure 1-5: The Document Setup screen
The Creating StyleEase Documents topic provides additional information about creating
new documents, and the Basic Document Types topic describes each of the document
types you can create with StyleEase.
Using StyleEase Commands
You access the features of StyleEase by selecting commands from the StyleEase menu (in
Word 2003 and earlier) or from the StyleEase ribbon tab (in Word 2007). See Using the
StyleEase Commands for more information about each command.
StyleEase User’s Guide 5The StyleEase Menu for Word 2003 and Earlier Versions
The StyleEase menu, shown in Figure 1-6, appears on the right side of Word’s menu bar,
and contains a number of commands and several submenus, which are indicated by a
small right-arrow in the menu itself. To use a StyleEase command, simply click the menu
choice, or click the right-arrow to reveal the submenu, and then click a command in the
submenu.
Figure 1-6: The StyleEase Menu
The StyleEase Ribbon Tab for Word 2007
The StyleEase ribbon tab, shown in Figure 1-7, also presents a number of command and
drop-down lists, which are organized into sections (groups) for easier access. To use a
StyleEase command, simply click the item in the ribbon tab, or click the down-arrow to
reveal the drop-down list and then click an item in the list.
Figure 1-7: The StyleEase Ribbon Tab
StyleEase User’s Guide 6Entering Document Content
The heart of working with StyleEase is in entering your document’s content: the text of
your paper, the figures and tables you want to include, and any special pages (such as an
abstract or appendix) or lists (such as a table of contents) that you need.
Entering text and applying styles
StyleEase defines styles in Word that automate the formatting of your document; each
style is defined in accordance with the APA style guidelines, and each specifies the
spacing, margins, font, and other paragraph attributes.
In most cases, you simply type and StyleEase applies the correct formatting. If you need
to change the style of a paragraph — for example, to create a new heading in your
document — you apply a style. Note that you can apply a style and thus reformat a
paragraph whenever you want.
In Word 2003 or earlier, apply a style by selecting a style name from StyleEase’s Format
Text submenu. In Word 2007, apply a style by selecting a style name from one of the
drop-down lists in the Format section of the StyleEase ribbon tab.
For more information about using our styles, see the Text Formatting with StyleEase
Styles topic.
Adding Pages and Lists
When you create a new StyleEase document, you can specify that you want to include
certain special sections, such as an abstract page, an appendix, or a table of contents, as
described in the Creating a New Document topic. You can also add these sections
(special pages or lists) while working on your documents.
To add a page such as an abstract or appendix, click the Insert New Page submenu in the
StyleEase menu or click the Special Pages drop-down in the StyleEase ribbon tab. Then
select the type of page you want to insert. Figure 1-8 shows selecting a new page to insert
in Word 2007.
StyleEase User’s Guide 7Figure 1-8: Inserting a New Special Page
To add a special list such as a Table of Contents or List of Figures, click the Insert Element
submenu in the StyleEase menu or click the List drop-down in the StyleEase ribbon tab.
Then select the type of special list you want to insert.
Figure 1-9: Inserting a New Special List
Note that you can also delete special pages and lists from your document at any time by
using the Delete Section command in the StyleEase menu or ribbon tab.
Adding Figures and Tables
If you need to insert a figure (a graphic image) or a table into your document, StyleEase
provides commands to simplify and automate the process.
To insert a figure, click the StyleEase Insert Element submenu and then select the Figure
with caption command; in Word 2007, click the Figure item in the StyleEase ribbon tab.
You are guided through browsing to the image on your computer, and then specifying a
caption for the figure. If your document includes a List of Figures page, that list is
automatically updated for the new figure. For more information about inserting figures,
see the Inserting Figures topic.
To insert a table, click the StyleEase Insert Element submenu and then select the Table with
caption command; in Word 2007, click the Table item in the StyleEase ribbon tab. You are
guided through specifying the layout of the table, and then specifying its caption. If your
document includes a List of Tables page, that list is automatically updated for the new
table. For more information about inserting figures, see Inserting Tables.
StyleEase User’s Guide 8Citing References
One of the most difficult tasks you face in working with academic documents is citing
references. StyleEase simplifies and automates this by providing a menu of reference
types. After you select the type of reference you want to insert, StyleEase asks you for the
information required to properly cite the reference. StyleEase then:
• correctly formats the reference
• inserts it into your References list
• adds a citation to your document
• adds the reference to your database, so that you can use it again without having to
enter any information
Creating References Manually
To create a new reference entry, start by selecting a reference type from either our
Traditional (Print) References menu, or from our Online References menu:
• In Word 2007, click Traditional Ref or Online Ref in the References section of the
StyleEase ribbon tab, and then select the type of reference you want to create from the
displayed menu.
• In Word 2003 or earlier versions, click Traditional Ref or Online Ref in the StyleEase
menu, and then select the type of reference you want to create from the displayed
menu.
The menu of traditional (non-online) references types isshown in Figure 1-10.
StyleEase User’s Guide 9Figure 1-10: Selecting a traditional (non-online) reference type
The menu of online references types is shown in Figure 1-11.
StyleEase User’s Guide 10Figure 1-11: Selecting an online reference type
You use both reference type menus in exactly the same way:
• Click a reference-type name (such as Web page) to see a brief description near the top
of the menu.
• Select a reference type by clicking it or entering its number in the blue box at the top
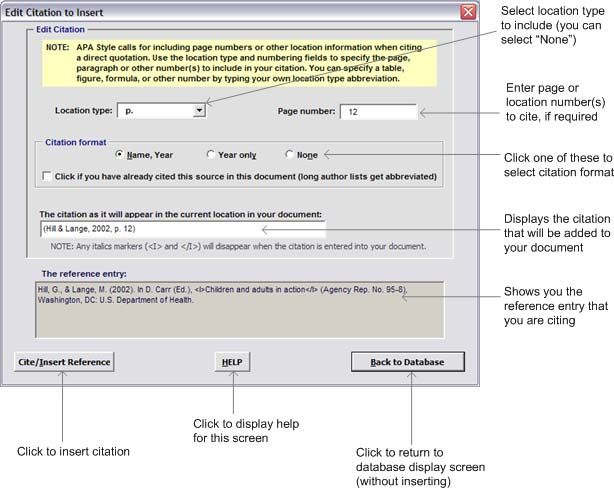
of the screen, and then click the Insert Reference button to create a new reference entry.
StyleEase displays a screen in which you enter information for the reference, like the
one shown in Figure 1-12.
Note that StyleEase color codes required (red) and optional (blue) fields in each
reference information screen. If you forget to enter a value for a field that is required
to create a correctly-formatted reference, StyleEase warns you and gives you an
opportunity to add the information.
StyleEase User’s Guide 11Figure 1-12: A reference entry information screen
As you can see, StyleEase displays the reference and citation that it will insert into your
paper. Note that text shown bracketed by and will be italicized in your
references section. After you have filled in the fields for your reference, click the Insert
Reference button. StyleEase then:
• adds the reference to your References section
• adds the citation in your paper, at the location that you were typing before creating
the reference
• stores the reference and citation information in your references database, so you can
easily reuse or edit it for use in any of your StyleEase papers
For more information about creating references, see Citing References.
StyleEase User’s Guide 12Citing References from the Database
StyleEase stores all of your references in a database that makes it simple to reuse the
reference, in either the same document or a different document. You can cite an entry by
simply clicking it in the database listing; you can also edit an entry before inserting it
from the database.
You can display the database browser, shown in Figure 1-13, by clicking References
Database in the StyleEase menu or the Browse button in the Database section of the
StyleEase ribbon tab.
Figure 1-13: The database browser
You click a database entry in the top half of the window, and then one of the command
buttons:
StyleEase User’s Guide 13• Click Cite/Insert Reference to add the entry to your References list, and to include a
parenthetical citation to it in the body of your paper.
• Click Insert Reference Only to add the entry to your References list without including a
parenthetical citation.
• Click Edit Reference to make changes in the database entry, which you can then add to
your paper.
• Click Delete Reference to remove an entry from the database.
The Using the References Database topic provides a more thorough guide to using the
StyleEase references database.
Changing Page Headers and Numbering
The page layout of your document — its working title, how the pages are numbered,
and the running header that appears on each page — is set up for you by StyleEase when
you create a new document. You can customize the appearance of your document by
modifying these layout characteristics at any time.
To change the layout of your pages, click Update Page Layout in the StyleEase menu, or
click either Numbering or Headers in the Page Layout section of the StyleEase ribbon tab.
Then select the options you want and click OK.
StyleEase User’s Guide 14Figure 1-14: Modifying page headers and numbering
The Changing Page Headers and Numbering topic provide detailed information about
the page layout options.
Preparing and Printing Documents
When you’re ready to print your document, it’s a good idea to use the StyleEase print
preparation feature to make sure that your references are correctly sorted (alphabetized)
and that all of your special lists have the correct page numbering.
Click Prepare for Printing in the StyleEase menu or click Print Prepare on the StyleEase
ribbon tab to display the Print Preparation screen, which is shown in Figure 1-15. Select
the updates that you want to perform before printing, and then click OK.
StyleEase User’s Guide 15Figure 1-15: Preparing for printing
For more information, see the Updating Your Document for Printing topic.
StyleEase User’s Guide 16StyleEase for APA Style
SECTION 2 •
Using StyleEase
This section describes how to use the basic functionality of StyleEase, in the following
topics:
• Enabling StyleEase shows you how to allow access to StyleEase’s functionality in your
Word documents.
• Creating StyleEase Documents provides information about the StyleEase Document
Setup screen, with which you specify the initial appearance and contents of new
StyleEase documents.
• Using the StyleEase Commands explains how to use the StyleEase menu or ribbon tab
to access all of our commands.
• Formatting Existing Documents explains how to convert an existing document into a
document that can take advantage of StyleEase’s capabilities.
• Editing Title Pages tells you how to customize the title pages that StyleEase can use
with your documents.
Enabling StyleEase
Whenever you open a StyleEase document, Microsoft Word detects that the document
contains macros (the StyleEase software), and determines if it’s safe to allow that
software to run. StyleEase signs its software with a digital certificate from Thawte; such
certificates are issued only after Thawte verifies the identity and validity of the signer.
If you tell Word to trust our certificate, then StyleEase can run without intervention;
otherwise, Word needs to ask you about our safety each time it opens a document.
Different versions of Word use different methods to allow you to trust our certificate:
StyleEase User’s Guide 1Trusting Our Certificate in Word 2003 or Earlier
Versions
Word displays a security warning when you first create a StyleEase document, as shown
in Figure 2-1.
Figure 2-1: Trusting the StyleEase Certificate in Word 2003
Select the Always trust macros from this publisher box, and then click Enable Macros.
Trusting Our Certificate in Word 2007
You must enable our macros to use StyleEase. We recommend that you set Word 2007’s
security settings to only enable macros that have been digitally signed, and to then trust
our certificate. You need to follow these steps:
1. Change Word 2007’s Macro Setting to Disable all macros except digitally signed macros.
2. Create a new StyleEase document from the Windows Start Menu.
3. Trust the StyleEase Digital Certificate.
You only need to perform these steps one time on your computer; thereafter, Word will
automatically allow any StyleEase documents to run without requiring extra steps.
Change Word 2007’s Macro Setting
1. Click the Office button in the top-left corner of a Word 2007 document window.
2. Click the Word Options button at the bottom of that screen.
StyleEase User’s Guide 23. Click Trust Center and then click Trust Center Settings.
4. Select the option to Disable all macros except digitally signed macros, as shown in Figure
2-2.
Figure 2-2: Changing the macro settings in Word 2007
5. Click OK to save this change.
Trust the StyleEase Digital Certificate
When you first create a StyleEase document after you’ve changed the macro settings,
Word will initially disable the macros and display both a message screen and a Security
warning, which is shown in Figure 2-3.
Figure 2-3: The Word 2007 security warning
To allow StyleEase to run, follow these steps:
1. Close the message screen.
2. Click the Options button in the security warning. Word displays the security options
screen shown in Figure 2-4.
StyleEase User’s Guide 3Figure 2-4: The Word 2007 security options screen
3. Select the Trust all document from this publisher and click OK. Thereafter all documents
signed with our certificate will be trusted by Word 2007.
Creating StyleEase Documents
This section describes how to start a new StyleEase document. Before creating a new
document, make sure that you have your macro security setting in Word set to allow
digitally signed software to run, as described in Enabling StyleEase.
To create a new StyleEase document:
a. Click the Windows Start button, then All Programs, and then click StyleEase.
b. Click APA Style Document.
c. Select options for your document in the StyleEase Document Setup screen, as shown
in Figure 2-5.
StyleEase User’s Guide 4Figure 2-5: The Document Setup screen
You should first choose which type of document you want to create, then select which
pages to include, and finally, type in the title and running head you want to appear in
your document. Note that this simply defines the initial layout of your document and
can be changed at a later time.
You can read more about the different StyleEase document types in the Basic Document
Types topic, and you can read more about the document setup options and fields in the
Document Setup Options topic.
Click here to view an interactive demonstration of creating a StyleEase document.
StyleEase User’s Guide 5Basic Document Types
You can create StyleEase document in four variations, which are shown in Table 2-1. Each
document type is preconfigured to include specific pages and characteristics, and each
can be reconfigured.
Table 2-1: StyleEase basic document types
StyleEase document type Purpose Sections included by default
Paper To write a journal article or • Title page (with title page running
other paper. header)
• Body of paper
• References
Term Paper To write a term paper. • Title page
• Body of paper
• References
Thesis To write a master’s thesis. • Title page
• Table of contents
• Body of paper
• References
Dissertation To write a dissertation. • Title page
• Copyright page
• Abstract
• Table of contents
• Body of paper
• References
Note that you can modify which pages are included by clicking checkboxes in The
Document Setup screen. You can also add or delete pages while you’re editing your
document, as described in the Adding Special Pages and Sections and Adding Special
Lists topics.
StyleEase User’s Guide 6Document Setup Options
The Document Setup screen contains options that allow you to define the type of paper
you want to create, title information, and which pages you want initially included in the
document. Table 2-5 describes these options.
Table 2-2:
Option Description
Document type Click one of these buttons to choose which document type you want to create:
paper, term paper, thesis, or dissertation. The Basic Document Types topic
provides descriptions of each type.
Note: You cannot change the type of a document after you create it.
Pages to include Select pages that you want included in your document.
StyleEase preconfigures which special pages and lists to include for each
document type, and most users do not need to make any changes in the initial
configuration.
Note: You can add or delete special pages and lists whenever you want.
Left margin Select whether you want to use the default left margin setting for your
document (1” for papers and term papers, 1.5” for theses and dissertations that
will be bound).
Title page title Allows you to enter the title that you want shown on the title page of your
document. You can change this at any time.
Running head Allows you to enter the abbreviated “running head” title that you want shown
in the upper right corner of each page. You can change this at any time.
Using the StyleEase Commands
You access the StyleEase software by clicking commands in the StyleEase menu (for Word
2003 or earlier versions) or in the StyleEase ribbon tab (for Word 2007). These commands
automate and simplify the writing of your documents.
The Word 2007 StyleEase Ribbon Tab
The StyleEase ribbon tab, shown in Figure 2-6, also presents a number of command and
drop-down lists, which are organized into sections (groups) for easier access. To use a
StyleEase command, simply click the item in the ribbon tab, or click the down-arrow to
reveal the drop-down list and then click an item.
StyleEase User’s Guide 7Figure 2-6: The StyleEase Ribbon Tab
For more information about each StyleEase command, see The StyleEase Commands.
The StyleEase Menu
The StyleEase menu, shown in Figure 2-7, appears on the right side of Word’s menu bar,
and contains a number of commands and several submenus, which are indicated by a
small right-arrow in the menu itself. To use a StyleEase command, simply click the menu
choice, or click the right-arrow to reveal the submenu, and click a command in the
submenu.
Figure 2-7: The StyleEase menu
For information about each command, see The StyleEase Commands.
StyleEase User’s Guide 8The StyleEase Commands
Table 2-3 summarizes the StyleEase commands. The Menu Command column displays the
commands in the menu used for Word 2003 and earlier, and the Ribbon Tab columns
show the location and name of the same commands in the Word 2007 ribbon tab.
Table 2-3: Accessing the StyleEase Commands
Early Word Version Word 2007 Ribbon Tab
Menu Command Section Command Description
Traditional Ref References Traditional Ref Displays the StyleEase Reference Entry menu.
Online Reference References Online Ref Displays the StyleEase Online Reference Entry
menu.
References Database Database Browse Provides access to the StyleEase database
Edit interface, which is described in Using the
References Database.
Delete
References Cite
Format Text Format APA Heading Displays a list of the formatting styles that you
Normal Text can apply to the text in your paper with a
single click.
Block Quote
For more information, see Text Formatting
with StyleEase Styles.
Insert Element Insert Figure Displays commands for inserting elements
Table such as figures, tables, and lists (e.g. tables of
contents and figures).
List
For more information, see
Captions
• Inserting Figures
• Inserting Tables
• Adding Special Lists
• Adding Captions
Insert New Page Insert Special Page Displays a list of pages/sections that you can
add to your document.
For more information, see Adding Special
Pages and Sections.
Update Page Layout Page Layout Numbering Displays the StyleEase Page Layout screen, in
Headers which you can modify the title, running
headers, and page number style and placement
in your documents.
For more information, see Changing Page
Headers and Numbering.
Prepare for Printing Page Layout Print Prepare Displays the StyleEase Print Preparation screen,
which you can use to update numbering, lists,
and references in your document.
For more information, see Updating Your
Document for Printing.
StyleEase User’s Guide 9Table 2-3: Accessing the StyleEase Commands (continued)
Early Word Version Word 2007 Ribbon Tab
Menu Command Section Command Description
Location of References References Location Allows you to change the location in which
your references are inserted. You can use this,
for example, if you need a Bibliography section
in addition to a References section.
For more information, see Creating a Second
References Section.
Delete Section Insert Delete Section Allows you to delete an entire section of your
document with one click.
Database Files Database Files Displays the Database Files commands, which
you can use to work with StyleEase database
files.
For more information, see Backup and
Organization of Database Files.
Help StyleEase Help Displays the StyleEase help system.
About StyleEase StyleEase About Displays version and date information for your
Updates StyleEase software, and provides a link for
checking for new updates.
Formatting Existing Documents
You can retrofit existing papers for use with StyleEase by creating a new StyleEase
document and pasting the content of the existing document into the new document.
Here’s how:
• Create a new StyleEase document and make sure that it includes all of the sections
included in the paper you’re reformatting. For example, if your paper includes an
abstract and two appendixes, tell StyleEase to create a new document that also
includes those sections.
• Also open the existing paper in Word.
• For each section in the paper (e.g. the abstract, a chapter, or the main body):
• copy the content from the existing paper by selecting the content and pressing
CTRL-C on your keyboard
• paste it into the corresponding section of your StyleEase paper by pressing CTRL-V
on your keyboard
StyleEase User’s Guide 10• Go through the new StyleEase document and apply styles as required to format your
document, as described in Text Formatting with StyleEase Styles.
Note that StyleEase cannot capture reference entry information from an existing paper
and add entries to your database. For more information about this, see Reformatting and
Reference Entries.
Reformatting and Reference Entries
When you reformat an existing document with StyleEase you are assured that your
paragraphs and pages are properly formatted; however, the reformatting process cannot
capture complete information about references that were in the old paper. Specifically,
StyleEase cannot:
• verify that an old reference entry contains all the information it should
• verify that the information in an old reference entry is correctly formatted
• add the old reference entry to your StyleEase references database
If you apply the Reference Entry style to a reference from your old paper, StyleEase makes
sure that the paragraph itself is correctly formatted, with proper indentation and
spacing; however, it cannot reformat the content of that paragraph.
Editing Title Pages
Each of the four basic StyleEase document types (paper, term paper, thesis, and
dissertation) has a title page associated with it. If your institution requires a title page
format that differs from the default, you can alter the title pages that StyleEase uses.
The page associated with each document type is stored in a specific Word file, so to
change it, you edit that file with Word. Table 2-4 shows the file name for each title page.
Table 2-4: Title page file names
Document Type File Name
Term Paper APATermPaperTitle.doc
Paper APAPaperTitle.doc
Thesis APAThesisTitle.doc
Dissertation APADissertTitle.doc
StyleEase User’s Guide 11The title page files are located in the TitlePages folder inside the folder where
StyleEase was installed on your computer, which in almost all cases is:
C:\Program Files\StyleEase\TitlePages.
After you locate the file you want to change:
• make a backup copy of it
• edit it with Word and make whatever changes you need to make
• save the file
Thereafter, StyleEase will use the new version of the title page.
StyleEase User’s Guide 12StyleEase for APA Style
SECTION 3 •
Entering Content
This section describes how to enter content — text, special pages and lists, figures, tables,
chapters, and sections — into your StyleEase documents. Read the following topics to
understand how to use StyleEase styles and commands to enter and modify information
in your documents:
• Text Formatting with StyleEase Styles
• Adding Special Pages and Sections
• Adding Special Lists
• Inserting Figures
• Inserting Tables
• Adding Captions
• Useful Word Options and Tips
Text Formatting with StyleEase Styles
The basic formatting features of StyleEase work by applying styles to text that you enter.
Each style contains formatting instructions that are consistent with the APA style
guidelines. When you apply a style to a paragraph, its formatting changes to match
those instructions, including its spacing, margins, and font appearance.
In many cases, StyleEase automatically applies the style that you want while you’re
typing. In other cases, such as when you want to insert a header in your document, you
apply a StyleEase style after clicking in the paragraph to make it the current paragraph.
If you are using Word 2007, apply a style by clicking one of the buttons in the Format
section of the StyleEase ribbon tab, as shown in Figure 3-1.
StyleEase User’s Guide 13Figure 3-1: Accessing the styles in Word 2007
To apply a style with Word 2003 and earlier versions of StyleEase, click Format Text in the
StyleEase menu, and then click the style you want applied, as shown in Figure 3-2.
Figure 3-2: The StyleEase Format Text menu
StyleEase instantly reformats the paragraph.
The StyleEase Text Styles topic describes each of the styles defined by StyleEase.
StyleEase User’s Guide 14The StyleEase Text Styles
Table 3-1 summarizes the formatting that each StyleEase style applies to the current
paragraph.
Table 3-1: The StyleEase text styles
Format Text Style Description
Normal (indented) Paragraph Indented first line, double-spaced, normal text paragraph.
This is the default style, automatically started every time
you press Enter, e.g. after creating a subheading.
Non-indented (normal) Paragraph Non-indented normal paragraph.
Use this style following block quotes, tables or figures if
wanting to continue text mid-paragraph.
Chapter Heading (APA Level 1) Creates a new chapter in a new section, with a preceding
page break, and a double-space following. The heading text
is automatically capitalized and uses a bold font.
To create a line break (that is, a 2-line chapter heading) press
CTRL-Enter in the place in the actual text in the paper where
you want the break.
APA Level 2 Heading Left-justified bold text, preceded by a double-space, and
followed by a double-space.
Enter text in headline capitalization style; for example, This
is Headline Cap Style.
APA Level 3 Heading Indented, bold text ending with a period.
APA Level 4 Heading Indented, bold italic text that starts a paragraph and ends
with a period.
APA Level 5 Heading Indented text that starts a paragraph and ends with a period.
Block Quote (no 1st line indent) Indented (.5 inch), double-spaced paragraph. The first line of
text is not indented relative to the rest of the paragraph.
Use this style if the quote does not begin a paragraph, or if
you do not want the first line indented.
Block Quote (1st line indented) Indented, double-spaced paragraph. The first line of text is
indented 0.5 inch relative to the rest of the paragraph.
Use this style if the quote begins a paragraph.
You can adjust the formatting performed by some StyleEase styles if your institution has
customized its standard, as described in the Changing Style Definitions topic.
StyleEase User’s Guide 15Adding Special Pages and Sections
When you create a new StyleEase document, you can specify that you want to include
certain special sections, such as an abstract page, an appendix, or a table of contents, as
described in the Creating StyleEase Documents topic. You can also add these sections
(special pages or lists) while working on your documents or delete an unwanted section
from a document.
IMPORTANT: Before adding a special page or section, make sure that you have
positioned the insertion point in your document immediately before
(above) where you want the new page or section inserted.
To add a special page in Word 2007, click the Special Pages drop-down in the StyleEase
ribbon tab, shown in Figure 3-3, and then select the type of page or section you want to
insert.
Figure 3-3: Inserting a New Special Page in Word 2007
In Word 2003 or earlier versions, click the Insert New Page submenu in the StyleEase
menu, which is shown in Figure 3-4. Then select the type of page or section you want to
add.
StyleEase User’s Guide 16Figure 3-4: Inserting a new page
If you add a new section, chapter, or appendix, StyleEase asks you for its title.
Note: StyleEase automatically updates any Table of Figures, List of Tables, or Table
of Contents in your document whenever you add or delete a section.
Deleting a special section
You can also delete sections from your document at any time by clicking somewhere in
the section (to make it the current selection in Word) and then clicking the Delete Section
command in the StyleEase menu or ribbon tab.
Adding Special Lists
You can add special lists — a Table of Contents, List of Figures, or List of Tables — to your
document, and StyleEase will automatically update them for you.
StyleEase User’s Guide 17IMPORTANT: Before adding a special list, make sure that you have positioned the
insertion point in your document immediately before (above) where
you want it inserted.
To add a special page in Word 2007, click the List drop-down in the StyleEase ribbon tab,
shown in Figure 3-5, and then select the type of list you want to insert.
Figure 3-5: Inserting a new special list in Word 2007
In Word 2003 or earlier versions, click the Insert New Page submenu in the StyleEase
menu, which is shown in Figure 3-6. Then select the type of list that you want to insert in
your document.
Figure 3-6: Inserting a new special list
StyleEase automatically updates the new list when you add it.
StyleEase User’s Guide 18Deleting a Special List
You can also delete special lists from your document at any time by clicking somewhere
in the list (to make it the current selection in Word) and then clicking the Delete Section
command in the StyleEase menu or ribbon tab.
Inserting Figures
To insert a graphic image (figure) into your document, click the Figure dropdown in the
StyleEase ribbon tab and then select either From File or From Clipboard. In Word 2003 and
earlier versions, click the StyleEase Insert Element submenu and then select one of the
Figure with caption commands. You can insert a figure from a file on your computer, or
insert from the clipboard if you have previously copied an image onto the clipboard.
Note: Before inserting a figure, make sure that you have positioned the insertion
point in your document to above where you want it inserted.
If you’re inserting from a file, StyleEase will ask you to locate the file on your computer
with Word’s Insert Picture screen, as shown in Figure 3-7.
Figure 3-7: The Insert Picture screen
After inserting the image, StyleEase displays a screen, shown in Figure 3-8, in which you
enter the caption that you want in your document for the image. Note that StyleEase
automatically modifies your caption to fit the APA style guidelines, as follows:
StyleEase User’s Guide 19• A period and a space (“. “) are added after the figure number.
• A period is added at the end of your caption text
• The word “Figure” and the figure number are italicized.
Figure 3-8: The Figure Caption entry screen
You can alter the placement and size of the figure that you inserted by right-clicking on
the image in your document, and clicking Format Picture.
If your document includes a List of Figures, StyleEase automatically updates that list with
information about the new figure.
Inserting Tables
To insert a table into your document, click the Table item in the StyleEase ribbon tab; in
Word 2003 or earlier versions, click the StyleEase Insert Element submenu and then select
the Table with caption command.
Note: Before inserting a figure, make sure that you have positioned the insertion
point in your document to above where you want it inserted.
You then specify the table’s dimensions, as shown in Figure 3-9. You can alter the size of
the table at any time, so you just need to define its initial dimensions.
StyleEase User’s Guide 20Figure 3-9: The Insert Table screen
Note: StyleEase automatically creates a table in the default APA format, which
includes horizontal lines at the top of the table, below the first (heading) row,
and at the bottom of the table. APA guidelines specify that tables cannot
include vertical lines.
After you have specified the table’s dimensions, click OK, and then enter a caption for
your table, in the table caption screen shown in Figure 3-10.
Figure 3-10: The Table Caption entry screen
StyleEase User’s Guide 21Note that StyleEase automatically modifies your caption to fit the APA style guidelines,
as follows:
• The word “Table” and the table number are placed on their own line, with the
caption text a double-spaced line below.
• The caption text is italicized.
If your document includes a List of Tables, StyleEase automatically updates that list with
information about the new table.
Adding Captions
If your document includes figures or tables that do not have captions, you can use
StyleEase commands to add a caption in APA style. Your captions are automatically
added to any list of figures or list of tables you have.
Figure Captions
To insert a figure caption, first click in the figure, and then select Figure from the Caption
drop-down in the StyleEase ribbon tab; in Word 2003 and earlier versions, select the
Figure caption command from the StyleEase Insert Element submenu. Then enter your
caption text in the top line of the Table Caption screen shown in Figure 3-11 and click OK.
Note that you can only use this command if you have first clicked in a figure.
Figure 3-11: The Figure Caption entry screen
StyleEase User’s Guide 22Note that StyleEase automatically modifies your caption to fit the APA style guidelines,
as follows:
• A period and a space (“. “) are added after the figure number.
• A period is added at the end of your caption text
• The word “Figure” and the figure number are italicized.
Table Captions
To insert a table caption, first click in the table, and then select the Table caption command
from the StyleEase Insert Element submenu; in Word 2007, select Table from the Caption
drop-down in the StyleEase ribbon tab. Then enter your caption text in the top line of the
Table Caption screen shown in Figure 3-12 and click OK.
Note that you can only use this command if you have first clicked in a table.
Figure 3-12: The Table Caption entry screen
Note that StyleEase automatically modifies your caption to fit the APA style guidelines,
as follows:
• The word “Table” and the table number are placed on their own line, with the
caption text a double-spaced line below
• The caption text is italicized.
If your document includes a List of Tables, StyleEase automatically updates that list with
information about the new table.
StyleEase User’s Guide 23Useful Word Options and Tips
This section presents a few options and tips that you might find useful when entering or
selecting text in your Word documents.
Selection Tips
Word makes it easy to select text with the mouse. You can select:
• a word at a time by double-clicking on any word
• a line of text by moving the cursor to the left edge of the document window until it
changes shape, and then clicking the mouse
• a paragraph by triple-clicking anywhere in the paragraph
Typing Tips
If you need to create a new line in a document without making it a separate paragraph,
you can press the Shift and Return keys (together) instead of just the Return key. Use this
in situations like when the title of a chapter is too long to fit on a single line.
Displaying Formatting Marks for Easier Editing
Knowing where tabs, spaces, and paragraph marks are can sometimes make editing a
document easer.
In Word 2007, click on the Office button, choose Word Options (at the bottom of the
screen), and then click on Display. Select options in the Formatting marks section, as
shown in Figure 3-13.
Figure 3-13: Displaying formatting marks
In Word 2003 and earlier versions, use the View Options screen to tell Word to display
these marks in your document. Click Options in the Tools menu, then click View to
display the View Options screen, and select the options you want.
StyleEase User’s Guide 24Note that the formatting marks are not printed; they are displayed on-screen only.
StyleEase User’s Guide 25StyleEase for APA Style
SECTION 4 •
Citing References
One of the most difficult tasks you face in working with academic documents is citing
references. StyleEase simplifies and automates this by providing a menu of reference
types. After you select the type of reference you want to insert, StyleEase displays a
reference entry screen in which you supply the information required to properly cite the
reference. StyleEase then:
• correctly formats the reference
• inserts it into your References list
• adds a citation to your document
• adds the reference to your database, so that you can use it again without having to
enter any information
This section contains the following topics to help you with citing references:
• Selecting the Reference Type explains using the References menu to select the type of
source your are citing.
• Using Reference Entry Screens explains the features of StyleEase reference entry
screens.
• Creating In-text Citations tells you how to customize the in-text citations added for
each reference entry that you add.
• Using the References Database describes the references database, which makes it easy
to cite any reference you’ve created with StyleEase.
Click here to view an interactive demonstration of creating reference entries.
StyleEase User’s Guide 26Selecting the Reference Type
To create a new reference entry, click Traditional Ref or Online Reference in the References
section of the StyleEase ribbon tab (Word 2007) or select Traditional Ref or Online Reference
from the StyleEase menu (earlier versions). Then select a reference type from the
References menu that StyleEase displays, which is shown in Figure 4-1.
Note: Figure 4-1shows the menu for traditional (non-online) reference types; the
online reference menu is slightly different, but you use it in exactly the same
way.
Figure 4-1: Selecting a reference type
StyleEase User’s Guide 27Selecting a Type
You can select a type by clicking its name in one of the lists, or you can type an entry
number in the number entry field. When you select an entry type, StyleEase displays a
brief description of the type in the Entry type information field.
Specifying a Citation Type
You can click one of the radio buttons in the Citation Type buttons to specify what kind of
in-text citation you want StyleEase to insert for the new reference entry. For more
information, see Creating In-text Citations.
Insert Multiple Entries at Once
If you want to create a number of reference entries in a row, without inserting citations,
you can use StyleEase multiple-entry mode. You typically use this mode to add a number
of bibliography entries at the end of your document.
Use this mode by selecting the multiple entry checkbox in the References menu. While in
this mode, StyleEase automatically redisplays the References menu after you’ve inserted a
reference entry. This continues until you click Cancel in the menu screen.
Using Reference Entry Screens
You fill in fields in a StyleEase reference entry screen (form) to specify the bibliographic
data that you want StyleEase to enter. Each reference entry type has its own entry form
that is configured specifically for that type.
This section describes the reference entry data screens, which are form screens in which
you enter the information that StyleEase uses to format and insert your reference entries
and citations.
Each reference entry type has its own form screen, with its own set of text and option
fields. However, you use all of the reference entry screens in the same way.
• Reference Entry Screen Components illustrates a typical reference entry screen.
• Entering Online Access Information describes how to use the online access
information screen to specify the location of online source material.
• Color Coding explains the significance of the colors used for text fields.
StyleEase User’s Guide 28• Navigating in Reference Entry Features describes shortcuts for moving through
fields.
• Field Help and Sample Text describes two StyleEase features that help you with
entering text into fields.
• Previewing Your Entry shows how new reference entries and citations are previewed
in reference entry screens.
• Checking Entry Completeness shows how StyleEase verifies that a new reference entry
contains values for all required fields.
Reference Entry Screen Components
Figure 4-2 shows a typical reference entry screen and its components.
StyleEase User’s Guide 29Figure 4-2: StyleEase Reference Entry screen
If you’re entering an online reference, you’ll also see a large button that you can click to
enter the required online access information for your entry, as shown in Figure 4-3.
Figure 4-3: The online access information button
StyleEase User’s Guide 30When you click this button, StyleEase displays the Online Access Information screen, which
is described in the next section, Entering Online Access Information.
Entering Online Access Information
You use the Online Access Information screen, shown in Figure 4-4, to specify access or
retrieval information for online references that you create. Unfortunately, specifying
online access information can get very complicated; StyleEase helps by simplifying your
choices, letting you know what’s required, and by providing some help information
right on the screen.
Figure 4-4: The Online Access Information screen
StyleEase User’s Guide 31Online URL Retrieval Specification
Basic online retrieval requires the URL of the page you accessed, the date on which you
accessed it (so readers can be sure they’re viewing the same version), and a retrieval
prefix. A high percentage of your online references will use a format like this:
Retrieved May 12, 2008 from http://www.styleease.com
You can optionally add a name for the web site, like this:
Retrieved May 12, 2008 from StyleEase Web site: http://
www.styleease.com
Some complications you need to be aware of:
• You almost always include the access date; however, you can leave it out if the
material you’re citing is in final, stable format.
• The retrieval prefix changes when your citing different materials. For example you
might use Video retrieved from for a video podcast you downloaded, or you
might use Accessed from if you clicked a link to retrieve something, etc. StyleEase
does its best to fill in a sensible retrieval prefix for you, which you can change at will.
Online Database Retrieval Specification
When you access something in an online database, you need to let the reader know how
to retrieve that same information, by providing the name of the database, and if
available, specific access information for your source in the database.
Retrieved from My Database. (12345)
Note that you almost always use the prefix Retrieved from.
Online DOI Retrieval Specification
Digital Object Identifiers, or DOIs, are a standard for assigning a unique number for a
unique online document. They’re similar to the ISBN numbers used for books and other
media products. DOIs are only assigned to documents in final format, so if the web page
or online media that you’re citing has a DOI, that’s all you need. You don’t need a URL,
access date, or retrieval prefix. For example:
doi:123456.789
Of course there is a possible complication: occasionally a preliminary DOI is issued
before the document is finalized. If this is the case, you DO have to include a retrieval
prefix and access date, to allow the reader to find your source. For example:
Retrieved May 12, 2008. doi: 123456.789
StyleEase User’s Guide 32Color Coding
StyleEase color codes text entry fields in the reference entry screens (see Figure 4-2) to let
you know which ones are required. Table 4-1 summarizes the color codes.
Table 4-1: Color coding of text entry fields
Screen component Description
Required text fields Required text fields are shown in read. You must enter values in these fields
(red) for your reference entry and citation to be correctly formatted.
Optional text fields Optional text fields are shown in blue. You can optionally specify
(blue) information in these.
One-of text fields One-of text fields are shown in green. These are paired fields in which you
(green) must enter a value for one; for example, in some references, you must enter
either a book’s author or its editor.
When you enter a value in one of these text fields, StyleEase automatically
disables the other field. You can reenable both fields by deleting all of the
text (reset the field to blank). For example, if you have entered an author
name, you can reenable the editor name by deleting the author text and then
tabbing to the next or previous field.
Navigating in Reference Entry Features
The basic action in a StyleEase reference entry form screen is to click in a text field and
start typing in data for the field. You can also use the mouse and keyboard actions
shown in Table 4-2 to navigate through and/or modify the fields in a form screen.
Table 4-2: Navigating through reference entry fields
Task Action
Enter text into a field. Click a text field and start typing
Note that fields initialy display example text that is replaced as
soon as you start typing.
Select (highlight) an entire text field you have entered. You can Triple-click
then press the Delete key or begin typing to delete the field text.
Move the focus to the next text field available for entry. The field Press the Tab key
will be highlighted.
You can leave example text showing in the field if you don’t want
to enter any value for it.
Move the focus to the previous text field available for entry. Press Ctrl-Tab keys
Delete text. Press the Delete key
Copy text using the CTRL-C keys, and then paste it into a text Cut and paste in text fields
field by pressing the CTRL-V keys.
StyleEase User’s Guide 33You can also read