Swordfish IV User Guide - Copyright 2007 - 2021 Maxprograms
←
→
Page content transcription
If your browser does not render page correctly, please read the page content below

Swordfish IV User Guide

 Copyright © 2007 - 2021 Maxprograms
Swordfish IV User Guide

Table of Contents
Introduction ................................................................................................................................... 1
      Supported File Formats ................................................................................................................... 1
      Supported Platforms ....................................................................................................................... 2
      Getting Started ................................................................................................................................. 2
Projects ........................................................................................................................................... 4
      Translate Single File ........................................................................................................................ 4
      Add Project ....................................................................................................................................... 5
      Translate Project .............................................................................................................................. 7
      Export Translations ......................................................................................................................... 9
      Project Statistics ............................................................................................................................... 9
      Export HTML ................................................................................................................................... 10
      Remove Project .............................................................................................................................. 10
      Import XLIFF File as Project .......................................................................................................... 10
      Export Project as XLIFF File .......................................................................................................... 11
Memories ...................................................................................................................................... 12
      Add Memory ................................................................................................................................... 12
      Import Translation Memory Data ............................................................................................... 13
      Export Memory Data ..................................................................................................................... 13
      Remove Memory ........................................................................................................................... 14
Glossaries ..................................................................................................................................... 15
      Add Glossary .................................................................................................................................. 15
      Import Glossary Data .................................................................................................................... 16
      Export Glossary Data ..................................................................................................................... 17
      Remove Glossary ........................................................................................................................... 17
      Add Term to Glossary ................................................................................................................... 17
Common Tasks ............................................................................................................................. 19
      Concordance Search ..................................................................................................................... 19
      Search Term in Glossary ............................................................................................................... 20
      Filter Segments .............................................................................................................................. 21
      Sort Segments ................................................................................................................................ 22
      Split Segment ................................................................................................................................. 23
      Merge With Next Segment ........................................................................................................... 24
      Replace Text ................................................................................................................................... 24
      Edit Source Text ............................................................................................................................. 25
      Pseudo-translation ........................................................................................................................ 25
Machine Translation ................................................................................................................... 27
      Machine Translation Settings ...................................................................................................... 27
      Translating Segments with MT .................................................................................................... 31
Auto-Translation ......................................................................................................................... 33
      Get Auto-Translations ................................................................................................................... 33

                                                                                                                                                          i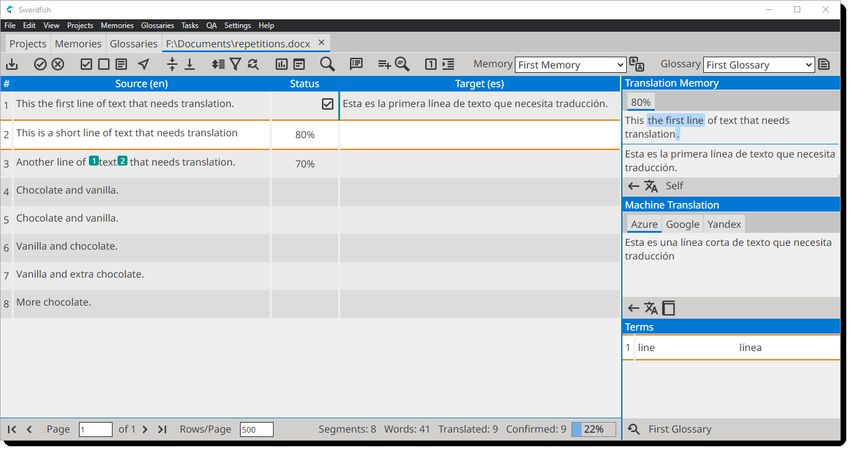
Swordfish IV User Guide

        Apply Auto-Translation to All Segments ..................................................................................... 33
        Remove All Auto-Translations ...................................................................................................... 34
 Quality Assurance ....................................................................................................................... 35
        Inline Tags ...................................................................................................................................... 35
        Initial/Trailing Spaces .................................................................................................................... 35
 Spellchecker ................................................................................................................................. 37
        Spellchecking on macOS .............................................................................................................. 37
        Spellchecking on Windows and Linux ......................................................................................... 40
 Configuration Options ................................................................................................................ 43
        Basic Settings ................................................................................................................................. 43
        Advanced Settings ......................................................................................................................... 43
 Subscriptions ............................................................................................................................... 46
        First Registration - Evaluation Request ....................................................................................... 46
        Subscription Renewal .................................................................................................................... 47

Glossary ...................................................................................................................................................... i

                                                                                                                                                               ii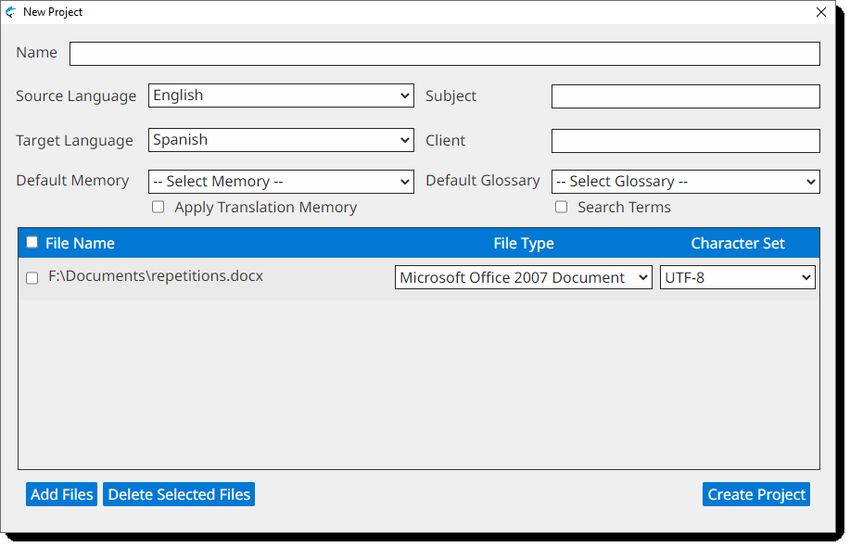
Swordfish IV User Guide

Introduction
Swordfish IV is an advanced CAT (Computer Aided Translation) tool based on Open Standards that
supports MS Office, DITA, HTML and other document formats.
Swordfish IV uses TM (Translation Memory) and MT (Machine Translation). Supports segment fil-
tering, terminology, customization and more.

Supported File Formats
The file formats currently supported by Swordfish IV are:
  • General Documentation Types
      – Adobe InCopy ICML
      – Adobe InDesign Interchange (INX)
      – Adobe InDesign IDML CS4, CS5, CS6 & CC
      – HTML
      – Microsoft Office (2007 and newer)
      – Microsoft Visio XML Drawings (2007 and newer)
      – MIF (Maker Interchange Format)
      – OpenOffice / LibreOffice / StarOffice
      – Plain Text
      – SRT Subtitles

  • Localization Files
      – SDLXLIFF (Trados Studio)
      – Trados Studio Packages (*.sdlppx)
      – TXML (GlobalLink/Wordfast PRO)
      – WPML XLIFF (WordPress Multilingual Plugin)
      – XLIFF from Other Tools (.mqxliff, .txlf, .xliff)

  • XML Formats
      – XML (Generic)
      – DITA 1.0, 1.1, 1.2 and 1.3
      – DocBook 3.x, 4.x and 5.x
      – SVG
      – Word 2003 ML
      – XHTML

  • Software Development Types
      – JavaScript

                                              Introduction                                  1
Swordfish IV User Guide

      – Java Properties
      – JSON
      – RC (Windows C/C++ Resources)
      – ResX (Windows .NET Resources)

       Note
       The filter for XML files supports custom configuration. Users can define conversion rules
       for almost any XML vocabulary. Contact tech@maxprograms.com for additional information.

Supported Platforms
Swordfish IV works on these Operating Systems:
  • Microsoft Windows (8, 8.1 and 10)
  • macOS High Sierra (10.13), Mojave (10.14), Catalina (10.15) and Big Sur (11.0)
  • Linux (with GNOME Desktop Manager)

Getting Started
Only a few steps are necessary to translate with Swordfish IV. The basic workflow for translating
documents is:
 1. Setup memories and glossaries
 2. Create a project
 3. Translate a project
 4. Export translations

Step 1: Setup Memories and Glossaries
Swordfish IV uses Translation Memory (TM) technology to assist translators. It stores your trans-
lations in Memories and offers them again when you need to translate a similar text.
 1. Create a Memory to store your translations, following the steps described in the Add Memory
    section.
 2. If you have Translation Memory data in TMX format, import your TMX files into your memories
    following the procedure indicated in the Import Translation Memory Data section.
Use Glossaries to store frequent terms and their translations for consulting at translation time.
Your glossary entries can also assist in assembling matches with the Auto-Translation engine in-
cluded in Swordfish IV.
 1. Create a Glossary to store your terms, following the instructions from the Add Glossary section.
 2. If you have terminology data in TMX or TBX format, import your data into your glossaries
    followingthe procedure indicated in the Import Glossary Data section.

                                             Introduction                                          2
Swordfish IV User Guide

       Note
       You can reuse memories and glossaries in different translation projects. It is not required
       to create a new memory or glossary at the start of each project.

Step 2: Create a Project
Swordfish IV allows you to translate one or more files at a time. Translation tasks are organized
as Projects.
There are two methods for creating projects:
  • Translate Single File: use this simplified method for creating a project containing just one file.
  • Add Project: use this option when you want to translate several related documents together.
When you create a project from a single file, the file name and location are used as project name.

Step 3: Translate a project
Follow the instructions from the Translate Project section and translate all segments contained
in your project.
Notice the features listed in the Common Tasks chapter. They provide useful functionality to carry
on with the translation task.

Step 4: Export translations
Once you have finished translating your project, follow the steps described in the Export Transla-
tions section.

                                              Introduction                                           3
Swordfish IV User Guide

Projects
Swordfish IV organizes your translation tasks in Projects.
The Projects tab in Swordfish IV lists your translation projects and offers direct access to these
project-related operations from its toolbar:
  •     Translate Single File
  •     Add Project
  •     Translate Project
  •     Export Translations
  •     Project Statistics
  •     Export HTML
  •     Remove Project
  •     Import XLIFF File as Project
  •     Export Project as XLIFF File

Translate Single File
Follow these steps to create a translation project from a single file.

Procedure
 1. Select the file to translate:
        • In main menu, select File → Open... ([Ctrl+O] on Windows/Linux, [Cmd+O] on macOS) or
          click the button on Projects tab toolbar. Use the dialog displayed by the Operating
          System to a file.
        • Drag a file and drop it in the Projects tab.
      Once you have selected a file, the Translate File dialog appears:

 2. Complete the fields of the Translate File dialog:

                                                Projects                                             4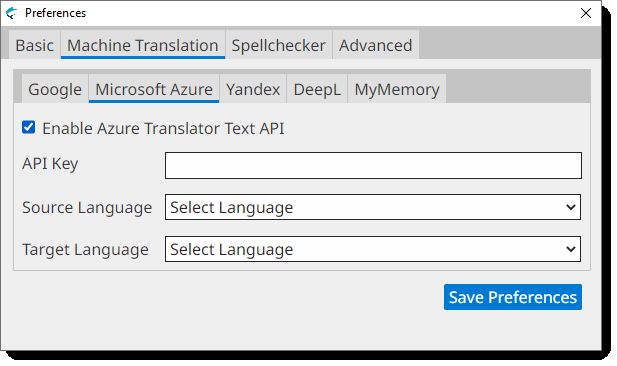
Swordfish IV User Guide

     a. If Swordfish has not detected the right document , select it using the File Type drop-down
        .
     b. if Swordfish has not detected the character set for the document automatically, select it
        using the Character Set drop-down
     c. Select the source language of your project using the Source Language drop-down.
     d. Select the target language of your project using the Target Language drop-down.
     e. Optionally, enter a subject description for the new project in the Subject box, or select
        an existing value from the drop-down list.
     f. Optionally, enter a client name for the new memory in the Subject box, or select an existing
        value from the drop-down list.
     a. Optionally, select a memory for storing your translations using the Default Memory
        drop-down.
     b. Optionally, select the Apply Translation Memory checkbox to incorporate Translation
        Memory matches from Default Memory into your project.
     c. Optionally, select a glossary for checking terms at translation time using the Default
        Glossary drop-down.
     d. Optionally, select the Search Terms checkbox for fetching all known terms from the De-
        fault Glossary before starting the translation task.

 3. Click the Translate File button.

Results
A project creation process is started. Once the project is ready, it is opened for translation.

Add Project
A Swordfish project may contain one or more files. Follow these steps to create a project with
several files.

Procedure
 1. In main menu, select Projects → New Project ([Ctrl+N] on Windows/Linux, [Cmd+N] on macOS)
    or click the button on Projects tab toolbar.
    The New Project dialog appears:

                                               Projects                                           5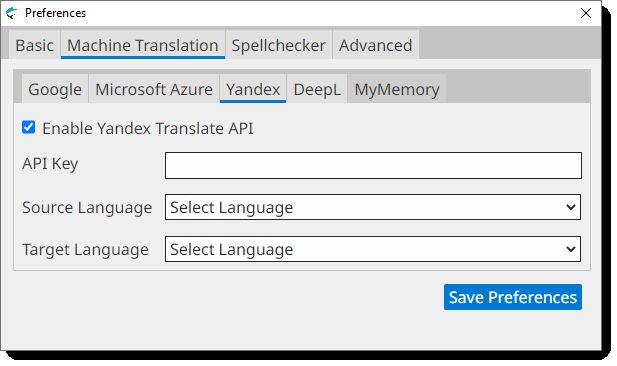
Swordfish IV User Guide

2. Complete the fields of the New Project dialog:
    a.    Enter a descriptive name for the project in the Name text box.
    b.    Select the source language of your project using the Source Language drop-down.
    c.    Select the target language of your project using the Target Language drop-down.
    d.    Optionally, enter a subject description for the new project in the Subject box, or select
          an existing value from the drop-down list.
    e.    Optionally, enter a client name for the new memory in the Subject box, or select an existing
          value from the drop-down list.
    f.    Optionally, select a memory for storing your translations using the Default Memory
          drop-down.
    g.    Optionally, select the Apply Translation Memory checkbox to incorporate Translation
          Memory matches from Default Memory into your project.
    h.    Optionally, select a glossary for checking terms at translation time using the Default
          Glossary drop-down.
     i.   Optionally, select the Search Terms checkbox for fetching all known terms from the De-
          fault Glossary before starting the translation task.

3. Click the Add Files button to select the files to translate using a dialog from the Operating
   System.
  Make sure that the File Type and Character Set drop-downs display the right selection for
  each file. Adjust their values as needed.

4. If you want to remove one or more files from the list, select the checkbox from the leftmost
   column and click the Delete Selected Files button.
5. Click the Create Project button.

                                               Projects                                             6
Swordfish IV User Guide

Results
A project creation process is started. Once the project is ready, it is opened for translation.

Translate Project
New projects are opened automatically for translation. To continue work on a closed project:
 1. In Projects tab, click the project that you want to translate.
 2. In main menu, select Projects → Translate Projects or click the              button on the Projects
    tab toolbar.

        Note
        You can also double-click on a project in the Projects tab to open it for translation.

A project opened for translation looks like this:

The translation view has these special areas:

Top Toolbar                    Contains an array of buttons for performing different tasks. It also
                               contains drop-down selectors for the active and glossary.

Translation Panel              Large scrollable table of segments, showing source text, segment
                               status and translation.

Side Panel                     Located on the right side, this section holds three panels: Translation
                               Memory, Machine Translation and Terms.

Navigation and Status          Located at the bottom, this area contains buttons for navigating
Bar                            between project pages and provides translation status information.

Click on a segment to start translating it. The corresponding row is highlighted and centered on
screen (whenever possible) and the cursor is positioned at the start of target text.

                                                  Projects                                                7
Swordfish IV User Guide
Source formatting is represented with green marks containing a number (i.e.: 3 ). To insert green
marks, also known as inline tags, press [Ctrl+N] on Windows/Linux, ([Cmd+N] on macOS) where N
is the number in the mark. You can also use the different options for managing tags from Edit
menu:
• Edit → Insert Tag ([Ctrl+T] on Windows/Linux, [Cmd+T] on macOS): displays a window for
writing the tag number. Use this option when the number is greater than 10.
• Edit → Insert Tags...: opens a submenu for inserting tags 1 to 10.
• Edit → Insert Next Tag ([Ctrl+Shift+T] on Windows/Linux, [Cmd+Shift+T] on macOS): inserts
the tag that follows the highest tag number inserted so far.
• Edit → Insert Remaining Tags ([Ctrl+Alt+T] on Windows/Linux, [Cmd+Alt+T] on macOS): in-
serts all tags from source that are not present in target text.
• Edit → Remove All Tags ([Ctrl+Shift+R] on Windows/Linux, [Cmd+Shift+R] on macOS): re-
moves all tags present in target text.
Note
In case there are tag errors or initial/trailing spaces errors in a segment, a warning icon ( )
is displayed in the center column of the Translation Panel when the segment is confirmed.
When the segment is fully translated, press [Ctrl+E] ([Cmd+E] on macOS) or click the button on
the top toolbar to confirm it. When you confirm a segment, its translation is stored in the memory
selected in the Memory drop-down of the top toolbar and is also automatically propagated to all
similar unconfirmed segments.
You have two more options for marking a segment as confirmed:
• Press [Alt+Down Arrow] ([Ctrl+Alt+Down Arrow] on macOS) or click the button on the top
toolbar to Confirm and go to Next Untranslated segment.
• Press [Alt+Shift+Down Arrow] ([Ctrl+Shift+Down Arrow] on macOS) or click the button on
the top toolbar to Confirm and go to Next Unconfirmed segment.
Use [Page Up] and [Page Down] keys to move to next and previous segments and translate them.
When all segments have been translated, on main menu select Projects → Export HTML([F5]) or
click on the button on the top toolbar to export an HTML version of your translations for review.
Note any segments with errors and correct them.
To visit a segment knowing its number, in main menu selectEdit → Go To Segment... or press
[Ctrl+G] ([Cmd+G] on macOS). The Go To Segment dialog appears:
Projects 8Swordfish IV User Guide
Type the number of the segment you want to review in the Segment Number box and click the
Go To Segment button.
Finally, use the Check Inline Tags [F9] and Check Initial/Trailing Spaces [F10] options from QA
menu to check that your file is properly translated. Pay special attention to errors in tags, because
the translated document may become unusable.
Export Translations
Follow these steps to generate translated versions of all files in a project.
About this task
Once all segments have been translated and reviewed, generate the translated version of your
project.
Procedure
1. In main menu, select Projects → Export Translations ([Alt+Ctrl+S] on Windows/Linux,
[Alt+Cmd+S] on macOS) or click the button on the Projects tab toolbar or the top toolbar
of a translation tab.
The Operating System will display a dialog for selecting where to save the translated docu-
ments.
Results
After your translations are exported, a new dialog will offer to open the translated file or folder.
Project Statistics
Follow these steps to generate an statistic report from a project.
About this task
Knowing the number of segments, words and available TM matches in a project is essential to
estimate the cost of a translation job.
Swordfish IV statistic analysis generates word counts and segment counts at file and project levels,
including the availability of Translation Memory matches at different ranges.
Procedure
1. In main menu, select Projects → Project Statistics or click the from the Projects tab toolbar
or the top toolbar of a translation tab.
Projects 9Swordfish IV User Guide
Results
An HTML file containing projects statistics is generated and automatically opened in the default
web browser.
Export HTML
Follow these steps to export your project as an HTML file for review.
Procedure
1. In main menu, select Projects → Export HTML ([F5]) or click the from the Projects tab
toolbar or the top toolbar of a translation tab.
Results
An HTML view of all segments is generated and automatically opened in the default web browser.
Remove Project
Follow these steps to permanently remove a Project from Swordfish IV.
Procedure
1. In Projects tab, selec all projects that you want to remove by clicking on them.
2. In main menu, select Project → Remove Projects or click the button from the Projects tab
toolbar.
3. Confirm projects removal in the dialog displayed by the Operating System.
Import XLIFF File as Project
Follow these steps to create a new project from an XLIFF file exported by Swordfish IV.
About this task
Use this option to import an XLIFF file created by Swordfish IV in another computer or for importing
an XLIFF file from Swordfish IV that has been processed using a different tool.
Procedure
1. In main menu, select Projects → Import XLIFF File as Project or click on the button on
the Projects tab toolbar.
The Import XLIFF File dialog is displayed:
Projects 10Swordfish IV User Guide
2. Enter a descriptive name for the project in the Project Name text box.
3. Type the name of the XLIFF file to import in the XLIFF File text box or click the Browse... button
next to it to select an XLIFF file from the file system.
4. Optionally, enter a subject description for the new project in the Subject box, or select an
existing value from the drop-down list.
5. Optionally, enter a client name for the new project in the Client box, or select an existing
value from the drop-down list.
6. Click the Import XLIFF File button.
Export Project as XLIFF File
Follow these steps to export a project as XLIFF file.
About this task
Export projects as XLIFF to continue working in a different computer that has Swordfish IV or to
process the XLIFF file using a different tool.
Note
XLIFF Manager, a free cross-platfor open-source tool, can be used to export translations
from XLIFF files created by Sworfish IV.
Procedure
1. In Projects tab, select the project that you want to export by clicking on it.
2. In main menu, select Projects → Export Project as XLIFF File or click the button on the
Projects tab toolbar.
The operating system displays a dialog for selecting the name and location of the XLIFF file
to create.
Results
An export process is started and an export indicator is displayed until the process is complete.
Projects 11Swordfish IV User Guide
Memories
Swordfish IV stores your translations in Memories for later reuse.
The Memories tab in Swordfish IV lists your translation memories and offers direct access to these
memory-related operations from its toolbar:
• Add Memory
• Remove Memory
• Import TMX File
• Export Memory as TMX File
• Concordance Search
Note
Export your memories as TMX files frequently and save the TMX files in a safe place as
backup.
Add Memory
Follow these steps to create a Memory for storing your Translation Memory (TM) data.
Procedure
1. In main menu, select Memories → Add Memory or click the button from the Memories
tab toolbar.
The Add Memory dialog appears:
2. Type a descriptive name for the new memory in the Name text box.
3. Optionally, enter a project description for the new memory in the Project box, or select an
existing value from the drop-down list.
4. Optionally, enter a subject description for the new memory in the Subject box, or select an
existing value from the drop-down list.
5. Optionally, enter a client name for the new memory in the Subject box, or select an existing
value from the drop-down list.
Memories 12Swordfish IV User Guide
6. Click the Add Memory button to create a new memory.
Import Translation Memory Data
Follow these steps to import Translation Memory Data from TMX files into Swordfish IV memories.
Procedure
1. In the Memories tab, select the memory into wich you want to import a TMX file by clicking
on it.
2. In main menu, select Memories → Import TMX File or click the button from the Memories
tab toolbar.
The Import TMX File dialog appears:
3. Type the name of the TMX file to import in the TMX File text box or click the Browse... button
next to it to select a TMX file from the file system.
4. Optionally, enter a project description for the TMX data in the Project box, or select an existing
value from the drop-down list.
5. Optionally, enter a subject description for the TMX data in the Subject box, or select an existing
value from the drop-down list.
6. Optionally, enter a client name for the TMX data in the Client box, or select an existing value
from the drop-down list.
7. Click the Import TMX File button.
Results
An import process is started. The number of imported entries is displayed when the import process
completes.
Export Memory Data
Follow these steps to export the content of your memories to TMX files
About this task
Export your Translation Memory data as TMX files regularly and keep a copy of the exported TMX
as backup.
Memories 13Swordfish IV User Guide
Procedure
1. In the Memories tab, select the memory that you want to export as a TMX file by clicking on
it.
2. In main menu, select Memories → Export Memory as TMX File or click the button from
the Memories tab toolbar.
The operating system displays a dialog for selecting the name and location of the TMX file to
create.
Results
An export process is started and an export indicator is displayed until the process is complete.
Remove Memory
Follow these steps to permanently remove a Memory from Swordfish IV.
Procedure
1. In the Memories tab, select all memory that you want to remove by clicking on them.
2. In main menu, select Memories → Remove Memory or click the button from the
Memories tab toolbar.
3. Confirm memories removal in the dialog displayed by the Operating System.
Memories 14Swordfish IV User Guide
Glossaries
Swordfish IV stores your terminology data in Glossaries.
The Glossaries tab in Swordfish IV lists your glossaries and offers direct access to these terms-
related operations from its toolbar:
• Add Glossary
• Remove Glossary
• Import Export
• Export Memory as TMX File
• Add Term to Glossary
• Search Term in Glossary
Note
Export your glossaries as TMX files frequently and save the TMX files in a safe place as
backup.
Add Glossary
Follow these steps to create a Glossary for storing your terminology data
Procedure
1. In main menu, select Glossaries → Add Glossary or click the button from the Glossaries
tab toolbar.
The Add Glossary dialog appears:
2. Type a descriptive name for the new glossary in the Name text box.
3. Optionally, enter a project description for the new glossary in the Project box, or select an
existing value from the drop-down list.
4. Optionally, enter a subject description for the new glossary in the Subject box, or select an
existing value from the drop-down list.
Glossaries 15Swordfish IV User Guide
5. Optionally, enter a client name for the new glossary in the Subject box, or select an existing
value from the drop-down list.
6. Click the Add Glossary button to create a new glossary.
Import Glossary Data
Follow these steps to import glossary data from TMX or TBX files into Swordfish IV glossaries.
About this task
Swordfish allows importing terminology data into Glossaries from TMX and TBX files. Two TBX
versions are supported:
• TBX version 2, also known as ISO 30042:2008, originally released in 2002 by LISA's OSCAR
special interest group.
• TBX version 3, also known as ISO 30042:2019, latest release from ISO.
Procedure
1. In the Glossaries tab, select the glossary into wich you want to import a glossary file by
clicking on it.
2. In main menu, select Glossaries → Import Glossary or click the buttom from the Glossaries
tab toolbar.
The Import Glossary File dialog appears:
3. Type the name of the file to import in the Glossary File text box or click the Browse... button
next to it to select a TMX or TBX file from the file system.
4. Optionally, enter a project description for the glossary data in the Project box, or select an
existing value from the drop-down list.
5. Optionally, enter a subject description for the glossary data in the Subject box, or select an
existing value from the drop-down list.
6. Optionally, enter a client name for the glossary data in the Client box, or select an existing
value from the drop-down list.
7. Click the Import Glossary File button.
Glossaries 16Swordfish IV User Guide
Results
An import process is started. The number of imported entries is displayed when the import process
completes.
Export Glossary Data
Follow these steps to export the content of your glossaries to TMX files
About this task
Export your glossary data as TMX files regularly and keep a copy of the exported TMX as backup.
Procedure
1. In the Glossaries tab, select the glossary that you want to export as a TMX file by clicking on
it.
2. In main menu, select Memories → Export Glossary or click the button from the Glossaries
tab toolbar.
The operating system displays a dialog for selecting the name and location of the TMX file to
create.
Results
An export process is started and an export indicator is displayed until the process is complete.
Remove Glossary
Follow these steps to permanently remove a Glossary from Swordfish IV.
Procedure
1. In the Glossaries tab, select all glossaries that you want to remove by clicking on them.
2. In main menu, select Glossaries → Remove Glossary or click the button from the Glossaries
tab toolbar.
3. Confirm glossaries removal in the dialog displayed by the Operating System.
Add Term to Glossary
Follow these steps for storing a term pair in a glossary.
About this task
You can add term pairs to a glossary while translating a project or from the Glossaries tab.
Procedure
1. • If you are adding a term from a translation tab, make sure a glossary is selected in the
Glossary drop-down.
• If you are adding a term from the Glossaries tab, select a glossary for storing the term.
Glossaries 17Swordfish IV User Guide
2. In main menu, select Glossaries → Add Term to Glossary ([Ctrl+B] on Windows/Linux, [Cmd+B]
on macOS) or click the button on the Glossaries tab toolbar or the translation tab top
toolbar.
The Add Term to Glossary dialog is displayed:
3. Type source term in the Source Term text box.
4. Select the language of source term using the Source Language drop-down.
5. Type target term in the Target Term text box
6.
7. Select the language of target term using the Target Language drop-down.
8. Click the Add Term button.
Glossaries 18Swordfish IV User Guide
Common Tasks
Common tasks usually performed while translating are:
• Concordance Search
• Search Term in Glossary
• Filter Segments
• Sort Segments
• Split Segment
• Merge Segments
• Replace Text
• Edit Source Text
• Pseudo-Translation
Concordance Search
A concordance search allows you to search for a given text in one or more Memories.
About this task
You can search for text while translating a project or from the Memories tab.
Procedure
1. • If you are searching from a translation tab, make sure a memory is selected in the Memory
drop-down.
• If you are searching from the Memories tab, select one or more memories for performing
the search.
To select more than one memory in Memories tab, hold the [Ctrl] key ([Cmd] key on macOS)
while clicking on the memories of your interest
2. In main menu, select Memories → Concordance Search ([Ctrl+Y] on Windows/Linux, [Cmd+Y]
on macOS) or click the button on the Memories tab toolbar or the translation tab top
toolbar.
The Concordance Search dialog appears:
Common Tasks 19Swordfish IV User Guide
3. Type the text to search in the Text to Search text box.
If you are searching from a translation tab, you can select text in source or target columns,
press [Ctrl+Y] ( [Cmd+Y] on macOS) and the text will be automatically added to the Text to
Search text box.
4. Select the language to use when performing the search using the Language drop-down.
Language value is automatically adjusted if the Concordance Search dialog is opened with
a keyboard shortcut after selecting source or target text in a translationt tab.
5. Select the maximum number of entries to display in the Entries to Display drop-down.
6. Optionally, select the Case Sensitive Search checkbox if you want to search only for entries
that exactly match the text entered on the Text to Search text box.
7. Optionally, select the Regular Expression checbox if the text entered in the Text to Search
box should be treated as a regular expression for searching.
8. Click the Search Text button
Results
A search is performed in the selected memories and results are displayed in a dialog like this:
Search Term in Glossary
About this task
You can search terms while translating a project or from the Glossaries tab.
Procedure
1. • If you are searching from a translation tab, make sure a glossary is selected in the
Glossary drop-down.
• If you are searching from the Glossaries tab, select a glossary for performing the search.
2. In main menu, select Glossaries → Search Term in Glossay ([Ctrl+D] on Windows/Linux,
[Cmd+D] on macOS) or click the button on the Glossaries tab toolbar or the translation tab
top toolbar.
The Term Search dialog is displayed:
Common Tasks 20Swordfish IV User Guide
3. Type the term to search in the Term text box.
4. Select the language to use when performing the search using the Language drop-down.
5. Select the minimum similarity porcentage to use when searching using the Similarity drop-
down.
6. Optionally, select the Case Sensitive Search checkbox if you want to search only for entries
that exactly match the text entered on the Term text box.
7. Click the Search Term button.
Results
On success, a dialog containing a list of matching results is displayed.
Filter Segments
Follow these steps to filter segments and view only those segments that contain a given text.
About this task
Use segment filtering to find segments containing text that you want to edit.
Procedure
1. In main menu, select View → Filter Segments ([Ctrl+F] on Windows/Linux, [Cmd+F] on macOS)
or click the button from the top toolbar.
The Filter Segments dialog appears:
Common Tasks 21Swordfish IV User Guide
2. Type the text to search in the Text to Search text box.
3. Select where to search by checking either Source or Target radio buttons.
4. Optionally, select the Case Sensitive Search checkbox if you want to search only for entries
that exactly match the text entered on the Text to Search text box.
5. Optionally, select the Regular Expression checkbox if the text entered in the Text to Search
box should be treated as a regular expression for searching.
6. Choose the types of segments to include in filtered results, by selecting/deselecting the
checkbox for Untranslated Segments, Translated Segments or Confirmed Segments.
7. Click the Filter Segments button.
Results
Translation view is updated, displaying only segments that contain the filtered text. Filtering remains
active until the Filter Segments dialog is reopened and the Clear Filter button is clicked.
Sort Segments
Follow these steps to sort segments on source/target text or on segment translation status.
About this task
Sometimes you may need to sort segment on text content for review. A common case is the need
to review segments that contain numbers.
It is also convenient to sort segments according to translation status when you want to keep all
untranslated or unconfirmed segments together.
Procedure
1. In main menu, select View → Sort Segments ([F3]) or click the button on the top toolbar.
The Sort Segments dialog is displayed:
Common Tasks 22Swordfish IV User Guide
2. Select how to sort segments
• Choose Sort on Column Text Content if you want to sort segments on Source Column
or Target Column text.
• Choose Sort on Segment Status if you want to sort segments according to their translation
status: Translated, Untranslated and Confirmed.
3. Optionally, select the Sort Descending checkbox if you want to sort segments in reverse order.
4. Click the Sort Segments button.
Results
Translation view is updated, displaying segments in the requested order. Sorting remains in effect
until the Sort Segments dialog is reopened and the Clear Sorting button is clicked.
Split Segment
Folow these steps to split a segment in two at translation time.
About this task
Procedure
1. In a projects translation tab, select the segment that you want to split.
2. In main menu, select Edit → Split Segment ([Ctrl+H] on Windows/Linux, [Cmd+H] on macOS)
or click the button on the top toolbar.
Source text is selected and highlighed in a different color.
3. Place the cursor at the point where you want to split the segment.
4. Press [Enter].
Results
On success, the segment is split at the selected point and the screen is updated to reflect the
changes.
Common Tasks 23Swordfish IV User Guide
Merge With Next Segment
Follow these steps to merge two conscutive segments at translation time.
About this task
Sometimes you may want to merge two consecutive segments to correct a segmentation error
or to produce a translation that would be better rearranging text.
You can merge segments that belong to the same paragraph. Segments that can be merged are
displayed with the same border color in the number column, as shown in the following picture:
Procedure
1. In a project transation tab, select the first of the two segments that you want to merge.
2. In main menu, select Edit → Merge With Next Segment ([Ctrl+J] on Windows/Linux, [Cmd+J]
on macOS) or click the button on the top toolbar.
Results
On success, selected segment is merged with the following one and the screen is updated to reflect
the merge.
Replace Text
Follow these steps to replace all appearances of a given text with a different text in all segments.
Procedure
1. In main menu, select Edit → Replace Text ([Alt+Ctrl+F] on Windows/Linux, [Alt+Cmd+F] on
macOS) or click the button on the top toolbar.
The Replace Text dialog is displayed:
Common Tasks 24Swordfish IV User Guide
2. Type the text to be replaced in the Text to Search text box.
3. Type the replacement text in the Replace With text box.
4. Optionally, select the Case Sensitive Search checkbox if you want to search only for entries
that exactly match the text entered on the Text to Search text box.
5. Optionally, select the Regular Expression checkbox if the text entered in the Text to Search
box should be treated as a regular expression for searching.
6. Click the Replace Text button.
Edit Source Text
Follow these steps to edit the source text of a segment.
About this task
When source text contains errors, you may want to correct them to ensure that your memories
contain accurate translations.
Procedure
1. Select the segment you wish to edit.
2. In main menu, select Edit → Edit Source Text or press [Alt+F2].
The background color of segment source changes and text becomes editable.
3. Make all required changes
Avoid reordering or removing tags. If changes in tags are made, it may not be possible to
export translations from the project.
4. At any time:
• Press the [Escape] key to discard all changes.
• Press [Alt+Enter] to save your changes, remaining in current segment.
• Click on another segment to save your changes and continue editing the selected segment.
Pseudo-translation
Use pseudo-translation to simulate the process of translating text into another language.
About this task
Pseudo-translation provides a quick way to test your translation process. Pseudo-translation, also
known as mock translation, is typically used to test if an application can correctly handle translated
text.
Swordfish IV pseudo-translation replaces all vowels in source text with accented vowels in target
text.
Procedure
1. In main menu, select Tasks → Pseudo-translate Untranslated Segments
Common Tasks 25Swordfish IV User Guide
Results
Targets of all untranslated segments are populated with a copy of source text that has all regular
vowels replaced with accented versions.
Common Tasks 26Swordfish IV User Guide
Machine Translation
Swordfish supports five Machine Translation (MT) engines:
• Azure Translator Text
• DeepL API
• Google Cloud Translation
• MyMemory API
• Yandex Translate API
Using Machine Translation is a two-step process:
1. Configure Machine Translation engines options.
2. Request the translation of individual segments or the complete file at translation time.
Machine Translation Settings
About this task
Follow these steps to configure the credentials used when requesting Machine Translations.
Procedure
1. • On macOS, select Apple → Preferences → Settings on the menu or press [Cmd + ,].
• On Windows or Linux main menu, select Settings → Preferences.
The Preferences dialog appears:
2. Select the Machine Translation tab.
• Select Google tab to configure Google Cloud Translation engine. Preferences dialog
switches to:
Machine Translation 27Swordfish IV User Guide
a. Check the Enable Google Cloud Translation box.
b. Enter your API Key in the API Key text box.
Note
You can get your personal API Key at Google's Cloud Platform Console.
c. Select a source language from the Source Language drop-down.
d. Select a target language from the Target Language drop-down.
e. Check the Use Neural Machine Translation (NMT> box if you want to request NMT
based translations from Google.
• Select Microsoft Azure tab to configure Azure Translator Text engine. Preferences dialog
switches to:
a. Check the Enable Azure Translation Text API box.
b. Enter your API Key in the API Key text box.
Machine Translation 28Swordfish IV User Guide
To obtain an API Key for Azure Translation Text API:
1. Create an account at http://www.azure.com/.
2. Login at the Azure Portal at https://portal.azure.com/
3. On the Azure dashboard, click the + Create a Resource button to create a new
service account.
4. Click the See all link next to Azure Marketplace.
5. Type Cognitive Services in the Search box and press Enter.
6. Select Translator in search results.
7. Clict the Create button in the Translator page.
8. Complete the form and click the Review + create button.
9. Wait for the account to be created (you will receive confirmation emails) and then
login again at the Azure Portal.
10. Click on All resources and then select your Translator service account from the
list of resources.
11. You will find your new API keys in the Keys and Endpoint section.
c. Select a source language from the Source Language drop-down.
d. Select a target language from the Target Language drop-down.
• Select Yandex tab to configure Yandex Translate API engine. Preferences dialog switches
to:
a. Check the Enable Yandex Translate API box.
b. Enter your API Key in the API Key text box.
Note
You can request a free API key for using Yandex.Translate at https://tech.yan-
dex.com/keys/get/?service=trnsl.
Machine Translation 29Swordfish IV User Guide
c. Select a source language from the Source Language drop-down.
d. Select a target language from the Target Language drop-down.
• Select DeepL tab to configure DeepL API engine. Preferences dialog switches to:
a. Check the Enable Azure DeepL API box.
b. Enter your API Key in the API Key text box.
To obtain an API Key for DeepL:
– Visit https://www.deepl.com/translator and create an account.
– Once logged in, you will find your "Authentication Key for CAT tool plugins" at
https://www.deepl.com/pro-account.html.
Note
You neet to subscribe to DeepL Pro Advanced or Ultimate plans. API Keys from
other plans are rejected by DeepL when used from a CAT tool.
c. Select a source language from the Source Language drop-down.
d. Select a target language from the Target Language drop-down.
• Select MyMemory tab to configure MyMemory API engine. Preferences dialog switches
to:
Machine Translation 30Swordfish IV User Guide
a. Check the Enable MyMemory API box.
b. Enter your API Key in the API Key text box.
It is not strictly required to have an API key for requesting machine translations from
MyMemory.
You can register for a user account at https://www.translated.net/top/?ref=mm and
then generate an API key with your user name and password at https://my-
memory.translated.net/doc/keygen.php.
c. Select a source language from the Source Language drop-down.
d. Select a target language from the Target Language drop-down.
3. Click on the Save Preferences button to save your changes.
Translating Segments with MT
You can use Machine Translation (MT) to translate individual segments or to translate all uncon-
firmed segments of a project as one operation.
Note
Machine Translation Engines configurstion must be completed before requesting MT
translations.
Translate a Single Segment with MT
1. Open a project for translation.
2. Select the segment to translate.
3. In main menu, select Tasks → Get Machine Translations ([Ctrl+L] on Windows/Linux, [Cmd+L]
on macOS) or click the button from the Machine Translation panel.
A translation request is sent to all enabled Machine Translation engines. Results are displayed in
the Machine Translation panel.
Machine Translation 31Swordfish IV User Guide
Translate All Segments with MT
1. Open a project for translation.
2. In main menu, select Tasks → Apply Machine Translations to All Segments
A translation request for each unconfirmed segment is sent to all enabled Machine Translation
engines. Results are displayed in the Machine Translation panel.
Managing Machine Translation Results
• When more than one result is available in the Machine Translation panel, tab labels indicate
translation origin.
Click on the tab label to view the corresponding result or use the following commands to view
them using the keyboard:
Menu Options Windows/Linux Short- macOS Shortcuts
cuts
View → Next Machine Translation [Alt+Right Arrow] [Ctrl+Alt+Right Arrow]
Match
View → Previous Machine Translation [Alt+Left Arrow] [Ctrl+Alt+Left Arrow]
Match
• To copy a Machine Translation match to the target of the selected segment, select Tasks →
Accept Machine Translation in main menu ([Alt+Ctrl+L] on Windows/Linux, [Alt+Cmd+L]
on macOS) or click the button in the Machine Translation panel.
• To insert a Machine Translation match in the target of all unconfirmed segments, select Tasks
→ Accept All Machine Translations from main menu.
Note
When there are multiple Machine Translations in a segment, the first one available is
copied to target.
• Select Tasks → Remove All Machine Translations in main menu if you wish to remove existing
MT matches from all segments of the selected project.
Machine Translation 32Swordfish IV User Guide
Auto-Translation
Auto-Translation assembles translations combining fragments from Translation Memory results
and Glossary entries.
When the difference between source text and the source tex of a match from a Memory is a
number or a term available in the active Glossary, Auto-Translation repairs the match adjusting
the number or term.
In cases where there is no match to repair but there are terms in the active Glossary, Auto-
Translation provides a partial Machine Translation based on Glossary terms.
The operations you can do with Auto-Translation are:
• Get Auto-Translations
• Apply Auto-Translation to All Segments
• Remove All Auto-Translations
Get Auto-Translations
Follow these steps to apply Auto-Translation to an individual segment.
About this task
Make sure that a Memory and a Glossary are selected in the corresponding drop-downs of the
top toolbar.
Procedure
1. In main menu, select Tasks → Get Auto-Translations ([Ctrl+R] on Windows/Linux, [Cmd+R]
on macOS) or click the button on the Machine Translation panel.
Results
On success, a match is added to the Machine Translation panel and fixed differences are high-
lighted like in this example:
Apply Auto-Translation to All Segments
Follow these steps to apply Auto-Translation to all segments of a project.
About this task
Make sure that a Memory and a Glossary are selected in the corresponding drop-downs of the
top toolbar.
Auto-Translation 33Swordfish IV User Guide
Procedure
1. In main menu, select Tasks → Apply Auto-Translation to All Segments.
Results
Auto-Translation is applied to all segments and current current segment is updated to display the
result, if available.
Remove All Auto-Translations
Follow these steps to remove Auto-Translation from all segments of a project.
About this task
Procedure
1. In main menu, select Tasks → Remove All Auto-Translations
The Operating System displays a confirmation dialog.
Results
After confirming the removal request, all existing Auto-Translations in the project are removed
and current segment is updated to reflect the changes.
Auto-Translation 34Swordfish IV User Guide
Quality Assurance
Performing Quality Assurance checks is a way of preventing mistakes and avoid problems when
delivering a translated document.
Swordfish IV highligts spelling errors while you type. Correct spelling errors, if any, before confirm-
ing a segment.
After translating all segments in a project, it is recommended to perform these actions:
• Export translations as HTML for review. Note all errors and edit segments as required.
• Check inline tags.
• Check initial and trailing spaces.
Inline Tags
Follow these steps to validate inline tags in a project
About this task
Always verify that inline tags are correct before exporting translations. If there are tag errors, ex-
ported translated documents may be unusable.
Procedure
1. In main menu, select QA → Check Inline Tags ([F9]) or click the button from the top toolbar.
If there are tag errors, the Tag Analysis dialog is displayed:
2. If there are tag errors, use the Go To Segment dialog (press [Ctrl+G] on Windows/Linux,
[Cmd+G] on macOS, or click the button on the top toolbar) to open all segments with errors
and fix them.
Initial/Trailing Spaces
Follow these steps to validate initial and trailing spaces in a project
About this task
Initial and trailing spaces are highlighted in source and target columns of the Translation Panel
table to make it easier to spot them. Check that spaces are properly transfered to target text to
avoid formatting issues in translated documents.
Quality Assurance 35Swordfish IV User Guide
Note
Checking spaces may not be necessary when working with Asian target languages.
Procedure
1. In main menu, select QA → Check Initial/Trailing Spaces ([F10]) or click the button from
the top toolbar.
If there are errors in spaces, the Space Analysis dialog is displayed:
2. If there are errors in initial or trailing spaces, use the Go To Segment dialog (press [Ctrl+G]
on Windows/Linux, [Cmd+G] on macOS, or click the button on the top toolbar) to open all
segments with errors and fix them.
Quality Assurance 36Swordfish IV User Guide
Spellchecker
Swordfish IV automatically spellchecks your text as you type.
On macOS, Swordfish IV uses the native spellcheking API provided by the Operating System. By
default, macOS tries to guess your writing language and may not provide accurate spellcheking.
You can configure macOS to use a specific language following the steps from the Spellchecking
on macOS section.
On Windows and Linux, Swordfish IV uses Hunspell dictionaries from the Chromium project. Dic-
tionaries are downloaded automatically by the program when they are available for the selected
target language.
If your target language is English, Spanish or Portuguese, you need to tell Swordfish IV which
language variant to use for spellchecking, following the steps from the Spellchecking on Windows
and Linux section.
Spellchecking on macOS
On macOS, Swordfish IV uses native spellchecker APIs.
About this task
By default, macOS detects the language the user is typing in and automatically adjusts its internal
spellchecker. Use theses steps to select a specific language for spellchecking.
Procedure
1. Open System Preferences application
Spellchecker 37Swordfish IV User Guide
2. On the System Preferences main window, select Keyboard option
System Preferences window switches to:
Spellchecker 38Swordfish IV User Guide
3. On the Keyboard panel, select the Text tab
Keyboard preferences changes to:
Spellchecker 39Swordfish IV User Guide
4. Select your preferred language from the Spelling drop-down list
What to do next
You may need to restart Swordfish IV to activate the new settings.
Spellchecking on Windows and Linux
On Windows and Linux, spellchecking is based on Hunspell dictionaries from the Chromium project.
About this task
Swordfish IV automatically downloads and installs dictionaries for your target language when
they are available at the Chromium project. Use these steps to adjust Swordfish's default language
settings.
Procedure
1. In main menu, select Settings → Preferences.
The Preferences dialog appears:
Spellchecker 40Swordfish IV User Guide
2. Select the Spellchecker tab.
Preferences dialog switches to:
3. If your target language is English, Portuguese or Spanish, select the default variant used
for spellchecking using the appropriate drop-down selector.
4. If you want to verify that your target language is supported for spellchecking, click on the
Available Spellchecker Languages button to display a list of supported languages.
The following dialog appears:
Spellchecker 41Swordfish IV User Guide
5. Click on the Save Preferences button to save your changes.
Spellchecker 42Swordfish IV User Guide
Configuration Options
Basic Settings
Follow these steps to configure your default language pair, theme colors and preferred font size
when translating.
Procedure
1. • On macOS, select Apple → Preferences → Settings on the menu or press [Cmd + ,].
• On Windows or Linux main menu, select Settings → Preferences.
The Preferences dialog appears:
2. Use the Default Source Language drop-down to select the language your source documents
are written in by default.
3. Use the Default Target Language drop-down to select the language into which you normally
translate.
4. Use the Theme drop-down to control the application's default appearance.
• Select System Default to let your Operating System control the default text/background
color combination (this option is not supported in some Linux distributions).
• Select Dark to work with light text on dark background.
• Select Light to work with dark text on light grey background.
5. Use the Font Size drop-down to select the default size of the text used in the translation
panel.
6. Click on the Save Preferences button to save your changes.
Advanced Settings
Follow these steps to configure segmentation options, XML catalog and terminology searches
preferences.
Configuration Options 43You can also read