The Complete Decision Formulation, Analysis, and Presentation for Windows Version 3.04 Student Version Tutorial - InfoHarvest
←
→
Page content transcription
If your browser does not render page correctly, please read the page content below
The Complete Decision Formulation, Analysis, and Presentation for Windows Version 3.04 Student Version Tutorial
A Step By Step Tutorial 3
Tutorial Overview 3
I - Brainstorming the Problem 3
II - Building the Hierarchy 13
III - Rate the Hierarchy 18
IV - Selecting the Best Alternative 30
V - Reviewing the Results 32
Saving Your Results 34
Closing the Hierarchy window 34
What’s Next? 34
A Tutorial: Select a Vacation Book
In This Tutorial
I Brainstorming the Problem
II Building the Hierarchy
III Rate the Hierarchy
IV Selecting the Best Alternative
V Reviewing the ResultsA Step By Step Tutorial
Our tutorial acquaints you with DecisionPlus as we assist you through your first decision-making process using this program. This tutorial
assumes you have little or no prior experience with decision making tools. For this reason, we selected a simple model that, although you may not
need a decision analysis tool to solve, will build confidence in your decision making process and in using DecisionPlus. You’ll use many of the
features in DecisionPlus to make a preferred decision.
Tutorial Overview
This tutorial has all the necessary parts to reach a preferred decision. The five parts of the tutorial are: Brainstorming the Problem, Building the
Hierarchy, Rate the Hierarchy, Selecting the Best Alternative, and Reviewing the Results.
I - Brainstorming the Problem
In the first part, you’ll use the brainstorming capability where you’ll type your ideas about the problem onto a canvas. On the canvas, we’ll show
you how to associate similar ideas with each other. We call these ideas criteria. This is also where you’ll enter your alternatives (the choices you
have available).
II - Building the Hierarchy
Next, you’ll build your hierarchy and make any necessary adjustments to criteria or alternatives. You’ll learn techniques such as how to add and
delete criteria, expand and contract your model, and navigate through your model.
III - Rating the Hierarchy
Then, you’ll rate your criteria and alternatives using various rating methods and rating scales.
IV - Selecting the Best Alternative
Here you’ll calculate the preferred alternative, and interpret and present the results.
V - Reviewing the Results
Finally, you’ll analyze how sensitive your results are, see how contribution affects the results, and determine if the decision is stable.
Supporting Sample Files
When you installed DecisionPlus, two sample tutorial files were copied to the DecisionPlus directory on your system (usually c:\criplus). The file,
bookttrl.bst, contains the brainstorm file for this tutorial as it should look after you have finished the first part of this tutorial, I - Brainstorming
the Problem. The file, bookttrl.cdp, contains your hierarchy file as it should be after you have finished part III - Rating the Hierarchy. You can
use these two files to skip parts of the tutorial if you wish.
Select a Vacation Book
Imagine you are packing for a tropical vacation and you want to take along one of your new books. You have three great books in mind, but
room for only one in your luggage. Will it be Jurassic Park, Fried Green Tomatoes, or 100 Years of Solitude?
I - Brainstorming the Problem
The first step in building your decision model is to display the brainstorming window so you can enter and organize your ideas on the “canvas.”
This is also where you’ll list your book choices.
¥ This part of the tutorial takes 20 to 40 minutes, depending on your learning style.
Step One: Display the Brainstorming Window
• From Program Manager, double-click the DecisionPlus icon. The Brainstorm window displays with a blank canvas, except for the word
“Goal” inside a centered circle.The goal circle in the middle of the canvas is where you’ll type your decision goal. If you move your cursor to the
goal circle it turns gray. This feature tells you when you’ve made contact with items on the canvas.
The recycle bin in the lower right corner stores ideas you may not want to work on for the time being. You can drag words to
the recycle bin and retrieve them at a later time during the same session.
The gray area to the right of the canvas is where you’ll type your choices. In this case, the choices are the books from
which you’ll choose. We call these alternatives.
Step Two: Enter Your Decision Goal
1. Click once inside the circle to select it. A box surrounds the goal circle.
2. Click once again inside the circle on the word “Goal” to highlight it.
3. Type Select a Book.
Note: Type your text in Brainstorm the same way you would in any Windows application using the same procedures.
Because the circle was only large enough to accommodate the word “Goal,” only parts of your typing show as you type.
ct a
4. Press ENTER or click outside the circle. Your whole name appears inside the circle.
To move the goal circle anywhere on the canvas, click on the circle and drag it to another position.
Step Three: Save Your File
1. From the File menu, select Save.2. Select a drive and folder. 3. Type book. 4. Click OK, or press ENTER. You’ll find your files with the extension .bst. For example, this file is book.bst. Step Four: Enter Your Alternatives Your alternatives are the three books from which you will choose. 1. To the right of the window, under the word Alternative, click once in the first gray block. 2. Type Jurassic Park. 3. Press ENTER. When you press ENTER, the insertion point drops down to the next gray block and is ready for you to make an entry. 4. Type Fried Green Tomatoes and repeat #3. 5. Type 100 Years of Solitude and repeat #3. 6. Click once anywhere on the canvas area to get out of Alternatives. Step Five: Enter Decision Criteria If you organize easily while you think, you might choose an organized way to enter information on the Brainstorm canvas. However, because the Brainstorm function can be used to help you form and organize ideas, we show you a less organized approach to entering your criteria. Let’s say you like books that are at least exciting, humorous, and educational, but you also like mysteries. These criteria can be entered anywhere on the canvas. The following steps are a quick way to make your entries: 1. Double-click in the top left corner of the canvas away from the decision goal circle. An empty block appears with an insertion point inside. 2. Type Exciting. 3. Press ENTER to accept your criteria and to create another empty block. 4. Type Humorous and repeat #3. 5. Type Educational and repeat #3.
6.   Type Mystery. This time, click outside the block to get out of the empty block creation mode.
     Note: If you prefer, another way to create a new block is to click outside each block after entering your criteria, then double-click in any
     area of the canvas.
Step Six: Save Your File
1.   From the File menu, choose Save and name your (*.bst) file.
Step Seven: Create Canvas Space
If you followed numbers 1-6, your decision criteria are all queued one below another.

To make room for related criteria, move one to each of the four corners of the decision goal.
1.   Click and hold down the left mouse button on Humorous. The criteria becomes surrounded by a gray shaded box. If you release the mouse
     button before we tell you, you’ll have a surrounding handled box instead. That’s okay.
2.   Drag Humorous to the top right side of the canvas and release the mouse button. A gray box outline follows your cursor to the new spot.
     When you release the mouse button, Humorous appears in the new area with a surrounding handled box.
3.   Click on Educational and repeat #2, dragging it to the lower right side of the canvas, below the goal.
Step Eight: Enter More Decision Criteria
Now that you think of it, you have several more ideas about what criteria influence your decision to read certain books. Of course there are
different types of humor, education, and excitement that influence your decisions.
1.   Double-click anywhere on the canvas to create an empty block. The area next to Exciting looks roomy, so let’s put it there.
2.   Type the following and press ENTER after each entry: Subtle, Outrageous, and Symbolic.
3. Click once outside the last block.
By now, you have all kinds of ideas you want to consider in your decision. To create even more space, turn off the Alternatives area of the
window.
• From the View menu, click Alternatives. The right side of your canvas fills again with the list of alternatives.
Step Nine: Enter the last of your criteria
Note: Because PCs vary, more or fewer words may fit on your Brainstorm canvas before the window begins to scroll. If you find yourself
running out of room to type, you can always click in another clear spot on the canvas and make your entries there. You can click and drag
your criteria to make your model look like our illustrations.
1. Double-click in the top right side of the window where Alternatives used to be to create an empty block.
2. Type the following criteria and press ENTER after each entry: Scientific, Cultural, Humanistic, Inspirational (for some of you, your window will
scroll up after this entry), Animated, Descriptive, Witty, Analytical. (For some of you, the goal has scrolled up off the window and you may be
typing off the window. See “Tip” below.)3. Click once outside the last block.
Tip: There are several ways you can handle the model if some of it has scrolled off the window:
1) Select Fit to Screen (or one of the % options) from the Zoom command on the View menu.
2) Use your scroll bars on the right and at the bottom of the window to recenter your goal on the canvas. However, your last entries
might scroll off the bottom of the canvas.
3) Click and drag the last entries back up closer to the goal.
4) Use the Find Block option under the Edit menu. This option finds and centers the specified block, which means other entries scroll
off the canvas.
Step Ten: Enter Notes
You could actually enter notes about your goal, criteria, or alternatives at the time you enter these items into your decision model. But you can
also enter them at any time. If you want, follow the steps below to enter your notes, or go on to Step Eleven.
To Select Your Goal
• Click once on your goal to display a surrounding box.
To Select a Criterion
• Single click Humorous, or any criteria, to get a box around it.
To Select an Alternative
• Click once in the gray block that says Jurassic Park, or any alternative, to get an insertion point inside the block.To Display the Notes Box and Type Your Notes
1. With your item selected, press Ctrl+N to display the Notes box. The name of your goal, criteria, or alternative appears in the Name area and
is highlighted.
2. Tab to or click in the Notes area to get an insertion point.
3. Type your message or notes.
4. Press ENTER or click OK. Your goal, criteria, or alternative appears back in their blocks followed by three dots that indicate they have notes
attached. See the following examples.
Select a Book . . .
Humorous . . .
Step Eleven: Form Groups of Similar Decision Criteria
At this point, you feel your entries represent most of the criteria you want to consider in selecting a book. You can start forming groups and
relationships of similar criteria. Some will be main criteria (parents), some will be subcriteria (children of the parents). Now we show you how to
group and connect these criteria.
Witty, Outrageous, and Subtle are words you used to further describe Humorous. So, Humorous is a main criterion, or the parent, and the other
three are subcriteria of Humorous. Let’s make that association on the canvas.1. Click and hold down the left mouse button on Witty, drag the word under Humorous, and release the mouse button. Do the same for
Outrageous and Subtle.
2. Now, click and hold down the left mouse button on Witty and drag it to Humorous.
3. When the word Humorous lights up gray, release the mouse button. The word Witty resumes its original position, but now has a line
connecting it to Humorous. (If it doesn’t have a connecting line, the connecting lines feature may be turned off. Select Connecting Lines
from the View menu.)
4. Repeat #2 and #3 for Outrageous and Subtle. If you need to make room, you can drag out of the way any blocks necessary.
Step Twelve: Save Your File
Step Thirteen: Group Subcriteria with Parent Criterion
Some ideas, or criteria, on the canvas may seem closely related to each other, but don’t have a parent criterion to connect to them. They are
orphans. Exciting, Inspirational, and Animated seem closely related to each other. Let’s give them the parent “Provocative.”
The following steps show you how to move Exciting, Inspirational, and Animated to a clear area on the canvas under Select a Book. Then we show
you how to select them and give them their parent.
1. Click on Exciting, hold the left mouse button down, drag the word under Select a Book, and release the mouse button. Do the same for
Inspirational and Animated, queuing them vertically.
2. To select Exciting, Inspirational, and Animated, click once on Exciting to get a box around it.
3. Move your cursor to Inspirational, press Ctrl and click once.
4. Move your cursor to Animated, press Ctrl and click once. Each criterion should have a box around it.
5. From the Edit menu, select Group. A Group Information box appears.
6. In the Name area, type Provocative.
7. Press ENTER or click OK.Exciting, Inspirational, and Animated are now connected to and are subcriteria of the parent Provocative, which appears just to the left.
Step Fourteen: Save Your File
Step Fifteen: Store Unneeded Criteria in the Recycle Bin
At this point, you decide some of your criteria aren’t really needed in this part of your model. For the time being, let’s can store them in the
Recycle Bin. You can drag them all at once, or one at a time. To drag them all at once:
1. Click once on Descriptive to display a box around it.
2. Hold down the Ctrl key and click once on Analytical.
3. Repeat #2 for Symbolic and Mystery.
4. When they are all enclosed in boxes, drag one to the Recycle Bin at the bottom of the canvas. The Recycle Bin displays paper in the top of
the bin to indicate items are stored inside.
5. To see your recycled information, double-click on the Recycle Bin, or select Recycle Bin from the View menu.
Step Sixteen: Establish Remaining Relationships
Now that you’ve seen a couple of ways to connect criteria and form criterion-subcriteria relationships, we’ll have you connect the remaining
criteria to each other and to the Goal.
Note: DecisionPlus remembers the order in which you drag one block onto another, and makes the criterion-subcriterion identification
based on that order. Always drag the block you wish to be the subcriterion onto that block you wish to be the parent criterion.
1. Click and drag Educational closer to the goal circle. When you reach the position you want, release the mouse button.
2. Click and drag Educational over the goal oval. When the goal turns gray, release the mouse button. Educational resumes its original position,
becomes gray large letters, and has a line connecting it to the goal. It is now a main criterion of the goal, Select a Book.
3. Click and drag Cultural to a spot above Educational and release the mouse button.
4. Repeat #3 for Scientific and Humanistic. dragging them above Educational, near Cultural.
5. Click and drag each subcriterion, one at a time, to Educational to connect them.
For the purposes of this tutorial, drag in this order: Humanistic, Cultural, then Scientific. This determines the order in which they appear in
the Hierarchy window, which we will talk about soon.
After each connection, the subcriteria turn to large green letters and are subcriteria of the parent criterion, Educational.
6. Click and drag Provocative over the goal circle as in #2 above. Its entire family of subcriteria becomes connected to the goal. Provocative,
being the highest level criterion, is in large gray letters. Exciting, Inspirational, and Animated, the subcriteria of Provocative, are in large green
letters.
7. Click and drag Humorous over the goal circle as in #2 above. Its entire family also becomes connected to the goal.Step Seventeen: Rearrange and Print Your Model Your canvas may not look quite like ours, but that’s okay. You can click and drag anything on the canvas area until your canvas looks similar to the illustration below. It isn’t necessary to rearrange your model before you can create a hierarchy, but you may want a readable copy if you print the Brainstorm results. 1. To redisplay the Alternatives area, select Alternatives from the View menu. 2. To reduce the model to fit onto the canvas area, select Fit to Screen from the Zoom command on the View menu. If you want to print your Brainstorm model, 1. Select Print from the File menu. 2. Select the options Single Item, Hierarchy Graph, Fit to One Page, Portrait. 3. Select Print. Congratulations! You have finished formulating your ideas into your own decision model. You are ready to build your hierarchy in section II. z Stopping Point If you want, you can stop here and start again another time. Save your Brainstorm file and close the Brainstorm window. • To save your document, select Save from the Brainstorm File menu. • To close Brainstorm, select Close from the File menu, or select Close from the Control Menu. • To close DecisionPlus, select Exit from the File menu. If you want to continue now, save your Brainstorm file, but do not close your file or the Brainstorm window, and proceed with II - Building the Hierarchy, below.
II - Building the Hierarchy
              The second part in building your decision model is building your hierarchy. In DecisionPlus, you can do this in two ways: you can generate it
              from a brainstorm file, or you can create it directly in the Hierarchy program.
              In this tutorial, you “generate” the hierarchy from the brainstorm file you just created. Your Brainstorm file must be open.

              ¥          This part of the tutorial takes 10 to 20 minutes, depending on your learning style.
              Step One: Display the Hierarchy Window
              If you closed your Brainstorm file and are starting the tutorial again, open your Brainstorm file before proceeding. Select the .cdp file from the
              Open command in the File menu.
              1.   From the Brainstorm window, select Generate Hierarchy from the View menu. This automatically closes your Brainstorm file. If you did
                   not save your Brainstorm file, you are prompted to save it.
                   The first window you see is an optional “Model Name and Notes” dialog box where you can name your Hierarchy model. Although you
                   can name your model later if you prefer, let’s name your model now.
2. In the Name area, type Vacation Book and press ENTER or select OK. (Enter notes if you like.) The following window displays with your model converted into a hierarchy according to your formulation in Brainstorm. The top of your window shows your model name, Vacation Book. This hierarchy is not stored until you save it in Hierarchy and create a .cdp file. If you like, you can close this window without saving it, even if you already named your model, and reopen your Brainstorm file. Just select Close from the File menu (you’ll be prompted to save and you can say No). If you make changes in Brainstorm that you want reflected in the Hierarchy window, you’ll need to regenerate a hierarchy. Once you save this file in Hierarchy, you have two separate files. Updating one does not update the other. You can use the same .bst file to create as many new hierarchy files as you want.
Note: If you connected some of your criteria a little out of order, your window may not look exactly like ours. However, the remaining
      instructions refer to the illustration above.
Step Two: Review Your Model
This is the point at which you can review your model to see if you included everything, to see if relationships between blocks make sense, and to
see if your connections are sufficient. You can edit your decision model easily in the Hierarchy window by moving, adding, deleting, and
renaming criteria and alternatives, and by adding and deleting levels.
The Hierarchy window lists your decision criteria in columns of levels. At the top of each column is a modifiable heading: Goal Level, Level 2,
Level 3, and Alternatives. In columns from left to right is your goal Select a Book, followed to the right by the second level of your decision
model, Educational, Provocative, and Humorous. Next is the third level of your decision model, the subcriterion of Educational, Provocative, and
Humorous, followed by the last level, your alternatives. The lines between the blocks of criteria represent the connections you made in Brainstorm.
Step Three: Save Your New Hierarchy File
We think your model looks pretty good. If we were going to fine-tune the basic structure, this is where we’d do it. But first, you should save your
file. Your filename can be the same as the one you used for the brainstorm file because this one will be saved with the .cdp extension.
Step Four: Add Criteria to Your Decision Model
As you look at your hierarchy, you begin to wonder how your decision would turn out if you considered the writing style of the book. You can add
this criterion easily in Hierarchy, so let’s add it.
Where will you put writing style? First, consider what level of importance writing style might take on. Is it as important as Education, Provocative, and
Humor, which are at Level 2, or is it perhaps a subcriteria of these criteria, which would have the same importance as criteria in Level 3. You
decide it’s just as important as Education, Provocative, and Humor, so let’s enter it in Level 2.
1.    Double-click just above Provocative in the Level 2 column. A yellow block appears with the word “Name” highlighted.
2.    Type Writing Style and press ENTER.
3.    Now double-click in the space between Scientific and Exciting in Level 3 (or, if your model is slightly different, between the third child of
      Educational and the first child of Provocative) to create another block.
         Note: To make more space between these two blocks, all the blocks above the space you clicked move up. If these blocks were below
         the center of your model, all the lower blocks would move down.
4.    Type Symbolic and press ENTER.
Step Five: Connect New Criteria

1.    To connect Writing Style to the goal, click and drag until Writing Style overlaps the goal, and release the mouse button (in Hierarchy, blocks
      don’t turn gray when approached by the cursor or another block). A line appears, connecting the two blocks.
2.    To connect Symbolic to Writing Style, click and drag either block to the other.
3.    To connect Symbolic to the three alternatives, click once on the heading “Alternatives” to highlight all three alternatives, and drag one
      alternative block to Symbolic. Lines connecting Symbolic to all three alternatives appear.
Note: You can break these connections by repeating the same steps you used to connect the blocks.
Step Six: Rearrange Your Model
Now, you’ll notice that parts of the model have moved just a little off center (such as Educational). We can take care of that by rearranging the
model.
Note: If at any time your model scrolls right off the window, to recenter your model, select Navigator from the View menu. Then follow
the steps in “View the Navigator” in Step Eight later in this chapter.1. From the View menu, select Arrange Blocks.
Step Seven: Delete the Writing Style Branch
On second thought, you don’t really need to include Writing Style in your decision because you know that all three authors have a writing style you
like. You can delete this branch easily.
1. Click once on Writing Style to highlight it.
2. Move your cursor to Symbolic, hold down the Ctrl key and click once to highlight it also.
3. Release the mouse button.
4. Press the Delete key, or use the Delete Selection Command on the Edit menu. This leaves gaps in your model.
5. Select the Arrange Blocks option from the View menu. Your model should now look like it did upon first opening Hierarchy. Normally, if
you were making several permanent changes, you’d save your file often.
Step Eight: View the Navigator
The Navigator is a small version of your model that you can display in the lower left corner of your Hierarchy window. This feature is useful for
several reasons. You can see entire larger models that don’t fit in the Hierarchy window. You can click in any area of the Navigator and the
corresponding area in Hierarchy becomes centered on your window. If you’ve scrolled your model off the screen, a quick way to recapture it is to
bring up Navigator and click on an area.
1. From the View menu, select Navigator. If you’ve highlighted any block in Hierarchy window, that block is also highlighted in the Navigator.
You can size Navigator in the usual way by positioning the cursor on the edge of the window (the cursor will become a double-head arrow)
and drag the window edge to the right size.
2. To close Navigator, select Close from the Control-Menu box in its upper left corner.z Stopping Point
If you want, you can stop here and start again another time. Save your Hierarchy file and close the Hierarchy window.
• To save your document, select Save from the File menu.
• To close the Hierarchy, select Close from the File menu, or select Close from the Control Menu.
• To close DecisionPlus, select Exit from the File menu.
If you want to continue now, save your Hierarchy file, but do not close the Hierarchy window and proceed with III, Rating the Hierarchy, next.
III - Rate the Hierarchy
Your decision model looks impressive so far. It’s time to start giving it some substance. We’ll help you do that in this part of the tutorial by
assigning weights to your model so you can produce some results. We need to decide how important your criteria are and how much weight each
should contribute to the decision model. Then we need to score each alternative against those criteria.
We begin by rating the criteria directly connected to your goal, Educational, Provocative, and Humorous. This is called a rating set. Then we weight
the subcriteria of Educational, then Provocative, and then Humorous. And finally, we score the alternatives. In this tutorial, there are a total of
thirteen rating sets.
Weighting criteria and scoring alternatives requires four main activities:
• Choosing a rating method
• Selecting rating scale views
• Assigning rating scales
• Entering weights or scores
¥ This part of the tutorial takes 30 to 60 minutes, depending on your learning style.
Step Zero: Select AHP Rating technique
This decision will be based on purely qualitative assessments of the merits of the books, and introducing new books might suggest great changes
in the model. The Analytical Hierarchy Process is therefore likely to be the best technique to use in this case (see Chapter 10). Since DecisionPlus
uses SMART as its default technique, let’s change techniques.
1. In the Hierarchy window, click the Model menu to reveal its contents.
2. Click Technique and choose the AHP item.
Step One: Display the Criterion Rating Window
The Criterion Rating window is where you perform the main activities in weighting your criteria. You should have your decision model active in
the Hierarchy window. If your Hierarchy model is closed, open it (your .cdp file) from the Open command on the File menu.
1. In the Hierarchy window, click once on your Goal block, Select a Book, to highlight it.2. From the Block menu, select Rate Subcriteria. You are entering weights for the subcriteria of the goal, Select a Book.
Note: A criterion block must be selected before you can display the Criterion Rating window.
On the Title bar, the window name AHP Criterion Rating - Direct Method appears. (Direct Method is a rating method and is described in Step Two,
“Select a Rating Method,” after this window description.)
The name of your goal appears in the Criterion box with the number 1.000 preceding it. This represents the highest ranked of the unrated
criteria and the most important of the decision model.
Below the Criterion box is the Descriptive Sentence, describing the rating logic of the verbal rating scale you assign. The Importance scale is the
default scale. In this example, no criteria are rated yet, which is reflected in the Descriptive Sentence on your screen. Our illustration below shows
a rated example. If you do not have Verbal Scale view selected, the Descriptive Sentence does not display.The next area shows the Scale Information of the scale for the primary view you have chosen (or in this case, the default numerical scale). You choose the scale you want to assign through the Assign Scale button. The major portion of the Criterion Rating window is the Subcriterion/Weight area where you enter weights and are able to view them in up to three different ways. You can view your weights in Numerical, Verbal, or Graphical views, or in all three at once, as is shown when you first enter the window. Below is an illustration of all three views reflecting assigned weights. • Choosing a Rating Method Three rating methods are available on the Method menu: Direct Comparison, Full Pairwise Comparison, and Abbreviated Pairwise Comparison. We describe and show you how to access each method, but for this tutorial we enter the weights using only one method. Direct Comparison is used to enter quantitative data about each criterion. Usually these values come from a previous analysis or from experience and detailed understanding of the decision problem. Direct Comparison is the default rating method for the Criterion Rating window, and is the name you see in the title bar. Full Pairwise Comparison means comparing in pairs and is useful if you lack quantitative data about each criterion, or if you feel strongly or similarly about most of your criteria. Each criterion in a rating set is compared to every other criterion in the same set. It’s easy to enter weights using this method because all criteria in the same set are verbally compared against each other, and because you can measure using a scale of 17 verbal weights ranging from Absolutely Better to Absolutely Worse. Abbreviated Pairwise Comparison is similar to Full Pairwise Comparison except that you work in smaller sets. It omits comparisons that are obvious. For example, if A is better than B, and B is better than C, then A is also better than C. The latter comparison is omitted.
Step Two: Select a Rating Method
1.   From the Criterion Rating window, select the Method menu. The method we want, Direct, is already selected and indicated with a check
     mark in front of it. If we were to select one of the pairwise comparisons, we would select it here.
2.   To practice selecting a rating method, select Full Pairwise to see how your window changes to the following illustration.

     (Details about the Full Pairwise and Abbreviated Pairwise methods are in Chapter 10, Rate the Hierarchy.)

3.   Select the Direct method again from the Method menu before continuing in this tutorial.

•    Selecting Rating Scale Views
DecisionPlus provides three scale views in which you can enter your weights: Numerical, Verbal, and Graphical. All three views appear in the
Criterion Rating window when you first open the window. Below, we describe the scale views.

The views show, in their own measurement, the weight you assign for each criterion. In addition to viewing these scales, this is where you actually
enter the weights, which we will get to later in Entering Weights. If you change a value in one view, the other two views (if you have them
displayed) reflect the equivalent value in its own measurement scale.
Numerical shows your rating in numbers. The illustrated numerical scale above ranges from 0.00 to 100.00.
Verbal shows your rating in words. The illustrated verbal scale above ranges from Trivial to Critical, and corresponds to the numerical scale 0.00
to 100.00.
Graphical shows you a bar illustration of both the numerical and verbal values. You can’t assign a graphical scale, it is unique.
Step Three: Select a Rating Scale View
1. Select the View menu. The views we want to use in this tutorial are already selected and are marked with a check mark.
Even though we use all three views in this tutorial, go ahead and click a couple of views to turn them on and off and observe the effect on
the Subcriterion/Weight area. When you turn off Verbal, Descriptive Sentence automatically turns off.
2. From the View menu, be sure all three scale views and the Descriptive Sentence are selected and appear in the Subcriterion/Weight area
before continuing with this tutorial.
• Assigning Rating Scales
Numerical and Verbal have different scale measurements, called types, that you can assign. Now, we’ll show you how to assign a different scale
type. (Details about selecting the appropriate scales for your own decision problems are in Chapter 10, Rate the Hierarchy.)
Step Four: Assign a Rating Scale
Assigning a Numerical Scale
1. Select the Assign Scale button in the Scale Information area to display the Assign Scales window.The following window displays.
In the Scale Type area, Numeric is selected as the default and in the Scale Information area, the name and the range for the default scale
appears. (If the Numeric Scale Type is not available, select Numerical from the View menu.)
2. In the Scale Information area, click once on the list box down arrow to see five system-designed numerical scales and their measurement
ranges.
3. To practice selecting a scale, click once on Rank to select it.
4. Select the Close button to return to the Criterion Rating window. Your Scale Information area on the Rating window now reflects the Rank
scale information.
5. Select the Assign Scale button again.
6. Click the list box down arrow again.
7. Select the Default scale. We are using this numerical scale to enter our weights.
Assigning a Verbal Scale
If you like, you can use these procedures also to practice selecting a different Verbal scale. When the Scale Type area first displays, it always
defaults to Numerical.
1. For Scale Type, select Verbal. The Scale Information area changes to display the default Verbal scale, Importance.
2. In the Scale Information area, click once on the list box down arrow to display six system-designed verbal scales and their measurement
ranges, then follow the steps above to select a new system verbal scale. (Your verbal scale selection also is reflected in the Descriptive
Sentence area.)
3. If you practiced selecting a different Verbal scale, please return the display to the Importance scale before continuing with this tutorial.
Note: If you want to see how assigning scales affects existing weights, you can repeat Assigning a Numerical (or Verbal) Scale
exercises after you enter some weights.
Assigning a Graphical Scale
The Graphical scale has only one view: the bar view. You can’t assign a different graphic scale. You can adjust the bar (thereby adjusting your
weight) by clicking in, or clicking and dragging to, a different area of the bar.
Details for creating your own Numerical or Verbal scales are in Chapter 10, Rate the Hierarchy.
• Entering Weights and scores
Step Five: Enter Weights for Your Criteria
Although you can begin rating (entering weights to) any rating set you want, we begin with the set ranked as the most important in your decision
model, your goal. When we finish rating all the children of this set, we display and rate the next set.Be sure all three rating views and the descriptive sentence are visible as shown in the following illustration. If they are not, select them from the
View menu.
Rating Carefully
DecisionPlus doesn’t let you miss a rating, but it can’t tell if you’ve assigned the right value. If you enter a value other than the value we list, the
next result may not be the same as illustrated. In this case, you can start over, or you can edit the previous rating sets. Instructions for starting
over are in the next paragraph, and instructions for editing previous rating sets are described after Rating Set One.
Starting Over
If at any time you want to start over, you can use the Cancel button at the bottom of the Rating window (a message appears, asking in essence if
you want to erase what you just entered — select Yes). You can also close the Rating window and return to the Hierarchy window, close the file
without saving it, then reopen the file. The Restore Current Ratings button erases your entries to the ratings set currently showing in your
window.
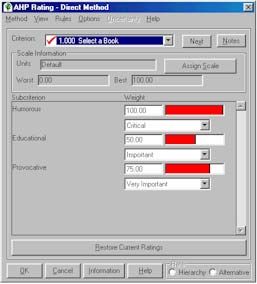
Okay, let’s roll up our sleeves and get to work. You know that selecting a good book means having one or all of the three subcriteria listed in the
Subcriteria/Weight area. However, as far as their contribution to the decision, you feel the strongest about Humorous, less strongly about
Provocative, and least strongly about Educational. Let’s enter equivalent weights using the default Verbal Scale, Importance.
Rating Set One Select a Book
— Educational
— Provocative
— Humorous
1. For each of the three subcriteria, we instruct you to click the list box down arrow, where “UNRATED” appears, to display the available
verbal choices. If you prefer working with numbers, beginning with Rating Set Two below, we give you the equivalent numerical value to
type into the Numerical scale.2. To rate Educational, select Important. Important replaces “UNRATED” in the Verbal view. The Numerical view also changes, reflecting 50,
and the Graphical view is filled in about half way.
3. To rate Provocative, select Very Important. Very Important replaces “UNRATED” in the Verbal view. The Numerical view also changes,
reflecting 75, and the Graphical view is filled in about three quarters of the way.
4. To rate Humorous, select Critical. Critical replaces “UNRATED” in the Verbal view. The Numerical view also changes, reflecting 100, and
the Graphical view is filled completely.
After you rate the last subcriterion of this rating set, Select a Book, listed in the Criterion box, gets a check mark.
Rating Set Two Humorous
— Subtle
— Outrageous
— Witty
1. Select the Next button at the top of the Rating window. Because you rated Humorous extremely high (Critical) in the first rating set, it
becomes the next important criterion. Therefore, DecisionPlus assumes you want to rate its subcriteria next.
2. To rate Subtle, select Important or click in the Numerical view and type 50.
3. To rate Outrageous, select Important also, or click in the Numerical view and type 50.
4. To rate Witty, select Critical, or click in the Numerical view and type 100.After you rate the last subcriterion of this rating set, Humorous gets a check mark beside it, indicating that it is fully rated. Click the Next button
and you should find that Provocative is the next criterion to be rated. Go on to Rating Set Three, unless Provocative did not come up next.
Checking Previously Rated Rating Sets
If Provocative didn’t come up next for you, check your previous rating set by redisplaying and editing the rating set in the Rating window.
Use the following steps at any time to check previously rated rating sets.
1. Click on the Criterion list box down arrow.
2. Select the rating set you want (in this case, Provocative). The rating set redisplays in the Subcriteria/Weight area of the Rating widow.
3. Compare your ratings against those suggested by us.
4. To change the weight of a subcriterion, click the Verbal scale down arrow and select the correct weight. Or, click in the Numerical
scale box and type the correct numerical weight.
5. Select the Next button.
The correct rating set should display in the Rating window. If this is not the case, if you want, you can start over following the Starting Over
instructions at the beginning of this section.
Rating Set Three Provocative
— Exciting
— Inspirational
— Animated
1. Select the Next button at the top of the Rating window. Provocative is the next criterion rating set, because in the first round you rated it as
Very Important, second to Humorous, which was Critical.2. To rate Exciting, select Critical (100).
3. To rate Inspirational, select Very Important (75).
4. To rate Animated, select Important (50).
Now Provocative gets a check mark.
Rating Set Four Witty
— Jurassic Park
— Fried Green Tomatoes
— 100 Years of Solitude
1. Select the Next button. Witty is the next criterion rating set.
Notice some changes here. You might have expected to see Educational as the next rating set, but instead, you see Witty. Witty is not on the
same level as Provocative and Humorous in your Hierarchy model. This change in order occurs because Witty received the highest rating,
Critical, in Rating Set Two. DecisionPlus considers Witty now to have a greater contribution to the decision model than the remaining
subcriteria and should be rated next.
The alternatives in the model are directly connected to Witty. We call criteria in this position lowest criteria. The rating set of lowest criteria are
always alternatives. This brings us to our next point. When rating the lowest criteria in a decision model, the Rating window changes
headings in the Subcriterion/Weight area. The word Subcriterion changes to Alternative, and Weight changes to Score. In AHP, when you
rate alternatives, you are scoring how much of each criterion the alternatives have. In other words, we heard that 100 Years of Solitude has a
fair amount of wit. Although we should choose another verbal scale here to rate this, we can convert “fair amount of wit” to a Very
Important amount of wit.So, what happened to Educational? DecisionPlus assumes that because you rated it in Rating Set One as the least important of the three
subcriteria, and you rated Witty so high in Rating Set Two, Educational has the least contribution to the model and can be rated later.
DecisionPlus assumes your time is best spent rating the most important criteria in your decision model first.
2. To rate Jurassic Park, select Trivial (0).
3. To rate Fried Green Tomatoes, select Important (50).
4. To rate 100 Years of Solitude, select Very Important (75).
Rating Set Five Educational
— Humanistic
— Cultural
— Scientific
1. Select the Next button. Educational is the next criterion rating set.
2. To rate Humanistic, select Important (50).
3. To rate Cultural, select Unimportant (25).
4. To rate Scientific, select Very Important (75)
Rating Set Six Exciting
— Jurassic Park
— Fried Green Tomatoes
— 100 Years of Solitude
1. Select the Next button. Exciting is the next criterion rating set.
2. To rate Jurassic Park, select Critical (100).
3. To rate Fried Green Tomatoes, select Important (50).
4. To rate 100 Years of Solitude, select Unimportant (25).
Rating Set Seven Inspirational
— Jurassic Park
— Fried Green Tomatoes
— 100 Years of Solitude
1. Select the Next button. Inspirational is the next criterion rating set.
2. To rate Jurassic Park, select Very Important (75).
3. To rate Fried Green Tomatoes, select Important (50).
4. To rate 100 Years of Solitude, select Critical (100).
Rating Set Eight Subtle
— Jurassic Park
— Fried Green Tomatoes
— 100 Years of Solitude
1. Select the Next button. Subtle is the next criterion rating set.
2. To rate Jurassic Park, select Very Important (75).
3. To rate Fried Green Tomatoes, select Important (50)
4. To rate 100 Years of Solitude, select Trivial (0).
Rating Set Nine Outrageous
— Jurassic Park
— Fried Green Tomatoes
— 100 Years of Solitude
1. Select the Next button. Outrageous is the next criterion rating set.2. To rate Jurassic Park, select Very Important (75).
3. To rate Fried Green Tomatoes, select Critical (100).
4. To rate 100 Years of Solitude, select Trivial (0).
Rating Set Ten Scientific
— Jurassic Park
— Fried Green Tomatoes
— 100 Years of Solitude
1. Select the Next button. Scientific is the next criterion rating set.
2. To rate Jurassic Park, select Critical (100).
3. To rate Fried Green Tomatoes, select Unimportant (25).
4. To rate 100 Years of Solitude, select Important (50).
We’re almost finished!
Rating Set Eleven Humanistic
— Jurassic Park
— Fried Green Tomatoes
— 100 Years of Solitude
1. Select the Next button. Humanistic is the next criterion rating set.
2. To rate Jurassic Park, select Important (50).
3. To rate Fried Green Tomatoes, select Very Important (75).
4. To rate 100 Years of Solitude, select Very Important (75).
Rating Set Twelve Animated
— Jurassic Park
— Fried Green Tomatoes
— 100 Years of Solitude
1. Select the Next button. Animated is the next criterion rating set.
2. To rate Jurassic Park, select Critical (100).
3. To rate Fried Green Tomatoes, select Important (50).
4. To rate 100 Years of Solitude, select Unimportant (25).
Rating Set Thirteen Cultural
— Jurassic Park
— Fried Green Tomatoes
— 100 Years of Solitude
1. Select the Next button. Cultural is the next criterion rating set.
2. To rate Jurassic Park, select Unimportant (25).
3. To rate Fried Green Tomatoes, select Very Important (75).
4. To rate 100 Years of Solitude, select Important (50).
Step Six: Complete the Ratings
When you select the rating for 100 Years of Solitude in this rating set, you have completed rating your decision model and when you select Next,
you see the following message.1. Select OK or Press ENTER. The Rating window stays open.
2. On the Rating window, select the OK button at the bottom of the window to store your ratings. The Hierarchy window displays. Your
ratings are still stored, but not saved.
Step Seven: Save Your Ratings
• Select Save from the Hierarchy File menu.
What a task! But now you have something to show for your careful work.
z Stopping Point
If you want, you can stop here and start again another time. Save your Hierarchy file and close the Hierarchy window.
• To save your document (if you have not already), select Save from the Hierarchy File menu.
• To close Hierarchy, select Close from the File menu, or select Close from the Control Menu.
• To close DecisionPlus, select Exit from the File menu.
If you want to continue now, save your Hierarchy file, but do not close your file or the Hierarchy window and proceed with IV, Selecting the Best
Alternative, below.
IV - Selecting the Best Alternative
The results of your decision model should come out close to what you expected from the start. The book with the highest score should be the
likely choice based on the criteria you weighted the highest. If you get completely unexpected results, you should check your model structure,
weights and scores.
In this section, you’ll have DecisionPlus calculate your results automatically when you select the Decision Scores window.
¥ This part of the tutorial takes about 10 minutes.
Step One: Display the Decision Scores
• From the Hierarchy menu, select Decision Scores from the Results menu. The following Decision Scores window below displays showing
the results of your decision model.This view shows your alternatives in the order they appear (vertically) in your Hierarchy Jurassic Park is the winner, or the preferred alternative, although not by a large margin. We’ll show you what that can mean later in this chapter. Clicking the Scores option in the Sort option rearranges your graph results from highest decision score to lowest. In this small model, they just happen to be in that order, so your display won’t change if you select this option. To Display the Results Data window If you prefer to see the decision scores in a spreadsheet, you can do that easily by selecting it from the View menu in the Decision Scores window. 1. In the Decision Scores window, select Results Data from the View menu to display the results in a spreadsheet.
Your results may be arranged differently in this display, and the numbers should be close. That’s okay. Major differences mean that you could
                have done something out of order or assigned a different value than we listed in a place that could sway the results dramatically.
                To Close the Decision Scores Window
                •     Select the Close button in the General portion of the window.

                z       Stopping Point
                If you want, you can stop here and start again another time. Save your Hierarchy file and close the Hierarchy window.
                •     To save your document, select Save from the Hierarchy File menu.
                •     To close Hierarchy, select Close from the File menu, or select Close from the Control Menu.
                •     To close DecisionPlus, select Exit from the File menu.
             If you want to continue now, save your Hierarchy file, but do not close your file or the Hierarchy window and proceed with IV- Reviewing the
             Results, below.
V - Reviewing the Results
                DecisionPlus provides different ways in which you can view your results. We talk about two of them. You can view how sensitive the scores of
                your alternatives are to changes in weights, and you can view how, and to what extent, the highest rated criteria contributed to those scores.

                ¥           This part of the tutorial takes about 15 minutes.
                Step One: Display the Sensitivity by Weights Window
                1.    In the Hierarchy window, select Sensitivity by Weights from the Analysis menu to display the Sensitivity by Weights window below.
                2.    Click the Update button to calculate all sensitivities.

                You are looking at the sensitivity of the models to the weight of Provocative with respect to the goal, Select a Book. The identity of the weight can be
                seen both by the highlighted item in the Criticality list box and in the graph title. The sloping lines on the graph represent scores of the
                alternatives and correspond to the colors of the alternatives that are listed to the right of the graph. The vertical red line, with a red bullet-shaped
                pointer (we call it a slider) at its base, indicates the current priority value for this weight. That is to say, although the weights you entered in the
                Criterion Rating window might have been entered in a scale using units of dollars or miles, DecisionPlus calculates a value on a universal priority
                scale from 0 to 1 for each of those weights.
                The point where the red line intersects an alternative line is that alternative’s score (as can be verified in the Decision Scores window).
The Criticality list box lists all the criteria weights in the model, from those to which the results are most sensitive to, at the bottom of the list, those to which the model is least sensitive. Those at the top are the most critical because small changes in their value can change the outcome of the model. The percentage on each line is the amount of change in the priority of that weight required to change the outcome of the model. If the percentage was 5% or less, indicating that a change of less than 5% would change the preferred alternative, we would recommend reassessing your model structure, weights and scores. When you first display the window, the Current Value is the same as the priority value for the red line. The Current Value is the value for the weight, 50, you assigned to the subcriteria, Educational, with respect to the criteria, Select a Book. If you select another weight in the Criticality list box, the value changes to reflect the priority of that weight. The Temp Value reflects the changes you might make in this window to check results. Once you leave the Sensitivity by Weights window, your scores return to their original, or Current, value. Step Two: Check the Sensitivity of the Scores Judging from the results in this graph, we have a somewhat sensitive result. We mentioned earlier that we would show you what the close results meant. Notice in your graph that Jurassic Park remains the preferred alternative until you move the slider to the left about 8%. Try it. Hold the mouse button down and drag the slider to the left to a Temp Value of about .22. At that point, the lines for Jurassic Park and Fried Green Tomatoes cross over, and Fried Green Tomatoes becomes the preferred alternative. You didn’t have to move the slider very far before you produced a crossover. This means, that your model results are sensitive to somewhat small changes in the priority value. Because the required change here is more than 5%, we would recommend that the model needs no reassessment. Step Three: Select Another weight Combination In the Criticality box, select the combination Select a Book-Humorous to produce the following display. There is a crossover point between Jurassic Park and Fried Green Tomatoes. You would have to slide your priority value from .44 to somewhere around .57 to cause Fried Green Tomatoes to rate higher than Jurassic Park for the Select a Book-Humorous pair. For details about sensitivity in your model, see Chapter 13, Analyze the Results. Step Four: Viewing Contribution by Criteria Another way to check your results is to investigate why Jurassic Park is preferred over Fried Green Tomatoes. 1. Close the Sensitivity by Weights window. The Hierarchy window redisplays.
2.    In the Hierarchy window, select Contribution by Criteria from the Analysis menu to display the Contribution by Criteria window.

               The colors in the bars correspond to the criteria listed to the right of the graph. (The colors on your monitor are a better example than the shades
               of gray and black in our illustration above.) These colors represent the amount of contribution each criterion made to that alternative’s decision
               score. You can immediately see that while Fried Green Tomatoes would be more humorous than Jurassic Park, Jurassic Park’s superiority in terms of
               Provocative and Educational aspects more than outweigh its lack of humor.
               For details about this window, see “Viewing Contribution by Criteria” in Chapter 13, Analyze the Results.
               This concludes the tutorial. According to the results you presented, you should have confidence in taking Jurassic Park along on your vacation.
               Close the Contribution by Criteria Window
             • Select the close button in the lower right corner of the window.
Saving Your Results
               If you didn’t save your work before viewing the results, you can do so now.
              • In the Hierarchy window, select Save from the File menu.
Closing the Hierarchy window
               •     In the Hierarchy window, select Close from the File menu.
What’s Next?
               Many printing options are available in which you can print your results. If you want to print your results, turn to Chapter 14, Document the
               Results, for a list of reports available and instructions for producing those reports.
               If you are ready to begin entering your own decision problem, turn to Part III, Designing Your Own Model. We suggest that you read the
               Building Your Own Decision Model checklist first in preparation for building your own model.
You can also read