ZM615 Indicator - User Instructions - Avery Weigh-Tronix
←
→
Page content transcription
If your browser does not render page correctly, please read the page content below

ZM615
    Indicator

User Instructions

     AWT35-501694
       Issue AD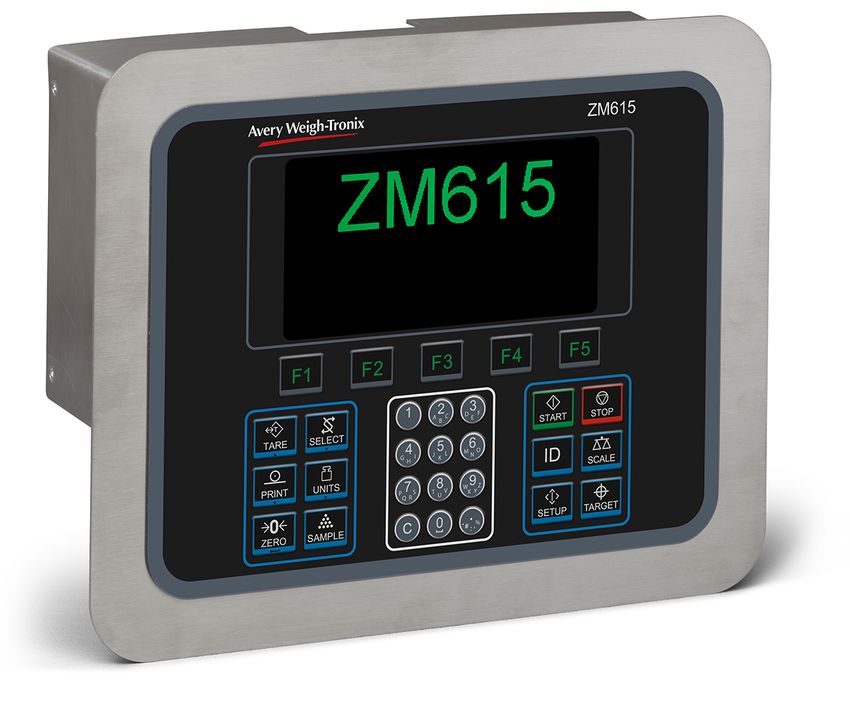
Avery Weigh-Tronix is a trademark of the Illinois Tool Works group of companies whose ultimate parent company is Illinois Tool
Works Inc (“Illinois Tool Works”). Copyright © 2021 Illinois Tool Works. All rights reserved.

No part of this publication may be reproduced by making a facsimile copy, by the making of a copy in three dimensions of a two-dimensional
work and the making of a copy in two dimensions of a three-dimensional work, stored in any medium by electronic means, or transmitted in
any form or by any means, including electronic, mechanical, broadcasting, recording or otherwise without the prior written consent of the
copyright owner, under license, or as permitted by law.

This publication was correct at the time of going to print, however Avery Weigh-Tronix reserves the right to alter without notice the
specification, design, price or conditions of supply of any product or service at any time.

ZM615_u_en_501694.book
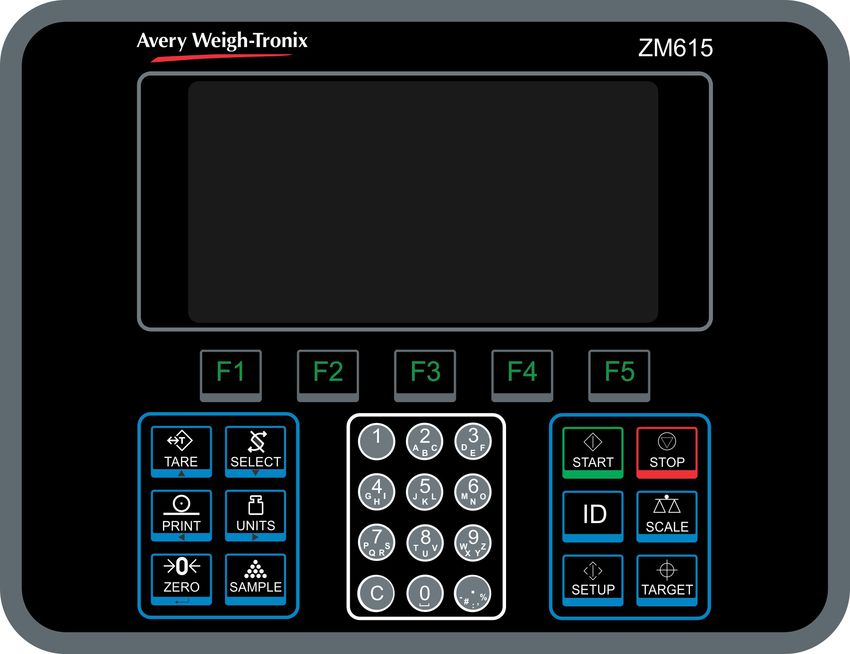
Table of Contents

                                                                                                                                                     page

Table of Contents ...................................................................................................................................... 3

Chapter 1 General information and warnings ......................................................................................... 5
              About this manual .............................................................................................................. 5
                  Text conventions ......................................................................................................... 5
                  Special messages ....................................................................................................... 5
              Installation .......................................................................................................................... 5
                  Safe handling of equipment with batteries .................................................................. 6
                  Wet conditions ............................................................................................................. 6
              Routine maintenance ......................................................................................................... 6
              Cleaning the machine ........................................................................................................ 7
              Training .............................................................................................................................. 7
              Sharp objects ..................................................................................................................... 7
              FCC and EMC declarations of compliance ........................................................................ 7

Chapter 2 Introduction .............................................................................................................................. 8
               Front Panel Keys ............................................................................................................. 10
               Powering up a ZM615 indicator ....................................................................................... 11
               Using the alphanumeric keypad ....................................................................................... 11
               Entering negative numbers or decimal point .................................................................... 11
               Menu access and navigation ........................................................................................... 11
                   Escaping or exiting from a menu ............................................................................... 12
               Adjusting screen contrast ................................................................................................. 12

Chapter 3 Operating Instructions ........................................................................................................... 13
              Power Up ......................................................................................................................... 13
              Accumulation weighing application .................................................................................. 13
                  Gross weighing .......................................................................................................... 13
                  Net weighing .............................................................................................................. 14
                  Using the Accumulation function ............................................................................... 16
                  Performing Accumulation weighments ...................................................................... 18

Chapter 4 Menus ...................................................................................................................................... 20
              User menu ....................................................................................................................... 20
              About menu ...................................................................................................................... 21
              Audit menu ....................................................................................................................... 23

Chapter 5 Error messages ...................................................................................................................... 24
               Printing errors .................................................................................................................. 24
               ‘Copying to or from USB’ errors ....................................................................................... 24
               BSQ errors ....................................................................................................................... 24
               ZB210 errors .................................................................................................................... 24
               T301X and ZT Cell errors ................................................................................................ 24

Chapter 6 Supervisor menu .................................................................................................................... 25
              Printed Preset Tare report example ................................................................................. 26

ZM615 Indicator User Instructions                                                                                                                            3
4 ZM615 Indicator User Instructions
1.1 About this manual
1 General information and warnings
1.1 About this manual
This manual is divided into chapters by the chapter number and the large text at the top
of a page. Subsections are labeled as shown by the 1.1 and 1.1.1 headings. The
names of the chapter and the next subsection level appear at the top of alternating
pages of the manual to remind you of where you are in the manual. The manual name
and page numbers appear at the bottom of the pages.
1.1.1 Text conventions
Key names are shown in bold and reflect the case of the key being described. If a key
has a dual function it may be referred to by its alternate function.
Displayed messages appear in bold italic type and reflect the case of the displayed
message.
Annunciator names appear as italic text and reflect the case of the annunciator.
1.1.2 Special messages
Examples of special messages you will see in this manual are defined below. The
signal words have specific meanings to alert you to additional information or the relative
level of hazard.
CAUTION!
This is a Caution symbol.
Cautions give information about procedures that, if not observed, could result
in damage to equipment or corruption to and loss of data.
NOTE: This is a Note symbol. Notes give additional and important information, hints
and tips that help you to use your product.
1.2 Installation
NO USER SERVICEABLE PARTS. REFER TO QUALIFIED SERVICE
PERSONNEL FOR SERVICE.
ZM615 Indicator User Instructions 5General information and warnings
1.2.1 Safe handling of equipment with batteries
CAUTION: Danger of explosion if battery is incorrectly replaced. Replace only
with the same or equivalent type recommended by the manufacturer. Dispose
of used batteries according to the manufacturer’s instructions.
ATTENTION: Il y a danger d'explosion s'il y a remplacement incorrect de la
batterie, remplacer uniquement avec une batterie du même type ou d'un type
équivalent recommandé par le constructeur. Mettre au rebut les batteries
usagées conformément aux instructions du fabricant.
1.2.2 Wet conditions
Under wet conditions, the plug must be connected to the final branch circuit via an
appropriate socket / receptacle designed for washdown use.
Installations within the USA should use a cover that meets NEMA 3R specifications
as required by the National Electrical Code under section 410-57. This allows the unit
to be plugged in with a rain tight cover fitted over the plug.
Installations within Europe must use a socket which provides a minimum of IP56
protection to the plug / cable assembly. Care must be taken to make sure that the
degree of protection provided by the socket is suitable for the environment.
1.3 Routine maintenance
IMPORTANT: This equipment must be routinely checked for proper operation
and calibration.
Application and usage will determine the frequency of calibration required for
safe operation.
Always isolate the indicator from the power supply before starting any routine
maintenance to avoid the possibility of electric shock.
6 ZM615 Indicator User Instructions1.4 Cleaning the machine
1.4 Cleaning the machine
Table 1.1 Cleaning DOs and DON’Ts
DO DO NOT
Wipe down the outside of standard products Attempt to clean the inside of the machine
with a clean cloth, moistened with water and Use harsh abrasives, solvents, scouring cleaners or
a small amount of mild detergent alkaline cleaning solutions
Spray the cloth when using a proprietary Spray any liquid directly on to the display windows
cleaning fluid
1.5 Training
Do not attempt to operate or complete any procedure on a machine unless you have
received the appropriate training or read the instruction books.
To avoid the risk of RSI (Repetitive Strain Injury), place the machine on a surface which
is ergonomically satisfactory to the user. Take frequent breaks during prolonged usage.
1.6 Sharp objects
Do not use sharp objects such as screwdrivers or long fingernails to operate the keys.
ZM615 Indicator User Instructions 7General information and warnings
1.7 FCC and EMC declarations of compliance
United States
This equipment has been tested and found to comply with the limits for a Class A digital device, pursuant to Part 15 of the FCC Rules.
These limits are designed to provide reasonable protection against harmful interference when the equipment is operated in a
commercial environment. This equipment generates, uses, and can radiate radio frequency energy and, if not installed and used in
accordance with the instruction manual, may cause harmful interference to radio communications. Operation of this equipment in a
residential area is likely to cause harmful interference in which case the user will be required to correct the interference at his own
expense.
Canada
This digital apparatus does not exceed the Class A limits for radio noise emissions from digital apparatus set out in the Radio
Interference Regulations of the Canadian Department of Communications.
Le présent appareil numérique n’émet pas de bruits radioélectriques dépassant les limites applicables aux appareils numériques de
la Classe A prescrites dans le Règlement sur le brouillage radioélectrique edicté par le ministère des Communications du Canada.
European Countries
WARNING: This is a Class A product. In a domestic environment, this product may cause radio interference in which the user may be
required to take adequate measures.
8 ZM615 Indicator User InstructionsIntroduction
2 Introduction
The ZM615 indicator is a powerful, programmable indicator with a default accumulation
weighing application. This manual will explain operation of the indicator and the
weighing application.
This indicator is suitable for the office, dusty, wet or high pressure and heavy
washdown environments. It comes in IP69K stainless steel desktop and IP66 panel
mount housings. Both have a high contrast, graphic display for text and graphic
messages appropriate to the function of the program.
The ZM615 indicator can support up to 32 - 350 ohm load cells. The indicator requires
90 VAC - 264 VAC, 50 or 60 Hz or 12-36VDC. The standard indicator connectivity
includes two USB Host, three serial ports and an Ethernet port.
Panel mount equipment to be powered by a UL Listed I.T.E. power supply: rated 12-
36VDC and marked “LPS, or a UL Listed power supply rated 12-36VDC and marked
“Class 2.”
Available options include:
l Analog Output kit
l Current Loop kit: Current loop and RS485/RS422
l USB Device kit: Provides USB interface to PC
l DeviceNetTM
l ProfiBus®
l RM300 WiFi module & antenna
l Internal 120 VAC relay
l 2nd Scale Input 5VDC Excitation w/o STVS
l 2nd Scale Input 10 VDC Excitation w/STVS
l External I/O Interface (for existing GSE or 1310 I/O cards)
l AC input, 4 Inputs (120-240VAC)
l DC input, 4 inputs(4-30VDC)
l AC output, 4 relays (20-240VAC, 1 amp max)
l DC output, 4 relays (3-60VDC, 2 amp max)
l STVS (Severe Transient Voltage Suppressor)
l PDIO Card (PWM, pulse counting, SCR module)
l ZT/ZM Interface Card with STVS
The indicator also has three logic level inputs with configurable functions and three
setpoint outputs. See the Specification literature for a full list of specifications.
8 ZM615 Indicator User InstructionsFigure 2.1 shows the front panel of the ZM615 indicator which consists of the keys and
the graphic display.
Figure 2.1 ZM615 front panel
Never press a key with anything but your finger. Damage to the overlay may result if
sharp or rough objects are used.
ZM615 Indicator User Instructions 9Introduction
2.1 Front Panel Keys
The key functions are listed below.
F1 F5 Use the F1 through F5 keys as defined by the label above each one
on the display. The functions change according to program need.
Press the TARE key to perform a pushbutton tare function.
TAR E
Acts as an up arrow key for menu navigation.
Press the SELECT key to toggle between the active display values.
SEL EC T
Acts as a down arrow key for menu navigation.
Press the PRINT key to send information to a peripheral device
PR IN T through a configured communications port.
Acts as a left arrow key for menu navigation.
Press the UNITS key to scroll through the available units of measure
U N ITS while in normal operating mode.
Acts as a right arrow key for menu navigation.
Press the ZERO key to zero the display.
ZER O Acts as an ENTER key to accept a displayed value or function in
setup mode.
The SAMPLE key can be used to perform custom application
SAMPL E
functions.
1 A
2C D
3F
B E
4I 5L 6O
Use the alphanumeric keypad for entering text or numbers.
G J M
H K N
P
7S T
8V W
9Z
Q R U X Y
C 0 -
# :, %
The START key can be used to perform custom application
START functions.
The STOP key can be used to perform custom application
STOP
functions.
The ID key can be used to perform custom application functions.
ID
The SCALE key can be used to perform custom application
functions. It can also be used to select the active scale when more
SCALE than one scale is enabled.
The SETUP key can be used to perform custom application
functions. It can also be used to view the password entry screen for
SETUP menu access.
The TARGET key can be used to perform custom application
functions.
TAR GET
10 ZM615 Indicator User Instructions2.2 Powering up a ZM615 indicator
2.2 Powering up a ZM615 indicator
The indicator is always active as long as power is received. Power must be 90-264 VAC
with a frequency of 50 or 60 Hz, or 12-36 VDC.
2.3 Using the alphanumeric keypad
Use the alphanumeric keypad to enter numbers and words when prompted by the
indicator. The action is similar to using a cell phone to select the number or letter. A
rapid succession of presses will scroll through the number on the key and then the
letters, starting with upper case and then lower case. The decimal key scrolls through
the negative sign, pound sign, colon, comma and percent sign. The 0 key toggles
between 0 and a space.
2.4 Entering negative numbers or decimal point
To enter a minus sign for a negative number or a decimal point (or comma), press the
C key (or PRINT key) to clear the current value from the display.
Then to enter a negative number, with a single 0 displayed press the Decimal key. The
first character will then change to a (-) negative sign. Enter the rest of the digits
normally.
To enter a decimal point (or comma), on a ZM615 use the decimal point key. To enter
a value less than 1 requires the entry of the leading 0 before a decimal point is allowed.
2.5 Menu access and navigation
The menus used to configure the ZM615 are accessed with passwords. Press and hold
the SELECT key to access the password entry screen, shown below.
Enter Password
Min Value: 0, Max Value: 999,999
Clear . - Esc
In general, a menu is made up of a group of top level items, sub levels under each of
those and lists of items to view or configure. There are variations on this theme.
Sometimes there may be no sub level or there maybe two sub levels before you get to
a list of items to set.
You will see on-screen lists with instructions on how to choose and set an item in each
menu list. On-screen prompts guide you as you move through the menus.
ZM615 Indicator User Instructions 11Introduction
When icons are on screen the bold box around an icon means it is the highlighted icon.
See the example below.
Audit User About
Highlighted icon
When a text list appears on screen the highlighted item is shown by a green bar over
the text. See the example below.
Serial
Port 1
Port 2
Port 3
scroll up and down list then enter to select
Esc
The main menu is made up of the User, About and Audit menus. See Chapter 4 for
complete information.
2.5.1 Escaping or exiting from a menu
In any menu you will have either UP or ESC keys listed on-screen.
If ESC is listed use it until it disappears then use the UP key until you are asked if you
want to save any changes or not. Highlight your choice and press ENTER to accept.
The indicator will reboot and return to the startup screen.
2.6 Adjusting screen contrast
To decrease or increase the screen contrast press and hold the UNITS key and press
the TARE (UP arrow) or SELECT (DOWN arrow) key repeatedly.
12 ZM615 Indicator User Instructions3.1 Power Up
3 Operating Instructions
The ZM615 provides multiple tare memory, transaction counter and weight
accumulator.
SELECT key default function: You can view the gross, net, tare, gross total, net
total, tare total and transaction total display values or other configured scale
parameters by repeatedly pressing SELECT.
3.1 Power Up
When the indicator is powered up, you will see the startup screen for the Accumulation
application, shown below:
0
kg
Gross
Accum Chan: 1 ID: 0
Net Total: 0 lb
Transactions: 0
CHAN ID SETPT
3.2 Accumulation weighing application
Gross and net weighing are covered first below followed by the instructions for the
Accumulation app.
3.2.1 Gross weighing
To change unit of measure, press UNITS.
To perform gross weighing, power up the unit and follow these steps:
1. Empty the scale and, if necessary, press ZERO to zero the display …
0 is displayed and the center-of-zero annunciator lights.
2. Place item to be weighed on the scale …
Weight is displayed.
3. Repeat steps 1 and 2.
ZM615 Indicator User Instructions 13Operating Instructions
3.2.2 Net weighing
Net weighing is available via three types of tare entry.
Pushbutton tare When enabled press TARE to tare the weight on the scale.
Entered tare When enabled key in a tare weight and press TARE to set.
Preset tare When enabled press TARE and then enter a stored Preset Tare
number (1 - 10) and press ZERO to set.
Pushbutton and Entered Tares can be enabled simultaneously.
Auto Tare Clear
If auto tare clear is enabled, after a weighment, when the weight falls into the gross zero
band, tare is cleared to zero.
Definition: Gross zero band - this is a configured value that defines a window around
gross zero. This is used in several ways in different applications.
The three types of tare are explained below.
Using Pushbutton Tare
To perform a net weighment using pushbutton tare, power up the unit and follow these
steps:
1. With no weight on the scale, if the display does not read 0 press ZERO …
0 is displayed and the center-of-zero annunciator lights.
2. Place item to be tared on the scale …
Weight is displayed.
3. Press TARE …
0 is displayed and the NET weight is displayed.
4. Place material to be weighed into or on the tared item on the scale …
Net weight of material is displayed.
5. Repeatedly press SELECT to view the gross, tare, and net values.
6. If repeated weighments use the same tared item, you do not need to establish
a new tare value as described in step 2 and 3.
Pressing TARE will perform the tare function but if you continue to press and hold
TARE for 3 seconds the display will show cLEArEd and the Tare weight is cleared.
14 ZM615 Indicator User Instructions3.2 Accumulation weighing application
If gross weight is not at 0, press the ZERO key; then press the TARE key to clear the
tare value.
Using Entered Tare
To perform a net weighment using entered tare, the following steps describe a typical
operation:
1. With no weight on the scale, if the display does not read 0 press ZERO …
0 is displayed and the center-of-zero annunciator lights.
2. Key in the tare value of the container or box that will be used to hold the
material that requires a net weight value, and press TARE …
Tare weight is displayed as a negative value and the NET weight is
display and the PT annunciator lights.
3. Place the container or box and material to be weighed on the scale …
Net weight of material is displayed.
4. If repeated weighments use the same tared item, you do not need to establish
a new tare value as described in step 2.
5. To remove the tare weight from the scale, enter 0, then press TARE …
The tare is cleared and the scale is in gross weigh mode.
Press and hold TARE for 3 seconds and the display will show cLEArEd and the Tare
weight is cleared.
Using Preset Tare
Preset tares are entered in a password protected menu. Refer to details described in
the Supervisor menu on page 25. There are 10 tare values stored in memory. To
perform a net weighment using one of the preset tares, follow these steps:
1. With no weight on the scale, if the display does not read 0 press ZERO …
0 is displayed and the center-of-zero annunciator lights.
2. Press TARE …
EntEr is displayed.
3. Key in the desired preset tare number and press ZERO …
Tare weight is displayed as a negative value and the net weight is
displayed and the PT annunciator lights.
4. Place container or box and material to be weighed on the scale …
Net weight of material is displayed.
ZM615 Indicator User Instructions 15Operating Instructions
Step 4 can be done prior to step 2 if desired.
When the item is removed from the scale the Tare is cleared automatically if Auto
Tare Clear is enabled. To remove the tare weight manually, select a preset tare ID that
has a value of 0 for the tare or press and hold the TARE key for three seconds.
If the active unit of measure is lb-oz then tare weights must be entered in the oz
equivalent. To enter 2 lb 4.5 oz you would need to enter 36.5 oz (2 lb = 32 oz plus the
4.5)
3.2.3 Using the Accumulation function
In the accumulator application the following softkeys are displayed and have the
functions described. Following that are in depth instructions for using them.
CHAN key (F1) Press this key to use the key pad and key in the desired
accumulator channel number (7 characters max).
ID key (F3) Press this key and key in the desired ID number (7 digits max).
SETPT key (F5) Press this key to set the setpoint or output values.
PRINT key A brief key press, or triggering input #3, accumulates and
transmits data out serial port #1 (See sample below).
Chan. # 1
Trans # 2
Gross 52 lb
Tare 25 lb
Net 27 lb
Press and hold the PRINT key to print the Total Format shown
below (if enabled in the supervisor menu):
Chan. # 1
Trans # 2
Gross Total 1077 lb
Tare Total 50 lb
Net Total 1027 lb
16 ZM615 Indicator User Instructions3.2 Accumulation weighing application
CHAN key (F1)
1. Press this key and the alphanumeric entry screen appears.
Enter Channel
1
7 Characters Max
Clear . #/' % Esc
2. Key in the Channel number and press the ENTER key.
Remember to press the Num Lock key to enable the numeric keys.
The main screen appears with your chosen channel number displayed.
0
kg
Gross
Accum Chan: 5 ID: 0
Net Total: 0 lb
Transactions: 0
CHAN ID SETPT
ID key (F3)
1. Press the ID key to enter an ID number. The following screen appears.
Enter ID
1
7 Digits Max
Clear . #/' % Esc
ZM615 Indicator User Instructions 17Operating Instructions
2. Use the keypad on the ZM615 to enter up to seven digits for the ID. When you
have entered the ID, press the ENTER key and the following is displayed …
0
kg
Gross
Accum Chan: 5 ID: 7841
Net Total: 0 lb
Transactions: 0
CHAN ID SETPT
SETPT key (F3)
1. Press and hold the SELECT key …
out1 is displayed followed by the current weight value for set point 1.
2. Press ENTER to accept the displayed value or key in a new value and press
ENTER to accept.
out2 is displayed followed by the current weight value for set point 2.
3. Press ENTER to accept the displayed value or key in a new value and press
ENTER to accept.
out3 is displayed followed by the current weight value for set point 3.
4. Press ENTER to accept the displayed value or key in a new value and press
ENTER to accept.
The indicator returns to the normal weighing mode
3.2.4 Performing Accumulation weighments
The accumulator application can be used to record totals of individual weighments.
Follow these steps:
1. Press ZERO to zero the scale, if necessary …
0 is displayed.
2. Place empty container on the scale and press TARE …
Net weight is displayed.
3. Place item on the scale. Press PRINT to add this weight to the accumulator
and to print the configured print format …
The PRINT annunciator lights briefly and Acc is briefly displayed.
4. Remove weight from the scale. Weight must return to inside the gross zero
band before another print and accumulation can be recorded.
18 ZM615 Indicator User Instructions3.2 Accumulation weighing application
5. Repeat steps 3 and 4 for each weight you want to accumulate.
If enabled, press and hold the PRINT key to transmit current active total
channel data out serial port #1. This will also clear the current active
channel data if the clear feature is enabled under the Supervisor’s
Menu.
ZM615 Indicator User Instructions 19Menus
4 Menus
The ZM615 three user accessible menus:
l User menu - Use to set Time, Date, Site ID, check Seal status and check
Archive information.
l About menu - Use to see information on the software, firmware, application,
serial number, options, ethernet and downloads
l Audit menu - Use this to check and/or print the calibration and configuration
counters.
The password for these menus is 111. Follow these steps to access and use these
menus.
1. Press and hold the SETUP key until …
the password entry screen appears.
2. Key in 111 and press the ENTER key …
This screen is displayed:
Audit User About
The bold box around the center image means that is the highlighted
menu item.
3. Use the Left and Right keys to highlight the menu you want to enter and press
the ENTER key. Below are the explanations for these menus.
4.1 User menu
When the User menu is selected, these choices appear:
Time Date Site ID Seal Archive
Use the Left and Right keys to highlight the menu item you want to access and press
the ENTER key.
Time Set - Use the numeric keys to enter the correct time in the style chosen
below.
Style - Choose the style of time display from these choices:
l 12HR - Shows time in the 12 hour style
l 12HR-AP - Shows time in the 12 hour style with AM/PM
l 24HR - Shows time in the 24 hour style
20 ZM615 Indicator User Instructions4.2 About menu
Date Set - Use the numeric keys to enter the correct date in the style chosen
below.
Style - Choose the style of date display from these choices:
l MMDD2Y
l MMDD4Y
l DDMM2Y
l DDMM4Y
The date format is how the date is stored internally. Printed dates will appear as
programmed in the selected print format.
Site ID Use the alphanumeric keys to enter a Site ID, up to six characters.
Seal Shows the status of the physical seal jumper inside the indicator: SEAL or
NO SEAL. If the unit is sealed, no changes can be made to the
configuration of the indicator.
Archive This item appears only if so configured in the ADMIN password protected
menu. This stands for electronic archive. In other regions it is known as an
alibi memory or tally roll. These will be transmitted via configured
communications ports. These reports can be used to confirm a weighment
if it is ever in dispute. Only records that are qualified as a LEGAL record,
per site motion criteria, are considered as entries to this log.
The indicator has memory capacity to store approximately 5,000 transactions.
The Archive report uses a rolling memory configuration (FIFO) so the oldest
transaction will be written over first when all the memory slots are filled.
Diagnostics Shows the operating conditions of the active Scale and the ZT Digital
Load Cells. This item is not available in the US market.
You can exit the menu by following the instructions in Escaping or exiting from a menu
on page 12.
4.2 About menu
If you access the About menu you will see this menu:
Boot Firm App Serial Option Enet DLoad BSQ
ZM615 Indicator User Instructions 21Menus
Definitions:
Bootloader Software that makes the electronics run.
Firmware Embedded system software that creates core functions of the product.
App Specific software that controls the behaviour for a given installation.
Use the Left and Right keys to highlight the menu item you want to access and press
the ENTER key.
Boot PartNo - See the bootloader part number.
Version - See the version of the bootloader.
Firm PartNo - See the firmware part number.
Version - See the version of the firmware.
App PartNo - See the application part number.
Version - See the version of the application.
Serial See the serial number of the indicator.
Option Bus 1 or 2 - Choose the Bus of the option card.
Card 1 or 2 - Choose the Card you want to view.
l Type - View the type of card.
l Version - View the firmware version of the card.
Enet This stands for Ethernet. Use this to view the network addresses:
IP Addr - See the IP address.
Subnet - See the Subnet address.
Gateway - See the Gateway address.
MAC - See the MAC address.
DLoad This stands for download. Use this to view the following:
sSerial - View the license number that created the configuration file.
dSerial - View the license number that downloaded the configuration file.
dName - View the company name for the license shown for downloading.
This is used for security and licensing purposes.
BSQ Scale X - Choose the scale.
l SW Part - View the firmware part number of the cell that is
connected.
l Version - View the firmware version of the cell that is
connected.
l Cur. Ser - View the serial number of the cell that is connected.
l Cal. Ser - View the serial number of the cell that WAS
connected at the time of calibration.
ZB210, T301X*, and ZT Cell*
(* Items are not available in the US market).
PartNo See the firmware part number.
Version See the version of the firmware.
You can exit the menu by following the instructions in Escaping or exiting from a menu
on page 12.
22 ZM615 Indicator User Instructions4.3 Audit menu
4.3 Audit menu
If you access the Audit menu you will see this menu:
Counter Print
Counter Config - See the number of configurations the indicator has undergone.
Calib - See the number of calibrations the indicator has undergone.
Print Use this to select which port to print the audit report through. The audit
report will contain both Config and Calib information. Choices are:
Port 1 Under Port 1 choose to print to a column or ticket printer.
Port 2 Under Port 2 choose to print to a column or ticket printer.
USB Printing to USB requires that a USB flash drive is connected
to the indicator host USB. Printing to USB will create a folder
on the flash drive and a comma separated file with the data.
You can exit the menu by following the instructions in Escaping or exiting from a menu
on page 12.
ZM615 Indicator User Instructions 23Error messages
5 Error messages
In order to complete the weighing process, a number of conditions must be met. The
following messages may appear which may prevent completion of the weighing
sequence.
5.1 Printing errors
Timeout Something interfered with the printing process. Check
connections and retry.
Print Error Something interfered with the printing process. Check
connections and retry.
Print Aborted Something interfered with the printing process. Check
connections and retry.
Print Failed Something interfered with the printing process. Check
connections and retry.
5.2 ‘Copying to or from USB’ errors
Failed to Copy File Something interfered with the copy process. Check USB
device.
Can’t Close database Software error. Restart indicator.
File Not Found File doesn’t exist. Create the database.
5.3 BSQ errors
BSQ Error Communications error
BSQ XCAL BSQ Calibration Mismatch Error - cell that is connected to
the scale is not the cell that was calibrated. X = scale
number.
5.4 ZB210 errors
Please contact Avery Weigh-Tronix or your service provider for assistance.
5.5 T301X and ZT Cell errors
If the messages “T301X error” or “ZT error” are displayed, open the Diagnostic Menu
(111) and contact Avery Weigh-Tronix or your service provider for assistance.
These items are not available in the US market.
24 ZM615 Indicator User Instructions5.6 ZT Ghost
5.6 ZT Ghost
If the message “ZT Ghost” is displayed, the scale is no longer legal for trade. The Ghost
is active and the feature detected and replaced one faulty ZT Cell with a simulated
output. The “non-legal weight” string should be printed on the tickets. Open the
Diagnostic Menu (111) and contact Acery Weigh-Tronix or your service provider for
assistance.
This item is valid only for the ZT Cell system, which is not used in the USA.
ZM615 Indicator User Instructions 256 Supervisor menu
The supervisor menu allows access to the items related to the Accumulation
application. Follow the steps below to access the menu items described.
Press and hold the SETUP key until the password entry screen appears. Enter the
Supervisor password, 1793 and press the ZERO key and the screen below appears.
Super
scroll up and down list then enter to select
Esc
Press the Enter key and the next screen appears.
TARE
ACCUM
scroll up and down list then enter to select
Esc
The TARE item appears only if Preset Tares are enabled.
Highlight the item you wish to set and press the Enter key. The definitions of each item
in the Supervisor menu are described below.
SuPEr This is the top item in the Supervisor menu.
tArE This item appears only if Preset Tares are enabled. Use this to enter tare
weights for up to 10 Preset Tares.
Edit Use this to set the tare weight for Tare 1 through Tare 10.
Print Use this to print the tare list to your desired port or to the USB port.
See Printed Preset Tare report example on page 26.
rESEt Use this to clear all tares in memory.
If the Preset Tare list has been reset and you print the Preset Tare report the 10
memory channels will be listed but all the weights will be 0.
AccuM Use this item to set the accumulation paramaters below.
Prt Tot This stands for Print Total. If enabled, during normal operation the
user can press and hold PRINT for three seconds and the selected
print format (see Tot Fmt section below) will be sent to any port
that is configured. The display will flash Prn-tot.
Tot Fmt This stands for Total Format. This is the designated print format
number used for the accumulated totals of the current active
channel. (Format 8 is the default).
ZM615 Indicator User Instructions 25Supervisor menu
Clr Tot This stands for Clear Total. If enabled, during normal operation the
totals for the active channel will be cleared after you press and
hold of the PRINT key for three seconds. The clearing will occur
after printing of the Totals (if enabled). The message cLr-tot will
flash on the display.
Print Select the destination the 200-channel report will be transmitted
to. Choices are: Port 1, Port 2 or USB. See a sample report
below.
Channel ID Gross Total Net Total Tare Total Transactions Units
1 111 1077.000000 1027.000000 50.000000 2 lb
2 0 0.000000 0.000000 0.000000 0 lb
3 0 0.000000 0.000000 0.000000 0 lb
4 0 0.000000 0.000000 0.000000 0 lb
5 0 0.000000 0.000000 0.000000 0 lb
6 0 0.000000 0.000000 0.000000 0 lb
7 0 0.000000 0.000000 0.000000 0 lb
8 0 0.000000 0.000000 0.000000 0 lb
9 0 0.000000 0.000000 0.000000 0 lb
10 1010 2966.000000 2524.000000 442.000000 3 lb
rESEt This clears the entire 200-channel database.
This completes the Supervisor menu. To return to normal mode repeatedly press the
ESC key to exit.
6.1 Printed Preset Tare report example
Tare Index Preset Tare
1 500 lb
2 0 lb
3 0 lb
4 0 lb
5 0 lb
6 0 lb
7 0 lb
8 0 lb
9 0 lb
10 0 lb
26 ZM615 Indicator User InstructionsAvery Weigh-Tronix USA 1000 Armstrong Dr. Fairmont MN 56031 USA Tel:507-238-4461 Fax:507-238-4195 Email: usinfo@awtxglobal.com www.averyweigh-tronix.com Avery Weigh-Tronix UK Foundry Lane, Smethwick, West Midlands, England B66 2LP Tel:+44 (0) 8453 66 77 88 Fax:+44 (0)121 224 8183 Email: info@awtxglobal.com www.averyweigh-tronix.com
You can also read