X80 Wireless Camera System - User's Manual www.buckeyecam.com
←
→
Page content transcription
If your browser does not render page correctly, please read the page content below
X80 Wireless Camera System
        User's Manual
            Version 2.0

       www.buckeyecam.com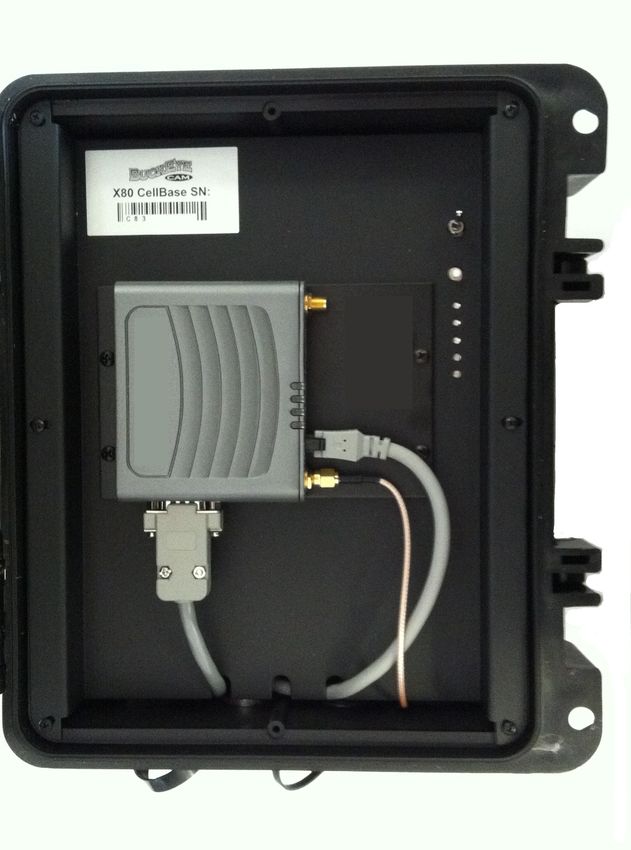
Table of Contents
1. Warnings.................................................................................................................................................... 2
2. Overview.................................................................................................................................................... 3
3. Getting Started........................................................................................................................................... 5
4. Connecting to a PC Base........................................................................................................................... 6
5. Connecting to a Cell Base.......................................................................................................................... 7
6. Connecting to a Net Base......................................................................................................................... 12
7. Register Cameras..................................................................................................................................... 15
8. Camera Settings....................................................................................................................................... 17
9. Camera Installation................................................................................................................................... 19
10. Antennas................................................................................................................................................ 22
11. Repeaters............................................................................................................................................... 24
12. Camera Technical Specifications............................................................................................................ 26
13. Camera Base......................................................................................................................................... 29
14. Troubleshooting...................................................................................................................................... 32
15. Additional Information............................................................................................................................. 34
16. Warranty and Service............................................................................................................................. 35

X80 Wireless Camera User's Manual v2.0                                                                                                            1 of 35

1. Warnings
1. Warnings

Contains FCC ID:MCQ-XBEE09P The enclosed device complies with Part 15 of the FCC Rules.
Operation is subject to the following two conditions: (i.) this device may not cause harmful
interference and (ii.) this device must accept any interference received, including interference that
may cause undesired operation.

If the camera is used with any antenna other than the portable antenna supplied with the X Series
Camera Unit or PCBase Unit, the system may not comply with the FCC regulation Part 15.247,
Operation within the license-free band 902 – 928 MHz. Contact manufacturer regarding use of
optional high-gain antennas with the X80 Wireless Camera System.

To satisfy FCC RF exposure requirements for mobile transmitting devices, a separation distance of
20 cm or more should be maintained between the antenna of this device and persons during
device operation. To ensure compliance, operations at closer than this distance are not
recommended. The antenna used for this transmitter must not be co-located in conjunction with
any other antenna or transmitter.

This product should not be used in any application where product failure may cause injury to
persons, loss of life, or catastrophic property damage.

X80 Wireless Camera User's Manual v2.0                                                      2 of 35
2. Overview
2. Overview
When a camera detects motion, a picture or video is taken and transmitted to a base receiver. Up
to 254 cameras can be assigned to one base. Four different base options are available.
Transmission distance may be up to 1-2 miles with standard antennas. Transmission distance can
be increased by using high gain antennas or repeaters.
                                                                PC Base
                                                               ● Connects to computer with USB
                                                               ● Lowest cost base option
                                                               ● Cell service is NOT required

                                                               Cell Base
                                                               ● Connects to computer over Internet
                                                               ● One cellular data plan is required
                                                               ● Works with most cell providers

                                                               Net Base
                                                               ● Connects to computer with Ethernet
                                                               ● Uses existing network
                                                               ● Cell service is NOT required

                                                               Camera Base
                                                               ● Computer is NOT required
                                                               ● Camera acts as base with SD card
                                                               ● Cell service is NOT required

X80 Wireless Camera User's Manual v2.0                                                      3 of 35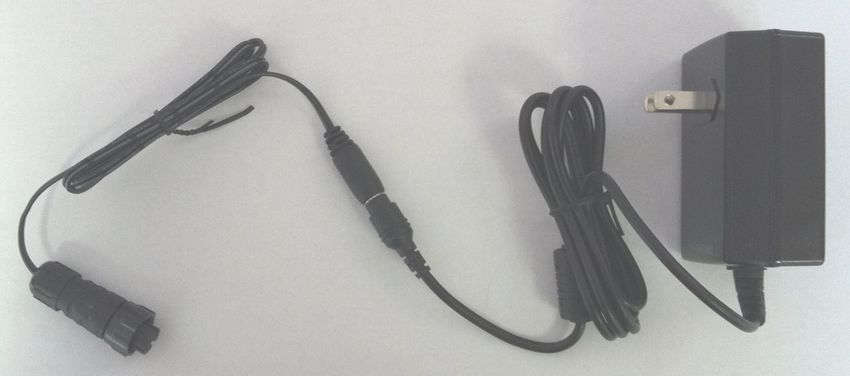
2. Overview
Images are received and all of the camera settings are controlled using the X-Series Network
Manager software application.

Images can be viewed from X-Series Network Manager, or automatically emailed, or uploaded to
your account at livecam.buckeyecam.com, making them easily accessible from smartphones or
tablets.

The cameras are powered with rechargeable lead acid batteries and can take thousands of
pictures on a single charge. Optional solar panel chargers are available to extend battery life
indefinitely. The camera and battery pack are housed in watertight, weatherproof enclosures for
reliable outdoor operation.

X80 Wireless Camera User's Manual v2.0                                                   4 of 35
3. Getting Started
3. Getting Started
If you are using a PC Base, Cell Base, or Net Base, follow the steps below to set up your system.
If you are using a Camera Base, go to chapter 13.

 Getting Started     Install X-Series Network Manager and USB Modem Driver for Windows.

      1
                     Use the supplied installation CD or download at
                     www.buckeyecam.com/site/support.html

 Getting Started     Connect to a Base.

      2
                     For PC Base refer to chapter 4.
                     For Cell Base refer to chapter 5.
                     For Net Base refer to chapter 6.

 Getting Started     Register cameras.

      3
                     Refer to chapter 7.

 Getting Started     Adjust camera settings.

      4
                     Refer to chapter 8.

 Getting Started     Install cameras in their permanent location.

      5
                     Refer to chapter 9.

X80 Wireless Camera User's Manual v2.0                                                    5 of 35
4. Connecting to a PC Base
4. Connecting to a PC Base

 PC Base    Attach antenna.

   1        The PC Base is for indoor use only.
            If optional high gain antenna will be
                  used, refer to Chapter 10.

 PC Base    Connect PC Base to computer with USB cable.

   2        Minimum computer requirements are :
            Windows XP or later, 128 MB RAM,
            1.5 GB disk space, USB port.

 PC Base    Start X-Series Network Manager
            and click the PCBase icon.
   3

 PC Base    Click the Connect button.

   4

 PC Base    Click the Done button.

   5

X80 Wireless Camera User's Manual v2.0                           6 of 35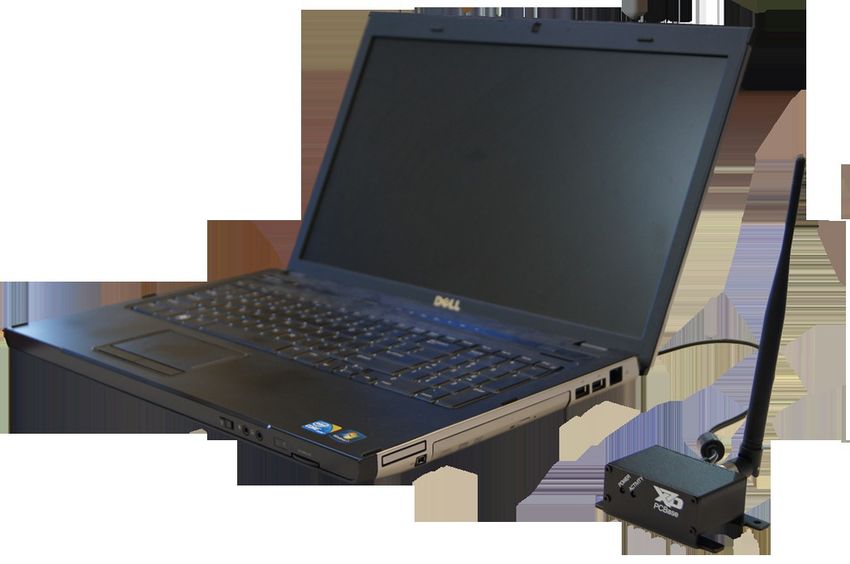
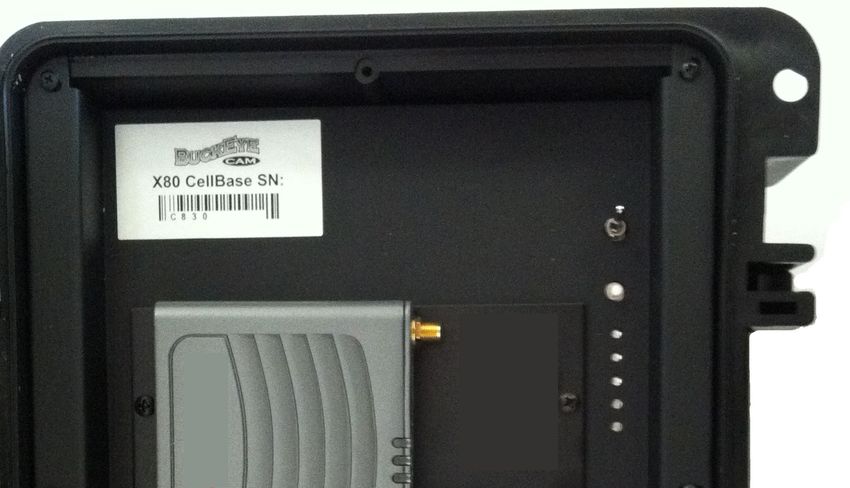
5. Connecting to a Cell Base
5. Connecting to a Cell Base

Cell Base   Make sure your Cell Base has an active cellular data account.

   1        If you need assistance setting up an account contact Buckeye Cam Service
            at 866-325-8172 ex 1195, or www.buckeyecam.com.

Cell Base   Connect the power source.

   2        If you are using the AC/DC wall adapter (provided), proceed to step A1.
            If you are using an external battery (not provided), proceed to step B1.

            Connect the pigtail to the AC/DC wall adapter.
  A1

            Connect the AC/DC wall adapter to the Cell Base.
  A2

            Plug the AC/DC wall adapter into an AC power outlet.
  A3
                     The AC/DC wall adapter is for indoor use only.

  A4        Proceed to Cell Base step 2

X80 Wireless Camera User's Manual v2.0                                                 7 of 35
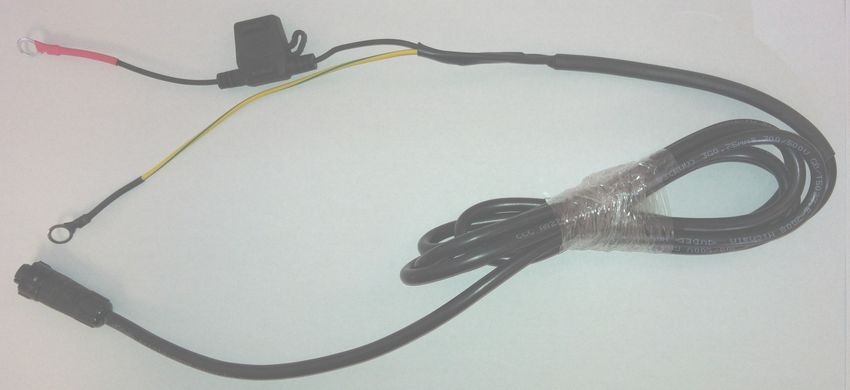
5. Connecting to a Cell Base

            Connect the battery cable to the
  B1        battery.
            Use the provided battery cable to connect
            to a 12 Volt 27DP-DL marine battery
            (or equivalent).
            (Battery is not provided).

            Connect optional solar charger (if used).
  B2        Use Buckeye Cam part number 997-0014 only.

                             Battery charging may produce potentially explosive gas. Do
                                       not charge battery in a sealed enclosure.

            Connect the battery cable to the Cell Base.
  B3

X80 Wireless Camera User's Manual v2.0                                           8 of 35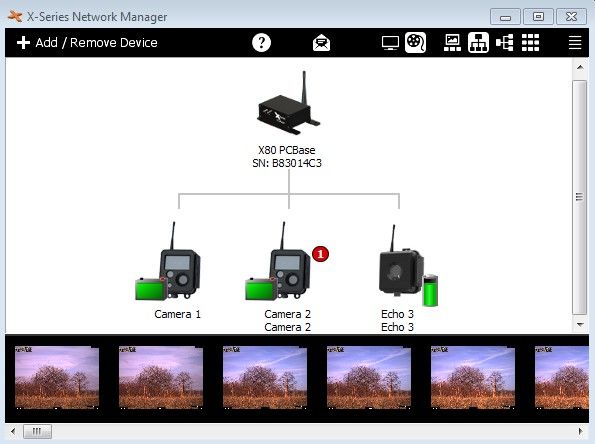
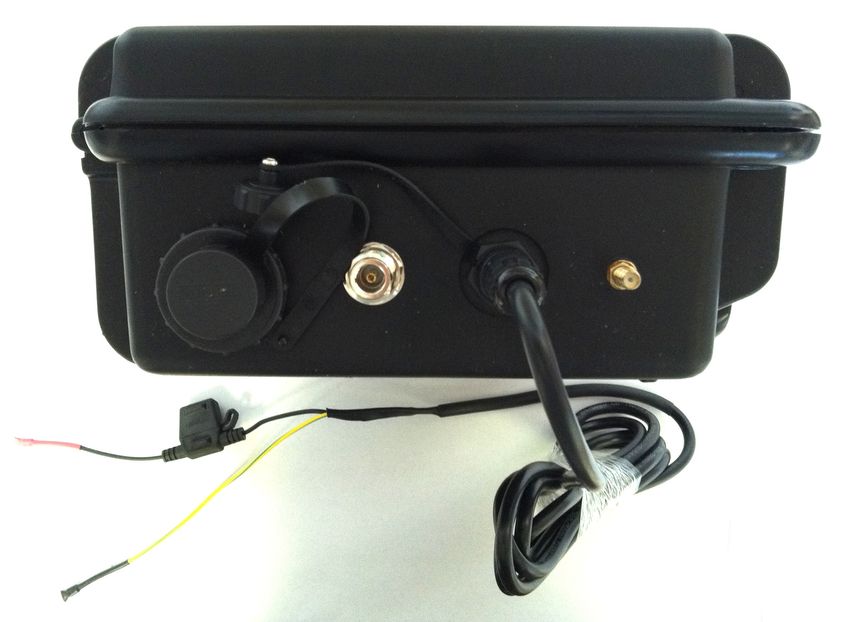
5. Connecting to a Cell Base

Cell Base   Connect the antennas.                                            Cell

   3                                                                                Camera

Cell Base   Open the enclosure lid.

   4

Cell Base   Move the toggle switch down to the ON position.

   5                                                                     O
                                                                         N

Cell Base   Wait for the first LED to blink slowly and the second

   6        to be on solid.
            This may take several minutes.

                                                                                      Blink
                                                                    On

X80 Wireless Camera User's Manual v2.0                                                   9 of 35
5. Connecting to a Cell Base
Cell Base Start X-Series Network Manager and
click on the Cell Base icon.
7
Cell Base Enter the IP Address / Domain Name and Authentication
Code from the Cell Base Information Sheet.
8
Keep the Cell Base Information Sheet in a safe place. You may
need it again if you need to re-enter the connection setup or if you
need to contact Buckeye Cam tech support.
X80 Wireless Camera User's Manual v2.0 10 of 355. Connecting to a Cell Base
Cell Base Set connection default options.
9 These should be checked for normal use.
Cell Base Enable or Disable Low Battery Detection.
10 If this box is checked, the cellular connection will
be turned off when the battery is low. This will
prevent battery damage. It will be automatically
turned back on if the battery charges back up to
a sufficient level (e.g. by solar charger).
It is recommended to check this box if the
Cell Base is powered with a battery.
Cell Base Select the check connection and lost
connection times.
11 The connection to the Cell Base may be lost due
to a temporary Internet outage or a dropped cell
signal. X-Series Network Manager will periodically
check the connection and try to reconnect if it is lost.
Shorter time settings will result in less down time
but will use slightly more battery power.
Cell Base Click the Connect button.
13
Cell Base Click the Done button.
14
Cell Base Close the enclosure lid.
15
X80 Wireless Camera User's Manual v2.0 11 of 356. Connecting to a Net Base
6. Connecting to a Net Base
Net Base Connect the pigtail to the AC/DC wall adapter.
1
Net Base Connect the AC/DC wall adapter to the Net Base.
2
Net Base Plug the AC/DC wall adapter into an AC power outlet.
3 The AC/DC wall adapter is for indoor use only.
Net Base Open the enclosure lid.
4
Net Base Move the toggle switch down to the ON position.
5
O
N
X80 Wireless Camera User's Manual v2.0 12 of 356. Connecting to a Net Base
Net Base Connect to the network with an
6 Ethernet cable.
Net Base Start X-Series Network Manager and
7 click on the Net Base icon.
Net Base Enter the IP Address / Domain Name.
8 In order for X-Series Network Manager to
connect to a Net Base, it must know the IP
address that has been assigned to it.
The IP address is assigned to the Net Base
by a DHCP server running on the local network.
The DHCP server may be running on a gateway
or router. You will need to access the client list
table and find the IP address that matches the
MAC address that is on the sticker inside of the
Net Base.
You may need to refer to the gateway or router
documentation for instructions on how to access
the client list table.
X80 Wireless Camera User's Manual v2.0 13 of 356. Connecting to a Net Base
Net Base Enter the Authentication Code from the Net Base
Information Sheet.
9
Keep the Net Base Information Sheet in a safe place. You may
need it again if you need to re-enter the connection setup or if you
need to contact Buckeye Cam tech support.
Net Base Set the Check connection and lost connection times.
10 The default time of 1 minute is adequate for most applications.
Net Base Click the connect button.
11
Net Base
Close the enclosure lid.
12
X80 Wireless Camera User's Manual v2.0 14 of 357. Register Cameras
7. Register Cameras
Register Connect the camera antenna.
1
Register Install a UB1270 battery into the battery pack.
2 The red wire connects to battery (+). The black
wire connects to battery (-).
Register Close and latch the battery pack and connect
it to the camera.
3
Register Open the camera enclosure and wait for the LCD
display to show “Not Registered Waiting for Base”.
4
X80 Wireless Camera User's Manual v2.0 15 of 357. Register Cameras
Register In X-Series Network Manager
5 click Add/Remove Device.
Register Drag the camera icon and drop
6 it into the network view.
Register Repeat for all cameras.
7 Click Done when finished.
Register Close the camera enclosure(s).
8 After a camera is successfully registered, the LCD
display will show the camera number.
X80 Wireless Camera User's Manual v2.0 16 of 358. Camera Settings
8. Camera Settings
To access the camera settings for any camera, click on the camera icon in the network view to
open the camera Control Panel.
Click to open
Control Panel
Settings
Click on the Settings button from the camera Control Panel. ( Note: The X-Series Network
Manager window is re-sizable. If you do not see the Settings button, you may need to use the
scroll bar on the right side of the window to scroll down. )
X80 Wireless Camera User's Manual v2.0 17 of 358. Camera Settings Stamps on pictures Time, Date, Moon Phase, and Temperature may be added to pictures by checking the appropriate box. Custom text may be entered in the Text 1 and Text 2 fields. This text may be added to pictures by checking the box next to each field. Image format Click on the arrow to select the image format. Select the picture resolution – or video. Delay between motion triggers Click on the arrow to select the delay between motion triggers. If a camera receives a motion trigger, it will not respond to another trigger until the delay time has elapsed. Motion sensor Click on the arrow to select the motion sensor sensitivity. To disable the motion sensor, set the sensitivity to Off. Pictures per motion trigger Click the arrow to select the pictures per motion trigger value. When the value is set to 1, the camera will take 1 picture each time it is triggered. To take multiple pictures with each trigger, set the value greater than 1. For example, if the value is set to 3, the camera will take 3 pictures, as fast as possible, each time it is triggered. Blink LED when motion detected Click the Yes/No toggle button to enable or disable a blinking LED when the camera detects motion. This is a visible red LED on the front of the camera. It is very useful for doing a “walk test” in front of the camera to verify that it is triggering correctly. (Note: If camera concealment is important, this option should be set to No after the camera is installed in the permanent location.) Camera schedule Click the On/Off toggle button to turn the camera schedule on or off. Using the camera schedule, the camera may be disabled at certain times of the day, or use different settings a different times of the day. Transmit last picture first Click the On/Off toggle button to turn on “transmit last picture first”. This setting controls how the camera transmits pictures when there is more than one picture waiting to be transmitted. If this button is set to Off, the pictures will be transmitted in the order they were taken. If it is set to On, they are transmitted latest picture first. Automatically delete files Click the arrow to change this setting. This can be used to have X-Series Network Manager automatically delete pictures from your computer after a certain period of time. If it is set to Never, X-Series Network Manager will never delete pictures from your computer. Stamps on pictures Click the Add Time Lapse button to setup a time lapse schedule. X80 Wireless Camera User's Manual v2.0 18 of 35
9. Camera Installation
9. Camera Installation

  Install   Attach camera to a solid structure.

   1        The supplied spring buckle strap may be
            used to attach the camera to a tree,
            vertical post, or other solid structure.

            Alternatively, it may be attached with a
            screw or nail using the hole in the top
            of the mounting bracket.

            The best height for the camera will
            depend on the primary target of interest.
            Usually, the camera should be placed at
            about the height of the center of mass
            of the primary target of interest.

            For maximum motion trigger distance,
            the face of the camera should be
            perpendicular to the ground.

            If maximum motion trigger distance
            is not critical, the camera may be placed
            at an angle.

  Install   Connect battery pack.

   2        If you have not done so already, install
            the battery (see Chapter 7).

            The supplied spring buckle strap may be
            used to attach the battery pack to the
            same solid structure as the camera.

            It may also be attached with a screw or
            nail using the hole in the top of the bracket.

            Alternatively, the battery pack may be
            placed on the ground. This may make it
            easier to conceal.

            The battery pack is watertight, however it
            should not be submerged.

            Once the battery pack is in place, connect
            it to the camera with the supplied cable.
X80 Wireless Camera User's Manual v2.0                           19 of 35
9. Camera Installation
Install Make sure the Base is installed and powered up and the camera is registered
(i.e. PC Base, Cell Base, Net Base, or Camera Base).
3
Install Open the camera enclosure and
push the NEXT button until the
4 LCD display shows the following
message:
Signal to Base
measuring...
If the camera can get a signal to the
Base, the LCD display will show the
signal strength.
If the camera cannot get a signal to the
Base, it will show the following:
no response!
Transmission distance may be up to 1-2 miles line-of-sight using the standard
antennas. This distance may be reduced if there are obstructions between the
camera and the Base.
If the camera cannot get a signal to the Base, you can try moving it to a different
location. If that is not an option, refer to Chapter 10, Antennas and Chapter 11,
Repeaters.
Install Close the camera enclosure.
5
Install Do a “walk test”.
6 Make sure that the “Blink LED when motion detected”
option is set to Yes and “Delay between motion triggers”
is set to 1 in X-Series Network Manager.
Walk in front of the camera and verify that the visible
LED triggers.
To get the get the maximum trigger distance, the face of
the camera should be perpendicular to the ground.
If maximum distance is not critical, the camera may be
placed at an angle.
X80 Wireless Camera User's Manual v2.0 20 of 359. Camera Installation
Install Adjust camera position if necessary.
6 If necessary, adjust the positioning of the camera until the visible LED triggers in the
desired range. Small changes in the angle can have a significant affect on the trigger
distance.
Install Repeat these steps for all cameras.
7
Don't forget to return the camera settings to the desired values.
The “Blink LED when motion detected” option may be left on permanently, but if
camera concealment is important you may want to turn it off.
X80 Wireless Camera User's Manual v2.0 21 of 3510. Antennas 10. Antennas The standard antennas provided with X80 cameras are small omnidirectional antennas that attach directly to the camera. The type of wireless transmission used is radio frequency (RF) line-of- sight. Generally speaking, this means that you need to have a limited amount of obstructions between the transmitting and receiving devices in order to get an acceptable transmission signal. Standard antennas WILL transmit through: ● Most types of trees ● Wood frame walls Standard antennas WILL NOT transmit through: ● Think pine trees (conifers) ● Metal buildings or structures ● Earth or large hills For many applications, the standard antennas will work well. The transmission distance with standard antennas may be up to 1-2 miles under ideal conditions (i.e. very few obstructions). For applications where a good signal to the Base cannot be obtained using the standard antennas, two options are available: high gain antennas and/or using cameras as repeaters. This chapter will discuss high gain antennas. Two types of high gain antennas are available: omnidirectional and directional (Yagi). High Gain Omnidirectional Antennas ● Transmit and receive equally in all directions (i.e. 360°) ● Should be mounted vertically. ● Mount high to avoid obstructions Typical Uses for Omnidirectional Antennas ● Base antenna (typically, 40” Omni) ● Repeater camera antenna (26” Omni) High Gain Yagi (Directional) Antennas ● Transmit and receive mostly in one direction ● Should be pointed at the receiver ● Mount high to avoid obstructions ● Provides the highest gain Typical Uses for Yagi (Directional) Antennas ● Camera antenna for improved signal (Mini Yagi) ● Camera antenna for very long distances (56” Yagi) ● Camera antenna when transmitting through trees or brush X80 Wireless Camera User's Manual v2.0 22 of 35
10. Antennas
The following illustrations show examples of the most common antenna setups. Transmission
distances may vary due to many factors such as, terrain, trees, brush, or various types of radio
frequency interference.

40” Omni at Base, Standard at Cameras
● Most common antenna upgrade
● Mount Omni as high as possible
● Use 400 series cable
● Typical transmission range up to 2 miles

40” Omni at Base, Yagi at Cameras
● Mount Omni as high as possible
● Use 400 series cable
● Mini Yagi or 56” Yagi at cameras
● Point Yagi antennas to the Base

It may be possible to increase transmission distance to many miles. This will usually require an
advanced antenna setup. For assistance in selecting the right antenna for your application,
contact Buckeye Cam at www.buckeyecam.com or by phone at 866-325-8172.

        Installing antenna masts may present a serious life threatening risk due to
        potential falls or contact with power lines. Installation should only be done
           by a qualified professional in accordance with all appropriate codes.

X80 Wireless Camera User's Manual v2.0                                                  23 of 35
11. Repeaters 11. Repeaters Any X80 camera can act as a repeater camera. This feature is very useful for extending transmission distance or transmitting over large hills or obstacles. Transmit over hills using a repeater. In this example, camera 1 and camera 2 cannot get a signal to the Base due to a large hill blocking the line-of-sight. Camera 3 has a clear line-of-sight to the Base and is able to get a good signal, so camera 1 and camera 2 are routed through it. Camera 3 receives all of the images from camera 1 and camera 2 and transmits them to the base (it also acts as a normal camera). Camera 4 transmits directly to the Base. Extend transmission distance using repeaters. In this example, camera 3 can get a good signal to the base. Camera 2 and camera 1 cannot get a signal to the base because they are too far away. Camera 2 can get a signal to camera 3, so it is routed through camera 3. Camera 1 can get a signal to camera 2, so it is routed through camera 2. Camera 3 receives all of the images from camera 1 and camera 2 and transmits them to the base (it also acts as a normal camera). Notes on using cameras as repeaters ● Repeating through cameras will cause some transmission delays. ● When a camera is acting as a repeater, it can still function as a normal camera. ● If a camera has multiple cameras routed through it, upgrading the antenna to a high-gain Omnidirectional antenna may improve performance (see Chapter 10, Antennas). X80 Wireless Camera User's Manual v2.0 24 of 35
11. Repeaters
Setting up a repeater network with multiple cameras
Repeaters   Install cameras in their permanent location and check the signal to the Base
            (see Chapter 9, Camera Installation).
   1        For best results, route cameras directly to the base when possible.

             To setup a repeater network, there must first be at least one camera that
                              can get a signal directly to the base.

Repeaters   Push the NEXT button until the display shows how
                                                                              Routed to Base
   2        the camera is currently routed.
                                                                                        … OK
                                                                        HOME     NEXT CHANGE ENTER

                                                                         `

Repeaters   To change the routing, push the CHANGE button.                    Routed to Base

   3        The camera will now search for any other devices that
            it can get a signal from.                                   HOME
                                                                               Searching...
                                                                                 NEXT CHANGE ENTER

                                                                         `

Repeaters   When the search is complete, push the NEXT button                  3 nodes found
            to the view all of the devices that were found (if any).          NEXT–view list
   4                                                                    HOME     NEXT CHANGE ENTER

                                                                         `

Repeaters   Push the ENTER button when the display shows                      Change to Node2
            the camera that you would like to route through.
   5
                                                                                 Camera 2
                                                                        HOME      NEXT CHANGE ENTER

                                                                          `

Repeaters   If the camera is able to contact the base through                 Routed to Node2
            the node that you have selected, the display will
   6        show “.... OK”.
                                                                        HOME
                                                                                         … OK
                                                                                  NEXT CHANGE ENTER

                                                                          `

X80 Wireless Camera User's Manual v2.0                                                     25 of 35
12. Camera Technical Specifications
12. Camera Technical Specifications
The X80 camera contains a 5 Megapixel image sensor. When the camera is triggered by motion,
a picture or video is immediately taken. If there is enough available light, the camera will take color
images. If there is not enough available light, a black and white infrared image will be taken.
For infrared images, the scene is illuminated with an infrared flash that is invisible to the human
eye.
The parts of the camera are shown below:
1. Antenna
2. Infrared flash
3. Images sensor
4. Light sensor
5. Motion detector
6. Latch
7. Battery connector
The camera may be opened using the latch, to access the status display and control panel
buttons. If battery power is properly connected, pushing any button will activate the status display.
The camera is watertight when the latch is closed and sealed properly.
However, when the camera housing is opened it is NOT watertight. The
camera should not be opened when it may be exposed to rain, snow, or
other sources of water.
The function of each of the control panel buttons is as follows:
HOME
Push to return the display to the first status message.
NEXT
Push this button to go to the next status message.
CHANGE
Push to change one of the parameters shown in the status message.
ENTER
Push to select one of the adjustable parameters in a status message, execute a function, or apply
a change.
If no buttons have been pressed for several minutes, the display will go blank to save power.
X80 Wireless Camera User's Manual v2.0 26 of 3512. Camera Technical Specifications Power is supplied to the camera from an external battery pack. The battery pack contains a 12 Volt sealed lead-acid type battery. The camera and battery pack are watertight and weatherproof when the latches are closed and sealed properly. The standard color of the camera and battery pack is matte black. Optional camo finishes are available in both desert and woodland patterns. X80 Wireless Camera User's Manual v2.0 27 of 35
12. Camera Technical Specifications

                                             Camera Specification Table 1
      Picture Format                                User Selectable.
                                                    5 Megapixel (Mp), 3 Mp HD, 3Mp
                                                    1080 HD, 1 Mp, 720 HD, 0.3 Mp
      Video Format                                  640 x 360 pixels
      Video Frame Rate                              Up to 15 frames per second.
      Video Length                                  5 to 60 seconds.
      Motion Detector Type                          Passive Infrared (PIR)
      Motion Detector Range 2                       User adjustable. Up to 100 feet
      Motion Detector Detection Angle 3             Approximately 10 degrees
      Reaction Time 4                               0.2 Seconds
      Delay Between Pictures                        User selectable. 1 second to 2 hours.
      Stamps on Picture                             User selectable. Date, Time, Temperature, Moon Phase,
                                                    and 2 custom text fields.
      Additional Optional Settings 5                Custom camera schedules.
                                                    Time lapse photography.
                                                    Pictures or video emailed or uploaded to secure LiveCam
                                                    Web-site.
      RF Transmission Range 6                       2 miles (standard antennas) Distance may be increased
                                                    with high gain antennas and / or repeaters.
      Transmission Speed 6                          Up to 8 kilo bytes per second
                                                    (Approx. 6 sec for 0.3Mp picture)
      Maximum allowable antenna gain                15.1 dBi (including cable losses)
      Number of Cameras Assigned to One             Up to 254
      Base
      Operating Temperature                         -40 to 140 F
      Battery Type                                  12V SLA UB1270 sold separately
      Solar Panel                                   Optional solar panels sold separately
      Communication Frequency Band                  902 to 928 MHz, software selectable channel mask for
                                                    interference immunity
      Transmitter Output Power                      Up to 250 mW
      Spread Spectrum                               FHSS
      Regulatory Approvals
            FCC (USA)                               MCQ-XB900HP
            IC (Canada)                             1846A-XB900HP
            C-Tick (Australia)                      Yes
            Anatel (Brazil)                         Pending
1   Specifications are subject to change and may not be available in all firmware or software versions.
2   Motion detector range may be affected by camera mounting angle and ambient temperature.
3   Approximately the center of camera field of view.
4   Time from the moment motion is detected until the picture (or video) is captured.
5An optional LiveCam account requires a paid subscription. Email and LiveCam are available with Cell Base and
PCBase only.
6 Transmission range and speed will depend on the type of antennas that are used, the surrounding terrain and
amount of interference received.

X80 Wireless Camera User's Manual v2.0                                                                     28 of 35
13. Camera Base
13. Camera Base
If a computer is not available to connect to a Base, a camera may be configured to act as a base.
In this mode, the Camera Base will receive images from other cameras and save them to an SD
card. To setup a Camera Base network, follow the steps shown below.
Camera Connect the camera antenna.
Base
1
Camera
Base
Install a UB1270 battery into the battery pack.
2 The red wire connects to battery (+). The black
wire connects to battery (-).
Camera Close and latch the battery pack and connect
Base
it to the camera.
3
Camera Open the camera enclosure and wait for the LCD
Base
display to show “Not Registered Waiting for Base”.
4
X80 Wireless Camera User's Manual v2.0 29 of 3513. Camera Base
Camera Push the NEXT button until the display shows
Base Camera Mode:
“Camera Mode”.
5
Wireless
HOME NEXT CHANGE ENTER
`
Camera Push the CHANGE button until the display shows
Base Change mode to:
“Change mode to: Base”.
6
Base
HOME NEXT CHANGE ENTER
`
Camera Push the ENTER button.
Base Camera Mode:
7
Wireless
HOME NEXT CHANGE ENTER
`
Camera Wait for the camera to reboot.
Base Base No Pics
8
No Card
HOME NEXT CHANGE ENTER
`
Camera Repeat Camera Base steps 1 through
Base
4 for all other cameras that will be in the
9 Network.
Camera Push the NEXT button until display Add Camera
Base
shows “Add Camera” and press ENTER.
10 Repeat until all un-registered cameras are found.
HOME
`
NEXT CHANGE ENTER
Camera Mode:
Camera Push the NEXT button until the display shows Wireless
Base
“Camera Mode”.
11
HOME NEXT CHANGE ENTER
`
X80 Wireless Camera User's Manual v2.0 30 of 3513. Camera Base
Camera To change camera settings, download the Camera Base
Base
software at www.buckeyecam.com and save it to an SD
12 card.
Camera Double click on the Camera Base software.
Base Base No Pics
Change settings if desired and insert the
13
ENTER to Eject
card into the Camera Base.
HOME NEXT CHANGE ENTER
`
Camera Install cameras.
Base
14 Follow the steps given in Chapter 9, Camera Installation.
X80 Wireless Camera User's Manual v2.0 31 of 3514. Troubleshooting 14. Troubleshooting Can't connect to PC Base with X-Series Network Manager. Make sure the computer meets the minimum requirements: Windows XP or later, 128 MB RAM, 1.5 GB disk space, USB port. Make sure the USB drivers are installed on the computer. They can be downloaded at http://www.buckeyecam.com/site/support.html Try closing X-Series Network Manager and unplug the USB cable. Plug the USB cable back in, start X-Series Network Manager and try to connect again. Can't connect to a Cell Base with X-Series Network Manager. Make sure the power supply is connected properly, either a 12 V battery or AC/DC wall adapter. Make sure the Off/On toggle switch is in the On position. Make sure you have an active cellular data account. Make sure you have entered the IP Address/Domain name and Authentication code correctly from the Information Sheet. Disable any anti-virus or firewall software that my be blocking the connection. Make sure that there is a good cell signal in the area where the Cell Base is. Does your phone have good service? Can't connect to a Net Base with X-Series Network Manager. Make sure the AC/DC wall adapter is plugged in properly. Make sure the Off/On toggle switch is in the On position. Make sure you are connected to the local network with an Ethernet cable. Make sure you have the correct IP address/Domain name entered. Make sure you have the authentication code entered correctly from the Information Sheet. Camera can't get a signal to the PC Base from a camera using standard antennas. Make sure the antenna is connected properly. There must be a limited amount of obstructions between the camera and the PC Base. There should be few trees, no large hills, buildings or structures. Make sure the distance between the PC Base and the camera is less than 2 miles. Try moving the PC Base. Do not put the PC Base in a basement. If possible, move it to a window that is facing the direction of the camera. Upgrade the PC Base antenna to a 40” Omnidirectional mounted as high as possible using 400 series cable available from Buckeye Cam. X80 Wireless Camera User's Manual v2.0 32 of 35
14. Troubleshooting
Can't get a signal to the PC Base from a camera using a Yagi (Directional) antenna.
Make sure the antenna is pointed in the direction of the PC Base (see Chapter 10).
The antenna cable should be 400 series cable from Buckeye Cam.
Raise antenna higher if possible.
Upgrade the PC Base antenna to a 40” Omnidirectional mounted as high as possible using 400
series cable available from Buckeye Cam.

Can't get a signal to the Cell Base from a camera using standard antennas.
If the Cell Base is installed outdoors, try moving it closer to the camera, or to a more central
location if multiple cameras are registered to it.
There must be a limited amount of obstructions between the camera and the Cell Base. There
should be few trees, no large hills, buildings or structures.
Try mounting the antenna higher. If longer cable is required, use 400 series cable from Buckeye
Cam.
Upgrade the antenna at the camera to a Yagi (Directional) antenna. The Yagi antenna at the
camera should be pointed in the direction of the Cell Base.

X80 Wireless Camera User's Manual v2.0                                                        33 of 35
15. Additional Information
15. Additional Information

Video Tutorials
X-Series Network Manager video tutorials are available at www.buckeyecam.com.

LiveCam

Images that are received by X-Series Network Manager may be automatically uploaded to an
optional LiveCam account. Images that are uploaded to LiveCam may be viewed from any
computer that has an Internet connection by logging into your LiveCam account. The account
may be public or private. The LiveCam service requires a yearly subscription fee.

To setup a LiveCam account, visit www.buckeyecam.com

Other X80 Series Wireless Devices

The Buckeye Cam X80 Series also includes auxiliary sensors, repeaters, actuators, and game
feeder controllers. All of the available devices work seamlessly together and may be controlled
and monitored with the X-Series Network Manager software application.

Visit www.buckeyecam.com for the latest product information.

X80 Wireless Camera User's Manual v2.0                                                34 of 35
16. Warranty and Service
16. Warranty and Service

For service or repair, contact ATSI/Buckeye Cam at:
ATSI
8157 US Hwy 50 • Athens, OH 45701
(866) 325-8172 • (740) 592-2874
Fax (740) 594-2875
www.buckeyecam.com

Athens Technical Specialists, Inc. (ATSI) warrants Products (BuckEye Cam TM ) sold by it and
guarantees to correct, by repair or replacement at our option, any defects of material and
workmanship which develop under normal and proper use within six (6) months from the date of
the original purchase when inspection proves the fault to be of manufacturing. Circuit board
components only receive a twelve (12) month warranty. All such Products must be returned to our
service center, transportation charges prepaid. This warranty does not apply to any of our Products
which have been repaired or altered by unauthorized persons or service centers in any way so as,
in our judgment, to injure their stability or reliability, or which have been subject to misuse,
negligence, or accident or which have had their serial number altered, effaced or removed.

We will not assume any expense or liability for repairs made by other parties without our written
consent. ATSI is not responsible for damage to any associated equipment or apparatus, nor shall
we be held liable for loss of profit or other special damages. There is no other guarantee or
warranty except as herein stated. The Buyer, his employees, or others assumes all risks and
liabilities for the operation, the use and the misuse of the product described herein and agree to
defend and to save the seller harmless from any and all claims arising from any cause whatsoever,
including seller’s negligence for personal injury incurred in connection with the use of the said
product.
ATSI reserves the right to discontinue models at any time or change specifications, price or design
without notice and without incurring any obligation. The express warranties are in lieu of all other
warranties, guarantees, promises, affirmations, or representations, express or implied which would
be deemed applicable to the goods sold hereunder. No express warranties and no implied
warranties, whether of merchantability, fitness for any particular use or purpose, against
infringement, or otherwise (except as to title) other than those expressly set forth herein, shall
apply.

X80 Wireless Camera User's Manual v2.0                                                     35 of 35
You can also read