BMS-IWF0320E BMS-IWF0320IN (for India only) - Smart device control interface Owner's Manual - Toshiba Air Conditioning
←
→
Page content transcription
If your browser does not render page correctly, please read the page content below
Owner’s Manual
                Smart device control interface

Model name:

BMS-IWF0320E
BMS-IWF0320IN (for India only)

                                          English
Smart device control interface                                                                                                      Owner’s Manual

       Contents
         1 Precautions for safety . . . . . . . . . . . . . . . . . . . . . . . . . . . . . . . . . . . . . . . . . . . . . . . . . . 3
         2 Operating environment (Smart device) . . . . . . . . . . . . . . . . . . . . . . . . . . . . . . . . . . . . 4
         3 Main function . . . . . . . . . . . . . . . . . . . . . . . . . . . . . . . . . . . . . . . . . . . . . . . . . . . . . . . . . 4
         4 How to install . . . . . . . . . . . . . . . . . . . . . . . . . . . . . . . . . . . . . . . . . . . . . . . . . . . . . . . . . 5
         5 Names and functions of main screens . . . . . . . . . . . . . . . . . . . . . . . . . . . . . . . . . . . . 6
           5-1. Login Screen . . . . . . . . . . . . . . . . . . . . . . . . . . . . . . . . . . . . . . . . . . . . . . . . . . . 6
           5-2. Screen of the list of air conditioners . . . . . . . . . . . . . . . . . . . . . . . . . . . . . . . . 7
           5-3. Air conditioner's settings screen . . . . . . . . . . . . . . . . . . . . . . . . . . . . . . . . . . . 8
                        [1]    The air conditioners' various settings . . . . . . . . . . . . . . . . . . . . . . . . . . . . . . . . . . . . . . . . . 10
                        [2]    Locking setting . . . . . . . . . . . . . . . . . . . . . . . . . . . . . . . . . . . . . . . . . . . . . . . . . . . . . . . . . . 11
                        [3]    Schedule settings screen . . . . . . . . . . . . . . . . . . . . . . . . . . . . . . . . . . . . . . . . . . . . . . . . . . 12
                               [3-1]      Schedule name settings screen . . . . . . . . . . . . . . . . . . . . . . . . . . . . . . . . . . . . . . . 13
                               [3-2]      Schedules' detailed display screen . . . . . . . . . . . . . . . . . . . . . . . . . . . . . . . . . . . . 14
             5-4.       Device settings screen . . . . . . . . . . . . . . . . . . . . . . . . . . . . . . . . . . . . . . . . . . 16
                        [1]    Users settings screen . . . . . . . . . . . . . . . . . . . . . . . . . . . . . . . . . . . . . . . . . . . . . . . . . . . . . 17
                               [1-1]      Detailed screen for users settings . . . . . . . . . . . . . . . . . . . . . . . . . . . . . . . . . . . . . 18
                        [2]    Temperature settings screen . . . . . . . . . . . . . . . . . . . . . . . . . . . . . . . . . . . . . . . . . . . . . . . 23
                        [3]    Clock settings screen . . . . . . . . . . . . . . . . . . . . . . . . . . . . . . . . . . . . . . . . . . . . . . . . . . . . . 24
                        [4]    Alarm screen . . . . . . . . . . . . . . . . . . . . . . . . . . . . . . . . . . . . . . . . . . . . . . . . . . . . . . . . . . . 25
                        [5]    Operation mode restriction screen . . . . . . . . . . . . . . . . . . . . . . . . . . . . . . . . . . . . . . . . . . . 26
             5-5.       Icon display . . . . . . . . . . . . . . . . . . . . . . . . . . . . . . . . . . . . . . . . . . . . . . . . . . . 27
         6 Enduser License Agreement . . . . . . . . . . . . . . . . . . . . . . . . . . . . . . . . . . . . . . . . . . . 28
         7 OSS . . . . . . . . . . . . . . . . . . . . . . . . . . . . . . . . . . . . . . . . . . . . . . . . . . . . . . . . . . . . . . . . 30

2-EN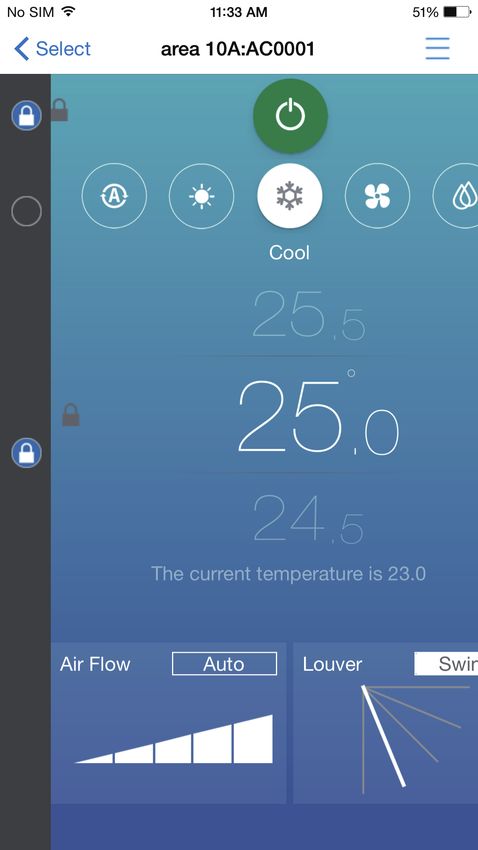
Smart device control interface                                                                                              Owner’s Manual

1           Precautions for safety                                                                               The following instructions
                                                                                                                 must be observed.

• The product and this manual are provided with important safety notices to ensure safe use and protect the user
  and other people from hazards and preclude damage to property.
  Be sure that you fully understand the following contents (expressions and graphic symbols) and read this manual
  carefully. Always observe the precautions.
• Keep this Manual at accessible place for future reference.

Expressions
                       Text set off in this manner indicates that failure to adhere to the directions in the warning could result in
      Warning          serious bodily harm (*1) or loss of life if the product is handled improperly.
                       Text set off in this manner indicates that failure to adhere to the directions in the caution could result in
      Caution          serious bodily injury (*2) or damage (*3) to property if the product is handled improperly.
*1: Serious bodily harm indicates loss of eyesight, injury, burns, electric shock, bone fracture, poisoning, and other injuries which leave
    aftereffect and require hospitalization or long-term treatment as an outpatient.
*2: Bodily injury indicates injury, burns, electric shock, and other injuries which do not require hospitalization or long-term treatment as an
    outpatient.
*3: Damage to property indicates damage extending to buildings, household effects, domestic livestock, and pets.

Graphic symbols
                    “ ” indicates prohibited items.
                    The actual contents of the prohibition are indicated by a picture or text placed inside or next to the graphic
                    symbol.
    Prohibited
                    “ ” indicates compulsory (mandatory) items.
                    The actual contents of the obligation are indicated by a picture or text placed inside or next to the graphic
                    symbol.
  Compulsory
                    “ ” indicates caution items.
                    The actual contents of the caution are indicated by a picture or text placed inside or next to the graphic symbol.

     Caution

                                                                      Warning
                    Ask your dealer or a professional for                                     Do not disassemble, alter, repair or
                    installation of your system.                                              relocate the system alone.
                    Installation requires specialized knowledge.                              This may cause fire, electric shock or injury.
                    If you install your system yourself, fire,                                Ask your dealer for repair or relocation.
   Ask              electric shock or injury may be caused.                 Disassembly
   professional                                                             prohibited

                    Power OFF in the event of an alarm (odor,
                    etc.).
                    Failure to do so may cause fire or electric
                    shock.
   Compulsory       Ask your dealer for repair.

                                                                       Caution
                    Before cleaning the unit, be sure to stop                                 Do not touch any button with wet fingers.
                    operation and turn OFF the power.                                         This may cause electric shock.
                    Failure to do so may cause electric shock or
                    injury.
   Compulsory                                                                Prohibited

                                                                                                                                                  3-EN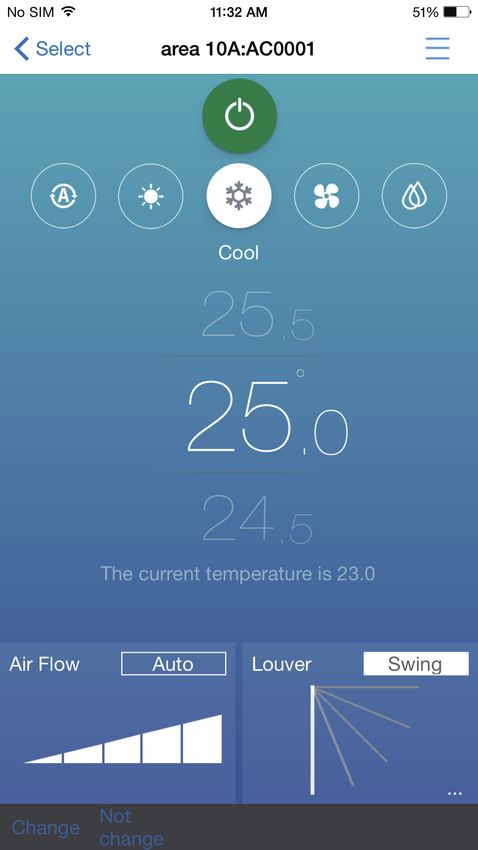
Smart device control interface Owner’s Manual
2 Operating environment (Smart device)
The following is the ideal operating environment for this software:
Item Necessary environment
Targeted devices iPad, iPhone, Android Phone, Android Tablet
Operating System (iOS) Version 9.x, 10.x
Operating System (Android) 5.x, 6.x, 7.x
• Apple, the Apple logo, AirDrop, AirPlay, AirMac, Aperture, AppleTV, FaceTime, Finder, iBooks, iCal, iMessage, iPad, iPhoto,
iPod, iPod touch, iSight, iTunes, Keychain, Mac, OS X, Photo Booth, Safari, Siri, Smart Cover, Spotlight, and Time Capsule
are trademarks of Apple Inc. that are registered in the USA and other countries. The iPhone trademark is being used under
the license of Aiphone Co., Ltd.
• AirPrint, EarPods, Flyover, Guided Access, iPad Air, iPad mini, Lightning, and Multi-Touch are trademarks of Apple Inc.
• Apple Store, Genius, iAd, iCloud, iTunes Extras, iTunes Plus, iTunes Store, iTunes U, and the Podcast logo are service marks
of Apple Inc. that are registered in the USA and other countries.
• App Store, iBooks Store, iTunes Match, and iTunes Radio are service marks of Apple Inc.
• iOS is a trademark or registered trademark of Cisco in the USA and other countries, and is being used under license.
• “Google”, the “Google logo”, “Google Play”, the “Google Play logo”, “AndroidTM” and the “Android logo” are trademarks of
Google Inc.
• This application is confirmed to operate with the following models.
Manufacturer Model name
Apple iPhone 7, iPhone 7 Plus, iPad
Sony Xperia XZ, Xperia XA1 Ultra
Samsung Galaxy S7, Galaxy S8, Galaxy Tab A10.1, Galaxy Tab S3 9.7, Galaxy Tab A7.0
• Xperia is a trademark or registered trademark of Sony Mobile Communications Inc.
• Galaxy is a trademark or registered trademark of Samsung Electronics Co., Ltd.
3 Main function
This is an application that, once installed on a smart phone or tablet, can be used as a remote control for air
conditioners.
The main functions are as follows.
Monitoring and controlling air conditioners
You can change the details of the settings, turn the air conditioners and off, and monitor the operation status, settings status,
and error incident status of the air conditioners.
Air conditioners are divided into hierarchies based on floors and can be positioned and registered for each floor. Controls for
the air conditioners can be set per air conditioner unit.
Scheduling operations
You can control the schedule for the air conditioners' operation in weekly units.
The items that you can set are almost the same as normal setting details, including starting and stopping operation, operation
modes, operation temperature settings, air speed, and air direction. You can also display and check the schedule you set as a
graph.
Administrator functions and user privilege functions
You can set either administrator privileges or user privileges for each user ID.
Users with administrator privileges can use all functions. Users with user privileges cannot use some functions.
4-EN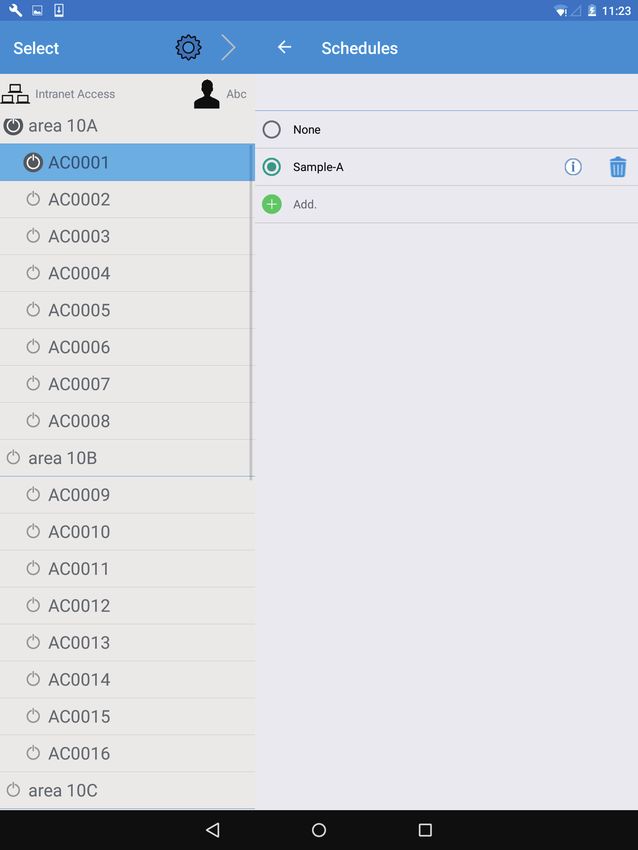
Smart device control interface Owner’s Manual
Screen configuration
5-2. The list of air 5-3. Air conditioner's [1] The air conditioners'
5-1. Login* conditioners settings various settings
[2] Locking setting
5-4. Device settings
[3] Schedule settings
* : The "Confirm personal information" screen appears when starting up for the first time. You can select the "Yes" button by
scrolling to the end of the message (smartphones only). Pressing "Yes" shows the login screen. Pressing "No" exits the
application.
System configuration
Smart device
(iPhone, iPad, Android phone, Android tablet)
Intranet Internet
Smart device control Air conditioner
interface
4 How to install
Download and install the application from either the AppStore or GooglePlay.
Install the appropriate application from below.
Name "TOSHIBA AC Control"
Developed by the "Toshiba Carrier Corporation"
5-EN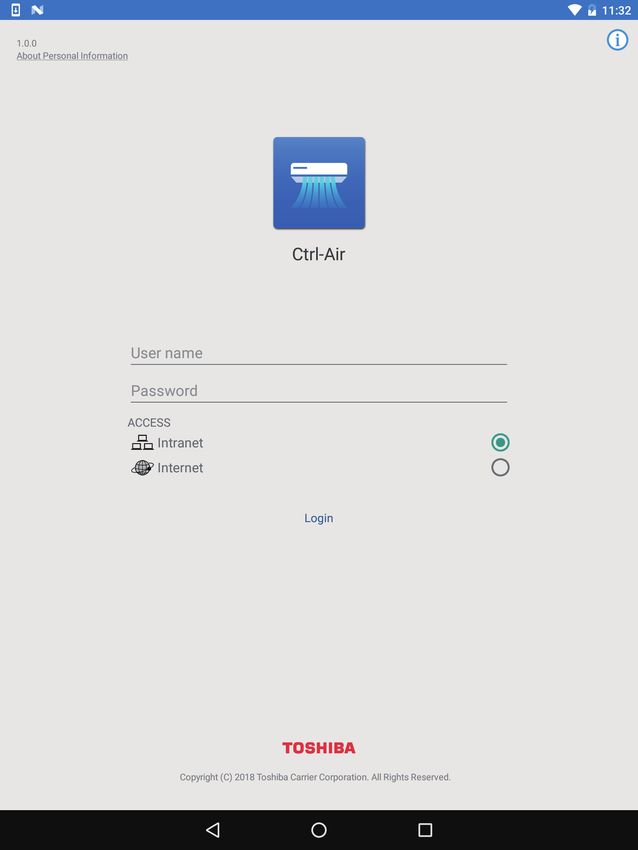
Smart device control interface                                                                              Owner’s Manual

       5            Names and functions of main screens
       This section explains each screen.
       We use an iPhone for the smart phone and an Android for the tablet as typical examples.
       In the User level, there are two settings, Administrator and User. Users who are registered as an Administrator can use all of
       the functions. Users who are registered as a User are limited in the functions that they can use.

         NOTE
       Some screens may differ from the actual screens.

       5-1. Login Screen

              1                                               2                1                                    2

              3                                                            3
                  4                                                            4
                  5
                                                                               5
                  6

                                                                               6

                             Fig.5-1 [Android tablet]                                    Fig.5-2 [iPhone]

        No.                    Item                                                   Function
                  Confirm handling of personal
         1        information button
                                                 Shows the confirm handling of personal information screen.

         2        Information button             Starts up browser and shows the detailed information on an external site.

         3        User name                      Enter your user name.

         4        Password                       Enter your password.

         5        ACCESS                         Select whether to connect to an Intranet or the Internet.
                                                 Log in.
                                                 Goes to the list screen after logging on.
                                                 Intranet: Access the Smart device control interface via LAN. The Smart device and
                                                           Smart device control interface must be in the same network.
         6        Login
                                                 Internet: Access the Smart device control interface via the Internet. The Smart
                                                           device and Smart device control interface must both be able to access the
                                                           Internet.
                                                 (Refer to page 7)

         NOTE
        • Service begins about 10 minutes after you power on the Smart device control interface.
        • The user name and password when you log in may differ depending on each Smart device control interface and access
          method (Intranet/Internet). Check with your system administrator for more information about your user name and password.
        • Depending on the “Level” that you log in, the functions that you can use may be different. Refer to page 18 about the
          differences in functions.
        • Set a user name and password that are between 8 and 64 characters and include a combination of at least one letter and
          one number each.

6-EN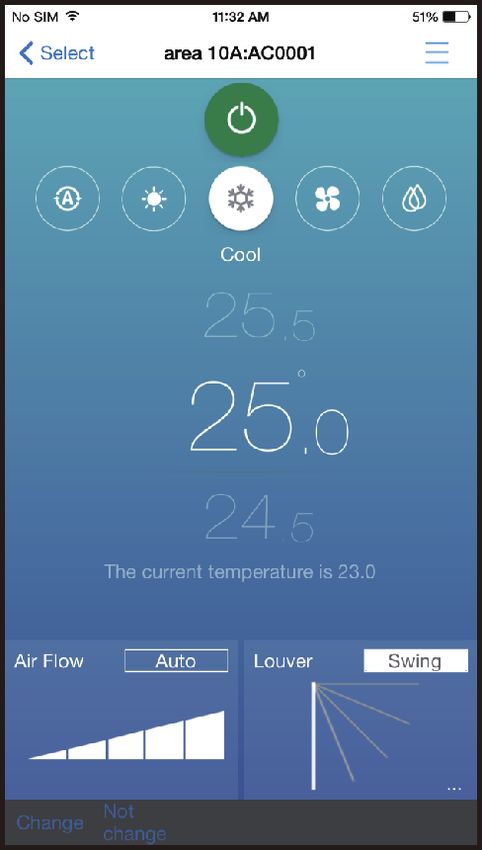
Smart device control interface                                                                                  Owner’s Manual

5-2. Screen of the list of air conditioners

                                                            5                                                         5
  1                                                         4          1                                              4
      2                                                                2
      3                                                                3

      6

                    Fig.5-3 [Android tablet]                                          Fig.5-4 [iPhone]

 No.                    Item                                                        Function
                                           Displays either “Internet” or “Intranet”.
  1       Connection information
                                           Displays where you are connected to Internet or Intranet.

                                           Displays the registered floor name (area name).
                                           You can turn on or off all of the air conditioners on a floor by tapping       .
  2       Floor name (area name)
                                               : Air conditioners on the floor are operating
                                               : Air conditioners on the floor are not operating

                                           Displays the air conditioner units that are registered to a floor.
                                           Tapping this goes to the air conditioner's settings screen.
                                           (Refer to page 8)
  3       Air conditioner unit             You can turn on or off air conditioner(s) on a floor by tapping      .
                                               : Air conditioner is operating
                                               : Air conditioner is not operating

                                           Displays the name of the logged-in user.
                                           User level
  4       User                                 : Administrator
                                               : User
                                           Refer to page 18 about how the functions differ depending on the user level.

                                           Goes to Setting.
  5       Setting
                                           (Refer to page 16)

                                           Displays the status of the air conditioner, such as operation modes, temperature
  6       Air conditioners' statuses*
                                           setting, air flow, louver, and schedule.

* : Displayed only on the iPad and Android tablets Although this displays the operation status of an air conditioner unit, you
    cannot change the settings. Make changes on the settings screen for individual air conditioners.

                                                                                                                                 7-EN
Smart device control interface Owner’s Manual
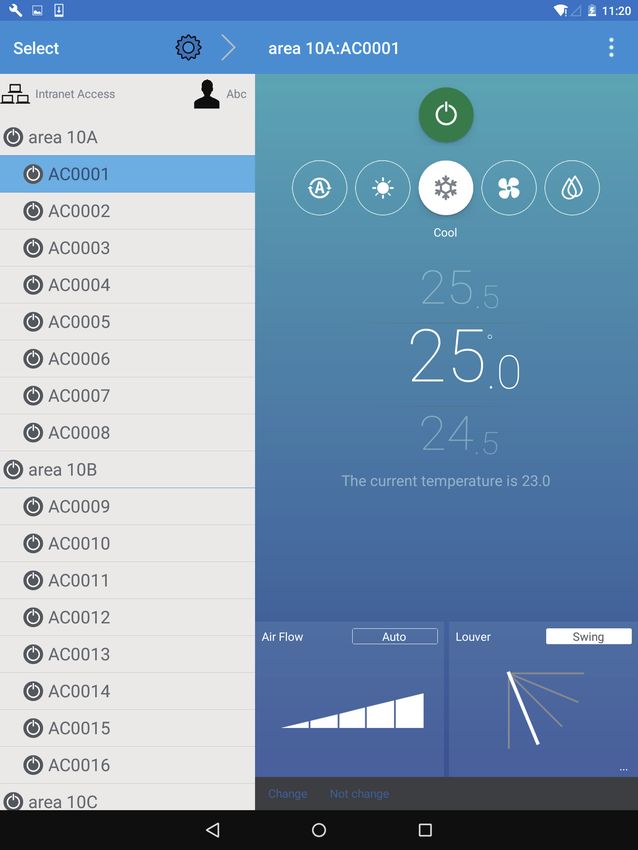
5-3. Air conditioner's settings screen
1 8 1 8
2 2
3
3
4
4
5
5
7 6
7 6
9 10
9 10
Fig.5-5 [Android tablet] Fig.5-6 [iPhone]
No. Item Function
Returns to the list screen.
1 Return button
(Refer to page 7)
Displays the on/off status of the air conditioner.
You can turn on or off the air conditioner by tapping this.
2 Air conditioner's status
: Air conditioner is operating
: Air conditioners is not operating
Displays the operation modes.
You can select an operation mode by tapping the buttons.
Auto: Auto mode
Heat: Heater mode
3 Operation modes
Cool: Cooler mode
Fan: Fan mode
Dry: Dry mode
Displays the set temperature.
4 Temperature setting
You can change the set temperature by flicking the number up or down.
5 Current temperature Displays the current temperature.
Adjust the air flow direction.
6 Louver You can change the setting by tapping it.
Tapping [Swing] changes the display to (swing).
Displays the air flow.
7 Air Flow You can change the setting by tapping it.
Tapping [Auto] changes the display to (automatic adjustment).
8-EN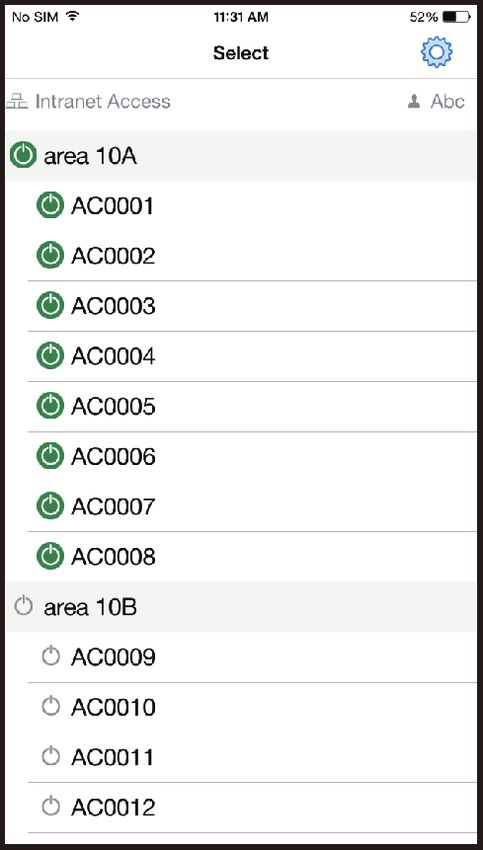
Smart device control interface                                                                              Owner’s Manual

                                         You can do the following settings.
                                              : Air conditioners' various settings
                                                Goes to the air conditioners' various settings.
                                                (Refer to page 10)
                                               : Locking
  8    Menu button                               You can set or release the locking mode by tapping this.
                                                 (Refer to page 11)
                                                Schedule: Schedule settings
                                                Goes to the schedule settings screen.
                                                (Refer to page 12)
                                               : Status refresh

  9    Change                            Sends the changed setting details to the air conditioners.

 10    Not change                        Returns the changes to what they were before.

  NOTE
The settings do not change if you do not tap [Change].

                                                                                                                             9-EN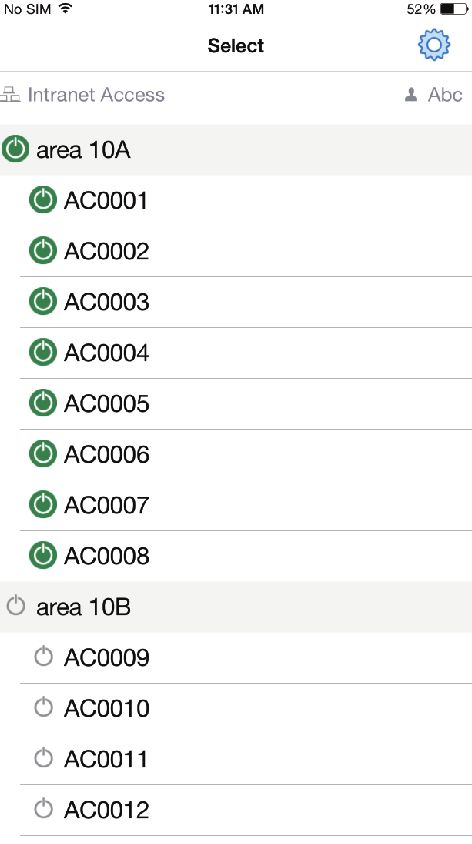
Smart device control interface                                                                              Owner’s Manual

        [1] The air conditioners' various settings

                 1                                                 8           1                                        8
                 2
               3                                                               2
                 4                                                             3
               5                                                               4
                 6
               7                                                               5
                                                                               6
                                                                               7

                            Fig.5-7 [Android tablet]                                       Fig.5-8 [iPhone]

         No.                 Item                                                       Function
                                                   Returns to the air conditioner's settings screen.
          1     Return button
                                                   (Refer to page 8)

          2     Eco Temperature Shift*1            Set the eco temperature shift to on or off.

          3     Save(%)*1                          Select save operation from [Release], [Max.], [50] or [0].

          4     Forced Thermo OFF Reset*1          Reset forced thermostat off.

          5     Ventilation mode setting*1         Set the ventilation mode.

                                                   Set the upper limit and lower limit of the temperature range for each operation
          6     Temperature Range*1
                                                   mode.

          7     Soft Cooling*1                     Set soft cooling to on or off.

          8     Done*2                             Save the changed settings.

        *1: In models that do not support these functions, they cannot be set.
        *2: Even if you have changed some settings, the settings are not saved unless you tap [Done].

          NOTE
        Only an administrator can set this function.

10-EN
Smart device control interface Owner’s Manual
[2] Locking setting
1 1
2
2
Fig.5-9 [Android tablet] Fig.5-10 [iPhone]
No. Item Function
Set the locking setting to on or off.
Operating, operation modes, and temperature setting are the items that can be set.
1 Locking : Locking setting is off
: Locking setting is on
2 Locking indicator Appears when the locking setting is turned on.
NOTE
• The settings do not change if you do not tap [Change].
(Refer to page 9)
• Only an administrator can set this function.
• Return to the previous screen by tapping on the menu button for locking.
11-ENSmart device control interface Owner’s Manual
[3] Schedule settings screen
1 1
2
3 2
3
Fig.5-11 [Android tablet] Fig.5-12 [iPhone]
No. Item Function
Returns to the air conditioner's settings screen.
1 Return button
(Refer to page 8)
Displays the registered schedule.
You can select a schedule by tapping to the left of it.*
Tapping goes to the name change screen.
2 Schedule
(Refer to page 13)
Tapping the schedule name goes to the detailed display screen.
(Refer to page 14)
Add a schedule.
3 Add*
(Refer to page 13)
* : Only an administrator can do this.
12-ENSmart device control interface Owner’s Manual
[3-1] Schedule name settings screen
1 4 1 4
3 3
2 2
Fig.5-13 [Android tablet] Fig.5-14 [iPhone]
No. Item Function
Returns to the schedule settings screen.
1 Return button
(Refer to page 12)
When adding: Enter the schedule name you are adding.
2 Schedule Name
When changing: Enter the schedule name after changing.
3 Delete Deletes the selected schedules.
4 Done* Save the changed settings.
* : Even if you have changed some settings, the settings are not saved unless you tap [Done].
NOTE
Only an administrator can set this function.
13-ENSmart device control interface Owner’s Manual
[3-2] Schedules' detailed display screen
1
3
4
5
Fig.5-15 [Android tablet]
1
2 3
4
5
Fig.5-16 [iPhone]
No. Item Function
Returns to the schedule settings screen.
1 Return button
(Refer to page 12)
Add a schedule item.
2 Add*
(Refer to page 15)
3 Switch schedules* Toggles between enabling and disabling the schedule that is displayed.
Displays schedules in a list format. You can add a schedule by tapping on [Add].
4 List display* You can change the schedule by tapping on the time.
(Refer to page 15)
Displays schedules in a graph format. You can add a schedule by tapping the
empty space in the graph. You can change the schedule by tapping a bar in the
5 Graph display
graph.
(Refer to page 15)
* : Only an administrator can do this.
14-ENSmart device control interface Owner’s Manual
▼ Schedule item setting screen
1 12 1 12
2 2
3
4 3
5
6 4
7 5
8 6
9
10 7
11 8
9
10
11
Fig.5-17 [Android tablet] Fig.5-18 [iPhone]
No. Item Function
Return to the schedules’ detailed display screen.
1 Return button
(Refer to page 14)
2 Delete Deletes the selected schedule item.
3 Day of the week Set the day of the week.
4 Time Set the time.
5 ON/OFF Set whether the air conditioner will turn on or off at the set time or day of the week.
6 Operation Mode*1 Set the operation mode.
7 Setting Temperature*1 Set the set temperature.
8 R/C Prohibited Prohibit remote control operations.
9 Return Back Set the return back setting.
10 Save (%)*1 Set the save operations.
11 Ventilation mode*1 Set the ventilation mode.
12 Done*2 Save the changed settings.
*1: In models that do not support these functions, they cannot be set.
*2: Even if you have changed some settings, the settings are not saved unless you tap [Done].
NOTE
Only an administrator can set this function.
15-ENSmart device control interface Owner’s Manual
5-4. Device settings screen
1 1
2
3 2
4 3
5 4
6 5
7
8 6
9
7
8
9
Fig.5-19 [Android tablet] Fig.5-20 [iPhone]
No. Item Function
Returns to the list screen.
1 Return button
(Refer to page 7)
Manage or add users.
2 User Manage passwords.
(Refer to page 17)
Set the temperature display.
3 Display
(Refer to page 23)
Set the time and date.
4 Cloud/Controller*
(Refer to page 24)
Check version information and update software and restart for Smart device control
5 Version
interface.
Set alerts when abnormalities are detected with the air conditioners.
6 Alarm
(Refer to page 25)
Set the selectable operation modes.
7 Operation mode restriction
(Refer to page 26)
8 Information Starts up browser and shows the detailed information on an external site.
9 Logout Log out.
* : "Cloud" appears on the screen when connected to the internet, and the "Controller" appears on the screen when connected
to the intranet.
NOTE
If you are using an Internet connection, the time may be corrected by the auto-correction function.
16-ENSmart device control interface Owner’s Manual
[1] Users settings screen
1
2
3 2
3
Fig.5-21 [Android tablet] Fig.5-22 [iPhone]
No. Item Function
Returns to the device settings screen.
1 Return button
(Refer to page 16)
Displays the registered users.
2 User Tapping this goes to the detailed screen for user settings.
(Refer to page 18)
Add a user.
3 Add*
(Refer to page 18)
* : Only an administrator can do this.
17-ENSmart device control interface Owner’s Manual
[1-1] Detailed screen for users settings
1 6 1 6
2 2
3
4 3
4
5 5
Fig.5-23 [Android tablet] Fig.5-24 [iPhone]
No. Item Function
Returns to the users settings screen.
1 Return button (Refer to page 17)
Add a user name.
2 User name*2 (Refer to page 19)
Set or change a password.
3 Password*2 (Refer to page 20)
Set the user privileges.
4 Level*2, *3 (Refer to page 21)
Set the range that the user can access.
5 Access Area*2 (Refer to page 22)
6 Done*1 Save the changed settings.
*1: Even if you have changed some settings, the settings are not saved unless you tap [Done].
*2: Only an administrator can do this.
*3: The differences between the user levels (Administrator/User) are as follows.
Access Intranet Internet
Level
Administrator User Administrator User
Function
Air conditioner's display ○ ○*1 ○ ○*1
Air conditioner's settings ○ ○*1, *2 ○ ○*1, *2
Users settings ○ - ○ -
3 4
Alarm ○ -* -* -*3
Schedule ○ - -*4 -
Air conditioners' various settings ○ -*4 ○ -*4
Clock settings ○ - - -
Operation mode restriction ○ - - -
*1: Only the air conditioners in the “Access Area” can be displayed.
*2: If the locking setting is enabled, you cannot do any settings.
*3: The alarm settings for “Access Area” can only be displayed.
*4: The settings can only be displayed.
18-ENSmart device control interface Owner’s Manual
▼ User name settings screen
1 3 1 3
2
2
Fig.5-25 [Android tablet] Fig.5-26 [iPhone]
No. Item Function
Returns to the detailed screen for user settings.
1 Return button
(Refer to page 18)
2 User Name Enter a new user name.
3 Done* Save the changed settings.
* : Even if you have changed some settings, the settings are not saved unless you tap [Done].
NOTE
• Only an administrator can set this function.
• Set a user name and password that are between 8 and 64 characters and include a combination of at least one letter and
one number each.
19-ENSmart device control interface Owner’s Manual
▼ Password settings screen
1 3 1 3
2 2
Fig.5-27 [Android tablet] Fig.5-28 [iPhone]
No. Item Function
Returns to the detailed screen for user settings.
1 Return button
(Refer to page 18)
Enter your password.*2
• Changing a password: After entering your old password, enter your new
2 Password
password.
• Registering a password: Enter a new password.
3 Done*1 Save the changed settings.
*1: Even if you have changed some settings, the settings are not saved unless you tap [Done].
*2: Enter the new password two times. Follow the screen display to enter the password.
NOTE
• Only an administrator can set this function.
• Set a user name and password that are between 8 and 64 characters and include a combination of at least one letter and
one number each.
20-ENSmart device control interface Owner’s Manual
▼ Level settings screen
1 3 1 3
2
2
Fig.5-29 [Android tablet] Fig.5-30 [iPhone]
No. Item Function
Returns to the detailed screen for user settings.
1 Return button
(Refer to page 18)
Set permissions.
2 Level • User: Limit functions.
• Administrators: Can use all functions.
3 Done* Save the changed settings.
* : Even if you have changed some settings, the settings are not saved unless you tap [Done].
NOTE
• Only an administrator can set this function.
• Privileges that have already been set cannot be changed. To change these, temporarily delete the user, and then redo the
settings.
21-ENSmart device control interface Owner’s Manual
▼ Access area settings screen
1 3 1 3
2
2
Fig.5-31 [Android tablet] Fig.5-32 [iPhone]
No. Item Function
Returns to the detailed screen for user settings.
1 Return button
(Refer to page 18)
Tap air conditioners to switch between allowing or disallowing users access to
2 List of air conditioners
them.
3 Done* Save the changed settings.
* : Even if you have changed some settings, the settings are not saved unless you tap [Done].
NOTE
Only an administrator can set this function.
22-ENSmart device control interface Owner’s Manual
[2] Temperature settings screen
4 1 4
2
2
3
3
Fig.5-33 [Android tablet] Fig.5-34 [iPhone]
No. Item Function
Returns to the device settings screen.
1 Return button
(Refer to page 16)
2 UNIT Select the temperature unit from either °C (Celsius) or °F (Fahrenheit).
Select the temperature settings from either per degree or per half degree °C
3 SCALE
(Celsius only).
4 Done* Save the changed settings.
* : Even if you have changed some settings, the settings are not saved unless you tap [Done].
23-ENSmart device control interface Owner’s Manual
[3] Clock settings screen
4 1 4
2
3 2
3
Fig.5-35 [Android tablet] Fig.5-36 [iPhone]
No. Item Function
Returns to the device settings screen.
1 Return button
(Refer to page 16)
2 Date Change the date.
3 Time Change the time.
4 Done* Save the changed settings.
* : Even if you have changed some settings, the settings are not saved unless you tap [Done].
NOTE
Only an administrator can set this function.
24-ENSmart device control interface Owner’s Manual
[4] Alarm screen
1
2 2
3
4 3
4
Fig.5-37 [Android tablet] Fig.5-38 [iPhone]
No. Item Function
Returns to the device settings screen.
1 Return button
(Refer to page 16)
2 Alarm history list Displays the history of abnormalities detected with the air conditioners.
3 Clear Alarm history* Clears the detected alarm.
4 Alarm email address* Set an email address to which to send alarms.
* : Only an administrator can do this.
25-ENSmart device control interface Owner’s Manual
[5] Operation mode restriction screen
3 1 3
2
2
Fig.5-39 [Android tablet] Fig.5-40 [iPhone]
No. Item Function
Returns to the device settings screen.
1 Return button
(Refer to page 16)
2 Operation mode restriction Set the selectable operation modes.
3 Done* Save the changed settings.
* : Even if you have changed some settings, the settings are not saved unless you tap [Done].
NOTE
• Set which operation mode to give priority if the switch commands for “HEAT”, “COOL”, and “DRY” are mixed in the cooling/
heating switch type’s outdoor unit.
• Only an administrator can set this function.
• Heating (HEAT, FAN) cannot be selected when the air conditioner is a cooling model.
26-ENSmart device control interface Owner’s Manual
5-5. Icon display
This section displays the meanings of the icons that appear on the screen.
(1) Operation modes
ON OFF
(2) Operation modes
Auto Heat Cool Fan Dry
(3) Air flow direction
F1 F2 F3 F4 F5 Swing
(4) Air flow (3-speed model)
Low Medium High Auto
(5) Locking
Locking
(6) Warning occurrence
(7) Lit filter sign
(8) Soft cooling
27-ENSmart device control interface Owner’s Manual
6 Enduser License Agreement
This Application for BMS-IWF0320E/BMS-IWF0320IN (Hereinafter called as “Application”) is provided and licensed by Toshiba
Carrier Co., Ltd. (Hereinafter called as “Toshiba Carrier”) and the Application includes the computer programs, documents such
as the manual, the information and data within this Application and update or upgrade version thereof, which are distributed
along with this End User License Agreement. PLEASE READ THE TERMS AND CONDITIONS OF THIS ENDUSER LICENSE
AGREEMENT (HEREINAFTER CALLED AS THE “AGREEMENT”) CAREFULLY BEFORE USING THIS Application AND IF
YOU (HEREINAFTER CALLED AS “USER”) AGREE PLEASE SELECT “AGREE”. IF USER DO NOT AGREE TO THESE
TERMS AND CONDITIONS, PLEASE SELECT “DISAGREE” AND DO NOT DOWNLOAD, INSTALL OR USE THE
APPLICATION. BY DOWNLOADING, INSTALLING, OR USING THE WHOLE OR A PART OF THIS APPLICATION, YOU ARE
DEEMED TO HAVE AGREED ALL THE TERMS AND CONDITIONS OF THIS AGREEMENT.
1. Intellectual Property Rights
The Application is the proprietary property of Toshiba Carrier and Toshiba Carrier owns all intellectual property rights
including copyrights in the Application except for the portion which the third parties own the rights. The Application is
protected under applicable laws and international conventions regarding the copyright. User shall pay serious attention to
the intellectual property rights of the Application.
2. License of Use
(1) User may install the Application into the compatible device and use the Application only for the purpose of doing
operations of the compatible Air-conditioner control product of Toshiba Carrier (hereinafter called as “Purpose”). This
Application is for Europe and Asia. In addition, User may use the information and data which is obtained by the use of
this Software (hereinafter called as “Data”) only for the Purpose. Except for the foregoing case, User shall not install and
use the Application. Further, the Application installed by User shall be immediately uninstalled or deleted when there is
no more need.
(2) User shall be prepared for the compatible device at its own cost and responsibility and be responsible for any internet
provider fees, telecommunications fees, connection fees, or other fees required for download, install and use this
Application.
(3) This Application includes the open source software which is provided under the license terms and conditions of Apache
license Version 2.0 and MIT License. User can see the license terms and conditions of such open source software in the
OSS License.
3. Device Data
The Application uses and collects device data (MAC address that the user set as the device name) of compatible device of
User and the device data is used only for detection from other device and these data will be recorded in the server and User
consents to such use and collection of the device data.
4. Prohibited Matters
(1) User shall not reverse engineer, decompile, disassemble, or modify this Application.
(2) User shall not provide the Application for the use by plural people through internal networks or the Internet.
(3) User shall not distribute, transfer, rent, lease, or sell to anyone the Application or the right to use the Application, nor shall
it grant to anyone a sublicense for the use of the Application.
(4) User shall not use the Application for a criminal act or an act that is, or is likely, in violation of laws and ordinances.
(5) User shall not use the Application for any act that infringes, or likely to infringe, property rights including the intellectual
property rights, privacy, or other rights or interests of any third party including Toshiba Carrier.
[(6)User represents and warrants that (i) User is not located in a country that is subject to a U.S. Government embargo, or
that has been designated by the U.S. Government as a “terrorist supporting” country; and (ii) User is not listed on any
U.S. Government list of prohibited or restricted parties.]
5. No Warranty and Disclaimer
(1) TO THE EXTENT PERMITTED BY APPLICABLE LAW, THIS APPLICATION IS PROVIDED “AS IS” WITHOUT ANY
WARRANTY OF ANY KIND, EITHER EXPRESS OR IMPLIED, INCLUDING, BUT NOT LIMITED TO, THE IMPLIED
WARRANTY OF MERCHANTABILITY AND THE FITNESS FOR A PARTICULAR PURPOSE. TOSHIBA CARRIER
HEREBY DISCLAIMS WITH REGARD TO THE APPLICATION ANY WARRANTIES RELATING TO QUALITY,
PERFORMANCE, INFORMATION PROVIDED BY OR DISPLAYED IN THE APPLICATION AND NONINFRINGEMENT
OF THE THIRD PARTY RIGHTS OF THE APPLICATION.
(2) User expressly acknowledge and agree that use of the application is at sole risk of user and, to the extent not prohibited
by applicable law, in no event shall Toshiba Carrier be responsible for any damages, losses, expenses or costs, if any,
incurred by User in connection with or as a result of the use of this Application, including but not limited to:
(i) any damage, losses, expenses or costs arising out of or related to the use or inability to use the Application, incorrect
operation of this Application by User, wrongful use of this Application and any trouble of the Application, compatible
device or the compatible Air-conditioner control product of Toshiba Carrier;
28-ENSmart device control interface Owner’s Manual
(ii) any conflicts between User and any third party(ies) including customer of User caused by or in connection with this
Application.
(iii) the loss, divulgation and any other incident of the information and data within this Application, compatible device.
(iv) any damage, losses, expenses or costs arising out of or related to the change, modification or improvement to the
Application, discontinuation or termination of the Application provided in the Article 8 of this Agreement.
6. Discontinuation of Use
(1) In a case of breach of any terms and conditions of this Agreement by User, User shall immediately uninstall and delete
the Application.
(2) Toshiba Carrier reserves the right to request User to stop using the Software at any time upon notice to User.
7. Changes, discontinuation and termination of the Application and the Agreement
(1) Toshiba Carrier may make a change, modification or improvement to the Application at any time without prior notice to
User.
(2) Toshiba Carrier may make a change, discontinue the services provided by this Application at any time without prior notice
to User for the purpose of maintenance, system trouble, or other circumstances.
(3) Toshiba Carrier may terminate the distribution and support of this Application including the update and the upgrade
version thereof with prior notice to user.
(4) Toshiba Carrier may amend the terms and conditions of this Agreement. The amended Agreement shall become
effective as of the date when Toshiba Carrier notifies and if User uses the Application after such amendment of the
Agreement, User shall be deemed agreed to the amended Agreement.
8. Export Control Compliance
User shall comply with the any applicable export laws and regulations including, but not limited to, the Foreign Exchange
and Foreign Trade Law of China and the U.S. Export Control Law and its Administration Regulations.
9. Governing Law
(1) This Agreement shall be governed and construed by the laws of each countries (excluding its rule of choice of laws).
[(2)User and Toshiba Carrier agree that the jurisdiction of all disputes arising out of or in connection with this Agreement
and/or the Application shall be ------ court, in each countries.]
10.Severability
If any provisions of this Agreement shall be held to be invalid, illegal or unenforceable, the validity, legality and enforceability
of the remaining provisions shall not in any way be affected or impaired.
http://www.toshiba-carrier.co.jp/global/privacy.htm
29-ENSmart device control interface Owner’s Manual
7 OSS
License Information on the software used in the Toshiba Carrier Smart device control
interface BMS-IWF0320E/BMS-IWF0320IN
The software pre-installed in the Toshiba Carrier Smart device control interface BMS-IWF0320E/BMS-IWF0320IN (hereinafter
referred to as a “Product”) consists of multiple, independent software components. Each software component is copyrighted
by Toshiba Carrier or a third party.
The Product uses software components that are distributed as freeware under a third-party end-user license agreement or
copyright notice (hereinafter referred to as a “EULA”). About the EULAs which are applicable to these software components,
please refer to the exhibits of License Information (License Agreement) .
Some EULAs require that the source code of the applicable component be disclosed as the condition for distributing the
software component in executable format. Please request from the web site below when you hope to obtain the source code of
the software components subject to the EULA. In this regards, please contain the items below. Product name, Products type
name, serial number and subject matter “Request for the source code of open source software”
http:www.toshiba-carrier.co.jp/global/contact/index.htm
In addition, some of the software components which are used in the Product include the software that are made or developed
originally by Toshiba Carrier. These software and accompanied documents are copyrighted by Toshiba Carrier, and protected
by Copyright Act, an international treaty’s articles and other governing laws. The software components which are made or
developed originally by Toshiba Carrier and not subject to EULAs are not a target of source code offering.
Some of the software components distributed under EULAs are made available for use by the user on the premise that they are
not copyrighted or warranted by any third party including the copyright holder or Toshiba Carrier. These software components
are licensed to the user free of charge and therefore not covered by any warranty within the scope of the applicable laws. These
software components are provided in “as is” condition without any warranty, whether express or implied. “Warranty” here
includes, but not limited to, an implied warranty for marketability or fitness for specific purposes. All risks associated with the
quality or performance of these software components are assumed by the user. Toshiba Carrier shall not be liable whatsoever
for any cost of repair or correction or other incidental expense incurred in connection with a defect found in any of these software
components. Unless specified under the applicable laws or in a written agreement, a party who changes or redistributes the
software with consent from the copyright holders or based on the aforementioned licenses shall not be held liable whatsoever
for any loss arising from the use of or inability to use such software components. The same applies even when the copyright
holders or relevant third parties have been informed of the possibility of such loss. “Loss” here includes normal, special,
incidental and indirect loss (including, but not limited to, the loss of data or its accuracy; loss incurred by the user or any third
party; and interface incompatibility with other software). Please read each EULA for details on the use conditions and items that
must be observed regarding these software components.
30-ENSmart device control interface Owner’s Manual
License Information on the software used in the Toshiba Carrier Smart device control
interface BMS-IWF0320E/BMS-IWF0320IN
The software pre-installed in the Toshiba Carrier Smart device control interface BMS-IWF0320E/BMS-IWF0320IN uses
software components that are distributed [as freeware] under a third-party end-user license agreement or copyright notice
(hereinafter referred to as a “EULA”). The user should read the applicable EULAs below carefully before using these software
components. The EULAs are exhibited in their original text (English) as exactly written by the respective parties other than
Toshiba Carrier.
The end user license agreement for free software components used in the Toshiba Carrier Smart device control interface BMS-
IWF0320E/BMS-IWF0320IN.
software component
Linux Kernel Exhibit A
mono-complete Exhibit B
mono-devel Exhibit C
nginx-light Exhibit D
openssh-server Exhibit E
rabbitmq-server Exhibit F
usbmount Exhibit G
31-ENDEA6729001
You can also read