Professional DVD Recorder MP-6000 Mk2 Instruction Manual
←
→
Page content transcription
If your browser does not render page correctly, please read the page content below
Professional DVD Recorder

                MP-6000 Mk2

             Instruction Manual

              http://www.datavideo-tek.com
Rev 141206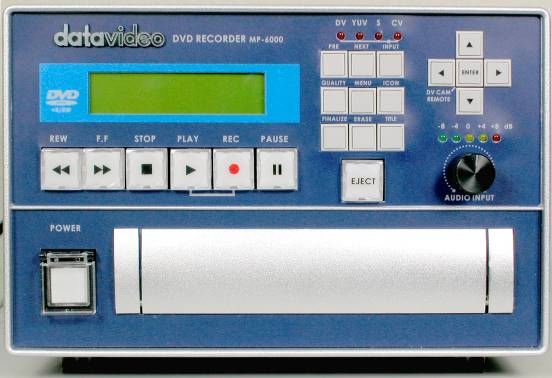
Table of contents

    Warnings and Precautions ----------------------------------------------------------------------------------- 3

    Warranty --------------------------------------------------------------------------------------------------------- 4

    What is in the package --------------------------------------------------------------------------------------- 5

    Introduction ------------------------------------------------------------------------------------------------------ 5

    Features ----------------------------------------------------------------------------------------------------------- 6

    Functions --------------------------------------------------------------------------------------------------------- 6

          Front Panel ----------------------------------------------------------------------------------------------- 7

          Rear Panel ---------------------------------------------------------------------------------------------- 10

    Installation------------------------------------------------------------------------------------------------------- 12

    Quick Start Guide -------------------------------------------------------------------------------------------- 15

    Setting Up ------------------------------------------------------------------------------------------------------ 18

           Connecting ---------------------------------------------------------------------------------------------- 18

           Powering Up -------------------------------------------------------------------------------------------- 18

           On screen display-------------------------------------------------------------------------------------- 18

           LCD Display --------------------------------------------------------------------------------------------- 19

           Setting the Time & Date ------------------------------------------------------------------------------ 20

           Setting the Video Input ------------------------------------------------------------------------------- 23

           Setting the Record Quality--------------------------------------------------------------------------- 24

    Recording a Disc --------------------------------------------------------------------------------------------- 24

           Inserting a Disc ----------------------------------------------------------------------------------------- 24

           Recording from an Analogue Source-------------------------------------------------------------- 26

           One Touch Recording (OTR)------------------------------------------------------------------------ 27

           Recording from a DV IEEE 1394 Source -------------------------------------------------------- 28

           Reviewing a Recording ------------------------------------------------------------------------------- 29

           Finalizing a DVD+R Disc ----------------------------------------------------------------------------- 30

           Finalizing a DVD+RW Disc (Make Compatible) ------------------------------------------------ 32

Editing a Title-------------------------------------------------------------------------------------------------------- 33

                                                                  1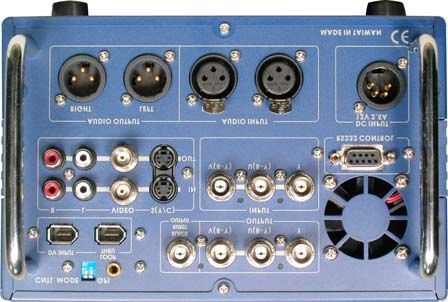
Editing a Title Description ---------------------------------------------------------------------------- 33

           Editing a Title Icon ------------------------------------------------------------------------------------- 35

Color Correction---------------------------------------------------------------------------------------------------- 37

Audio Level Adjustment ------------------------------------------------------------------------------------------ 38

Setting the Video Standard (PAL/NTSC) --------------------------------------------------------------------- 39

GPI Functions------------------------------------------------------------------------------------------------------- 39

Additional Features of DVD+RW Discs----------------------------------------------------------------------- 41

           Formatting a new DVD+RW Disc ------------------------------------------------------------------ 41

           Erasing a DVD+RW Disc----------------------------------------------------------------------------- 42

           Erasing the Last Title from a DVD+RW Disc ---------------------------------------------------- 43

Factory Reset (Return to default) ------------------------------------------------------------------------------ 45

RS 232 Information------------------------------------------------------------------------------------------------ 47

Specifications ------------------------------------------------------------------------------------------------------- 48

Service and Support --------------------------------------------------------------------------------------------- 49

                                                                  2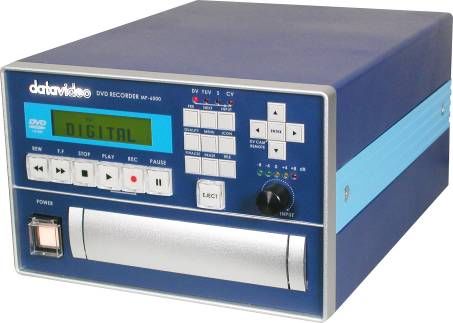
Warnings and Precautions

1. Read all of these warnings and save them for later reference.
2. Follow all warnings and instructions marked on this unit.
3. Unplug this unit from the wall outlet before cleaning. Do not use liquid or aerosol cleaners. Use a
   damp cloth for cleaning.
4. Do not use this unit in or near water.
5. Do not place this unit on an unstable cart, stand, or table. The unit may fall, causing serious
   damage.
6. Slots and openings on the cabinet top, back, and bottom are provided for ventilation. To ensure
   safe and reliable operation of this unit, and to protect it from overheating, do not block or cover
   these openings. Do not place this unit on a bed, sofa, rug, or similar surface, as the ventilation
   openings on the bottom of the cabinet will be blocked. This unit should never be placed near or
   over a heat register or radiator. This unit should not be placed in a built-in installation unless
   proper ventilation is provided.
7. This product should only be operated from the type of power source indicated on the marking label
    of the AC adapter. If you are not sure of the type of power available, consult your Datavideo dealer
    or your local power company.
8. Do not allow anything to rest on the power cord. Do not locate this unit where the power cord will
    be walked on, rolled over, or otherwise stressed.
9. If an extension cord must be used with this unit, make sure that the total of the ampere ratings on
    the products plugged into the extension cord do not exceed the extension cord’s rating.
10. Make sure that the total amperes of all the units that are plugged into a single wall outlet do not
    exceed 15 amperes.
11. Never push objects of any kind into this unit through the cabinet ventilation slots, as they may
    touch dangerous voltage points or short out parts that could result in risk of fire or electric shock.
    Never spill liquid of any kind onto or into this unit.
12. Except as specifically explained elsewhere in this manual, do not attempt to service this product
    yourself. Opening or removing covers that are marked “Do Not Remove” may expose you to
    dangerous voltage points or other risks, and will void your warranty. Refer all service issues to
    qualified service personnel.
13. Unplug this product from the wall outlet and refer to qualified service personnel under the following
    conditions:
       a. When the power cord is damaged or frayed;
       b. When liquid has spilled into the unit;
       c. When the product has been exposed to rain or water;
       d. When the product does not operate normally under normal operating conditions. Adjust
            only those controls that are covered by the operating instructions in this manual; improper
            adjustment of other controls may result in damage to the unit and may often require
           extensive work by a qualified technician to restore the unit to normal operation;
        e. When the product has been dropped or the cabinet has been damaged;
        f. When the product exhibits a distinct change in performance, indicating a need for service.

                                                   3
CAUTION:
This unit employs a laser. Due to possible eye injury, only qualified service personnel
should remove the cover or attempt to service this de vice.
Use of controls, adjustments, or the performance of procedures other than those specified herein
may result in hazardous radiation exposure.
CAUTION VISIBLE AND INVISIBLE LASER RADIATION WHEN OPEN AVOID EXPOSURE TO BEAM
(WARNING LOCATION: INSIDE ON LASER COVER SHIELD)
Warranty
Datavideo warrants that the equipment it manufactures shall be free from defects in material and
workmanship for a period of 12 months from the date of product purchased. If equipment fails due to such
defects, Datavideo will, at its option, repair or provide a replacement for the defective part or product.
Equipment that fails after the warranty period, has been operated or installed in a manner other than that
specified by Datavideo, or has been subjected to abuse or modification, will be repaired for time and
material charges at the Buyer’s expense.
This warranty does not affect your statutory rights within the Country of purchase.
Note: Datavideo except no responsibility for compensation for the loss of data that could not be recorded
or played due to problems such as unit malfunction, corruption or loss of recorded data.
Disposal
For EU Customers only - WEEE Marking.
This symbol on the product indicates that it will not be treated as household waste. It must be handed over
to the applicable take-back scheme for the recycling of electrical and electronic equipment. For more
detailed information about the recycling of this product, please contact your local Datavideo office.
4What’s in the Package
The following is a packing list, if any items are missing from your box please contact your dealer
immediately.
Item Description Q’ty
1 MP-6000 unit 1
2 Y/C Cable s-plug to s-plug 1.2m 1
3 Stereo Audio RCA 2 Phono to 2 Phono Cable 1
4 BNC to BNC 1.2m 3
5 IEEE 1394 6Pin to 4Pin Cable 1.8m 1
6 IEEE 1394 6Pin to 6Pin Cable 1.8m 1
7 AC power cord 1
8 AC/DC Switching Adaptor 12V / 4.2A 1
9 Instruction Manual 1
Introduction
The MP-6000 is a DVD+R/RW drive based high quality digital audio and video recorder. It integrates a high
performance MPEG-2 Codec for Real-Time Recording of live audio/video material from DV or Analogue
camcorders, VCRs, Betacam VTRs or other a/v sources on to DVD+R/RW disc in real time. The created
DVD discs can be played in most DVD players. It will also create index images automatically.
5Features
- Multi Format - DV, YUV, Y/C (S-Video) and Composite video inputs.
- IEEE-1394 6-pin FireWire (iLink) input port with 12V bus power. Available in DV25 NTSC 4:1:1 / PAL
4:2:0 formats.
- YUV, Y/C, Composite video outputs with selectable NTSC/PAL video system.
- Features Video color processor control of Brightness, Color, Contrast, and Tint (Tint is NTSC only).
- Two channels Balanced (XLR) and unbalanced (RCA) analog audio input and output for
interconnection with professional digital audio equipment.
- Analog audio input level calibration and audio output level meter on front panel.
- RS-232 Front panel control interface for external remote thru PC or other devices.
- GPI (General Purpose Interface) for connecting an external foot switch or other trigger devices.
- Built in TBC
- Built in 3D noise filter
- Built in 3D Y/C separation filter/Comb filter (Composite and S-Video only)
6Functions: Front Panel
Power On / Off
Fast Rewind Mode at 2X,4X,8X,16X,30X,60X,100X speed
Fast Forward Mode at 2X,4X,8X,16X,30X,60X,100X speed
Stop
Play a Title/Track
Record. Press and hold the REC button and press on the “ ”
button to start recording a clip.
Pause/Play a Title/Track
7EJECT button. Press to Open/Close Disc Tray
Jump to Previous track (Title)
Jump to Next track (Title)
Input Source Select of DV, S, CV, or YUV
Please note, system will take about 2-3 seconds to switch between
video sources
Selects the recording video quality at HQ, SP, LP, EP or SLP.
“MENU” KEY has several different functions,
1. COLOR CORRECTION:
To adjust Brightness, Contrast, Color, and Tint
2. GPI FUNCTION:
To set up GPI trigger modes, Record/Pause or Play/Pause with the
setting in rear panel DIP SWITCH.
When GPI DIP SWITCH is set to OFF, there are two different
functions
a. Press GPI TRIGGER BUTTON once, will start RECORDING.
Press it again will PAUSE recording.
b. Press GPI TRIGGER BUTTON once, will start playback. Press it
again will PAUSE playback.
When GPI DIP SWITCH is set to ON, there is only one function
a. Press and hold GPI TRIGGER BUTTON will start to RECORD.
Release GPI TRIGGER BUTTON will PAUSE recording.
3. VIDEO STANDARD:
Select video output as NTSC 0, 7.5 IRE or PAL
84. SYSTEM SETUP:
a. Set time: Manually set up timing.
b. System info: Check system information.
c. Factory Reset: Change all the setting to Factory Default.
d. Quit:
5. MAKE COMPATIBLE: This function is similar to “FINALIZE”, but it
only works when you insert a DVD+RW disc. The purpose is to make
this disc more compatible to playback by other DVD players.
Pause the desired image as the Icon for the Title
Finalize a DVD+R Disc (DVD+RW does not need finalizing)
Erase Disc (DVD+RW only)
Press Title button, it will go to the track list of the disc. Press it again; it
will go back to the video clip you were playing.
Move Cursor UP, Down, Left, Right
There are two functions of ENTER key.
1. ENTER button Confirms Select Option.
2. Enable/Disable DV device control functions when input source is
set to DV
Audio Input level calibration
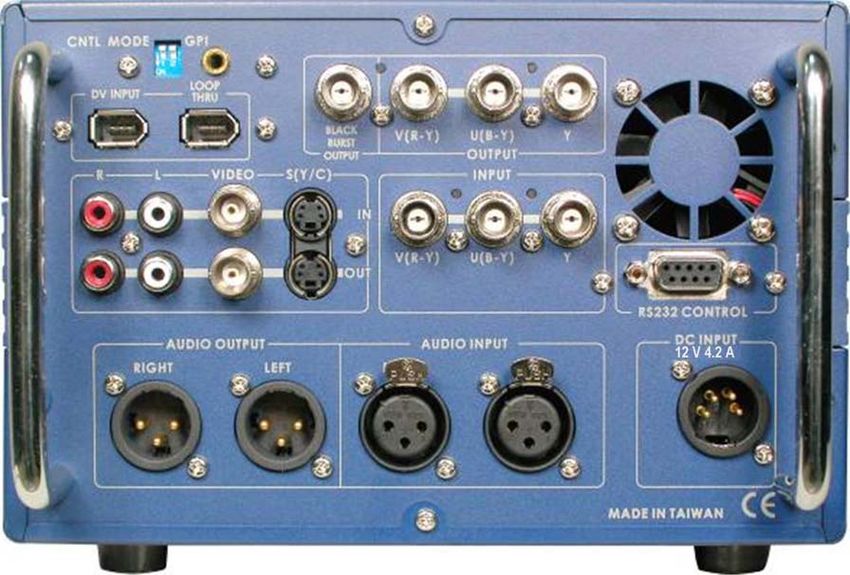
9Functions: Rear Panel
DIP switch
DIP switch 1 OFF,
•External device control by GPI trigger.
DIP switch 1 ON (When this function is turned on, the front
panel and GPI function will be disabled. Only “EJECT”
will work.)
•External device control enabled (by RS-232)
DIP switch 2 OFF
•GPI function is set to Pulse Trigger.
DIP switch 2 ON
•GPI function is set to Level Trigger.
Note: Please make sure the unit is turned off before
changes DIP switch.
RS-232 Remote Control interface
• 9-pin serial port standard RS-232 interface
• With additional PC remote software to remote control MP-6000.
104-Pin XLR locked 12Volt Power connector
Connecting 12VDC 4.2A input from an external DC adaptor.
Black Burst output terminal for video monitoring
Component Y.U.V. Video input/output terminal.
Composite Video & S-Video (Y/C) Input and Output
IEEE-1394 6-pin FireWire (iLink) DV Input and loop thru output
Available in DV25 NTSC 4:1:1 or PAL 4:2:0 format
Note: This IEEE1394 interface does not take control command or
video signal from a PC / MAC.
Two channels Unbalanced L/R Audio input and Output
Balanced Audio Input
Supports two channels XLR Balanced Audio Input
Balanced Audio Output
Supports two channels XLR Balanced Audio output
Cooling fan
Please ensure this is not blocked during operation
11Installation
The following are simple examples of how to integrate the MP 6000 into any video setup. Obviously there
are too many possible combinations to cover them all in detail, but these examples cover the most
frequently used input and output combinations.
1. Connecting composite video and stereo audio outputs from the MP-6000 to a TV set / monitor.
Alternatively you may prefer to connect the audio outputs to an amplifier or speakers.
122. Connecting YUV output from the MP-6000 to a Projector.
3. Connecting Y/C or Composite video and stereo audio outputs from an analogue camcorder or
DVD player to the MP-6000.
134. Connecting a DV (IEEE1394) output from a DV camcorder or DV Deck to the MP-6000. With this
connection you can also use DV device control from the MP 6000 to cue up the tape.
5. Connecting a Betacam VTR to the MP-6000.
14Quick Start Guide:
As the heading suggests, this is the quick start section. If you require more detailed operating
instructions please go to page 18.
Step 1: Turn on power to the MP-6000, the source and the monitor.
Step 2: Press the “POWER” button, to turn on the MP-6000. The word “MP-6000” and then “BOOT”
will appear on the display window. After a couple seconds, it will present “NO Disc” that means
the tray is empty. Please place a disc on the tray.
Note: The upper right window on the TV screen will show two lines of data. One is the
status of the unit, the other one is the input format setting.
Step 3: Press the “EJECT” button once, the tray will come out, the word “OPEN” appears in the
window. Please put the DVD+R or RW disc with the printing surface up, and then press the
“EJECT” button again. The tray will return into the MP-6000.
Step 4: The word ' Reading ' appears on the screen, in the upper right corner, this means the MP
6000 is reading the disc. If the disc contains previous recordings, it will be detected during the
read process. If there is a recording present you can press the “PLAY“ key and play out the
program immediately.
Step 5: If it is a blank/brand-new disc, the MP-6000 will start the formatting process immediately. A
window will appear saying “FORMATTING.” The entire process will take approximately 20 second.
Note: It’s necessary to format the disc before you start recording.
Step 6: Press the “INPUT“ button to choose the input signal source.
Step 7: Press the “QUALITY” button on the panel to choose HQ / SP / LP / EP / SLP record quality.
Once this is set you can start recording.
Step 8: Before you start to record, you can adjust video input source quality by using the color
processor of the MP-6000.
a. Press the “MENU” button once, choose '”1.COLOR CORRECTION”, then press the “ENTER”
button. Use the Up and Down arrow buttons to move to different categories.
z Brightness
z Contrast
15z Color
z Tint (This function only works on composite and S-video input in NTSC standard.)
Note: The Color Processor only works on analogue input signals, such as composite,
Y/C, or component. It does not work on a DV input signal.
b. Press the “ENTER” button again, and use the Left and Right arrow buttons to adjust the level.
z To confirm the changes, press the “ENTER” button again. Select “Save” and then
“ENTER” to save the settings.
z To cancel the changes, select “Abort”
z To restore factory default settings, select “Default”
c. Press the “ENTER” button again, and it will return to the previous menu.
d. To adjust other categories, please repeat the above procedure.
Step 9: Press ' REC ' and ' PLAY ' at the same time, and the MP 6000 will start recording. The “REC”
symbol appears on the TV monitor to show that a recording is in progress and a second
symbol indicates the type of disc being created “DVD+R” / “DVD+RW”.
Step 10: If you want to stop recording, press the “STOP” button. Note: Once “STOP” has been
pressed the MP 6000 will create a title/track. Any subsequent recordings will be created as new
titles/tracks.
Step 11: Once the recording is complete, press the “STOP” button. (It takes a few seconds to stop the
process. Depending on the time frame you have recorded in the disc.) Then, press the “PLAY”
button, you can playback the video which you just recorded immediately.
Step 12: Change the title name. Before the disc is finalized, you can change the title name as you
wish. Press the “TITLE” button, then press “MENU”. Go to “1. EDIT TITLE NAME” and press
“ENTER”. It will pop up a window on the TV screen. Then follow the screen display to change the
name for that video clip.
Step 13: “FINALIZE” the disc: If want to playback recorded DVD+R disc in other DVD players, you
have to finalize the disc first. Press the “FINALIZE” button, choose “CONFIRM” and press the
“ENTER” button. A “Finalize” Progress Bar will appear on the TV monitor. When the bar
disappears, the process is complete. The entire process takes approximately 1 minute.
Note: While finalizing the disc, all buttons on the front panel are inactive. Do not turn off the
power, during finalization as disc damage may occur.
If unable to finalize the disc, press the “TITLE”, “STOP”, and then “FINALIZE’” buttons to
finalize the disc.
16Step 14: “ERASE” the disc: This function is only used in DVD+RW discs. It can not be used with
DVD+R disc. DVD+RW disc can be recorded and erased repeatedly.
If there is any error and the recording needs to be erased, there are two different methods to do it.
a. Erase the entire “Title” (Track) in DVD+RW disc.
Press “ERASE” button, the entire disc will be erased in about 20 second.
b. Erase the last track in DVD+RW disc.
Press “TITLE” button, then press “MENU”. Go to “2. ERASE LAST TITLE”, and choose
“CONFIRM”. Then press “ENTER” button again.
You can follow this procedure to erase the previous track.
Note: If the DVD+RW disc has been closed (made compatible), you can only erase the entire disc,
not the last track.
17Setting Up
Connecting
Hopefully you have read the installation chapter, and you’ve studied the diagrams on pages 12 – 14. With
your chosen source and a suitable monitor connected your ready to go.
Connect the 12v power supply to the MP 6000 DC Input Socket, and connect the AC power cord to a
suitable socket. You could alternatively use other, stable 12v power feeds, if for example you are working
in the field. The MP 6000 would require a 12v DC supply with a constant current of 3A.
Powering Up
With your source and monitor connected you can now power up the MP 6000.
Lift the protective cover from the Power On button, press the button and close the protective cover.
The Power On button should now be illuminated.
On-Screen Display
The MP 6000 displays configuration information in two areas: An on-screen display on the TV monitor and
also on the LCD display.
The information on the TV monitor will most often appear in the top right hand corner of the screen. It is
superimposed over the video image – it does not appear on the recording.
Line 1 indicates disc status.
(Reading, No Disc, DVD+R etc)
Line 2 indicates Video Input..
(CVBS, SVIDEO,YUV, DV)
Line 3 indicates Record status
(DVD-REC … etc)
18LCD Display
The LCD on the front panel of the MP 6000 displays various forms of information. Here are some of the
many examples
Displayed when first switched on.
Displayed briefly while the MP 6000 is booting up.
Displayed when the Eject Button is pressed.
General display indicating the Record Quality selected and the
active video input. in this example HQ is the Record Quality –
other options are SP, LP, EP and SLP. The active video input is
Composite Video – other options are S-VIDEO, Y U V and
DIGITAL
Playback Display. This indicates the playback status such as
PLAY, PAUSE, FWD etc. The Title Number (TLE) from 00-99,
and the Chapter Number (CHP) from 00-99 are displayed as is
the Dolby™ Indicator if Dolby™ Noise Reduction is present. The
HH.MM.SS display indicates the position within the track or
chapter.
Record Display. This indicates Record status. It displays the
Record Quality, in this case HQ – other options are SP, LP, EP
and SLP. It also indicates whether the MP 6000 is in Rec or Rec
Pause mode. The counter display in HH:MM:SS indicates the
length of the track being recorded.
The Menu display is shown when the Menu Button is pressed.
There are many options available, which we will examine in more
detail later.
We will look at other LCD display information later on, in other chapters.
19Setting the Time & Date
With the MP 6000 powered up the LCD display should be displaying No Disc
Press the Menu Button.
The LCD Display should now show the Set Up Menu.
Press the Down Arrow button 3 times
The LCD Display should now show option 4 System Setup.
Press the Enter button.
The LCD Display should now read System Setup, and on the TV monitor the Setup options should be
displayed.
LCD Display TV Monitor
20Press the Right Arrow button to highlight Set Time.
Press the Right Arrow button again to highlight
Manual.
Press the Enter button to open the Time & Date
settings
Use the Left and Right Arrow buttons to navigate the
fields, and the Up and Down Arrow buttons to alter
the values.
Once set correctly use the Left Arrow button to
highlight Save and press the Enter button to close the
Time & Date settings and save the values.
21Press the Left Arrow button to highlight Set Time
Press the Down Arrow button 3 times, until Quit is
highlighted.
Press the Right Arrow button to highlight OK
And now press the Enter button to exit Setup.
Finally press the Menu button to exit the Setup Menu
and return to the General display.
22Setting the Video Input
The MP 6000 has four Video Input options; Composite Video, S-Video, Component Video (Y U V) and DV
(DIGITAL) (IEEE 1394).
The selected option is displayed in three ways
LCD Display LED Display On-Screen Display
VIDEO = Composite Video CV = Composite Video CVBS = Composite Video
S-VIDEO = S-VIDEO (Y/C) S = S-Video SVIDEO = S-Video
Y U V = COMPONENT YUV = Component Video YUV = Component Video
DIGITAL = DV (IEEE 1394) DV = DV (IEEE 1394) DV = DV (IEEE 1394)
We will concentrate on the LCD display
Press the Input button to toggle through the Video Input Options
Repeated presses of the Input button will switch from Composite Video, to S-Video, to Y U V (Component
Video) and finally to DV.
Once you have selected the correct input, the video signal from your source should appear on the TV
monitor.
23Setting the Record Quality
The MP 6000 has five Recording Quality options HQ, SP, LP, EP, SLP. The Selected option is displayed in
two ways.
LCD Display On-Screen for five seconds
We will concentrate on the LCD Display
Press the Quality button to toggle through the Record Quality options.
As you select each different Record Quality option you will notice that the on-screen display indicates how
many minutes of record time are available at the selected quality, this information bar is displayed for five
seconds.
The figures above are typical for an empty DVD+R disc.
Recording a Disc
With the Video Input selected and the Record Quality selected you are now ready to make a recording.
Inserting a Disc
It is most important that you handle DVD+R / RW discs with care. Do not touch the underside of the disc,
fingerprints, smudges and scratches are likely to make the recording fail. Discs should be stored in a cool,
dry place out of direct sunlight; they should not be exposed to extremes of temperature.
DVD+R
Press the Eject button, the message OPEN will be displayed on the LCD display, and the disc tray will
open.
Place a blank DVD+R disc on the disc tray; label/printed side up.
Press the Eject button again, so that the tray retracts, and the CLOSE message appears.
After a few seconds the message will change to READING, and after a few more seconds it will return to
the general display.
24If you are using a brand new disc that has never been recorded previously, it must first of all be formatted.
The MP-6000 MD will automatically format a new disc for you.
On the TV monitor you will see this message
After about 20 seconds the message will disappear, and the disc is ready to use.
DVD+RW
Press the Eject button, the message OPEN will be displayed on the LCD display, and the disc tray will
open.
Place a DVD+RW disc on the disc tray; label/printed side up.
Press the Eject button again, so that the tray retracts, and the CLOSE message appears.
After a few seconds the message will change to READING, and after a few more seconds it will return to
the general display.
If you are using a brand new disc that has never been recorded previously, it must first of all be formatted.
The MP-6000 MD will automatically format a new disc for you.
On the TV monitor you will see this message
After about 20 seconds the message will disappear, and the disc is ready to use.
If the disc has been used previously it will not be necessary to format it, the MP 6000 will check the disc
and you can start recording immediately. If there are other tracks on the disc that you would like to erase
please see the chapters, “Erasing a DVD+RW Disc” and “Erasing the Last Title from a DVD+RW Disc”.
25Recording from an Analogue Source
If you are recording from a tape start the tape playing, the video image should appear on the TV monitor
connected to the MP 6000 output. If you are recording a live image from a camera you should be able to
see the image from the camera on the TV monitor connected to the MP 6000 output.
If necessary you can adjust the Brightness, Contrast, Color and Tint (NTSC Only) of the video image, this
is covered in the chapter “Color Correction”. You also have an Audio Input setting that can adjust the
volume of the audio prior to recording, see the chapter “Audio Level Adjustment” for more details.
We will first look at recording from an analogue video input (Composite Video, S-Video, Y U V); recording
from DV is a little different, so we will look at that, in more detail in another chapter.
To start recording press and hold the Rec button, then while still holding it down press the Play button
+
The LCD should go to the Record Display and On-Screen there should be a Rec indicator, such as this:
LCD Display On-Screen Indicator – In upper left corner of screen
To stop recording press, the Stop button.
The LCD will return to general display and the On-Screen display will show the Stop Message.
LCD Display On-Screen Display
+
The first track of the disc is now completed. You can record more tracks by following the same routine; up
to 99 tracks can be recorded on a disc.
26One Touch Recording ( OTR )
The MP 6000 features an OTR function, this allows a recording of a fixed duration to be quickly
activated. For example if you know the recording is going to last 30 minutes it is possible to use
OTR as you start recording so that you don’t need to watch the recording and wait around to press
stop at the end. OTR can be set to either 30 minutes or 60 minutes
This is how it works.
To start recording press and hold the Rec button, then while still holding it down press the Play button.
On Screen Indicator –In upper left corner of screen
+
To activate OTR keep holding the Rec button down and press the Play button again
The On Screen Indicator should indicate +30 (30 minutes)
On Screen Indicator –In upper left corner of screen
+
If you press the Play button again OTR will change to +60
The On Screen Indicator should indicate +60 (1 hour recording)
On Screen Indicator –In upper left corner of screen
+
Note: Repeated presses of the Play button will toggle between standard record (no OTR), 30 minutes and
60 minutes.
At the end of the 30 or 60 minute duration the MP 6000 will automatically stop recording.
27Recording from a DV IEEE1394 (Digital) Source
If you are recording from a DV tape, the MP 6000 offers device control via the IEEE 1394 cable.
With device control you can control Fast Forward, Rewind, Pause, Play, Picture Search Fwd / Rev and
Stop Functions.
Select DIGITAL as the Video Input and press the Enter button (Also marked DV Cam Remote), you will see
the Device Control options in the On-Screen display.
Select Digital Press the Enter On-Screen Device Control
button
You can control the DV device by using the control buttons on the MP 6000 (with the exception of Rec)
The On Screen Display will indicate the status of the DV Device:
Play Pause Stop Pic Search Pic Search Fast Rewind No DV
Forward Reverse Forward Device
Once you have found the scene on the tape that you want to record, press play to start the tape playing
To start recording press and hold the Rec button, then while still holding it down press the Play button
+
28The LCD should go to the Record Display and On-Screen the Device Control display will be replaced by a
Rec indicator, such as this:
LCD Display On-Screen Indicator – In upper left corner of screen
To stop recording press, the Stop button.
The LCD will return to general display and the On-Screen display will show the Stop Message.
LCD Display On-Screen Display
+
The first track of the disc is now completed. You can record more tracks by following the same routine; up
to 99 tracks can be recorded on a disc.
Reviewing a Recording
Once you have recorded one or more tracks onto a disc, you can play the disc and review the recordings.
Press the Title button to switch from Rec mode to playback mode.
The General Display should be replaced by the Playback Display.
On the TV Monitor you should see the Track List and details.
In the example above there are two tracks.
29Each track has a data panel next to it which gives details of the Video Source, the date & time it was
recorded, the length of the track in H:MM:SS and the Record Quality.
(The Title and the Icon can be edited, we will look at this in a later chapter “Editing a Title”.)
At the bottom of the list is another data panel which gives details of how much free space is left on the disc.
It is displayed as a percentage of total time and in minutes for each Record Quality Setting.
To play a track, use the Up or Down Arrow button to highlight the track, and then press the Enter button.
OR THEN
Once the track has played you can choose to playback other tracks, by following the same procedure, or
you can return to record mode to add more tracks, or you can finalize the disc so that it can be played back
in ordinary DVD Players.
If you want to return to the Record Mode to add some more tracks, press the Stop button twice.
X2
Finalizing a DVD+R Disc
Before a disc is finalized it is possible to edit the title details, if you want to do this see the chapter “Editing
a Title”
To finalise a disc the LCD Display must be displaying the General Display. If the LCD is showing any other
display press the Stop button, until the General Display is showing.
Now press the Finalize button
The LCD Display will show the Finalise Menu
Use the Right Arrow button to highlight CONFIRM And then press the Enter button
30The Finalize process will start. The LCD display will show the Finalize message, and the on-screen display
will show a progress bar.
LCD On Screen Display
The finalize process may take several minutes; you will see the progress bar becoming gradually more red
from right to left.
Once the disc is finalized the progress bar will become completely red, and then disappear from the
screen.
Finalize Completed
Once the disc has been finalized, press the Title button to display the Track List.
The Track List will appear on the TV monitor.
You will notice the data panel showing available space has disappeared from the bottom of the screen; this
is because the disc is now finalized and therefore has no available space.
The disc can now be ejected and played in other DVD players or computers. Please note: Not all DVD
players are compatible with DVD+R media, some older players may not recognise the disc.
31Finalizing a DVD+RW Disc (Make Compatible)
Strictly speaking an RW disc doesn’t get finalized, since it is always possible to erase and re-record. The
finalizing process with a DVD+RW disc is called Make Compatible; it doesn’t close the disc to future
recordings, but it does make it compatible with other DVD players and computers.
Please note: DVD+RW discs must be treated with great care, finger prints or scratches on the recordable
surface will reduce the number of times a disc can be re-recorded, and may result in record errors or
lock-ups.
To finalise a disc the LCD Display must be displaying the General Display. If the LCD is showing any other
display press the Stop button, until the General Display is showing.
Press the Menu button and the LCD display will show the Menu Options
Press the Down Arrow button to navigate the Menu Options, until 5. Make Compatible is displayed.
Press the Enter Button and the Make Compatible progress bar will appear on the TV monitor.
Once the process is complete the Make Compatible progress bar will disappear from the TV monitor, press
the Menu button to exit the Menu Options and return to the General Display.
The disc is now ready to be played in other devices, such as PCs or DVD players. Please note: Not all
DVD players are compatible with DVD+RW media, some older players may not recognise the disc.
32Editing a Title
It is possible to edit the Title Description and the Icon of each Title. This can only be done before the disc
has been finalized; once finalized a DVD+R disc cannot be modified.
Editing a Title Description
Start with the LCD display showing the General Display
Press the Title button to switch from General Display to playback mode.
The General Display should be replaced by the Playback Display.
On the TV Monitor you should see the Track List and details.
In the example above there are two tracks.
In this example we are going to modify the description of the second track.
Use the Down Arrow button to highlight the second track.
With the second track highlighted press the Menu button
The LCD Display will show the Edit Title Name option
Press the Enter button
33On the TV monitor the Title Editing Panel will appear
Use the Up, Down, Left and Right Arrow buttons to highlight the required letter and press the Enter button.
The description can be up to 15 characters.
In this example we are calling the track FAIRGROUND, so the first letter is F.
Use the Up, Down, Left
and Right Arrow buttons to
highlight the required
letter.
Press the Enter button to
accept the character and
move on to the next
selection
Once the description is
complete use the Up,
Down, Left and Right
Arrow buttons to highlight
Done
Press the Enter button to
confirm. The screen will go
black for a few seconds,
while the Track List is
updated
34After a few seconds the updated Track List
will appear with the new description in place.
Press the Menu button to exit
the Edit Title mode and return
to the Playback Display
Editing a Title Icon
Now using the same example we will change the Icon of the second track.
Start with the LCD Display showing the Playback Display, and the TV monitor showing the Track List
LCD Display TV Monitor
Press the Down Arrow button to highlight
Track 2
Press the Enter button and the track will start
to play
35Use the Control Buttons to find the image
you would like to use as the Icon. You can
use picture search forward \ reverse, play,
pause etc.
Once you have found the image press the
Icon button. The message Change Thumbnail
will appear on the TV monitor
The screen will go black for a few seconds
while the Track List is updated
Then the updated Track List will be displayed
Once you have updated the Title Descriptions and Icons the disc can be finalized as normal.
36Color Correction
If the image from the video source is in need of adjustment the MP 6000 has a built in video processor, it
can adjust the Brightness, Contrast, Color Saturation and Tint (NTSC only). These settings are only
available with analogue video signals, YUV, S-Video and Composite Video.
To call up the Video Processor Settings start with the LCD display on General Display. Have your video
source playing, so that you can see the image on the TV monitor
Press the Menu button to bring up the Color Correction menu
Press the Enter button and the display will change to the
Brightness setting
To adjust the Brightness press the Enter button again. The LCD
display will change and the Brightness adjustment will appear
on the TV monitor.
LCD Display On-Screen Adjustment
Use the Left and Right Arrow buttons to A reduced value
adjust the Brightness – Left reduces the
brightness and Right increase the brightness An increased value
Once the setting is correct press the Enter button
The LCD Display will change
SAVE should be flashing, press the Enter button and the new value is saved. If SAVE is not flashing use
the Left Arrow button to highlight SAVE so that it is flashing, and then press the Enter button
Press the Enter button to save the new value. Once saved the
Menu will return to 1.Brightness
37To access other options press the Down Arrow button to select
Contrast, Color and Tint (NTSC only)
The procedure for setting Contrast, Color and Tint (NTSC only) is the same as for Brightness.
Once all the adjustments are correct, press the Menu button to
exit the Color Correction menu and return to the General
Display
These color correction settings will be stored as your default settings for the unit.
If you wish to return to the factory default at any point, follow the above procedure but highlight DEFAULT
and press the Enter button, then highlight SAVE and press the Enter button again.
Audio Level Adjustment
This setting applies to analogue inputs only; it is not available from a DV (Digital) source.
It is important to make sure that the audio level from your input source is not too high, as this will cause
distortion on the finished disc. The MP 6000 has a built in audio level control that allows you to optimize the
audio level prior to recording.
The LED’s above the adjustment knob will light up to show the volume of the incoming audio. It is ideal to
adjust the knob so that the red LED occasionally lights up, when then is a particularly loud noise, but it is
not illuminated at any other time.
38Setting the Video Standard (PAL/NTSC)
The MP 6000 can be set to PAL or NTSC. Generally if the unit is bought it Europe it will be set to PAL as a
default, whereas if it is bought in the U.S. or ASIA it will be set to NTSC as a default.
The MP 6000 auto detects the input format so it is only necessary to change the output format
It is advisable to finish burning a disc before switching from one format to another - i.e. Do not create
mixed NTSC / PAL format discs.
If you want to switch from one standard to another here’s what to do.
Start with the MP 6000 LCD display showing the General Display.
Press the Menu button to call up the Menu options
Press the Down Arrow button twice to call up 3.Video
Standard
Press the Enter button to call up the Video Standard
options
Use the Up or Down Arrow buttons to select the video
standard you want to use.
Once your chosen video standard is displayed, press
the Menu button to save and exit.
Note: NTSC “0 IRE” is used in Japan, NTSC “7.5 IRE” is used in other NTSC countries such as the U.S.,
Canada etc.
GPI Function
The MP 6000 has a simple GPI (General Purpose Interface) function that allows hard wired control of
either Record & Pause or Play & Pause. GPI works on either momentary contact closure, or maintained
closure, so it is very easy to make a simple control cable with a 3.5mm stereo jack plug at one end and a
switch or button of your choice at the other. The Dip Switches on the rear panel of the MP 6000
determine the type of GPI remote control. If Dip Switch 2 is Off (up) the GPI is momentary closure (also
known as pulse), this means that one press of the button will start the recording, and the next press will
pause the recording.
39If Dip Switch 2 is On (down) the GPI becomes maintained closure (also known as level), this means the
MP 6000 will record while the button is held down, and will pause as soon as the button is released.
Dip Switch 1 switches the MP 6000 between simple GPI control and RS 232 control. If Dip Switch 1 is Off
(up) the MP 6000 responds to GPI, if it is On (down) then it responds to RS 232. The Front Panel and the
GPI interface will be deactivated if RS 232 control is selected
DIP switch
DIP switch 1 OFF (up),
• GPI trigger is enabled.
Dip Switches
DIP switch 1 ON (When this function is turned on, the front
panel and GPI function will be disabled. Only “EJECT”
will work.)
•External RS 232 device control enabled.
DIP switch 2 OFF (up)
•GPI function is set to momentary closure (Pulse Trigger).
GPI Port
DIP switch 2 ON
•GPI function is set to maintained closure (Level Trigger).
Note: Please make sure the MP 6000 is turned off before
changing DIP switch settings.
The 3.5mm Stereo Jack Plug should be wired for contact closure between the inner pin and outer pin. The
middle of the three contacts supplies a voltage which can be used to light an LED as an indication that the
MP 6000 is recording.
40The GPI Function can be set to either control Play & Pause or Record & Pause.
To select the GPI Function you require, start with the LCD Display showing the General Display
Press the Menu button to call up the Menu Options
Use the Down Arrow button to navigate to 2. GPI Function
Press the Enter button to enter the GPI Function menu
Use the Down Arrow button to select either Record/Pause or
Play/Pause
Once you have highlighted the required mode, press the
Menu button to save and exit.
Once set, the setting will remain as the default setting.
Additional Features of DVD+RW Discs
There are a few extra features that are only available with DVD+RW (Re-writable).
Formatting a New DVD+RW Disc
If you are using a brand new DVD+RW disc that has never been recorded previously, it must first of all be
formatted. The MP-6000 MD will do this automatically
Press the Eject button, the message OPEN will be displayed on the LCD display, and the disc tray will
open.
Place a DVD+RW disc on the disc tray; label/printed side up.
Press the Eject button again, so that the tray retracts, and the CLOSE message appears.
41After a few seconds the message will change to READING, and after a few more seconds it will return to
the general display.
On the TV monitor you will see this message
After about 20 seconds the message will disappear and the disc is ready to use.
Erasing a DVD+RW Disc
If you have an old DVD+RW Disc that you want to re-record as a new disc, i.e. you wish to remove all
previously recorded tracks and data from the disc, follow this procedure.
Press the Eject button, the message OPEN will be displayed on the LCD display, and the disc tray will
open.
Place a DVD+RW disc on the disc tray; label/printed side up.
Press the Eject button again, so that the tray retracts, and the CLOSE message appears.
After a few seconds the message will change to READING, and after a few more seconds it will return to
the general display.
Press the Erase button and the Erase menu will appear.
Press the Right Arrow button to highlight CONFIRM
Press the Enter button to confirm and the LCD Display
will show the ERASE message
On the TV monitor the Erase Progress bar will appear
and after a few seconds will disappear
Once erase has been completed the LCD Display will
return to the General Display
The disc is now empty and ready for re-recording.
42Erasing the Last Title from a DVD+RW Disc
With a DVD+RW disc it is possible to remove the last recorded title from the disc without erasing the whole
disc.
Insert the disc and wait for the General Display to appear on the LCD display.
Press the Title button to view the Track List. The LCD display will
show the Playback Display and the Track List will appear on the TV
monitor
In this example there are eight tracks recorded on the
disc. Press the Down Arrow button to scroll down
through the titles.
43At the bottom of the list we can see there is 88% of free space
available on the disc, and above that we can see title eight.
Press the Menu button to call up the Edit menu on the
LCD display
Press the Down Arrow Button to call up Erase Last Track
Press the Enter button to call up the Erase Confirmation
Screen
Press the Right Arrow button to highlight CONFIRM
Press the Enter button to Erase the track. The LCD
Display will return to the Erase Last Track display.
The TV monitor will go black for a few seconds while the Track
List is being updated.
44Once completed you will see that eight has been removed and
the free space on the disc has increased. You can remove further
tracks by following the same procedure.
Once completed, press the Menu button to return to the
Playback Display
Factory Reset (Return to default)
The MP 6000 can be reset to original, default, factory settings by following this procedure.
Start from the General Display
Press the Menu button to call up the menu options
Use the Down Arrow button to navigate to 4.System Setup
Press the Enter button to enter System Setup
The System Setup Menu will appear on the TV monitor
Press the Right Arrow button to highlight set time
45Now use the Down Arrow button to navigate down
to Factory Reset
Press the Right Arrow button to highlight Start
Press the Enter button to confirm
Press the Left Arrow button to highlight Yes
Press the Enter button to confirm
After a few seconds the MP 6000 will re-boot itself. Once re-booted you will see the “Set Date & Time”
menu on the TV monitor.
46Use the Up, Down Left and Right Arrow
buttons to navigate and set the date and time
Then use the Right Arrow button to highlight
save, and press the Enter button to confirm.
The screen will go black for a few seconds
and then the MP 6000 is ready to go.
RS 232 Information
The MP 6000 can be fully controlled via RS 232. The RS 232 port situated on the rear of the MP 6000 uses
standard RS 232 wiring. Full information on the control protocol is available from your local Datavideo
office. Please read the chapter on GPI functions, as this will guide you regarding which Dip switch settings
to use.
47Specifications Supports Disc.
Selectable Video Standards
Disc types Playback Recording
NTSC/PAL DVD+RW ● ●
DV Input DVD+R ● ●
Two 6-PIN IEEE1394 Fire Wire Ports with DC12V DVD-R ● ─
Bus Power supported DVD-RW, ● ─
Supports DV25, NTSC 4:1:1, PAL 4:2:0 video mode
DVD-Video ● ─
Analog Video Input/Output Super VCD ● ─
Composite (CVBS): 1.0 Vp-p 75 ohm BNC. Audio CD ● ─
S-Video(Y/C): 4-pin 75 ohm DIN Plug
CD-R ● ─
Y: 1Vpp, 75 ohm
C: 0.286Vpp, 75 ohm CD-RW ● ─
Component YUV: Betacam standard,
Y, Cr, Cb 75 ohm BNC DVD+R/RW Disc Format
Black Burst Output: 75 ohm BNC connector Capacity 4.7Gbyte (12cm single-sided)
Recording time HQ 60’ 9.72Mbit/s
Analog audio SP 120’ 5.07Mbit/s
Unbalanced Audio L/R in & Out RCA Ch1/2 LP 180’ 3.38Mbit/s
Balanced XLR audio in and out Ch1/2 EP 240’ 2.54Mbit/s
SLP 360’ 1.69Mbit/s
Level: 6 Vp-p
Bandwidth: 20HZ ~ 20KHZ Video Format
S/N Ratio: >55 dB, THD:Service and Support
It is our goal to make your products ownership a satisfying experience. Our support team is available to
assist you in setting up and operating your system. Please refer to our web site www.datavideo-tek.com for
answers to common questions, support requests or contact your local office below.
Datavideo Corporation (USA)
12300-U East Washington Blvd., Whittier, CA 90606 USA
Tel: +1 562 696 2324 contactus@datavideo.us www.datavideo.us
Datavideo Technologies Europe BV
Californiedreef 263565 BL Utrecht, The Netherlands
Tel: +31 30 261 9656 info@datavideo.nl www.datavideo.info
Datavideo UK Limited
Unit 2 Waterside Business Park, Hadfield, Glossop, Derbyshire SK13 1BE UK
Tel: +44 1457 851000 sales@datavideo.co.uk www.datavideo.info
Datavideo Technologies Co., Ltd.
10F, 176 Jian-Yi Rd, Chung Ho City, Taipei Hsien, Taiwan 235
Tel: +886 2 8227 2888 info@datavideo.com.tw www.datavideo.com.tw
Datavideo Technologies China Co.
2F-D, 2 Lane 777, West Guangzhong Rd, Zhabei District, Shanghai, China
Tel: +86 21 5603 6599 service@datavideo.cn www.datavideo.cn
Datavideo Technologies (S) PTE Ltd.
No. 100, Lorong 23 Geylong, #01-03 D’Centennial Bldg, Singapore 388398
Tel: +65 6749 6866 info@datavideo.sg www.datavideo.info
Datavideo Hong Kong Limited
G/F., 26 CROSS LANE, WANCHAI, HK
Tel: +852 2833 1981 info@datavideohk.com www.datavideohk.com
All the trademarks are the properties of their respective owners.
Datavideo Technologies Co., Ltd. All rights reserved 2005. P/N: 082060373E1
49You can also read