Help for Rad Pro Calculator
←
→
Page content transcription
If your browser does not render page correctly, please read the page content below
Help for Rad Pro Calculator

Note for Online Users: This help file was written for the desktop
version of the software. Most everything applies to the online version
as well. The major controls, selections and input/output boxes are
identical. The section that discusses output format options is not
available online, so ignore that. On the desktop version, the Decay
and Half-Life calculators are combined whereas they are separate on
the online version. You’ll have to cull through the combined section in
the help file and apply it appropriately to each individual online
calculator. There are no Excel functions online. Ignore that section
and those button descriptions. There are no menu selections or skins
online, so ignore those sections.
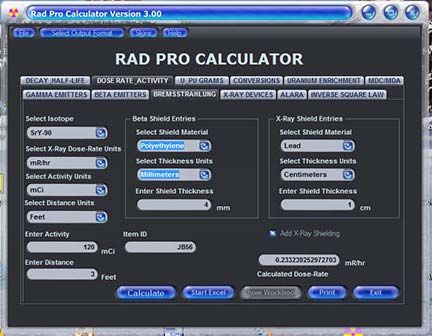
Table of Contents

Table of Contents ......................................................................................................... 2
1.0 Software General Description ........................................................................ 3
2.0 Menu Selections................................................................................................... 3
  2.1 File ........................................................................................................................ 3
  2.2 Select Output Format .................................................................................... 3
  2.3 Skins .................................................................................................................... 4
  2.4 Help ...................................................................................................................... 4
3.0 The Calculators .................................................................................................... 5
  3.1 Decay and Half-Life........................................................................................ 5
  3.2 Timed Decay .................................................................................................. 7
  3.3 Gamma Emitter Dose-Rate, Activity and Shielding (Point
  Source)......................................................................................................................... 8
  3.4 Beta Emitter Dose-Rate and Activity (Point and Plane Sources) . 9
  3.5 Bremsstrahlung from Beta Shielding.................................................. 10
  3.6 X-Ray Devices Dose-Rate and Shielding ............................................. 11
  3.7 ALARA (Time, Distance and Shielding) ................................................ 12
  3.8 Inverse Square Law ..................................................................................... 14
  3.9 Uranium and Plutonium Grams (Specific Activity) .......................... 14
  3.10 Units Conversion......................................................................................... 15
  3.11 Uranium Enrichment ................................................................................. 16
  3.12 MDC/MDA ...................................................................................................... 18
4.0 Excel Output Functions................................................................................... 19
1.0 Software General Description

     Rad Pro Calculator performs many nuclear calculations that are useful to the
     health physicist, radiological researcher, radiochemist, radiation safety officer,
     health physics technician (HP) and nuclear medicine professional. It
     calculates, among other things, radiation safety unit conversions (SI and US
     customary) and gamma emitter dose rate and activity. Other calculations
     include:

           •   Gamma shielding equations (with or without buildup)
           •   Beta emitter dose rate and activity
           •   Dose-rates for x-ray machines and devices
           •   Grams of plutonium (Pu) and uranium (U) from activity (specific
               activity)
           •   Decay and half life equations
           •   Bremsstrahlung x-ray calculations for beta interactions
           •   Uranium enrichment from U-234 and U-238 lab data for environmental
               levels of uranium (also works well for uranium fuel enrichment and U
               enrichment in nuclear waste)
           •   Inverse Square Law calculations for electromagnetic energies
           •   Minimum detectable concentration and contamination (MDC aka MDA)
               for counters and scan instruments (includes LLD and critical level
               calculations)
           •   ALARA calculations for dose and job planning

     The software has gained popularity with many other nuclear professionals in
     medical engineering, medical physics and other nuclear physics disciplines.
     Included are the most common isotopes at nuclear power reactors and
     government and private research facilities. Isotopes were added for nuclear
     medicine use (such as P-32 (32P), Tc-99m (99mTc), FDG / F-18 (18F) and
     other positron emitters used in PET scanning). The x-ray machine/device
     calculator allows the choice of empirical data or the use of known x-ray tube
     output. The x-ray shielding equations are the same ones used in the gamma
     isotope calculator.

2.0 Menu Selections

2.1 File

     The two selections here are Exit and Print. Exit is simply to close the
     application. Print gives you a screen print of just the calculator with whatever
     data is showing at the time. The printer selection window opens for you to
     select your printer, if you have multiple printers connected.

2.2 Select Output Format

     By default, the answers are outputted in full decimal place numbers until the
     number is either less than 0.001 or greater than 9999. At that point, it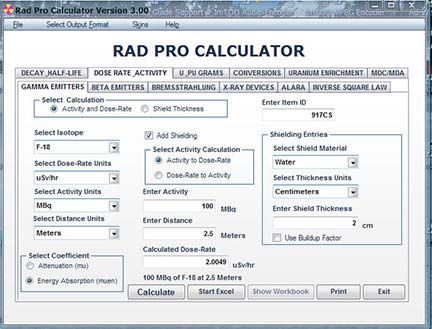
switches to scientific notation with full decimal places (x.xxxxxE+yyy). If you
     click on Select Output Format, a window opens with selections so that you
     may hard code in your preference, overriding the default.

     Automatic is the default setting as described above. Full Scientific always
     displays the output in full scientific notation (x.xxxxxE+yyy). 2 Decimal
     Scientific always displays the output in scientific notation rounded to two
     decimal places (x.xxE+yyy). Decimal always displays the answer in decimal
     format, up to the limitations of the software (0.000000000000000000x or
     xxx,xxx,xxx,xxx,xxx,xxx,xxx have to be displayed in scientific notation).

     Once you select Decimal, you may display all decimal places (Automatic) or
     Select how many decimal places to round to. The Full Scientific selection is
     new with version 3.00 and above. The format settings that you select are
     saved upon exiting the software and when you open the software again, those
     settings are loaded.

2.3 Skins

     In version 2.60, the ability to change the way the controls and GUI interface
     look was added. With one click, a new skin can be added and the entire
     software looks totally different. The default setting is Vista Style, with the
     look of the operating system windows in Microsoft’s Windows Vista. Try all of
     the selections until you find one that you like. The screen prints will also take
     on the look of your selected skin. You may also select None for the classic
     look with your Windows Appearance selections applied. Unfortunately, at this
     time, the software does not memorize your selection so you must select your
     favorite each time you start the program. The screenshots in this help file
     demonstrate the look of the different skins. The skin that you select is saved
     upon exiting the software and when you open the software again, that skin is
     loaded.

2.4 Help

     The Help menu selections display this help file that you are reading now, as
     well the legal disclaimer, references utilized in doing the math and developing
     the software, an About window with the version number and release date and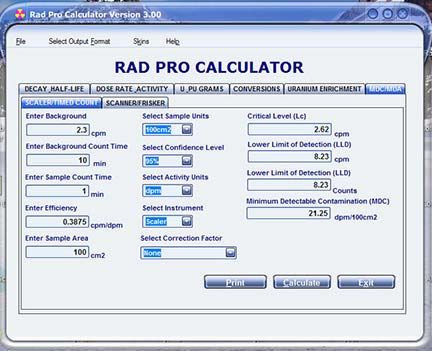
contact information, the math formulas for uranium enrichment and a paper
describing shielding equations and buildup factors.
3.0 The Calculators
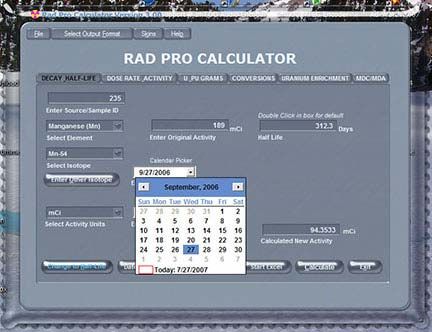
3.1 Decay and Half-Life
Useful for calculating today's activity for any radioactive isotope. You may
also back decay sources to find out the original activity (or for any date),
knowing the current activity. Calendar pickers are included for date entry
convenience.
If you use the online version, you will notice that there are separate pages for
decay and half-life calculations. When this version was written, both
calculations were included on this one tab. That complicates the usage a little
and warrants explanation. Upon opening, the calculator is in the decay mode.
In this mode, you select an isotope and enter original activity and two
different dates and/or times and you can calculate the new activity. If you
press the Change to Half-Life button, the GUI switches to the half-life
calculator mode where you enter two activites at two dates and/or times and
the half life will be calculated for you. This mode is generally used for
identifying an isotope or mixture when they are unknown. For instance, this
is a common calculation used in counting rooms for air samples. A fresh,
undecayed air sample could have high levels of radon daughter products on it
giving a false indication of high airborne man-made radioactivity. Rather than
run it on a gamma spectrometer, some count rooms will count it and then
count it again after 20 minutes of decay time and calculate the half-life. If
the half-life falls withing the normal range of radon daughters for the local
region, it is determined that most of the radioactivity deposited on the filter is
natural. If it is higher than the normal range, then it is sent for gamma
spectroscopy because it more than likely has enough man-made isotopes on
it to be of concern. To switch back from the half-life mode to the decay
mode, press the Change to Activity button.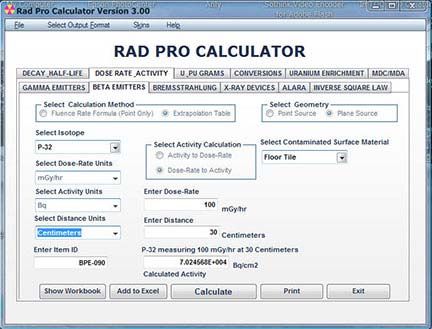
In the decay mode, when you select first an element, and then an isotope,
the half-life is displayed for you. This can be useful for just looking up the
half-life of an isotope. In this case, it replaces a look up table or a search
database.

To use the decay calculator, select an element. Then select your isotope. If
you have a different source of half-lives than we used (LLNL) you may type in
your own half-life to replace the one automatically displayed. If you isotope
is not listed, press the Enter Other Isotope button. The lists disappear and
you may type in your own isotope and half-life. A group of option buttons
also appears to select your half-life time units. To switch back to the default
isotope drop down lists, press the Default Isotope List button. Select your
activity units. Enter your original activity. For date entry, you may manually
type them in or press on the boxes to pop up a calendar picker. The
calculator defaults to date only entry. To enter time, press the Date and Time
button. You may enter dates and times in the appropriate boxes. Enter
and/or select your beginning and ending dates and/or times. Press the
Calculate button to get your new activity.

To use the half-life calculator, select your activity units. Enter the intial and
ending activities. Select either date only or date and time mode. Enter your
initial and ending dates and/or times (or use the calendar pickers). Press
calculate for the half-life. Select your option button for your time units. The
half-life is automatically recalculated for you in the new time unit.

The Item ID textbox is optional and is used for the Excel spreadsheet options.
The Start Excel button and other Excel functions are described in detail in the
last section of this help file.
3.2 Timed Decay
   This calculator is used to determine the amount of time that an isotope takes to
   decay to a preset activity, named “Desired Activity.” You may also think of this
   as “Final Activity.” It is useful for calculating the date that a drum of short
   lived waste reaches non-radioactive status, when sources reach exempt activity
   levels and when activated concrete is less than soil release limits, as well as
   other calculations.

   Select your activity units from the drop down list. Select your time output units
   from the drop down list. Select an element from the drop down list, then select
   the isotope from the drop down list. Enter today’s activity in the “Original
   Activity” textbox. Enter the final activity in the “Desired Activity” textbox.
   Press the calculate button. The amount of time to reach the desired activity
   and the date that it reaches that activity are given to you. If you exceed
   Microsoft date range limits, the date answer box displays “Date Out of Range.”
   The Microsoft date ranges allowed are from 1/1/0001 to 12/31/9999. If the
   number entered into the desired activity textbox is greater than the number
   entered into the original activity textbox, you are back calculating activity. The
   answer will be a negative number of years, days, etc. and the date displayed
   will be a date in the past. This may be useful if you wish to know how long ago
   and when was the isotope stronger, at some date in the past.

   If your isotope is not on the list, check the “Isotope Not Listed” checkbox. The
   dropdown lists will disappear and a textbox to enter the isotope name will
   appear, as well as a list of radio buttons to select the half-life time unit. Enter
   your Isotope name. Select the half-life time units from the radio button list.
   Enter your half-life. Enter today’s activity in the “Original Activity” textbox.
   Enter the final activity in the “Desired Activity” textbox. Press the calculate
   button. The amount of time to reach the desired activity and the date that it
   reaches that activity are given to you.
If you change the output time units, the answer box will change automatically
    for you.

3.3 Gamma Emitter Dose-Rate, Activity and Shielding (Point Source)

     This calculator is also multi-functional. Upon opening, it is in the calculate
     dose-rate mode. Select your activity, dose-rate and distance units. Select an
     isotope. (Note that these calculations are for single isotope point sources.
     For line, plane, cylinder, or box and multi-isotope calculations, you need an
     expensive commercial program such as MicroShield by Grove Engineering or
     MegaShield by WMG Nuclear Services). Enter your source activity and the
     measurement distance from the source. Click the Calculate button and your
     dose-rate is calculated and displayed. Check the Add Shielding checkbox to
     add a shield to your calculations. Select you shielding coefficient type. For
     guidance on which to use, look under the Help menu and select the Shielding
     and Buildup Paper menu item. Select your shielding material and thickness
     units. Enter your shield thickness or for lead blankets, enter your solid lead
     equivalency (i.e. 1 lead blanket is equivalent to 0.5 inches of solid lead or
     whatever your number is for your blankets, usually provided by the
     manufacturer). Press the Calculate button again for your new dose-rate.

     Click the Dose-Rate to Activity option button. This switches to a mode that
     let’s you calculate the activity of your source from a measured dose-rate at a
     measured distance. The instructions are the same as in the last paragraph
     except you enter your dose-rate and your measurement distance and then
     the activity is calculated for you. If your source is in a pig or behind
     shielding, click the Add Shielding checkbox and then proceed with selections
     and entries as in the last paragraph.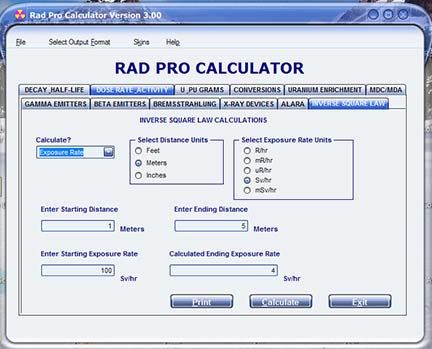
The final mode is turned on by selecting the Shield Thickness option button.
     This allows you to enter your initial dose-rate and a target dose-rate. Then a
     shield thickness is calculated for you. The more expensive programs won’t do
     this calculation. It is a complex calculation, especially if you use the buildup
     factor method. To get your buildup factor, you need to know your shield
     thickness, but you are trying to calculate your shield thickness. This is a
     paradox that can only be solved by computer algorithms.

     To see the fluence rate formulas used in this calculator, click here to read a
     very good white paper by George Chabot, PHD, CHP describing the formulas
     and explaining how they were derived.

     Note: All energies below 18 keV are ignored.

     The Item ID textbox is optional and is used for the Excel spreadsheet options.
     The Start Excel button and other Excel functions are described in detail in the
     last section of this help file.

3.4 Beta Emitter Dose-Rate and Activity (Point and Plane Sources)

     The beta calculator is identical to the gamma calculator but for common beta
     emitters and with no shielding. After selecting your isotope and unit
     preferences for dose-rate, distance and activity, an activity and distance may
     be entered to calculate the dose-rate. Inversely by selecting the Dose-Rate
     to Activity option button, you may enter a dose-rate and a distance and
     calculate the isotope activity.

     The formulas use data extrapolated from tables in the "Handbook of Health
     Physics and Radiological Health.” You have the choice for calculating a point
     or a plane source. With the plane source, the activity is expressed per unit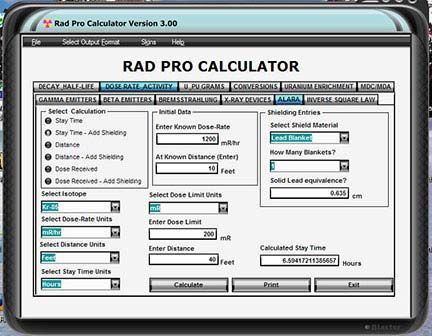
area. This is useful for calculating and predicting spill levels. In plane source
calculations, you may also select a surface material for backscatter factor
inclusion.
Beta particles eventually lose all of their energy and disappear. The distance
traveled is dependent on their original emission energy. If you input a
distance that is great than e-max, the highest possible energy for the isotope,
you’re answer will be 0 if calculating dose-rate or you will get a message
saying “Too Far,” if calculating activity. For tritium (H-3), the maximum
travel distance is less than 1 centimeter due to its very low beta energy. You
will get the “Too Far” message for any distance that is less than 1 cm. If you
select a very small distance, you will get a message saying “Too Close”
because both methods utilize tables due to the fact that there was no table
data available for that distance.
The Item ID textbox is optional and is used for the Excel spreadsheet options.
The Start Excel button and other Excel functions are described in detail in the
last section of this help file.
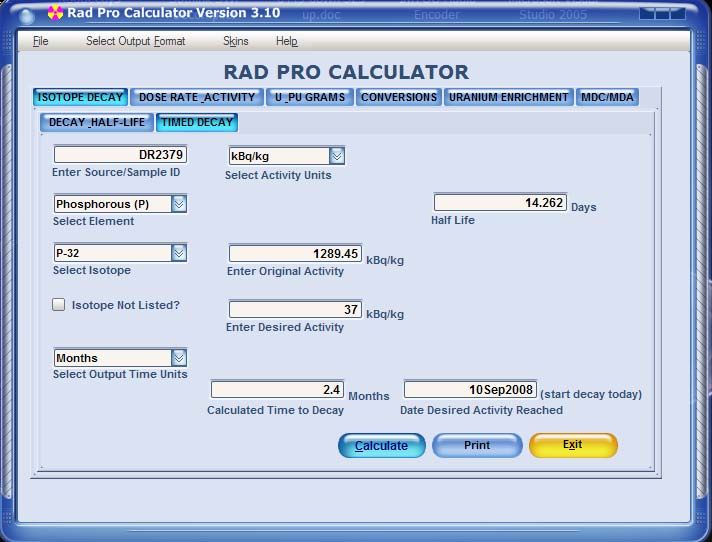
3.5 Bremsstrahlung from Beta Shielding
As beta particles travel, they interact with the atoms in their travel path and
lose their energy. The electron or positron energy lost reappears as x-rays
called Bremsstrahlung or braking radiation (as the betas put on the brakes,
other, electromagnetic radiation appears). The number of x-rays produced in
the beta shield material increases as the atomic number (Z) of the material
increases. For Human radiation protection, a low Z shield material is a better
choice because a higher Z shield could actually expose them to more radiation
energy from the Bremsstrahlung than the original beta exposure would have
been, especially at a distance. Low Z shields still produce x-rays though.Common practice is to first shield the betas with a low Z material, like
polyethylene to stop the betas and then shield the resulting x-rays with a
higher Z material like iron or lead. This calculator allows you to first calculate
the x-ray dose-rate coming from the beta shield and allows you to select a
second x-ray shield and then calculate the secondary shielded dose-rate. It
only calculates the electromagnetic energy resulting from shielding the betas.
It does not calculate the beta dose-rate from using a very thin, low Z shield,
i.e. shielding a Sr-90 source with one layer of Saran wrap.
First select your isotope, dose-rate units, activity units and distance units
using the drop down boxes. Select your beta shield material and shield
thickness units from those drop down boxes. Enter your source activity, the
measurement distance from the source and the shield thickness. Then press
the Calculate button to obtain the dose-rate. Check the Add X-Ray Shielding
checkbox and the secondary shield entry box pops up. Select the x-ray shield
material and thickness units. Enter the secondary shield thickness and then
press the Calculate button for your new dose-rate.
The Item ID textbox is optional and is used for the Excel spreadsheet options.
The Start Excel button and other Excel functions are described in detail in the
last section of this help file.
3.6 X-Ray Devices Dose-Rate and Shielding
This calculation is nearly impossible to do to any high level of accuracy due to
the variability in x-ray devices. The target material, target angle and even
small things like tube head plate spacing manufacturing tolerances all can
make a noticeable difference in the output of a device. This calculator is
provided to give engineers a ball park approximation to aid in tasks related to
x-ray devices. Two methods are available, using empirical data from the
British Standard BS 4094-2-1971 and using known device output. The
shielding equations are standard shielding equations utilizing buildup factors.
The standard recommends against this, but we provided it to you as another
approximation calculation. It should always overestimate the amount of
shielding required because e-max for the tube head is used when in reality
the device produces an entire energy spectrum from lower energies up to e-
max. We have been assured that many people use the standard in their
planning and calculations, so this calculator saves you the time of looking up
the data on the graphs in BS 4094-2-1971. Beware also that if you use
manufacturer provided data from a factory manual, that is more than likely
an average number and different tubes of the same model have slightly
different outputs because of manufacturing tolerance differences.
If the Empirical Data (CP) option button is selected, the dose-rates calculated
are extrapolated from the graphs in the BS 4094-2-1971 standard. The CP
stands for constant potential. The data for pulsed machines in the standard
was very sparse, so that option was not added. Select your filter medium,
filter thickness, dose-rate units and distance units. You will notice that as you
change the filter medium, the voltage range above the Enter Voltage Range
textbox changes. This represents the data limits of the graphs provided in
the standard. If you enter a voltage outside of the specified limits, you get
and “Out of Range” error message.Enter the tube current, tube voltage and distance from the tube. Press the
Calculate button to obtain your dose-rate. Check the Add Shielding textbox
and the shield entry box appears. Select your shield material and thickness
units. Enter your shield thickness and then press the Calculate button to
obtain the shielded dose-rate. Remember that the shielding numbers are not
from the graphs in BS 4094-2-1971. They are theoretical numbers using
mono-energy equations.
If the Known Tube Output option button is selected, the GUI changes to the
option and entry controls needed. Select your answer dose-rate units,
answer distance units, tube output dose-rate units and tube output distance
units. Enter your tube output dose-rate and what distance it was obtained at
(i.e. 20 kR/hr at 200 mm). Enter your measurement distance for your
answer and press the Calculate button to obtain the dose-rate at that
distance. Checking the Add Shielding checkbox opens the shielding options
box. Select your shield material and thickness units. Enter your shield
thickness and then press the Calculate button to obtain the shielded dose-
rate.
Excel functions are not available on this calculator at this time. If you would
find it useful, send us a request at this link. If enough requests are received,
Excel output will be considered for a future release.
3.7 ALARA (Time, Distance and Shielding)
This calculator was added at the request of emergency response personnel in
the UK and the USA. Three calculations are available. In all three cases, the
source strength must be known. This may be a measured value or a value
calculated with the gamma calculator in Rad Pro Calculator. In all threecalculations, shielding may be added. If the shielding option is not invoked, you will notice that there is no isotope selection drop down box. That is because it is purely an Inverse Square Law calculation. Although attenuation due to air will differ from isotope to isotope, the effect is generally small so attenuation due to air is not considered. If your source is low energy, i.e. Am-241, your number will be conservative because the actual dose-rate at the working distance will be a little lower than the one calculated. If you do use the shielding option, the isotope drop down list appears because the effect of different shielding material varies greatly with gamma energy. You are also reminded that the shielding equations are for point source isotopes. In the Stay Time calculation option, after selecting dose-rate, distance, stay time and dose limit units from the drop down boxes, enter the worker dose limit for the job and the working distance and press the Calculate button to obtain the worker stay time. If the Add Shielding option is invoked, select your isotope, shielding material and shield thickness units. Enter your shield thickness and press the Calculate button again to obtain your new stay time. In the Distance calculation option, after selecting dose-rate, distance, stay time and dose limit units from the drop down boxes, enter the worker dose limit and the work time for the job and press the Calculate button to obtain the working distance. If the Add Shielding option is invoked, select your isotope, shielding material and shield thickness units. Enter your shield thickness and press the Calculate button again to obtain your new working distance. In the Dose Received calculation option, after selecting dose-rate, distance, stay time and dose received units from the drop down boxes, enter the work distance and the work time for the job and press the Calculate button to obtain the worker dose received. If the Add Shielding option is invoked, select your isotope, shielding material and shield thickness units. Enter your
shield thickness and press the Calculate button again to obtain your new dose
     received.

     Excel functions are not available on this calculator at this time. If you would
     find it useful, send us a request at this link. If enough requests are received,
     Excel output will be considered for a future release.

3.8 Inverse Square Law

     This calculator easily demonstrates the principles of the Inverse Square Law.
     This law simply says that if you double the distance from an electromagnetic
     energy source (gamma or x-ray) the dose-rate goes down by a factor of four
     (the square of two for “double”).

     There are two calculations available, selectable through the Calculate drop
     down box. You may enter a starting distance, starting dose-rate and ending
     distance to calculate the dose-rate at the ending distance. You may also
     enter a starting distance, starting dose-rate and ending dose-rate to calculate
     the distance required to obtain the ending dose-rate.

     Excel functions are not available on this calculator at this time. If you would
     find it useful, send us a request at this link. If enough requests are received,
     Excel output will be considered for a future release.

3.9 Uranium and Plutonium Grams (Specific Activity)

     In some instances, the regulations and procedures for uranium and plutonium
     are specified in units of mass rather than activity units, especially for the
fissile isotopes. It is sometimes also necessary to know total U and total Pu in
grams for inventory, shipping and waste disposal. This calculator will do the
math in both directions. You may calculate grams from activity or activity
from grams for the most common uranium and/or plutonium isotopes.
Select the option button for the direction that you wish to calculate, Activity
to Grams or Grams to Activity. Select whether you are calculating Uranium,
Plutonium or Both with the center option buttons. Select how many isotopes
that you wish to calculate. With each addition, a new row of calculation boxes
appears. If you select one, you get just the one answer box for that isotope.
If you select two or more isotopes, one or two Total boxes appear for total U
and/or total Pu. Select your isotope(s). Enter the activity(s) or grams in the
box(es). Your calculated values appear automatically as you type, without
having to press a Calculate button.
Excel functions are not available on this calculator at this time. If you would
find it useful, send us a request at this link. If enough requests are received,
Excel output will be considered for a future release.
3.10 Units Conversion
Units may be converted for all of the common SI and US customary radiation
units. There a four tabs under this calculator for Activity, Dose Equivalent,
Absorbed Dose and Miscellaneous units. Miscellaneous converts common
combined units such as dpm/100cm2 to Bq/cm2 and μCi/ml to pCi/L.Select the unit category that you wish for your calculation. Select the input
units and the output units from the left and right list boxes. Enter your
original value and the converted value appears as you type.
Excel functions are not available on this calculator at this time. If you would
find it useful, send us a request at this link. If enough requests are received,
Excel output will be considered for a future release.
3.11 Uranium Enrichment
This was initially developed as a separate software package named Uranium
Enrichment Calculator and was programmed into Rad Pro Calculator in version
2.30 released on 9-4-2006. Many times, samples with low levels of uranium
such as soil or water return < MDA values on U-235 and detectable values of
U-234 and U-238 when sent to the laboratory for analysis. Since uranium
enrichment is defined as the mass percent of U-235 in total uranium, a
straight out percentage calculation cannot be performed from laboratory data.
This calculator was developed for the purpose of calculating enrichment from
U-234 and U-238 data, especially for use in environmental remediation and
facility release projects. It is nice to have a calculation to help demonstrate
to regulators that the uranium in remaining soil or groundwater is natural or
0.7% U-235.
Specific activity formulas were developed from empirical data collected from
US gaseous diffusion plants and other sources. The lab data ratios are
compared to the formula ratios. Since enrichment always ends up on both
sides of the equation, creative computer algorithms had to be developed to
calculate enrichment. Additional useful calculations are performed for you
such as mass and activity ratios, ppm, etc. This calculator is useful for
proving that uranium found in soil and water samples are all naturally
occurring as well as other situations. If enriched or depleted uranium werepresent, the enrichment would be higher or lower than normally found in soil and water (natural U = 0.7 mass percent U-235). The calculator is also useful for calulating the enrichment of man-enhanced uranium in contamination and radioactive waste. For futher information about the formulas, read the text available by clicking the About Enrichment Formulas menu selection under the Help menu. There are four tabs under Uranium Enrichment. The first three are tied together as one calculation set. The fourth tab is a stand alone calculator to predict the U-234 to U-235 activity ratio, inputting enrichment. On the first three tabs, the first tab, Enrichment, has the input controls and boxes. The other two tabs contain all output data based on the input in the first tab. On the Activity Ratios tab, the theoretical specific activities for U- 234, U-235 and U-238 have default values but you may input your own favorite values. Just remember to go back to tab 1, Enrichment to press the Calculate Enrichment and Fractions button again. Select your units, pCi/g for solids or pCi/L for liquids. If you selected pCi/L, then enter your liquid’s density in g/cc (1.0 for water). This is important for the parts per million (ppm) calculation. Enter the lab data for U-234 along with the reported uncertainty. Enter the lab data for U-238 along with the reported uncertainty. Press the Calculate Enrichment and Fractions button. The enrichment and enrichment uncertainty range are calculated and displayed. Select the second and third tabs to see the activity ratios and mass fractions. Select the fourth tab, Calculate Ratio. Enter your enrichment in mass percent U-235. Press the Calculate Ratio button. The ratio of U-234 to U-238 and the ratio of U-235 to U-238 are calculated and displayed.
Excel functions are not available on this calculator at this time. If you would
    find it useful, send us a request at this link. If enough requests are received,
    Excel output will be considered for a future release.

3.12 MDC/MDA

    Minimum Detectable Concentration/Minimum Detectable Contamination
    (MDC) was formerly called Minimum Detectable Activity (MDA). This
    calculation may be performed for timed counters such as lab analyzers and
    scalers and for count rate instruments used for frisking and scanning.

    Under the Scaler/Timed Count tab, select your sample units, confidence level
    (default 95%), activity units and your instrument type from the drop down
    boxes. You may also select a correction factor for surface abnormalities,
    chemical yield (recovery factor) or filter efficiency. Enter the background,
    background count time, sample count time, efficiency, sample area (or
    sample mass or sample volume) and if a correction factor option was
    selected, enter that value. Press the Calculate button. The critical level (Lc),
    Lower Limit of Detection (LLD) and MDC are calculated and displayed.

    Under the Scanner/Frisker tab, select your frisker type and MDC units. Enter
    your background, detector width, scan speed, efficiency and probe area (if
    alpha or beta frisker). Press the Calculate button. The critical level (Lc),
    Lower Limit of Detection (LLD) and MDC are calculated and displayed.

    To learn more about these calculations, click here to go to the USA EPA
    MARSSIM site and read Chapter 6 or click here Field Measurement Methods and
    Instrumentation.
Excel functions are not available on this calculator at this time. If you would
find it useful, send us a request at this link. If enough requests are received,
Excel output will be considered for a future release.
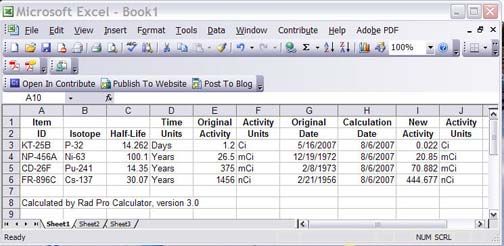
4.0 Excel Output Functions
This is a major new feature added with version 3.0. With versions 1.xx and
2.xx, the only output available was the screen print of one calculation at a
time. If you had multiple sources to decay or wanted to do multiple gamma
shields and take the results to a meeting, you had to copy and paste the
answers or hand type them into a spreadsheet or table one at a time. Now
with a few mouse clicks you can create a spreadsheet of multiple calculations
which can be saved, printed or copied and pasted into a database, Word
document or Power Point presentation with ease. To learn how to use this
new feature you should learn how it works and learn why limitations of its use
were programmed into the software.
On each calculator that has the Excel output feature, you will see a Start
Excel button. When this is pressed, an Excel object is created in memory. It
is not visible at this time but is there awaiting your input. You may make the
Excel spreadsheet visible at any time by pressing the Show Workbook button.
You may still input more data after showing it by minimizing the Excel
application. Whether visible or not, the input to the spreadsheet is the same.
Once you start the Excel object, the button changes to an Add to Excel
button. Each time that you press this button, the data that is currently in the
calculator is added to new row in the spreadsheet object. This Add to Excel
button is placed right next to the Calculate button to minimize mouse
movement. Do your input. Press the Calculate button. Press the Add to
Excel button. Enter the next input. Press the Calculate button. Press the
Add to Excel button. Continue this process until you are finished. Press the
Show Workbook button.
Save the spreadsheet, print it or format it as you wish first. Copy and paste
the data into a database, Word document or Power Point spreadsheet if you
like. Once you close the application, the object is killed and Excel is closed.You are given one last chance to save the spreadsheet, if you forgot to do it before closing it. The spreadsheet is attached to the object in memory. When you close Rad Pro Calculator, the object must be killed to free up memory. When the object is killed, the spreadsheet is closed and killed also. If you accidentally close the spreadsheet while the application is running, Rad Pro Calculator does not know it right away because the object is still in memory. If you then press the Add to Excel button, it knows that there is no spreadsheet and gives you an error message. The only way to recover or create a new Excel object on that calculator again is to close Rad Pro Calculator and reopen it and press the Start Excel button again. That is a limitation that you must learn. When you press the Add to Excel button, you will notice that certain drop down boxes and option buttons freeze and cannot be used. This was necessary to preserve the integrity of the data under the column headings under the spreadsheet. If you are using the gamma calculator, calculating the dose-rate by inputting activity and distance and then start a spreadsheet, the last column heading says dose-rate in your selected dose-rate units. You may not switch dose-rate units then. Say you started with mSv/hr. If you were start a spreadsheet and switch to μSv/hr, the column header would still read mSv/hr so the new values added would be wrong, when compared to the heading. Say you then wanted to do some activity calculations, inputting the dose-rate and distance. If you were allowed to make that switch while a spreadsheet was open, your answer would be in say MBq and the column header would still say mSv/hr. That is why the things that freeze are frozen for you. If you must make a change, you have no choice but to close Rad Pro Calculator, reopen it and start a new spreadsheet. You must learn that limitation also.
Here is what you can do. You may open a gamma dose-rate spreadsheet,
and then open a decay calculator spreadsheet. You may switch back and
forth between the two tabs on the software and between the two
spreadsheets, if you show them both. You may even copy data from one
spreadsheet to another one. All in all, we think that you will find this new
feature useful.

Ray McGinnis
Rad Pro Calculator
Software Development
Click to Contact Me
You can also read