Working with Text: Basics - Writer Guide - The Document ...
←
→
Page content transcription
If your browser does not render page correctly, please read the page content below
Writer Guide

Chapter 2
Working with Text: Basics
Copyright
This document is Copyright © 2021 by the LibreOffice Documentation Team. Contributors are
listed below. You may distribute it and/or modify it under the terms of either the GNU General
Public License (https://www.gnu.org/licenses/gpl.html), version 3 or later, or the Creative
Commons Attribution License (https://creativecommons.org/licenses/by/4.0/), version 4.0 or later.
All trademarks within this guide belong to their legitimate owners.

Contributors
To this edition
 Rafael Lima                          Jean Hollis Weber                   Kees Kriek
To previous editions
 Jean Hollis Weber                    Bruce Byfield                       Gillian Pollack
 Ron Faile Jr.                        John A. Smith                       Hazel Russman
 John M. Długosz                      Shravani Bellapukonda               Kees Kriek

Feedback
Please direct any comments or suggestions about this document to the Documentation Team’s
mailing list: documentation@global.libreoffice.org

       Note
       Everything you send to a mailing list, including your email address and any other
       personal information that is written in the message, is publicly archived and cannot
       be deleted.

Publication date and software version
Published April 2021. Based on LibreOffice 7.1 Community.
Other versions of LibreOffice may differ in appearance and functionality.

Using LibreOffice on macOS
Some keystrokes and menu items are different on macOS from those used in Windows and
Linux. The table below gives some common substitutions for the instructions in this document.
For a detailed list, see the application Help.

 Windows or Linux              macOS equivalent                      Effect
 Tools > Options
                               LibreOffice > Preferences             Access setup options
 menu selection
 Right-click                   Control+click or right-click
                                                                     Open a context menu
                               depending on computer setup
 Ctrl (Control)                ⌘ (Command)                           Used with other keys
 F11                           ⌘+T                                   Open the Styles deck in the Sidebar

Documentation for LibreOffice is available at https://documentation.libreoffice.org/en/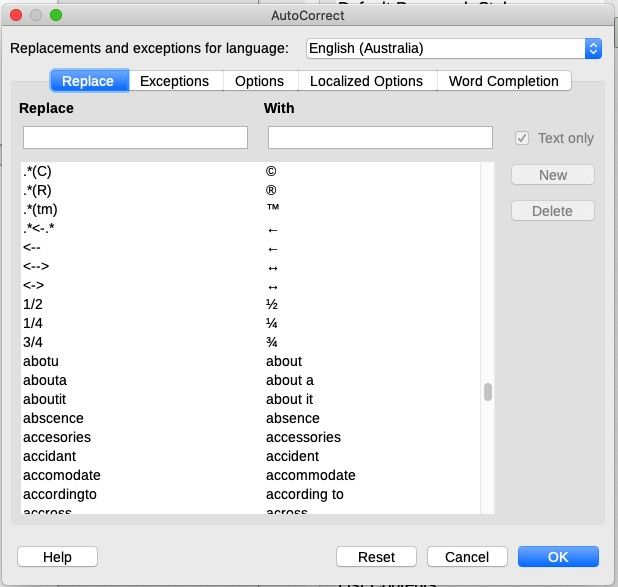
Contents
Copyright............................................................................................................................2
   Contributors.............................................................................................................................. 2
   Feedback.................................................................................................................................. 2
   Publication date and software version.......................................................................................2
   Using LibreOffice on macOS.....................................................................................................2
Introduction........................................................................................................................4
Selecting text.....................................................................................................................4
   Selecting items that are not contiguous.....................................................................................4
   Selecting a vertical block of text................................................................................................5
Cutting, copying, and pasting text..................................................................................5
Finding and replacing text................................................................................................6
   Using the Find toolbar............................................................................................................... 6
   Using the Find and Replace dialog...........................................................................................7
Inserting special characters.............................................................................................8
   Inserting non-breaking spaces and hyphens.............................................................................9
   Inserting en and em dashes....................................................................................................10
Checking spelling and grammar....................................................................................11
   Spelling................................................................................................................................... 11
   Spelling and grammar............................................................................................................. 12
   Grammar................................................................................................................................. 13
   English sentence checking......................................................................................................14
     Grammar checking............................................................................................................. 15
     Punctuation........................................................................................................................ 15
     Others................................................................................................................................ 16
Using synonyms and the thesaurus.............................................................................16
Hyphenating words.........................................................................................................17
   Automatic hyphenation............................................................................................................ 17
   Manual hyphenation................................................................................................................ 19
Using AutoCorrect...........................................................................................................19
Using Word Completion..................................................................................................20
Using AutoText................................................................................................................21
   Creating AutoText.................................................................................................................... 21
   Inserting AutoText.................................................................................................................... 22
   Printing a list of AutoText entries.............................................................................................22
Changing the case of selected text...............................................................................23

                                                                                         Chapter 2 Working with Text: Basics | 3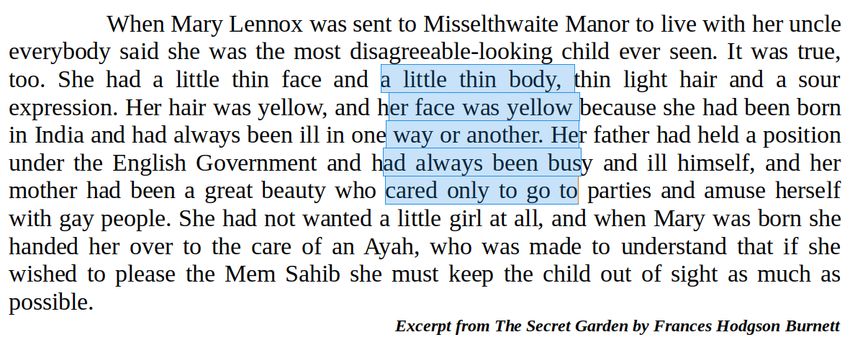
Introduction
This chapter covers the basics of working with text in Writer. It assumes that you are familiar with
the use of a mouse and keyboard and that you have read about Writer’s menus and toolbars and
other topics covered in Chapter 1, Introducing Writer.
We recommend that you also display formatting aids, such as end-of-paragraph marks, tabs,
breaks, and other items in Tools > Options > LibreOffice Writer > Formatting Aids. You can
hide or display these markers by going to View > Formatting Marks. See Chapter 20, Setting up
Writer, for more information.
When you have read this chapter, you should know how to:
    •   Select, cut, copy, paste, and move text.
    •   Find and replace text.
    •   Insert special characters.
    •   Check spelling and grammar, use the thesaurus, and choose hyphenation options.
    •   Use the AutoCorrect, Word Completion, AutoText, and case-changing features.
See also Chapter 3, Working with Text: Advanced, and Chapter 4, Formatting Text.

Selecting text
Selecting text in Writer is similar to selecting text in other applications. You can swipe the mouse
cursor over text or use multiple clicks to select a word (double-click), sentence (triple-click), or
paragraph (quadruple-click).
You can also click in the text, press F8 to enter Extending selection mode, and then use the
arrow keys on your keyboard to select a contiguous block of text. Press F8 again after you have
finished selecting the block of text.
In addition, you can select non-contiguous items and vertical blocks of text.
One way to change the selection mode is to use the icon on the Status bar (see Figure 1). When
you right-click the icon, a context menu displays the available options: Standard selection,
Extending selection (F8), Adding selection (Shift+F8), and Block selection (Ctrl+Shift+F8). Left-
clicking cycles through these selections.

                         Figure 1: Changing the selection mode using
                         the status bar

Selecting items that are not contiguous
To select non-contiguous items (as shown in Figure 2) using the mouse in Standard selection
mode:
   1) Select the first piece of text.
   2) Hold down the Ctrl key and use the mouse to select the next piece of text.
   3) Repeat as often as needed.

4 | Chapter 2 Working with Text: Basics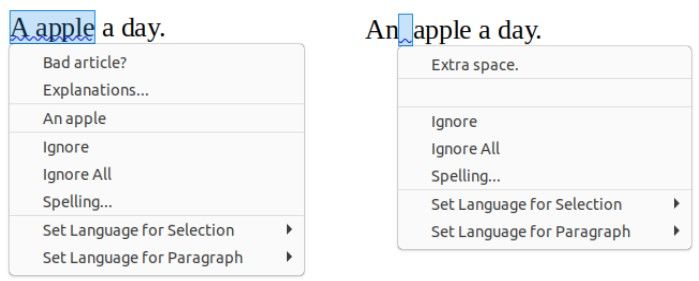
To select non-contiguous items using the keyboard in Adding selection mode:
   1) Select the first piece of text. (For more information about keyboard selection of text, see
      the topic “Navigating and Selecting with the Keyboard” in the LibreOffice Help (F1).)
   2) Press Shift+F8 to enable Adding selection mode.
   3) Use the arrow keys to move to the start of the next piece of text to be selected. Hold
      down the Shift key and select the next piece of text.
   4) Repeat as often as required.
Now you can work with the selected text. After finishing your work with the selected text, press
Esc to exit Adding selection mode.

       Figure 2: Selecting non-consecutive pieces of text

Selecting a vertical block of text
You can select a block text that spans through multiple rows using Writer’s Block selection mode.
To change to Block selection mode, use Edit > Selection Mode > Block Area, or press Ctrl+F8,
or click the Selection icon in the status bar and select Block selection in the list. Now you can
highlight the selection, using mouse or keyboard, as shown in Figure 3.

            Figure 3: Selecting a block of text

Cutting, copying, and pasting text
Cutting and copying text in Writer is similar to cutting and copying text in other applications. You
can copy or move text within a document, or between documents, by dragging or by using menu
selections, icons, or keyboard shortcuts. You can also copy text from other sources such as Web
pages and paste it into a Writer document.

                                                                Cutting, copying, and pasting text | 5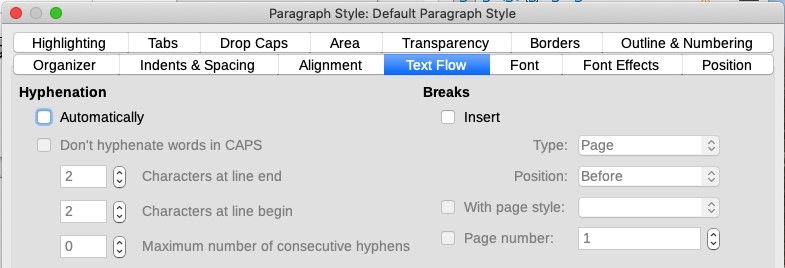
•   To move (drag and drop) selected text using the mouse, drag it to the new location and
        release it; the cursor changes shape while dragging.
    •   To copy selected text, hold down the Ctrl key while dragging. The text retains the
        formatting it had before dragging.
    •   To move (cut and paste) selected text, use Ctrl+X to cut the text, insert the cursor at the
        paste-in point and use Ctrl+V to paste. Alternatively, use the Copy/Paste buttons on the
        Standard toolbar.
When you paste text, the result depends on the source of the text and how you paste it. If you
click the Paste button, then the pasted text keeps its original formatting (such as bold or italics).
Text pasted from websites and other sources may be placed automatically into frames or tables
as part of the format when you paste. If you do not like the results, click the Undo button or press
Ctrl+Z.
To make the pasted text inherit the paragraph style at the insertion point:
    •   Choose Edit > Paste Special, or
    •   Click the arrow on the combination Paste button, or
    •   Double-click the Paste button without releasing the left mouse button, or
    •   Press Ctrl+Shift+V
Then select Unformatted text in the resulting menu.
You can also press Ctrl+Alt+Shift+V, which pastes unformatted text directly.
The range of choices on the Paste Special menu varies depending on the origin and formatting of
the text (or other object) to be pasted. See Figure 4 for an example with text on the clipboard.

                             Figure 4: Paste Special menu

Finding and replacing text
Writer has two ways to find text within a document: the Find toolbar for fast searching and the
Find & Replace dialog. In the dialog, you can:
    •   Find and replace words and phrases.
    •   Use wildcards and regular expressions to fine-tune a search (see Chapter 3).
    •   Find and replace specific attributes or formatting (see Chapter 3).
    •   Find and replace paragraph styles (see Chapter 3).

Using the Find toolbar
By default, the Find toolbar is shown docked at the bottom of the LibreOffice window (just above
the Status Bar) in Figure 5, but you can float it or dock it in another location. For more information
on floating and docking toolbars, see Chapter 1, Introducing Writer. If the Find toolbar is not
visible, you can display it by choosing View > Toolbars > Find on the Menu bar or by pressing
Ctrl+F.

6 | Chapter 2 Working with Text: Basics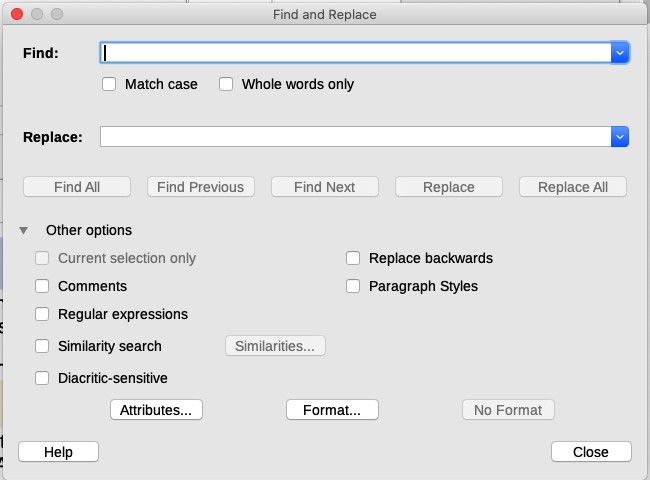
Figure 5: Docked position of Find toolbar
To use the Find toolbar, click in the text input box and type your search text, then press Enter to
find the next occurrence of that term from the current cursor position. Click the Find Next or Find
Previous buttons as needed.
Click the Find All button to select all instances of the search term within the document. Select
Match Case to find only the instances that exactly match the use of upper and lower case letters
in the search term. Click the icon next to Match Case to open the Find and Replace dialog.
To close the Find toolbar, click the X button on the left, or press Esc on the keyboard when the
text cursor is in the search box.

Using the Find and Replace dialog
To display the Find and Replace dialog (Figure 6), use any of the following methods:
   •     Use the keyboard shortcut Ctrl+H,
   •     Choose Edit > Find and Replace on the Menu bar.
   •     Click the Find and Replace button on the Find toolbar. When the dialog is open,
         optionally click Other Options to expand it (see Figure 6).

           Figure 6: Expanded Find & Replace dialog

                                                                       Finding and replacing text | 7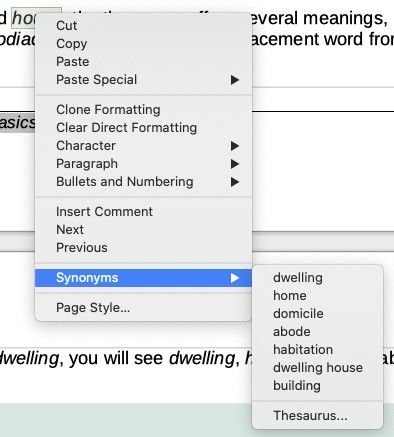
To use the Find and Replace dialog:
   1) Type the text you want to find in the Find box.
   2) To replace the text with different text, type the new text in the Replace box.
   3) You can select various options, such as matching the case or matching whole words only.
        The other options include searching only in selected text, searching from the current cursor
        position backwards toward the beginning of the document, searching for similar words, and
        searching in comments. The use of other options is described in Chapter 3, Working with
        Text: Advanced.
        Additional options are shown automatically when CTL or Asian languages have been
        selected in Tools > Options > Language Settings > Languages.
   4) When you have set up the search, click Find Next. As the document view moves to each
      found instance, you can replace the text by clicking Replace or skip that instance by
      clicking Find Next again.

        Tip
        If you click Find All, Writer selects all instances of the search text in the document.
        Similarly, if you click Replace All, Writer replaces all matches, without stopping for
        you to accept each instance.

        Caution
        Use Replace All with caution; otherwise, you may end up with mistakes that you
        won’t be able to undo later on if you save and close the file. A mistake with Replace
        All might require a manual, word-by-word, search to fix. (Ctrl+Z works only before
        the file is saved.)

Inserting special characters
A special character is one not found on a basic English keyboard. For example, © ¾ æ ç Ł ñ ö ø
¢ are all special characters.
To insert one or more special characters, place the cursor in the position where you want the
characters to appear. Then do one of the following:
    •    Click the Special Character icon in the Standard toolbar to open a list of favorite and
         recently used characters and click on the one you wish to insert (see Figure 7). You can
         also open the Special Characters dialog (Figure 8) by clicking the More Characters
         button on this list.

                                Figure 7: Insert Special Characters in
                                the standard toolbar

8 | Chapter 2 Working with Text: Basics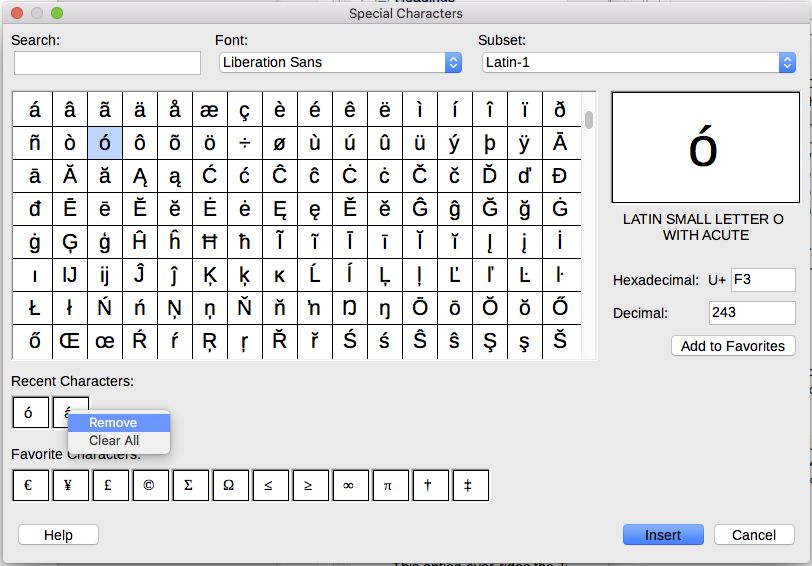
•    Click Insert > Special Character to open the Special Characters dialog (Figure 8).
         Double-click the characters (from any font or mixture of fonts) you wish to insert, in order;
         they appear in the document as you select them. The selected characters are also added
         to the Recent Characters list on the lower left of the dialog.

   Figure 8: The Special Characters dialog

        Tips
        To view details of a character, single-click it; details are shown on the right, along
        with its numerical code.
        To insert a character and leave the dialog open, double-click the character. To insert
        a character and close the dialog, click it and then click the Insert button.
Different fonts include different special characters. If you do not find a particular special character
you want, try changing the Font selection.

Inserting non-breaking spaces and hyphens
 Non-breaking spaces
    To prevent two words from being separated at the end of a line, press Ctrl+Shift when you
    type the space between the two words.
 Non-breaking hyphen
    You can use a non-breaking hyphen in cases where you do not want the hyphen to appear
    at the end of a line, for example in the following text “123-4567”. To insert a non-breaking
    hyphen, press Shift+Ctrl+minus sign.
These hyphens and spaces, and more, are also available through Insert > Formatting Mark.

                                                                          Inserting special characters | 9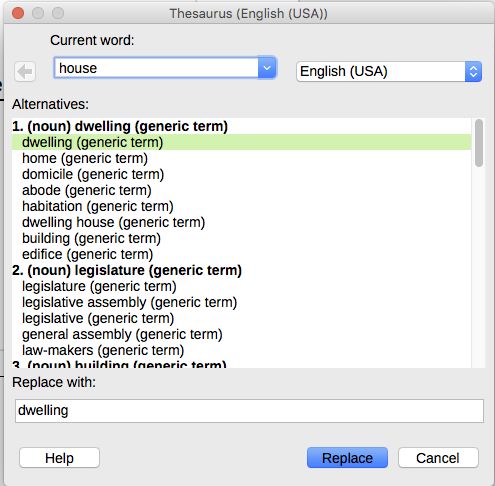
Inserting en and em dashes
To enter en and em dashes as you type, you can use the Replace dashes option on the Options
page under Tools > AutoCorrect > AutoCorrect Options. This option replaces two hyphens,
under certain conditions, with the corresponding dash.
–     is an en-dash; that is, a dash the width of the letter “n” in the font you are using. Type at least
      one character, a space, one or two hyphens, another space, and at least one more letter. The
      one or two hyphens will be replaced by an en-dash.
— is an em-dash; that is, a dash the width of the letter “m” in the font you are using. Type at
  least one character, two hyphens, and at least one more character. The two hyphens will be
  replaced by an em-dash. Exception: if the characters are numbers, as in a date or time
  range, the two hyphens are replaced by an en-dash.
In Table 1, the A and B represent text consisting of letters A to Z or digits 0 to 9.
Table 1: Inserting dashes
    Text that you type                                  Result
    A - B (A, space, hyphen, space, B)                  A – B (A, space, en dash, space, B)
    A -- B (A, space, hyphen, hyphen, space, B)         A – B (A, space, en dash, space, B)
    A--B (A, hyphen, hyphen, B)                         A—B (A, em dash, B)
    1--2 (number, hyphen, hyphen, number)               1–2 (number, en dash, number)
    A-B (A, hyphen, B)                                  A-B (unchanged)
    A -B (A, space, hyphen, B)                          A -B (unchanged)
    A --B (A, space, hyphen, hyphen, B)                 A –B (A, space, en dash, B)

Another means of inserting en and em dashes is through the Insert > Special Characters menu.
Select the U+2013 or U+2014 character (found in the General punctuation subset), respectively.
A third method uses keyboard shortcuts. These shortcuts vary depending on your operating
system, as described below.

       Tip
        You can also record macros to insert en and em dashes and assign those macros to
        unused key combinations, for example Ctrl+Shift+N and Ctrl+Shift+M. For more
        information about key combinations, see Chapter 20, Customizing Writer.

    macOS
       For an en dash, hold down the Option (Alt) key and type a hyphen. For an em dash, the
       combination is Shift+Option+Hyphen.
    Windows
       On most non-Asian installations of Windows, hold down the left Alt key and type on the
       numeric keypad: 0150 for an en dash or 0151 for an em dash. The dash appears when you
       release the Alt key.

       Tip
        On a keyboard with no numeric keypad, use a Fn (Function) key combination to type
        the numbers. (The Fn key is usually to the right of the left-hand Ctrl key on the
        keyboard.) For example, on a US keyboard layout, the combination for an en dash
        should be Alt+Fn+mjim and for an em dash it should be Alt+Fn+mjij.

10 | Chapter 2 Working with Text: Basics
Linux
Hold down the Compose key and type two hyphens and a period for an en dash, or three
hyphens for an em dash. The dash appears when you release the Compose key.
Tip
The key that operates as a Compose key varies with the Linux distribution. It is
usually one of the Alt or Win keys, but may be another key, and should be user-
selectable.
Checking spelling and grammar
Spelling
Writer provides a spelling checker, which checks to see if each word in the document is in the
installed dictionary. Also provided is a grammar checker within the Spelling dialog, which can be
enabled or disabled in the Spelling dialog.
Automatic Spell Checking checks each word as it is typed and displays a wavy red line under
any unrecognized words. Right-click an unrecognized word to open a context menu (Figure 9).
You can click one of the suggested words to replace the underlined word with the one selected. If
the list does not contain the word you want, click Spelling to open a dialog. When the word is
corrected, the line disappears. If the word is correct but not in the dictionary, you can chose Add
to dictionary to add it.
Figure 9: Spelling context menu
To enable automatic checking, go to Tools on the Menu bar and select Automatic Spell
Checking, or click the Automatic Spell Checking icon (which may not be displayed by default)
on the Standard Toolbar, or go to Tools > Options > Language Settings > Writing Aids and
select Check spelling as you type in the Options list.
If the document has change tracking enabled, then the context menu contains extra options
relating to changes in the text.
The choices in the second and third sections of the menu are:
Ignore
This one instance of the underlined word will be ignored while the document is open. Other
instances, if they exist, will still be underlined. This setting is not stored with the document.
Checking spelling and grammar | 11Ignore All
All instances of the word in the document will be ignored, and the word will be added to the
IgnoreAllList user-defined dictionary.
Add to Dictionary
The word is added by default to the Standard dictionary.
Spelling
This choice opens the Spelling dialog, which is explained in the next section.
Always correct to
Selecting this opens the submenu, which repeats the suggestions for the word from the top
section listing. Selecting a replacement word here stores the word pair in the replacement
table under Tools > AutoCorrect > AutoCorrect Options > Replace. The underlined word
is replaced with the selected word.
AutoCorrect Options
Opens the AutoCorrect Options dialog (see page 19), where you can add your own
corrections or change those supplied with LibreOffice.
In the fourth section of the context menu, you can set language settings for the text. These
settings can be applied to the selection, or to the paragraph containing the selection.
Spelling and grammar
To perform a combined spelling and grammar check on the document (or a text selection), select
Tools > Spelling or click the Spelling button on the Standard toolbar, or press F7. In order to
use this feature, the appropriate dictionaries must be installed.
The Spelling tool checks either the document from the cursor point onwards, or the text selection.
It opens the Spelling dialog (Figure 10) if any unrecognized words are found or if any of the built-
in grammar rules are broken. You can choose to restart from the beginning of the document
when the check reaches the end of the document.
Figure 10: Spelling alert using the Spelling dialog
12 | Chapter 2 Working with Text: BasicsThe elements of the Spelling dialog are as follows.
Text language
The language to be used for the spelling checking can be selected from this list. If the spell
check is enabled for this language, a check mark is displayed in front of it.
Not in dictionary
The sentence containing the error is displayed in the pane. If an unrecognized word is
found, it is highlighted.
If the error is grammatical, then it is indicated in a pale colored bar below the Text language
setting (Figure 12). The sentence or the word can be edited in the pane.
Suggestions
The box contains suggested replacements for the highlighted word. Select a word and then
select Correct or Correct All to replace it.
For grammatical errors there is a single choice. Select Change to accept the suggestion.
Ignore Once, Ignore All, and Add to Dictionary
Clicking one of these buttons has the same effect as the item in the context menu
described above.
Ignore Rule
When checking grammar, you can choose to ignore the suggested change.
Correct
Replaces the unknown word with the suggested word. If the sentence was edited, the
whole sentence is changed.
For grammar, the suggested replacement is used to correct the text.
Correct All
This replaces all instances of the word with the selected replacement word. Not available
for grammar checking.
Always Correct
This behaves in a similar fashion to AutoCorrect.
Undo
This button is enabled when a change has been made to the sentence, so you can reverse
the change. The button is not available if you use a Correct button to replace a word.
Options
Click this button to open the Options dialog where you can select user-defined dictionaries
and set the spell checking rules.
Grammar
By default, Check grammar as you type is enabled in Tools > Options > Language Settings >
Writing Aids > Options. Automatic Spell Checking must be enabled for this to work.
If any errors are detected, they are shown underlined by a wavy blue line. Right-clicking on this
line brings up a context menu which may be similar to one of those shown in Figure 11.
The first entry in the menu describes the suspected broken grammatical rule.
The second menu item in the left example is Explanations, which opens your browser to a web
page offering more information about the error. This entry is not always present in the context
menu, as seen in the second example in Figure 11.
Checking spelling and grammar | 13Figure 11: Context menu for grammar errors
In the second section of the menu is the suggested correction. Clicking this changes the text to
the suggestion. The example to the right appears blank, but clicking here removes the extra
space causing the error.
In the third section of the menu you can choose to ignore the indicated error, or to open the
Spelling and Grammar checker, shown in Figure 12. The example displays the URL that will take
you to more information on the error indicated.
In the final section of the menu, you can set the language for the selection or the paragraph.
Figure 12: Dialog showing the URL for expanded explanation
English sentence checking
Additional grammar checking rules can be selected through Tools > Options > Language
Settings > English sentence checking, or through Tools > Extension Manager > English
spelling dictionaries > Options.
On the English Sentence Checking page, you can choose which items are checked for,
reported to you, or converted automatically. Select which of the optional features you wish to
check.
After selecting the additional grammar checks, you must restart LibreOffice, or reload the
document, for them to take effect.
14 | Chapter 2 Working with Text: BasicsFigure 13: Additional grammar checking options
Grammar checking
Possible mistakes
Checks for errors such as with it's, he don't, this things and so on.
Capitalization
Checks for the capitalization of sentences.
Word duplication
Checks for all word duplication, rather than just the default words 'and', 'or', 'for' and 'the'.
Parentheses
Checks for correct pairing of parentheses and quotation marks.
Punctuation
Word spacing
This option is selected by default. It checks for single spaces between words, indicating
instances of double or triple spaces. To find and correct longer groups of spaces, you need
to run the checker more than once.
Quotation marks
This checks that double quotation marks are typographically correct, that is, beginning [“]
and ending [”] quotation marks curve in the correct directions.
Sentence spacing
Checks for a single space between sentences, indicating when one or two extra spaces are
found.
Apostrophe
Replaces an apostrophe with the correct (curved) typographical character.
More spaces
Checks word and sentence spacing for more than two extra spaces.
Em dash; En dash
These options force a non-spaced em dash to replace a spaced en dash, or force a spaced
en dash to replace a non-spaced em dash, respectively. This feature provides for different
punctuation conventions.
Multiplication sign
This option is selected by default. It replaces an 'x' used as a multiplication symbol with the
correct typographical symbol.
Checking spelling and grammar | 15Ellipsis
Replaces three consecutive periods (full stops) with the correct typographical symbol.
Minus sign
Replaces a hyphen with the correct minus typographical character.
Others
Convert to metric; Convert to non-metric
Converts quantities in a given type of unit to quantities in the other type of unit.
Thousands separation of large numbers
Depending on the locale setting for the document, converts a number with five or more
significant digits to either use a comma as a thousands separator or the ISO format, which
uses a narrow space as a separator.
Using synonyms and the thesaurus
You can access a short list of synonyms from a context menu (Figure 14).
1) Right-click a word and point to Synonyms on the context menu. A submenu of alternative
words and phrases is displayed.
2) Click a word or phrase in the submenu to have it replace the highlighted word or phrase
in the document.
Figure 14: Synonyms on the context menu
The thesaurus gives a more extensive list of alternative words and phrases. To use the
thesaurus:
1) Right-click on a word, point to Synonyms in the context menu, then click Thesaurus in
the Synonyms submenu. See Figure 14.
2) In the Thesaurus dialog (shown in Figure 15), click a word or phrase in the list of
meanings to select it.
3) Click Replace to make the substitution.
16 | Chapter 2 Working with Text: BasicsFor example, when given the word house, the thesaurus offers several meanings, including
dwelling, legislature, sign of the zodiac, and others. Select a replacement word from the list under
the relevant meaning, so for dwelling, you will see dwelling, home, domicile, abode, and other
alternatives.
Note
If the current language does not have a thesaurus installed, this feature is disabled.
Figure 15: The thesaurus offers alternatives to words
Hyphenating words
You have several choices regarding hyphenation: let Writer do it automatically (using its
hyphenation dictionaries), insert conditional (soft) hyphens manually where necessary, or do not
hyphenate at all. Each choice has its pros and cons.
Automatic hyphenation
This option over-rides the Tools > Options choices described on the next page.
To turn automatic hyphenation of words on or off:
1) Click the Styles tab on the Sidebar to open the Styles deck. On the Paragraph Styles list,
right-click Default Paragraph Style and select Modify (see Figure 16).
2) On the Paragraph Style dialog (Figure 17), select the Text Flow tab.
3) Under Hyphenation, select or deselect the Automatically option.
4) Click OK to save.
Hyphenating words | 17Figure 16: Modifying a paragraph style
Figure 17: Turning on automatic hyphenation
Note
Turning on hyphenation for the Default Style paragraph style affects all other
paragraph styles that are based on Default Style. You can individually change other
styles so that hyphenation is not active; for example, you might not want headings to
be hyphenated. Any styles that are not based on Default Style are not affected. For
more on paragraph styles, see Chapters 8 and 9 in this book.
You can set hyphenation settings in Tools > Options > Language Settings > Writing Aids.
These choices apply when there is no specific setting in a paragraph style. Hyphenation options
set in Writing Aids are effective only if hyphenation is turned on through paragraph styles.
In Options, near the bottom of the dialog, scroll down to find the hyphenation settings.
Figure 18: Setting hyphenation options
To change the minimum number of characters for hyphenation, or the minimum number of
characters before or after a line break, select the item, and then click the Edit button in the
Options section.
Hyphenate without inquiry
Specifies that you will never be asked to manually hyphenate words that the hyphenation
dictionary does not recognize. If this box is not selected, when a word is not recognized, a
dialog will open where you can manually enter hyphens.
Hyphenate special regions
Specifies that hyphenation will also be carried out in footnotes, headers, and footers.
18 | Chapter 2 Working with Text: BasicsManual hyphenation
To manually hyphenate words, do not use a normal hyphen, which will remain visible even if the
word is no longer at the end of a line when you add or delete text or change margins or font size.
Instead, use a soft hyphen, which is visible only when required.
To insert a soft hyphen inside a word, click where you want the hyphen to appear and press
Ctrl+hyphen (minus sign) or use Insert > Formatting Mark > Insert soft Hyphen. The word will
be hyphenated at this position when it is at the end of the line, even if automatic hyphenation for
this paragraph is switched off.
Using AutoCorrect
Writer’s AutoCorrect function includes a long list of common misspellings and typing errors, which
it corrects automatically. For example, “hte” will be changed to “the”. It also includes codes for
inserting special characters, emojis, and other symbols.
AutoCorrect is turned on when Writer is installed. You may wish to disable some of its features,
modify others, or turn it off completely.
You can add your own corrections or special characters or change those supplied with
LibreOffice. Select Tools > AutoCorrect > AutoCorrect Options to open the AutoCorrect dialog.
On the Replace tab, you can define what strings of text are corrected and how.
Figure 19: Replace tab of AutoCorrect dialog
Using AutoCorrect | 19To stop Writer replacing a specific spelling, go to the Replace tab, highlight the word pair, and
click Delete. To add a new spelling to the list, type it into the Replace and With boxes on the
Replace tab, and click New.
To turn AutoCorrect off, uncheck Tools > AutoCorrect > While Typing.
See Chapter 4, Formatting Text: Basics, for discussion of the Options and Localized Options tabs
of the dialog.
Using Word Completion
If Word Completion is enabled, Writer tries to guess which word you are typing and offers to
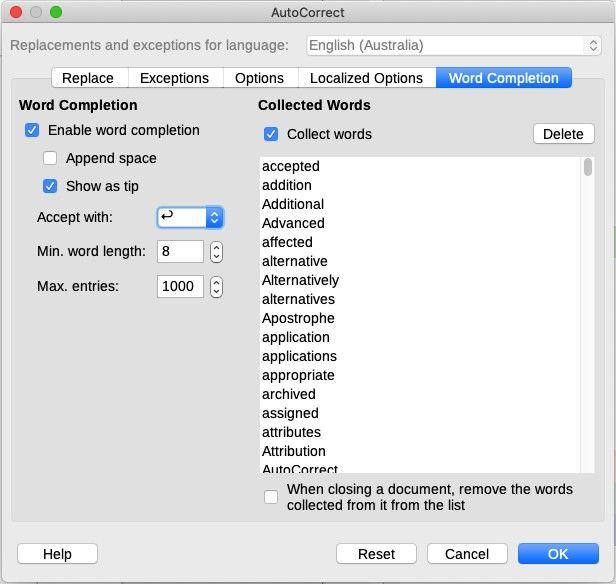
complete the word for you. To accept the suggestion, press Enter. Otherwise, continue typing.
To turn off Word Completion, select Tools > AutoCorrect > AutoCorrect Options > Word
Completion and deselect Enable word completion.
Figure 20: Customizing word completion
You can customize word completion on the Word Completion page of the AutoCorrect dialog
(Figure 20):
• Add (append) a space automatically after an accepted word.
• Show the suggested word as a tip (hovering over the word) rather than completing the
text as you type.
• Collect words when working on a document, and then either save them for later use in
other documents or select the option to remove them from the list when closing the
document.
• Change the key that accepts a suggested entry; the options are right arrow, End key,
Enter (Return), Space bar, and Tab.
20 | Chapter 2 Working with Text: Basics• Change the maximum number of words remembered for word completion and the length
of the smallest words to be remembered.
• Delete specific entries from the word completion list.
Note
Automatic word completion occurs only after you type a word for the second time in
a document.
Using AutoText
Use AutoText to store text, tables, fields, graphics, and other items for reuse and assign them to
a key combination for easy retrieval. For example, rather than typing “Senior Management” every
time you use that phrase, you can set up an AutoText entry to insert those words when you type
“sm” and press F3.
AutoText is especially powerful when assigned to fields. See Chapter 17, Fields.
Creating AutoText
To store some text as AutoText:
1) Type the text into your document.
2) Select the text.
3) Go to Tools > AutoText (or press Ctrl+F3).
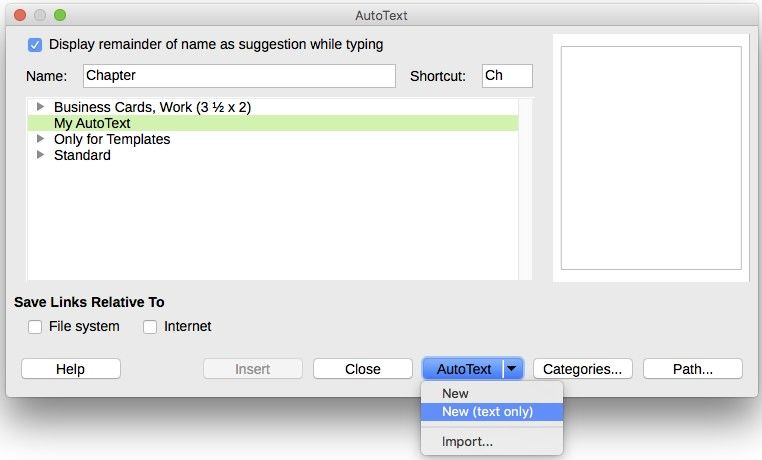
4) In the AutoText dialog (Figure 21), type a name for the AutoText in the Name box. Writer
will suggest a one-letter shortcut, which you can change.
Figure 21: Defining a new AutoText entry
5) Choose the category for the AutoText entry, for example My AutoText.
6) Click the AutoText button at the bottom of the dialog and select from the menu either
New (to have the AutoText retain specific formatting, no matter where it is inserted) or
New (text only) (to have the AutoText take on the formatting around the insertion point).
Using AutoText | 217) Click Close to return to your document.
Tip
If the only option under the AutoText button is Import, either you have not entered a
name for your AutoText or there is no text selected in the document.
To save a table as AutoText:
1) Create a table and format it the way you want.
2) Select the table.
3) Go to Tools > AutoText (or press Ctrl+F3).
4) Type a name for the AutoText (or amend the suggested shortcut and choose the category
for the AutoText entry).
5) Click the AutoText button and select New (because you want the formatting of the table
preserved).
6) Click Close to return to your document.
Inserting AutoText
To insert AutoText, type the shortcut and press F3.
Printing a list of AutoText entries
To print a list of AutoText entries:
1) Choose Tools > Macros > Organize Macros > Basic.
2) In the Macro From list, find and expand Gimmicks.
3) Select AutoText and then click Run. A list of the current AutoText entries is generated in
a separate text document. You can then print this document.
Figure 22: Basic Macros dialog
22 | Chapter 2 Working with Text: BasicsChanging the case of selected text
To quickly change the case of text, select it, choose Format > Text on the Menu bar, and then
choose one of the following:
• UPPERCASE, where all letters are capitalized.
• lowercase, where no words (except proper nouns) are capitalized.
• Cycle Case, which cycles the selected words through uppercase, lowercase, and
capitalize every word.
• Sentence case, where only the first word is capitalized (together with any proper nouns).
• Capitalize Every Word, where every word is capitalized.
• tOGGLE cASE, which changes every letter to the opposite case.
• Small capitals, which capitalizes all letters in a reduced font size.
The Format > Text menu also includes several manual formatting options, including bold, italic,
and superscript. If Asian language support has been enabled, there are also several options that
are used with Asian text: half-width, full-width, Hiragana, and Katakana.
Writer does not have an automated way to do Title Case, where all words are capitalized except
for certain subsets defined by rules that are not universally standardized. However, you can use
Capitalize Every Word and then restore those words that you do not want capitalized.
You can also change the case of text using the Character dialog or a character style. Choose
Format > Character, click the Font Effects tab (Figure 23), then select the type of capitalization
in the Effects – Case: box.
Figure 23: Changing the case using the Character dialog
Changing the case of selected text | 23You can also read


