Poison centre notifications - A GUIDE TO DOSSIER PREPARATION AND SUBMISSION - Poison Centres
←
→
Page content transcription
If your browser does not render page correctly, please read the page content below
Poison centre notifications
A GUIDE TO DOSSIER PREPARATION AND SUBMISSION

Version 2.1 May 2020

Slide 2

Table of contents

Getting access…………………………………………………………………………………………………. 3
ECHA Submission Portal for poison centre notifications………………………………… 10
Guided dossier preparation for PCN submissions ………………………………………….19
Dossier preparation: ‘Mixture information’…….…………….………………………………..30
          Reporting mixture (in mixture) components ………………………………… 42
          Reporting substance components…………………………………………………….45
          Reporting generic product identifier components……………………………51
Dossier preparation: ‘Product information’…………………………………………………….54
Validate information, create dossier and preview notification………………………62
Updating dossier information………………………………………………………………………….70
Slide 3

       Getting access

       This chapter describes the process how to create an ECHA Account and link the
       legal entity information. This allows to use the tools for the preparation and
       submission of notifications.

Version 2.1 May 2020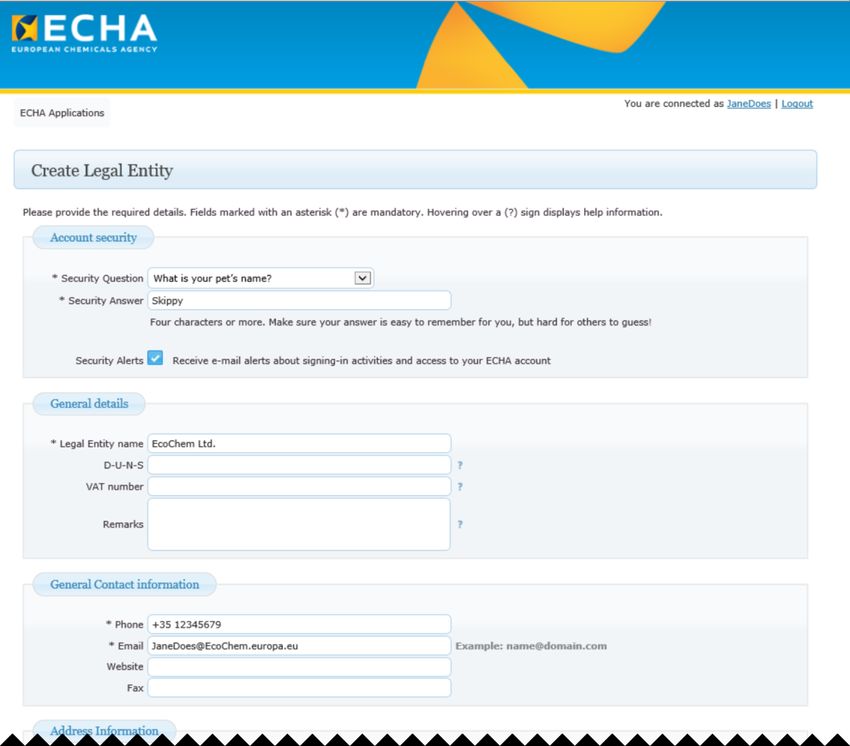
Slide 4

    Creating an ECHA account
                                                         ! Using the latest version of                             Enter all the
                                                         Chrome, Firefox and Microsoft                             information
                                                         Edge guarantees the best user                             requested for
                                                         experience.                                       3       your user.
You must create an ECHA Account if you
want to use the ECHA Cloud Services for
preparing your notifications.

The ECHA Accounts Login page is located at
https://idp-industry.echa.europa.eu/idp/
                                                 1

                                                                                                                   4
                                                                                                                              Click Save. A message will
    If you do not have a valid username and
    password, then you will need to register a       2                                                                        appear prompting you to
                                                                                                                              verify the given email
    legal entity by creating an account.
                                                                                                                              address before continuing.

                                                                                         You can find more detailed
                                                                                         information about managing your
                                                                                  5      account in the ECHA Accounts
                                                                                         Manual.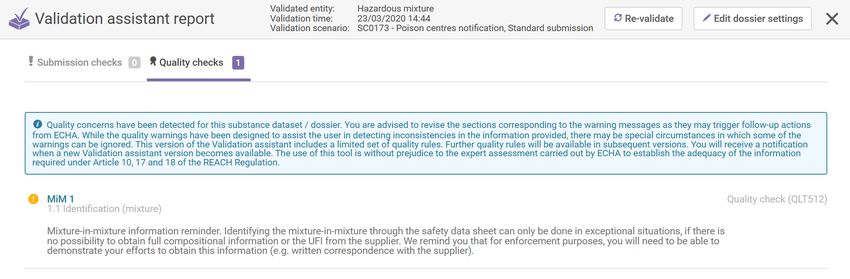
Slide 5

                                                                                       Enter as much
                                                                                       information as possible
                                                                                       for the legal entity and
                                                                                       press Save.
                                                                                   2
Assign the Legal Entity                                                                             3

Once you have created an ECHA Account, it needs to have a legal
entity (LE) assigned to it. Then you will be able to access the
ECHA IT applications.
A legal entity may represent anything between a complex
business structure and a simple organised business, for example,
to a corporation, a company, or a single person.
The first user associated with a legal entity is a legal entity
manager.

                                              If you do not have an existing
                                              legal entity to import (created in
                                              IUCLID) you can select Encode
                                              Legal Entity and enter the
                                              details.
                                 1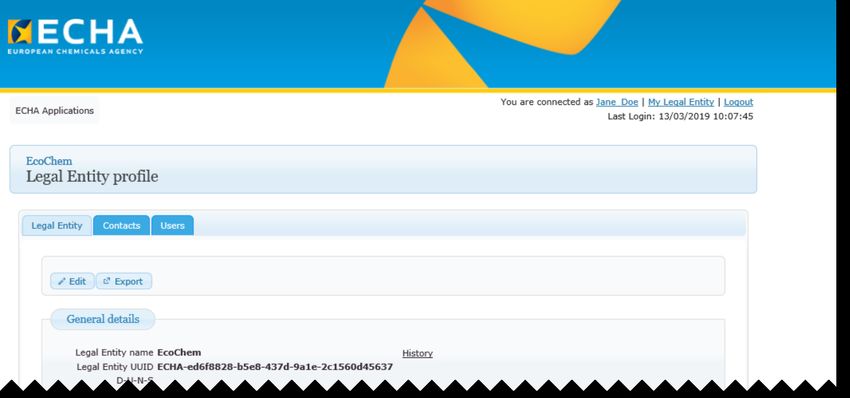
Slide 6

     ECHA Accounts navigation

                                          Clicking on the user name allows you
                                          to review and edit the user
                                          information.

Clicking ECHA Applications                                                       Clicking on My Legal Entity allows you to view,
redirects you to the list of                                                     edit and export the Legal Entity Profile
ECHA IT applications,                                                            information (if the user role permits). Here new
including the ECHA                                                               users can be added or deleted, and their roles
Submission Portal.             In this tab, as legal entity                      defined by the ‘legal entity manager’.
                               manager, you can add new
                               users; manage user roles,
                               and delete outdated users.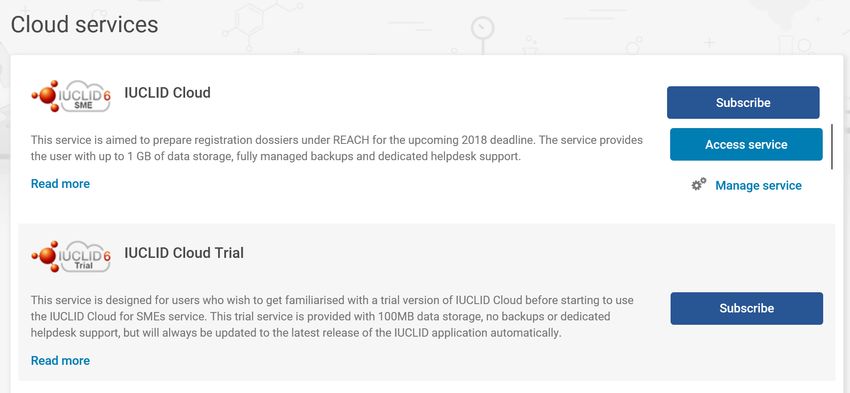
Slide 7

Assigning a foreign user
It is possible to add a foreign user, or a ‘third party’,
in ECHA Accounts. This user can work on behalf a
company using the IUCLID Cloud and ECHA
Submission portal.

The foreign user can be, for example, a consultant or
a mother company working on behalf a subsidiary.

The foreign user will also be able to see in ECHA           You can choose the type of LE
Accounts the list of legal entities for which he works.     that you want to add: foreign
                                                            user, or personal account.

! If the legal entity of the submitter does not match
the legal entity of the dossier (mixture level), the
error BR570 will be triggered. It will appear in the
validation report, and the submission will fail – you
can find instructions in the PCN: practical guide at
https://poisoncentres.echa.europa.eu/echa-
submission-portal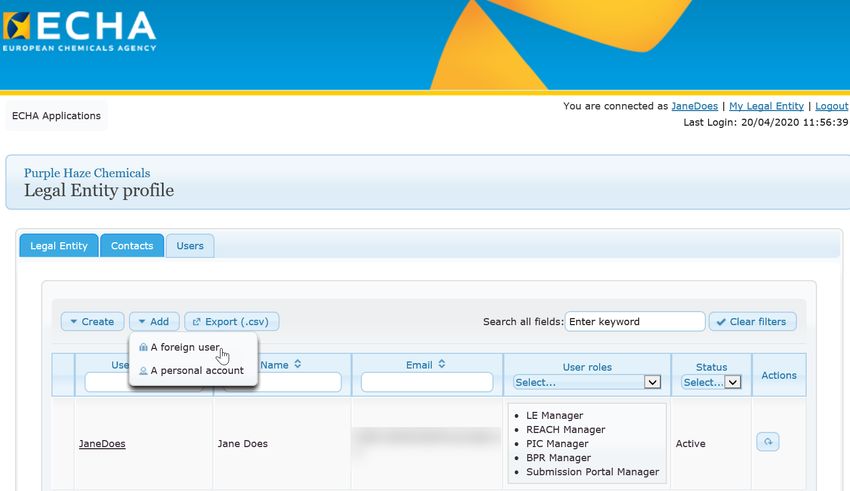
Slide 8

Defining the user roles
The user roles define the user access level within the ECHA IT applications. The PCN related roles include:
• LE manager: ’legal entity manager’, can view and edit the LE account and add, remove or edit user’s data and contacts.
• Submission portal manager: can make submissions through ECHA Submission portal.
• IUCLID full access: can prepare submissions online in IUCLID Cloud.                                  Enter all the user information details for
                                                                                                       the new user and indicate the type, or
• IUCLID trial: can work in the trial version of the IUCLID Cloud.                                     types, of roles that the user should have.
• ‘Reader’ and ‘Read’ roles are entitled to read-only access.                                          Press Save, and the user will appear in
                                                                                                       the users list under the User tab.

                                                                                              3
                          The Users tab allows you                                                               It is advisable to have at least two users
                 1        to create new users and                                                                with the ‘LE manager’ role per legal
                          manage their roles.                                                                    entity. This will ensure that, if there are
                                                                                                                 personnel or organisational changes,
                                                                                                                 there is more than one user who can
2                                                                                                                create or modify the accounts.

                                                                                                       4                        Select the relevant
           Click on Create to open the
           ‘Add new user’ form.                                                                                                 user roles from the
                                                                                                                                available list using the
                                                                                                                                arrow buttons.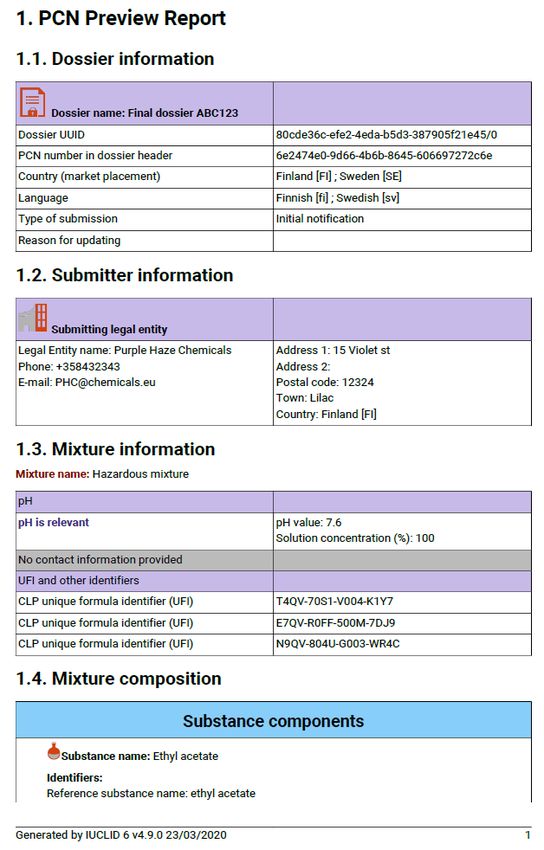
Slide 9

Terms and conditions

                       First time users will be required to accept
                       the terms and conditions of each
                       application before being able to proceed.

                       To view the full terms and conditions, click
                       on the hyperlink.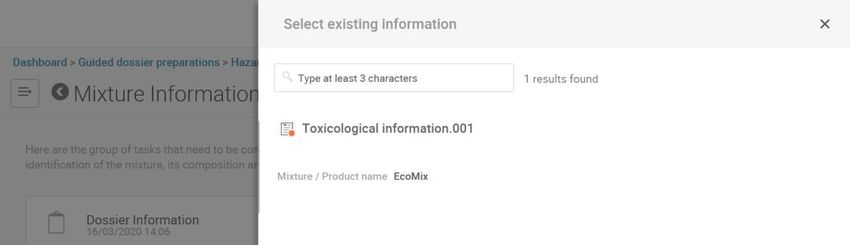
Slide 10
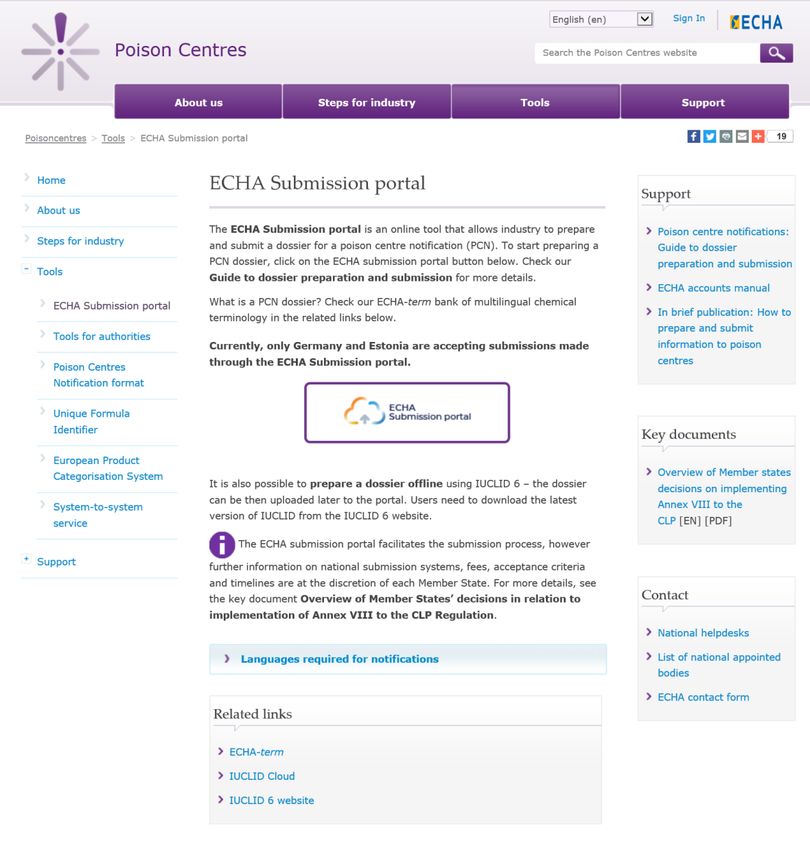
ECHA Submission portal
for poison centre notifications
A navigational guide around the ECHA Submission portal; highlighting the three
pillars of the notification process:
• dossier creation
• dossier submission
• searching for notifications
Version 2.1 May 2020Slide 11
ECHA Submission portal webpage
The ECHA Submission portal webpage is available from the
ECHA Poison Centre website, and directly at:
https://poisoncentres.echa.europa.eu/echa-submission-portal
You can find links to key documents and support on the right
hand side of the page, and additional related links at the
bottom.
! Refer to the Overview of Member States decisions on Log in to the ECHA
implementing Annex VIII to the CLP key document which Submission portal here.
details which Member States are ready to receive notifications
submitted through the ECHA Submission portal.
Overview of Member
states decisionsSlide 12
ECHA Submission portal landing page The user icon displays the name and legal
entity of the user. When clicked on, opens
The bell icon will alert a new window for redirection to the ECHA
The portal navigation bar directs you to the you, for example, when Cloud dashboard, accounts management
‘Upload and submit’ page, or to the ‘Create new versions have been and the logout functionality.
dossier online’ page, using IUCLID Cloud. released.
The dialogue icon
leads you to external
2 sources of information,
such as tutorials.
1
The ECHA Submission 4
portal landing page
directs you to the Search 3 The Submission list is empty
submission page. until you make a submission.
Click here to expand or collapse the
search criteria window.Slide 13
ECHA Submission portal Search page
Click on the submission number
to view the submission report. All the submissions made
by the active legal entity
will be listed here. You can
use the ‘Sort by’
Symbol for submission update functionality or scroll
through the pages at the
bottom of the page.
Symbol for initial submission
Indicators on the status of the submission:
‘’ indicates a successful submission.
‘X’ indicates a failed submission.
‘!’ indicates a successful submission but
which contains warnings.
In some cases the system may be
processing the submission and the status is
pending – indicated by the circular waiting
symbol.Slide 14 Submission number, PCN number, UFI – which is which? Submission number: Number automatically assigned by the ECHA Submission portal after a submission. This number can be used to track or monitor a submission if any issues arise during the submission process. For example: RMH755489-94 PCN number: Number assigned to an initial notification and used by poison centres to track all related notification updates. A PCN number can be generated either in the dossier preparation tools, or by you, using one of the UUID generators available online, for example, https://www.uuidgenerator.net/. An example of a PCN number is 5b2faca2-fc5b-4c6b-9c64- 84de096ae811 Related PCN number: A related PCN number is in essence a new PCN number required for an update notification (where the mixture composition has significantly changed). This related PCN number must refer to the previous PCN number in the updated notification. Unique formula identifier (UFI): The UFI is a 16-character alphanumeric code with a defined format (for example: P200- U0CW-500A-QVFJ). The UFI is required in the notification and on the label of your products. You can generate the UFI using the UFI Generator tool available from ECHA’s Poison Centre Website https://poisoncentres.echa.europa.eu/ufi-generator
Slide 15

                                                Validation succeeded - the submission has passed the validation checks. The dossier has been
                                                dispatched and is available to Member States for download.
                                                Validation succeeded ! - the submission has passed the validation checks with warnings. A validation

 The submission report
                                                report listing potential deficiencies will be available for the submitter and the receiving Member State.
                                                Validation failed X - the dossier has failed the validation checks and has not been forwarded to the
                                                relevant Member State(s). A validation report listing the deficiencies is available for the submitter, who
                                                will need to make a new submission .

                                                                                        Submitter information and legal
           The submission number is                                                     entity UUID.
           automatically assigned by the
           system.

                                                                                                        Here are listed the receiving Member
                                                                                                        States for the notification.
     The submission information displays
     all the information related to the
     submission, including the PCN number
     for the notification. The PCN number                                                               The time stamped events in the
     is a link displaying all the submissions                                                           submission process. The event when
     related to that number.                                                                            a dossier has been downloaded by
                                                                                                        the Member State will also be shown
                                                                                                        here.
               The product information
               contains the trade name(s)
               and the UFI(s) for the
               mixture.

The submission history displays how
submissions are related to each other such
as: initial, updates, and new notifications
after significant change of composition
Slide 16
Once the correct file has been
selected for upload, it will
appear here. If it is not the
correct file, simply click on
Remove and upload again.
Upload and submit 2
3
When everything is ready,
Submit the dossier!
1
To submit a PCN dossier, you
4 Following submission, the
submission portal will
need to first upload it here by assign a submission
using either selecting the number.
relevant file using the Browse
button or the ‘Drag and drop’
functionality.Slide 17 Create dossier online From here, you can navigate to IUCLID Cloud for the online preparation and creation of a dossier.
Slide 18

ECHA Cloud Services Dashboard
Once you have successfully logged into the system, the ECHA Cloud Services Dashboard page opens. The IUCLID Cloud service allows the
online preparation of a dossier by a ‘guided dossier preparation’ wizard. The IUCLID Cloud Trial service, however, is used only for training
purposes to get more familiar with the tool.
Only legal entity managers have the rights to subscribe to a service. For other users, this functionality will not be visible.

                                                                                                                   You will first need to
                                                                                                                   perform a one-time
                                                                                                                   subscription to use the
                                                                                                                   particular service.
                                                                                                             1
                                                                                                                   Once subscribed, you
                                                                                                                   can access and manage
                                                                                                            2      the service.

                                                                                                                     ! Please note that the Trial service
                                                                                                                     allows you to get familiar with the
                                                                                                                     tool. It is not a test version for
                                                                                                                     submissions. Any submission made
                                                                                                                     within will be forwarded to the
                                                                                                                     Member State selected.
Slide 19
Guided dossier preparation for PCN submissions
An overview of the features and functionalities in IUCLID Cloud to help you get
started with the preparation, validation and creation of a PCN dossier.
Version 2.1 May 2020Slide 20
The top bar always contains
The IUCLID Dashboard for dossier preparation the same options throughout
the guided dossier preparation.
The IUCLID Dashboard page is displayed after logging in and accessing the service.
The user icon displays the
name of the user and
You can return to the company name of the
Dashboard from submitting legal entity.
anywhere in the
interface by clicking
on the Cloud icon.
You can search for dossiers
There is always a link using their UUID.
to the main menu by
the three lines icon at
the left of the header.
The Import area allows
This area is used for data you to upload IUCLID
entry and navigation files by the browse
between the various IUCLID functionality or ‘drag
entities: dossier under and drop’.
preparation; substance
datasets; mixture datasets,
and articles.Slide 21
The dialogue icon leads
The dashboard top user bar
to external sources of
information on using The user icon displays the name and legal
ECHA Cloud services, entity of the user. When clicked on, opens
such as tutorials. a new window for redirection to the ECHA
Cloud dashboard and to the search page
of the submission portal, accounts
management and the logout functionality.
The quota icon
displays the available
user storage quota.
The ’Switch legal entity’ feature can
be used by, for example, a third
party working on behalf of a duty
The bell icon will alert you, holder, using the foreign user
for example, when new functionality.
versions have been
released.
In the dashboard, the consultant can
select the legal entity on whose
behalf he will work on when using
this feature.
! The legal entity UUID of the logged in
user’s company must match the legal
entity UUID in the PCN dossier (Mixture
level). If there is a mismatch, the
dossier will fail the Business rule
BR570.Slide 22
Initiating a guided dossier preparation
This is the Guided dossier preparation page which contains a list of all the dossiers under preparation that have been initiated. To initiate
the dossier preparation for a poison centre notification, click +New and select ‘PCN submission’.
By clicking on +New, and
selecting the relevant item,
you can initiate the
preparation of a new dossier
for a PCN submission.
This is the name of the
mixture to which the
Guided dossier
preparation refers to. Click anywhere here to resume
This name is created preparation of a dossier
when you select a new previously started.
‘PCN submission’.
Clicking delete will
permanently delete a
dossier in preparationSlide 23
Establishing the submission context for a mixture – step 1
Once you initiate a dossier preparation for a PCN submission, the submission context is defined in a two-step process: Specify
your mixture, and Dossier information.
Specify your mixture by either:
1 • Selecting from your inventory of existing
mixtures (this is possible for update
notifications), or notifications following a
significant change in composition, OR
• Entering a name for your mixture, to encode a
new one.
Here you can optionally provide the name of the
dossier. This may help you identifying the stage of the 2
life cycle of the project. For example:
My hazardous mixture’s name_initial submissionSlide 24
Dossier information
Generate and assign a PCN number to
This page is called the Dossier Header the initial notification by clicking on the
page. It collects the information required circular arrows. This number will be
to define the dossier so as to configure used by poison centres to track all
related notification updates.
the relevant dossier fields (for example,
for multilingual support), as well as
determine the specific validation rules.
For example, if limited submission is
selected, then an emergency contact(s)
must be provided.
Please consult the Guidance for Annex
VIII to the CLP for full details on
information requirements and submission
types: https://echa.europa.eu/guidance-
Make a selection in the drop
documents/guidance-on-clp
down list for every country
(market placement) you
The language selection is intend to place the mixture on.
required. It is used to determine
the multilingual fields where you
need to provide information as
free text.Slide 25
Guided dossier preparation ’navigation page’
The navigation page for the mixture allows easy movement from the main functionalities: data entry, validation and dossier creation. You
need to provide data entry in two main sections: one for the mixture and one for the product. Each section is comprised of a series of tasks
and sub-tasks.
Breadcrumbs refers to the path to a You can switch to the dataset view using
page in the interface that is shown in this functionality. To return to the Guided
the application bar. The links provide a dossier preparation view, you will need to
convenient way to navigate to previous go back to the dashboard and search
pages in the interface. under ‘Guided dossier preparations’.
The Delete button will
delete the dossier
preparation for the
mixture.
There are two main task
groups which contain specific
tasks and sub-tasks.
Here is a list of links to
support you in the poison
Link to the ECHA
centre notification process.
Submission portal
See more on the
Preview notification
See more on functionality.
The validation See more on Creating and
assistant. exporting the dossier.Slide 26
The task page
A specific task page exists for the Mixture
information and the Product information.
Here, in the Mixture information task
page, is a list with the six tasks that you
are required to complete for this section.
Each task requires to first create a new
record (in some cases, multiple records
are allowed) which acts as a page where
information can be entered in specific The number indicates how many
records have been created for a
fields. Records can also be created from
particular task. In some cases, for
existing information, where it is copied example pH, classification and
from another dossier. labelling, and toxicological
information, only allow the
creation of a single record.
The information contained in a record
can be viewed and updated. You can
delete records if needed.Slide 27
Moving between tasks
When finishing each task, the system will take you to the record view. Here you can add records or delete them. You can also move on to
the following task, or any other, by clicking on its name on the right-hand side list of tasks.
List of tasks when
filling the Mixture
Information. The one
without a dot is the
one you are working
with now.Slide 28
The record has been created and
you can now enter the
information. Click on Finish at the
bottom of the page to ensure the
Creating a new record entered information is saved.
2
Hover the mouse over the relevant
task, e.g. Toxicological information,
and click on Provide information.
The dedicated page for entering the
information will open.
1
Once you have saved
the record, it is possible
to remove it by clicking
on the X. Note that the
+Record button is
disabled as this task can
refer to only one
document, meaning it is
3 ‘fixed’.Slide 29
A list of available records, if any,
will appear. Scroll through the
existing records and select the
Creating a record from existing information
relevant record by clicking
anywhere in the document bar
area.
2
Hover the mouse over a specific task,
e.g. Toxicological information, and click
on Use existing information, a sliding
window will appear on the left of the
screen and display the records available
for ‘copying’ existing information from.
A single Toxicological
information record, now created
1 and pre/populated, is visible in
the task list. The record should
be opened and checked for
accuracy and completeness.
3Slide 30
Dossier preparation:
‘Mixture information’
An overview of how to use IUCLID to complete the tasks in the Mixture information section for
the preparation of a PCN dossier. Full details on the information requirements can be found inthe
Guidance on harmonised information relating to emergency health response at:
https://poisoncentres.echa.europa.eu/guidance
Version 2.1 May 2020Slide 31
The back button is useful to
navigate back from sub-tasks
and tasks.
Mixture information task page
The number indicate
how many records have
been created for each
task.
Clicking on ‘Mixture information’ from the dossier
preparation navigation page, redirects to the
Mixture information task page, listing the six tasks
(some tasks contain additional sub-tasks) that are
required to be completed for this sectionSlide 32
The ‘Contact person(s)’ task
Select the contact person type from the
picklist by clicking on ‘Please select’.
Then enter the information in as many
A Contact person record is used to record the fields as possible for the sake of
person's role and contact, for example, an completeness.
emergency contact in the case of a limited
submission.
1
If the Contact type picklist does not contain
the correct type of contact you wish to
specify, you can select ’Other’ and enter the
information in the free text field.
2
For limited submissions to multiple
Member States, the ‘Country’ field is
Click on Finish at the 3
bottom of the page and the
used to identify the relevant market area
information will be saved in
for each emergency contact – see
a single record. You will
Providing emergency contacts.
have the opportunity to
create additional records to
indicate more contact
persons.Slide 33
Providing emergency contacts
! An ‘Emergency contact’ person is always required for limited submissions. If the mixture is placed on the market in a single
market area, then you must provide only one emergency contact record containing this information. If the submission is for multiple
market areas, then you need to provide multiple Contact person(s) records. Each record will contain the ‘Emergency contact’ person
information for each country, specified in the ‘Country’ field, even if the same details are applicable for all the countries. See below
how to add additional contact person records.
To indicate additional contact type
records, click the + button and select
Provide additional information.
To remove a contact person
record, click on the X button and
select Remove.Slide 34
The ‘pH’ task
If the pH cannot be measured, you
must tick the ‘pH is not relevant’ box.
You should not indicate a pH value
nor a solution concentration.
Once you have clicked on the pH task from the
task list, you are directed to the data entry page.
To indicate the exact pH value, only a single 3
entry is required:
A pH value (and operators)
must be provided. You can
1
provide an exact value or a
range.
2
When you provide the pH value,
the solution concentration must
4
be given in any case.
Click on Finish to save
your entries and move
to the next task.Slide 35
The ‘Toxicological information’ task Although it is not mandatory
information, you can upload
here the safety data sheet.
Only one toxicological record can be created from the
mixture information task. However, if the submission is for
multiple markets or is a submission that requires more than
one national language, then this information must be given 2
for each language requirement.
In all cases, this section must include the information on the
toxicological effects of the mixture, or its components, as
required in Section 11 of the safety data sheet for the
mixture.
Enter the required toxicological
You must ensure that the information entered here is ‘stand information as free text (tables
alone’ information and does not contain, for example, cross- are allowed) for every 1
language requirement. In
references to other sections of the SDS. this example, in Finnish and
Swedish.
! If your mixture/product is related to a multi-component
product, then all relevant information (e.g. on the mixture
created upon use) should be included in the toxicological
information field.Slide 36
The sub-tasks for mixture
components are further
The ‘Mixture composition’ task
explained - see Mixture (in
mixture) components.
The Mixture composition task contains additional sub-tasks to define the
components of the mixture. Mixture components can be either
substances, other mixtures (referred to as mixture in mixtures or MiMs)
or generic product identifiers (GPIs).
The sub-tasks for substance
components are further
explained - see Substance
components.
The sub-tasks for GPI
components are further
explained – see GPI
components.Slide 37
The ‘UFI and other identifiers’ task
The UFI task is the repository of all the UFIs associated to a single mixture composition in the notification. The relevant UFIs can be entered
here but note that they must be referenced or ‘linked’ to a product(s) in the Product information section. It is also possible to enter the UFIs in
the Product information section. In any case, they will be visibly stored in the UFI task here.
To report a single UFI, click
on +New to open the data
entry window. Select CLP Unique Formula
Identifier (UFI).
1 2
The UFI assigned to the mixture
must be reported in the Id field in
the correct format, for example:
3 E200-U0CW-500A-Q27E
5
4
‘Other IT system identifiers’ is a
non-mandatory field to specify other Clicking Close, saves
identifiers you wish to include, for
example, national notification
6 the information and
redirects back to the
number. Clicking Finish saves the information entered for UFI record where the
this record and redirects back to the UFI task item will now be listed.
page where the record is displayed. Additional
records can be created.In this example, multiple records
Slide 38
exist; each record consists of one
UFI item. When you create
additional records, they are listed
together here, on the UFI task page.
Reporting multiple UFIs for the mixture
a
Multiple UFIs can be included in a notification in a flexible way,
depending on your business needs. There are two ways to report them,
either
a) Multiple UFI records exist each containing one UFI item
b) A single UFI record exists which contains multiple UFIs items
The way in which multiple UFIs are recorded depends on the preferred
method of assigning each UFI to a specific product.
Information on assigning UFIs to individual products is covered in the
Product information section of this document.
b
In this example, one UFI record is
created and multiple UFI items are
added. When you create additional
items, they are listed together from
within the record.Slide 39 The ‘Classification and labelling’ task Only a single classification and labelling record can exist for a mixture for a standard submission. The following slides will cover the classification and the labelling separately. If your mixture is not classified for any physical, health or environmental hazards, select Not classified. This selection freezes the classification fields. Environmental hazards may be included, but are not mandatory to indicate. ! If you are preparing a multimarket submission covering several languages, then multilingual text will be required to complete this section.
Slide 40

‘Classification’
Enter the classification of your mixture by providing the Hazard category
and statements, and any other relevant additional information.
                                                                                     Select the hazard category and statement
                                                                                     for each of the hazard classes your mixture
                                                                                     falls under, selecting from the pick list.
                                                                                     Typing part of the hazard category name or
                                                                                     number will filter the result list.

                     1

                                                                                 2
                                         Some health hazards contain free text
                                         fields to include information, for          3
                                         example, about the effected organs or
                                         specific effects. This information
                                         should be provided in all the
                                         relevant languages if you are
                                         preparing, for example, a
                                         multimarket dossier.
Slide 41
1
‘Labelling’
You can use the ‘Calculate’ functionality
which will auto-fill the labelling information
based on the information you entered for
the classification. You will still need to enter
free text field where relevant.
Alternatively, you can enter each of the
labelling information elements for your
mixture by selecting the relevant
information from the drop down lists.
2
! Some hazard and precautionary
statements may require additional
text. In such cases, all free text fields
must contain information in all
relevant languages.Slide 42
Reporting mixture (in mixture) components
An overview of how to use IUCLID to complete the sub-tasks for mixture (in mixture) components.
Full details on the information requirements can be found from the Guidance on harmonised
information relating to emergency health response at:
https://poisoncentres.echa.europa.eu/guidance
Version 2.1 May 2020Slide 43
Mixture (in mixture) components
If all the substances in the mixture component are known, they need
to be reported individually, as for all other substances. Specify your mixture
2 component (MiM) by either
selecting an existing mixture
Reporting multiple mixture components is allowed and should be dataset, or by creating a new
declared in descending order of concentration. dataset, giving the MiM a
name. Then press ‘Continue’.
From the Mixture
composition task, Click 1
on +Mixture component
to begin the process of 3 Once the mixture component (MiM)
declaring each mixture has been specified with a name, a
(in mixture) number of sub-tasks will be
component, present in displayed.
the mixture.
Refer to the Classification slide on
how to complete this section.This is the name of the MiM as provided in
Slide 44
the previous step. It is editable.
‘Function’ is not mandatory
1
Sub-task ‘Mixture in mixture
information but you may add it
if you want.
information’ 2
You may declare the concentration of
components either as a ‘typical’ concentration or
as a concentration range, and expressed in either
3
% (w/w) or % (v/v). Operators must be included.
4
Click on +New item to list the substance components of the MiM. Each
substance requires you to enter the concentration (%(w/w) or %(v/v)) Click on +New item to begin
and link to a reference substance. To link to a reference substance, click 5 the process of identifying a MiM
on +Select in the sliding window, and either select a reference substance by it’s UFI.
from the list or create one and provide the relevant information. See
Substance components for more details.
6
Click on +Select and either make a selection
from the list of available suppliers (meaning,
legal entities), or, if the details are not listed,
select +Create and fill in relevant details for
the MiM supplier. 7
Click on +New item to begin the process. A sliding
window will open. Upload the relevant file and
select the relevant country and language. Note
that multiple SDS (‘items’ in the system) can be
added.Slide 45
Reporting substance components
An overview of how to use IUCLID to complete the sub-tasks for substance components. Full details
on the information requirements can be found from the Guidance on harmonised information
relating to emergency health response at:
https://poisoncentres.echa.europa.eu/guidance
Version 2.1 May 2020Slide 46
Substance components
Specifying a substance component can be done either by selecting an Either specify your substance component by
existing substance (option 2a, from the available inventory), or providing selecting an existing substance from the
a name and creating a new one (option 2b). available inventory.
2a
A substance component requires a record that contains information about
Or, if the substance is not listed in the available
function and concentration, its identity and its classification. Each OR inventory, provide a name for the substance in this
substance component must be linked to a Reference Substance. field.
2b
Note: the name you provide here is only for the
label of the record.
Click on the back button ‘Slide 47
Downloading and importing a
Save the file locally (.i6z
Reference substance format) to a more
meaningful name.
A reference substance is used to define the identity of a substance, in
such a way that the definition may be re-used in more than one dossier if
needed. You can create reference substance documents during dossier 3
preparation. However, it is also possible and more efficient to download
and import them as a ready-made set from the IUCLID web site.
https://iuclid6.echa.europa.eu/get-reference-substances
A green tick symbol
5 indicates the file has
1 been successfully
imported and will be
available in the list of
reference substances.
Search for the substance
using and EC or other
product identifier.
3
4
2 To import the reference
From the results list, substance from the Cloud
select Download. Dashboard, select Browse,
and locate the file.Slide 48
The substance record has
now been created.
3
How to ‘Select an existing substance’
You can specify a substance component by selecting an existing substance
(from the available inventory), but only if it has been previously created.
In the ’Substance information’
task you will have two sub-
tasks: ‘Substance information’
In step 2a ‘Select an existing substance’ and ‘Classification and labelling
in the Substance components, you can information’.
specify a substance by searching and 4
selecting from the inventory, if it has
1 been added there.
In the ’Substance information’
sub-task you can enter the
concentration of the substance
(function is optional).
Select the substance and press
continue (not shown) to create
3
the substance record. This
example uses ‘Ethyl acetate’. Create the link to the relevant
reference substance by locating
The substance record has now it from the inventory.
been created.
2
4Slide 49
3
Establishing a link to an existing reference
substance Click on the reference substance
name to view the reference
substance information.
You can edit the
reference substance
information, if required.
Create the link to the relevant
reference substance by pressing
+Select.
4
1
Locate the reference substance from 2
the inventory and click on the name.Slide 50
3
The reference substance name is
mandatory. It may be the same as
the record label but does not need
It is possible to link the
to be.
reference substance to the EC
inventory by entering the
name, EC number or CAS
Creating a Reference substance number.
The IUPAC name field is also available for
substances which are identified by an
To create a reference substance alternative international chemical name.
document, press +Select.
Note: the Synonyms field can be used to
1 indicate if the substance is identified by
Selecting +Create, will open an colour index or INCI name.
empty Reference Substance
document in which you can
enter information about the
substance identity.
2
The molecular and structural information is not
mandatory information: you can be add it
optionally. If you use existing Reference
substances downloaded from the IUCLID website,
the substance identifiers, molecular and structural
information will be prefilled.Slide 51
Reporting generic product identifier components
An overview of how to use IUCLID to complete the sub-tasks for generic product identifier (GPI)
components. Full details on the information requirements can be found from the Guidance on
harmonised information relating to emergency health response at:
https://poisoncentres.echa.europa.eu/guidance
Version 2.1 May 2020Slide 52
Generic product identifier components
The generic product identifiers include only those components (either substances or MiMs): used exclusively to add perfume, fragrance or
colour; only if they are not classified for any health hazard, and the concentration of a given GPI does not exceed in total 5% for the sum of
perfumes or fragrances and 25% for the sum of colouring agents.
Specify your GPI by either
2 selecting an existing GPI
component from the
inventory, or begin the
creation of a new component
From the Mixture composition task, click dataset, by giving the GPI a
on +Generic Product Identifier name. Then press Continue.
component to begin the process of
declaring and identifying each GPI
present in the mixture.
1 1 The following sub-tasks are
3 triggered for GPI information,
and classification.
4 For more information on reporting
classification, you can refer to
classification of the substance.Slide 53
Sub-task ‘Generic product identifier information’ for the GPI
The name of the GPI you entered in
the previous step is displayed here,
and is editable.
1
Function is mandatory information
and must be added. Selections are
limited to colourant or perfume.
2
You may declare the concentration of
components either as a ‘typical’
3
concentration, or a concentration
range and expressed in either % (w/w)
or % (v/v). Operators must be
included.Slide 54
Dossier preparation:
‘Product information’
An overview of how to use IUCLID to complete the tasks and sub-tasks in the Product information
section for the preparation of a PCN dossier. Full details on the information requirements can be found
from the Guidance on harmonised information relating to emergency health response at:
https://poisoncentres.echa.europa.eu/guidance
Version 2.1 May 2020Slide 55
Navigating to the Product details page
2
When you click on the ‘Product
information’ section from the dossier 3
preparation navigation page, the
Product details task appears.
By clicking on the Product details The Product details task. The
task, you will be referred to all the number here represents the
1 product records number of product ‘records’
created.
At least one complete
Product details record must
be present in the final
dossier.Slide 56
Product details page Clicking +New item, opens a window
where you can enter the trade name. It
is possible to add additional trade
names using this feature.
1
Optionally, you may use the 2
field Other Names if there are
additional names on the label
of the product.
3
By clicking +Select, the UFIs that you declared
earlier in the Mixture information ‘UFI task’ are See Colour and physical
listed and can be linked to specific products. 4 state.
See Unique formula identifiers.
5 See slide on Packaging.
6 See slide on Product
use category
Select the countries where the product is
intended to be placed on the market. Countries
not indicated in the dossier header should not be
selected. Note that multiple selections per record 7
are allowed.Slide 57
a
Product identifiers
Reporting a single product with a single trade name and UFI is the
most straightforward way to include product information in a You can create numerous ‘Product
notification. This means a single Product details record referring to records’ where each one can be
distinguished from the other. For
one product under one trade name, and one UFI.
example: products with different trade
names or UFIs; market areas, or
packaging types for instance.
Trade name is mandatory
information.
Numerous products are listed as
‘items’ and you report them in a
single Product details record.
b
Where multiple products are concerned, the Product details record
allows a very flexible configuration. In such cases, there is the
possibility to manage these in a dossier in two different ways: a)
and b).Slide 58
Alternatively, if you did not indicate any UFIs
in the Mixture information UFI task, then you
can click +Create and enter the UFI details
directly in the record.
‘Unique formula identifier’
3
3
You can link the UFIs through
selecting the correct UFI assigned
to the mixture (included on the
label of the related product), by
clicking anywhere in the relevant
information bar.
2
1
By clicking first on the UFI link (blue
text), then +Select, the UFIs that you
declared earlier in the Mixture
information ‘UFI task’ are listed and
you can link them to specific products.
Note that this linking is still required
even in the simplest case; where a
single UFI is declared and only one
product exists.Slide 59
The system offers the option
to select an existing General
information document (if one
‘Colour and physical state’
exists) or create a new
document.
2
1
To establish a link to the information
about colour and physical state for the
product referred to in the record, click
on +Select. You can reference multiple • If you selected +Create in the previous
documents here. step, a new General information
3 document is created.
Here, the physical state and colour are
4 mandatory fields, while form and colour
intensity are optional.
• If you selected an existing document,
check the information carried over to this
Single or multiple colour selections (x 15 total) are available. document is available and correct.
Selecting multiple colours (for example, white and yellow),
means that the product comes in white or yellow variations.
An additional colour selection ‘Mixtures containing generic
product identifiers ‘colouring agents’ is available, and you
must additionally select all relevant colours.You can then either select and re-use an existing
document or create a new one.
Slide 60
To create a new document, select +Create and
enter information into a new document as shown
in the screenshot below (see point 3,4, & 5).
‘Packaging’ 2
If a mixture is supplied in different types and sizes of packaging, you need
to include information on all the relevant types and sizes. Note that
mixtures for industrial use are not required to have packaging indicated.
Selecting the check box Not From here, you can select one of 33
packaged can not be used in different packaging types. For
conjunction with other packaging example: aerosol can, airspray,
information within a single product atomizer, bag/sack…
record.
3
1 4
To establish a link to the related 5 The size of the packaging and the
packaging information for the You may include here any units are indicated here. Ranges
product referred to in the record, packaging related documents such as 50–100mL are not
click on Link to the packaging such as an example label. The permitted. This means that you will
information, then press +Select. system accepts files such as PDF, need to create multiple packaging
Word or JPEG. documents.Slide 61
‘Product use’
A single main intended use category per Product details
The selection of the use type should reflect both the mixture as record is allowed.
placed on the market as well as for other mixtures, if it is
incorporated for use further down the supply chain. For example: ! Note: if the product may fit multiple categories and is
the use type of a mixture for industrial use will also need to reflect subject to authorisation according to the Biocidal Product
other use types if it is used as a mixture for further formulation in Regulation (BPR) or to the Plant Protection Product
professional or consumer use products. Regulation (PPPR), you must select the product category
reflecting the intended use as a biocide or plant protection
product.
You can select multiple use types for the
mixture possible:
More detailed information can be found at:
consumer, professional, industrial.
https://poisoncentres.echa.europa.eu/eu-product-
categorisation-system
1
2
3
Secondary uses are not a mandatory requirement and
you should not provide them in the notification if they
are not intended to be used as such. The main intended
use categories are, however, available to make
secondary use selections if needed. The maximum
number recommended is three.Slide 62
Validate information, create dossier and preview
notification
An explanation of the functionalities to finalise the dossier preparation process; validate, create
a dossier, and preview notification.
Version 2.1 May 2020Slide 63
The validation assistant
The validation assistant carries out checks according to a set of pre-defined rules to verify that you have provided the information as
expected. The rules will determine if the dossier will pass, pass with warnings or fail according to the rules in place.
The outcome of the validation is a report, which lists the rules (if any) for which the validation assistant was triggered. For a list of the rules,
you may refer to the Annex available at: https://poisoncentres.echa.europa.eu/poison-centres-notification-format
2 Click on Validate again from the
dossier header page and the
Validation report will be
displayed.
1
Clicking Validate will display
the Dossier header page for
final review.Slide 64 The validation report - passing When no rules are triggered, the validation assistant will not issue a validation report. Instead, it will provide a note to highlight that additional checks are performed in the system upon submission.
Slide 65

     The validation report - failure
     When rules are triggered, the validation report will be visible listing the submission checks as failures or warnings.

                                                                               ‘Edit dossier settings’
                                                                               redirects to the Dossier
                                            It is possible to re-validate                                 The ‘X’ directs backs to
                                                                               Header page.
                                            any new change.                                               the Dashboard

 1

Use the link, where available, to be
redirected to the area that requires
additional review or input.

                                                                  Make any required changes
                                                                  where relevant and save before
                                                                  re-validating.
                                                                                                          2
Slide 66 The validation report – warnings listed A quality rule (QLT) warns or reminds you, the notifier, of common shortcomings and inconsistencies. Quality rules will not lead to the failure of the submission, but can result in further clarification requests from Member State(s) at a later stage.
Slide 67

Creating and submitting (or exporting) the dossier

                                                            2
                                                                3
       1   Clicking ‘Create dossier’ will
           display the Dossier header
           page.                                                    If the dossier did not trigger any
                                                                    warnings or errors, and the creation was
                                                                    successful, you can proceed to the ECHA
                                                                    Submission portal to submit.
                         Flag the submission type if
                         you are notifying alternatives             Note, clicking Proceed to submission
                         to the standard information                automatically uploads the dossier to the
                         requirements.                              ECHA Submission porta. However, you
                                                                    will still need to use the Submit
                                                                    functionality – see Upload and submit.

                                                                    Alternatively, you can export the dossier
     Flag the notification type. If you select ‘The
                                                                    locally by clicking Open dossier, clicking
     submission is an update’, then you need to provide
                                                                    ‘…’ in the top left corner and selecting
     a reason or justification for updating. See Updating
                                                                    Export to i6z. Give the dossier a
     the dossier header for a submission update.
                                                                    meaningful name to help you with dossier
                                                                    management.
Slide 68
Locating the dossier
Clicking on Mixtures from the IUCLID Dashboard will display all the
mixture datasets and dossiers created. Mixtures that are associated with
dossiers will have a lock symbol. Toggle between ‘View
dossier’ and ‘View
The search function mixture dataset’.
is based on the name
of the mixture.
2
1
In View Dossier
Clicking on the name of the mode, the lock
selected dossier, redirects to symbol means a
the View Dossier mode. dossier file.Slide 69
You can open or save the
PCN preview report
contents.
2
Preview notification
The Preview notification
functionality here generates a
PCN report in PDF format,
containing all the information
you entered.
1Slide 70
Updating dossier information
An explanation on how to prepare for a dossier update.
Version 2.1 May 2020Slide 71
Updating dossier information
Once you have created a dossier from a data set, it is possible to Navigate to the section where you
update that data and create an updated dossier. need to make the update the Mixture
or Product Information task, and
make the changes.
2
1
From the guided dossier 3
preparations list, click on the
name of the mixture for which 4
you wish to modify information
When you have made all the necessary changes to When you click on Create dossier, the
in the notification.
the notification, click on Validate. dossier header page will be displayed.
Note: some validation checks can only be performed Note that the information can be edited
following the submission process, particularly in the where relevant. See also: Updating the
case of updates. dossier header for submission update.Slide 72
Updating dossier information – clone a dossier
Once you have created a dossier, it is possible to update that data and create an
updated dossier from the Guided dossier preparations list. You can also use the
‘Clone’ functionality – see Cloning a mixture dataset.
Navigate to the section where
you need to make the update
the Mixture or Product
Information task, and make the
2 changes.
1
From the guided dossier 3
preparations list, click on the
name of the mixture for which 4
you wish to modify information When you have made all the necessary Click on Create dossier to
in the notification. changes to the notification, click on edit the dossier header
Validate. page. See Updating the
Note: that some validation checks can dossier header for
only be performed following the submission update.
submission process, particularly in the
case of updates.Slide 73
Updating the dossier header for a submission update
You should give the
dossier a new and
1
meaningful name.
2
The PCN number remains
the same in the update
dossiers.
It may be that an update reason is not
listed in the picklist, e.g. a change in
the emergency contact, or a new
packaging type. For this purpose, select
Other and indicate the type of change
You must untick the tick box in the free text field.
‘Initial submission’ and select
‘The submission is an update’. 3
In the ‘Reason for updating field’, click
on +New item and make a selection 4
from the available picklist. Multiple
reasons for updating are allowed.Slide 74
Updating the dossier header when the mixture significantly
changes in composition
When the mixture composition changes beyond the allowable limits defined in Annex
VIII to CLP, by default, this will lead to two chemically different ‘products’ on the
Edit the dossier name.
market. In this case, you must make a notification for the new composition (containing 2
a new PCN number), meaning a new notification after a significant change in
composition.
Provide a new PCN number
for the notification.
In addition to this, the notification must refer to the previous PCN number as the
’related PCN number’, and you must assign a new UFI, declared in the notification
and included on the product. These identifiers are included in the UFI and other
identifiers section in the Mixture task
1
You must select the
notification type ‘New
notification after a
Check that a new UFI is included in the notification – see UFI
significant change of
and other identifiers task. You must also indicate the PCN
composition’.
number from the previous related submission – this becomes
the related PCN number.Slide 75
The cloned mixture
dataset will be saved
Cloning a mixture dataset
in the dataset list.
The ‘clone’ functionality is available to facilitate the preparation of update dossiers 2
by cloning a mixture dataset and build a new dossier on that. In this way, you do
not need to re-enter all the information related to the mixture, such as
composition, toxicological information or product information.
3
1
From the Mixture dataset view, The information can be edited in the
locate the dataset you wish to dataset view.
clone. Click on ‘…’ and select
‘Clone’.Slide 76
You can also read