A Practical Guide to AutoCAD 2021 - Tracy Chadwick and Rick Ellis Foreword written by Lynn Allen - Cadapult Software
←
→
Page content transcription
If your browser does not render page correctly, please read the page content below
A Practical Guide to
                                     AutoCAD® 2021

Tracy Chadwick and Rick Ellis

Foreword written by Lynn Allen

                                         A CADapult Press Publication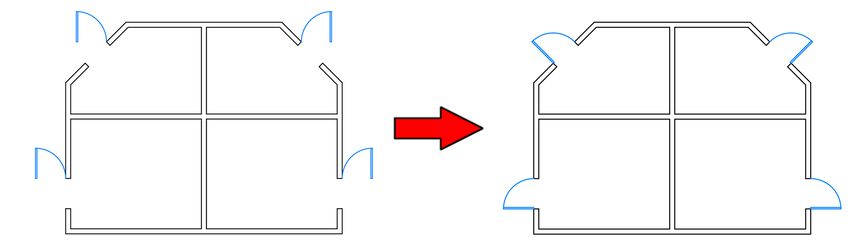
Copyright

Copyright © CADapult Press, Inc. 2020

All rights reserved. No part of this publication may be reproduced in any form, or by any means electronic,
mechanical, recording, photocopying, or otherwise, without written permission from the publisher, except for
brief quotations used in reviews, or for marketing purposes specific to the promotion of this work.

ISBN: 978-1-934865-52-1

Although CADapult Press has made every attempt to ensure the accuracy of the contents of this book, the
publisher and author make no representations or warranty with respect to accuracy or completeness of the
contents in this book, including without limitation warranties of fitness for a particular purpose. The datasets
included in this book are for training purposes only.

Autodesk screen shots reprinted with the permission of Autodesk, Inc.

Autodesk, AutoCAD, DWG, and the DWG logo are registered trademarks or trademarks of Autodesk, Inc.,
and/or its subsidiaries and/or affiliates in the USA and other countries. All other trademarks are the property
of their respective owners.

Published in the United States of America by:
CADapult Press
(503) 829-8929
books@cadapult-software.com

Printed and manufactured in the United States of America

ii
About the Authors

Tracy Chadwick serves as coordinator and instructor for the Computer Drafting Technology program at
Hutchinson Community College in Hutchinson, Kansas. He is responsible for teaching a wide range of
courses, including those on engineering graphics, AutoCAD software, Inventor software, and Revit
Architecture software.

Tracy has been an AutoCAD user since 1995, and has been teaching AutoCAD classes to working
professionals and college students since 2001. His experience and dedication to teaching led to him being
recognized by Autodesk, Inc. with the North America Award for Distinguished Performance in AutoCAD
Software Training.

Tracy has also been recognized as a top rated speaker at Autodesk University, where he has presented for
several years. He has recently begun serving as a mentor to first-time Autodesk University speakers.

Tracy can be reached at: tracy@cadapult-software.com

Rick Ellis has worked with and taught AutoCAD Map 3D since the mid-90s, along with Civil 3D and other
Autodesk products. He is the Author of several critically acclaimed books on AutoCAD Map 3D, Civil 3D and
Land Desktop.

Rick continues to use AutoCAD Map 3D on projects in a production environment, in addition to teaching
classes to organizations both large and small.

This practical background and approach has made him an award winning speaker at Autodesk University and
a sought after instructor by organizations around the world.

Rick can be reached at: rick@cadapult-software.com

Acknowledgements
Thank you to my wonderful wife Candace, and my two amazing daughters Sydney and Casey. Without their
support I could never have completed this book. Thank you to all the students of the Computer Drafting
Technology program at Hutchinson Community College. I am honored to have played a part in helping so
many students achieve fulfilling careers over the last two decades. Thank you to Vince Puyear, who first
introduced me to AutoCAD back in 1995. He started as my instructor, then later became my colleague,
mentor, and friend. Thank you to Amber Brawner for lending her graphic design talent to this book, and for
being a great friend. Last, but not least, thank you to Rick Ellis and CADapult Press for helping me to achieve
my dream of being an author, so that I may spread my love for AutoCAD from beyond central Kansas to the
world!
-Tracy Chadwick

                                                                                                              iii
A Practical Guide to AutoCAD® 2021
Introduction
Congratulations on choosing this course to help you learn how to use AutoCAD 2021. The term “practical” is
used in the title because this course focuses on what you need to effectively use AutoCAD 2021, and does
not complicate your learning experience with unnecessary details of every feature in the product. Should you
want to pursue aspects of features and functionality in greater detail than provided in this course, you are
directed and guided to that information.
Each lesson contains the concepts and principles of each feature to provide you with the background and
foundation of knowledge that you need to complete the lesson. You then work through exercises to reinforce
your understanding and provide you with practice on common tasks that other professionals are performing
with AutoCAD 2021 in the workplace every day.
Most lessons include a Challenge Exercise at the end. These exercises ask you to perform tasks based on
what you learned in the lesson without the step-by-step instructions to test your skills and understanding of
the new material.
When you complete this course, you will be armed with the background and knowledge to apply AutoCAD to
your job tasks, and become more effective and productive in your job.
Course Objectives
The objectives of this course are performance based. In other words, once you have completed the course,
you will be able to perform each objective listed. If you are already familiar with AutoCAD, you will be able to
analyze your existing workflows, and make changes to improve your performance based on the tools and
features that you learn and practice in this course.
After completing this course, you will be able to:
• Understand the user interface
• Navigate through drawings with pan and zoom commands
• Create drawing objects, including lines, arcs, and circles
• Create and modify polylines, including rectangles and polygons
• Use Layers to differentiate drawing objects
• Draw using Polar Tracking and coordinate methods
• Use Object Snaps and Object Snap Tracking
• Modify drawing objects
• Duplicate drawing objects
• Extract information from drawings with measuring tools
• Create and modify hatch patterns
• Create, insert, and modify blocks
• Work with external references
• Import a PDF
• Create and scale paper space layouts and viewports
• Print scale drawings and check plots
• Detail drawings with text, dimensions, and leaders
ivDownloading and Installing the Datasets
In order to perform the exercises in this book, you must download a zip file and install the datasets.
Type the address below into your web browser to load the page where you can download the dataset.
www.cadapult-software.com/data
Unzip the Files
Unzip the file APG_AutoCAD2021.zip directly to the C drive. The zip file will create the following folder
structure:
C:\A Practical Guide\AutoCAD 2021\Files for Exercises
Exercises
The exercises in this course have been carefully chosen and designed to represent common tasks that are
performed by design professionals.
The exercise files are from many different industries and are meant only to be examples. It’s important to
focus on the tools being shown and how you could apply them to your project and industry.
Exercises provide higher level process information throughout the exercise tasks. You are given information
about not only what to do, but why you are doing it. In most cases, an image is included to help guide you.
Most lessons include a Challenge Exercise at the end. These exercises ask you to perform tasks based on
what you learned in the lesson without the step-by-step instructions to test your skills and understanding of
the new material. If you get stuck in these exercises go back and review the information in the lesson for
guidance.
vTable of Contents
Chapter 1 Introduction to AutoCAD .............................................................................................................. 1
1.1. Lesson: Navigating the AutoCAD User Interface .................................................................................. 2
1.1.1 Navigating the AutoCAD Interface ...................................................................................... 8
1.2. Lesson: Working with AutoCAD Drawing Files ................................................................................... 10
1.2.1 Working with AutoCAD Drawings ..................................................................................... 17
1.3. Lesson: Basic AutoCAD Tools ............................................................................................................. 20
1.4. Lesson: Selection Techniques.............................................................................................................. 26
1.4.1 Selection Techniques ........................................................................................................ 29
Chapter 2 Drawing Lines and Working with Layers .................................................................................. 31
2.1. Lesson: Drawing Lines ......................................................................................................................... 32
2.1.1 Drawing Lines ................................................................................................................... 35
2.2. Lesson: Drawing with Cartesian Coordinates ...................................................................................... 37
2.2.1 Drawing a Rectangle with Absolute Coordinates .............................................................. 41
2.2.2 Drawing a More Complex Shape with Absolute Coordinates ........................................... 42
2.2.3 Drawing a Rectangle with Relative Coordinates ............................................................... 43
2.2.4 Drawing a More Complex Shape with Relative Coordinates ............................................ 44
2.2.5 Drawing a Rectangle with Polar Coordinates ................................................................... 46
2.2.6 Drawing a More Complex Shape with Polar Coordinates................................................. 47
2.3. Drawing with Polar Tracking ................................................................................................................. 49
2.3.1 Drawing a Rectangle with Polar Tracking ......................................................................... 56
2.3.2 Drawing a More Complex Shape with Polar Tracking ...................................................... 58
2.3.3 Drawing with Additional Polar Tracking Angles ................................................................ 60
2.3.4 Drawing with Architectural Units ....................................................................................... 62
2.3.5 Challenge Exercise - Polar Tracking................................................................................. 64
2.4. Drawing with Layers ............................................................................................................................. 65
2.4.1 Drawing with Layers .......................................................................................................... 72
2.4.2 Changing the Layers of Existing Objects .......................................................................... 74
2.4.3 Modifying Layer States ..................................................................................................... 75
2.4.4 Creating and Modifying Layers ......................................................................................... 77
2.4.5 Challenge Exercise - Layers ............................................................................................. 80
Chapter 3 Drawing Additional Objects (Part I) ........................................................................................... 81
3.1. Drawing Circles..................................................................................................................................... 82
3.1.1 Drawing Circles with the Center, Radius and Center, Diameter Methods ........................ 85
3.1.2 Additional Practice with the Center, Radius and Center, Diameter Methods ................... 86
vi3.1.3 Drawing Circles with the 2-Point and 3-Point Methods .................................................... 87
3.1.4 Drawing Circles with Tangent Methods ............................................................................ 88
3.1.5 Challenge Exercise - Drawing Circles .............................................................................. 90
3.2. Drawing Rectangles ............................................................................................................................. 91
3.2.1 Drawing Rectangles ......................................................................................................... 93
3.2.2 Challenge Exercise - Drawing Rectangles ....................................................................... 95
3.3. Drawing Polygons ................................................................................................................................ 96
3.3.1 Drawing Polygons ............................................................................................................. 99
3.3.2 Additional Practice Drawing Polygons ............................................................................ 100
3.3.3 Challenge Exercise - Drawing Polygons ........................................................................ 101
Chapter 4 Object Snaps and Object Snap Tracking ................................................................................ 103
4.1. Drawing with Object Snaps ................................................................................................................ 104
4.1.1 Drawing with Endpoint, Midpoint, and Quadrant Object Snaps ..................................... 111
4.1.2 Drawing with Center and Tangent Object Snaps ........................................................... 114
4.1.3 Drawing with Node and Perpendicular Object Snaps .................................................... 116
4.1.4 Drawing with Intersection and Geometric Center Object Snaps .................................... 118
4.1.5 Drawing with Object Snap Overrides ............................................................................. 120
4.1.6 Additional Practice Drawing with Object Snap Overrides .............................................. 122
4.1.7 Challenge Exercise - Objects Snaps #1 ......................................................................... 124
4.1.8 Challenge Exercise - Objects Snaps #2 ......................................................................... 125
4.2. Drawing with Object Snap Tracking ................................................................................................... 126
4.2.1 Tracking Off of a Single Point with Object Snap Tracking ............................................. 131
4.2.2 Object Snap Tracking of Multiple Points ........................................................................ 133
4.2.3 Challenge Exercise - Objects Snap Tracking ................................................................. 135
Chapter 5 Drawing Additional Objects (Part II) ........................................................................................ 137
5.1. Drawing Arcs ...................................................................................................................................... 138
5.1.1 Drawing Arcs .................................................................................................................. 144
5.1.2 Additional Practice Drawing Arcs ................................................................................... 146
5.1.3 Challenge Exercise - Drawing Arcs ................................................................................ 149
5.2. Drawing and Editing Polylines ........................................................................................................... 150
5.2.1 Drawing Polylines ........................................................................................................... 157
5.2.2 Drawing Polylines with Varying Widths .......................................................................... 159
5.2.3 Editing Polylines ............................................................................................................. 162
5.2.4 Challenge Exercise - Drawing Polylines ......................................................................... 164
viiChapter 6 Modifying Drawing Objects ...................................................................................................... 167
6.1. Moving Drawing Objects ..................................................................................................................... 168
6.1.1 Moving Drawing Objects ................................................................................................. 170
6.1.2 Additional Practice Moving Objects ................................................................................ 171
6.1.3 Challenge Exercise - Moving Drawing Objects ............................................................... 176
6.2. Scaling Drawing Objects .................................................................................................................... 177
6.2.1 Scaling Objects ............................................................................................................... 180
6.2.2 Scaling Drawing Objects with the Reference Option ...................................................... 183
6.2.3 Challenge Exercise - Scaling Drawing Objects .............................................................. 185
6.3. Stretching Drawing Objects ................................................................................................................ 186
6.3.1 Stretching Drawing Objects ............................................................................................ 188
6.3.2 Challenge Exercise - Stretching Drawing Objects .......................................................... 191
6.4. Rotating Drawing Objects ................................................................................................................... 192
6.4.1 Rotating Drawing Objects ............................................................................................... 196
6.4.2 Rotating Objects with Polar Tracking .............................................................................. 199
6.4.3 Rotating Objects with the Reference Option ................................................................... 201
6.4.4 Challenge Exercise - Rotating Drawing Objects ............................................................. 203
6.5. Trimming Drawing Objects ................................................................................................................. 204
6.5.1 Trimming Drawing Objects .............................................................................................. 211
6.6. Extending Drawing Objects ................................................................................................................ 214
6.6.1 Extending Drawing Objects ............................................................................................. 220
6.6.2 Additional Practice Trimming and Extending Objects ..................................................... 222
6.6.3 Challenge Exercise - Trimming and Extending Drawing Objects ................................... 226
6.7. Creating Rounded Corners with the Fillet Command ......................................................................... 227
6.7.1 Filleting Drawing Objects ................................................................................................ 232
6.7.2 Additional Practice Filleting Drawing Objects ................................................................. 236
6.7.3 Challenge Exercise - Filleting Drawing Objects .............................................................. 238
6.8. Creating Angled Corners with the Chamfer Command ...................................................................... 239
6.8.1 Chamfering Drawing Objects .......................................................................................... 247
6.8.2 Challenge Exercise - Chamfering Drawing Objects ........................................................ 253
Chapter 7 Duplicating Drawing Objects .................................................................................................... 255
7.1. Copying Drawing Objects ................................................................................................................... 256
7.1.1 Copying Drawing Objects ............................................................................................... 258
7.1.2 Exercise: Additional Practice Copying Objects ............................................................... 260
7.1.3 Challenge Exercise - Copying Drawing Objects ............................................................. 262
7.2. Mirroring Drawing Objects .................................................................................................................. 263
7.2.1 Mirroring Drawing Objects .............................................................................................. 266
viii7.2.2 Additional Practice Mirroring Objects ............................................................................. 268
7.2.3 Challenge Exercise - Mirroring Drawing Objects ........................................................... 271
7.3. Creating Rectangular Arrays of Drawing Objects .............................................................................. 272
7.3.1 Creating a Rectangular Array ......................................................................................... 276
7.3.2 Additional Practice Creating Rectangular Arrays ........................................................... 280
7.3.3 Challenge Exercise - Rectangular Array ........................................................................ 283
7.4. Creating Polar Arrays of Drawing Objects ......................................................................................... 284
7.4.1 Creating a Polar Array .................................................................................................... 290
7.4.2 Additional Practice Creating Polar Arrays ...................................................................... 294
7.4.3 Creating Polar Arrays with Multiple Rows ...................................................................... 296
7.4.4 Challenge Exercise - Polar Array ................................................................................... 298
7.5. Creating Path Arrays of Drawing Objects .......................................................................................... 299
7.5.1 Creating Path Arrays Using the Measure Method .......................................................... 304
7.5.2 Creating Path Arrays Using the Divide Method .............................................................. 307
7.5.3 Challenge Exercise - Path Array .................................................................................... 309
7.6. Offsetting Drawing Objects ................................................................................................................ 310
7.6.1 Offsetting Drawing Objects ............................................................................................. 314
7.6.2 Additional Practice Offsetting Objects ............................................................................ 317
7.6.3 Challenge Exercise - Offsetting Drawing Objects .......................................................... 320
7.7. Modifying Drawing Objects with Grips ............................................................................................... 321
7.7.1 Grip Editing Drawing Objects ......................................................................................... 326
Chapter 8 Inquiry Tools .............................................................................................................................. 331
8.1. Measure commands ........................................................................................................................... 332
8.1.1 Measuring Distance, Area, and Perimeter ..................................................................... 348
8.1.2 Measuring Distance, Radius, Area, and Angle .............................................................. 351
8.1.3 Measuring Angles ........................................................................................................... 355
8.1.4 Measuring with the Quick Measure Tool ........................................................................ 357
8.1.5 Challenge Exercise - Measure Commands .................................................................... 358
8.2. Object Properties ............................................................................................................................... 361
8.2.1 Viewing and Modifying Object Properties ....................................................................... 368
Chapter 9 Adding and Modifying Hatch Patterns .................................................................................... 373
9.1. Adding and Modifying Hatch Patterns ................................................................................................ 374
9.1.1 Adding Hatch Patterns .................................................................................................... 381
9.1.2 Additional Practice Adding Hatch Patterns..................................................................... 385
9.1.3 Challenge Exercise - Adding Hatch Patterns ................................................................. 390
ixChapter 10 Working with Blocks, External References, and PDF Files............................................... 391
10.1. Inserting Blocks ............................................................................................................................... 392
10.1.1 Inserting Blocks with the Blocks Palette ......................................................................... 402
10.1.2 Inserting Dynamic Blocks ................................................................................................ 409
10.1.3 Inserting Blocks with Tool Palettes ................................................................................. 412
10.1.4 Inserting Blocks with DesignCenter ................................................................................ 415
10.1.5 Challenge Exercise - Inserting Blocks ............................................................................ 419
10.2. Creating Blocks ................................................................................................................................ 420
10.2.1 Creating Local Blocks ..................................................................................................... 426
10.2.2 Creating Global Blocks ................................................................................................... 432
10.2.3 Challenge Exercise - Creating Blocks............................................................................. 437
10.3. Attaching External References ........................................................................................................ 438
10.3.1 Working with External References .................................................................................. 443
10.3.2 Challenge Exercise - External References ..................................................................... 447
10.4. Importing PDF Files ......................................................................................................................... 448
10.4.1 Importing PDF Files ........................................................................................................ 452
10.4.2 Challenge Exercise - Importing PDF Files ...................................................................... 457
Chapter 11 Plotting Drawings .................................................................................................................. 459
11.1. Plotting Drawings from Model Space .............................................................................................. 460
11.1.1 Plotting from Model Space .............................................................................................. 463
11.1.2 Challenge Exercise - Plotting from Model Space ........................................................... 468
11.2. Plotting Drawings from Paper Space............................................................................................... 469
11.2.1 Plotting from Paper Space .............................................................................................. 475
11.2.2 Challenge Exercise - Plotting from Paper Space ............................................................ 482
Chapter 12 Annotating Drawings ............................................................................................................. 483
12.1. Adding and Modifying Text .............................................................................................................. 484
12.1.1 Adding Text Notes to a Drawing ..................................................................................... 488
12.1.2 Additional Practice Adding Text Notes to a Drawing ...................................................... 491
12.1.3 Challenge Exercise - Adding Text................................................................................... 494
12.2. Adding and Modifying Dimensions .................................................................................................. 495
12.2.1 Adding Linear Dimensions .............................................................................................. 505
12.2.2 Adding Aligned and Angular Dimensions ....................................................................... 507
12.2.3 Adding Radius and Diameter Dimensions ...................................................................... 509
12.2.4 Adding Continuous and Baseline Dimensions ................................................................ 513
12.2.5 Challenge Exercise - Adding Dimensions #1 .................................................................. 515
12.2.6 Challenge Exercise - Adding Dimensions #2 .................................................................. 516
x12.3. Adding and Modifying Leaders........................................................................................................ 517
12.3.1 Adding Leaders .............................................................................................................. 524
12.3.2 Adding Balloons with the Multileader Command ............................................................ 527
12.3.3 Challenge Exercise - Adding Leaders ............................................................................ 532
Index .............................................................................................................................................. 535
xiForeword Welcome to the wonderful world of AutoCAD. I say that somewhat tongue and cheek as learning AutoCAD can be somewhat daunting – and no doubt why you’ve chosen to pick up this book. I commend you for not trying to learn AutoCAD completely on your own (a dreadful route to take) but for relying on the skillful guidance of Tracy Chadwick and Rick Ellis. These two award winning authors have been teaching AutoCAD for many years and know exactly what it takes to lead the beginning user through the oft overwhelming tools inside of AutoCAD. This A Practical Guide of AutoCAD 2021 will focus on the all-important basics of the product and steer you clear of the nonessential tools (you can tackle those later when you are more seasoned!) There is a right and a wrong way to use AutoCAD…this book will ensure that you learn how to use it the “right” way! I taught AutoCAD at the collegiate and professional level for 11 years before joining Autodesk in their training department. I know the importance of good training materials and I know a great AutoCAD book when I see it. You are looking at one right now. Tracy and Rick have mastered the art of writing in terms that we can all understand without a need to impress or complicate the task at hand. Their goal is simple: to help you successfully use AutoCAD for your design work. They have taken their many years of training expertise and rolled it all into this well massaged book. How I wish I’d had this book when I was training people how to use AutoCAD! In my 20+ year role as Autodesk Evangelist, I had the distinct privilege of working with Tracy and Rick at Autodesk University and other conferences. Their presentations are always highly rated and very popular with attendees. They have that special knack of connecting with an audience and making the difficult sound easy – which is exactly what you need when you are learning to use AutoCAD. You will experience this as you make your way through the chapters of this book. A Practical Guide of AutoCAD 2021 also includes real-world examples from many different industries. You won’t be drawing any Mickey Mouses or smiley faces, but actual drafting examples. Let’s face it – you wouldn’t get a job with that limited skillset (well…unless you go work for Disney). The variety of practical examples used with practical commands is the perfect combination to get you prepared for drafting and designing in the real world. Use this book to build a firm foundation for designing with AutoCAD. Those users with a firm foundation of the product do best overall in successfully mastering the product (another reason to read this book). Physically do as many exercises in the book as possible and you’ll be on the road to becoming a great AutoCAD user! I’m pretty sure that your first thought when you’re finished with this book is going to be…”When are Tracy and Rick going to come out with an Advanced Practical Guide of AutoCAD?” I know that’s my question! Lynn Allen Global Technology Evangelist In her 20+ year career as Autodesk Technology Evangelist, Lynn Allen has spoken to more than a half million design professionals in over 50 countries throughout the world. Her online reach over the years easily reaches into the millions. An early CAD entrepreneur, Lynn taught AutoCAD at the corporate and collegiate level for 11 years before joining Autodesk. A popular columnist for Cadalyst magazine for over two decades, she is the face behind hundreds of software videos including the series “AutoCAD Tips and Tricks with Lynn Allen”. A sought-after public speaker with a unique comedic style, Lynn was the host of Autodesk University for over a decade and is always one of the highest rated presenters at the many worldwide Autodesk Universities. She is also the author of three technical books focused on AutoCAD software. xii
Sample Lesson
Chapter: Modifying Drawing Objects
6.4.      Rotating Drawing Objects

Introduction
In this lesson, you learn how to rotate drawing objects.

Key Concepts
Concepts and key terms covered in this lesson are:

      •   Rotating Objects
      •   Base Point
      •   Rotation Angle
      •   Reference Angle

Objectives
After completing this lesson, you will be able to:

      •   Rotate drawing objects.

192                                                                        Rotating Drawing Objects
Chapter: Modifying Drawing Objects About the Rotate Command Many times while drawing you will have the need to adjust the orientation of drawing objects by rotating them. The Rotate command can achieve this in a few simple steps. Starting the Rotate Command The Rotate command is located at Ribbon: Home ⇒ Modify ⇒ Rotate. Alternatively, you can type RO then press [Enter] at the keyboard. After starting the Rotate command, you are prompted to select the objects to be rotated. The Rotate command will allow you to select as many objects as you want. When you are finished selecting objects you must press [Enter] at the keyboard to move on to the next step. Next you will specify the base point. This point will remain in the same location while the rest of the selected objects rotate around it. Finally, the Command line asks for the rotation angle. The angle can be specified by typing a value or by selecting a point on-screen. When entering a rotation angle value, it is important to remember that by default in AutoCAD, angles are positive when rotating in the counterclockwise direction; angles are negative when rotating in the clockwise direction. Rotating Drawing Objects 193
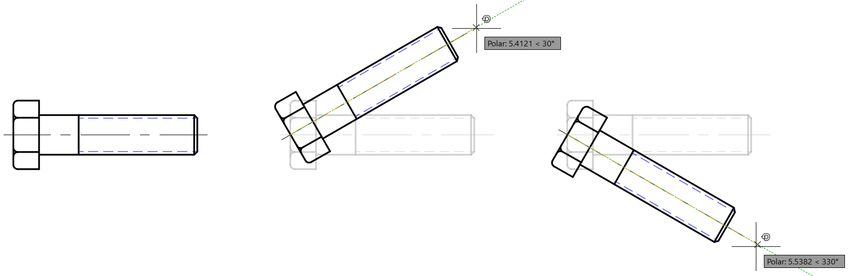
Chapter: Modifying Drawing Objects
Instead of typing the rotation angle value, you can also pick a point on-screen. Turn on Polar
Tracking to ensure that the rotation angle is precise. In the example below the Incremental
Angle value of Polar Tracking has been set to 30 degrees. This could be a more efficient
workflow because you do not need to be concerned with whether or not an angle is positive
or negative. Instead, you simply click when the object is located on the appropriate tracking
angle.

Specifying the Reference Angle
Occasionally when working in a drawing, you may find
the need to rotate an object to return it to a standard
orientation. For example, the bolt in the image to the
right is currently at an angle, and it needs to be rotated
until it is back to horizontal.

This is a fairly simple process if the object was rotated at a known angle, such as 30 degrees;
you could simply rotate the object negative 30 degrees to return it to horizontal. However, if
the object has been rotated at an unknown angle, the process could be more difficult. One
possibility is to measure the angle from horizontal, then rotate using a negative value.

In the image to the right, the angle of the bolt has been
measured and found to be nine degrees.

The first instinct might be to rotate the object negative
nine degrees to return it to horizontal. This might not
work precisely, because the nine degree dimension
could be rounded off. A closer look reveals that the angle
is slightly less.

Using this new, more precise value could still lead to an incorrect drawing because this value
is most likely rounded off as well.

The much more precise and quicker solution is to use the Reference option of the Rotate
command.

194                                                                                  Rotating Drawing Objects
Chapter: Modifying Drawing Objects
In this example the centerline of the bolt will serve as the reference angle. Therefore, the left
endpoint of the centerline will serve as the basepoint.

        1. Begin the Rotate command and select the
           objects to be rotated.

        2. Specify the basepoint.

        3. Choose the [Reference] option in the Command line.

        4. Select the two endpoints of the centerline to represent the new reference angle.

        5. Move the crosshairs horizontally to the right
           of the basepoint along the 0 degree Polar
           Tracking angle.

        6. Select a point to rotate the bolt into place.

Exercises: Rotating Drawing Objects
In these exercises, you will rotate several drawing objects.

You do the following:

    •   Start the Rotate command.
    •   Select objects.
    •   Specify base points.
    •   Specify a rotation angle by typing a value.
    •   Specify a rotation angle with Polar Tracking.
    •   Use the reference option to orient drawing objects.

Rotating Drawing Objects                                                                            195
Chapter: Modifying Drawing Objects
6.4.1 Rotating Drawing Objects
In this exercise you will use the Rotate command to adjust the orientation of several doors.
1. Open drawing 6.4.1 Rotating Objects 1.dwg.
2. Set Endpoint as a Running Object Snap.
Four doors have been placed, but they need to be rotated into place. Start with the door in
the lower left, then work clockwise around the building.
3. Zoom to the lower-left quadrant of the building.
4. Select Ribbon: Home ⇒ Modify ⇒ Rotate.
5. Select the door.
6. Press [Enter] at the keyboard to finish selecting objects.
You are now prompted to select the base point.
7. Select the point where the arc touches the
wall to specify it as the base point.
You are now prompted to specify the rotation angle.
8. At the Command line type 90 then press [Enter] at the keyboard.
The door is rotated into place.
9. Zoom to the upper-left quadrant of the building.
196 Rotating Drawing ObjectsChapter: Modifying Drawing Objects
10. Select Ribbon: Home ⇒ Modify ⇒ Rotate.
11. Select the door.
12. Press [Enter] at the keyboard to finish selecting objects.
You are now prompted to select the base point.
13. Select the point where the arc touches the
wall to specify it as the base point.
You are now prompted to specify the rotation angle.
14. At the Command line type 45 then press [Enter] at the keyboard.
The last two doors will be rotated in the clockwise direction, which will require negative
rotation angles.
15. Zoom to the upper-right quadrant of the building.
16. Select Ribbon: Home ⇒ Modify ⇒ Rotate.
17. Select the door.
18. Press [Enter] at the keyboard to finish selecting objects.
You are now prompted to select the base point.
19. Select the point where the arc touches the
wall to specify it as the base point.
You are now prompted to specify the rotation angle.
20. At the Command line type -45 then press [Enter] at the keyboard.
Next you will rotate the final door.
21. Zoom to the lower-right quadrant of the building.
Rotating Drawing Objects 197Chapter: Modifying Drawing Objects
22. Select Ribbon: Home ⇒ Modify ⇒ Rotate.
23. Select the door.
24. Press [Enter] at the keyboard to finish selecting objects.
You are now prompted to select the base point.
25. Select the point where the arc touches the
wall to specify it as the base point.
You are now prompted to specify the rotation angle.
At the Command line type -90 then press [Enter] at the keyboard.
The completed drawing appears as shown.
26. Save the drawing.
198 Rotating Drawing ObjectsChapter: Modifying Drawing Objects
6.4.2 Rotating Objects with Polar Tracking
In this exercise you will use the Rotate command and Polar Tracking to speed up the rotate
process.
1. Open drawing 6.4.2 Rotating Objects 2.dwg.
2. Set Endpoint as a Running Object Snap.
3. Select the fly-out arrow next to the Polar Tracking button and select
45 degree increment angles.
4. If necessary, select the Polar Tracking button to turn it on.
5. Zoom to the lower-left quadrant of the building.
6. Select Ribbon: Home ⇒ Modify ⇒ Rotate.
7. Select the door.
8. Press [Enter] at the keyboard to finish selecting objects.
Rotating Drawing Objects 199Chapter: Modifying Drawing Objects
You are now prompted to select the base point.
9. Select the point where the arc touches the wall
to specify it as the base point.
You are now prompted to specify the rotation angle.
10. Move the crosshairs above the previous point,
until it snaps on to the 90 degree Polar Tracking
angle, then select a point.
The door is rotated into place.
11. Zoom to the upper-left quadrant of the building.
12. Select Ribbon: Home ⇒ Modify ⇒ Rotate.
13. Select the door.
14. Press [Enter] at the keyboard to finish selecting objects.
You are now prompted to select the base point.
15. Select the point where the arc touches the
wall to specify it as the base point.
200 Rotating Drawing ObjectsChapter: Modifying Drawing Objects
You are now prompted to specify the
rotation angle.
16. Move the crosshairs above and to the right
of the previous point, until it snaps on to the
45 degree Polar Tracking angle, then select
a point.
17. Repeat the process to complete the right side of the drawing.
18. Save the drawing.
6.4.3 Rotating Objects with the Reference Option
In this exercise you will use the Reference option of the Rotate command to adjust the
orientation of an object.
1. Open drawing 6.4.3 Rotating Objects 3.dwg.
2. Set Endpoint as a Running Object Snap.
A bolt head has been rotated at an unknown angle. You will rotate it until the top and bottom
edges are horizontal.
3. Select Ribbon: Home ⇒ Modify ⇒ Rotate.
4. Select the objects that make up the bolt head.
5. Press [Enter] at the keyboard to finish selecting objects.
Rotating Drawing Objects 201Chapter: Modifying Drawing Objects
You are now prompted to select the base point.
6. Select the lower-left corner to specify it
as the base point.
You are prompted for a rotation angle. By default, AutoCAD uses 0 as the reference angle,
meaning that you are rotating from horizontal. In this case the reference angle should match
the bottom edge of the bolt head. Since that value is unknown, you will select the two
endpoints of that line to specify it as the new reference angle.
7. At the Command line select the [Reference] option.
You are prompted to specify the reference angle.
8. Click the lower-left point.
9. Click the lower-right point.
The reference angle now matches the bottom edge
of the bolt head.
10. Move the crosshairs horizontally to the
right along the 0 degree Polar Tracking
angle.
11. Select a point to rotate the bolt head into
place.
The top and bottom edges of the bolt head are now horizontal.
12. Save the drawing.
202 Rotating Drawing ObjectsChapter: Modifying Drawing Objects
6.4.4 Challenge Exercise - Rotating Drawing Objects
In this exercise you will use the Rotate and Move commands to complete the kitchen layout.
1. Open drawing 6.4.4 Rotating Objects 4.dwg.
The drawing contains a partial floorplan of a kitchen layout.
Also included are several objects that need to be placed in
the floorplan including appliances, furniture, and windows.
2. Rotate each object the appropriate angle, then move the object to the correct location as shown
in the image above.
Points have been provided to aid in locating the objects properly. Enable the Node object
snap to move the objects to the points.
The windows have been rotated to non-standard angles. Use the Reference option of the
rotate command to rotate the windows to the proper angles.
3. Save the drawing.
Lesson Review
In this lesson, you learned how to rotate drawing objects both by typing angle values at the
Command line and with the aid of Polar Tracking.
Rotating Drawing Objects 203Index
[F2] 22 External Reference Fading 441
Absolute Coordinates 38 External Reference Path Type 441
Additional Tracking Angles 52 External Reference Type 440
Aligned Dimension 499 External Reference Updating 441
Angles 40 External References 438
Angular Dimension 499 External References Palette 439
Application Menu 5 File Tabs 6
Arc 139 File Types 11
Area 342 Fillet command 228
Associative Dimensions 503 Freezing and Thawing Layers 67
automatic save 15 Geometric Center Snap 108
automatic save files 15 Grip Editing 322
backup copy 15 Hatch patterns 375
Baseline Dimension 502 Help 6
Block Editor 424 Increment Tracking Angles 50
Blocks 393, 439 Inscribed 97
Boundary edges 215 Insert command 439, 449
Boundary Edges in Quick Mode 216 Insert Snap 110
Cartesian Coordinates 38 Inserting Blocks 393
Center Snap 108 Intersection Snap 108
Chamfer command 240 Joining Lines and Arcs 155
Changing the Layer of Existing Objects 66 Keyboard Options 21
Circle 83 Lasso 28
Circumscribed 98 Layer Properties Manager 69
Closing a File 16 Layer States 67
Closing a Polyline 154 Layers 66
Command Line 7 Layout Tabs 7
Command Line Options 22 Layouts 472
Continue Dimension 501 Leaders 518
Copy command 257 Line 33
Create Block command 421 Linear Dimension 498
Crosshairs 6 Linetype 70
Crossing selection method 27 Lineweight 71
Current Layer 66 List command 363
Cutting edges 205, 208, 218 Locking Layers 68
Cutting Edges in Quick Mode 206 Match Properties 362, 378
DesignCenter 401 Measure Angle 339, 340
Diameter Dimension 500 Measure Area 342
Dimensioning 496 Measure Commands 333
Direct Distance Entry 50 Measure Distance 335
Drafting Settings Dialog Box 106 Measure Radius 337
Drawing Units 334 Midpoint Snap 107
Drawing Window 6 Mirror command 264
Dynamic Blocks 399 Model Space 461, 473
Edit Polyline 153 Move command 169
Endpoint Snap 107 Multileader 518
Erasing Objects 25 Multiline Text 485
Explode 156, 287, 396 Multiple Drawings 16
Extend command 215 Navigation Bar 24
Extend Quick Mode 215 Nearest Snap 110
Extend Standard Mode 218 New 11
Extension Snap 129 Node Snap 110
535Object Snap Tracking 127 Redo 25 Object Snaps 105, 129 Reference Angle 194 Offset command 311 Reference Option 178 Open 13 Relative Coordinates 39 ORTHO 50 Removing objects from a selection set 28 OSNAP 105 Ribbons 5 OTRACK 127 Right-Click Context Menus 23 Page Setup Manager 470 Rotate command 193 Pan 24 Running Object Snaps 105 Paper Space 470 Save 14 Parallel Snap 130 Save As 14 Path Array 300 Scale command 178 PDF data to import 450 Selection Techniques 26 PDF Import 449 Status Bar 7 Perpendicular Snap 109 Stretch command 187 Plot style table 462 Tangent Snap 109 Plotting 461, 470 Text 485 Polar Array 285 Text Window 22 Polar Coordinates 40 Tool Palettes 400 Polar Tracking 50 Tracking Angles 129 Polygon 97 Trim command 205 polyline 92 Trim Quick Mode 205 Polyline Width 152, 154 Trim Standard Mode 208 Polylines 151 Turning Layers On and Off 67 Properties palette 365 UCS Icon 7 Properties Panel 362 Undo 25, 34 QNew 11 Units 53, 334 Quadrant Snap 109 View Cube 6, 24 Quick Access Toolbar 6 Viewport Scale 474 Quick Measure 346 Viewports 472 Quick Select 367 Window selection method 27 Radius Dimension 500 Write Block command 423 Rectangle 92 Zoom 24 Rectangular Array 273 536
You can also read