BIG-IP Virtual Edition Setup Guide for Amazon EC2 - Version 11.5
←
→
Page content transcription
If your browser does not render page correctly, please read the page content below
BIG-IP® Virtual Edition Setup Guide for
                        Amazon® EC2®

                              Version 11.5
Table of Contents

Table of Contents
       Legal Notices.....................................................................................................5

       Chapter 1: Getting Started with BIG-IP Virtual Edition..........................................................7
            What is BIG-IP Virtual Edition?..........................................................................................8
                   About BIG-IP VE compatibility with EC2 hypervisor products.................................8

       Chapter 2: Deploying BIG-IP Virtual Edition.........................................................................11
            About BIG-IP VE EC2 deployment...................................................................................12
                   Creating a key pair................................................................................................12
                   Creating a new virtual private cloud......................................................................13
                   Adding an additional subnet..................................................................................13
                   Creating new security groups................................................................................13
                   Adding a route for external subnet accessibility....................................................14
                   Launching a new BIG-IP Virtual Edition Amazon Machine Image........................14
                   Adding a third network interface............................................................................16
                   Making the BIG-IP Virtual Edition management port accessible...........................16
                   Logging in and setting the Admin password..........................................................17
                   Adding a secondary IP address............................................................................17
                   Making the secondary IP address accessible.......................................................18
                   Creating VLANs mapped to external and internal interfaces................................19
                   Creating self IP addresses for external and internal VLANs.................................19
                   About failover for EC2 instances...........................................................................20

       Chapter 3: Updating a BIG-IP VE Virtual Machine................................................................23
            About disk space changes...............................................................................................24
                   Increasing the disk space allotted to the BIG-IP virtual machine .........................24
            About updates to the BIG-IP VE virtual machine.............................................................25
                   Downloading and importing a BIG-IP VE update..................................................25
                   Installing a BIG-IP VE update................................................................................26
                   Rebooting after a BIG-IP VE update.....................................................................26

                                                                                                                                           3
Table of Contents 4
Legal Notices

        Publication Date
        This document was published on April 29, 2015.

        Publication Number
        MAN-0438-02

        Copyright
        Copyright © 2013-2015, F5 Networks, Inc. All rights reserved.
        F5 Networks, Inc. (F5) believes the information it furnishes to be accurate and reliable. However, F5 assumes
        no responsibility for the use of this information, nor any infringement of patents or other rights of third
        parties which may result from its use. No license is granted by implication or otherwise under any patent,
        copyright, or other intellectual property right of F5 except as specifically described by applicable user
        licenses. F5 reserves the right to change specifications at any time without notice.

        Trademarks
        AAM, Access Policy Manager, Advanced Client Authentication, Advanced Firewall Manager, Advanced
        Routing, AFM, APM, Application Acceleration Manager, Application Security Manager, ARX, AskF5,
        ASM, BIG-IP, BIG-IQ, Cloud Extender, CloudFucious, Cloud Manager, Clustered Multiprocessing, CMP,
        COHESION, Data Manager, DevCentral, DevCentral [DESIGN], DNS Express, DSC, DSI, Edge Client,
        Edge Gateway, Edge Portal, ELEVATE, EM, Enterprise Manager, ENGAGE, F5, F5 [DESIGN], F5 Certified
        [DESIGN], F5 Networks, F5 SalesXchange [DESIGN], F5 Synthesis, f5 Synthesis, F5 Synthesis [DESIGN],
        F5 TechXchange [DESIGN], Fast Application Proxy, Fast Cache, FirePass, Global Traffic Manager, GTM,
        GUARDIAN, iApps, IBR, Intelligent Browser Referencing, Intelligent Compression, IPv6 Gateway,
        iControl, iHealth, iQuery, iRules, iRules OnDemand, iSession, L7 Rate Shaping, LC, Link Controller, Local
        Traffic Manager, LTM, LineRate, LineRate Systems [DESIGN], LROS, LTM, Message Security Manager,
        MSM, OneConnect, Packet Velocity, PEM, Policy Enforcement Manager, Protocol Security Manager,
        PSM, Real Traffic Policy Builder, SalesXchange, ScaleN, Signalling Delivery Controller, SDC, SSL
        Acceleration, software designed applications services, SDAC (except in Japan), StrongBox, SuperVIP,
        SYN Check, TCP Express, TDR, TechXchange, TMOS, TotALL, Traffic Management Operating System,
        Traffix Systems, Traffix Systems (DESIGN), Transparent Data Reduction, UNITY, VAULT, vCMP, VE
        F5 [DESIGN], Versafe, Versafe [DESIGN], VIPRION, Virtual Clustered Multiprocessing, WebSafe, and
        ZoneRunner, are trademarks or service marks of F5 Networks, Inc., in the U.S. and other countries, and
        may not be used without F5's express written consent.
        All other product and company names herein may be trademarks of their respective owners.

        Patents
        This product may be protected by one or more patents indicated at:
        http://www.f5.com/about/guidelines-policies/patents
Chapter 1 Getting Started with BIG-IP Virtual Edition • What is BIG-IP Virtual Edition?
Getting Started with BIG-IP Virtual Edition

What is BIG-IP Virtual Edition?
                 BIG-IP® Virtual Edition (VE) is a version of the BIG-IP system that runs as a guest in specifically-supported
                 hypervisors. BIG-IP VE virtualizes a hardware-based BIG-IP system running a VE-compatible version of
                 BIG-IP® software.

                 Note: The BIG-IP VE product license determines the maximum allowed throughput rate. To view this rate
                 limit, you can display the BIG-IP VE licensing page within the BIG-IP Configuration utility. Lab editions
                 have no guarantee of throughput rate and are not supported for production environments.

About BIG-IP VE compatibility with EC2 hypervisor products
                 Each time there is a new release of BIG-IP® Virtual Edition (VE) software, it includes support for additional
                 hypervisor management products. The Virtual Edition and Supported Hypervisors Matrix on the AskF5™
                 website, http://support.f5.com, details which hypervisors are supported for each release.
                 BIG-IP® VE is compatible with the Amazon Web Services (AWS) EC2 hypervisors. This information
                 documents the AWS interface as it exists at the time of the version 11.5.0 BIG-IP software release to Amazon
                 Web Services.
                 SSL encryption processing on your VE will be faster if the instance type you choose supports the Advanced
                 Encryption Standard New Instruction (AES-NI). Contact your cloud vendor for details on which instance
                 types provide AES-NI support.

                 Important: Hypervisors other than those identified in the matrix are not supported with this BIG-IP version;
                 installation attempts on unsupported platforms might not be successful.

About the hypervisor guest definition requirements

                 The Amazon Web Services instance types supported for this release, along with the number of NICs each
                 supports, are detailed here:
                 •   m3.large (supports up to 3 network interfaces)
                 •   m3.xlarge (supports up to 4 network interfaces)
                 •   m3.2xlarge (supports up to 4 network interfaces)
                 •   c3xlarge (supports up to 4 network interfaces)
                 •   c3.2xlarge (supports up to 4 network interfaces)
                 •   cc2.8xlarge (supports up to 8 network interfaces)
                 •   c3.4xlarge (supports up to 8 network interfaces)
                 •   c3.8xlarge (supports up to 8 network interfaces)
                 •   2 x virtual network adapter cards (NICs). Up to 8 (1 management + 7 dataplane) are supported).

                     Important: F5 Networks recommends three or more network adapters for most topologies, but the
                     minimum requirement is two (one for management and one for traffic).

                     Important: To support NICs on Amazon Web Services you must create a virtual private cloud (VPC).

                 •   1 x virtual private cloud (VPC).

8
BIG-IP® Virtual Edition Setup Guide for Amazon® EC2®
• SCSI disk storage; download the image size that provides sufficient space to meet your requirements.
An optional secondary disk might also be required as a datastore for specific BIG-IP modules. For
information about datastore requirements, refer to the BIG-IP module's documentation.
Note: Refer to Increasing the disk space allotted to the BIG-IP virtual machine for details on changing the
disk size after initial download.
Important: You must supply at least the minimum virtual configuration limits to avoid unexpected results.
Important: There is no longer any limitation on the maximum amount of RAM supported on the hypervisor
guest.
Note: Refer to
http://docs.amazonwebservices.com/AWSEC2/latest/UserGuide/instance-types.html
for their most current definition of the service that meets these requirements.
Disk space guidelines
The size of the image that you choose to download determines both the number of slots and the number
and type of modules that are supported on the VE instance.
Allocated disk Supported module Module specific concerns
space combinations
7 GB LTM only on a single slot You cannot install upgrades or hotfixes to this version.
31 GB LTM only on two slots. This option can be extended and upgraded with new
versions and hot fix updates. It does not allow installing
any modules besides LTM, GTM, or LTM + GTM.
100 GB Supports all modules. Two slots This option can be extended and upgraded with new
are supported with potential room versions and hot fix updates. It allows installing any
to install a third. combination of other modules supported by the current
version of BIG-IP VE software.
9Chapter 2 Deploying BIG-IP Virtual Edition • About BIG-IP VE EC2 deployment
Deploying BIG-IP Virtual Edition
About BIG-IP VE EC2 deployment
To deploy the BIG-IP® Virtual Edition (VE) system on Amazon® EC2®, you need to perform these tasks:
• Create a key pair (if none exists)
• Create a VPC (if none exists)
• Launch a new AMI
After you complete these tasks, you can log in to the BIG-IP VE system and run the Setup utility. Using
the Setup utility, you can perform basic network configuration tasks, such as assigning VLANs to interfaces.
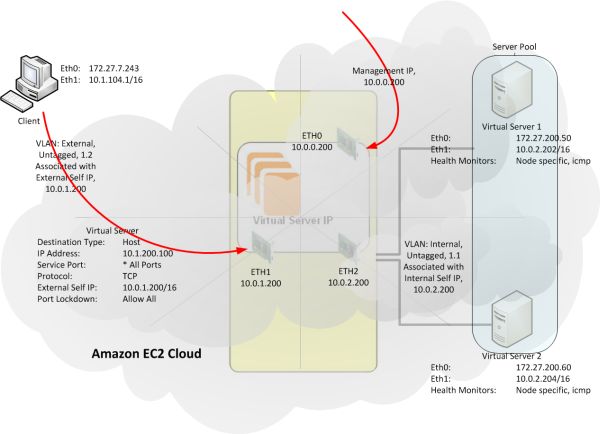
Figure 1: Basic Amazon Elastic Compute Cloud (EC2) diagram
Creating a key pair
To create a virtual private cloud (VPC) from which you can deploy BIG-IP® Virtual Edition (VE), you need
a (private-public encryption) key pair to authenticate your sessions. Key pairs are reusable, so if you have
a key pair, you do not need to repeat this task.
For the most current instructions for creating a key pair, refer to the Amazon Virtual Private Cloud
(VPC) Documentation web site http://aws.amazon.com/documentation/vpc/.
Important: It is crucial to your success that you be consistent in the Region that you choose throughout
the configuration process. Objects configured in one region are not visible within other regions, so they
cannot function together. There are a number factors that determine which region will best suit your
requirements. Refer to Amazon user documentation for additional detail.
The file that downloads from Amazon Web Services uses the extension .pem. If you plan to use this key
pair with the PuTTY terminal emulator application, you will need to convert the key pair from a .pem to a
12BIG-IP® Virtual Edition Setup Guide for Amazon® EC2®
.ppk file. At the time of this release, PuTTY does not support the extension .pem. PuTTY does have a tool
(called PuTTYgen) that converts your key pair to the required PuTTY format.
Creating a new virtual private cloud
You need a virtual private cloud (VPC) to deploy BIG-IP® Virtual Edition (VE) because Amazon Web
Services (AWS) only provides multiple network interface support for instances that reside within a VPC.
At the time of this release, Amazon does not support EC2 instances outside of a VPC.
For the most current instructions for creating a Virtual Private Cloud, refer to the Amazon Virtual Private
Cloud (VPC) Documentation web site http://aws.amazon.com/documentation/vpc/.
Important: It is crucial to your success that you be consistent in the Availability Zone that you choose
throughout the configuration process. Objects configured in one zone are not visible within other zones,
so they cannot function together.
Important: The first choice you have when creating a VPC is to select a VPC configuration. Choose
the VPC with Public and Private Subnets option.
Adding an additional subnet
When you create a VPC, Amazon Web Services creates two subnets (Management and External) for it. For
many network topologies, three or more subnets (Management, External, and Internal) are required.
For the most current instructions for creating an internal subnet, refer to the Amazon Virtual Private
Cloud (VPC) Documentation web site http://aws.amazon.com/documentation/vpc/.
If you are following a typical deployment strategy, when you finish adding the Internal subnet, your VPC
will have three subnets.
• a Management subnet on 10.0.0.0
• an External subnet on 10.0.1.0
• an Internal subnet on 10.0.2.0
Creating new security groups
To use your virtual private cloud (VPC) to deploy BIG-IP® Virtual Edition (VE), the VPC needs two security
groups. The table details the rules required that govern the security behavior for the traffic routed through
each group.
Group Name Group Rule Name Source Rule Type
Description
allow-only-ssh-https-ping Allow only SSH Inbound SSH 0.0.0.0/0
HTTPS or PING
Inbound HTTP 0.0.0.0/0
Inbound Custom ICMP 0.0.0.0/0 Echo Request
Outbound Custom ICMP 0.0.0.0/0 Echo Request
13Deploying BIG-IP Virtual Edition
Outbound Custom ICMP 0.0.0.0/0 Echo Reply
allow-all-traffic Allow all traffic Inbound All Traffic 0.0.0.0/0
Outbound All Traffic 0.0.0.0/0
Tip: The "Outbound All Traffic" rule is only necessary if you need to pass SNAT traffic with your outbound
connection.
For the most current instructions for creating security groups, refer to the Amazon Virtual Private Cloud
(VPC) Documentation web site http://aws.amazon.com/documentation/vpc/.
When you finish adding the two groups and their associated rules, your VPC should be ready to go with
three subnets and two security groups. It is a good idea to test connectivity before proceeding.
Important: F5 Networks recommends enhancing your security by using the security group source fields
to allow subnets only restricted management access; however, we recognize that this does not complete
your security solution. For enhanced security, you might want to deploy a topology with limited management
network access. For example, you could restrict source addresses to an Amazon Web Services VPN circuit,
or to a fixed IP address block unique to your organization.
Adding a route for external subnet accessibility
Most network topologies require an Amazon Web Services route to the VPC that makes the External subnet
used by the BIG-IP® Virtual Edition (VE) accessible to the Internet.
1. From the Services tab at the top of the Amazon Web Services Management Console screen, select VPC.
2. In the Navigation pane, select Route Tables.
The Route Tables screen opens.
3. Select the routing table with one subnet.
4. Click the Associations tab at the bottom of the window.
5. From the Select a subnet list, select the 10.0.1.0/24 subnet.
6. Click Associate.
The Associate Route Table popup screen opens.
7. Click Yes, Associate.
Launching a new BIG-IP Virtual Edition Amazon Machine Image
You need to know the name of your key pair and the Availability Zone from which they were created before
you can complete this task.
You need to have an EC2 Amazon Machine Image (AMI) to deploy BIG-IP® Virtual Edition (VE).
Important: At publication, this task illustrates the Amazon web interface. However, F5 recommends that
you refer to Amazon user documentation for the latest documentation.
1. Log in to your account on Amazon Web Services (AWS) marketplace.
2. In the Search AWS Marketplace bar, type F5 BIG-IP and then click GO.
The F5 BIG-IP Virtual Edition for AWS option is displayed.
3. Click F5 BIG-IP Virtual Edition for AWS and then click CONTINUE.
14BIG-IP® Virtual Edition Setup Guide for Amazon® EC2®
Tip: You might want to take a moment here to browse the pricing details to confirm that the region in
which you created your security key pair provides the resources you require. If you determine that the
resouces you need are provided in a region other than the one in which you created your key pair, create
a new key pair in the correct region before proceeding.
The Launch on EC2 page is displayed.
4. Click the Launch with EC2 Console tab.
Important: At the time of this publishing, BIG-IP VE requires launch in a VPC so that NICs can be
attached. This configuration is supported from the Launch with EC2 Console option, but not the 1-Click
Launch option.
Launching Options for your EC2 AMI are displayed.
5. Select the BIG-IP software version appropriate for your installation and then click the Launch with
EC2 button that corresponds to the Region that provides the resources you plan to use.
Important: There are a number factors that determine which region will best suit your requirements.
Refer to Amazon user documentation for additional detail. Bear in mind though that the region you
choose must match the region in which you created your security key pair.
The Request Instances Wizard opens.
6. Select an Instance Type appropriate for your use.
7. From the Launch Instances list, select VPC.
8. From the Subnet list, select the 10.0.0.0/24 subnet.
9. Click Continue
The Advanced Instance Options view of the Request Instances Wizard opens.
10. From the Number of Network Interfaces list, select 2.
11. Click the horizontal eth1 tab to set values for the second network interface adapter, and then from the
Subnet list, select the 10.0.1.0/24 subnet.
12. Click Continue.
The Storage Device Configuration view of the Request Instances Wizard opens.
13. Click Continue
The Instance Details view of the Request Instances Wizard opens.
14. In the Value field, type in an intuitive name that identifies this AMI (for example, BIG-IP VE .
15. Click Continue.
The Create Key Pair view of the Request Instances Wizard opens.
16. From Your existing Key Pairs, select the key pair you created for this AMI.
17. Click Continue.
The Configure Firewall view of the Request Instances Wizard opens.
18. Under Choose one or more of your existing Security Groups, select the allow-all-traffic security group.
19. Click Continue.
The Review view of the Request Instances Wizard opens.
20. Confirm that all settings are correct, and then click Launch.
The Launch Instance Wizard displays a message to let you know your instance is launching.
21. Click Close.
Your new AMI will appear in the list of instances when it is fully launched.
15Deploying BIG-IP Virtual Edition
Adding a third network interface
When you first create a virtual private cloud (VPC), there are typically only two network interfaces associated
with it. F5 Networks recommends adding a third network interface to the VPC before you use it to deploy
BIG-IP® Virtual Edition (VE).
1. From the Services tab at the top of the Amazon Web Services (AWS) Management Console screen,
select EC2.
2. In the Navigation pane, select Network Interfaces.
The Network Interfaces screen opens.
3. Click the Create Network Interface button (at top left).
The Create Network Interface popup screen opens.
4. In the Description field, type Internal 10.0.2.0-24 (or a similarly mnemonic name).
5. In the Subnet field, select 10.0.2.0/24.
6. From the Security Groups list, select allow-all-traffic.
7. Click Yes, Create
AWS adds your network interface to the list.
8. Right-click the new network interface, and then select Attach.
The Attach Network Interface popup screen opens.
9. From the Instance list, select the VE AMI that you created.
Making the BIG-IP Virtual Edition management port accessible
The Management port for your BIG-IP® Virtual Edition (VE) might require accessibility over the Internet.
Alternative topologies exist that do not require exposing the Management port to the Internet.
F5 Networks recommends, at a minimum, adding restrictions to your source addresses in the
allow-only-ssh-https-ping security group.
Alternatively, you might find the Amazon Web Services EC2 VPN sufficiently effective so that you do not
need to associate an Internet accessible Elastic IP with the Management port.
1. From the Services tab at the top of the Amazon Web Services Management Console screen, select EC2.
2. In the Navigation pane, select Elastic IPs.
The Addresses screen opens.
3. Click Allocate New Address.
The Allocate New Address popup screen opens.
4. From the EIP used in list, select VPC.
5. Click Yes, Allocate.
6. In the Address column, right-click the newly created Elastic IP and select Associate from the popup
menu.
The Associate Address popup screen opens.
7. From the Instance list, select the VE AMI that you created as an EC2 hypervisor.
8. From the Private IP Address list, select 10.0.0.0/24 (the Management subnet).
9. Click Yes, Associate.
16BIG-IP® Virtual Edition Setup Guide for Amazon® EC2®
Logging in and setting the Admin password
To perform this task, you must have completed the following tasks:
• Created a key pair
• Created and configured a VPC
• Instantiated and launched a BIG-IP® VE AMI
• Made the BIG-IP VE Management port accessible using the Internet
To maintain security, the first time you log in to your EC2 AMI, you should log in as root, and change the
Admin password.
1. Log in to the new AMI that you just launched.
Use the name of the key pair (.pem file), and the elastic IP address of your EC2 instance. $ ssh -i
-aws-keypair.pem root@
Tip: You can also use a terminal emulator such as PuTTY to test your connectivity. At publication,
PuTTY does not support the extension .pem, so remember that you will also need to convert the key
pair .pem file to a .ppk file before you can use it with PuTTY.
2. At the command prompt, type tmsh modify auth password admin.
Important: Because this login is visible externally, make sure to use a strong, secure password.
The terminal window displays the message: changing password for admin, and then prompts:
new password .
3. Type in your new password and then press Enter.
The terminal window displays the message: confirm password.
4. Re-type the new password and then press Enter.
5. To ensure that the system retains the password change, type tmsh save sys config, and then press
Enter.
Important: Without your security key pair, you cannot access this AMI. Once you login with your key
pair, you could create a root password. However, if you decide to do this, choose the root password
wisely, bearing in mind that depending on your Security Group policies, this login could provide external
SSH access.
The Admin password is now changed.
Adding a secondary IP address
Secondary IP addresses are required for each subnet on which a Virtual Server resides. This task documents
the process of adding a Secondary IP address to a network interface of a BIG-IP® VE instance. This process
describes the Amazon Web Services (AWS) user interface at the time of this release.
Important: If you plan to setup high availability, you must perform this task twice, the first secondary IP
address you create is used by the BIG-IP device as the virtual server address. The second time perform this
task, you create the floating IP address for high availability fast failover.
1. From the Services tab at the top of the Amazon Web Services Management Console screen, select EC2.
17Deploying BIG-IP Virtual Edition
2. In the Navigation pane, select Network Interfaces.
The Network Interfaces screen opens.
3. Identify the External network interface (that is the NIC that uses the 10.0.1.0 subnet).
4. Right-click the external NIC, and select Manage Private IP Addresses.
The Manage Private IP Addresses popup screen opens.
5. Below the list of existing addresses and the corresponding subnets, select Assign a secondary private
address.
6. Click Yes, Update.
AWS adds a new IP address to the 10.0.1.0 subnet.
7. Click Close.
The IP address you just added is displayed in the Secondary Private IPs column of the Network Interfaces
screen.
Important: Make a note of the new IP address so that you will have it readily available when you want to
access your VPC. Inside Amazon Web Services, this new secondary IP address is used to access the BIG-IP
VE virtual server in the Amazon EC2 configuration.
Tip: Before these IP addresses can be used with the BIG-IP VE system, they must be configured within
TMOS.
Important: Before proceeding, verify that your allow-only-ssh-https-ping security group rule is functioning
properly. That is, confirm that you can successfully access the BIG-IP VE using SSH, HTTPS, and PING,
but other protocols (such as HTTP) are blocked.
Making the secondary IP address accessible
You might need to make the external IP address for the virtual server Internet-accessible.
1. From the Services tab at the top of the Amazon Web Services Management Console screen, select EC2.
2. In the navigation pane, select Elastic IPs.
The Addresses screen opens.
3. Click Allocate New Address.
The Allocate New Address popup opens.
4. From the EIP used in list, select VPC.
5. Click Yes, Allocate, and then click Close.
6. From the list of elastic IP addresses, right-click the just-created address, and select Associate from the
popup menu.
The Associate Address popup opens.
7. From the Network Interface list, select the Network Interface ID of the just-created external interface.
If you are using the Bring your own license (BYOL) AMI, you must now license the BIG-IP® Virtual Edition
(VE) and add your configuration objects. For information on performing these tasks, see the AskF5 web
site (http://support.f5.com/kb/en-us.html).
Important: If you are using the Hourly Billing AMI, you do not need to perform the licensing task, because
Amazon will monitor and control your license status automatically. The hourly charge for the instance
includes BIG-IP VE licensing fees as well. Similarly, with this AMI, you do not need to re-activate your
license.
18BIG-IP® Virtual Edition Setup Guide for Amazon® EC2®
Creating VLANs mapped to external and internal interfaces
Before you can configure VLANs, you must license the BIG-IP VE and set up the root and admin passwords.
Use the Setup Utility to perform these tasks.
You will create two VLANs (an external and an internal). You map the external VLAN to the 1.1 interface
and the internal VLAN to the 1.2 interface.
Important: When you complete the licensing tasks, you'll need to log in again with the admin password.
At this point, you'll have the option between the Standard and Advanced Network configuration. The standard
option uses the Setup Utility to step you through each setting. Because you only to need to set up a couple
items, it's better to choose advanced options and configure them manually.
1. Under Advanced Network Configuration on the Setup Utility Network page, click Finished to close the
Setup Utility.
2. On the Main tab, click Network > VLANs.
The VLAN List screen opens.
3. Click Create.
The New VLAN screen opens.
4. In the Name field, type external.
5. For the Interfaces setting, click interface 1.1 from the Available list, and use the Move button to add
the selected interface to the Untagged list.
6. You can leave the remaining controls as is. The system will use default settings.
7. Click Repeat.
8. Repeat steps 4 and 5, but this time type Internal for the Name and select 1.2 for the interface number.
Tip: You may have to select the 1.1 interface and use the Move button to remove it from the Untagged
list, so that when you are finished, only the 1.2 interface is listed.
9. Click Finished.
The screen refreshes, and displays the two new VLANs in the list.
Creating self IP addresses for external and internal VLANs
You must assign one self IP address to the external VLAN and another self IP address to the internal VLAN.
1. On the Main tab, click Network > Self IPs.
The Self IPs screen opens.
2. Click Create.
The New Self IP screen opens.
3. In the IP Address field, type the private IP address that is assigned to the ETH1 network interface.
4. From the VLAN/Tunnel list, select external.
5. Click Repeat.
6. In the IP Address field, type the private IP address that is assigned to the ETH2 network interface.
7. From the VLAN/Tunnel list, select internal.
8. Click Finished.
One self IP address is assigned to the external VLAN and the other is assigned to the internal VLAN.
19Deploying BIG-IP Virtual Edition
Now that you have your VLANs configured and associated with the EC2 self IPs, you can proceed with
configuring configuration objects such as pools and servers normally. Recall that the Amazon EC2
configuration uses the secondary private IP created earlier in this process to access the BIG-IP VE virtual
server.
About failover for EC2 instances
Active standby sync failover for EC2 makes it possible for you to configure a second BIG-IP® instance that
can process traffic if the first instance goes offline.
Important: You might also need to add management and external subnet routes to your Amazon virtual
private network so that those two networks can be accessed using an elastic IP address. For the most current
instructions for creating subnet routes, refer to the Amazon Virtual Private Cloud (VPC) Documentation
web site http://aws.amazon.com/documentation/vpc/
Supplying EC2 credentials for failover
You must supply the access key and secret key for both members of the active-standby pair so that your
Amazon Web Services account will accept the F5 API calls that facilitate the failover process.
1. Log in to your Amazon Web Services account and find your Access Key ID and Secret Access Key.
2. Use your cursor to highlight the Access Key ID that you want to use, and then copy the key to your
clipboard.
3. On the Main tab of the active-standby pair's primary BIG-IP device, click System > Configuration >
AWS.
The Global Settings page opens.
4. On the BIG-IP system Global Settings page, for Access Key paste in the Access Key ID that you copied
previously.
5. On the AWS interface, access your Secret Access Key, and then copy the key to your clipboard.
6. On the BIG-IP system Global Settings page, for Secret Key, paste in the Secret Access Key that you
copied previously.
7. Click Update.
8. Repeat the previous steps, but this time paste the credentials into the Global Settings page for the
active-standby pair's standby BIG-IP device.
Active-standby failover is referred to as Device Service Clustering (DSC). Configuration for DSC® is detailed
in product guides available from the AskF5™ Knowledge Base web site, http://support.f5.com.
The following list provides a high-level overview of the tasks to complete for completing your DSC
configuration.
1. Specify config sync local addresses for each instance.
2. Establish device trust between the instances. To do this, you create a peer list on one instance that
identifies its failover peer and then you perform a sync.
3. Create a device group on one instance that contains both instances.
4. Modify the default traffic group on one instance to define the failover method.
5. Perform one more sync. The configuration objects you created on one instance will be shared so that
both instances have the same configuration.
20BIG-IP® Virtual Edition Setup Guide for Amazon® EC2®
Important: One thing to keep in mind when you work between the AWS and F5 interfaces, is that the IP
addresses that AWS refers to as "public" and "private" are called "external" and "internal in the F5 Networks
user interface.
21Chapter
3
Updating a BIG-IP VE Virtual Machine
• About disk space changes
• About updates to the BIG-IP VE virtual
machineUpdating a BIG-IP VE Virtual Machine
About disk space changes
BIG-IP® VE can be deployed in a number of different disk space configurations. Because disk space can
be a costly resource, it makes sense to install the smallest disk space configuration that is practical for your
operation. If you opt for a smaller disk size, but later determine that you need additional space so you can
install upgrades and hot fixes, or to run additional module combinations, you can increase the size of the
disk space the BIG-IP VE uses to suit your needs.
Important: At the time of this release, decreasing the VE disk size is not supported. If you decide that you
need a smaller disk size, first install a smaller disk size version of BIG-IP VE, and then increase the size to
what you want. For example, you might install the 31Gb disk version of BIG-IP VE, but then decide you
only need 20Gb. You could install the 7Gb version, and then increase the disk size to 20Gb.
Increasing the disk space allotted to the BIG-IP virtual machine
You can customize the amount of resources available by using a sequence of hypervisor-specific steps to
increase the disk space the hypervisor uses, and follow those with a sequence of tmsh commands to increase
the size of the directories that BIG-IP® VE uses.
1. The process of expanding the virtual disk size of your hypervisor depends on which hypervisor you use.
Consult your hypervisor documentation for specific instructions.
2. After you complete the steps for expanding your hypervisor disk size, reboot the BIG-IP VE to see that
new disk size.
Important: Before the BIG-IP VE can use the additional disk space, you need to increase the size of
the directories on the disk.
3. Submit the following sequence of tmsh commands to schedule expansion of the directories in which
you need more room.
Tip:
There are four disk directories that can be resized.
• /config
• /shared
• /var
• /var/log
a) List the current size of the directories on your disk so you can determine which ones need to be
resized.
(tmsh show sys disk directory)
b) Expand the size of the directories in which you need additional space.
(tmsh modify sys disk directory new-size )
For example, use tmsh modify sys disk directory /config new-size 3145740 to
increase the size of /config directory to 3145740 1KB blocks (or roughly 3,221,237,760 bytes).
c) To confirm that the command you just submitted is properly scheduled, you can show the new list
of directories again.
24BIG-IP® Virtual Edition Setup Guide for Amazon® EC2®
(tmsh show sys disk directory)
d) If you change your mind about a submitted size change, you can revoke that size change.
(tmsh modify sys disk directory /config new-size 0)
In this example, the size of the /config directory is left as is, revoking any scheduled size changes.
After you submit this sequence of tmsh commands, the directory size changes will be scheduled. That
is, the next time the BIG-IP VE is rebooted, the disk directories are re-sized.
4. Reboot the BIG-IP VE.
During the reboot, the directory size increases finish.
About updates to the BIG-IP VE virtual machine
BIG-IP® VE updates within the same major version are installed in the same manner as updates to BIG-IP
software already installed on BIG-IP hardware. You do not need to reinstall BIG-IP VE in the hypervisor
guest environment to upgrade your system. To update a BIG-IP VE virtual machine, you can use the Software
Management tool in the Configuration utility, or you can upgrade the software from the command line. The
update procedure described in this guide uses the Software Management tool.
Downloading and importing a BIG-IP VE update
To install an update, BIG-IP software needs access to the ISO file. If the update is a hotfix, you need the
ISO files for both the base version and the hotfix before you can successfully import and install a hotfix
update.
1. In a browser, open the F5 Downloads page (https://downloads.f5.com).
2. Download the version's base ISO file, such as 11.5, and its associated MD5 checksum file.
Tip: The location to which you download ISO files is not significant. Just make sure you can navigate
to that location when you perform the import task.
3. Download the update ISO file, such as Hotfix-BIGIP-11.5.1-511.0-HF3.iso, and its associated
MD5 checksum file.
Important: Before you perform the installation, F5 recommends testing the integrity of the ISO files to
verify that you have downloaded clean copies. Use an MD5 verification program to ensure that the
downloaded ISO file's checksums match the values in their corresponding MD5 files.
4. On the Main tab, click System > Software Management > Image List > Import.
The Import Software Image screen opens.
5. Click Browse to navigate to the downloaded base level installation file.
6. When the image name appears in the Software Image field, click Import to begin the operation.
Important: Do not navigate away from this screen before the operation completes; the system might
not import the image successfully. Wait for the operation to complete before continuing with any other
work on the BIG-IP VE system.
The system presents a progress indicator during the operation; when the import is complete, the Import
page closes and the downloaded base image displays as an available image.
25Updating a BIG-IP VE Virtual Machine
7. Click the Hotfix List tab.
The Available Images portion of the screen displays any hotfixes you've imported previously.
8. At the right side of the screen, click Import.
The Import Hotfix screen opens.
9. Click Browse to navigate to the downloaded hotfix installation file.
10. When the image name appears in the Software Image field, click Import to begin the operation.
Important: Do not navigate away from this screen before the operation completes; the system might
not import the image successfully. Wait for the operation to complete before continuing with any other
work on the BIG-IP VE system.
The system presents a progress indicator during the operation; when the import is complete, the Import
page closes and the downloaded hotfix displays in the list of available images.
Installing a BIG-IP VE update
After you download and import the software installation image, you can initiate the installation operation.
There are three boot locations on which you can install images on the BIG-IP system. The process for
installing a hotfix or a base version is essentially the same.
1. On the Main tab of the navigation pane, click System > Software Management.
The Software Management Image List screen opens.
2. In the Available Images area, select the software image you want to install and click Install.
The Install Software Image popup screen opens.
3. Select the disk you want to install the image on, and then type or select a volume name, and click Install.
The upgrade process installs the software on the inactive disk location that you specify. This process
usually takes between three and ten minutes.
Tip: If there is a problem during installation, you can use log messages to troubleshoot a solution. The
system stores the installation log file as /var/log/liveinstall.log.
The software image is installed.
When the installation operation is complete, you can safely reboot the newly installed volume or partition.
Rebooting after a BIG-IP VE update
When the installation operation is complete, you can safely reboot into the newly installed volume or
partition.
1. On the Main tab of the navigation pane, click System > Software Management.
The Software Management Image List screen opens.
2. On the menu bar, click Boot Locations.
The Boot Locations screen opens.
3. In the Boot Location column, click the link representing the boot location you want to activate.
The properties screen for the boot location opens.
4. Click Activate.
A confirmation screen opens.
5. Click OK to initiate the reboot operation.
The system presents progress messages during the restart operation.
26BIG-IP® Virtual Edition Setup Guide for Amazon® EC2®
When the BIG-IP® VE system reboot is complete, the system presents the login screen. To configure the
system, log in using an account that has administrative permissions.
27Index
Index
A H
access key hypervisor
finding 20 about 8
Admin password hypervisor guest definition 8
changing 17
setting 17
AMI
I
launching new 14 installation
rebooting after 26
B installation operation 26
IP address
BIG-IP Virtual Edition making secondary accessible 18
about increasing disk size 24 IP addresses
updating 25 adding secondary 17
ISO file
and location on virtual machine 25
C downloading 25
CPU downloading base ISO file 25
and guest definition 8 downloading update ISO file 25
D K
deployment overview 12 key pairs
disk size, See virtual disk size creating 12, 20
disk space guidelines 9
downloads L
and importing update 25
of ISO base file 25 log file
of ISO update file 25 and location 26
and media speed messages 26
log in
E after updating 26
EC2
supplying credentials 20 M
EC2 AMI
launching 14 management port
EC2 credentials making it accessible 16
for failover 20 maximum allowed throughput rate 8
EC2 instances
about failover 20
EC2 VPC
N
creating 13 network interface
Elastic Compute Cloud adding 16
and compatible versions 8
elastic IP address
making accessible 18 P
environment, for guest 8
password
external subnet
changing Admin 17
adding route for accessibility 14
setting Admin 17
product license 8
G progress indicator, for update 25
guest environment 8
29Index
R task list (continued)
for deploying on virtual machine 12
reboot operation for updating on virtual machine 25
after updating 26
route
adding for external subnet 14
U
untagged interfaces
S configuring 19
update
secondary IP address downloading and importing 25
making accessible 18 installing 26
secondary IP addresses update progress indicator 25
adding 17
secret pair
finding 20
V
security groups virtual configuration, and hypervisor guest definition 8
creating 13 virtual disk size
Setup utility 12 extending 24
subnet increasing 24
adding additional 13 virtual machine settings 8
adding route for external 14 virtual private cloud
system reboot, See reboot operation. creating 13
system update procedure 25 VLAN external
creating self IP addresses for 19
T VLANs
creating with untagged interfaces 19
task list
for deploying on Amazon EC2 12
30You can also read