Windows
PowerShell Tutorial
  for Beginners
←
→
Page content transcription
If your browser does not render page correctly, please read the page content below

Windows PowerShell Tutorial for Beginners
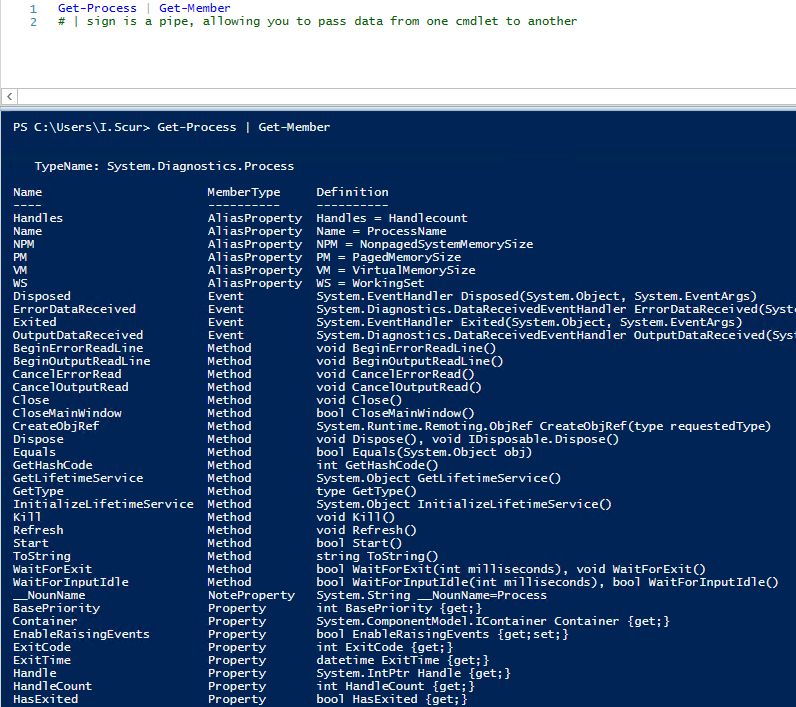
Table of Contents
Introduction                                                                   4

1. PowerShell Scripting Basics                                                 5

   1.1 Launching the PowerShell                                                5

   1.2 Preparing to Run PowerShell Scripts                                     6

   1.3 PowerShell Cmdlets                                                      7

   1.4 Comments                                                               11

   1.5 Pipes                                                                  11

2. Top 10 Active Directory Management Tasks with PowerShell                   12

   2.1 Creating New User and Computer Accounts                                12

   2.2 Joining a Computer to a Domain and Removing a Computer from a Domain   18

   2.3 Renaming a Computer                                                    19

   2.4 Resetting a Computer Account                                           20

   2.5 Disabling User and Computer Accounts                                   20

   2.6 Deleting a Computer from Active Directory                              21

   2.7 Creating and Deleting an Active Directory Group                        22

   2.8 Adding Users and Computers to a Group                                  24

   2.9 Removing Users and Computers from a Group                              25

   2.10 Moving Users and Computers to a New Organizational Unit               26

                                                                               2
3. Top 10 File System Management Tasks Using PowerShell   28

   3.1 Viewing Objects in a Directory                     28

   3.2 Creating Files and Folders                         29

   3.3 Deleting Files and Folders                         29

   3.4 Copying Files and Folders                          31

   3.5 Moving Files and Directories                       32

   3.6 Renaming Files                                     33

   3.7 Setting File and Folder Permissions                33

   3.8 Removing User Permissions                          36

   3.9 Enabling and Disabling Permissions Inheritance     37

   3.10 Changing File and Folder Ownership                38

4. Automating PowerShell Scripts                          39

   4.1 Creating Scheduled Tasks with PowerShell Scripts   39

   4.2 Running PowerShell Scripts with Task Scheduler     40

Final Word                                                45

About Netwrix                                             47

                                                           3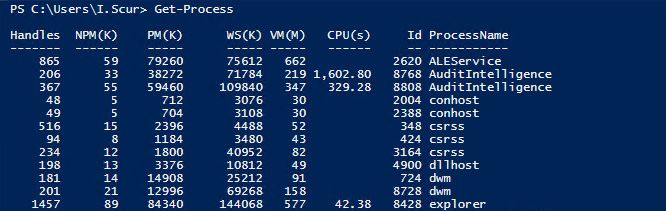
Introduction
Automate it. Now, where’s that script…
Warning: PowerShell is addictive.

Windows PowerShell is an object-oriented automation engine and scripting language with an interactive
command-line shell designed to help IT professionals configure systems and automate administrative tasks.
You can find it in every modern Windows OS starting with Windows 2008R2.

Learning Windows PowerShell is like learning to use a universal multi-tool. In this eBook, we’ll walk you
through PowerShell scripting basics, show you PowerShell commands and scripts for performing the most
common administrative tasks, and explain how you can schedule your PowerShell scripts and commands.

So, let’s start learning PowerShell!

                                                                                                        4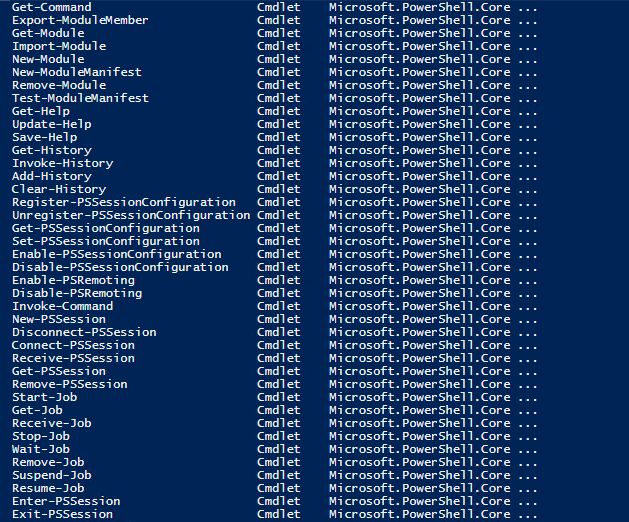
1. PowerShell Scripting Basics
In this part, we’ll cover PowerShell scripting basics so you can more easily perform virtually any
administration task in your Windows IT environment.

1.1 Launching the PowerShell
PowerShell offers both a command-line option and an integrated scripting environment (ISE):

  To launch the PowerShell command line, type powershell.exe in the Windows Start menu. You’ll see a
  screen like the following:

  To launch the PowerShell ISE, type powershell_ise.exe in the Start menu. Using the PowerShell ISE is the
  preferred way to work with the scripting language because it provides syntax highlighting, auto-filling of
  commands and other automation features that simplify script development and testing.

                                                                                                          5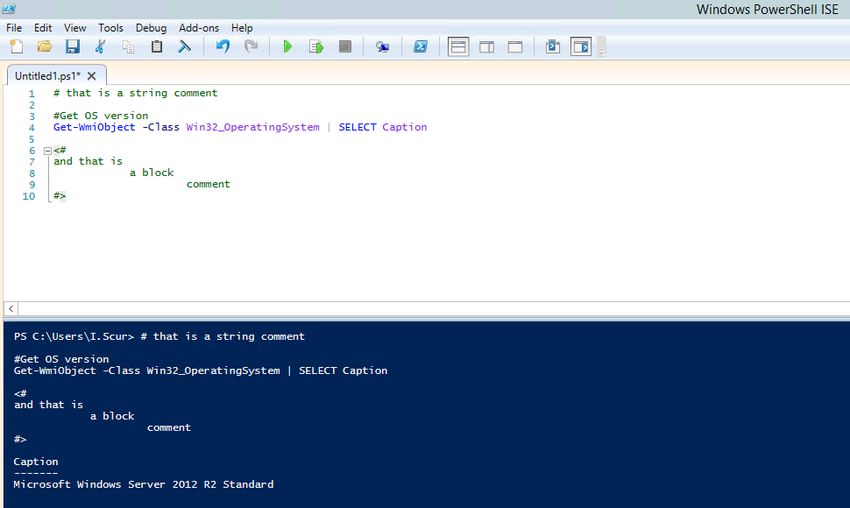
1.2 Preparing to Run PowerShell Scripts
PowerShell scripts are stored in.ps1 files. You cannot run a script by simply double-clicking a file; this design
helps avoid accidental harm to your systems. Instead, to execute a script, right-click it and choose Run with
PowerShell:

In addition, there is a policy that restricts script execution. You can check this policy by running the
Get-ExecutionPolicy command in PowerShell:

You will get one of the following values:

  Restricted — No scripts are allowed. This is the default setting, so you will see it the first time you run the
  command.

  AllSigned — You can run scripts signed by a trusted developer. Before executing, a script will ask you to
  confirm that you want to run it.

  RemoteSigned — You can run your own scripts or scripts signed by a trusted developer.

  Unrestricted — You can run any script you want.

To start working with PowerShell, you’ll need to change the policy setting from Restricted to RemoteSigned
using the Set-ExecutionPolicy RemoteSigned command:

                                                                                                               6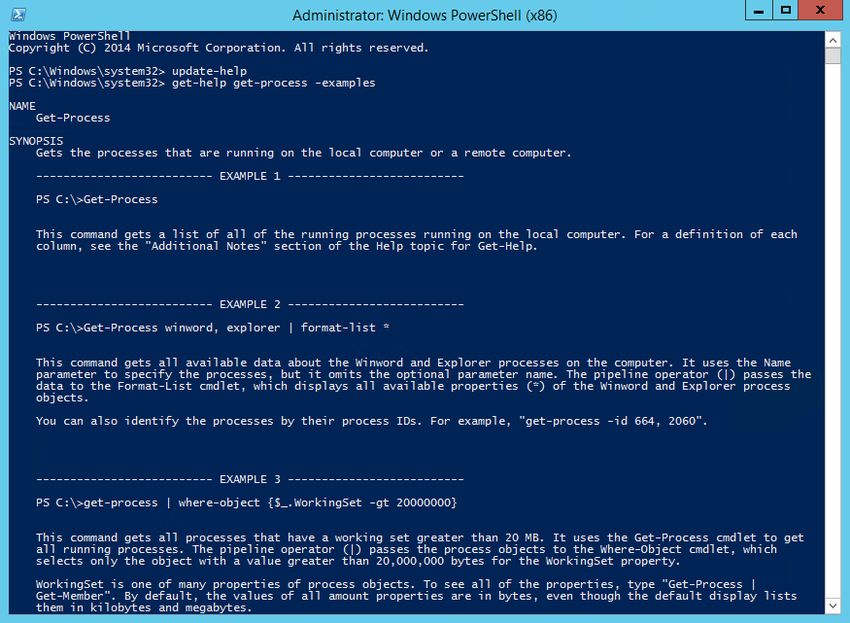
1.3 PowerShell Cmdlets
A cmdlet is a PowerShell command with a predefined function, similar to an operator in a programming
language. Here are some key things to know about cmdlets:

  There are system, user and custom cmdlets.

  Cmdlets output results as an object or as an array of objects.

  Cmdlets can get data for analysis or transfer data to another cmdlet using pipes (I’ll discuss pipes more in
  a moment).

  Cmdlets are case-insensitive. For example, it doesn’t matter whether you type Get-ADUser, get-aduser
  or gEt-AdUsEr.

  If you want to use several cmdlets in one string, you must separate them with a semicolon (;).

A cmdlet always consists of a verb (or a word that functions as a verb) and a noun, separated with a hyphen
(the “verb-noun” rule). For example, some of the verbs include:

  Get — To get something

  Set — To define something

  Start — To run something

  Stop — To stop something that is running

  Out — To output something

  New — To create something (“new” is not a verb, of course, but it functions as one)

For practice, try executing the following cmdlets:

  Get-Process — Shows the processes currently running on your computer:

                                                                                                             7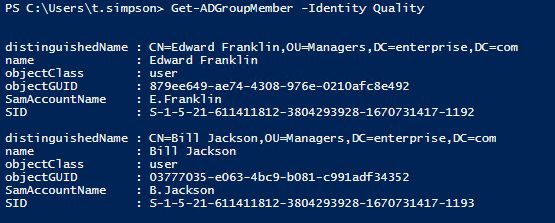
Get-Service — Shows the list of services with their status

  Get-Content    —    Shows   the   content    of   the   file   you   specify   (for   example,   Get-Content
  C:\Windows\System32\drivers\etc\hosts)

Good news — you don’t need to memorize all cmdlets. You can list all cmdlets by executing the Get Help
-Category cmdlet, which will return the following:

You can also create your own custom cmdlets.

Each cmdlet has several parameters that customize what it does. The PowerShell ISE will automatically
suggest all valid parameters and their types after you type a cmdlet and a hyphen (-):

                                                                                                            8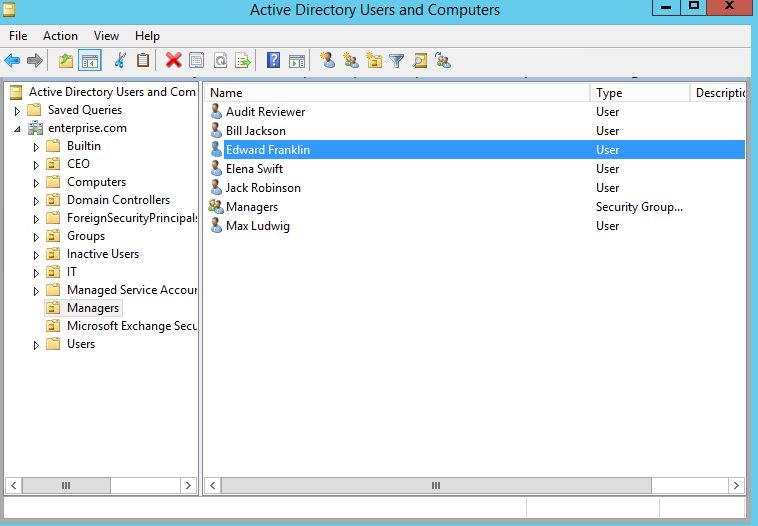
For example, the following cmdlet shows all services whose names start with “W”:
Get-Service -Name W*

If you forget a cmdlet’s parameters, just use a script like the following, which will display the parameters for
the Get-Process cmdlet:

 Get-Process | Get-Member

If you still don’t find the cmdlet you need, you can make sure the help is current and then get examples for
a cmdlet (such as Get-Process) using a script like this:

 Update-Help #to update the help data
 Get-Help Get-Process -Examples

                                                                                                               9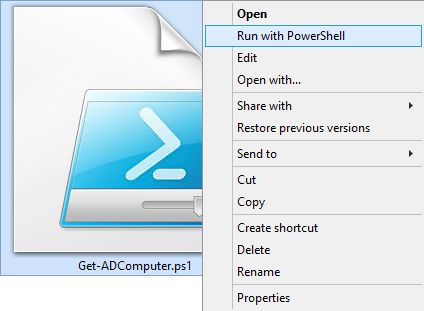
You can also use aliases, which are shortened cmdlet names. For instance, instead of Get-Help you can use
just Help. Try running the following two commands and see whether you get the same result:

 Start-Process notepad

 start notepad

Similarly, to stop this process, you can use either of the following commands:

 Stop-Process -Name notepad

 spps -Name notepad

To see all aliases, execute the Get-Alias cmdlet.

                                                                                                        10
1.4 Comments
Leaving comments in a script will help you — and your colleagues — better understand what the script does.
A string comment is a single line that starts with a number sign (#); block comments spread across multiple
lines, starting and ending with number signs and angle brackets:
1.5 Pipes
A pipe passes data from one cmdlet to another. I used a pipe earlier to get all properties of an object.
For example, if you execute the following script, you’ll get all services sorted by their status:
Get-Service | Sort-Object -property Status
You can also use a pipe to output text to a file using a script like the following:
"Hello, World!" | Out-File C:\ps\test.txt
You can use multiple pipes. For instance, the following script lists all services, with the first pipe excluding
stopped services and the second pipe limiting the list to display names only:
Get-Service | WHERE {$_.status -eq "Running"} | SELECT displayname
# “$_.” defines current element in the pipe
112. Top 10 Active Directory Management
Tasks with PowerShell
The easiest way to manage objects in an Active Directory domain is using the Active Directory Users and
Computers (ADUC) MMC snap-in. However, what if you need to create multiple user accounts in bulk, or
ADUC is not available for some reason? In this part, we’ll explore how to perform most common AD
management tasks with PowerShell.
Keep in mind that before you can work with Active Directory and its objects, you need to import the Active
Directory module for Windows PowerShell. In Microsoft Windows Server 2008 R2, you need to enable this
module by running the following command:
Import-Module ActiveDirectory
In Microsoft Windows Server 2012 and later, this module is enabled by default.
2.1 Creating New User and Computer Accounts
You can create new user accounts in Active Directory using the cmdlet New-ADUser. You can get its full
syntax by running the following command:
Get-Command New-ADUser –Syntax
When you know the syntax, it’s easy to add users to Active Directory:
New-ADUser B.Johnson
12Accounts are created with the following default properties:
Account is created in the “Users” container.
Account is disabled.
Account is a member of Domain Users group.
No password is set.
User must reset the password at the first logon.
Therefore, to make a new account that’s actually usable, you need to enable it using the Enable-ADAccount
cmdlet and give it a password using the Set-ADAccountPassword cmdlet.
Let’s create a new account with the following attributes:
Name — Jack Robinson
Given Name — Jack
Surname — Robinson
Account Name — J.Robinson
User Principal Name — J.Robinson@enterprise.com
Path — “OU=Managers,DC=enterprise,DC=com”
Password Input — Required
Status — Enabled
Here’s the script we’ll use:
New-ADUser -Name "Jack Robinson" -GivenName "Jack" -Surname "Robinson" -SamAccountName
"J.Robinson" -UserPrincipalName "J.Robinson@enterprise.com" -Path
"OU=Managers,DC=enterprise,DC=com" -AccountPassword(Read-Host -AsSecureString "Input
Password") -Enabled $true
The Read-Host parameter will ask you to input new password. Note that the password should meet the
length, complexity and history requirements of your domain security policy.
13Now, let’s create ten similar Active Directory accounts in bulk and set a default password (P@ssw0rd) for
each of them. To send the default password in a protected state, we must use the ConvertTo-SecureString
parameter. Here’s the script to use:
parameter. Here’s the script to use:
$path="OU=IT,DC=enterprise,DC=com"
$username="ITclassuser"
$count=1..10
foreach ($i in $count)
{ New-AdUser -Name $username$i -Path $path -Enabled $True -ChangePasswordAtLogon $true `
-AccountPassword (ConvertTo-SecureString "P@ssw0rd" -AsPlainText -force) -passThru }
To make the script more flexible, add the Read-Host parameter, which will ask for the number of users to be
added:
$path="OU=IT,DC=enterprise,DC=com"
$username=Read-Host "Enter name"
$n=Read-Host "Enter Number"
$count=1..$n
foreach ($i in $count)
{ New-AdUser -Name $username$i -Path $path -Enabled $True -ChangePasswordAtLogon $true `
-AccountPassword (ConvertTo-SecureString "P@ssw0rd" -AsPlainText -force) -passThru }
14Another option for creating users in AD is to import them from a CSV file. This option is great when you have
a list of users with predefined personal details such as:
FirstName
LastName
Username
Department
Password
OU
The CSV file must be in UTF8 encoding and contain contact data that looks like this:
The following script will create enabled user objects for any users in the CSV that don’t already have accounts
in AD. The “Reset password at the next logon” option will be enabled for the new accounts, so you can use
your default password:
15#Enter a path to your import CSV file
$ADUsers = Import-csv C:\scripts\newusers.csv
foreach ($User in $ADUsers)
{
$Username = $User.username
$Password = $User.password
$Firstname = $User.firstname
$Lastname = $User.lastname
$Department = $User.department
$OU = $User.ou
#Check if the user account already exists in AD
if (Get-ADUser -F {SamAccountName -eq $Username})
{
#If user does exist, output a warning message
Write-Warning "A user account $Username has already exist in Active Directory."
}
else
{
#If a user does not exist then create a new user account
#Account will be created in the OU listed in the $OU variable in the CSV file; don’t forget
to change the domain name in the"-UserPrincipalName" variable
New-ADUser `
-SamAccountName $Username `
-UserPrincipalName "$Username@yourdomain.com" `
-Name "$Firstname $Lastname" `
-GivenName $Firstname `
-Surname $Lastname `
-Enabled $True `
-ChangePasswordAtLogon $True `
-DisplayName "$Lastname, $Firstname" `
-Department $Department `
-Path $OU `
-AccountPassword (convertto-securestring $Password -AsPlainText -Force)
}
}
16After script execution, we have two new users, Edward Franklin and Bill Jackson, in our Active Directory
domain:
To create a computer object, use the New-ADComputer cmdlet. For example, execute the following cmdlet
parameters to create a computer object with “WKS932” as its name and the default LDAP path value:
New-ADComputer –Name “WKS932” –SamAccountName “WKS932”
If you have a list of computers that should be imported into Active Directory, save the list to a CSV file with
the heading “computer” and the list of computer names in the column below it. Run the following PowerShell
script on your domain controller to add computers from the CSV file, making sure you have the Path and File
variables set correctly:
$File="C:\scripts\Computers.csv" # Specify the import CSV position.
$Path="OU=Devices,DC=enterprise,DC=com" # Specify the path to the OU.
Import-Csv -Path $File | ForEach-Object { New-ADComputer -Name $_.Computer
-Path $Path -Enabled $True}
172.2 Joining a Computer to a Domain and Removing
a Computer from a Domain
Another common task is joining a computer to a domain controller. To join a PC to an Active Directory
domain, run the following PowerShell script locally:
$dc = "ENTERPRISE" # Specify the domain to join.
$pw = "Password123" | ConvertTo-SecureString -asPlainText –Force # Specify the password for
the domain admin.
$usr = "$dc\T.Simpson" # Specify the domain admin account.
$creds = New-Object System.Management.Automation.PSCredential($usr,$pw)
Add-Computer -DomainName $dc -Credential $creds -restart -force -verbose # Note that the
computer will be restarted automatically.
The computer will restart and then join the domain; it will be added to the default container.
To join a computer to a DC remotely, you need to enhance this script this way:
$dc = "ENTERPRISE"
$pw = "Password123" | ConvertTo-SecureString -asPlainText -Force
$usr = "$dc\T.Simpson"
$pc = "R07GF" # Specify the computer that should be joined to the domain.
$creds = New-Object System.Management.Automation.PSCredential($usr,$pw)
Add-Computer -ComputerName $pc -LocalCredential $pc\admin -DomainName $dc -Credential
$creds -Verbose -Restart -Force
The $pc variable and –LocalCredential parameter are used to authenticate the computer to the domain.
Note that in order to use this method, you must disable the firewall on the local computer.
You can add more than one computer to the domain by either specifying them in the command line as a
comma-delimited list or importing their names from a text file.
Here’s how to specify the computers in a comma-delimited list:
$dc = "ENTERPRISE"
$pw = "Password123" | ConvertTo-SecureString -asPlainText -Force
$usr = "$dc\T.Simpson"
$pc = "WKS034, WKS052, WKS057" # Specify the computers that should be joined to the domain.
$creds = New-Object System.Management.Automation.PSCredential($usr$pw)
Add-Computer -ComputerName $pc -LocalCredential $pc\admin -DomainName $dc -Credential
$creds -Restart -Force
18And here’s how to use a text file with the list of computers that should be joined:
$dc = "ENTERPRISE"
$pw = "Password123" | ConvertTo-SecureString -asPlainText -Force
$usr = "$dc\T.Simpson"
$pc = Get-Content -Path C:\Computers.txt # Specify the path to the computers list.
$creds = New-Object System.Management.Automation.PSCredential($usr,$pw)
Add-Computer -ComputerName $pc -LocalCredential $pc\admin -DomainName $dc -Credential
$creds -Restart -Force
To remove a computer from a domain remotely, use the Remove-Computer cmdlet. Here, we’re removing a
computer from a domain, so no local credentials are needed and we can skip the –LocalCredential parameter:
$dc = "ENTERPRISE"
$pw = "Password123" | ConvertTo-SecureString -asPlainText -Force
$usr = "$dc\T.Simpson"
$pc = "R07GF"
$creds = New-Object System.Management.Automation.PSCredential($usr,$pw)
Remove-Computer -ComputerName $pc -Credential $creds –Verbose –Restart –Force
To remove multiple computers using a list in a TXT file, use the script above for joining computers to a DC,
replacing the Add-Computer cmdlet with Remove-Computer. Note that you will still need domain admin
credentials to complete this unjoin operation.
2.3 Renaming a Computer
To change a computer name, use the Rename-Computer cmdlet. Note that the computer must be online
and connected to Active Directory.
Rename-Computer –ComputerName "FS1" -NewName "FS2"
If you want to run this script locally, it will look like this:
Rename-Computer -NewName "newname" -DomainCredential "Domain\Administrator"
19You can improve the renaming script by joining the computer to the domain and putting it into the specified
OU simultaneously. The script should be run on the target machine, not on the domain controller.
$NewComputerName = "Server3" # Specify the new computer name.
$DC = "contoso.com" # Specify the domain to join.
$Path = "OU=TestOU,DC=contoso,DC=com" # Specify the path to the OU where to put the
computer account in the domain.
Add-Computer -DomainName $DC -OUPath $Path -NewName $NewComputerName –Restart
–Force
The script will prompt for the credentials of an account that has permissions to join computers to the
domain, and then the computer will be renamed, restarted and joined to the domain.
2.4 Resetting a Computer Account
Like a user account, a computer account interacts with Active Directory using a password. But for computer
accounts, a password change is initiated every 30 days by default and the password is exempted from the
domain’s password policy. Password changes are driven by the client (computer), not AD.
Computer credentials usually unknown to the user because they are randomly set by the computer. But you
can set your own password; here is a PowerShell script for doing so:
$pc = read-host –Prompt “Input computer name to reset“ # Specify the computer name.
$pw = read-host –Prompt “Input random characters for temp password“ –AsSecureString #
Specify the password.
Get-ADComputer $pc | Set-ADAccountPassword –NewPassword:$pw -Reset:$true
2.5 Disabling User and Computer Accounts
To disable user, computer or service accounts, use the Disable-ADAccount cmdlet. The -Identity parameter
specifies which account to disable. You can specify an account by its distinguished name, security identifier
(SIDs), globally unique identifier (GUID) or Security Account Manager (SAM) account name.
Disable-AdAccount -Identity RussellS
20If you specify a computer account name, remember to append a dollar sign ($) at the end of the name;
otherwise, you’ll get an error after script execution.
Disable-ADAccount -Identity fs1$
You can also disable accounts in bulk using a list in a text file:
$Pclist = Get-Content C:\scripts\Computer.txt # Specify the path to the computer list.
Foreach($pc in $Pclist)
{
Disable-ADAccount -Identity "$pc"
Get-ADComputer -Identity "$pc" | Move-ADObject -TargetPath “OU=Disabled
Computers,DC=enterprise,DC=com”
}
2.6 Deleting a Computer from Active Directory
To delete a computer account from AD, use the Remove-ADObject cmdlet:
Remove-ADObject -Identity "WKS932"
You will be prompted to confirm the deletion.
If you have a text file with a list of old computers, you can streamline the task of removing them using
PowerShell. The following script will read the computer names from a TXT file and delete the corresponding
accounts via a pipeline:
Get-Content C:\scripts\computersfordeletion.txt | % { Get-ADComputer -Filter { Name
-eq $_ } } | Remove-ADObject -Recursive
21Stale accounts in Active Directory can be compromised, leading to security incidents, so it is critical to keep
an eye on them. This PowerShell script will query Active Directory and return all computers that have not
been logged in to for the past 30 days. It also will remove those accounts to keep your AD clean.
$stale = (Get-Date).AddDays(-30) # means 30 days since last logon; can be changed to any number.
Get-ADComputer -Property Name,lastLogonDate -Filter {lastLogonDate -lt $stale} |
FT Name,lastLogonDate
Get-ADComputer -Property Name,lastLogonDate -Filter {lastLogonDate -lt $stale} |
Remove-ADComputer
There is one computer, FS1, that has been not been logged on to for more than 30 days. The system will
prompt for confirmation before deleting it from the domain:
If you want to disable, rather than delete, the inactive computer accounts, replace the
Remove-ADComputer cmdlet with Set-ADComputer and -Enabled $false parameter and value.
Remember that it is critical to closely track all changes to computer accounts, so you can quickly spot any
unwanted modifications and respond appropriately. Here’s how to monitor computer account deletions.
2.7 Creating and Deleting an Active Directory Group
In Active Directory, access to network resources is granted to security principals, such as user accounts and
computer accounts, and those permissions can change over time. To simplify access management and
improve security, medium and large companies often use Active Directory security groups, which can
contain user and computer accounts as well as other groups. They also often use distribution groups to
manage email distribution lists. Both security and distribution groups have unique SIDs and GUIDs.
22If you’re not already familiar with AD groups and group management, please read the Active Directory
Group Management Best Practice guide.
To create an AD group, use the New-ADGroup cmdlet. You can get its syntax by running the following command:
Get-Command New-ADGroup –Syntax
The easiest way to create a group is to run this short script:
New-ADGroup "Group Name"
The system will ask you to specify the GroupScope parameter and then it will create a new group. However,
this group will have default values, such as:
It will be created in the default LDAP container called “Users”.
It will have the “Security” group type.
The Members, Member of, Description, Email and Notes fields will all be blank.
Let’s create a security group called “Quality” in the “Production” OU (-Path); it should be a security group
(-GroupCategory) and it should be global (-GroupScope):
New-ADGroup "Quality" -Path "OU=Production,DC=enterprise,dc=com" -GroupCategory
Security -GroupScope Global -PassThru –Verbose
If you want to make a universal distribution group, simply change the –GroupCategory parameter to “Distribution” and
the –GroupScope parameter to “Universal”. You can also change the LDAP path by changing the –Path parameter.
To delete an AD group, use the Remove-ADGroup cmdlet. The easiest script for that will look like this:
Remove-ADGroup -Identity Quality
You’ll be prompted to confirm the deletion of the group.
232.8 Adding Users and Computers to a Group
You can add users to an AD group with the Add-AdGroupMember cmdlet. For instance, if you needed to
add two users, B.Jackson and E.Franklin, to the “Quality” group, here is what the script would look like:
Add-AdGroupMember -Identity Quality -Members B.Jackson, E.Franklin
Once you’ve added users to a security group, you can run this script to verify that they are listed as members:
Get-ADGroupMember -Identity Quality
If you need to add users to another security or distribution group, such as Domain Admins, specify “Domain
Admins” as the value for the –Identity parameter. If you need one group to be a member of another, specify
the group name as the value for the –Members parameter. The same principle applies to computer accounts,
but you’ll need to append a dollar sign ($) to the end of the computer account name. For example, to add the
computer “WKS043” to a group, specify “WKS043$” as the value for the –Member parameter:
Add-AdGroupMember -Identity Quality -Members WKS043$
To add a user to multiple groups at once, run the following script.
"Managers","Quality" | Add-ADGroupMember -Members `
(Read-Host -Prompt "Enter User Name")
You’ll be prompted to input the username.
If you want to add a large number of users to a group, you can specify them in a CSV file and then import that
file. Note that the list of the usernames in the CSV file must contain the SamAccountNames in the “users”
column, as shown below:
24To add users to group from a CSV file, run the following PowerShell script:
Import-CSV C:\scripts\users.csv -Header users | ForEach-Object {Add-AdGroupMember
-Identity "Quality" -members $_.users}
If you want to copy all members from one group to another group, run the following script:
Get-ADGroupMember “Quality” | Get-ADUser | ForEach-Object {Add-ADGroupMember
-Identity “QualityControl” -Members $_}
2.9 Removing Users and Computers from a Group
To remove a user from a group, use the Remove-ADGroupMember cmdlet:
Remove-ADGroupMember -Identity Quality -Members J.Robinson
To remove a computer account from a group, specify the computer name with a dollar sign ($) at the end as
the value for the -Members parameter.
An easy way to remove multiple users from an AD group is to create a CSV file with the list of usernames and
then remove those users from the group object using this script:
Import-CSV C:\scripts\users.csv -Header users | ForEach-Object {Remove-ADGroupMember
-Identity "Quality" -members $_.users}
To remove a user from all groups, run this script:
Get-ADUser -Identity E.Franklin -Properties MemberOf | ForEach-Object {
$_.MemberOf | Remove-ADGroupMember -Members $_.DistinguishedName -Confirm:$false
}
25Note that the user will lose all group membership except Domain Users, which can be removed manually if
needed.
Don’t forget to enable the Active Directory Recycle Bin feature so you can easily roll back your changes if
something goes wrong.
2.10 Moving Users and Computers to a New Organizational Unit
The PowerShell Move-ADObject cmdlet moves any object or set of objects (such as a user, a computer, a
group or an OU) to a specified OU. The -Identity parameter specifies which Active Directory object or
container to move. Note that you need to enter the full LDAP path or SID of the object; you cannot use its
SamAccountName. Here’s how to move the user “John Brown” to the “Districts” OU:
Move-ADObject -Identity "CN=John Brown,CN=Users,DC=enterprise,DC=com" -TargetPath
"OU=Districts,OU=IT,DC=Enterprise,DC=Com"
Use the same syntax to move computer objects. The following command will move the computer “R07GF” to
the “Computers” container:
Move-ADObject -Identity "CN=R07GF,OU=CEO,DC=enterprise,DC=com" -TargetPath
"CN=Computers,DC=Enterprise,DC=Com"
If you have a predefined list of objects to move, you can save it as a CSV file and then import that file to Active
Directory. The CSV list should be in the following format:
26Use this PowerShell script to move AD user accounts listed in a CSV file:
# Specify target OU. This is where users will be moved.
$TargetOU = "OU=Districts,OU=IT,DC=enterprise,DC=com"
# Specify CSV path. Import CSV file and assign it to a variable.
$Imported_csv = Import-Csv -Path "C:\temp\MoveList.csv"
$Imported_csv | ForEach-Object {
# Retrieve DN of user.
$UserDN = (Get-ADUser -Identity $_.Name).distinguishedName
# Move user to target OU.
Move-ADObject -Identity $UserDN -TargetPath $TargetOU
}
To move AD computer accounts listed in a text file, use the following PowerShell script:
# Specify path to the text file with the computer account names.
$computers = Get-Content C:\Temp\Computers.txt
# Specify the path to the OU where computers will be moved.
$TargetOU = "OU=Districts,OU=IT,DC=enterprise,DC=com"
ForEach( $computer in $computers){
Get-ADComputer $computer |
Move-ADObject -TargetPath $TargetOU
}
273. Top 10 File System Management Tasks
Using PowerShell
Every day, system administrators have to perform a range of standard operations on the numerous files and
folders on their Windows servers, from managing user data on shared resources to maintaining backups
properly. Using the following information, you can automate many of these tasks and save time for more
important projects.
In this part, we explain how to automate file management and NTFS permissions management tasks with the
help of PowerShell scripts.
3.1 Viewing Objects in a Directory
To view the content of a directory on a Windows file server, use the Get-ChildItem cmdlet. To show all
hidden files, add the -Force parameter. The command below shows all root objects in the Shared folder:
Get-ChildItem -Force \\fs\Shared
If you want to also check all subfolders and their content, add the -Recurse parameter:
Get-ChildItem -Force \\fs\Shared -Recurse
To filter the output, add the Filter, Exclude, Include and Path parameters to the Get-ChildItem cmdlet. For
advanced object filtering, use the Where-Object cmdlet. The script below searches for all executable files in
the IT folder that were modified after April 1, 2018:
Get-ChildItem -Path \\fs\Shared\IT -Recurse -Include *.exe | Where-Object -FilterScript
{($_.LastWriteTime -gt '2018-04-01')}
283.2 Creating Files and Folders
To create new objects with Windows PowerShell, you can use the New-Item cmdlet and specify the type of
item you want to create, such as a directory, file or registry key. For example, this command creates a folder:
New-Item -Path '\\fs\Shared\NewFolder' -ItemType Directory
And this command creates an empty file:
New-Item -Path '\\fs\Shared\NewFolder\newfile.txt' -ItemType File
If you need to create a file and write data to it, there are at least two built-in methods. The first is to use the
Out-File cmdlet:
$text = 'Hello World!' | Out-File $text -FilePath C:\data\text.txt
To overwrite an existing file, use the –Force switch parameter.
Alternatively, you can create files using the Export-Csv cmdlet, which exports the output to a csv file that can
be opened in Excel:
Get-ADuser -Filter * | Export-Csv -Path C:\data\ADusers.csv
3.3 Deleting Files and Folders
To delete objects, use the Remove-Item cmdlet. If the object is not empty, you’ll be prompted to confirm the
deletion. Here’s how to delete the “IT” folder and all the subfolders and files inside it:
Remove-Item -Path '\\fs\shared\it\'
Confirm
The item at \\pdc\shared\it has children and the Recurse parameter was not specified. If you
continue, all children will be removed with the item. Are you sure you want to continue?
[Y] Yes [A] Yes to All [N] No [L] No to All [S] Suspend [?] Help
(default is "Y"):
29If you have already made sure that every object inside the folder should be deleted, you can use the
-Recurse switch to skip the confirmation step:
Remove-Item -Path '\\fs\shared\it\' -Recurse
Sometimes you need to clean up old files from a certain directory. Here’s the way to accomplish that:
$Folder = "C:\Backups"
#delete files older than 30 days
Get-ChildItem $Folder -Recurse -Force -ea 0 |
? {!$_.PsIsContainer -and $_.LastWriteTime -lt (Get-Date).AddDays(-30)} |
ForEach-Object {
$_ | del -Force
$_.FullName | Out-File C:\log\deletedbackups.txt -Append
}
#delete empty folders and subfolders if any exist
Get-ChildItem $Folder -Recurse -Force -ea 0 |
? {$_.PsIsContainer -eq $True} |
? {$_.getfiles().count -eq 0} |
ForEach-Object {
$_ | del -Force
$_.FullName | Out-File C:\log\deletedbackups.txt -Append
}
30Here’s how to check whether a file exists and delete it if it does:
$FileName = 'C:\data\log.txt'
If (Test-Path $FileName){
Remove-Item $FileName
}
To delete files from remote PCs, you must have the appropriate security permissions to access them.
Be sure to use UNC paths so the script will correctly resolve the file locations.
$filelist = @(" \c$\Temp", "\c$\Backups") #variable to delete files and folder
$computerlist = Get-Content C:\data\pc.txt #get list of remote pc's
foreach ($computer in $computerlist){
foreach ($file in $filelist){
$filepath= Join-Path "\\$computer\" "$filelist" #generate unc paths to files or folders
if (Test-Path $filepath)
{
Remove-Item $filepath -force -recurse -ErrorAction Continue}}}
3.4 Copying Files and Folders
The Copy-Item cmdlet enables you to copy objects from one path to another. The following command
creates a backup by copying the file users.xlsx from one remote computer (fs) and saving it to another (fs2)
over the network:
Copy-Item -Path \\fs\Shared\it\users.xlsx -Destination \\fs2\Backups\it\users.xlsx
If the target file already exists, the copy attempt will fail. To overwrite the existing file, even if it is in
Read-Only mode, use the -Force parameter:
Copy-Item -Path \\fs\Shared\it\users.xlsx -Destination \\fs2\Backups\it\users.xlsx -Force
If you’re copying files to or from remote computers, be sure to use UNC paths. For example, use this
command to copy files from a remote file server to the local C: directory:
Copy-Item \\fs\c$\temp -Recurse C:\data\
31To copy files from your local directory to the remote folder, simply reverse the source and destination
locations:
Copy-Item C:\data\ -Recurse \\fs\c$\temp
You can also copy files from one remote server to another. The following script recursively copies the
\\fs\Shared\temp folder to \\fs\Shared\test:
Copy-Item \\fs\Shared\temp -Recurse \\fs\Shared\test
To copy only certain files from the source content to the destination, use the -Filter parameter. For instance,
the following command copies only txt files from one folder to another:
Copy-Item -Filter *.txt -Path \\fs\Shared\it -Recurse -Destination \\fs2\Shared\text
You can also run the XCOPY and ROBOCOPY commands to copy files, or use COM objects as in the example
below:
(New-Object -ComObject Scripting.FileSystemObject).CopyFile('\\fs\Shared', 'fs2\Backup')
3.5 Moving Files and Directories
The Move-Item cmdlet moves an item, including its properties, contents, and child items, from one location
to another. It can also move a file or subdirectory from one directory to another location.
The following command moves a specific backup file from one location to another:
Move-Item -Path \\fs\Shared\Backups\1.bak -Destination \\fs2\Backups\archive\1.bak
This script moves the entire Backups folder and its content to another location:
Move-Item -Path \\fs\Shared\Backups -Destination \\fs2\Backups\archive
The Backups directory and all its files and subfolders will then appear in the archive directory.
323.6 Renaming Files
The Rename-Item cmdlet enables you to change the name of an object while leaving its content intact. It’s
not possible to move items with the Rename-Item command; for that functionality, you should use the
Move-Item cmdlet as described above.
The following command renames a file:
Rename-Item -Path "\\fs\Shared\temp.txt" -NewName "new_temp.txt"
To rename multiple files at once, use a script like this:
$files = Get-ChildItem -Path C:\Temp #create list of files
foreach ($file in $files)
{
$newFileName=$file.Name.Replace("A","B") #replace "A" with "B"
Rename-Item $file $newFileName
}
3.7 Setting File and Folder Permissions
In order to implement a least-privilege model, which is a best practice for system security, IT security
specialists and system administrators configure NTFS access control lists (ACLs) by adding access control
entries (ACEs) on NTFS file servers. There are both basic and advanced NTFS permissions. You can set each
of the permissions to “Allow” or “Deny”. You can find all these user permissions by running the following
PowerShell script:
[system.enum]::getnames([System.Security.AccessControl.FileSystemRights])
If you’re not familiar with NTFS permissions management, check out this NTFS Permissions
Management Best Practice guide.
The PowerShell set-acl cmdlet is used to change the security descriptor of a specified item, such as a file,
folder or a registry key; in other words, it is used to modify file or folder permissions. The following script sets
the “FullControl” permission to “Allow” for the user “ENTERPRISE\T.Simpson” to the folder “Sales”:
33$acl = Get-Acl \\fs1\shared\sales
$AccessRule = New-Object
System.Security.AccessControl.FileSystemAccessRule("ENTERPRISE\T.Simpson","FullControl","Allow")
$acl.SetAccessRule($AccessRule)
$acl | Set-Acl \\fs1\shared\sales
Note that the SetAccessRule parameter completely overwrites the permissions for a user or group, so you
can change folder permissions using this parameter. If you just want to add permissions, use the
AddAccessRule parameter instead. For instance, the following script adds the “FullControl” permission for
the “ENTERPRISE\J.Carter” user account to the “Accounting” folder:
$acl = Get-Acl \\fs1\shared\Accounting
$AccessRule = New-Object
System.Security.AccessControl.FileSystemAccessRule("ENTERPRISE\J.Carter","FullControl","Allow")
$acl.AddAccessRule($AccessRule)
$acl | Set-Acl \\fs1\shared\Accounting
Here are the other permissions you can assign to users or security groups:
Access Right Access Right’s Name in PowerShell
Full Control FullControl
Traverse Folder / Execute File ExecuteFile
List Folder / Read Data ReadData
Read Attributes ReadAttributes
Read Extended Attributes ReadExtendedAttributes
Create Files / Write Data CreateFiles
Create Folders / Append Data AppendData
Write Attributes WriteAttributes
Write Extended Attributes WriteExtendedAttributes
Delete Subfolders and Files DeleteSubdirectoriesAndFiles
Delete Delete
Read Permissions ReadPermissions
Change Permissions ChangePermissions
Take Ownership TakeOwnership
34There are also sets of basic access rights that can be applied:
Access Rights Set Rights Included in the Set Name of the Set in PowerShell
Read List Folder / Read Data Read
Read Attributes
Read Extended Attributes
Read Permissions
Write Create Files / Write Data Write
Create Folders / Append Data
Write Attributes
Write Extended Attributes
Read and Execute Traverse folder / Execute File ReadAndExecute
List Folder / Read Data
Read Attributes
Read Extended Attributes
Read Permissions
Modify Traverse folder / Execute File Modify
List Folder / Read Data
Read Attributes
Read Extended Attributes
Create Files / Write Data
Create Folders / Append Data
Write Attributes
Write Extended Attributes
Delete
Read Permissions
35To copy permissions, a user must own both the source and target folders. The following command will copy
the permissions from the “Accounting” folder to the “Sales” folder:
get-acl \\fs1\shared\accounting | Set-Acl \\fs1\shared\sales
If you want to get a list of NTFS permissions via PowerShell, you can follow this easy how-to about
exporting NTFS permissions to CSV.
3.8 Removing User Permissions
To remove permissions, use the RemoveAccessRule parameter. Let’s delete the “Allow FullControl”
permission for T.Simpson to the “Sales” folder:
$acl = Get-Acl \\fs1\shared\sales
$AccessRule = New-Object
System.Security.AccessControl.FileSystemAccessRule("ENTERPRISE\T.Simpson","FullControl","Allow")
$acl.RemoveAccessRule($AccessRule)
$acl | Set-Acl \\fs1\shared\sales
Note that RemoveAccessRule deletes only specific permissions. To completely wipe T.Simpson’s
permissions to the “Sales” folder, use the PurgeAccessRules command:
$acl = Get-Acl \\fs1\shared\sales
$usersid = New-Object System.Security.Principal.Ntaccount ("ENTERPRISE\T.Simpson")
$acl.PurgeAccessRules($usersid)
$acl | Set-Acl \\fs1\shared\sales
Note that PurgeAccessRules doesn’t work with a string user name; it works only with SIDs. Therefore, we
used the “Ntaccount” class to convert the user account name from a string into a SID. Also note that
PurgeAccessRules works only with explicit permissions; it does not purge inherited ones.
363.9 Enabling and Disabling Permissions Inheritance
NTFS permissions can be either explicit or inherited. Explicit permissions are permissions that are
configured individually, while inherited permissions are inherited from the parent folder. The hierarchy for
permissions is as follows:
Explicit Deny
Explicit Allow
Inherited Deny
Inherited Allow
To manage inheritance, we use the SetAccessRuleProtection method. It has two parameters:
The first parameter is responsible for blocking inheritance from the parent folder. It has two states:
“$true” and “$false”.
The second parameter determines whether the current inherited permissions are retained or removed.
It has the same two states: “$true” and “$false”.
Let’s disable inheritance for the “Sales” folder and delete all inherited permissions as well:
$acl = Get-Acl \\fs1\shared\sales
$acl.SetAccessRuleProtection($true,$false)
$acl | Set-Acl \\fs1\shared\sales
All inherited permissions were removed; only access permissions added explicitly are left.
Let’s revert this change and re-enable inheritance for the “Sales” folder:
$acl = Get-Acl \\fs1\shared\sales
$acl.SetAccessRuleProtection($false,$true)
$acl | Set-Acl \\fs1\shared\sales
373.10 Changing File and Folder Ownership
If you want to set an owner for a folder, you need to run the SetOwner method. Let’s make
“ENTERPRISE\J.Carter” the owner of the “Sales” folder:
$acl = Get-Acl \\fs1\shared\sales
$object = New-Object System.Security.Principal.Ntaccount("ENTERPRISE\J.Carter")
$acl.SetOwner($object)
$acl | Set-Acl \\fs1\shared\sales
Notice that we again used the Ntaccount class to convert the user account name from a string into a SID.
Note that the SetOwner method does not enable you to change the owner to any account you want; the
account must have the “Take Ownership”, “Read” and “Change Permissions” rights.
384. Automating PowerShell Scripts
Now let’s explore you how to create scheduled tasks using PowerShell scripts and Microsoft Windows Task
Scheduler.
4.1 Creating Scheduled Tasks with PowerShell Scripts
Suppose that each day at 10 AM, we want to execute a PowerShell script that monitors changes to group
membership in an Active Directory site.
In Windows Powershell 2.0 (Windows 7 or Windows Server 2008 R2), to create a scheduled job, you must use
the Task Scheduler module. Install the module by running the Import-Module TaskScheduler command,
and then use the following script to create a task that will execute the PowerShell script named
“GroupMembershipChanges.ps1” daily at 10 AM:
Import-Module TaskScheduler $task = New-Task
$task.Settings.Hidden = $true
Add-TaskAction -Task $task -Path C:\Windows\system32\WindowsPowerShell\v1.0\powershell.exe
–Arguments “-File C:\Scripts\GroupMembershipChanges.ps1”
Add-TaskTrigger -Task $task -Daily -At “10:00”
Register-ScheduledJob –Name ”Monitor Group Management” -Task $task
Windows PowerShell 3.0 and 4.0 (Windows Server 2012 R2 and above) don’t include the Task Scheduler
module, so this script will not work. Instead, PowerShell 3.0 and 4.0 include new cmdlets for creating
scheduled tasks, New-ScheduledTaskTrigger and Register-ScheduledTask, which make creating a
scheduled task much easier and more convenient. So let’s create a task that will execute our script daily at
10 AM using the system account (SYSTEM), which has elevated privileges:
$Trigger= New-ScheduledTaskTrigger -At 10:00am –Daily # Specify the trigger settings
$User= "NT AUTHORITY\SYSTEM" # Specify the account to run the script
$Action= New-ScheduledTaskAction -Execute "PowerShell.exe" -Argument "C:\PS\StartupScript.ps1"
# Specify what program to run and its parameters
Register-ScheduledTask -TaskName "MonitorGroupMembership" -Trigger $Trigger -User $User
-Action $Action -RunLevel Highest –Force # Specify the name of the task
39Other trigger options that could be useful in creating new tasks include:
-AtStartup — Triggers the task at Windows startup.
-AtLogon — Triggers the task when the user signs in.
-Once — Triggers the task once. You can set a repetition interval using the –RepetitionInterval parameter.
-Weekly — Triggers the task once a week.
Note that, it is not possible to trigger execution “on an event” using these cmdlets; PowerShell scripts with
“on an event” triggers are much more complicated. However, it is possible to do so with the Task Scheduler
tool, so this is a real disadvantage of using PowerShell rather than Task Scheduler.
4.2 Running PowerShell Scripts with Task Scheduler
Task Scheduler can help you automatically launch a program or PowerShell script at a certain time or when
certain conditions are met. You can also schedule sending emails and even displaying certain messages.
To create a task, open Task Scheduler by pressing “Windows+R” and typing taskschd.msc in the window that
opens. Then take the following steps:
1. Click Create a task and enter a name and description for the new task. To run the program with
administrator privileges, check the Run with the highest privileges box. In our example, we’ll assign a
service account to run the task and run it regardless of whether the user is logged on.
402. Switch to the Triggers tab and click the New… button. Here you can specify the conditions that trigger the
task to be executed. For example, you can have it executed on schedule, at logon, on idle, at startup or
whenever a particular event occurs. We want our task to be triggered by any new software installation, so we
choose On an event from the drop-down menu and select Application from the Log drop-down. Leave the
Source parameter blank and enter “11707” for the EventID. Click OK to save your changes.
413. Navigate to the Actions tab and click New…. Here you can specify the actions that will be executed
whenever the trigger conditions are met. For instance, you can send an email or display a message. In our
case, we want to start a program. You can find the script here; it will send an alert with the event details
about the installed software.
To schedule the PowerShell script, specify the following parameters:
Action — Start a program
Program\script — powershell
Add arguments (optional) — -File [Specify the file path to the script here]
Click OK to save your changes.
424. The Conditions tab enables you to specify the conditions that, along with the trigger, determine whether
the task should be run. In our case, we should leave the default settings on this tab.
5. You can also set up additional parameters for your scheduled task on the Settings tab. For our example,
though, we’ll leave them unchanged.
436. When the task is completely set up, the system will ask you for the service account password. Note that
this account must have the “Log on as Batch Job” right. Enter the password and click OK to save the task.
7. For Task Scheduler to function properly, the Job Scheduler service must be set to start automatically. Run
Services.msc. In the list of services, find Task Scheduler and double-click it. On the General tab, set the
startup type to “Automatic” and click OK to save your change.
Now whenever new software is installed on your Microsoft Windows Server, you will be notified via an email
that details the time of the installation, the name of the software and the user ID (SID) of the person who
installed it.
To modify an existing task, right-click it in the list, select Properties, edit the required settings and click OK.
To delete a scheduled task, right-click it, select Delete and confirm the action.
44Final Word
Let’s quickly summarize the key points of this Windows PowerShell tutorial. Now you know the basics of
PowerShell scripting, how to perform the most common Active Directory and file system management tasks
using PowerShell, and how to schedule PowerShell scripts. You might also want to check out the following
PowerShell scripts used by IT professionals to address specific cases:
How to Collect AD Site Information Using PowerShell
How Find Disabled or Inactive Users and Computers in AD
How to Find Locked Out User Accounts in AD
How to Find Account Lockout Source
How to Get a List of AD Users Whose Passwords Never Expire
How to Get a List of All Computers in an OU
How to Get a List of All Users from a Specific OU
How to Get an Active Directory OU Permissions Report
How to Export Active Directory Objects to CSV
How to Export Members of a Particular AD Group
How to Export Group Policy Settings
How to Determine Every AD User’s Last Logon Date
How to Get User Login History
How to Monitor AD Group Membership Changes
How to Detect Changes to OUs and Groups in AD
How to Determine Who Modified Permissions to an OU
How to Count Files in a Folder or a Directory
How to Get the ACL for a Folder
How to Monitor a Folder for New Files
How to Find Duplicate Files
How to Get Server Inventory Across Your Network
How to Get Local Group Membership Reports
How to List All User Accounts on a Windows System
How to Get Rid of Ransomware Using Free Tools and PowerShell
You can also further expand your knowledge of PowerShell by reviewing the following resources:
Netwrix Blog: PowerShell
Netwrix How-To Guides
45Simplify Your Life with
the Top 7 Freeware Tools
for IT Professionals
Independently reviewed and recommended by leading industry experts, these tools
consistently prove themselves useful for IT pros. Audit Active Directory and file servers,
troubleshoot account lockouts, find stale accounts and more — all for free.
Netwrix Auditor Free Community Edition Free Download
Free Community Edition Free Community Edition Free Community Edition
Netwrix Auditor for Netwrix Auditor for Netwrix Auditor for
Active Directory Windows File Servers Windows Server
Free Download Free Download Free Download
Netwrix Account Netwrix Effective Netwrix Inactive
Lockout Examiner Permissions Reporting Tool User Tracker
Free Download Free Download Free DownloadAbout Netwrix Netwrix Corporation is a software company focused exclusively on providing IT security and operations teams with pervasive visibility into user behavior, system configurations and data sensitivity across hybrid IT infrastructures to protect data regardless of its location. Over 9,000 organizations worldwide rely on Netwrix to detect and proactively mitigate data security threats, pass compliance audits with less effort and expense, and increase the productivity of their IT teams. Founded in 2006, Netwrix has earned more than 140 industry awards and been named to both the Inc. 5000 and Deloitte Technology Fast 500 lists of the fastest growing companies in the U.S. For more information about Netwrix, visit www.netwrix.com. Corporate Headquarters: 300 Spectrum Center Drive, Suite 200, Irvine, CA 92618 Phone: 1-949-407-5125 Toll-free: 888-638-9749 EMEA: +44 (0) 203-588-3023 netwrix.com/social
You can also read