Tweaking the Windows 7 Registry
←
→
Page content transcription
If your browser does not render page correctly, please read the page content below
CHAPTER               12         IN THIS CHAPTER
                                                                      . Firing Up the Registry Editor
   Tweaking the Windows                                               . Getting to Know the Registry

               7 Registry                                             . Understanding the Registry
                                                                        Files
                                                                      . Keeping the Registry Safe
                                                                      . Working with Registry Entries
It is almost everywhere the case that soon after it is begotten the
                                                                      . Finding Registry Entries
greater part of human wisdom is laid to rest in repositories.
—G. C. Lichtenberg

When you change the desktop background using Control
Panel’s Personalization window, the next time you start
your computer, how does Windows 7 know which image or
color you selected? If you change your video display driver,
how does Windows 7 know to use that driver at startup and
not the original driver loaded during setup? In other words,
how does Windows 7 remember the various settings and
options either that you’ve selected yourself or that are
appropriate for your system?

The secret to Windows 7’s prodigious memory is the
Registry. The Registry is a central repository Windows 7 uses
to store anything and everything that applies to the config-
uration of your system. This includes all the following:

   . Information about all the hardware installed on your
     computer

   . The resources those devices use

   . A list of the device drivers that Windows 7 loads at
     startup

   . Settings that Windows 7 uses internally

   . File type data that associates a particular type of file
     with a specific application
   . Backgrounds, color schemes, and other interface
     customization settings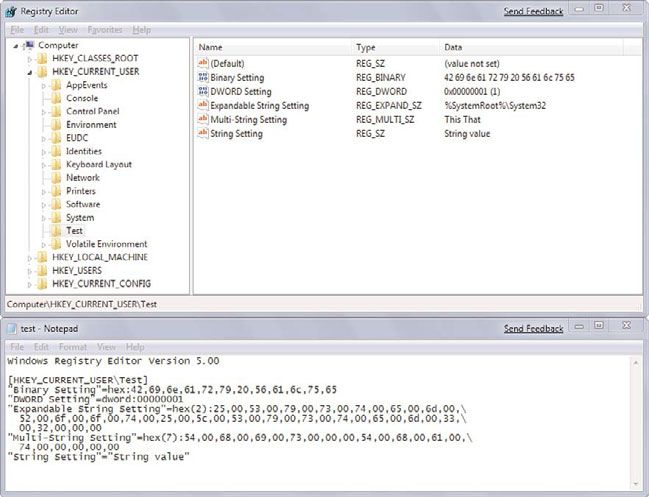
226      CHAPTER 12     Tweaking the Windows 7 Registry

   . Other customization settings for things such as the Start menu and the taskbar

   . Internet and network connections and passwords

   . Settings for Windows 7 applications such as Windows Explorer and Internet Explorer

   . Settings and customization options for many third-party applications

It’s all stored in one central location, and, thanks to a handy tool called the Registry Editor,
it’s yours to play with (carefully!) as you see fit, and that’s what this chapter is all about.

Firing Up the Registry Editor
All the direct work you do with the Registry happens inside the reasonably friendly
confines of a program called the Registry Editor, which enables you to view, modify, add,
and delete Registry settings. It also has a search feature to help you find settings and
export and import features that enable you to save settings to and from a text file.

To launch the Registry Editor, select Start, type regedit into the Search box, and then
press Enter. When the User Account Control dialog box shows up, enter your credentials
to continue.

Figure 12.1 shows the Registry Editor window that appears. (Note that your Registry Editor
window might look different if someone else has used the program previously. Close all
the open branches in the left pane to get the view shown in Figure 12.1.)

FIGURE 12.1 Run the regedit command to launch the Registry Editor, the program that
enables you to work with the Registry’s data.
Getting to Know the Registry 227
CAUTION
The Registry Editor is arguably the most dangerous tool in the Windows 7 arsenal. The
Registry is so crucial to the smooth functioning of Windows 7 that a single imprudent
change to a Registry entry can bring your system to its knees. Therefore, now that you
have the Registry Editor open, don’t start tweaking settings willy-nilly. Instead, read the
section titled “Keeping the Registry Safe,” later in this chapter, for some advice on pro-
12
tecting this precious and sensitive resource.
Getting to Know the Registry
The Registry may be a dangerous tool, but you can mitigate that danger somewhat by
becoming familiar with the layout of the Registry and what it various bits and parts are
used for. This will help you avoid sensitive areas and stick to those Registry neighborhoods
where it’s safe to poke around. The next few sections introduce you to the major parts of
the Registry.
Navigating the Keys Pane
The Registry Editor is reminiscent of Windows Explorer, and it works in sort of the same
way. The left side of the Registry Editor window is similar to Explorer’s Folders pane,
except that rather than folders, you see keys. For lack of a better phrase, I’ll call the left
pane the Keys pane.
The Keys pane, like Explorer’s Folders pane, is organized in a tree-like hierarchy. The five
keys that are visible when you first open the Registry Editor are special keys called handles
(which is why their names all begin with HKEY). These keys are collectively referred to as
the Registry’s root keys. I’ll tell you what to expect from each of these keys later (see the
section called “Getting to Know the Registry’s Root Keys” later in this chapter).
These keys all contain subkeys, which you can display by clicking the arrow to the left of
each key, or by highlighting a key and pressing the plus-sign key on your keyboard’s
numeric keypad. To close a key, click the minus sign or highlight the key and press the
minus-sign key on the numeric keypad. Again, this is just like navigating folders in Explorer.
You often have to drill down several levels to get to the key you want. For example,
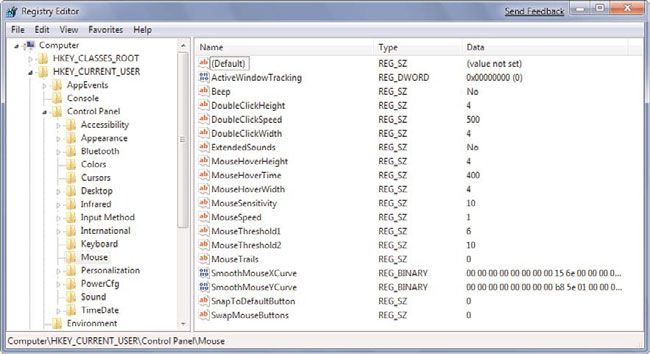
Figure 12.2 shows the Registry Editor after I’ve opened the HKEY_CURRENT_USER key, and
then the Control Panel subkey, and then clicked the Mouse subkey. Notice how the status
bar tells you the exact path to the current key, and that this path is structured just like a
folder path.
NOTE
To see all the keys properly, you likely will have to increase the size of the Keys pane.
To do this, use your mouse to click and drag the split bar to the right. Alternatively,
select View, Split, use the right-arrow key to adjust the split bar position, and then
press Enter.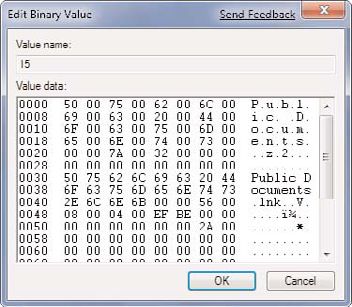
228     CHAPTER 12      Tweaking the Windows 7 Registry

FIGURE 12.2 Open the Registry’s keys and subkeys to find the settings you want to work with.

Understanding Registry Settings
If the left side of the Registry Editor window is analogous to Explorer’s Folders pane, the
right side is analogous to Explorer’s Contents pane. In this case, the right side of the
Registry Editor window displays the settings contained in each key (so I’ll call it the
Settings pane). The Settings pane is divided into three columns:
   . Name—This column tells you the name of each setting in the currently selected key
     (analogous to a filename in Explorer).

   . Type—This column tells you the data type of the setting. There are six possible
     data types:
      REG_SZ—This is a string value.

      REG_MULTI_SZ—This is a series of strings.

      REG_EXPAND_SZ—This is a string value that contains an environment variable name that
      gets “expanded” into the value of that variable. For example, the %SystemRoot% environ-
      ment variable holds the folder in which Windows 7 was installed. So, if you see a Registry
      setting with the value %SystemRoot%\System32\, and Windows 7 is installed in
      C:\Windows, the setting’s expanded value is C:\Windows\System32\.

      REG_DWORD—This is a double word value: a 32-bit hexadecimal value arranged as eight
      digits. For example, 11 hex is 17 decimal, so this number would be represented in DWORD
      form as 0x00000011 (17). (Why “double word”? A 32-bit value represents four bytes of
      data, and because a word in programming circles is defined as two bytes, a four-byte
      value is a double word.)
      REG_QWORD—This is a quadruple word value: a 64-bit hexadecimal value arranged as 16
      digits. Note that leading zeros are suppressed for the high 8 digits. Therefore, 11 hex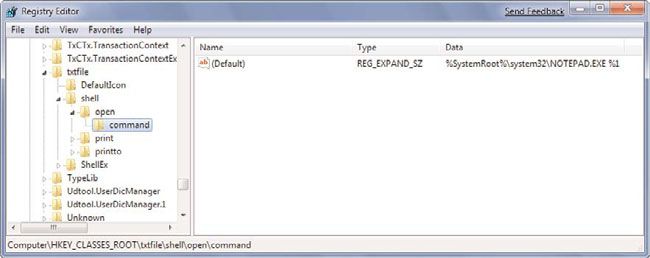
Getting to Know the Registry        229

      appears as 0x00000011 (17), and 100000000 hex appears as 0x1000000000
      (4294967296).
      REG_BINARY—This value is a series of hexadecimal digits.

   . Data—This column displays the value of each setting.

                                                                                                   12
Getting to Know the Registry’s Root Keys
The root keys are your Registry starting points, so you need to become familiar with what
kinds of data each key holds. The next few sections summarize the contents of each key.

HKEY_CLASSES_ROOT
HKEY_CLASSES_ROOT—usually abbreviated as HKCR—contains data related to file extensions
and their associated programs, the objects that exist in the Windows 7 system, as well as
applications and their automation information. There are also keys related to shortcuts
and other interface features.

The top part of this key contains subkeys for various file extensions. You see .bmp for
bitmap (Paint) files, .txt for text (Notepad) files, and so on. In each of these subkeys, the
Default setting tells you the name of the registered file type associated with the exten-
sion. (I discussed file types in more detail in Chapter 3, “Customizing the File System.”)
For example, the .txt extension is associated with the txtfile file type.

   . See “Understanding File Types,” p. 46.

These registered file types appear as subkeys later in the HKEY_CLASSES_ROOT branch, and
the Registry keeps track of various settings for each registered file type. In particular, the
shell subkey tells you the actions associated with this file type. For example, in the
shell\open\command subkey, the Default setting shows the path for the executable file
that opens. Figure 12.3 shows this subkey for the txtfile file type.

FIGURE 12.3 The registered file type subkeys specify various settings associated with each
file type, including its defined actions.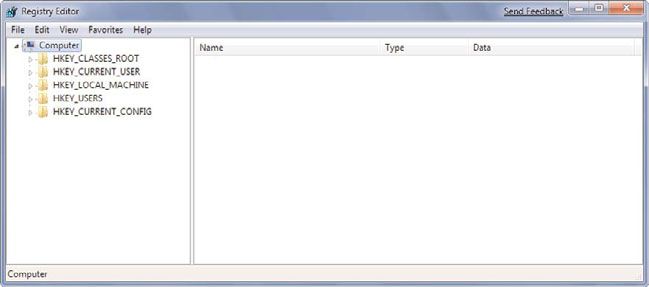
230     CHAPTER 12      Tweaking the Windows 7 Registry

HKEY_CLASSES_ROOT is actually a copy (or an alias, as these copied keys are called) of the
following HKEY_LOCAL_MACHINE key:

HKEY_LOCAL_MACHINE\Software\Classes

The Registry creates an alias for HKEY_CLASSES_ROOT to make these keys easier for applica-
tions to access and to improve compatibility with legacy programs.

HKEY_CURRENT_USER
HKEY_CURRENT_USER—usually abbreviated as HKCU—contains data that applies to the user
that’s currently logged on. It contains user-specific settings for Control Panel options,
network connections, applications, and more. Note that if a user has group policies set on
his account, his settings are stored in the HKEY_USERS\sid subkey (where sid is the user’s
security ID). When that user logs on, these settings are copied to HKEY_CURRENT_USER. For
all other users, HKEY_CURRENT_USER is built from the user’s profile file, ntuser.dat (located
in %UserProfile%).

  TIP
  How do you find out each user’s SID? First, open the following Registry key:
  HKLM\SOFTWARE\Microsoft\Windows NT\CurrentVersion\ProfileList\

  Here you’ll find a list of SIDs. The ones that begin S-1-5-21 are the user SIDs.
  Highlight one of these SIDs and then examine the ProfileImagePath setting, which
  will be of the form %SystemDrive%\Users\user, where user is the username associat-
  ed with the SID.

Here’s a summary of the most important HKEY_CURRENT_USER subkeys:
      AppEvents          Contains sound files that play when particular system events occur
                         (such as maximizing of a window)
      Control Panel      Contains settings related to certain Control Panel icons
      Keyboard Layout Contains the keyboard layout as selected via Control Panel’s Keyboard
                         icon
      Network            Contains settings related to mapped network drives
      Software           Contains user-specific settings related to installed applications and
                         Windows

HKEY_LOCAL_MACHINE
HKEY_LOCAL_MACHINE (HKLM) contains non-user-specific configuration data for your system’s
hardware and applications. You’ll use the following three subkeys most often:
      Hardware     Contains subkeys related to serial ports and modems, as well as the float-
                   ing-point processor.
Getting to Know the Registry 231
Software Contains computer-specific settings related to installed applications. The
Classes subkey is aliased by HKEY_CLASSES_ROOT. The Microsoft subkey
contains settings related to Windows (as well as any other Microsoft prod-
ucts you have installed on your computer).
System Contains subkeys and settings related to Windows startup.
12
HKEY_USERS
HKEY_USERS (HKU) contains settings that are similar to those in HKEY_CURRENT_USER.
HKEY_USERS is used to store the settings for users with group policies defined, as well as the
default settings (in the .DEFAULT subkey) which get mapped to a new user’s profile.
HKEY_CURRENT_CONFIG
HKEY_CURRENT_CONFIG (HKCC) contains settings for the current hardware profile. If your
machine uses only one hardware profile, HKEY_CURRENT_CONFIG is an alias for
HKEY_LOCAL_MACHINE\SYSTEM\ControlSet001. If your machine uses multiple hardware
profiles, HKEY_CURRENT_CONFIG is an alias for HKEY_LOCAL_MACHINE\SYSTEM\ControlSetnnn,
where nnn is the numeric identifier of the current hardware profile. This identifier is given
by the CurrentConfig setting in the following key:
HKLM\SYSTEM\CurrentControlSet\Control\IDConfigDB
Understanding Hives and Registry Files
The Registry database actually consists of a number of files that contain a subset of the
Registry called a hive. A hive consists of one or more Registry keys, subkeys, and settings.
Each hive is supported by several files that use the extensions listed in Table 12.1.
TABLE 12.1 Extensions Used by Hive Supporting Files
Extension Descriptions
None A complete copy of the hive data.
.log1 A log of the changes made to the hive data.
.log, .log2 These files are created during the Windows 7 setup, but
remain unchanged as you work with the system.
NOTE
To see all of these files, you must display hidden files on your system. In Windows
Explorer, select Organize, Folder and Search Options, select the View tab, and then acti-
vate the Show Hidden Files, Folder, and Drives option. While you’re here, you can also
deactivate the Hide Extensions for Known File Types check box. Click OK.232 CHAPTER 12 Tweaking the Windows 7 Registry
Table 12.2 shows the supporting files for each hive. (Note that not all of these files might
appear on your system.)
TABLE 12.2 Supporting Files Used by Each Hive
Hive Files
HKLM\BCD00000000 %SystemRoot%\System32\config\BCD-Template
%SystemRoot%\System32\config\BCD-Template.LOG
HKLM\COMPONENTS %SystemRoot%\System32\config\COMPONENTS
%SystemRoot%\System32\config\COMPONENTS.LOG
%SystemRoot%\System32\config\COMPONENTS.LOG1
%SystemRoot%\System32\config\COMPONENTS.LOG2
HKLM\SAM %SystemRoot%\System32\config\SAM
%SystemRoot%\System32\config\SAM.LOG
%SystemRoot%\System32\config\SAM.LOG1
%SystemRoot%\System32\config\SAM.LOG2
HKLM\SECURITY %SystemRoot%\System32\config\SECURITY
%SystemRoot%\System32\config\SECURITY.LOG
%SystemRoot%\System32\config\SECURITY.LOG1
%SystemRoot%\System32\config\SECURITY.LOG2
HKLM\SOFTWARE %SystemRoot%\System32\config\SOFTWARE
%SystemRoot%\System32\config\SOFTWARE.LOG
%SystemRoot%\System32\config\SOFTWARE.LOG1
%SystemRoot%\System32\config\SOFTWARE.LOG2
HKLM\SYSTEM %SystemRoot%\System32\config\SYSTEM
%SystemRoot%\System32\config\SYSTEM.LOG
%SystemRoot%\System32\config\SYSTEM.LOG1
%SystemRoot%\System32\config\SYSTEM.LOG2
HKU\.DEFAULT %SystemRoot%\System32\config\DEFAULT
%SystemRoot%\System32\config\DEFAULT.LOG
%SystemRoot%\System32\config\DEFAULT.LOG1
%SystemRoot%\System32\config\DEFAULT.LOG2
Also, each user has his or her own hive, which maps to HKEY_CURRENT_USER during logon.
The supporting files for each user hive are stored in \Users\user, where user is the username.Keeping the Registry Safe 233
In each case, the ntuser.dat file contains the hive data, and the ntuser.dat.log1 file
tracks the hive changes. (If a user has group policies set on her account, the user data is
stored in an HKEY_USERS subkey.)
Keeping the Registry Safe
12
The sheer wealth of data stored in one place makes the Registry convenient, but it also
makes it very precious. If your Registry went missing somehow, or if it got corrupted,
Windows 7 simply would not work. With that scary thought in mind, let’s take a moment
to run through several protective measures. The techniques in this section should ensure
that Windows 7 never goes down for the count because you made a mistake while editing
the Registry.
Preventing Other Folks from Messing with the Registry
Do you share your computer with other people? How brave! In that case, there’s a pretty
good chance that you don’t want them to have access to the Registry Editor. In Windows
7, User Account Control automatically blocks Standard users unless they know an admin-
istrator’s password. For other administrators, you can prevent any user from using the
Registry Editor by setting a group policy:
1. Select Start, type gpedit.msc, and then press Enter.
2. Open the User Configuration, Administrative Templates, System branch.
3. Double-click the Prevent Access to Registry Editing Tools policy.
4. Click Enabled.
5. In the Disable Regedit from Running Silently? list, click Yes.
6. Click OK.
Note that you won’t be able to use the Registry Editor, either. However, you can over-
come that by temporarily disabling this policy prior to running the Registry Editor. Even
better, you can run the following script, which toggles the Registry Editor between
enabled and disabled:
NOTE
The file that contains the code for this script (ToggleRegistryEditing.vbs) is avail-
able on my website at www.mcfedries.com/Windows7Unleashed.234 CHAPTER 12 Tweaking the Windows 7 Registry
Set objWshShell = WScript.CreateObject(“WScript.Shell”)
‘
‘ Get the current setting
‘
intDisableRegistryTools = Int(objWshShell.RegRead(“HKCU\Software\Microsoft\
➥Windows\CurrentVersion\Policies\System\DisableRegistryTools”))
‘
‘ Toggle the current setting
‘
If intDisableRegistryTools = 0 Then
objWshShell.RegWrite “HKCU\Software\Microsoft\Windows\CurrentVersion\
➥Policies\System\DisableRegistryTools”, 2, “REG_DWORD”
WScript.Echo “The Registry Editor is disabled.”
Else
objWshShell.RegWrite “HKCU\Software\Microsoft\Windows\CurrentVersion\
➥Policies\System\DisableRegistryTools”, 0, “REG_DWORD”
WScript.Echo “The Registry Editor is enabled.”
End If
Note that you need to run this script as the administrator. I show you how to do this in
Chapter 30, “Programming the Windows Scripting Host.”
. See “Running a Script as the Administrator,” p. 664.
Backing Up the Registry
Windows 7 maintains what is known as the system state: the crucial system files that
Windows 7 requires to operate properly. Included in the system state are the files used
during system startup, the Windows 7–protected system files, and, naturally, the Registry
files. Windows 7’s Backup utility has a feature called a system image backup that enables
you to easily back up the current system state, so it’s probably the most straightforward
way to create a backup copy of the Registry should anything go wrong. See Chapter 7,
“Maintaining Your Windows 7 System,” for the details.
. See “Creating a System Image Backup,” p. 157.
Saving the Current Registry State with System Restore
Another easy way to save the current Registry configuration is to use Windows 7’s System
Restore utility. This program takes a snapshot of your system’s current state, including the
Registry. If anything should go wrong with your system, the program enables you to
restore a previous configuration. It’s a good idea to set a system restore point before doing
any work on the Registry. I show you how to work with System Restore in Chapter 7.
. See “Setting System Restore Points,” p. 149.Keeping the Registry Safe 235
TIP
Another way to protect the Registry is to ensure that its keys have the appropriate per-
missions. By default, Windows 7 gives members of the Administrators group full control
over the Registry. A standard user gets Full Control permission only over the HKCU key
when that user is logged on and Read permissions over the rest of the Registry. To
adjust the permissions, right-click the key in the Registry Editor, and then click
12
Permissions. Make sure that only administrators have the Full Control check box acti-
vated.
Protecting Keys by Exporting Them to Disk
If you’re just making a small change to the Registry, backing up all of its files might seem
like overkill. Another approach is to back up only the part of the Registry that you’re
working on. For example, if you’re about to make changes within the HKEY_CURRENT_USER
key, you could back up just that key, or even a subkey within HKCU. You do that by export-
ing the key’s data to a registration file, which is a text file that uses the .reg extension.
That way, if the change causes a problem, you can import the .reg file back into the
Registry to restore things the way they were.
Exporting the Entire Registry to a .reg File
The easiest way to protect the entire Registry is to export the whole thing to a .reg file on
a separate hard drive or network share. Note that the resulting file will be about 150MB
on a default Windows 7 system, and possibly twice that size (or more) if you have lots of
other programs installed, so make sure the target destination has enough free space.
Here are the steps to follow:
1. Open the Registry Editor.
2. Select File, Export to display the Export Registry File dialog box.
3. Select a location for the file.
4. Use the File Name text box to type a name for the file.
5. Activate the All option.
6. Click Save.
Exporting a Key to a .reg File
Here are the steps to follow to export a key to a registration file:
1. Open the Registry Editor and select the key you want to export.
2. Select File, Export to display the Export Registry File dialog box.
3. Select a location for the file.
4. Use the File Name text box to type a name for the file.
5. Activate the Selected Branch option.
6. Click Save.236 CHAPTER 12 Tweaking the Windows 7 Registry
Finding Registry Changes
One common Registry scenario is to make a change to Windows 7 using a tool such
as the Group Policy Editor, and then try and find which Registry setting (if any) was
affected by the change. However, because of the sheer size of the Registry, this is
usually a needle-in-a-haystack exercise that ends in frustration. One way around this is
to export some or all the Registry before making the change and then export the
same key or keys after making the change. You can then use the FC (file compare)
utility at the command prompt to find out where the two files differ. Here’s the FC
syntax to use for this:
FC /U pre_edit.reg post-edit.reg > reg_changes.txt
Here, change pre_edit.reg to the name of the registration file you exported before
editing the Registry; change post_edit.reg to the name of the registration file you
exported after editing the Registry; and change reg_changes.txt to the name of a
text file to which the FC output is redirected. Note that the /U switch is required
because registration files use the Unicode character set.
Importing a .reg File
If you need to restore the key that you backed up to a registration file, follow these steps:
1. Open the Registry Editor.
2. Select File, Import to display the Import Registry File dialog box.
3. Find and select the file you want to import.
4. Click Open.
5. When Windows 7 tells you the information has been entered into the Registry, click
OK.
NOTE
You also can import a .reg file by locating it in Windows Explorer and then double-click-
ing the file.
CAUTION
Many applications ship with their own .reg files for updating the Registry. Unless
you’re sure that you want to import these files, avoid double-clicking them. They might
end up overwriting existing settings and causing problems with your system.
Working with Registry Entries
Now that you’ve had a look around, you’re ready to start working with the Registry’s keys
and settings. In this section, I’ll give you the general procedures for basic tasks, such as
modifying, adding, renaming, deleting, and searching for entries, and more. These tech-
niques will serve you well throughout the rest of the book when I take you through some
specific Registry modifications.Working with Registry Entries 237
Changing the Value of a Registry Entry
Changing the value of a Registry entry is a matter of finding the appropriate key, display-
ing the setting you want to change, and editing the setting’s value. Unfortunately, finding
the key you need isn’t always a simple matter. Knowing the root keys and their main
subkeys, as described earlier, will certainly help, and the Registry Editor has a Find feature
that’s invaluable. (I’ll show you how to use it later.)
12
To illustrate how this process works, let’s work through an example: changing your regis-
tered owner name and company name. In earlier versions of Windows, the installation
process probably asked you to enter your name and, optionally, your company name.
These registered names appear in several places as you work with Windows:
. If you select Help, About in most Windows 7 programs, your registered names
appear in the About dialog box.
. If you install a 32-bit application, the installation program uses your registered
names for its own records (although you usually get a chance to make changes).
Unfortunately, if you install a clean version of Windows 7, Setup doesn’t ask you for this
data, and it takes your username as your registered owner name. (If you upgraded to
Windows 7 for Windows XP, the owner name and company name were brought over from
your previous version of Windows.) With these names appearing in so many places, it’s
good to know that you can change either or both names (for example, to put in your
proper names if Windows 7 doesn’t have them or if you give the computer to another
person). The secret lies in the following key:
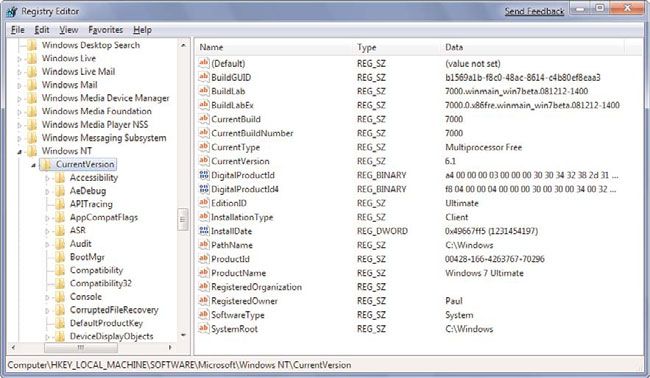
HKLM\SOFTWARE\Microsoft\WindowsNT\CurrentVersion
To get to this key, you open the branches in the Registry Editor’s tree pane:
HKEY_LOCAL_MACHINE, and then SOFTWARE, and then Microsoft, and then Windows NT.
Finally, click the CurrentVersion subkey to select it. Here, you see a number of settings,
but two are of interest to us (see Figure 12.4):
RegisteredOrganization This setting contains your registered company name.
RegisteredOwner This setting contains your registered name.
TIP
If you have keys that you visit often, you can save them as favorites to avoid trudging
through endless branches in the keys pane. To do this, navigate to the key and then
select Favorites, Add to Favorites. In the Add to Favorites dialog box, edit the Favorite
Name text box, if desired, and then click OK. To navigate to a favorite key, pull down the
Favorites menu and select the key name from the list that appears at the bottom of the
menu.238 CHAPTER 12 Tweaking the Windows 7 Registry FIGURE 12.4 Navigate to HKLM\SOFTWARE\Microsoft\Windows NT\CurrentVersion to see your registered names. Now you open the setting for editing by using any of the following techniques: . Select the setting name and either select Edit, Modify or press Enter. . Double-click the setting name. . Right-click the setting name and click Modify from the context menu. The dialog box that appears depends on the value type you’re dealing with, as discussed in the next few sections. Note that edited settings are written to the Registry right away, but the changes might not go into effect immediately. In many cases, you need to exit the Registry Editor and then either log off or restart Windows 7. Editing a String Value If the setting is a REG_SZ value (as it is in our example), a REG_MULTI_SZ value, or a REG_EXPAND_SZ value, you see the Edit String dialog box, shown in Figure 12.5. Use the Value Data text box to enter a new string or modify the existing string, and then click OK. (For a REG_MULTI_SZ multistring value, Value Data is a multiline text box. Type each string value on its own line. That is, after each string, press Enter to start a new line.) FIGURE 12.5 You see the Edit String dialog box if you’re modifying a string value.
Working with Registry Entries       239

Editing a DWORD or QWORD Value
If the setting is a REG_DWORD, you see the Edit DWORD (32-Bit) Value dialog box shown in
Figure 12.6. In the Base group, select either Hexadecimal or Decimal, and then use the
Value Data text box to enter the new value of the setting. (If you chose the Hexadecimal
option, enter a hexadecimal value; if you chose Decimal, enter a decimal value.) Note that
editing a QWORD value is identical, except that the dialog box is named Edit QWORD (64-

                                                                                                 12
Bit) Value, instead.

FIGURE 12.6 You see the Edit DWORD Value dialog box if you’re modifying a double word value.

Editing a Binary Value
If the setting is a REG_BINARY value, you see an Edit Binary Value dialog box like the one
shown in Figure 12.7.

FIGURE 12.7 You see the Edit Binary Value dialog box if you’re modifying a binary value.

For binary values, the Value Data box is divided into three vertical sections:

  . Starting Byte Number—The four-digit values on the left of the Value Data box
    tell you the sequence number of the first byte in each row of hexadecimal numbers.
    This sequence always begins at 0, so the sequence number of the first byte in the
    first row is 0000. There are eight bytes in each row, so the sequence number of the
    first byte in the second row is 0008, and so on. You can’t edit these values.

  . Hexadecimal Numbers (Bytes)—The eight columns of two-digit numbers in the
    middle section display the setting’s value, expressed in hexadecimal numbers, where
240 CHAPTER 12 Tweaking the Windows 7 Registry
which each two-digit number represents a single byte of information. You can edit
these values.
. ANSI Equivalents—The third section on the right side of the Value Data box
shows the ANSI equivalents of the hexadecimal numbers in the middle section. For
example, the first byte of the first row is the hexadecimal value 54, which represents
the uppercase letter T. You can also edit the values in this column.
Editing a .reg File
If you exported a key to a registration file, you can edit that file and then import it back
into the Registry. To make changes to a registration file, find the file in Windows Explorer,
right-click the file, and then click Edit. Windows 7 opens the file in Notepad.
TIP
If you need to make global changes to the Registry, export the entire Registry and then
load the resulting registration file into WordPad or some other word processor or text
editor. Use the application’s Replace feature (carefully!) to make changes throughout
the file. If you use a word processor for this, be sure to save the file as a text file when
you’re done. You can then import the changed file back into the Registry.
Creating a .reg File
You can create registration files from scratch and then import them into the Registry. This
is a handy technique if you have some customizations that you want to apply to multiple
systems. To demonstrate the basic structure of a registration file and its entries, Figure 12.8
shows two windows. The top window is the Registry Editor with a key named Test high-
lighted. The Settings pane contains six sample settings: the (Default) value and one each
of the five types of settings (binary, DWORD, expandable string, multistring, and string).
The bottom window shows the Test key in Notepad as an exported registration file
(Test.reg).
NOTE
The file that contains the test Registry code (test.reg) is available on my website at
www.mcfedries.com/Windows7Unleashed.
Windows 7 registration files always start with the following header:
Windows Registry Editor Version 5.00
TIP
If you’re building a registration file for a Windows 9x, Me, or NT 4 system, change the
header to the following:
REGEDIT4Working with Registry Entries 241
12
FIGURE 12.8 The settings in the Test key shown in the Registry Editor correspond to the
data shown in Test.reg file shown in Notepad.
Next is an empty line followed by the full path of the Registry key that will hold the
settings you’re adding, surrounded by square brackets:
[HKEY_CURRENT_USER\Test]
Below the key are the setting names and values, which use the following general form:
TIP
If you want to add a comment to a .reg file, start a new line and begin the line with a
semicolon (;).
”SettingName”=identifier:SettingValue
SettingName The name of the setting. Note that you use the @ symbol to repre-
sent the key’s Default value.
identifier A code that identifies the type of data. REG_SZ values don’t use an
identifier, but the other four types do:
dword Use this identifier for a DWORD value.
hex(b) Use this identifier for a QWORD value.
hex Use this identifier for a binary value.242 CHAPTER 12 Tweaking the Windows 7 Registry
hex(2) Use this identifier for an expandable string value.
hex(7) Use this identifier for a multistring value.
SettingValue This is the value of the setting, which you enter as follows:
String Surround the value with quotation marks.
DWORD Enter an eight-digit DWORD value.
QWORD Enter eight two-digit hexadecimal pairs, separated by
commas, with the pairs running from highest order to
lowest. For example, to enter the QWORD value
123456789abcd, you would use the following value:
cd,ab,89,67,45,23,01,00
Binary Enter the binary value as a series of two-digit hexadec-
imal numbers, separating each number with a comma.
Expandable Convert each character to its hexadecimal equivalent
string and then enter the value as a series of two-digit hexa-
decimal numbers, separating each number with a
comma, and separating each character with 00.
Multistring Convert each character to its hexadecimal equivalent
and then enter the value as a series of two-digit hexa-
decimal numbers, separating each number with a
comma, and separating each character with 00, and
separating each string with space (00 hex).
TIP
To delete a setting using a .reg file, set its value to a hyphen (-), as in this example:
Windows Registry Editor Version 5.00
[HKEY_CURRENT_USER\Test]
“BinarySetting”=-
To delete a key, add a hyphen to the start of the key name, as in this example:
Windows Registry Editor Version 5.00
[-HKEY_CURRENT_USER\Test]Working with Registry Entries 243
Renaming a Key or Setting
You won’t often need to rename existing keys or settings. Just in case, though, here are the
steps to follow:
1. In the Registry Editor, find the key or setting you want to work with, and then
highlight it.
12
2. Select Edit, Rename, or press F2.
3. Edit the name and then press Enter.
CAUTION
Rename only those keys or settings that you created yourself. If you rename any other
key or setting, Windows 7 might not work properly.
Creating a New Key or Setting
Many Registry-based customizations don’t involve editing an existing setting or key.
Instead, you have to create a new setting or key. Here’s how you do it:
1. In the Registry Editor, select the key in which you want to create the new subkey
or setting.
2. Select Edit, New. (Alternatively, right-click an empty section of the Settings pane and
then click New.) A submenu appears.
3. If you’re creating a new key, select the Key command. Otherwise, select the
command that corresponds to the type of setting you want: String Value, Binary
Value, DWORD Value, Multi-String Value, or Expandable String Value.
4. Type a name for the new key or setting.
5. Press Enter.
Deleting a Key or Setting
Here are the steps to follow to delete a key or setting:
1. In the Registry Editor, select the key or setting that you want to delete.
2. Select Edit, Delete, or press Delete. The Registry Editor asks whether you’re sure.
3. Click Yes.
CAUTION
Again, to avoid problems, you should delete only those keys or settings that you creat-
ed yourself. If you’re not sure about deleting a setting, try renaming it instead. If a
problem arises, you can also return the setting back to its original name.244 CHAPTER 12 Tweaking the Windows 7 Registry
Finding Registry Entries
The Registry contains only five root keys, but they contain hundreds of subkeys. The fact
that some root keys are aliases for subkeys in a different branch only adds to the confu-
sion. If you know exactly where you’re going, the Registry Editor’s tree-like hierarchy is a
reasonable way to get there. If you’re not sure where a particular subkey or setting
resides, however, you could spend all day poking around in the Registry’s labyrinthine
nooks and crannies.
To help you get where you want to go, the Registry Editor has a Find feature that enables
you to search for keys, settings, or values. Here’s how it works:
1. In the Keys pane, select Computer at the top of the pane (unless you’re certain of
which root key contains the value you want to find; in this case, you can highlight
the appropriate root key instead).
2. Select Edit, Find or press Ctrl+F. The Registry Editor displays the Find dialog box,
shown in Figure 12.9.
FIGURE 12.9 Use the Find dialog box to search for Registry keys, settings, or values.
3. Use the Find What text box to enter your search string. You can enter partial words
or phrases to increase your chances of finding a match.
4. In the Look At group, activate the check boxes for the elements you want to search.
For most searches, you want to leave all three check boxes activated.
5. If you want to find only those entries that exactly match your search text, activate
the Match Whole String Only check box.
6. Click the Find Next button. The Registry Editor highlights the first match.
7. If this isn’t the item you want, select Edit, Find Next (or press F3) until you find the
setting or key you want.
When the Registry Editor finds a match, it displays the appropriate key or setting. Note
that if the matched value is a setting name or data value, Find doesn’t highlight the
current key. This is a bit confusing, but remember that the current key always appears at
the bottom of the Keys pane.You can also read