Springboard Marketplace online benefits system - Broker user guide for Small Group self-insured
←
→
Page content transcription
If your browser does not render page correctly, please read the page content below
Springboard Marketplace®
  online benefits system

            Broker user guide
        for Small Group self-insured

Aetna Funding Advantage℠ (AFA) products
  Desktop and Mobile URL: springboardmarketplace.com

              Revision date: 10/15/2017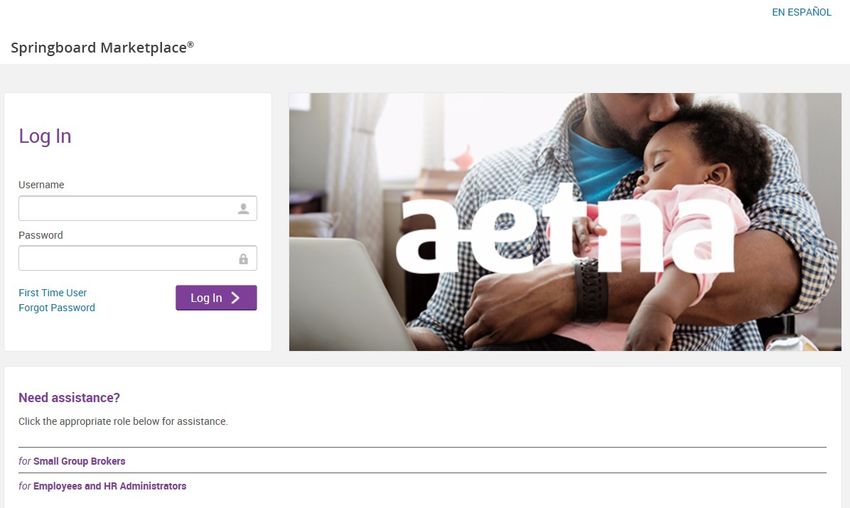
Contents
Browser requirements .................................................................................................................................. 3
Springboard™ log-in ...................................................................................................................................... 3
Admin home page/broker tools.................................................................................................................... 4
Submitting a new group ................................................................................................................................ 6
Employee open enrollment .......................................................................................................................... 6
       Member shopping ................................................................................................................................. 6
       Group quick admin enrollment ............................................................................................................. 9
   Ending employee enrollment.................................................................................................................. 12
Finding a specific group .............................................................................................................................. 14
Searching for an employee ......................................................................................................................... 15
Resetting an employee password ............................................................................................................... 17
Adding an employee post-sale.................................................................................................................... 19
   Member shopping ................................................................................................................................... 20
   Impersonating a user ............................................................................................................................ 200
Retroactive employee/dependent adds ..................................................................................................... 26
Terminating an employee ........................................................................................................................... 26
Dependent terms ........................................................................................................................................ 27
Retro terms ................................................................................................................................................. 28
Reporting .................................................................................................................................................... 28
Life events ................................................................................................................................................... 39
COBRA ......................................................................................................................................................... 41
Activate COBRA on existing group (group billed) ....................................................................................... 41
Adding COBRA member .............................................................................................................................. 42
Renewing a group in Springboard............................................................................................................... 43
   Plan selections ........................................................................................................................................ 44
   Defined contribution............................................................................................................................... 47
       Percentage 100% across all tiers, all plans ......................................................................................... 49
       Percentage less than 100%, all plans .................................................................................................. 50
       Percentage to base plan ..................................................................................................................... 52
       Dollar amount across all plans ............................................................................................................ 55
       Dollar amount to base plan ................................................................................................................ 57

                                                                                                                                                       Page 2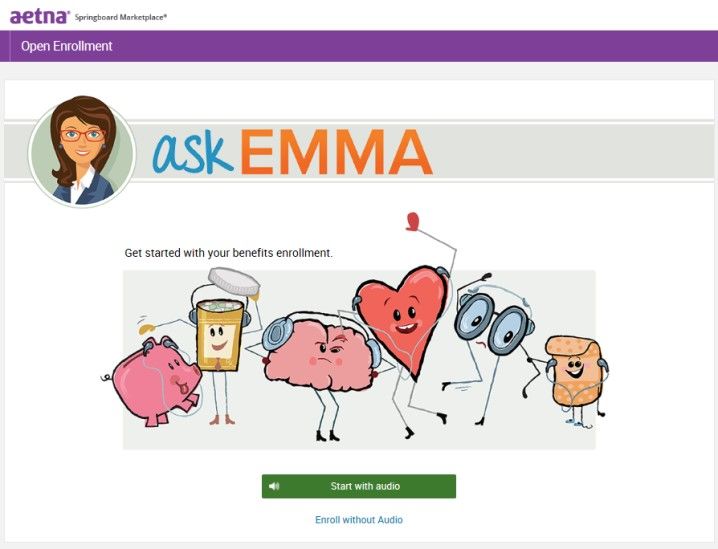
Single lump sum .................................................................................................................................. 59
  Starting employee open enrollment ....................................................................................................... 61
     Member shopping ............................................................................................................................... 62
     Group quick admin enrollment ........................................................................................................... 65
  Ending employee enrollment.................................................................................................................. 68
  Final review and approval ....................................................................................................................... 70

Browser requirements
Springboard Marketplace supports the following browsers:

    •     Microsoft Internet Explorer, version 9.0 and up
    •     Mozilla Firefox, version 35.0 and up
    •     Safari, version 9.0 and up
    •     Google Chrome, version 39.0.2171.99m and up

We encourage you to keep your browser updated.

You must have the following enabled:

    •     Cookies
    •     JavaScript
    •     Style sheets

Springboard™ log-in
1. To begin, visit springboardmarketplace.com and log in by entering your username and password.
   First time users will click on the “First Time User” hyperlink. You’ll need to make sure you have your
   unique Producer World user name to register for access to Springboard Marketplace.

                                                                                                                                               Page 3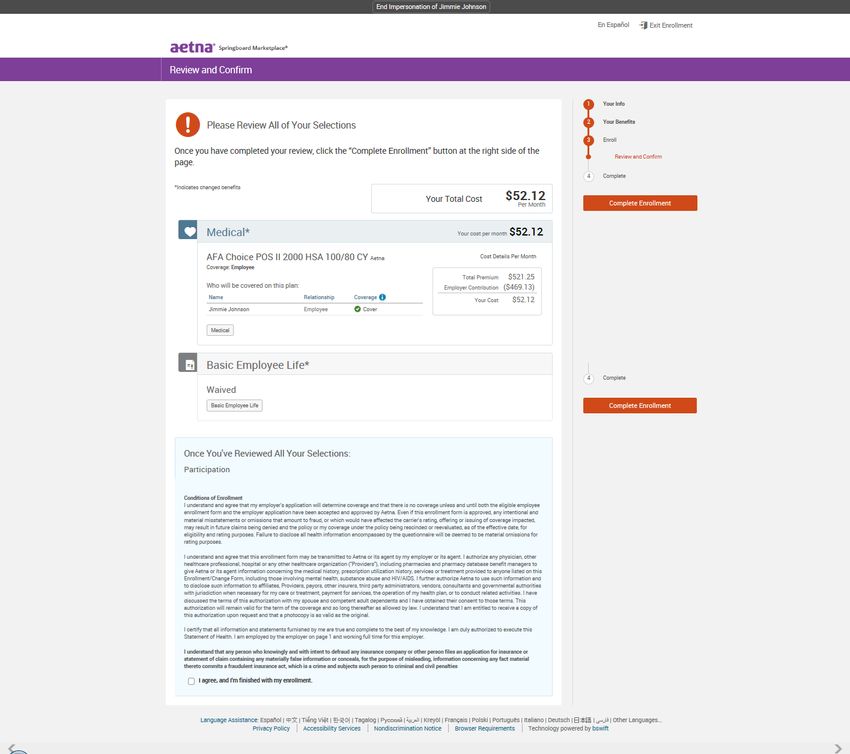
After initial log-in, you’ll land on the parent site of the Springboard Marketplace platform. The parent
site governs most of the administrative functions for Springboard. The child site is the actual employer
group site where enrollments will take place. It allows employees to manage their information and
choose their benefits. You will only see the employer group(s) you are aligned to within the Springboard
Marketplace.

Please note: Springboard Marketplace will time out after 30 minutes of inactivity.

Admin home page/broker tools
The admin home page is available at both the parent site and the child site. At the parent site level, you
can search for your employer groups via the “Manage Groups and Membership” tab, manage quotes,
and review alerts.

    •   Manage groups and membership: To review high-level information about a group, such as
        group number, group status, address information and employee count, enter the employer
        group name within the search box. Once you find the requested group, click on the name for
        more information. You can also use this section to navigate to the employer group site (child
        site) by selecting the “Navigate to Group” link.

                                                                                                   Page 4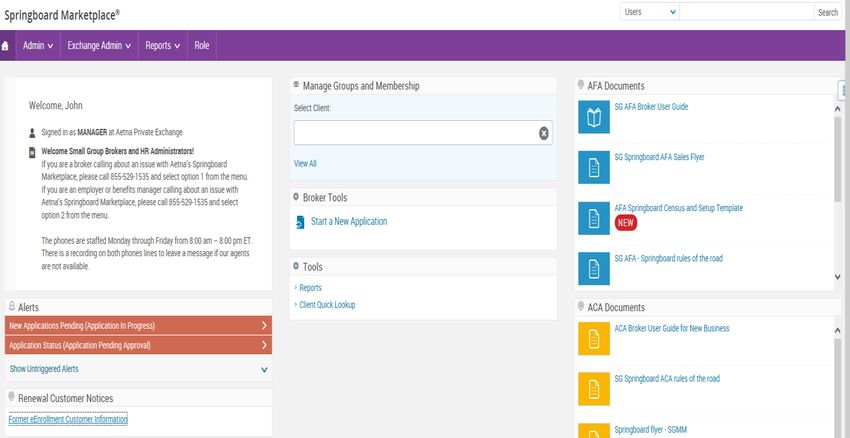
•   Alerts: The alerts tab shows the status of employer applications and employee enrollment. To
    review more information about an alert, choose the alert name.

                                                                                           Page 5
Submitting a new group

Once you return all required applications and supporting documentation to the sales coordinator, we
will review the information and set up the case in Springboard. The sales coordinator will then notify
you that the group is ready for enrollment.

Case status will be “Enrollment in Progress”.

Employee open enrollment
Once the group is in “Enrollment in Progress” status, employees will complete their enrollment through
member shopping. Or the broker/HR administrator will complete it through administrative enrollment.

Member shopping
This is our preferred method of employee open enrollment. If you select this option, the employees will
receive an email notification once Springboard is set up and ready for shopping.

1. Employees will log in to Springboard and start their enrollment by accessing
   springboardmarketplace.com. (Employees will get their user name and initial password login in the
   email provided. If they misplace the email, employees may also select the “for Employees and HR
   Administrators” link listed below the “Need Assistance” heading. This will provide the employee
   with their user name logic as well as the initial password logic.)

                                                                                                  Page 6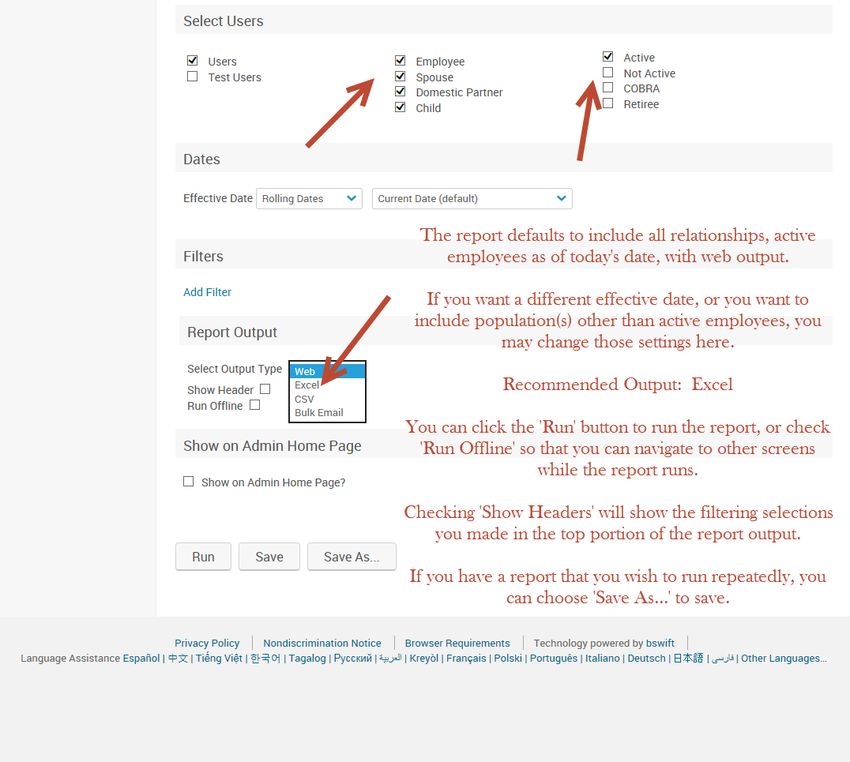
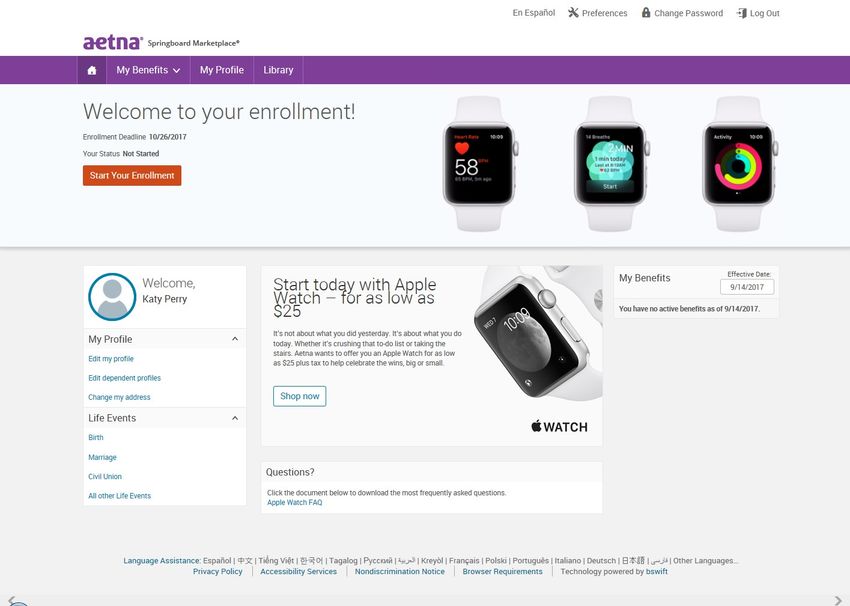
2. After logging in, employees can start their enrollment by selecting “Start Your Enrollment”.

           This shop now panel will not appear until the member elects an AFA medical plan. They will
           click the house on the menu bar to return to this page after they complete their enrollment.

3. As long as the employee is enrolling in an AFA medical plan they are eligible to purchase an Apple
   Watch for as low as $25 by clicking on the “Shop now” link. (Not eligible for waivers or dependents.)

                                                                                                          Page 7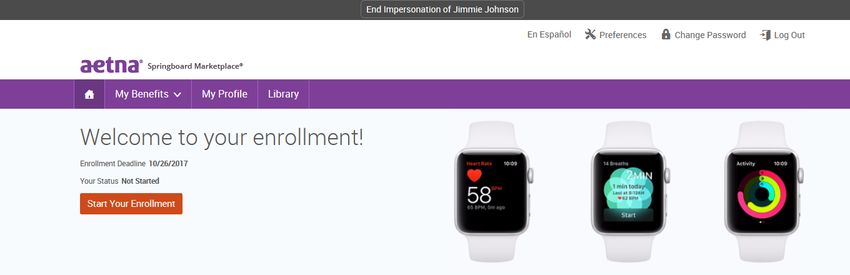
4. Emma, our online benefit advisor, guides the employee through the enrollment process. Emma also
   helps determine the best plan option for the member based upon answers to a series of questions.
   The questions pertain to how they’ll use their benefits while taking into account their monthly costs.

5. Emma will highlight her recommendation after the employee answers the health questions she
   presents.

6. Employees can then select a plan by choosing the “Select” button. (Emma’s recommendation will be
   highlighted with a green box around the plan. But employees can select any of the plans offered by
   their employer.)

                                                                                                  Page 8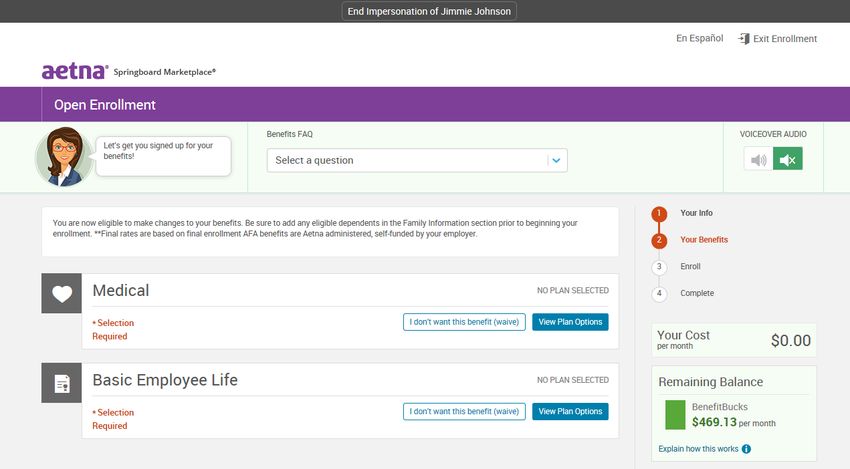
7. Then they confirm their selections and “Complete Enrollment”.

Group quick admin enrollment
From the menu bar, hover over “Exchange Admin” and then select “Group Manager”.

                                                                                  Page 9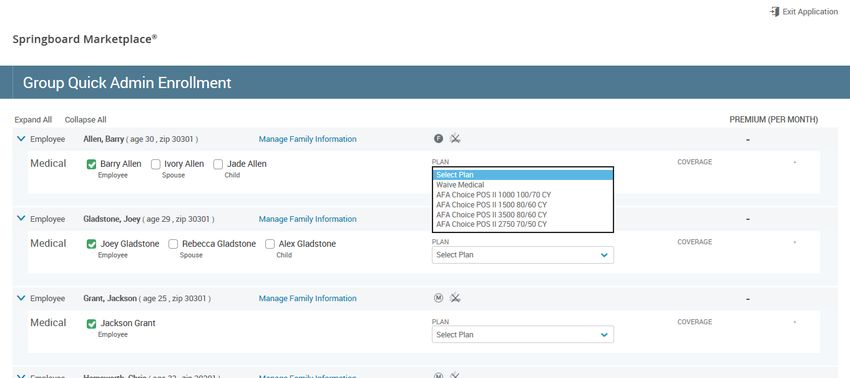
Enter the name of the group and choose “Search.” Then, select the group’s hyperlink.

Select “Continue Administrative Enrollment/End Enrollment”.

                                                                                       Page 10
On this page, Springboard will show all employees (enrolling or waiving) and dependents listed on the
original Springboard census. Coverage tier defaults to employee only, regardless of the tier listed on the
census.
This screen will also reflect any enrollments completed through administrative enrollment or by the
employee through member shopping.
To process enrollment, select the arrow on the “Plan” drop-down for the chosen employee and then
choose the appropriate plan.
Coverage tier and monthly costs will update based on the selection. Monthly cost is the employee’s cost
after defined contributions have been applied.
Page 11To modify or review additional dependent demographic information, or to add dependents, select
“Manage Family Information” next to the employee’s name. Unselect the green checkmark next to the
dependent’s name if the dependent chooses not to enroll. Select the box next to each dependent to be
enrolled.
If you need to add any dependents, select “Add Dependents”. Enter the required information.
Note: Correct employee Social Security numbers and street addresses are required during enrollment. If
they were not supplied on the initial census, you will need to enter them by selecting the “Manage
Employee Information” link.
Ending employee enrollment
We will begin final review once all employee enrollments are complete and enrollment has ended.
1. You can monitor enrollment status of all employees by going to “Manage Groups and Membership”
on your home page and selecting “Review Application”.
Page 122. Select the “Group Information” tab and then select “Continue Administrative Enrollment/End
Enrollment”.
3. Confirm every employee has a plan selection or shows waived coverage.
Page 13Confirm each member has
a selection. Select Plan
indicates enrollment is not
complete.
4. Once you’ve verified enrollment, and every employee has a plan selection or shows waived
coverage, end enrollment by selecting “Submit Enrollment”.
5. This sends a notification back to Aetna for final review and approval. At this time the group will
move to “Enrollment Complete – Pending Audit” status.
Finding a specific group
If you want to review group level information, such as employee enrollment information, adding a new
hire, or updating employee address information, simply go to the employer group site.
1. To locate and review a specific employer group, from the Springboard Marketplace home page,
enter the group name or group number in the search box under “Manage Groups and Membership”.
2. Select “Navigate to Group” to access the group site.
Page 14Searching for an employee
Often you’ll need to find employees in the system to reset their log-in information, update their
enrollment information or change their address. This tool gives you two ways to find an employee.
Please note, both of these options can be processed at the Springboard Marketplace home page (after
initial log-in) or at the employer group site. If you are currently at the Springboard site, you do not need
to go to the group site first to search for the employee. If you are already at the group site, you can
simply search for the employee at the group level.
1. User search bar option:
a. To confirm you’re at the Springboard Marketplace parent site or the employer group site
(child site) from the home page, use the “Signed in as Manager” status below the user
search bar.
Parent Site Child Site
b. From the home page, enter the first and last name of the employee in the upper right-hand
corner search bar. (Be sure drop-down menu shows “Users”.)
Page 15c. A pop-up window will appear with a brief overview of the employee’s information. Select
any of the options below to go directly to that page within the employee’s profile. Or choose
“View User Information”.
2. User admin option:
a. From the home page, select Admin > User Admin from the Navigation tool bar
b. In the search box, enter any of the following information:
i. Last name
ii. First name
You can also submit a blank search by not typing anything in the search box and instead just
selecting “Search”.
c. If searching for the employee at the Springboard Marketplace parent site, be sure to check
the option “Include Users of Child Sites”.
Page 16Blank search or search
by employee’s name.
d. Select the employee’s last name in blue font to be directed to the employee’s profile.
Resetting an employee password
If an employee forgets their password and is locked out of the Springboard Marketplace tool, follow the
steps below to reset the password.
1. Search for the employee by following the instructions in Searching for an Employee.
2. If locked out of the system, the Log-in Enabled field on the View/Edit page will be set to No under
the Log-in Information section. If the employee has attempted to log in but has not yet been locked
out, a -1 or -2 will be next to Log-in Enabled. This means they have unsuccessfully tried to log in
once or twice. Note: Users get three log-in attempts until the system locks them out.
3. Select “Edit” next to Log-in Information.
Page 174. From the Log-in Information page:
a. Log-in Enabled should be Yes
b. Reset Password: Choose one of the following options to reset the password
i. Reset Password to the default password: Date of birth (after selecting “Save”, the
password immediately resets)
ii. Reset password via email to employee: If the password is reset via email, from the
drop-down menu select the email address to which the password reset link will be
sent. Once the employee receives and selects the link, they will be asked to enter
the last four digits of their Social Security number. The employee will have three
chances before being locked out of the password reset process. If they enter the
correct four digits, they can enter and confirm a new password.
iii. Reset password via SMS to employee: If the password is reset via the SMS
authentication option, the employee will receive a six-digit SMS validation code.
They will need to enter it after choosing the “Forgot Password” link on the log-in
page. Passcodes can only be used once before becoming invalid. If the correct
Page 18passcode is entered before it expires, the employee will be asked to enter the last
four digits of their Social Security number. The employee will have three chances
before being frozen out of the password reset process.
c. Choose “Save”.
Adding an employee post-sale
If an employee needs to be added to the system after the initial application process (for example, a new
hire) you can add them to the group site via user admin. (Adding any employees retroactive to the
original effective date requires Aetna approval. Review employee/dependent retro add policy.)
1. To add a user, from the group site, choose Admin >> User Admin and select “Add User” from either
the left-hand navigation tool bar or from the search box.
2. Once on the “Add a New User” page, complete all necessary fields.
a. Fields marked with an asterisk are required.
3. After you’ve completed the “Add a New User” page, select “Save” to continue to the “Family
Information” page.
a. If the family information is available, you may add the dependents to the system as well.
Otherwise, the member will have the option to add their family members during their
enrollment.
b. To add dependents, select the “Add Dependents” link and complete all required fields.
Repeat for each dependent.
Page 195. After adding the employee and dependent demographic information there are two ways to enroll
the employee into benefits. See two options below.
Member shopping
1. Provide employee with their Springboard Marketplace username and instruct them to enroll in
benefits by going to springboardmarketplace.com.
Go here to review member shopping.
Impersonating a user
“Impersonate User” allows you to view the system through the eyes of the employee. The most
common reason for this function is to process an enrollment on behalf of employees when they cannot
access the system.
Important note: You or the HR administrator must obtain a copy of the signed paper enrollment form
from the employee being impersonated. The information entered into the system should match the
information entered onto the paper form by the employee. You or the HR administrator must retain
Page 20the signed enrollment form and final Springboard confirmation form for seven years. And you must
provide it to Aetna upon request.
To impersonate:
1. Locate the employee within the Springboard Marketplace tool. (See section: Searching for an
Employee.)
2. Select the “Impersonate User” link either from the search pop-up menu or from the employee’s
profile.
3. Choose “Impersonate”.
4. Select the “Start Your Enrollment” button at the top of the employee home page.
Page 215. You’ll be asked to confirm the member’s demographic information is correct. Then you’ll need to
confirm the family dependent information.
6. Our online benefit advisor, Ask Emma, will start the enrollment introduction. Select “Let’s Go” or
“Enroll without Audio” to continue.
7. To enroll for benefits per benefits plan type, select the “View Plan Options” button on the right-
hand side. This will expand the section and show all the plans offered.
8. After selecting the “View Plan Options” button, you’ll be directed to confirm who the plan will cover.
You can add dependents during this time.
Page 229. Once you’ve added and confirmed who the plan should cover, select “Continue” to go to the “Plan
Selection” page. Here you can see plan details and compare plans side by side. To enroll in the
requested plan, select the “Select” button.
Page 2310. Repeat these steps for the remaining benefits plan types. Once you’ve made the enrollment
selections, select the “Continue” button on the right-hand side of the screen.
11. This will bring you to the bottom of the page, where you need to confirm the elections and agree to
the participation statement. Select “I agree, and I’m finished with my enrollment” on the bottom of
the screen and then the “Complete Enrollment” button on the right-hand side.
Page 2412. The confirmation page will appear, verifying the enrollment is complete. At this point, you can print
or email a confirmation statement to the address on file for the employee to review and file for their
records.
13. To end the impersonation, select “End Impersonation” at the top of the page. This will return you to
the administrator view of the employee’s record.
Page 25Note: If you or an HR administrator makes a change while impersonating an employee, that
change will update the system. Your name or the HR administrator’s name will be identified as
the user who saved the record.
Retroactive employee/dependent adds
Adding any employees or dependents after the group has been medically underwritten will require
underwriting approval.
Terminating an employee
When an employee is terminated from employment, you can process the termination by following the
steps below:
1. Search for the employee (See Searching for an Employee).
2. From the View/Edit screen of the employee’s profile, select the “Terminate Employment” link
located within the left-hand navigation tool bar.
3. Once on the “Terminate Employment” page, enter the termination reason and date within the
appropriate fields. Select “Save”.
Page 264. A pop-up window will appear asking you to confirm the plans the employee is enrolled in and when
the last day of coverage is. Once the information is confirmed, select “Save”.
5. The employee (and dependents if applicable) is now terminated from employment and coverage.
Dependent terms
When a dependent is to be removed from coverage, you can process the dependent termination by
following the steps below:
1. Search for the employee the dependent is enrolled under. (See Searching for an Employee.)
2. On the left-hand side navigation menu, select “Life Events”.
3. Select “Other Life Events”.
4. On the drop-down select “other” once more.
5. Enter the date of qualifying event (date dependent is to be terminated).
6. Verify/acknowledge life event information is true and accurate.
7. Select “Save and Start Life Event Enrollment”.
8. Select “Got it, let’s get started”.
9. For each line of coverage enrolled select “View Plan Options”.
10. Uncheck dependent(s) who should no longer be covered under the plan.
11. Select “Continue”.
12. Select “Keep Selection” to retain current plan selection for the employee.
13. Continue.
14. Check “I agree” at bottom of page, then select “Complete enrollment”.
Page 27Retro terms
You may process a retro term of an employee within Springboard as long as the termination of the
employee was in the last 30 days. To process please review Terminating an employee section making
sure you indicate a termination date within the last 30 days. If seeking an approval for special
circumstances longer than 30 days, contact the Springboard Helpdesk for assistance. (Keep in mind last
day of coverage will be the last day of the policy month.)
Reporting
You can access reports via the “Client Quick Lookup” on the admin home page. Once you select the link,
you can choose your client and the report you would like to run. The system will run the report and you
can export it to Excel for editing, if necessary.
There are hundreds of reports available. This section includes an overview of common reports and their
description.
To access the full reporting tool in Springboard, select “Reports”, then choose “Report Center”.
Page 28Each report has a standard data set that is automatically included when the report is selected. Most
standard reports are configurable, meaning that fields can be added or removed prior to running the
report. In addition, if there are reports that are run repeatedly, the templates can be saved for future
access.
Report output formats
• Web: If you select this option, the report will open in a new browser tab. Web reports can also be
exported as Excel or CSV files. You can add more custom filters after the web report has been
generated.
• Excel: If you select this option, you can open the report and save it as an Excel (.xls) file.
• CSV: If you select this option, you can open the report and save it as a comma separated values (.CSV)
file.
To display information about the report's configuration on the report itself, check the Include Report
Header option. On web reports, this will automatically expand the header panel at the top of the
report. In Excel and CSV reports, report header info will appear at the top of the spreadsheet above the
column headers. Report headers display the report's:
• Configuration, including the report's name
• Scope , or whether it’s limited to certain clients
• Benefit plan types, vendors, benefit classes, etc.
• Types of users included
• Run date
• Effective and end dates
To run the report offline, check the Run Offline option. Choose this option to generate the report for
retrieval from the “Offline Reports” page. Look under Reports >> Report Center >> Offline Reports.
As noted, you can save reports, making it easier to run customized reports on a recurring basis. You can
schedule reports on a daily, weekly, monthly, or quarterly basis.
The recommended output format is Excel, but any of the options noted will provide output. Again, any
reports that are output to Web can be exported from Web to either Excel or CSV.
How to search for reports
From the landing page, you can search for reports by name or category. For example, if you’re
interested in reports for newly hired employees, you could search for the key words “new hire”. The
search results include the report category. Likewise, if you have saved reports configured to your
preferences and that contain your name (for example, “Sue’s Benefit Report”), you can search for “Sue”
to pull up those reports.
Page 29Tips!
• If there’s a report you like to run on a regular basis you can easily select the star next to the
name of the report and the next time you access the report center it will appear on the top of
list.
• You can save a report you’ve customized so you won’t have to edit it each time. (You can also
“Star” your saved report for easy access.)
Types of reports
• Activity reports: Activity reports provide information about log-ins that may help you contact
employees during an enrollment period. You can use these reports during enrollment, along
with enrollment reports, to monitor employees' progress.
• Admin reports: Administrative reports provide a snapshot of the data stored in an employee
profile. For example, census reports and dependent listing reports are categorized as admin
reports.
• Benefit reports: Benefit reports provide information about employee and/or dependent benefit
overage, such as plan selection, cost and coverage effective dates and cost information.
• Change reports: Change reports detail changes to employee or dependent information, such as
benefit class changes, beneficiary changes, changes to demographic information, and more.
• Configuration reports: Configuration reports provide information about a client’s site, benefit
plan, and enrollment rule structure. The reports allow you to quickly view information without
having to go into the configuration pages to find out the settings. For example, a report showing
plans assigned to benefit class is categorized as a configuration report.
• Enrollment reports: Enrollment reports show the completion status of enrollments where
employees make their own elections. These reports can be used to identify and contact
employees who have not completed their enrollment before the window closes. Or to view
information about completed enrollments.
• Pending reports: Under certain scenarios, such as plans that need evidence of insurability (EOI),
enrollments can be pended for HR admin approval before being officially posted on an
Page 30employee's record. Pending reports can be used when HR admins want to approve changes
employees make to their personal information (e.g., last name, address, or banking
information).Pending reports help HR admins monitor, approve, and reject pended information.
When pending reports are used in web format, the HR admin can review all pended changes and
approve or reject each change within the web output, without going into each employee record.
Tip
Specific instructions for accessing reports, along with some reports that may be useful, are outlined on
the following pages.
How to access reports
Log in to the Springboard site. Navigate to your group and select “Reports” from top navigation, then
“Report Center”. To search for a specific category of reports, select the drop arrow at the end of the
search bar.
You can select a report category or search on “Report Name”. If you’re searching for a saved report, be
sure the “Include Saved Reports” option is checked. Choose “Search”.
This will display all benefit category reports.
Page 31Scroll down to select: Benefit Elections (EE & Dep. No Codes). This is the report you’ll pull to identify all
of your enrollees.
The information outlined for the Benefit Report in this example applies for other types of reports. The
exception is if a report is not configurable with respect to data items, you cannot customize the data
output as shown in the first step of this section.
Page 32Choose data items
This column shows This column shows
all the fields that all the fields that
can be added to will appear on your
appear on your report
report
The blue hyperlinks allow you
to narrow your search by plan
type, vendors, plans, etc.
You can also customize the report by adding or removing fields. The report is defaulted to include a
multitude of demographic and benefit fields, as well as the group number tied to each enrollment.
Page 33Useful reports
1. Benefit election reports: Benefit Reports > Benefit Elections (EE & Dependent No Codes) or
Benefit Elections (EE Only No Codes)
• This report pulls a snapshot of the health and welfare plans in which the employees are
enrolled, and can be run for employees and dependents or for employees only. Both
reports always show coverage tier, but the EE & Dependent report will show rows for the
individual dependents.
• In the Dates field, make sure to select a date that is on or after the group’s benefit effective
date.
2. Census reports: Admin Reports > Census (EE Only) or Census (EE & Dependent)
• This report produces a list of all employees listed under the group, regardless of whether
they’re enrolled in coverage.
3. Enrollment changes: Change Reports > Enrollment Changes (EE Only) or Enrollment Changes
(EE and Dep)
• This report shows enrollment changes that occurred within a specific time frame, defined
when the report is run. Changes include but are not limited to new hires, life events, benefit
election changes, terminations, COBRA changes, etc.
4. Open enrollment status reports: Enrollment Reports > Open Enrollment Complete and Open
Enrollment Not Complete
• This report pulls employees who have or have not completed enrollment.
Page 345. COBRA QE changes: Change Reports > COBRA QE Changes
• This report identifies recently terminated employees who may be eligible for COBRA
coverage.
Note: The information captured in this report is based on what was entered at termination.
Please refer to the employer’s COBRA administrator for rules and regulations.
6. Rate/costs reports: Configuration Reports > Rate Bands by Tier
• This report pulls rates for non-tiered, volume-based plans (life, STD, LTD, AD&D, etc.).
7. Activity/log-in info reports: Reports > Activity Reports > Log-in Status
• This report pulls all employees at each group with their user name and if their log-in is
currently enabled or disabled.
Information regarding additional reports is listed below including where the report should be run, a brief
description and other useful information.
Run at
Report
Report name parent (P) or Description Comment
type
child (C)?
Custom report created
to list all answers
Custom report created to list all
provided by the
answers provided by the
Activity eList P/C employer
employer sponsor/broker
sponsor/broker
regarding the employee census.
regarding the
employee census.
Generates a list of
newly added
dependents at Run this report when you need to
Newly Added employer sponsor sites. see any newly added dependents
Admin P/C
Dependents This report will display within a date range, which you
dependents added input when you run the report.
regardless of
enrollment status.
Generates a list of
newly added
employees at employer Run this report when you need to
Newly Added sponsor sites. This see any newly added employees
Admin P/C
Employees report will display within a date range, which you
employees added input when you run the report.
regardless of
enrollment status.
Page 35Pull this report when you need to
see information about each
Data retrieved from
ExchangeSolutions client, including the template the
Admin P employer application
Client Data client is aligned to, effective date,
questions.
renewal date, new hire waiting
period, and contact information.
Generates a list of Use this report to see quotes
quotes created by created, including answers to
Pre-Quote Client
Admin P brokers and answers to each pre-quote question,
Data
each pre-quote including quotes that never
question. became applications.
Lists all users in the
system, including but
not limited to brokers,
employees, and Run this report to pull census
Census (EE Only) administrators. This data as of a fixed point in time -
Admin P/C
& (EE & Dep) report can be you choose the "as of" date when
customized to include you run the report.
details such as
demographic and
address information.
A detailed and
customizable report on
enrollment information Use this report when you need to
by employee and see either employee (EE Only) or
Benefit Elections
dependents. This both employee and dependent
Benefit (EE Only) & (EE + P/C
includes but is not (EE + Dep) information. The
Dep)
limited to report shows individuals
demographic, benefit, separately, per row.
enrollment, and
address information.
Lists all dependents
that are over the age of
the maximum
dependent age set by
This report looks at the maximum
Overage plan rules. The
Benefit P/C age, by plan, as configured in the
Dependent Listing maximum dependent
system.
age can be different by
plan and the overage
flag is triggered
accordingly.
Lists employees who Terminations list by date range,
Terminations
Benefit P/C are terminated by as entered when report is run
Report
employer sponsor site. ("from" and "to")
Report returns data as of the
Waive Coverage Lists all employees who
Benefit P/C effective date input at the time
Detail waived coverage.
the report is run.
Page 36A listing by employee
of answers to benefit Pull this report to review answers
plan questions during to dental questions during the
Benefit Benefit Questions P/C enrollment. This is only enrollment. This is only triggered
triggered by plans by plans configured to ask
configured to ask questions.
questions.
Use this report when you need to
Identifies and lists all see changes in enrollment. You
benefit can run the report on individuals
enrollment/coverage with relationship of “employee”
Enrollment
changes by employee only, or both “employee” and
Change Changes (EE Only) P/C
and dependent. This dependent relationships. The
& (EE & Dep)
report can be report returns one row per
customized from a dependent, per benefit. User
selection of fields. inputs "start" and "end" date for
changes to be captured.
Accounts for any
employee address
changes made. This can
be customized to User inputs "start" and "end"
Change Address Changes P/C
include specific address date for changes to be captured.
fields and by who and
when the changes were
made.
This accounts for any
age change by
Age employee. This can be User inputs "start" and "end"
Change P/C
Changes/Birthdays helpful in auditing date for changes to be captured.
monthly costs for age-
banded costs.
Identifies and
generates a list of
name, SSN, or DOB
changes by employee.
Name, SSN, DOB This report can be User inputs "start" and "end"
Change P/C
Changes helpful in auditing date for changes to be captured.
sensitive information
that are cost drivers or
need to be updated in
downstream systems.
Plan offering by
Run this report to confirm which
employer sponsor for
plans are assigned to a specific
all product lines. This
benefit class (eligibility group), or
can be used to identify
Plan Assigned to to compare assignment across all
Config P/C which plans the
Class classes. Also, useful to validate
employer sponsor is
that plans are properly assigned
offering for the given
to the appropriate Benefit
plan year, regardless of
Classes.
current enrollment.
Page 37Plan offering by
employer sponsor for
all product lines. This Use this report to review group
can be used to identify benefit plan(s) and bundle(s)
which plans the elected during the application
Benefit Package
Config P/C employer sponsor is process. These elections
Group Elections
offering for the given determine what plan offerings
plan year. Only plans are available for employees to
that have active enroll in.
enrollments will appear
on this report.
Displays rates loaded
This report pulls rates for non-
Rate Bands by for rate banded plans
Config P/C tiered plans, such as volume
Plan such as life and
based (life, AD&D, STD, LTD, etc.)
disability plans.
Displays monthly costs This report pulls monthly costs
loaded for tier based for tiered plans, by plan and tier.
Costs by Benefit benefit plan types such For example, for each medical
Config P/C
Class/Tier as medical, dental, and plan, it will pull monthly costs by
vision plans by Benefit Class, plan, and tier. It will
employer sponsor site. not include volume based costs.
Generates a list of all
Exchange -
applications currently Generates a list of all applications
Enrollment
Config P in the Enrollment currently in the Enrollment
Complete -
Complete - Pending Complete - Pending Audit status.
Pending Audit
Audit status.
Accounts for
employees who have a Accounts for employees who
Employees in New
new hire enrollment have a new hire enrollment
Enrollment Hire Enrollment - P/C
window open and have window open and have not yet
Not Yet Complete
not yet completed their completed their enrollment.
enrollment.
Accounts for
Employees in employees who have Accounts for employees who
Open Enrollment - an open enrollment have an open enrollment window
Enrollment P/C
Enrollment window open and have open and have completed their
Complete completed their enrollment.
enrollment.
Accounts for
employees who have Accounts for employees that have
Employees in
an open enrollment an open enrollment window open
Enrollment Open Enrollment - P/C
window open and have and have not yet completed their
Not Yet Complete
not yet completed their enrollment.
enrollment.
Lists all employee
enrollments currently
Pending Use this report to review any
pending. The pend is
Pending Enrollments P/C pending enrollments awaiting
triggered by enrollment
Awaiting Approval approval.
rules as well as EOI
rules when applicable.
Page 38Lists all pending
employee enrollments
Use this report to review all
that were approved.
pending enrollments that have
This report displays
Approved Pending been approved. The report
Pending P/C when the enrollment
Enrollments displays when the enrollment was
was approved, by
approved, by whom, and the
whom it was approved,
approval reason
and the approval
reason.
Lists all pending Use this report to review all
employee enrollments pending enrollments that have
Rejected Pending that were rejected with been rejected. This report
Pending P/C
Enrollments a reject reason, who displays the reject reason, who
rejected it, and date of rejected it and the date of the
rejection. rejection.
Life events
Employees can log on using their user name and password to process a life event. If you or an HR admin
will be adding and processing the life event, please refer to the Impersonating a User section then
proceed with the steps listed below.
1. From the employee home page, locate the “Life Events” section located on the left-hand side of the
page. Select the applicable life event. If none of the life event options are applicable, select the “All
Other Life Events”.
2. Enter the date of the life event.
3. Enter the new dependent information (if applicable for the life event selected) by selecting the “Add
Dependent” link. Select “Save” when you’ve entered all the information.
Page 394. Select “Continue” to proceed to the next page and confirm the information entered is correct.
5. Step through the enrollment and save the elections. **Be sure to check the box next to any
dependents who should be added during this enrollment. **
Page 40COBRA
Groups that are Group Billed will be placed in the COBRA benefit class and will be able to enroll for
benefits during the group’s open enrollment and/or renewal.
Activate COBRA on existing group (group billed)
For members employed with Group Billed groups, if an employee terminates and becomes COBRA
eligible, follow the steps below.
1. Search for the employee by following the instructions as outlined in the section titled Searching for
an Employee.
2. Assuming the member was previously terminated from employment (see Terminating an Employee
for more information), from the “View/Edit” page of the member’s profile, select the “Activate
COBRA” link located within the left-hand navigation tool bar.
Page 413. On the “Activate COBRA” page, enter the following information:
a. Benefit Class: Select COBRA
b. Benefit Class Effective Date: Enter the COBRA effective date
c. Employment Status: This will pre-populate as COBRA
d. Employment Status Effective Date: Enter the COBRA effective date
4. Choose “Save”.
5. At this point you will need to contact the Springboard Marketplace Helpdesk for a special open
enrollment so this employee can enroll.
Adding COBRA member
Assuming you have activated COBRA for the member within Springboard. See Activate Cobra on Existing
Group. Now that the member has elected coverage and the Springboard Marketplace Helpdesk has
opened a special open enrollment for the member, there are two ways for them to enroll.
1. Provide employee with their Springboard Marketplace username and instruct them to enroll in
benefits by going to springboardmarketplace.com.
Page 42Go here to review member shopping.
2. Impersonate User allows you to view the system through the eyes of the employee. The most
common reason for Impersonate User is to process an enrollment on behalf of employees when
they cannot access the system.
Important note: You or the HR administrator must obtain a copy of the signed paper
enrollment form from the employee being impersonated. The information entered into the
system should match the information the employee entered on the form. You or the HR
Administrator must keep the signed enrollment form and the Springboard confirmation form
for seven years. You must also provide it to Aetna upon request.
To impersonate: Go here to review Impersonating a User
Renewing a group in Springboard
We’ll send you and your client their renewal package as early as 60 days before their renewal date. If
your client is currently an AFA group, they’ll get an AFA renewal. If your client is currently an ACA group
and a good fit for AFA, they’ll get an ACA renewal and AFA plan options.
Groups using Springboard are loaded with renewing monthly costs and plans. The census at the time of
the renewal package is also loaded. The Springboard process is identical for AFA to AFA renewals and
ACA to AFA renewals. A request for sold paperwork will be sent outside of Springboard for ACA to AFA
renewals.
Page 43Once you have confirmation of the AFA sale, you will log in to Springboard and begin broker shopping.
Note: Springboard replaces Aetna’s other online enrollment systems. For groups that currently have an
EZenroll or eEnroll account, once the renewal processing is under way (about 45 days before the
renewal effective date), eEnroll or EZenroll will not be available. You must complete any transactions
relating to your current coverage using the applicable paper forms until your renewal effective date.
Plan selections
On the Springboard home page, type your group’s name in the “Select Client” section under “Manage
Groups and Membership”.
Page 44Select the group name and then “Go to Group Elections”:
You’ll see all available plans, including any ancillary options. You can compare plans, view all costs, and
view plan details if needed.
Page 45Check the box next to the sold medical plan(s). Groups with existing AFA plans have the renewing plans
pre-checked. If the group is replacing the renewing plan, uncheck the defaulted plan and check the
appropriate plan.
Dental, vision, life and disability plans available to the group display after medical. Check the box next to
the sold product. If the group has an existing ancillary product they are not renewing, uncheck any
defaulted plans. Then select “Save and Continue”.
Page 46Defined contribution
You now arrive on the defined contribution screen. Select “Create a Contribution Strategy”.
Check employee and select next.
Page 47Select the products you want to set up for defined contribution. You can choose just medical, or include
dental or vision, if applicable.
Choose next.
Page 48Springboard will lead you through the appropriate screens, based on the type of strategy you’re
requesting. The most common strategy types are explained in the next sections. Once you complete the
applicable section, move to “Starting employee open enrollment”.
Percentage 100% across all tiers, all plans
Strategy: Percentage, 100% to each tier, and all plans
In Springboard, select “Contribute to one benefit, Medical, Next”.
Select “I want to break out my contribution”, contribute a percentage, then type 100 into each tier field.
Choose next.
Page 49Percentage less than 100%, all plans
Strategy: Percentage, less than 100% to any tier, across all plans
Use the defined contribution tool to calculate the actual percentage for each tier. If, for example, 100%
EE Only and 75% Dep is selected, do not enter this into Springboard. The calculations will be incorrect.
Open the tool and enter the requested percentages for EE contribution and dependent contribution.
Then enter the full tier monthly costs for one plan into the respective rows in Column B.
Page 50In Springboard, select “Contribute to one benefit, Medical, Next”.
Select “I want to break out my contribution, contribute a percentage”, and enter the Springboard Tier
percentages into their respective fields.
Select no and then next.
Page 51Select no and then next.
Choose save.
Percentage to base plan
Strategy: percentage to base plan.
Page 52In Springboard, select “Contribute to one benefit, Medical, and click Next”.
Select “I want to break out my contribution and Contribute a flat dollar amount”. Select the appropriate
plan in the percent calculator drop-down. Enter the requested tier amounts. Then choose calculate
contributions.
Page 53Select no and then next.
Select no and then next.
Page 54Choose save.
Dollar amount across all plans
Strategy: Dollar amount and all plans.
In Springboard, select “Contribute to one benefit, Medical, Next”.
Page 55Select “I want to break out my contribution, contribute a flat dollar amount”. Enter the requested
amount in each tier.
Select no and then next.
Page 56Select no and then next.
Choose save.
Dollar amount to base plan
Strategy: Dollar Amount, A Base Plan.
In Springboard, select “Contribute to one benefit, Medical, Next”.
Page 57Select “I want to break out my contribution, Contribute a flat dollar amount.” Then enter the requested
amount in each tier.
Select no and then next.
Select no and then next.
Page 58Choose save.
Single lump sum
Strategy: Single lump sum for all benefits
Select “Contribute a single lump sum for all benefits in strategy”. Then choose next.
Page 59Enter the appropriate amount and choose next.
Check medical and leave the limit field blank. Choose next.
Choose save.
Page 60Starting employee open enrollment
Once you’ve completed the defined contribution section, you’ll start the open enrollment period. If
you’re completing enrollments on behalf of the employees, select “Complete employee enrollments on
their behalf”. Then choose “Continue to Enrollment”.
If the employees are completing their own enrollment, select “Start an Open Enrollment window for
employees”. If you’d like to send an email to each employee with their user name and log in
instructions, select “Yes, send an email notification”.
Note: work email addresses are loaded to the employee’s profile if we have them on file. If addresses
are missing or incorrect, the system-generated email will not be received. You can run a report to see if
Springboard has the correct addresses for the employees. You can update the missing or incorrect
addresses by accessing the profile of each employee in User Admin.
Email addresses are not required for employees to log in to Springboard or complete enrollment. The
open enrollment email only serves as a notification of user name. Instead, you can pull a user name
report to provide to the plan sponsor or employees.
Page 61The group will now be in “Renewal Enrollment in Progress” status. This will notify us of the sale. For ACA
to AFA renewals, we’ll send you the sold case paperwork request.
Any census changes between the time of the renewal package and the time you open enrollment are
automatically updated within Springboard.
Member shopping
This is our preferred method of employee open enrollment. If this option is selected, employees will
receive an email notification once Springboard has been set up and is ready for the shopping
experience.
Employees will log in into Springboard and start their enrollment by accessing
springboardmarketplace.com. (Employees will get their user name and initial password logic in the
email provided. If they misplace the email, employees may also select the “for Employees and HR
Administrators” link listed below the “Need Assistance” heading. This will provide the employee with
their user name logic as well as the initial password logic.)
Page 62After logging in, employees can start their enrollment by selecting “Start Your Enrollment”.
This shop now panel will not appear until the member elects an AFA medical plan. They will
click the house on the menu bar to return to this page after they complete their enrollment.
As long as the employee is enrolling in an AFA medical plan, they are eligible to purchase an Apple
Watch for as low as $25 by selecting the “Shop now” link. (Not eligible for waivers or dependents.)
Page 63Emma, our online benefit advisor, will guide the employee through the enrollment process. Emma will
also help determine the best plan option for the member based upon the answers to a series of
questions. These pertain to how they will use their benefits while taking into account their monthly
costs.
Ask Emma will highlight her recommendation after the employee has provided the answers to the
health questions she presents.
Employees can then select their plan by choosing the “Select” button. (Emma’s recommendation will be
highlighted with a green box around the plan. But employees can select any of the plans offered by their
employer.)
Page 64Employees will then confirm their selections and “Complete Enrollment”.
Group quick admin enrollment
From the menu bar, hover over “Exchange Admin” and then select “Group Manager”.
Page 65Enter the name of the group and select “Search”. Then choose the group’s hyperlink.
Select “Continue Administrative Enrollment/End Enrollment”.
Page 66All employees (enrolling or waiving) and dependents enrolled in the existing plan will be listed on this
page. Coverage tier defaults to employee only, regardless of the actual enrolled tier.
Any completed enrollments done through administrative enrollment or by the employee through
member shopping will be reflected on this screen, as well.
To process enrollment, select the arrow on the “Plan” drop-down for the chosen employee. Select the
appropriate plan.
Coverage tier and monthly costs will update based on the selection. Monthly cost is the employee’s cost
after defined contributions have been applied.
Page 67To modify or review additional dependent demographic information, or to add dependents, select
“Manage Family Information” next to the employee’s name. Unselect the green checkmark next to the
dependent’s name if the dependent chooses not to enroll. Select the box next to each dependent to be
enrolled.
If you need to add any dependents, select “Add Dependents”. Enter the required information.
Note: Correct employee Social Security numbers and street address are required during enrollment. If
they were not supplied on the initial census, they will need to be entered by choosing the “Manage
Employee Information” link.
Ending employee enrollment
Final review by Aetna will begin once all employee enrollments are completed and enrollment has
ended.
You can monitor enrollment status of all employees by going to “Manage Groups and Membership” on
your home page and selecting “Review Application”.
Page 68You can also read