Car Quote User Guide Contents
←
→
Page content transcription
If your browser does not render page correctly, please read the page content below
Car Quote User Guide
Contents
Contents
References
Document References
Video References
User Interface Summary and Common Terms All Jobs
Common Terms
Outlook Bar Jobs Group
Outlook Bar Edit Data Group
All Jobs Grid
All Jobs Grid Search Toolbar
Searching (Filtering) Jobs
All Jobs Generic Report
Exporting your “All Jobs” Data to Microsoft Excel
Default Searches
Managing the Grid Layout
Current Job
Header Tab
Owner Details
*
Insurance Details
Job Details
Vehicle Details
Model Selector
Details Tab
ORM specific Info
PNET Specific Info
Hourly Rates
Incidents and Notes
Pick List Tab
Searching the Pick List
Using the Pick List to add Labour Items
Using the Pick List to add Parts Items
Adding Items to Supplementals
Templates
Labour Tab
Summary of Header buttons:
Summary of Grid Columns
Labour Item Edit Window
Parts Tab
Summary of Header buttons:
Summary of Grid Columns
Part Item Edit Window
Images Tab
Summary of Images buttons:
Images Pop up Edit
Times Tab
Totals Tab
Job Summary Sub Tab
Insurance Summary Sub Tab
Job Costing
Notes Tab
Job Reports
Overview
Assessment Sheet
Estimate
Authority To Repair
Tax Invoice
Parts Quote Request
Parts Order
Parts List
Coversheet
Worksheet
Worksheet + Checklist
Quality Checklist
Simple Quality Checklist
Clearance Certificate
Debtors
Overview
Debtors Grid
Search Debtors
Debtor Dialog
Debtor Details Tab
Debtor Insurance Details Tab
Creditors
Overview
Creditors Grid
Search Creditors
Creditors Dialog
Reports System Reports
Overview
Sales Reports
All Sales Summary for a period
Detailed Sales for a period
Job only Summary for a period
Excess only Summary for a period
Private only for a period
Production Management
Invoices Exported to Accounts
Jobs by Source
Address
Overview
Address Grid
Address Search Search People
Address Dialog People
Loan Cars
Overview
Loan Cars Grid
Loan Cars Dialog
Loan Car Agreement Report
Edit Pick Lists
Setup & Options
Company Details
Register & Server
Quote & Invoice
Quote and Invoice Appearance
Default Labour Rates
Biz Mgmt
Interfaces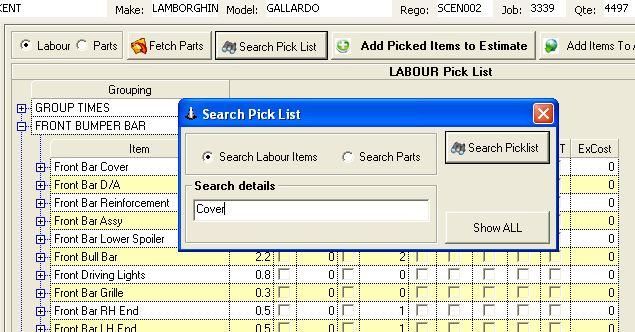
Audatex
General
References Document References The following guides provide further user guides for modules that are not covered in this document: Car Quote MYOB Guide Car Quote Templates Guide Car Quote WebTrim Guide Car Quote Moneyworks Guide Car Quote Exchange Module Guide Car Quote Insurers Interface Overview Car Quote ORM Guide Car Quote PNET Guide Car Quote Estimage Guide Car Quote ARNIE Guide Car Quote NTAR Guide Video References The Following Video guides provide further in depth use of Car Quote: Adding a New Job to Car Quote Editing and Printing Your Estimate Supplementals Address Book Setting Estimate Items Sort Order Cost Based Quoting Advanced Pick List Use Copying a Car Quote Job Adding Images To Car Quote Default Insurance Company Rates Debtors Insurers Debtors Owners Using the Labour Pick List to Add Items Using the Parts Pick List to Add Items CQIM for ORM Intro 1 ORM Submitting a Quote MYOB Exporting Invoices
User Interface Summary and Common Terms - All Jobs
Common Terms

Throughout the User guides and general desktop software community there is a range of
common terms that are used and referenced, along with some standard application UI
conventions.

The Main application is a Single Document Interface Design, navigated via the Outlook Bar on
the left hand side, the main Menu and Toolbars at the top, and the content area as demonstrated
in the above image, which is in this case is the All Jobs grid sometimes known as the
“Dashboard”. Please refer to the image above for an explanation of the terms.

To navigate between each of the major components you use the Outlook Bar (See Image). The
Outlook bar is broken into two Groups, “Jobs” and “Edit Data” that are detailed as follows:
Outlook Bar - Jobs Group
● All Jobs All jobs in the system along with its filter controllers at the top of the grid.
● Current Job Shows the current Job you are working on. Clicking on this when in another
function takes you back to the last job you were working on.
● Debtors Insurers and Owners are both Debtors and centrally managed here
● Creditors Parts suppliers are managed here
● Reports Central reporting
● Address People and contacts used in the system
Outlook Bar - Edit Data Group
● Loan Cars Manage all loan cars
● Edit Pick Lists Where you manage and edit your pick list
● Edit Templates Manage your templates
All Jobs - Grid The All Jobs Grid allows you to see a snapshot of all the jobs akin to a Dashboard. The most recent jobs are shown on top. The Toolbar on top of the grid allows you to perform searching (filtering) functions on the data (See section below) setup how your grid looks by default, run reports and export data. Buttons Summary: ● Search Loads Search Dialog (See section below) ● Show All Clears any applied search filter ● Show Default Loads the default saved search filter ● Default Search Setup Loads the Default Search setup dialog (See section below) ● Manage Grid Layout Loads the Manage grid layout dialog (See section below) ● Add New Jobs Adds a new Job! You can move the columns by dragging and dropping them around the grid from the column headers and then save the layout as a default view. (See section below)

All Jobs - Grid Search Toolbar Searching (Filtering) Jobs The most powerful and most important feature in Car Quote is the ability to Search (Filter) the jobs in the All Jobs grid to a particular view. These jobs once filtered can be viewed directly in the All Jobs grid, in the All Jobs generic report to print, or export to MS Excel. The search filter uses “Exclusive AND” which means you can apply multiple items in the search window to narrow down the search results. For example you can search on a Status of “In Progress” AND Due Out Date “30/12/2013” that will result in only showing those jobs that exactly meet both of those criteria elements. To perform a search filter select you 1 or more search criteria and click the search button. You will see the underlying grid show only the matching results. If your search yields a single job as a result, the dialog will close and that job will load in the Job Details view “Current Job”. Please see the section on “Current Job” below for further details. Buttons Summary: ● Search Jobs Performs the search filter based upon your selected criteria in the dialog ● Show All Clears the filter and shows all Jobs again ● Clear Fields Clear the search fields ● Print Report Prints the All Jobs report based upon the search result (See section below)
● Export Jobs Exports the All Jobs data to excel based upon the search results (See
section below)
All Jobs Generic Report
To run a report on any jobs that you “Filter/Search” for in the All Jobs Search window:
1. Go to the “All jobs” Window
2. Select a Filter and click “Search Jobs”
3. Click the “Print Report”
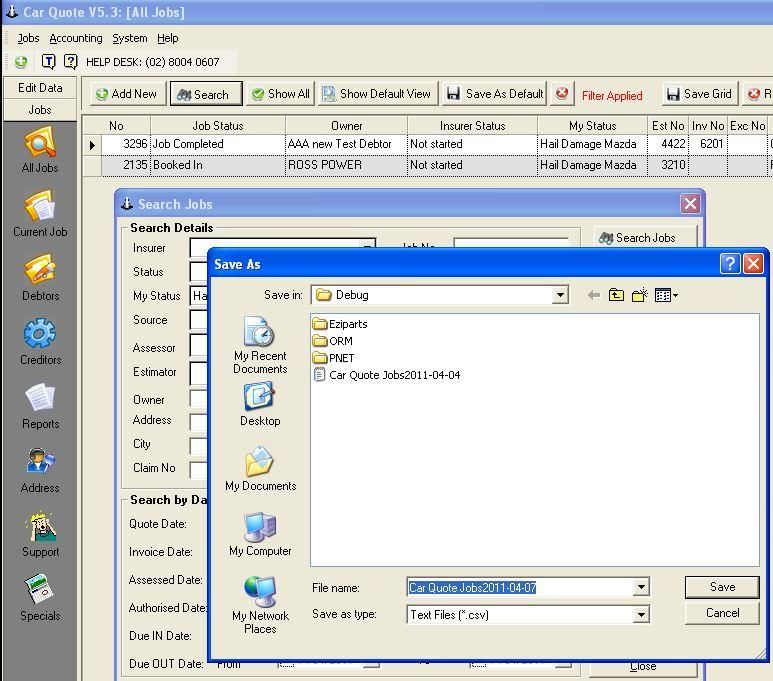
Exporting your “All Jobs” Data to Microsoft Excel
To export any jobs that you “Filter/Search” for in the All Jobs Search window:
1. Go to the “All jobs” Window
2. Select a Filter and click “Search Jobs”
3. Click the “Export Jobs” Button, and select location you wish to save the “.csv” Excel file.
4. Once saved you can then load it up in MS Excel from the location you saved it to.
Default Searches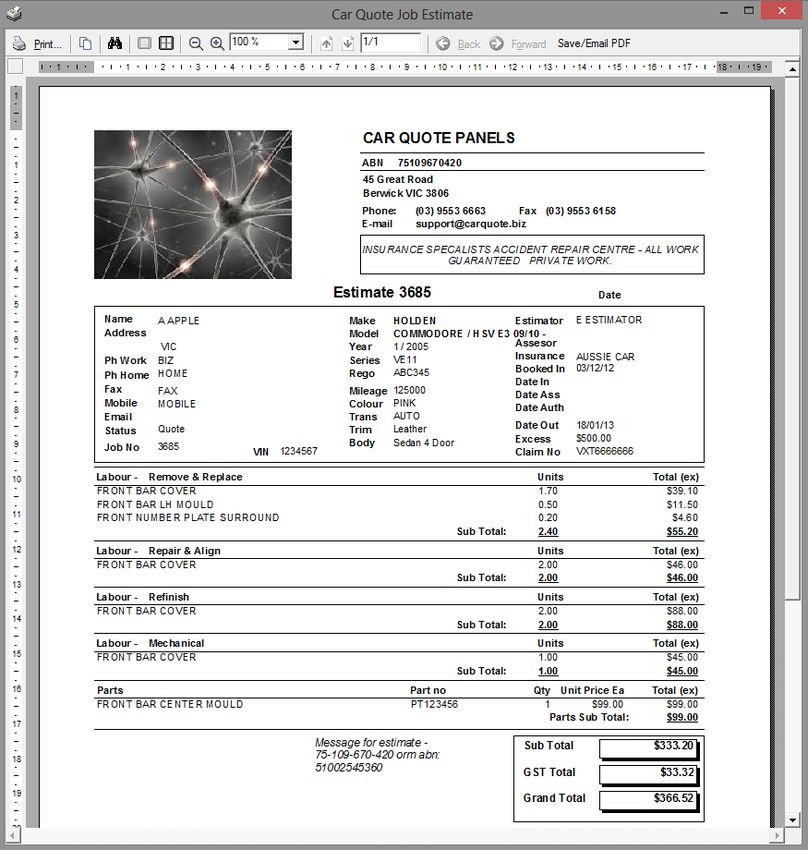
Any search filter you have applied can be saved as a default filter that will be run when Car
Quote Starts or when selected from the grid buttons.
To save a search as a default:
   1. Go to the “All jobs” Window
   2. Select a Filter and click “Search Jobs” as desired
   3. Close the search dialog
   4. Click the “Default Search Setup” button
   5. Click the “Add new Search as Default button”

To clear the default search:
   1. Go to the “All jobs” Window
   2. Click the “Default Search Setup” button
   3. Click the “Clear Default Search Filter”

Managing the Grid Layout

To save a Grid Layout as a default:
   1. Go to the “All jobs” Window
   2. Adjust grid layout by dragging and dropping column headers in the grid and adjusting
      column widths by dragging them to the desired width.
   3. Click the “Manage Grid Layout” button
   4. Click the “Save Grid button”

To clear the default grid layout:
   4. Go to the “All jobs” Window
   5. Click the “Manage Grid Layout” button
   6. Click the “Reset Grid” button
Current Job
The heart of the Car Quote application is the “Current Job” window. For full details on how to
create a Job in Car Quote please refer to the following User Training Videos:
Adding a New Job to Car Quote
Editing and Printing Your Estimate
The window is is driven in a colour coded top down progression through the quoting process as
defined by the coloured “Tabs” on the RH Side.
Summary of the Tabs:
● Header Main Job header for Customer, Insurer, Claim, Vehicle and critical dates
information for the Job.
● Details Details of the Incident, PNET and ORM specific data that's required and rates
management.
● Pick List Pick list for Labour and Parts to build up the Estimate from
● Labour Labour items for the Job
● Parts Parts items for the Job
● Images Image selection, editing and management
● Times Job times for the Job and management
● Totals Job totals including any supplementals, Private Contributions and Excess
● Notes System and user defined notes history for the Job.
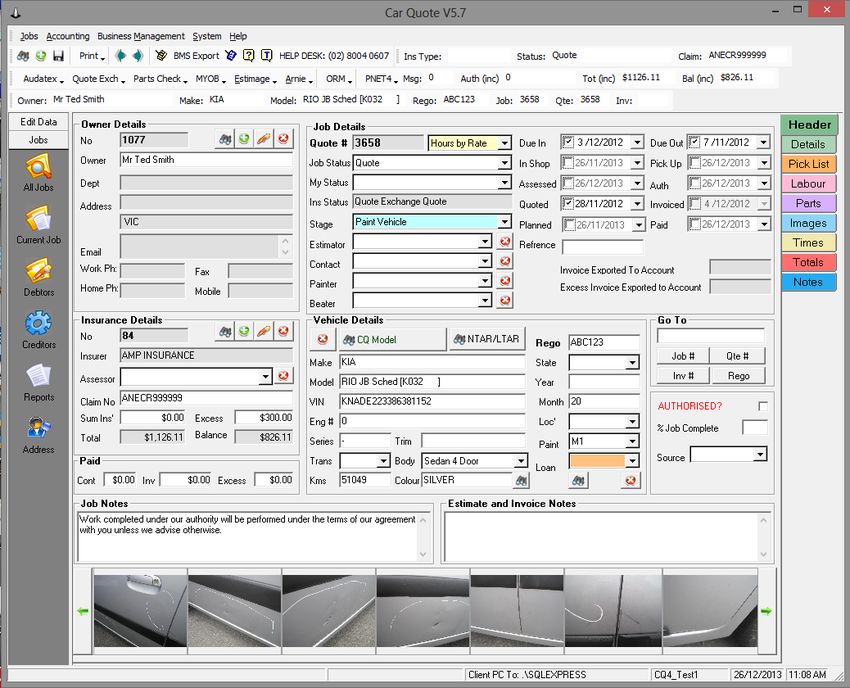
Each tab is explained in further detail in the sections below:Header Tab The Header Tab Main manages the Customer, Insurer, Claim, Vehicle and critical dates and status information for the Job. Summary of Core Sections: ● Owner Details Owner of the vehicle that the job is for. Linked to Debtors. ● Insurance Details Details of the Insurer for the job f applicable. Linked to Debtors ● Job Details Key status, Key Staff, and Key Dates relating to the job. ● Vehicle Details Key vehicle data and information critical for workshop management Owner Details The owner details are displayed as Read Only (hence the fields are in Gary background). To add and edit a owner (Debtor) for a job you have a mini toolbar of buttons inside the Owner Details section. The data fields are self explanatory.
The four buttons are as follows:
● Search for an existing Owner in Debtors
● Add a new Owner in Debtors and assign to the Job
● Edit the current Owner (only works if a Owner has been selected)
● Remove the currently assigned Owner (Does not delete the debtor, merely un assignes
the owner for this job)
Insurance Details
The insurer details are displayed as Read Only (hence the fields are in Gary background). To
add and edit an insurer (Debtor) for a job you have a mini toolbar of buttons inside the Owner
Details section. The data fields are self explanatory.
The four buttons are as follows:
● Search for an existing Insurers in Debtors
● Add a new Insurer in Debtors and assign to the Job
● Edit the current Insurer (only works if an Insurer has been selected)
● Remove the currently assigned Insurer (Does not delete the debtor, merely un assigns
the owner for this job)
An Insurer once selected will copy the default rates for that insurer to the Job (See Details Tab>
Hourly Rates section). Any new items added from the pick lists from that moment forward will
use those assigned rates.Job Details
Summary of Key Job Details Section fields:
● Quote No System generated quote number. Cannot be changed or edited and is
numeric only.
● Quote Type hours by Rate or Fixed Cost. Default is Hours by Rate. Fixed cost is not
commonly used anymore.
● Job Status Status of the Job. Fixed list that cannot be changed.
● My Status Your user assigned status from a list you can edit and change.
● Ins Status Insurer status. Fixed and cannot be changed. Specific for ORM and PNET
updates from Insurer.
● Stage
● Estimator Linked to Address list Staff. Person performing estimate
● Contact Linked to Address list Staff. Main contact
● Painter Linked to Address list Staff. Painter for Job
● Beater Linked to Address list Staff. Beater for Job
● Due In Date Vehicle is due in
● Due Out Date Vehicle is due out
● In Shop Date Vehicle arrived in the shop
● Pick Up Date Vehicle was picked up
● Assessed Date Vehicle was assessed
● Auth Date Vehicle was authorised
● Quoted Date Vehicle was Quoted
● Invoiced Date Vehicle was Invoiced
● Planned Date Vehicle is planned to be completed
● Paid Date Invoice paid
● Reference General user reference field for searching and reporting purposes as
required by the user.
The other data fields are self explanatory.Vehicle Details
Model details can be entered manually in the data fields as shown, or a model can be selected
from our model list where available.
The vehicle data fields are self explanatory however some key fields to consider:
● Paint Important and critical for Pick list as this determines what paint type and time
when using the pick list and NTAR times (See Separate doc on NTAR for more
information)
● Month: Must be 01 or 02 for PNET not 1 or 2
● Rego: Must exactly match the one on Estimage when exporting to Estimage and is case
sensitive
● CQ Model Button refer to section below on Models
● NTAR/LTAR button refer to section below on ModelsModel Selector
Car Quote supports a range of model crash books. However with the advent of the Audatex
integration this is no longer relevant or maintained as parts information can be sourced from
Audatex. However it does contain part numbers and parts information to a good selection of
models.
How to Search and select Models:
1. Select supported makes from the drop down List
2. Enter partial search information for the Model
3. Click “Search Models” to get a list of matching models
4. Double Click the model you wish to select
Tabs:
● Tab Parts Models Only Shows all models that Car Quote has parts information for.
● Tab NTAR Models only Shows only NTAR models. When doing a NTAR job you must
select a model from this list only. (See Separate doc on NTAR for more information)Details Tab ORM specific Info Data fields specific to the operation of ORM are in this section. Please refer to the following two extensive training videos for IAG’s ORM: ● CQIM for ORM Intro 1 ● ORM Submitting a Quote Also refer to the IAG supplied User guides and documentation provided by IAG on ORM. PNET Specific Info Data fields specific to the operation of Suncorp’s PNET are in this section. Please refer to the following extensive user guide for PNET for more information: Car Quote PNET Guide
Hourly Rates
The hourly rates used as the default rates when adding items via the pick list only.
Rates Workflow:
1. The rates for a job when first created are taken from the default rates setup for the
database in the System>Setup & Options>Quote and Invoice tab. (Refer to section in
this document on Setup for more information)
2. When an Insurer is added, the default rates are then applied over these default rates
3. If you change insurer or add an insurer after you have already added items via the pick
list, those existing items will still have the original rates, and all new items will use the
new rates. To change the rates of an existing item use the “Apply to Items” button.
Incidents and Notes
The notes data fields are self explanatory.Pick List Tab The Pick List is a user configurable pick list formed on the basis of 30+ years experience and 20+ Panel shops in Australia to provide a generic time base to use as a starting basis for your estimate. The use of the pick list assists you in providing a massive time saving in the estimating process and is still the quickest way to produce an estimate. It works on the simple principle of selecting multiple RR,RA,REF for the same labour description/item as required and work your way through the vehicle in an anti clockwise fashion. Car Quote will automatically add those items applying the default rates defined to the labour and Parts sections of the estimate. For a specific in depth user guide on how to use the pick list please refer to the Advanced Pick List Use User video.
The Pick list shows Labour Or part Items. To select between the two select labour Or Parts at
the top section near the buttons. You also can “Open” the whole Tree or “Close” the whole Tree
using the buttons in the ToolBar. Please refer to the Image below:

Searching the Pick List
To search the Pick List:

   1.   Go to the “Pick List” Tab for the Job
   2.   Click the “Search Pick List Button”
   3.   Enter search criteria into Search Details Text Field
   4.   Click the “Search PickList” Button
   5.   To See all of the Pick List again and clear the search, click the “Show ALL” button”

Using the Pick List to add Labour Items

   1.   Make sure the Labour option button is selected
   2.   Go to Group and item you wish to add to the estimate
   3.   Tick each item you want to add per row, and update/Add labour times
   4.   Click the + Estimate button
Using the Pick List to add Parts Items

Note: Can only be used if you have selected a model from the range of Car Quote supplied
models in the details tab.

   1. Make sure the Parts option button is selected
   2. Click the “Fetch Parts” button and wait while it retrieves the parts information from the
      server.
   3. Go to Group and item you wish to add to the estimate once the pick list has refreshed
      after the download
   4. Tick each part you want to add to your estimate
   5. Click the + Estimate button to add it to your Parts section of your estimate

Note: Make sure you are connected to the internet and your account is active before performing
a “Fetch Parts”
Adding Items to Supplementals To add items to your Supplementals and Private contributions from the pick list, select the items as per the sections above then select which supplemental or private contribution you wish to add the items to in the estimate. Templates You can add a selection from your pick list directly into a Template for further use if required. To add items to your Template from the pick list, select the items as per the sections above then click the “+Template” button that will load the Search Template Dialog then double click the Template you wish to add the items to.
Labour Tab
The Labour Tab is the location of all labour items broken up into the following key sections:

   ●   Remove and Replace
   ●   Repair and Align
   ●   Refinish
   ●   Mechanical
   ●   Miscellaneous
   ●   Sublet

You can edit items directly in the grid using the arrow keys to navigate or Mouse and Enter to
select a cell to edit or you can double click the item row to load the Labour Item edit window.
(refer to sub section below)
Summary of Header buttons:
● Item Add an item manually
● from Template Add items from a Template. Refer to the Car Quote Templates Guide
for a detailed user guide on Templates.
● NTAR/LTAR Add NTAR/LTAR Items Refer to the Car Quote NTAR Guide for a detailed
user guide on NTAR.
● Sundry Refer to the Car Quote NTAR Guide for a detailed user guide on NTAR.
● NTAR Calculator Refer to the Car Quote NTAR Guide for a detailed user guide on
NTAR.
● Add Items to Template Add items To a Template. Refer to the Car Quote Templates
Guide for a detailed user guide on Templates.
Summary of Grid Columns
● Sort Sort order of the item. Adjust sort number to adjust the position in the estimate.
● Status Status of the item. Mainly used by ORM and NET for Insurer feedback
● Item The actual details of the labour item
● Supp Supplemental this item belongs to
● Rate Rate used
● Hrs Hours
● Total Total cost
● Rep Item on report? For ORM and PNETLabour Item Edit Window Navigation: Once the edit item dialog is loaded you can actually scroll back and forth through all the estimate items in the estimate using the Prev and Next buttons at the bottom of the dialog. Any edits or changes made in the dialog will automatically save when you move to the next item or you close the edit dialog. The Item details data fields are self explanatory. The RR, REF, Sublet sections are applicable to NTAR jobs only. Please refer to the Car Quote NTAR Guide for a detailed user guide on NTAR. The Insurance section is for sending item notes at an item level to ORM.
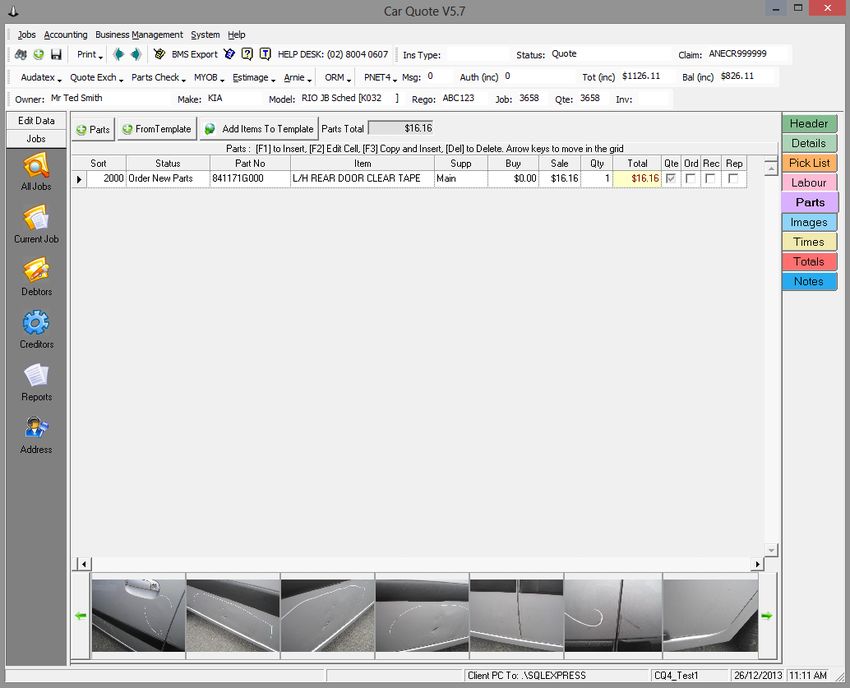
Parts Tab
You can edit items directly in the grid using the arrow keys to navigate or Mouse and Enter to
select a cell to edit or you can double click the item row to load the Part Item edit window. (refer
to sub section below)
Summary of Header buttons:
● Parts Add a Part manually
● from Template Add items from a Template. Refer to the Car Quote Templates Guide
for a detailed user guide on Templates.
● Add Items to Template Add items To a Template. Refer to the Car Quote Templates
Guide for a detailed user guide on Templates.
Summary of Grid Columns
● Sort Sort order of the item. Adjust sort number to adjust the position in the estimate.● Status Status of the item. Mainly used by ORM and NET for Insurer feedback
● PartNo Part Number
● Item Part Description
● Supp Supplemental this item belongs to
● Buy Buy Price
● Sale Sale Price
● Qty Qty of parts
● Total Total
● Qte Get Quote?
● Ord Part Ordered?
● Rec Part Received?
● Rep Part on Report. ORM and PNET use.
Part Item Edit Window
Summary of Dialog functions:
● Navigation: Once the edit part dialog is loaded you can actually scroll back and forth
through all the parts in the estimate using the Prev and Next buttons at the bottom of the
dialog. Any edits or changes made in the dialog will automatically save when you move to
the next item or you close the edit dialog.● The Part details data fields are self explanatory.
● The Insurance section is for sending item notes at an item level to ORM.
● Part details and Supplier Section: Here you can assign to a creditor where the part
has come from, date it came in and supplier reference number.
Images Tab
All images in Car Quote are stored directly in the SQL database and are automatically converted
and compressed. They can be exported again to disk, emailed and included in the estimate. The
same images can be sent through all 4 Insurer conduits of ARNIE, Estimage, PNET and ORM.
For an extensive user guide on how to add images to Car Quote please refer to the Adding
Images To Car Quote user video.To perform an action such as export out to the PC, or email the images, select the images you wish to do this to by clicking the “Est” check box and hitting save first before performing the action. To identify what images go to an Insurer select the “Ins” Check box next to each of the images then click the “Save” button. Use the drop down to see All images or select by supplement. To set an Image to a supplement (all are Main by default) double click the image to load the popup edit window (See section below for more details) and set it to Supplement and hit save. You will see that the image now says Sup1 in the bottom RH side of the thumbnail. Summary of Images buttons: ● Add Add one or more Images to the Job ● Delete Delete the currently selected thumbnail image ● Scan Doc Runs the scanning utility to scan in a document and store as an Image ● Drop Down All or by Supplemental show filter ● Select All Selects all images ● Email Emails selected Images ● Export Exports selected Images to HDD ● Coversheet Creates a coversheet report of the selected IMage ● Save Save any changes
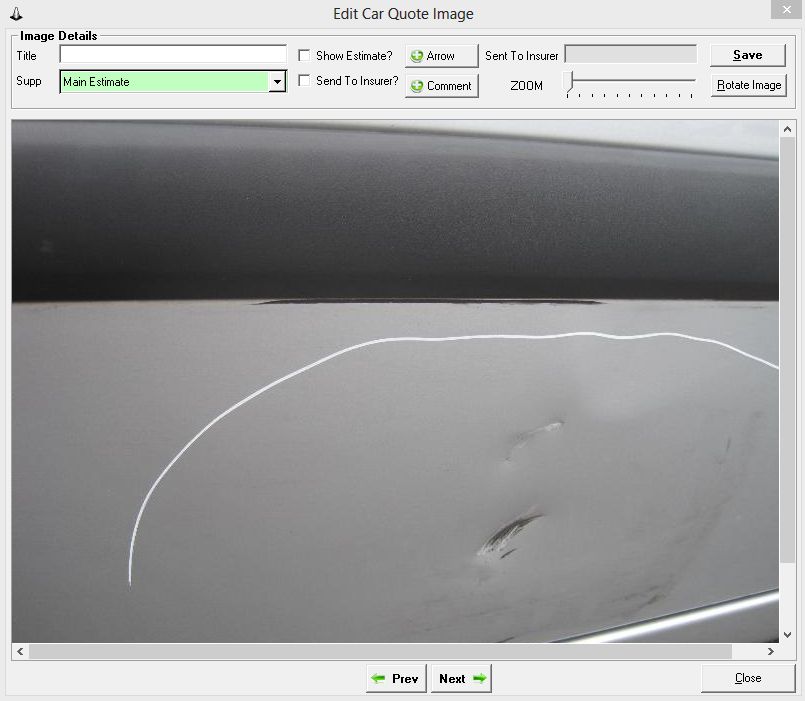
Images Pop up - Edit

When you double click an Image thumbnail on the IMages tab it will load up the Image editor
window where the user can add comments, arrows, title, and what supplement it belongs to.

Note: Always click the “Save” button after you change anything to ensure it updates. Autosave is
disabled on this window when you move between images.

To add an Arrow or comment click the button and then click on the image where you want the
comment or Arrow.
Times Tab The Times tab is a simple time logging function to track staff time working on the job. Working from the Worksheet report provided by the estimator (see section on Job Reports below) the shops staff can enter actual times for the Job such that data is collected to perform a cost analysis of the Job. Times are added by clicking the “Add Actual Time to Task” button at the top of the grid. The timer dialog has a built in timer function if required or you can manually enter in the times in the grid directly. The labour costs are are set by in System>Setup & Options>Biz Mgmt tab where you can set the actual cost of the staff by role. For example: The data fields are self explanatory.
Totals Tab
The totals tab is the central area where the main estimate, all supplementals and private
contributions are totalled and managed and each are individually represented as a row in the
grids.

For example if you had a Main estimate with 2 supplements, a private contribution, and the
owner had a $500 excess then you would see a total record for:

   ●   Main Estimate
   ●   Supplement 1
   ●   Supplement 2
   ●   Private Contribution
   ●   Excess

Job Summary Sub Tab
The Job Summary Sub Tab shows the breakdown of each component of the estimate into its
sections (RR,RA,REF etc).

Insurance Summary Sub Tab
The Insurance Summary Sub Tab provides a view of all Quote and Invoice numbers and their
status at an individual level with the Insurer.
Quote and Invoice numbering follow the following convention: ● Main Estimate/Invoice Numeric number system allocated ● Supplements 1 has a “1” Suffix ● Supplements 2 has a “2” Suffix ● Supplements 3 has a “3” Suffix ● Private Contribution has a “P” Suffix ● Excess has a “E” Suffix Job Costing By clicking the “Job Costing” button you can run the Job Costing report for the Job. For this feature to work you need to setup the baseline staff costs in System>Setup & Options>Biz Mgmt tab and set the actual cost of the staff by role. For example: The report uses these base costs and divides the estimated value by the rate to create the target time to break even on that task. For example if you have $195 worth of R&R on the estimate then to break even at $65 the work must be completed in 3 hours. This is your Target.
By doing this you are able to work around the Funny Money Funny times issue and show a true reflective target hours that is required for each Labour section. In the report we show the following: ● Quoted Quoted hours for the section of Labour. ● Target The calculated Target hours to break even ● Actual The actual hours performed. Drawn from the Times Tab data entry. ● $ Quoted The Quoted cost to the client ● $ Target The Target cost to break even ● Profit The Profit ● Profit % The Profit %
Notes Tab

The Notes tab serves two distinct functions:

   1. User defined notes and comments by staff by date and time
   2. System generated messages including ORM, PNET messages and transaction logging

To manually add a note click the “Add Note” button that will add a new blank note in the grid.
Enter the details directly into the grid, and assign a Staff Member from the drop down lisdt and
use the date pick lists.

If there is no one in the drop down list then that is because you have not defined any people in
your address book as “Staff”. To do this go to Address grid, select the staff member by double
clicking in the grid then set the ‘Staff” checkbox to True and save.

Please refer to the “Address” section for more information.
Job Reports
Overview
Every Job has a range of reports specific to that Job. These can all be found in the “Print” Menu
on the top toolbar under the main menu (please refer to the image below). You need to have the
Job loaded in “Current View” to see this menu.

Please refer to the subsections below for details on each report.
Assessment Sheet

The Assessment sheet is like a pick list that you can print out and use to manually do an
assessment of a vehicle with a clip board. It breaks the vehicle into its butterfly components and
provides a pick list grid format for the assessment details such that it can be easily translated
when using the pick list inside Car Quote.

Estimate

An estimate can be printed in its individual components such as the main Job, each of its
supplements, and private contributions separately. You can also print the estimate with all the
supplements combined.
When you select “Print Estimate” from the menu you will load up the Print Estimate dialog box where you select what Estimate component you wish to print. Select from the drop down list and click “Print” to load the report in preview mode. Below is an example of an estimate report. The report is broken up into five components and is completely configurable. The look and feel can be setup in the System>Setup & Options>Quote & Invoice in setup. You can change and modify everything from the header appearance, through to showing what data row items in labour.
Preview Window Report Functions:

   ●   To Print the report click the                button on the report preview window

   ●   To Save as a PDF and Email the report click the
       button on the report preview window and click “Yes” to Email the report.

   ●   To Save as a PDF click the                                       button on the report
       preview window and click “No” to Email the report.

Please refer to the image below of the options available that can be modified.

Note: West Australian users need to set the “West Australian Parts” option as they handle parts
in their estimates differently than the rest of Australia, which is reflected in the way the estimate
is presented.
Note: These settings are for the default views of the Estimate and Invoice. Any insurer settings
will override these if an Insurer is selected for the Job that is different than the defaults set in this
section.
The report is broken up into the following 5 sections:
● Header Shows logo, or can be company details only, a image that goes across the
entire top, or a logo and details as shown above.
● Job Details All the details on the job such as Owner, Insurer, vehicle details and key
dates. Data fields are self explanatory.
● Labour Details List of Labour items broken up into their respective sections. The design
is based on the Setup & Options default unless overridden by the Insurer settings
● Parts Details List of Parts. The design is based on the Setup & Options default unless
overridden by the Insurer settings
● Totals The Job TotalsAuthority To Repair The repair authority report is used to protect the panel shop owner from failure to pay for the repairs by the owner. Please refer to the sample below: Note: This report uses the Header default settings from Setup & Options
Tax Invoice
An Invoice can be printed in its individual components such as the main Job, each of its
supplements, and private contributions separately. You can also print the Invoice with all the
supplements combined.

When you select “Print Invoice” from the menu you will be asked to confirm the action because
once you print an Invoice it creates the Invoice number and sets the Invoice date to today.

If you confirm, then Car Quote will load the Print Invoice dialog box where you select what Invoice
component you wish to print. Select from the drop down list and click “Print” to load the report in
preview mode.

Note: If you decide to print the Invoice in its separate components (ie Main Job as one Invoice
and Supplement 1 as a separate Invoice) you cannot later reverse this back to a combined
Invoice and vice versa.

Below is an example of an Invoice report.
The report is broken up into five components and is completely configurable. The look and feel
can be setup in the System>Setup & Options>Quote & Invoice in setup. You can change and
modify everything from the header appearance, through to showing what data row items in
labour.
The report is broken up into the following 5 sections:
● Header Shows logo, or can be company details only, a image that goes across the
entire top, or a logo and details as shown above.
● Job Details All the details on the job such as Owner, Insurer, vehicle details and key
dates. Data fields are self explanatory.
● Labour Details List of Labour items broken up into their respective sections. The design
is based on the Setup & Options default unless overridden by the Insurer settings
● Parts Details List of Parts. The design is based on the Setup & Options default unless
overridden by the Insurer settings
● Totals The Job TotalsPreview Window Report Functions:
●   To Print the report click the             button on the report preview window

●   To Save as a PDF and Email the report click the
    button on the report preview window and click “Yes” to Email the report.

●   To Save as a PDF click the                                   button on the report
    preview window and click “No” to Email the report.
Parts Quote Request The Parts Quote request report is designed to provide and simple report that can be emailed or faxed to the parts dealer with all the important Job information such that the dealer can provide pricing and part number information for your estimate. The parts need to be selected prior to running this report. By clicking the “Qte” tick box next to each part in the Parts section of the estimate (see image below) you define what parts you wish to get an estimate for. Below is an example of an Request for Parts Report: Preview Window Report Functions:
●   To Print the report click the             button on the report preview window

●   To Save as a PDF and Email the report click the
    button on the report preview window and click “Yes” to Email the report.

●   To Save as a PDF click the                                   button on the report
    preview window and click “No” to Email the report.
Parts Order The Parts Order report is designed to provide and simple parts order that can be emailed or faxed to the parts dealer with all the important Job information such that the dealer can supply the requested parts. The parts need to be selected prior to running this report. By clicking the “Ord” tick box next to each part in the Parts section of the estimate (see image below) you define what parts you wish to get an estimate for. Below is an example of an Parts Order Report: Preview Window Report Functions:
● To Print the report click the button on the report preview window
● To Save as a PDF and Email the report click the
button on the report preview window and click “Yes” to Email the report.
● To Save as a PDF click the button on the report
preview window and click “No” to Email the report.Parts List Provides a list of all parts for the Job. To Print the report click the button on the report preview window
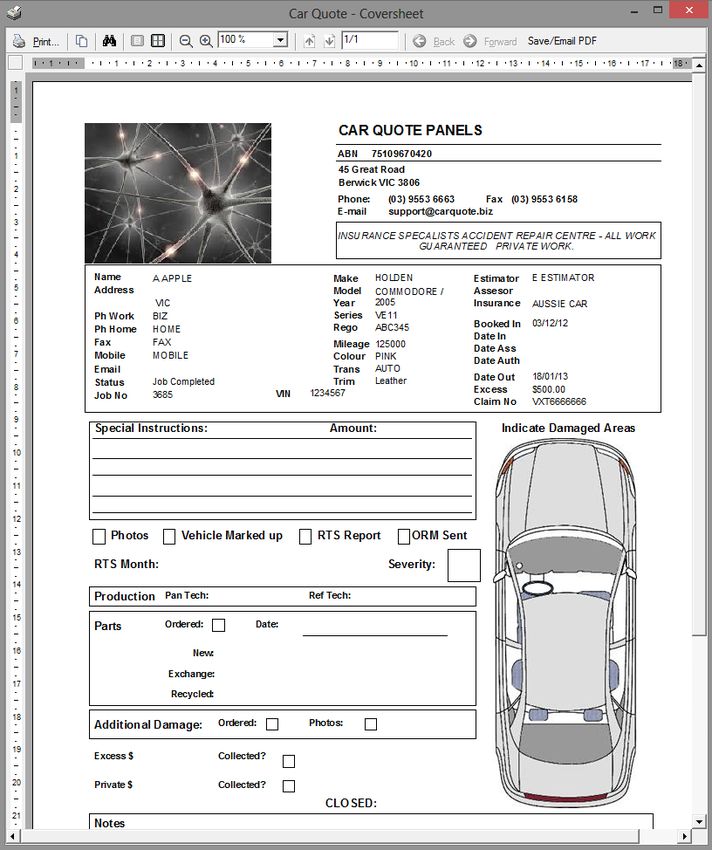
Coversheet

Preview Window Report Functions:

   ●   To Print the report click the   button on the report preview window
●   To Save as a PDF and Email the report click the
       button on the report preview window and click “Yes” to Email the report.

   ●   To Save as a PDF click the                                   button on the report
       preview window and click “No” to Email the report.

Worksheet

To Print the report click the             button on the report preview window
Worksheet + Checklist To Print the report click the button on the report preview window
Quality Checklist

To Print the report click the   button on the report preview window
Simple Quality Checklist

To Print the report click the   button on the report preview window
Clearance Certificate

To Print the report click the   button on the report preview window
Debtors Overview There are two types of debtors used in car Quote; Insurers and Owners. In a Job both are usually assigned, and they can be independently managed and edited through the Debtors grid and dialogs. Debtors Grid The Debtors Grid allows you to see a snapshot of all the debtors akin to a Dashboard. The Toolbar on top of the grid allows you to perform searching (filtering) functions on the data (See section below) Buttons Summary: ● Search Loads Search Dialog (See section below) ● Show All Clears any applied search filter ● Show Default Loads the default saved search filter ● Save As Default Saves the current apply filter as the default ● X Clear Default Filter button ● Print Grid View Print the current grid view ● Add New Debtor Adds a new debtor
Search Debtors The search facility is an Exclusive And search which means you can search on any combination of the three criteria of: 1. Debtor Type Insurer or Owner 2. Debtor Name 3. Debtor Code A special text field to assign user defined code to Click the “Search Debtors” button to perform your search. The grid will automatically reflect the search result. Debtor Dialog Debtor Details Tab
General details of the debtor. The data fields are self explanatory. Debtor Insurance Details Tab The Insurance details tab is where Insurer specific information is managed. As discussed in the previous sections on adding Insurers to a Job, the default settings that are saved here are applied to the job when the Insurer is assigned. General Options ● Parts Markup No longer used. Leave at 0. ● Show Rate on Quote/Invoice Self explanatory ● Show Hours on Quote/Invoice Self explanatory ● Show Labour detail on Quote/Invoice Self explanatory ● Show null rate for all Labour items Self explanatory ● GST In Excess No longer an option. Ignore. ● NTAR Insurer Click if an IAG ORM NTAR Insurance company. Default Labour Rates ● Default Labour Rate The default labour rate if no others are set. ● Refinish Rate Default Insurer rate if M1S2 is not set
● M1 Default Insurer rate for M1 Paint Type ● M2 Default Insurer rate for M2 Paint Type ● M3 Default Insurer rate for M3 Paint Type ● S1 Default Insurer rate for S1 Paint Type ● S2 Default Insurer rate for S2 Paint Type ● Repair Rate Default Insurer rate for Repair Labour ● Mechanical Rate Default Insurer rate for Mechanical labour ● R and R Rate Default Insurer rate for R&R Labour Arnie Options Needs to be filled in with the details provided by the Arnie Insurer for the Arnie export to work. ● Repairer ID Provided by Arnie Insurer ● E MAil Provided by Arnie Insurer ● Brand Provided by Arnie Insurer ● Excess GST Inclusive No longer required by Arnie. Leave unchecked ● Contribution GST Inclusive No longer required by Arnie. Leave unchecked
Creditors Overview Creditors can be independently managed and edited through the Creditors grid and dialogs. Creditors are usually parts suppliers. Creditors Grid The Creditors Grid allows you to see a snapshot of all the creditors akin to a Dashboard. The Toolbar on top of the grid allows you to perform searching (filtering) functions on the data (See section below) Buttons Summary: ● Search Loads Search Dialog (See section below) ● Show All Clears any applied search filter ● Show Default Loads the default saved search filter ● Save As Default Saves the current apply filter as the default ● X Clear Default Filter button ● Print Grid View Print the current grid view ● Add New Creditor Adds a new creditor
Search Creditors
The search facility is an Exclusive And search which means you can search on any combination
of the two criteria of:

   1. Creditor Type
   2. Creditor Name

Click the “Search Creditors” button to perform your search. The grid will automatically reflect the
search result.

Creditors Dialog
Reports - System Reports
Overview
Car Quote supplies in addition to the generic reporting tool described above in the “All Jobs”
section, a range of fixed reports that are visible when you click “Reports” in the Outlook bar.

To select and run a report in preview mode, select from the Tree list on the Left hand side pane
(See image below), then enter in any search or selection criteria in the right hand pane and click
the “View Report Preview” button.

The same report in some instances can also be exported as .CSV text files by clicking the
“Export Report as a .CSV File” button.

Please refer to the sub sections below for details on each of the reports:
Sales Reports
All Sales Summary for a period

Detailed Sales for a period

Job only Summary for a period
Excess only Summary for a period

Private only for a period

Production Management
Invoices Exported to Accounts

Jobs by Source
Address Overview All contact, staff and address can be independently managed and edited through the Address grid and dialogs. Address Grid The Address Grid allows you to see a snapshot of all the Addresses akin to a Dashboard. The Toolbar on top of the grid allows you to perform searching (filtering) functions on the data (See section below) Buttons Summary: ● Search Loads Search Dialog (See section below) ● Show All Clears any applied search filter ● Show Default Loads the default saved search filter ● Save As Default Saves the current apply filter as the default ● X Clear Default Filter button ● Print Grid View Print the current grid view ● Add New Address Adds a new Address record
Address Search - Search People

The search facility is an Exclusive And search which means you can search on any combination
of the three criteria of:

   1. Address Type
   2. First Name
   3. Last Name

Click the “Search People” button to perform your search. The grid will automatically reflect the
search result.

Address Dialog - People

Double click a record in the Address Grid to load the Address Dialog window to edit a contact.
Note: The Staff checkbox is important as this identifies who is a staff member for such things as Notes. Note: Rate Cost Now redundant due to system wide generic rates set in System>Setup & Options
Loan Cars
Overview
Loan cars can be assigned to a Job in the Job Details tab of the current Job. The Loan Cars grid
allows you to independently manage your loan car fleet.

Loan Cars Grid

The Loan Cars Grid allows you to see a snapshot of all the vehicles akin to a Dashboard.
Double click a vehicle to load the Edit dialog (See section below)
Loan Cars Dialog

You can assign the car to a job inside the job details tab of current job or you can also assign the

vehicle to a job from this edit window using the                                       search
button where you can select a job to assign the vehicle to, and click the “Out” check box if the
vehicle is out.

All other data fields are self explanatory

To print a loan car agreement click the “Loan Agreement” button. Please refer to the image
below for a sample of the Loan Agreement report.
Loan Car Agreement Report
Edit Pick Lists

One of the more powerful features for advanced Car Quote users is the ability to modify the
Labour pick list to your own needs.

You can edit the Groups and Items, remove and add items to the Pick List

To edit existing items, select the item you wish to edit and “Click” in the cell in the grid. Use the
“Tab” key to move from field to field. When you click on another row the grid will automatically
save your changes.

   ●   You can edit all fields in the Group header
   ●   You can edit all fields in the items section

To Add a new item select a row in a group and RH mouse click to bring up a pop up menu (See
Image below)
Select “ Add Default Labour item to Group” to add a new blank row. Enter in the data as follows: ● Task Item Description Actual Labour item description ● Sort Sort order position ● Default Default Labour Rate RR ● Default Paint Hours REF ● Cost Ex No longer used as fixed value quoting is no longer used. Note: Always put a value in every column do not leave any “blank” as this may cause unpredictable behaviour in the pick list when adding items.
Setup & Options Most of the options presented in this section are covered in the representative section of the User guides that are dependant on them. However a complete summary of the options and their purpose are listed here as well. Each Tab is listed as sub section and the groups are summarised. Company Details Car Quote is licenced on the one database for one business principle. So Company details is where all the business information is stored for the Panel Shop including ABN etc. This data is what is used at the headers of Estimate reports etc. All the data fields are self explanatory with the following exceptions: ● Estimate Body Message Default message in the estimate body ● Estimate Footer Message Default message in the estimate Footer ● Tax Invoice Body message Default message in the Invoice body ● Repairer ID Critical for ORM and is supplied by IAG if the shop is a preferred repairer.
Register & Server
The Register and Server Tab is where connection to the Registration Server is setup and
Connection to the local database is setup. Refer to the Car Quote Install and Activation Guides
for detailed Installation, Registration, and Activation of Car Quote guides.
Register and Activate Car Quote Online
● Account Name Eziparts Account Name on registration Server
● Account Password Eziparts Account Password on registration Server
● Account No Eziparts Account No on registration Server
● Registration PC One PC is a registration PC per network Click this as True if it is.
● Bike Quote Only for Bike Quote clients.
● CQIM No longer required. Leave unchecked.
● 1. Register my Account for this PC Online Register with Registration server. Record
must have a blank hash on server. Clicking this multiple times will lock the account.
● 2. Activate Car Quote Once registered ok, click to Activate Car Quote with the
registration server.
● 3. Get latest Model lists, Sundry Items Get Latest models from registration server.SQL Server Database Location
Car Quote is a multi user application and can be configured for multi user. Please seek
assistance from the Car Quote Support Engineer for assistance on multi user setup.
Refer to the Car Quote Install and Activation Guides for specific Installation and configuration of
SQL Server.
Summary of fields:
● Server Actual Server “.\SQLEXPRESS” is usually the local server name when the
database is on the same machine as the application. In a Multi user configuration it is the
Microsoft assigned Server instance name.
● Main Database Database Name. Default is CQ4
● DB Username Default is CQUSER
● DB Password Default is CQUSER
● SQL User Authentication Always check
Other Options
● Clearance Certificate Content
● Show Work Sheet Item Status Quote & Invoice
The Quote and Invoice Tab s where you can configure the default layout options of your
Estimates and Invoice reports, set default labour rates and some Insurance options.
Quote and Invoice Appearance
● Quote Header Select one of the 4 following options
○ Show Logo and Details
○ No Logo and Show Details
○ None Use Letterhead
○ Whole Page Top Image
● Invoice Header Select one of the 4 following options
○ Show Logo and Details
○ No Logo and Show Details
○ None Use Letterhead
○ Whole Page Top Image
● Logo Image Used in Show logo option above
● Report Title Image Used in Whole Page Top Image option aboveDefault Labour Rates
These rates are the default rates that you would use on a non insurance job. These are always
overridden by default Insurer rates if an Insurer is selected for a job. Please refer to the section in
Job Details for the Current Job for further information.
Biz Mgmt
The Biz Mgmt Tab is where each of the Interface options ands settings are configured as well as
some other system options. Car quote supports WebTrim only as Bodynet is no longer available
from Car Quote.
● WebTrim Options Please refer to the Car Quote WebTrim Guide for full details
● Rate Costs These are the default cost of your staff. Used in the Cost Analysis report in
the Totals tab of “Current Job”
● Auto Status Updates Specific to ORM and PNET. Have the baility to turn off status
updates automatically from CQIM back to the job in Car Quote. Default is to leave these
on.Interfaces
Interfaces options relate to Estimage, IAG’s NTAR, MYOB, and Moneyworks.
● Estimage Options Directory where exported XML files for Estimage are stored.
Estimage will import the XML files from this directory.
● NTAR Options Supplied by IAG Update in these fields when they change.
● MYOB Import Text Files Account numbers used in the exported Invoices.
● Moneyworks Account numbers used in the exported Invoices.
● Other Interfaces and Options Check as required. By default all turned on.Audatex Enter Auda Bridge login details in this ection as proioded by Audatex Support.
General
● Pick List Options Options on how the pick list is presented
● Estimate Tab Options Options on how Labour and parts information in the estimate are
presented
● Default Images location When adding images to Car Quote the default startinging
location when the Open Dialog is up.
● Quote No Options Quote No = job No? Default is now true.
● Parts Check Enter the Parts Check Hash code as provided by Parts Check support.You can also read