Installation and User manual Probas Webservice Frontend - National Working Environment Authority, Denmark
←
→
Page content transcription
If your browser does not render page correctly, please read the page content below
Installation and User manual

        Probas Webservice
            Frontend

National Working Environment Authority,
               Denmark
Arbejdstilsynet

Table of content
0 General ......................................................................................................................................3
1 Introduction ..............................................................................................................................4
2 System demands........................................................................................................................5
3 Registration as a user to NWEA .............................................................................................6
3.1 Existing users.............................................................................................................................7
3.2 New users ..................................................................................................................................7
4 Installation.................................................................................................................................8
5 Before logging in – export your personal certificate ...........................................................11
6 Putting the Probas Frontend icon on your desktop.............................................................13
7 How to notify with Probas Frontend ....................................................................................14
7.1 Offline mode and online mode ................................................................................................14
7.3 An example of a notification ...................................................................................................18
7.4 Send notification......................................................................................................................32
7.5 Programme updating and version management.......................................................................37
8 Problems with installation and use of programme..............................................................38

Installation manual                                                                                                      Page 2 of 40
Version 1.1 printed 08-11-12

Arbejdstilsynet

0 GENERAL
Probas Frontend is a notification programme for notification of chemical substances and
products to the NWEA (National Working Environment Authority) in Denmark.
Most of the installation procedures are pretty much straight forward and should not cause
any trouble for a user with some IT-experience. If you have the slightest doubt however, on
how to follow the instructions in this manual, we recommend that you contact your IT-
department or relevant person for help.
The software offers a high level of security and you will need a personal certificate from
GlobalSign.com, before you can use the programme online. As a minimum you will need a
personal certificate type: PersonalSign 2. You can order the certificate here:
http://www.globalsign.com/digital_certificate/personalsign/index.htm. Select Digital Ids
for Consumers – PersonalSign 2 as a minimum, but any certificates above this level – for
Consumer or Enterprises – are also applicable. Next step is to register yourself as a user to
the NWEA, see section 3.
After registration, you can use the software in online mode. Follow the procedures in
section 4, which will guide you through the different steps of the installation procedure and
help you with the first start of the system. Please also refer to the on-line help and guidance
built into the system.
The userid and password you receive in a letter from NWEA must be used when you come
to section 7. When you log on to the system the first time, you will be asked to change the
password into a new one known only to yourself.
If case of problems during installation, please contact the following persons in The
National Working Environment Authority between 9:00 and 15:30:

Sven Nielsen, tel: +45 7220 8625, e-mail: sni@at.dk or
Birgit Pedersen, tel: +45 7220 8771, e-mail: bip@at.dk

Opening hours: The system is available all hours except between 24:00-2:00 local time
(GMT+01:00) during which backup procedures occupies the system. System maintenance
usually take place in the morning and if you have login problems, try one hour later or
contact the National Working Environment Authority on the above mentioned phone
numbers or e-mail addresses.

Installation manual                                                                 Page 3 of 40
Version 1.1 printed 08-11-12
Arbejdstilsynet

1 INTRODUCTION

Probas Frontend is a notification programme for notification of chemical substances and
products to the NWEA (National Working Environment Authority) in Denmark.
The software is not a browser-based programme, but a platform-independent programme
which the user can download from the internet and install on his/her desktop. You will
need a browser to download the programme (MSExplorer, Netscape, Mozilla etc.), but you
don’t need a browser to run and use the programme.
An important feature in Probas Frontend allows you to work in both offline and online
mode and to store your notifications locally, i.e. in your own IT-system. Many companies
have called for this feature for a long time and the NWEA is happy to be able to offer this
possibility.
You will also find the user interface to be user-friendly and consistent with most Windows-
based software on the market.
The software will run on most of the commonly used platforms and as a browser-
independent programme, the software will not have all the usual limitations involved with
the use of browsers (unable to handle large and complicated notifications etc.) and the
problems of having different kinds of browser versions on peoples clients.

Installation manual                                                               Page 4 of 40
Version 1.1 printed 08-11-12
Arbejdstilsynet

2 SYSTEM DEMANDS
As previously mentioned, you must have a personal certificate before you can use Probas
Frontend in online mode. If your company do not possess or is able to issue such
certificates, they can be ordered at:
http://www.globalsign.com/digital_certificate/personalsign/index.htm.
Different kinds of solutions can be ordered to meet different company demands. As a
minimum you will need a personal certificate type: PersonalSign 2 for consumers or
enterprises, but any certificate above this level is also applicable.
After a successful registration procedure, including certificate exchange and registration as
a user at NWEA (see section 3), you are able to use the programme in online mode.

Other system requirements are:
-   minimum disk space 60 Mb
-   desktop (PC) with internet connection
-   installation and use of the programme depends on free access to the internet. If your
    desktop is behind a company firewall and/or proxy-server, you must consult your LAN-
    administrator to make sure that your desktop can communicate through port 443 and
    port 8888. Proxy-servers may call for special configuration of your client in order to
    reach the DNS name www.produktdata.dk. Should your LAN-administrator decide to
    open for communication in the firewall via a static ip-address (e.g. as a static entry in
    the arp-table), the ip-address of www.produktdata.dk is 194.239.148.106.
-   the programme runs on most platforms, i.e. Win 95/98/Me, Win NT/2000/Xp, Win 7
    and Mac. Fully updated Windows/Mac OS systems in a virus-free environment as well
    as a Java Runtime Environment (Jre 1.5 or higher) are required.
-   if you don’t run Windows locally on your PC and have access rights to install software
    on the C:\-drive, but work with a so-called ‘thin client’ (e.g. a Citrix solution), you
    cannot install the software according to the procedures in this manual, but must consult
    your IT-administrator to find a solution
The software has been designed for 1024 x 768 and therefore best viewed with this screen
size, but you can use other sizes as well.
Please also refer to section 8 of this manual where you can find more information on
software demands and trouble shooting.

Installation manual                                                                Page 5 of 40
Version 1.1 printed 08-11-12
Arbejdstilsynet

3 REGISTRATION AS A USER TO NWEA
Before you can use Probas Frontend online you must register to the NWEA. The procedure
is a bit different for existing users of the old software ProbasWeb and for new users.
Registration is done by exporting the personal certificate (cf. section 2) into a copy in a
specific pre-defined format. The copy of the certificate must then be mailed as an
attachment to an e-mail to pd@at.dk. Do the following:
Open your browser (MS-Explorer, Netscape etc.) in which you have installed the personal
certificate and make an export in Base64-encodet X.509(.CER) format. Select a name of
your own choice (e.g. your initials).
Here is shown how this can be done with MS-Explorer:
Select ‘Tools’ – ‘Internet options’ – ‘Content’ and press the ‘Certificates’ button. Mark
your personal certificate in the Certificate Manager window and press

Select  followed by ‘No – do not export the private key’ and  and you get:

Installation manual                                                                  Page 6 of 40
Version 1.1 printed 08-11-12
Arbejdstilsynet

Select Base64-encodet X.509(.CER) format and press . State passwords, press the
 button to select a path and give the export file a name and press
followed by  and OK. You can find more information at
https://www.globalsign.com/support/.

3.1 Existing users

User in possession of a login consisting of userid and password, can also use this in the
new system. Send an e-mail to pd@at.dk, put ’Registration Frontend’ in the subject field,
state userid in the mail and attach the copy of the exported certificate. You will get a return
mail from NWEA when the registration is finished.

3.2 New users

New users sends an e-mail to pd@at.dk , put ’New Registration Frontend’ in the subject
field, state company name, address and telephone number and state the name(s) of the
user(s) in the company who needs a login and attach the copy/copies of the exported
certificate(s). If there is more than one login needed for one company and you want the
certificates to correspond to specific users, you must state the names of the certificates next
to the names of the users. The NWEA will return company registration number (CVR-no.),
userid(s) and password(s) in a written letter when the registration of the users is finished.

Installation manual                                                                  Page 7 of 40
Version 1.1 printed 08-11-12
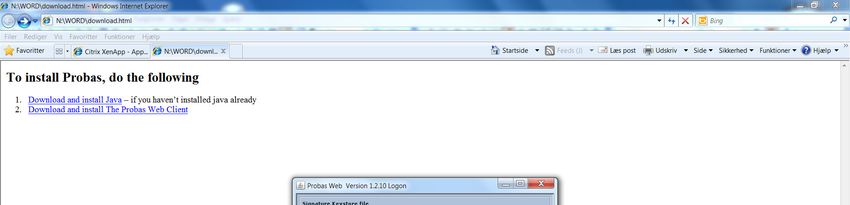
Arbejdstilsynet

4 INSTALLATION

It may take some time to download the software and finish the installation more or less
depending on how fast your internet connection is. In most cases, the installation will run
pretty fast.
Open your browser and select the address: http://www.produktdata.dk:8888/ and you will
get the following page:

If you don’t get this page, the port 8888 may be closed in your company network, cf.
chapter 2. Contact the It/Network administrator in your company to check this.
Click on the link 1. ‘Download dokumentation’ to get to our documentation page, where
you will find documents containing guidance and other documentation including this
manual.
Click on the link 2. ‘Download Probas Web klienten’ to download and install the
programme on your desktop. The link will guide you to the following page:

Installation manual                                                                Page 8 of 40
Version 1.1 printed 08-11-12
Arbejdstilsynet

Most desktops will already have a Java Runtime Environment installed, but if you don’t
know if this is the case, select 1. to install Java. The link will guide you to the java page.
Press ‘Free Java download’ and the page will either install latest java version or verify that
Java is already installed on your computer.
On the verification page, return to the NWEA installation website by selecting ‘Previous
pages’ on the top menu left to the address field in your browser …

Now select 2. ‘Download Probas Web klienten’ to download and install The Probas Web
Client. The following page will appear …

followed by this …

Installation manual                                                                 Page 9 of 40
Version 1.1 printed 08-11-12
Arbejdstilsynet

and finally this …

which is the start- and login window of the programme now installed on your desktop.
You are now able to start and use the programme in offline mode by pressing the OK
button on the lower menu bar. Offline/online mode is always shown in the status field on
the lower menu bar.
However, we recommend that you finalize the installation by making the programme
available in online mode and that you create a shortcut to the programme on your desktop.
Therefore, close the programme by clicking on the Cancel button and follow the
instructions in chapter 5 and chapter 6.

Installation manual                                                              Page 10 of 40
Version 1.1 printed 08-11-12
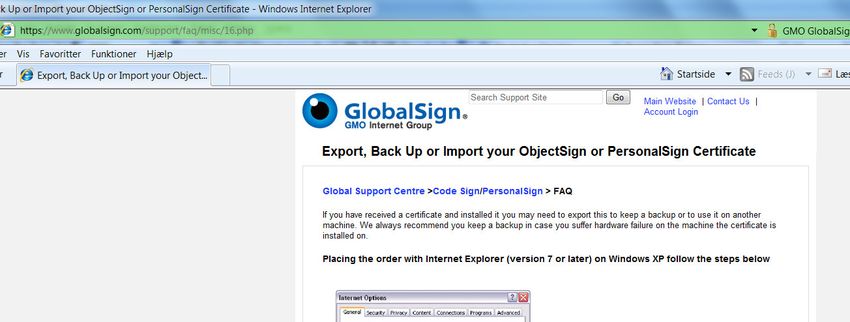
Arbejdstilsynet

5 BEFORE LOGGING IN – EXPORT YOUR
PERSONAL CERTIFICATE
Before you can use the programme, you must export your personal certificate again, but
this time in a different format than you did in section 3, where you made a copy for
registration to the NWEA. This time the certificate must be exported into a keystore format
(.pkcs12) allowing you to use it in other programmes. You must have this copy available
on your desktop and be able to point at it before you can logon to the system.
The procedure is also known as making a backup copy of the certificate in a keystore. You
can find the procedure at the support page on globalsign.com:
Go to https://www.globalsign.com/support/faq/misc/16.php and see how you can create the
export file:

Follow the procedure the same way as described in section 3, but this time select ‘Yes,
export the private key’ (Important!) and in the next window, select the PKCS
#12(.PFX) format (pre-selected if export of private key has been selected correctly).

Installation manual                                                             Page 11 of 40
Version 1.1 printed 08-11-12
Arbejdstilsynet

NB! The Export wizard will present 2 (or 3) options for the Personal Exchange format
export file and it is important that the top one is selected, so tick on ‘Include all
certificates in the certification path if possible’ and press

Enter passwords in the next window. (It is recommended to use the same password you
choosed when the certificate was installed, but you can of course enter a new one.)
Press the  button to select a path (NB! Don’t save the file in the desktop
folder!) and give the export file a name and press  followed by  and OK.
You can find more information at http://www.globalsign.com/support/personalsign.php

Now you have a keystore file in .pfx format, which you must use later in order to be able to
logon to the system, see section 7.

Installation manual                                                              Page 12 of 40
Version 1.1 printed 08-11-12
Arbejdstilsynet

6 PUTTING THE PROBAS FRONTEND ICON
ON YOUR DESKTOP
If the installation procedure did not result in leaving a Probas Frontend icon on your
desktop or in placing the programme in the Programme menu, you can do this yourself by
using the Java Control Panel in Windows Control Panel. Locate the Java Control Panel on
your computer (normally by selecting Start - Control Panel – Programmes – Java). After
opening of the Java Control Panel, click on the View…-button at the bottom right hand
side in the General section and the following window will appear

Mark the row ‘Produktdatabase Frontend’ of the type Application and right-click to get the
following scroll-down menu, where you select ‘Install Shortcuts’
Leave the programme with File – Exit. Now you should have the following icon on your
desktop as a link to Probas Frontend.

Please note that the icon must be renewed by repeating the above-mentioned procedure
each time a new version of ProbasFrontend is downloaded. Since this often happens
automatically, you may find that the shortcut does not work indicating that a new one must
be created.

Installation manual                                                            Page 13 of 40
Version 1.1 printed 08-11-12
Arbejdstilsynet

7 HOW TO NOTIFY WITH PROBAS
FRONTEND
When you have userid, password and copy of your personal certificate ready, you can start
the programme and logon to the system. Start the programme from the icon on your
desktop.
Start from icon:

Accept message windows and enter password if you are prompted for certificate password
and the following window will appear. From this window you are able to use the
programme in different ways (online or offline mode) depending on how you start.

7.1 Offline mode and online mode
One of the new features of Probas Frontend allows you to prepare notifications offline, i.e.
use the programme locally on your desktop without connection to the internet and the
NWEA server. You can then logon to the system at a later time when you are ready to send
one or more locally stores notifications.
As you can see in the status field at the bottom of the window, the programme will start up
in offline mode. Therefore, if you press OK without selecting a keystore file or logon with
your userid, the programme will start and you will now only be able to work locally. You
will now be able to enjoy the advantages of working with notifications even if the server or

Installation manual                                                              Page 14 of 40
Version 1.1 printed 08-11-12
Arbejdstilsynet

your internet connection is down. The downside of this however, is that you cannot test
your notification completely during preparation, because full validation of data, including
data check on the server (e.g. of numbers etc.) is impossible.
Furthermore, offline mode will not allow you to send or query your notifications or
chemical substances and products in the Product Register. Therefore, using offline mode
makes no sense for users who only use the programme for query.
If you have started up in offline mode and you for instance at a later time wishes to send or
query, the programme is however equipped with a menu, where you can select signing,
en/decrypting and login without leaving the programme. Therefore, you do not have to
close the programme and start all over again in order to login and use the programme in
online mode.
If you wish to start the programme in online mode, the minimum requirements are that you
first enter the keystore file in the field ‘Signature Keystore file’ followed by a login with
userid and password.
Signature Keystore file: Must be entered before you are able to login in online mode with
userid and password. Refer to chapter 5 on how to create the keystore file.

7.2 How to login
The following is a demonstration on how to start the programme in online mode.
Press the  button next to the field ‘Signature Keystore file’. This appears..

Press the  button here and you will get an Open window, allowing you to locate

Installation manual                                                               Page 15 of 40
Version 1.1 printed 08-11-12
Arbejdstilsynet

your keystore file (if you can’t find a file, you must create one, – see chapter 5)

Mark the file to put the name in the ‘File name’ field and press Open and you will get the
following window

(Please notice that the key file will appear automatically in the field the next time you
login, and you will only have to enter the password during future logins)

Enter the keystore password. (If you have selected your certificate password for this at an
earlier stage, enter this). Press OK and you will return to the Probas Web Login window …

where you can see that the keystore file is in the correct field. The Login button is now
highlighted and ready to be used. If you have answered Yes to the question: ‘Do you want
to use the certificate also for en/decrypting ?’, the keystore file will also appear in the field

Installation manual                                                                   Page 16 of 40
Version 1.1 printed 08-11-12
Arbejdstilsynet

‘En/decrypting Keystore file’. If you answer No, no big problem: on the one hand it is not
necessary for notifying and sending in encrypted form and on the other hand, you will be
able to save your notifications encrypted should you choose to do so later.

Press the Login button and enter the User ID and Password you have received in a letter
from NWEA in the following window.

(If you encounter an error message during the login procedure, please refer to chapter 8
where you will find the most common error messages including some guidance on how to
solve the problems)

Press OK or just hit  and you will return to the following window

Installation manual                                                             Page 17 of 40
Version 1.1 printed 08-11-12
Arbejdstilsynet

Now notice that the User ID is in the correct field and that the status has changed to
. Press OK to start the programme, which will look like this …

The following section contains an example of a notification, including an illustration of the
different program functions.

7.3 An example of a notification

Normally, you should be able to have other programmes (e.g. MSWord etc.) running on
your desktop simultaneously with the Probas Frontend programme without any problems.
However, please notice that Probas Frontend sometimes can be ‘frozen’ when you return to
continue with the programme. This is particularly the case if you leave the programme with
a so-called modal window open (e.g. a code selection window). The problem is solved by
pressing  and then change to the Java icon instead of using the process line on
your desktop, which could look something like this:

Installation manual                                                               Page 18 of 40
Version 1.1 printed 08-11-12
Arbejdstilsynet

Hence, should the programme be locked when you try to open it on the process line, use
 and select the programme from here.

In order to enter a new notification or to open an already saved one, you will first have to
select File – New notification – followed by notification type + New or Update and finally
product type (Product, frame notification etc.) to start entering data.

After this selection, you will notice that the menu entry ‘Form’ has been activated and that
menu entries for Open, Save and Close notification are available in the File menu. You
will also notice that menu items for Login, Keystore signing and Keystore En/decrypting
are available. You can use these if you have started the programme without activating them
in the Login window, see section 7.1.

If you wish to prepare a new notification, just start entering data in the current form section
(the first section is usually the enterprise section). If you wish to continue with an already
saved (unfinished) one, select Open notification. The notification you choose to open must
have been made in the same form you have selected from the start.

Installation manual                                                                Page 19 of 40
Version 1.1 printed 08-11-12
Arbejdstilsynet

Form on the menu bar offers a range of possibilities which will be demonstrated in the
following

The top seven items in the Form menu (Status, Print etc.) is shared by all forms and the rest
will depend on the content of the individual form. The form sections shown here is for the
notification of a new product according to the notification of a chemical substance or
material. This form will be used a an example in the following.
Enterprise
 First you enter information on the notifying company. If the company is Danish the section
looks like this. If a CVR-no. is entered, the number will be checked for validity and for
existence in the Product Register. CVR-numbers are issued to foreign companies who wish
to notify to the Danish Product Register. Tick off the field ‘The enterprise is Danish’ and
enter the Company registration number you received along with the userid(s) and
password(s). This is the easiest way to enter enterprise information

If you cannot find your company number, you will have to tick off the field ‘Company
registration number’. A new section will then appear, in which you have to enter the

Installation manual                                                              Page 20 of 40
Version 1.1 printed 08-11-12
Arbejdstilsynet

following company details.

It is highly recommended to check the form during the preparation of the notification. You
do this with the functions Status and Validation. Validation can be done on the entire
form section or as a validation of the codes in the section.
If for example, you select Status for a product notification when you have only entered the
enterprise information section as shown here …

You will get the following window ..

Installation manual                                                             Page 21 of 40
Version 1.1 printed 08-11-12
Arbejdstilsynet

5 status columns are shown for each section of the form:
Active:             The section is active, i.e. a part of the current form
Empty:              The section is empty. Entering data will tick off the field
Changed:            The section has changed its status
Valid:              Data has been entered correctly in the section
Mandatory:          The section must be completed in the current form if ticked

In the current example, all sections except the enterprise section are empty and unchanged.
In this particular case the enterprise has not been marked as producer and supplier. Had this
been done these sections would have been inactivated and marked valid. The section
‘Quantities manufactured/imported’ is empty, because the company is a foreign one. Had it
been a Danish enterprise, the section would have been active and the section ‘Expected
quantities sold to Denmark’ would have been inactive accordingly.
The most important column is the column ’Valid’, because the notification will only be
accepted by the server if all sections have been marked valid when you try to send the
notification.
Use the Status function freely when you go from section to section, but as a minimum it
must be used before you try to send the notification. Please notice that you can go directly
from the status window to the individual sections by marking the section on the left and
pressing OK.
In the same way, you can use the ‘Validation for section’ function

Installation manual                                                               Page 22 of 40
Version 1.1 printed 08-11-12
Arbejdstilsynet

In this case the validation resulted in the following error message …

Because Country was not completed. Press OK and the cursor will be in the Country field
ready to be updated by the user.

You can navigate freely between the sections, either by using the Form menu or by using
the buttons at the bottom of the window

: Last section

Exit: Leave notification. You will be asked if you want to save first.
Send: Send your notification
Save: Saves your notification locally
Clear: Clear the current section for data.
Print: Prints the entire form with current data.
Please also notice the status line at the bottom showing the name of the current section,
whether you are online or offline and date/time.
The other 8 sections in the form will be described shortly in the following.

Installation manual                                                               Page 23 of 40
Version 1.1 printed 08-11-12
Arbejdstilsynet

The notifier:

If the Consultant field is ticked a field will appear, allowing you to enter Company
registration Number of the consultant company.

Do this if you act as a consultant, completing forms on behalf of a other companies.

Installation manual                                                              Page 24 of 40
Version 1.1 printed 08-11-12
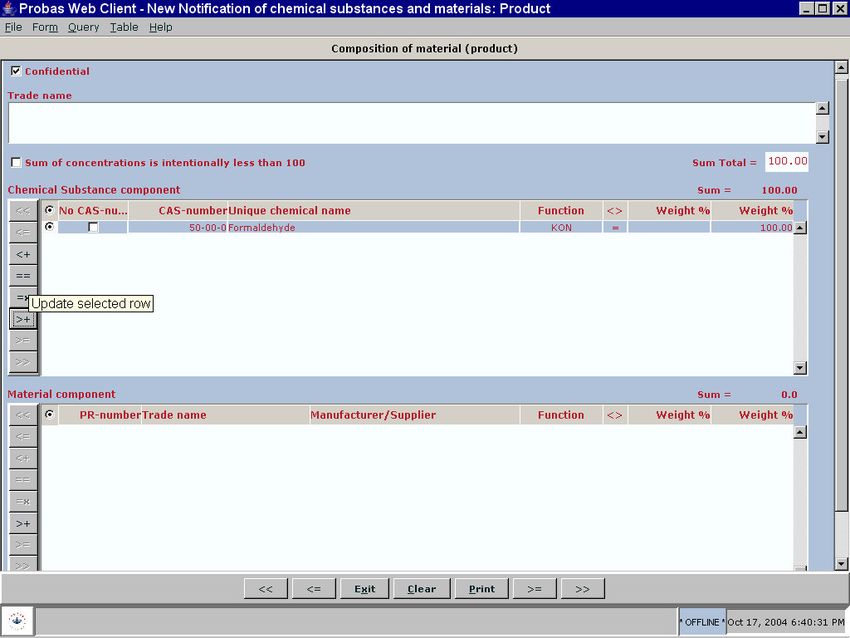
Arbejdstilsynet

Composition of material (product)
Always start by completing the Trade name of the material/product

Component can be added using the vertical menu bar ton the left. The buttons are ‘mouse-
over’ enabled. Position the mouse pointer over the buttons and a ToolTip will appear en
ToolTip will appear describing the function of the button. In this case, the mouse pointer
has been positioned over the button == (Update selected row).
: Update last row
Please notice the field: ’Sum of concentrations is intentionally less than 100’. If the sum
of the concentrations after completion of the composition with all components is less thane
end 100, you can indicate if this is intentionally by ticking this field.

Installation manual                                                              Page 25 of 40
Version 1.1 printed 08-11-12
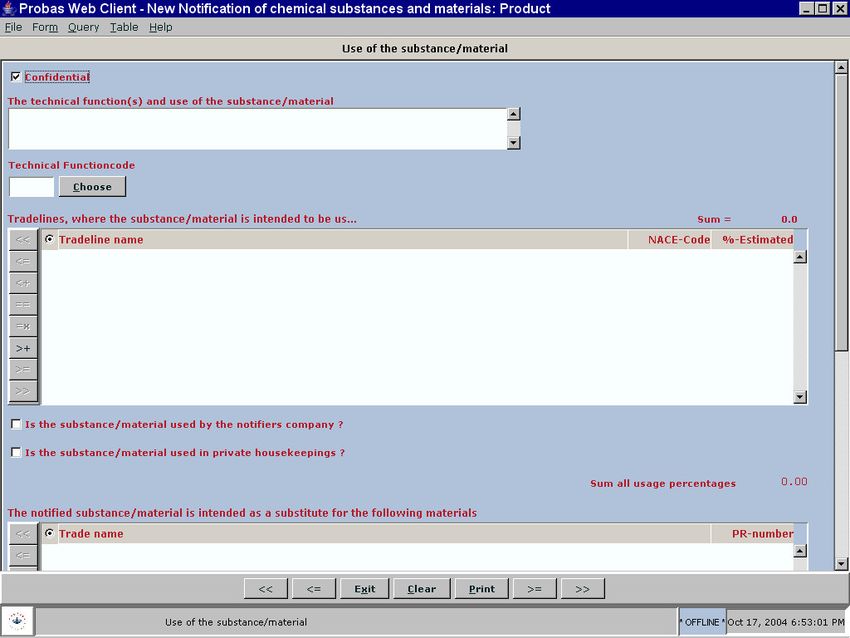
Arbejdstilsynet

Use of the substance/material

.
.

Installation manual             Page 26 of 40
Version 1.1 printed 08-11-12
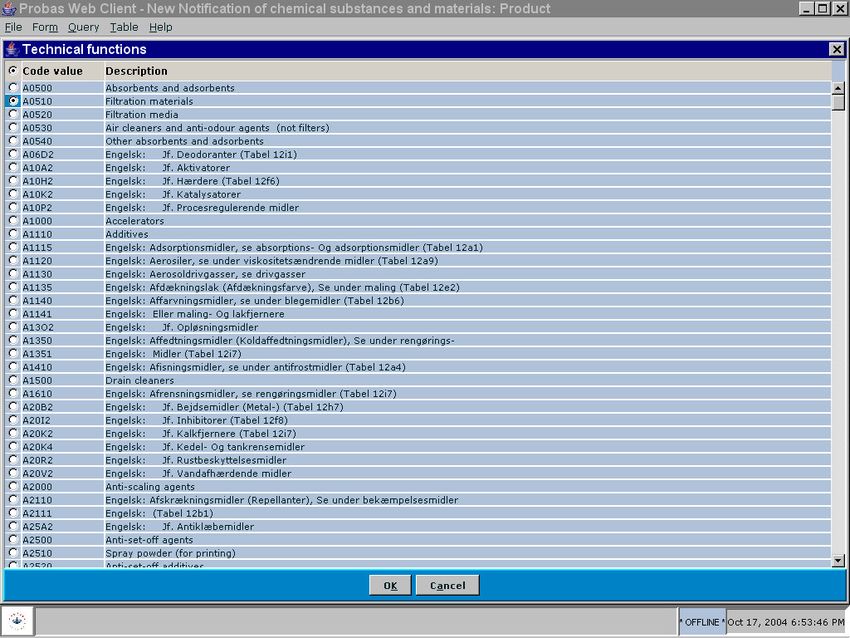
Arbejdstilsynet

Enter technical function in free text (mandatory). Feel free to add a technical function code
by pressing the  button. This will bring up a list of functions

Select a function by marking the function to the left or click on the text and press
. You will then return to the use section and see that the code and text is inserted
in the window.

Please notice that you have to enter some sort of free text even if you have selected a
function from the list. Press the >+ button in the vertical menu bar to enter a tradeline.
Don’t forget to enter percentage distribution.

Installation manual                                                                Page 27 of 40
Version 1.1 printed 08-11-12
Arbejdstilsynet

Packaging

Enter packaging information (e.g. bottles of plastic, etc.) if convenient.

Expected quantities sold to Denmark

Danish importers must be stated. Use the vertical menu bar to the left to add importers.

Installation manual                                                              Page 28 of 40
Version 1.1 printed 08-11-12
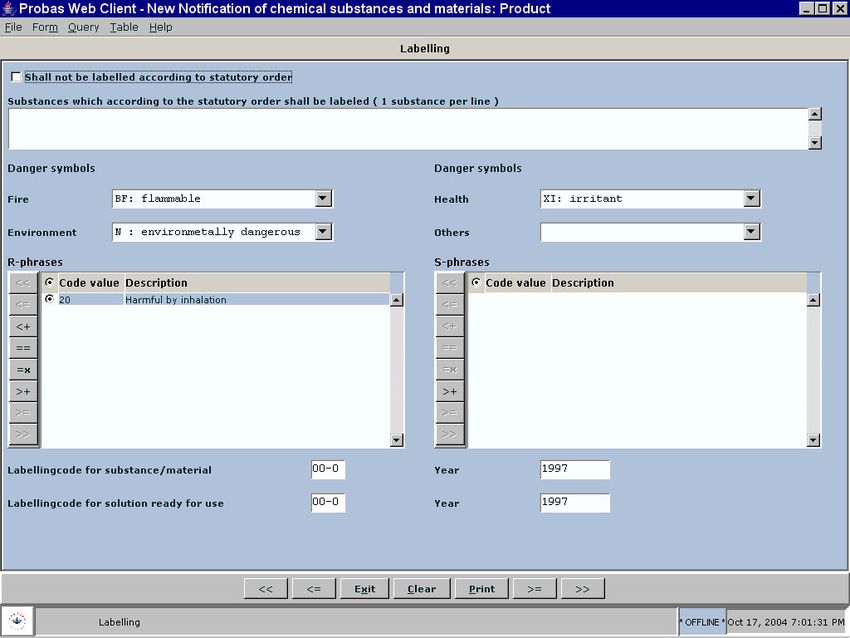
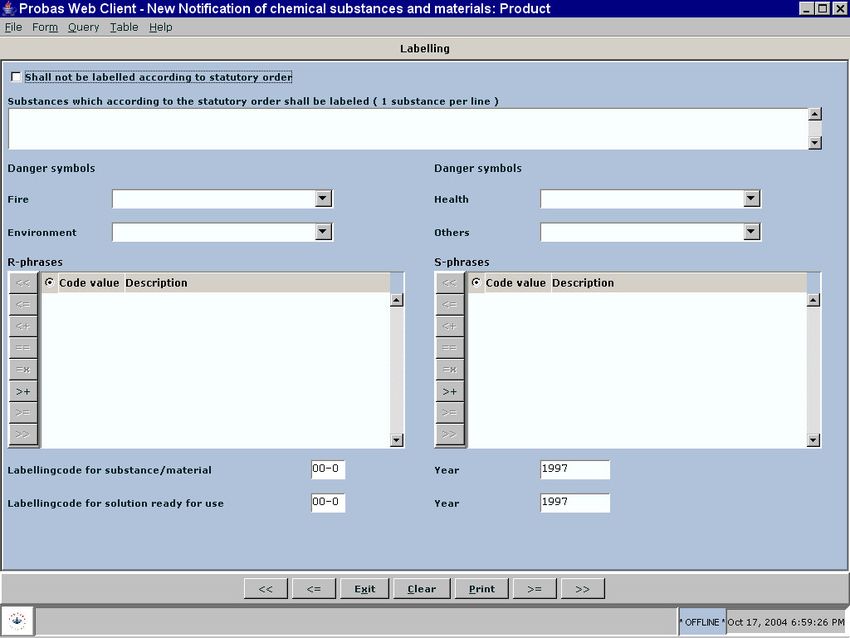
Arbejdstilsynet

Labelling

Tick the ‘Shall not be labelled according to statutory order’ field if no labelling is necessary
for the product. Otherwise, complete Danger symbols and R- and S-phrases. Select R- and
S-phrases as code values from a list. Press >+ in the vertical menu bar

Installation manual                                                                 Page 29 of 40
Version 1.1 printed 08-11-12
Arbejdstilsynet

and press . Mark the R-phrase and hit . Press OK and you will return to
the Labelling section and see the R-phrase number and text as a new row in the window.

Other information

KN-article number (custom tariff) and physical state are mandatory information. Bring up
the list of tariff numbers with the  button and select a category. Select physical
state in the scroll-down menu for state. Feel free to add information on waste and disposal
and other remarks to the notification.

Installation manual                                                              Page 30 of 40
Version 1.1 printed 08-11-12
Arbejdstilsynet

Now the notification is almost complete. Look at the status by selecting From – Status …

The status window shows that all sections in the form are valid. Not all sections has been
completed e.g. ‘Quantities manufactures/imported’ and ‘List of enclosures’, but since they
are either not active or mandatory sections in this particular form, the entire form is marked
as valid. Therefore, the notification is ready to send.
If you wish to attach or send additional information in the form of documents, select the
‘List of enclosures’ section. Just mark the section in the window above and hit .
List of enclosures

Additional information in electronic form (Word, Excel, PDF format are accepted) can be
attached by ticking the ‘Attached to notification’ field followed by . This will
bring up an Open window as shown above. Find your documents, click them down in the
field ‘File name’ and press . The document will be attached and shown in the field
‘File name’
If your document is in paper form only or in a non-acceptable format, tick off the field
‘Attached to notification’ and the following window appears …

Installation manual                                                               Page 31 of 40
Version 1.1 printed 08-11-12
Arbejdstilsynet

Enter how you will send the documentation in the field ‘Is sent by (mail, email, fax …)’
and enter the name of the document in the field ‘Description’.
As you can see, it is possible to add more documents and it is also possible to combine
attached electronic documents and information on other sent information in the same
notification.

7.4 Send notification
Make a status of the notification form before you send it. Select Form – Status in the top
menu bar and check that all sections are valid

If it is OK, press the Send button …

Installation manual                                                              Page 32 of 40
Version 1.1 printed 08-11-12
Arbejdstilsynet

or select Form – Send from the top menu bar …

After send, validation and ‘notification received’ messages, you will get the following
window …

If no receipt pops up and you get an error message, it is probably because the form is not
valid. Check the form and re-send. Try and interpret the error message to get an idea of
what is wrong. If the error message appears in the receipt window, use the button . Read the xml and correct error or send the clipboard text to pd@at.dk.
Installation manual                                                              Page 33 of 40
Version 1.1 printed 08-11-12
Arbejdstilsynet

Sign the notification with the  button and you will receive the following window …

The signature has been sent and received and is shown in the receipt form. A message box
confirms that the signature has been received and asks if you wish to save the receipt. You
can Save/Print the form for your own documentation, but do not send the form to the
Product Register.
If you leave the receipt window without using the Print or Sign button, you will get a
warning and a request to sign or print. The print option to be followed by a hand-written
signature is maintained if the digital signing procedure should fail.
The  button will sign the notification and your signature will automatically be stored
along with the notification in our database. The handling of your notification will proceed
in the registration unit, following electronic lists of signed notifications.

You can query your notifications if they have been sent successfully by the use of the
Query function in Probas Frontend. Select Query – Notification in the top menu bar …

Installation manual                                                             Page 34 of 40
Version 1.1 printed 08-11-12
Arbejdstilsynet

You may want to save your notification locally, i.e. on your own machine or on another
suitable site in the IT-system of your company.

Select File – Save notification in the top menu bar and save the notification with a name
that will help you to identify it later. A good idea is to use file systems with dates etc., in
order to manage the notifications and keep track of what you have stored and sent.

Please observe, that the possibility to save and load your notifications and perhaps
correct them on a local level, can cause confusion and incompatibility between the
information in the Product register and the information in your own system.
It is possible to download notifications, that you have sent to the NWEA, from the Product
Register into your programme and correct them. If you want to update information on
chemicals, you already have sent to the register, you must use the update form. Therefore,
select an update form, e.g. the following

Complete the update form and send it. Save it locally on your own system and use it the
next time the product need to be updated. Updated notifications are also available for query
with the Query function in the programme.
Please note that if you wish to update a notification in the register by downloading
information from the register and update data, you can only do this directly if you
download information stored as an update notification and send an updated form. If you

Installation manual                                                                   Page 35 of 40
Version 1.1 printed 08-11-12
Arbejdstilsynet

download a standard notification and update it and send it, the notification will be seen as a
new notification.

Installation manual                                                               Page 36 of 40
Version 1.1 printed 08-11-12
Arbejdstilsynet

7.5 Programme updating and version management

Introduction of new and better versions of Probas Frontend will take place automatically
when the programme is launched at your desktop.
A programme update will normally involve an installation of a complete .jar file on the
machine. This may cause some more delay in programme download and start-up than usual
and certain new message boxes may appear.
You may expect more updates than usual during the first months of introduction of the new
programme. As time goes by, the updates are expected to be fewer and fewer.

Installation manual                                                             Page 37 of 40
Version 1.1 printed 08-11-12
Arbejdstilsynet

8 PROBLEMS WITH INSTALLATION AND
USE OF PROGRAMME
If the installation fails you can install the Java environment independently from
http://java.com/en/download/index.jsp . Select the latest recommended version of Java
Runtime Environment.
Continue with installation of ProbasFrontend from the following link:
http://www.produktdata.dk:8888/.
As mentioned in section 2, you must have free and full internet access to the webservice at
www.produktdata.dk in order to download, install and use the Probas Frontend
programme. However, most companies and organisations today uses some sort of
protection (firewalls, proxy-servers etc.) of the internal company network to which many
users platforms are connected.
The webservice use port 443 and port 8888 and you must therefore consult your network-
administrator and make sure that the firewalls opens for tcp/ip communication on these
ports if you cannot connect to the webservice. Proxy-server may demand special
configuration of your client to reach the DNS name www.produktdata.dk. Should your
LAN-administrator decide to open for communication in the firewall via a static ip-address
(e.g. as a static entry in the arp-table), the ip-address of www.produktdata.dk is
194.239.148.106.
Here is a list of the most common error messages you may encounter during installation
and login, including some suggestions for correction. It is presumed that you have finished
the registration procedure as described in section 3.
1. You cannot access http://www.produktdata.dk:8888 when you want to start
   installation. The error messages could be as follows: ‘Service not available, ‘The
   server was not found or you may have encountered a DNS error’ etc.

    Check if company firewalls and/or proxy-servers are blocking your communication to
    the web site, see notes above.

    The NWEA webservice could be down. Try access later. If the site is still not available,
    contact NWEA and check that the webservice is running.

    DNS problems may be solved by inserting the DNS translation directly in the host file
    of the PC client. Open the file c:\Windows\system32\drivers\etc\Hosts with a text
    editor, e.g. MS Notepad and add the line:
    194.239.148.106 www.produktdata.dk
    and save the file. Try and login again.

    Please also refer to item 9 below.
2. You receive the message ‘403 Forbidden’ when you try to login

    The certificate may not be registrated at NWEA or your certificate is different from the
    one registrated at NWEA (has a different serial no.).

Installation manual                                                              Page 38 of 40
Version 1.1 printed 08-11-12
Arbejdstilsynet
First of all, make sure you have completed the registration procedure, including receipt
of an e-mail from NWEA confirming that your certificate is registered. The site cannot
be accessed before this has been done.
Check that the serial no. of your certificate in your browser is the same as the serial no.
on the certificate you have mailed to NWEA. Double-click on the export(.cer) file you
have mailed to NWEA and find the serial no. Press the ‘Show certificate’ button in the
Identification window you receive when you access the NWEA site. Compare the
numbers, - they must be the same. If not, modify your browser to point to the correct
certificate or mail the correct one to NWEA.
If you receive the Forbidden message during login after a successful installation, you
may have created the keystore file based on the wrong certificate. Check that the
certificate is the correct one (see above) and repeat the .pkcs12 (.pfx) export procedure,
cf. section 5.
3. You receive the message ‘Error in handshake’ when you try to login
Your key-store file has been exported into a wrong format. Follow the instructions in
section 5 carefully and check that the correct .PKCS #12 format (.pfx) has been
selected.
Pay particular attention to settings of the following options during the export
procedure:
1. You must select ‘Yes, export the private key’
2. The option: ‘Include all certificates in the certification path if possible’ must be
ticked on
Finally, check that the login window points to the correct key-store file in the correct
location. Repeat the export procedure if necessary.
4. You receive the message: ‘401 Unauthorized’ when you try to login
A wrong userid/password has been entered in the Login window. Enter correct
password. Your account will be closed if wrong password is entered 3 times in a row
and you must contact the NWEA in order to get your account re-opened and/or get a
new password.
5. You receive the message: ‘Message send failed: Connection refused. Connect’ or
other fail connect messages, when you try to login
Try and login later. If necessary, check at the NWEA if the webservice is running.
If the problem persists, your communication to the webservice is blocked somewhere in
your company network. This time it is not your company firewall that is causing the
problem, because you have been able to download and install the programme correctly
from the NWEA web server. Most likely, the error is caused by a company proxy-
server protecting your desktop from communication from the internet. The proxyserver
cannot handle the Private Key-NWEA webserver SSL communication and must be
modified or bypassed. Contact your IT-administrator who may be able to help you with
a solution.
6. You receive the message: ‘error constructing MAC: java.io.IOException: PKCS12
key store mac invalid - wrong password or corrupted file.’, when you have
Installation manual Page 39 of 40
Version 1.1 printed 08-11-12Arbejdstilsynet
entered your keystore file password
You may have entered a wrong password. If you are not 100% sure that the password
is correct, you can create a new keystore file with a new password by repeating the
procedure in section 5.
If you are 100% sure that the password is correct, you may have used some special
characters in the password that are not accepted by the Java software. Create a new
keystore file with a new password without the special characters. Try and pass step 1 of
the login procedure.
7. You receive the message: ‘exception unwrapping private key -
java.security.InvalidKeyException: Illegal key size’ when you enter the keystore
file password
1) You have saved your keystore file in your desktop folder, see chapter 5. Select
another path (on your c:\-drive or any network-drive you have access to) and save the
file. Please remember to correct the path in the field ‘Filename’ in the window
‘Keystore for signing’ when you try and logon again.
2) The policy-files in your Java environment may have been overwritten by an auto-
update module/function on your machine after you have installed Probas Frontend and
created the keystore file and password for the first time. Find the guidance on how to
fix this manually and the necessary policy-files on your desktop in the document:
C:\Users\\probas\JCE\README.TXT.
8. Java errors when opening notification files from a local archive, e.g. “The
following error was encountered: JAXBException in
javax.xml.bind.UnmarshalException: Unexpected element
{http://at.dk/xml/schemas/probas/2004/01/06}:Pictograms“
Such errors will typically be encountered when files from a local archive are opened
with a newer version of the Probas Frontend programme than the version used for
storing the file.
If you have sent the notification, you can use the Query-function in the programme and
download the notification from The Product Register. Select Query – Notification and
find the notification. Mark the relevant notification and press the Show button. This
will automatically download the notification into the corresponding form and you will
now be able to revise the data and prepare/store/send a new one.
It is however also possible to correct these files into a format, so they can be read into
the new version of the programme. Read more about how to do this on
http://www.produktdata.dk:8888/doc under ‘Schema changes, version 1.1.5’.
9. Your Shortcut to ProbasFrontend on your desktop does not work
Unfortunately, the Shortcut is not updated when a new version of ProbasFrontend is
downloaded. If this happends, please remove the Shortcut and repeat the procedure in
chapter 6 to create a new Shortcut.
Installation manual Page 40 of 40
Version 1.1 printed 08-11-12You can also read