The Dolphin Handbook
         Peter Penz
       Orville Bennett
       Michael Austin
     David Edmundson
     Alan Blanchflower
     Frank Reininghaus
←
→
Page content transcription
If your browser does not render page correctly, please read the page content below
The Dolphin Handbook
Peter Penz
Orville Bennett
Michael Austin
David Edmundson
Alan Blanchflower
Frank Reininghaus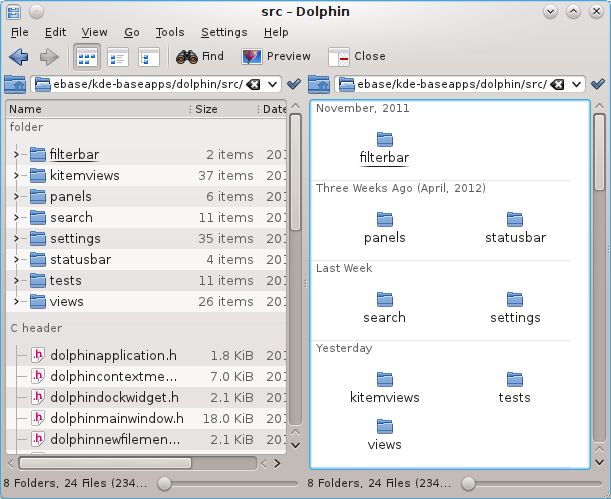
The Dolphin Handbook

         2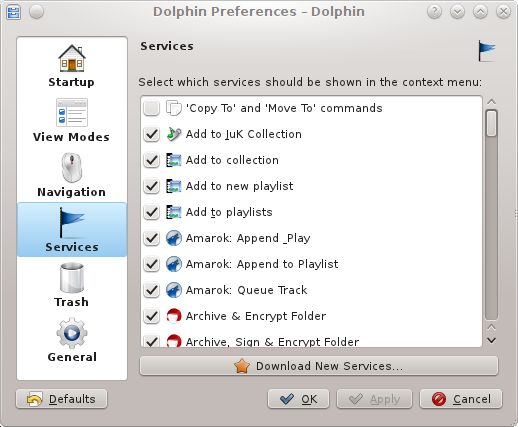
Contents

1   Introduction                                                                                                                                                               6

2   Using Dolphin                                                                                                                                                              7
    2.1   Dolphin User Interface . . . . . . . . . . . . . . . . . . . . . . . . . . . . . . . . . . .                                                                          7
    2.2   The Dolphin View . . . . . . . . . . . . . . . . . . . . . . . . . . . . . . . . . . . . . .                                                                          8
          2.2.1   Using the View . . . . . . . . . . . . . . . . . . . . . . . . . . . . . . . . . . .                                                                          8
          2.2.2   Dolphin View Appearance . . . . . . . . . . . . . . . . . . . . . . . . . . . .                                                                               9
                  2.2.2.1   View Modes . . . . . . .                           .   .   .   .   .   .   .   .   .   .   .   .   .   .   .   .   .   .   .   .   .   .   .   .    9
                  2.2.2.2   Information in the View .                          .   .   .   .   .   .   .   .   .   .   .   .   .   .   .   .   .   .   .   .   .   .   .   .   10
                  2.2.2.3   Preview . . . . . . . . . .                        .   .   .   .   .   .   .   .   .   .   .   .   .   .   .   .   .   .   .   .   .   .   .   .   10
                  2.2.2.4   Split . . . . . . . . . . . .                      .   .   .   .   .   .   .   .   .   .   .   .   .   .   .   .   .   .   .   .   .   .   .   .   10
          2.2.3   Selecting Items in the View . . . . . . . . . . . . . . . . . . . . . . . . . . . .                                                                          10
                  2.2.3.1   Selecting Items Using the Mouse . . . . . . . . . . . . . . . . . . .                                                                              11
                  2.2.3.2   Selecting Items Using the Keyboard . . . . . . . . . . . . . . . . . .                                                                             11
    2.3   Location Bar . . . . . . . . . . . .             .   .   .   .   .   .   .   .   .   .   .   .   .   .   .   .   .   .   .   .   .   .   .   .   .   .   .   .   .   11
          2.3.1 Bread Crumb Mode . . .                     .   .   .   .   .   .   .   .   .   .   .   .   .   .   .   .   .   .   .   .   .   .   .   .   .   .   .   .   .   11
          2.3.2 Editable Mode . . . . . . .                .   .   .   .   .   .   .   .   .   .   .   .   .   .   .   .   .   .   .   .   .   .   .   .   .   .   .   .   .   12
                 2.3.2.1 Using Kioslaves                   .   .   .   .   .   .   .   .   .   .   .   .   .   .   .   .   .   .   .   .   .   .   .   .   .   .   .   .   .   12
          2.3.3 Places and Context         .   .   .   .   .   .   .   .   .   .   .   .   .   .   .   .   .   .   .   .   .   .   .   .   .   .   .   .   .   .   .   .   .   13
    2.4   Panels . . . . . . . . . . . .   .   .   .   .   .   .   .   .   .   .   .   .   .   .   .   .   .   .   .   .   .   .   .   .   .   .   .   .   .   .   .   .   .   14
          2.4.1 Places . . . . . . . .     .   .   .   .   .   .   .   .   .   .   .   .   .   .   .   .   .   .   .   .   .   .   .   .   .   .   .   .   .   .   .   .   .   14
          2.4.2 Information . . . .        .   .   .   .   .   .   .   .   .   .   .   .   .   .   .   .   .   .   .   .   .   .   .   .   .   .   .   .   .   .   .   .   .   14
          2.4.3 Folders . . . . . . .      .   .   .   .   .   .   .   .   .   .   .   .   .   .   .   .   .   .   .   .   .   .   .   .   .   .   .   .   .   .   .   .   .   14
          2.4.4 Terminal . . . . . .       .   .   .   .   .   .   .   .   .   .   .   .   .   .   .   .   .   .   .   .   .   .   .   .   .   .   .   .   .   .   .   .   .   15
    2.5   Quick Tips . . . . . . . . .     .   .   .   .   .   .   .   .   .   .   .   .   .   .   .   .   .   .   .   .   .   .   .   .   .   .   .   .   .   .   .   .   .   15
          2.5.1   Quick Bookmarking . . . . . . . . . . . . . . . . . . . . . . . . . . . . . . . .                                                                            15
          2.5.2   Finding Files and Searching in Files . . . . . . . . . . . . . . . . . . . . . . .                                                                           15
          2.5.3   Mounting Storage Media . . . . . . . . . . . . . . . . . . . . . . . . . . . . .                                                                             16
          2.5.4   Undo Actions . . . . . . . . . . . . . . . . . . . . . . . . . . . . . . . . . . . .                                                                         16
          2.5.5   Renaming A Batch Of Files . . . . . . . . . . . . . . . . . . . . . . . . . . . .                                                                            16
          2.5.6   Comparing A Selection Of Files or Folders . . . . . . . . . . . . . . . . . . .                                                                              16
          2.5.7   Filtering Files . . . . . . . . . . . . . . . . . . . . . . . . . . . . . . . . . . . .                                                                      16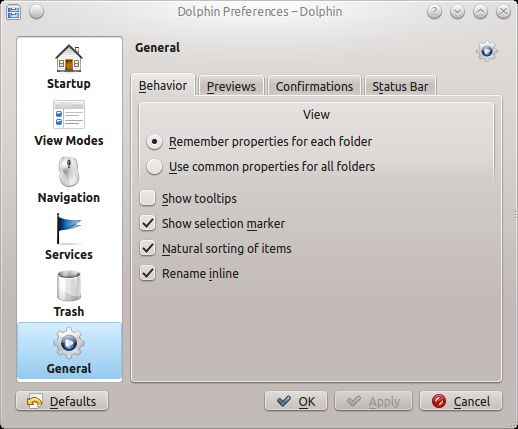
The Dolphin Handbook

3   Configuring Dolphin                                                                                                                                            17
    3.1   The Dolphin Preferences Dialog . . . . . . . . . . . . . . . . . . . . . . . . . . . . . .                                                               17
          3.1.1   Startup . . . . . . . . . . . . . . . . . . . . . . . . . . . . . . . . . . . . . . . .                                                          17
          3.1.2   View Modes . . . . . . . . . . . . . . . . . . . . . . . . . . . . . . . . . . . . .                                                             18
                  3.1.2.1 Common settings for all view modes . . . . . . . . . . . . . . . . .                                                                     19
                  3.1.2.2   Icons . . . . . . . . . . . . . . . . . . . . . . . . . . . . . . . . . . . .                                                          19
                  3.1.2.3   Compact . . . . . . . . . . . . . . . . . . . . . . . . . . . . . . . . .                                                              19
                  3.1.2.4 Details . . . . . . . . . . . . . . . . . . . . . . . . . . . . . . . . . . .                                                            19
          3.1.3   Navigation . . . . . . . . . . . . . . . . . . . . . . . . . . . . . . . . . . . . . .                                                           20
          3.1.4  Services . . . . . . . . . . .    .   .   .   .   .   .   .   .   .   .   .   .   .   .   .   .   .   .   .   .   .   .   .   .   .   .   .   .   20
          3.1.5  Trash . . . . . . . . . . . . .   .   .   .   .   .   .   .   .   .   .   .   .   .   .   .   .   .   .   .   .   .   .   .   .   .   .   .   .   21
          3.1.6  General . . . . . . . . . . . .   .   .   .   .   .   .   .   .   .   .   .   .   .   .   .   .   .   .   .   .   .   .   .   .   .   .   .   .   22
                 3.1.6.1 Behavior Tab . . .        .   .   .   .   .   .   .   .   .   .   .   .   .   .   .   .   .   .   .   .   .   .   .   .   .   .   .   .   23
                 3.1.6.2 Previews Tab . . .        .   .   .   .   .   .   .   .   .   .   .   .   .   .   .   .   .   .   .   .   .   .   .   .   .   .   .   .   23
                 3.1.6.3 Confirmations Tab         .   .   .   .   .   .   .   .   .   .   .   .   .   .   .   .   .   .   .   .   .   .   .   .   .   .   .   .   24
                 3.1.6.4 Status Bar Tab . .        .   .   .   .   .   .   .   .   .   .   .   .   .   .   .   .   .   .   .   .   .   .   .   .   .   .   .   .   24
    3.2   Folder View Properties . . . . . . .     .   .   .   .   .   .   .   .   .   .   .   .   .   .   .   .   .   .   .   .   .   .   .   .   .   .   .   .   24
          3.2.1   The View Properties Dialog . . . . . . . . . . . . . . . . . . . . . . . . . . . .                                                               25

4   Command Reference                                                                                                                                              26
    4.1 The Menubar in Dolphin’s Main Window . . . . . . . . . . . . . . . . . . . . . . . .                                                                       26
          4.1.1   The File Menu . . . . . . . . .      .   .   .   .   .   .   .   .   .   .   .   .   .   .   .   .   .   .   .   .   .   .   .   .   .   .   .   26
          4.1.2   The Edit Menu . . . . . . . .        .   .   .   .   .   .   .   .   .   .   .   .   .   .   .   .   .   .   .   .   .   .   .   .   .   .   .   27
          4.1.3   The View Menu . . . . . . . .        .   .   .   .   .   .   .   .   .   .   .   .   .   .   .   .   .   .   .   .   .   .   .   .   .   .   .   27
          4.1.4   The Go Menu . . . . . . . . .        .   .   .   .   .   .   .   .   .   .   .   .   .   .   .   .   .   .   .   .   .   .   .   .   .   .   .   28
          4.1.5   The Tools Menu . . . . . . . .       .   .   .   .   .   .   .   .   .   .   .   .   .   .   .   .   .   .   .   .   .   .   .   .   .   .   .   28
          4.1.6   The Settings and Help Menu           .   .   .   .   .   .   .   .   .   .   .   .   .   .   .   .   .   .   .   .   .   .   .   .   .   .   .   28

5   Miscellaneous Questions                                                                                                                                        29

6   Credits and License                                                                                                                                            30

A How to get Dolphin                                                                                                                                               31

                                                           4
Abstract

Dolphin is the default file manager for KDE, designed with usability as a primary focus.
The Dolphin Handbook

Chapter 1

Introduction

Dolphin is KDE’s default file manager. It aims to improve usability at the user interface level.
Dolphin focuses only on being a file manager whereas Konqueror, which was KDE’s default file
manager in KDE 3 and can still be used for file management, is a universal viewer for many file
types.
This design approach allows the developers to concentrate on optimizing the user interface for
the specific task of file management.
Please report any problems or feature requests to the Dolphin author via the bug report dialog.
This is accessible either from the Control button at the right of the toolbar in the default mode
without menubar; or from Help → Report Bug... menu of the application, if the menubar is
shown.

                                               6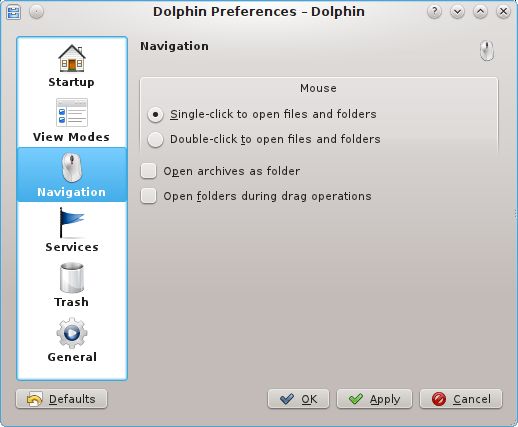
The Dolphin Handbook
Chapter 2
Using Dolphin
2.1 Dolphin User Interface
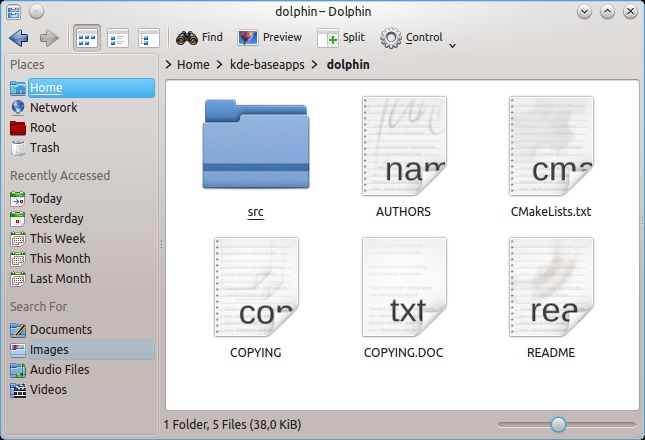
The screenshot below shows Dolphin’s default user interface:
Dolphin’s default user interface.
The elements of the default user interface are:
• The toolbar, which can be used for quick access to frequently used actions. The toolbar can
be customized by clicking it with the right mouse button and choosing Configure Toolbars...
from the context menu, with Configure Toolbars... from the Control button at the right of the
toolbar or via Settings → Configure Toolbars... from the main menu.
7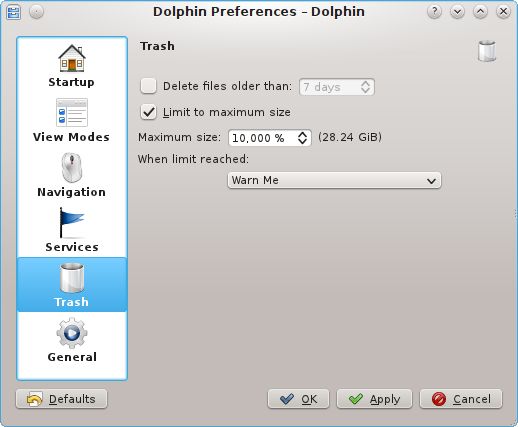
The Dolphin Handbook

      Toolbar items where the icon is sufficient for knowing the command do not have text
  alongside the icons. This can be changed by a right mouse button click and selecting the item
  text below Show Text. The Control button at the right side of the toolbar is only displayed if
                                     the menubar is hidden.
• The location bar, which always displays the path to the current folder. It can be switched
  between two different modes, see the section on the location bar for details.
• The view, which shows all files and folders in the current folder.
• The Places panel, which provides quick access to bookmarked locations and disks or other
  media.
  If desktop search and file indexing are enabled in the Desktop Search module in the System
  Settings the panel provides Recently Saved items and allows you to search for Documents,
  Images, Audio Files and Video.
• The status bar. It displays the name, size and type of the file which is currently hovered over
  with the mouse, or the number and size of the files which are selected. At the right, there is a
  zoom slider that allows you to adjust the size of the icons in the view.
• The menubar (hidden by default), which provides access to all commands and configuration
  options. See the Command Reference for a list of all menu commands. The menubar can be
  toggled with Show Menubar (Ctrl+M) from the Settings menu or the Control button.
  If the menubar is hidden, all its actions are available from the Control button.
• The additional Information, Folders and Terminal panels are hidden by default, for more
  information see Panels.

2.2     The Dolphin View

2.2.1    Using the View
The view displays all files and folders in the current folder. These items can be accessed or
manipulated in different ways:

• A file or folder can be opened by clicking it with the left mouse button (or double-clicking, if
  Double-click to open files and folders is enabled in the ‘Navigation’ section of the settings).
• Clicking any item or the white area around the items with the right mouse button opens a
  context menu which provides access to many frequently used actions for the item or the current
  folder, respectively.
• If the left mouse button is pressed on an item, but not immediately released, the item can be
  dragged and dropped in another folder in the current view or in another Dolphin view (in
  another Dolphin window or in the same window if the view is split, see below) to move or
  copy it or to create a symbolic link. Items can even be dropped in another application to open
  them in that application.

Dolphin remembers the history of visited folders. To navigate backward or forward in the history,
the corresponding buttons in the toolbar can be used:

        The Back and Forward buttons in the toolbar can be used to navigate in the history.

                                                8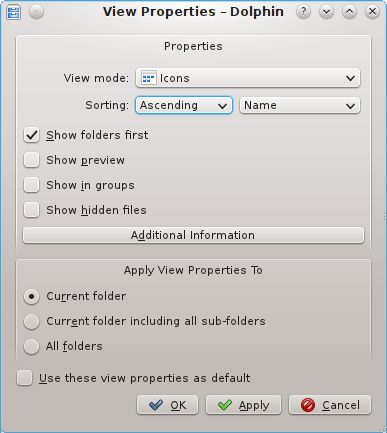
The Dolphin Handbook

2.2.2     Dolphin View Appearance

The toolbar contains buttons to control the appearance of the view:

              The buttons in the toolbar which control the appearance of the view.
All the settings discussed below and other options concerning, e.g. the sorting of the files in the
current folder, can also be modified in the View menu and in the View Properties dialog. By
default, these settings are remembered for each folder separately. This behavior can be changed
in the ‘General’ section of the settings.

2.2.2.1   View Modes

The first three buttons in the above screenshot switch between Dolphin’s view modes.

• In the Icons view, which is the default, files will be represented by an icon that visualizes the
  file type, and a folder icon will be shown for subfolders. The names of folders and files, and
  the items enabled in View → Additional Information, are displayed below the icons.
• The Compact view shows the folder contents as icons with the name beside it and the items en-
  abled in View → Additional Information below the name. The items are grouped in columns
  similar to the Short View in the KDE file dialog.
• In the Details view, the folder contents are displayed as a detailed list which contains the name,
  size and last modification time of each item. Additional columns can be added by clicking a
  column header with the right mouse button.
  In the context menu of the header line you can choose between custom or automatic column
  width. Automatic width adjusts the width of all columns once to display the longest item in
  the column completely, except for the Name column where the extension is replaced by ‘...’
  The order of columns can be changed by drag and drop of column headers, except for the
  Name header, which is always the first column in this view.
  The details view allows you to view the current directory in a tree-like fashion if Expandable
  folders are enabled: Each subfolder of the current folder can be ‘expanded’ or ‘collapsed’ by
  clicking on the > or v icon next to it.

                                                 9
The Dolphin Handbook

          All view modes support grouping by the sort type selected in View → Sort by

2.2.2.2   Information in the View

In all view modes Dolphin shows at least an icon and a name for each item. Using Additional
Information in the View menu or the context menu of the header in Details mode, you can select
more information for each item to be shown:
Size, Date, Type, Rating, Tags or Comment.
Depending on the file type, additionally, sorting criteria can be selected:
 Document: Number of words and lines
 Image: Size and orientation
 Audio: Artist, album, duration and track
The Other submenu allows you to select Path, Link Destination, Copied From, Permissions,
Owner or User Group.

2.2.2.3   Preview

If Preview is enabled, the icons are based on the actual file or folder contents; e.g. for images a
scaled down preview of the image is shown.

2.2.2.4   Split

If Split is clicked, two views are shown which can display the contents of different folders. This
can be convenient for moving or copying files.

2.2.3     Selecting Items in the View
There are several ways to select items in the view. Once a group of items is selected, all actions,
such as Cut, Copy, Move to Trash, and drag and drop operations, affect all selected items.

                                                 10
The Dolphin Handbook
2.2.3.1 Selecting Items Using the Mouse
• You can press the left mouse button somewhere in the view and draw a rectangle around a
group of items before releasing the button. This will select all items in the rectangle and clear
the previous selection. If the Shift key is pressed during the selection process, the previous
selection is kept.
• If the Ctrl key is pressed while an item is clicked with the left mouse button, the selection state
of this item is toggled. If the Ctrl key is pressed while a rectangle is drawn around a group of
items as described above, the selection state of all items in the rectangle will be toggled.
• If the Shift key is pressed while an item is clicked with the left mouse button, all items between
the previous current item and the clicked item will be selected.
• If Show selection marker is enabled in the ‘Behavior’ tab of the General section of the settings,
a small + or - button appears in the top left corner of the item which is currently hovered over
with the mouse. Clicking this sign selects or deselects the item, respectively.
2.2.3.2 Selecting Items Using the Keyboard
• If an arrow key, Page Up, Page Down, Home, or End is pressed, the new current item is
selected, and the previous selection is cleared.
• If the Ctrl key is held while one of the above keys is pressed, the selection remains unchanged.
• If the Shift key is held while one of the above keys is pressed, all items between the previous
current item and the new current item will be selected.
• If Ctrl+Space is pressed, the selection state of the current item is toggled.
• Ctrl+A selects all items in the view.
• Ctrl+Shift+A toggles the selection state of all items in the view.
• Select a file or folder by typing the first few letters of its name and the first matching item is
selected. To clear the selection and cancel the keyboard search press Esc or wait longer than
the timeout of 1 second.
2.3 Location Bar
The location bar, which can be found above Dolphin’s view, displays the path to the current
folder. The location bar has two modes.
2.3.1 Bread Crumb Mode
In the ‘bread crumb’ mode, which is the default, each folder name in the path to the current folder
is a button which can be clicked to quickly open that folder. Moreover, clicking the ‘>’ sign to the
right of a folder opens a menu which allows you to quickly open a subfolder of that folder.
11The Dolphin Handbook
Location bar in bread crumb mode.
2.3.2 Editable Mode
When in bread crumb mode, clicking in the gray area to the right of the path with the left mouse
button switches the location bar to ‘editable’ mode, in which the path can be edited using the
keyboard. To switch back to bread crumb mode, click the check mark at the right of the location
bar with the left mouse button.
Location bar in editable mode.
2.3.2.1 Using Kioslaves
If the location bar is empty in editable mode, a drop down box appears in front of the bar listing
all available kioslaves on your system. Kioslaves are programs built into KDE which add support
for many different protocols to Dolphin and other KDE applications.
For example with the ‘fish’ kioslave Dolphin can be used to manage files and folders on a remote
host that is accessible via SSH. To do this you would type fish://username@remotehost
into the location bar. Similar remote file management can be done on remote hosts accessible via
the FTP, NFS, SFTP, SMB (CIFS) or webdav protocols.
It is also possible to use the kioslaves drop down list to access System Settings, fonts, trash,
other programs and devices attached to your computer. See the drop down list for the full list of
capabilities available from kioslaves on your system.
12The Dolphin Handbook
List of available kioslaves.
2.3.3 Places and Context
If the Places panel is hidden; in both modes an additional icon in front of the path is displayed.
This icon can be clicked with the left mouse button to open a menu which offers quick access to
‘places’ and storage media. See the section about the Places Panel for details.
The context menu of the location bar offers actions to switch between the modes and to copy and
paste the path using the clipboard. Check the last option in this context menu to display either
the full path starting with the root folder of the file system or to display the path starting with
the current places entry.
13The Dolphin Handbook
2.4 Panels
Dolphin allows a number of panels to be placed next to the view. These can be enabled in View
→ Panels. By unlocking the panels and clicking and dragging a panel title, the panel can be
moved to a different position, even outside the window.
2.4.1 Places
The Places panel is located at the left of the window by default. The Places panel shows any
locations you have bookmarked. It also shows any disk or media attached to the computer,
recently accessed items and allows you to search for certain type of files. The order of these
entries can be changed by drag and drop.
The easiest way to add a folder to the Places panel is to drag it and drop it in the panel. Moreover,
you can click inside the panel with the right mouse button and choose Add Entry... from the
context menu. The first procedure creates a system wide bookmark, the second procedure can
be used to add the current path of the location bar or any desired folder or device. A dialog
opens where label, location and icon can be edited and the usage of this entry can be restricted to
Dolphin.
A right mouse button click opens the context menu to edit, add, hide or remove entries and
change the icon size to one of the predefined values or lock/unlock the panels.
The context menu has an action to open the entry in a new tab. Devices can be unmounted using
the context menu.
2.4.2 Information
The Information panel shows extended information about the selected items(s) or about the cur-
rent folder or the file which is currently hovered over with the mouse, including size, type, and
date of last modification. It also features a large preview of the selected item and allows you to
assign a rating, tags, and comments to it.
2.4.3 Folders
The Folders panel shows a tree view structure of the file system. It only shows folders. Clicking
a folder with the left mouse button opens this folder in the Dolphin view.
14The Dolphin Handbook
2.4.4 Terminal
This panel contains a terminal. The terminal will open at the folder currently shown in the Dol-
phin view. Changing the folder in the active Dolphin view will update the working folder of the
terminal. Changing the directory in the terminal will update the working folder in the Dolphin
view. The terminal only works with local media.
2.5 Quick Tips
The following are a number of tips to save time when using Dolphin.
2.5.1 Quick Bookmarking
To quickly create a bookmark in the Places panel for the current folder, right mouse button click
in the work space and click Add to Places in the context menu.
2.5.2 Finding Files and Searching in Files
Dolphin is capable of searching for files and for content in files. If Ctrl+F is pressed or Edit
→ Find... is used, the Find bar will open already set up to search for files within the current folder
and any sub-folders. Start to type into the find input box and the search starts immediately.
Dolphin searching files and for content in files.
The search is case insensitive, and does not require surrounding wildcards (*foo* and foo are
equivalent), but you can use wildcards inside the search term. * will match zero or more charac-
ters, ? only one single character.
This feature can be used with running Baloo services; without these services a KIOSlave is
launched to provide the search results.
The option from Everywhere with activated Baloo services searches in all indexed folders, with-
out Baloo this option starts the search from the user’s Home folder.
Dolphin searching with More Options.
15The Dolphin Handbook
Use the More Options button to extend the Find bar. This provides a very comfortable way for
the user to shrink the number of search results.
To start a search select one or more file types (Documents, Audio, Video, Images), a time period
and rating
Alternatively you can use these options in the Places panel together with the Filter bar to find
files using Baloo or limit the search to files matching the filter expression.
2.5.3 Mounting Storage Media
A quick way to mount Storage Media is to click on the device in the Places panel. This will mount
and open the device in Dolphin.
2.5.4 Undo Actions
Dolphin is capable of undoing changes you have made to files. For example if you moved a file
to the Trash, Dolphin can undo this and move it back to its original location. To undo an action,
press Ctrl+Z or select Edit → Undo: (action name) in the menu, e.g. Undo: Rename.
2.5.5 Renaming A Batch Of Files
Dolphin is capable of renaming a number of files at the same time. Each file will have the file
name specified, including a number, e.g., Image1.jpg, Image2.jpg, Image3.jpg. This can be useful,
e.g., for pictures taken with a digital camera.
If you wish to rename a batch of files, first select the files to be renamed. This can be done by
pressing the left mouse button and drawing a rectangle around the files to be renamed before
releasing it, or by holding Ctrl and clicking each file to be renamed (see Selecting Items in the
View for more details on item selection). Then open the batch-rename dialog by pressing F2 or
via the File menu: File → Rename...
Then enter the name you wish to give the files. The # character must be present within the
name. The files will then be renamed, where the # character is replaced by a different consecutive
number for each file.
If all file extensions in your selection are different, the name of all files can be changed without
using a # placeholder while preserving the file extensions. This is e.g. useful to rename a video
file and all associated subtitle files, which have the same filename, but different extensions.
2.5.6 Comparing A Selection Of Files or Folders
If the Kompare application is installed, you can use it to see the differences between two files or
folders.
First select the two files or folders to be compared. Then launch the Kompare application via the
Tools menu: Tools → Compare Files. Kompare will then open showing the differences between
the files or folders.
2.5.7 Filtering Files
Dolphin is capable of filtering files, i.e. showing only those items in the view whose name con-
tains a given text. For example, if you wish to show only the MP3 files within a folder, you could
filter for ‘.mp3’. This would then filter out all files whose name does not contain ‘.mp3’.
To filter files, first enable the filter bar, either by pressing Ctrl+I or via the menu: Tools → Show
Filter Bar. You can then enter the text to be filtered for in the filter bar. The filter bar can be
disabled either by pressing Esc, or with a left mouse button click on the Hide Filter Bar icon.
16The Dolphin Handbook
Chapter 3
Configuring Dolphin
Dolphin distinguishes two different kinds of settings:
• Settings which affect the general behavior of Dolphin. These can be configured using the
Preferences Dialog.
• Settings which determine how the contents of a folder are displayed in Dolphin. These settings
are called View Properties and can be controlled with toolbar buttons, via the View menu, and
with the View Properties Dialog. In the default configuration, the view properties are remem-
bered for each folder, but Dolphin can also be configured to use common view properties for
all folders in the ‘General’ section of the settings.
3.1 The Dolphin Preferences Dialog
The Preferences Dialog is opened via Settings → Configure Dolphin... in the menu in Dolphin’s
main window. The settings are divided into several groups which can be accessed by clicking the
corresponding icon on the left of the dialog.
All settings except for the Startup page and the Status Bar tab on the General page are shared
with Konqueror in filemanager mode.
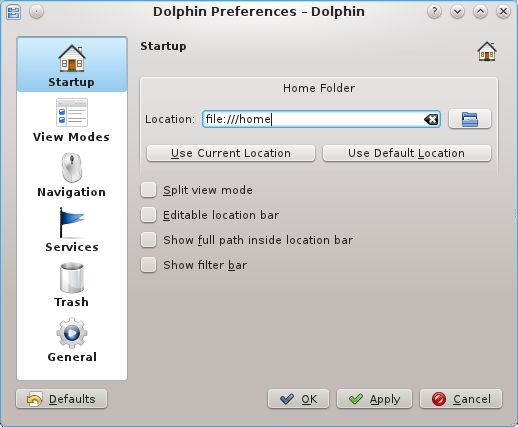
3.1.1 Startup
This group contains settings which control the appearance of Dolphin on startup.
17The Dolphin Handbook
Startup Settings in Dolphin’s Preferences Dialog.
• The Home Folder is the folder which is opened on startup. The location of the folder can be
entered directly or chosen in a dialog which can be opened by clicking the button showing a
‘folder’ icon. Moreover, the current location or the default location (which is the user’s home
folder) can be used as the Home Folder by clicking the corresponding button.
• Split View Mode controls if the Dolphin view is split on startup or not.
• Editable location bar controls if the location bar is in editable mode on startup. The bread
crumb mode of the location bar is used otherwise. See the section about the location bar for
details about the two modes.
• If Show full path inside location bar is enabled, the full path of the current location is shown
in the bread crumb mode of the location bar. Otherwise, a shortened version of the path is
shown if it begins with the path of one of the places in the Places panel.
• Show filter bar controls if the filter bar is shown on startup or not. See the section on the filter
bar for details.
3.1.2 View Modes
This group contains settings which control the behavior of Dolphin’s view modes. The three view
modes (Icons, Compact, and Details) are accessible via the tab bar at the top.
18The Dolphin Handbook
View Modes Settings in Dolphin’s Preferences Dialog.
3.1.2.1 Common settings for all view modes
All three view modes have some common settings:
• Sliders which control the size of the icons. The Default or Preview sizes are used if previews
are disabled or enabled, respectively. Note that the icon size can be changed easily with the
zoom slider in the status bar if the corresponding option is enabled in the ‘General’ section of
the settings.
• A setting for the font used in the view mode: either the system font or a custom font can be
chosen.
The other settings in the Text section which apply to only one of the view modes are discussed
below.
3.1.2.2 Icons
• Width controls the minimum width that is reserved for the text of a file item.
• Maximum lines means maximum number of text lines below the icon.
3.1.2.3 Compact
• Maximum width controls the maximum width that is reserved for the text of a file item.
3.1.2.4 Details
• Expandable folders determines whether any folders that have subfolders are displayed in a
tree view, where the sub items can be expanded by left mouse button clicking the > icon and
collapsed by clicking the v icon.
19The Dolphin Handbook
3.1.3 Navigation
This group contains settings which control how navigation in the folder structure and in archives
works.
Navigation Settings in Dolphin’s Preferences Dialog.
• Dolphin can be configured to open items with a single mouse click (Single-click to open files
and folders) or a double mouse click (Double-click to open files and folders). In the latter
case, a single mouse click will select the file or folder.
N OTE
This is a system wide setting and can be changed in the System Settings in the Input Devices
→ Mouse module as well.
• Archives will be opened inside Dolphin, and not in an external application, if Open Archives
as folder is enabled.
• If Open folders during drag operations is enabled, dragging an item with the mouse and
hovering over a folder with it for a short time will open that folder. This allows you to move
or copy items quickly to folders which are several levels deeper in the folder hierarchy.
3.1.4 Services
This group offers a selection of services that can be shown in the Actions submenu of Dolphin’s
context menu which appears when clicking a file or folder with the right mouse button.
20The Dolphin Handbook
Services Settings in Dolphin’s Preferences Dialog.
Using the Download New Services you can fetch additional services for the context menu.
If you have installed Dolphin’s plugins for Bazaar, Mercurial, Git or Subversion from the kdesdk
module these services are shown in the list. If these plugins are enabled and you enter a folder
which is under version control, the version state (locally changed, up to date etc.) is indicated by
icons and you have additional entries in the context menu like commit, update, add, remove etc.
In the service list you can also choose if the Delete, Copy To, and Move To commands are shown
in the context menu.
Dolphin has to be restarted to activate the changes for some of these settings.
3.1.5 Trash
This group contains settings which control the behavior of the trash.
21The Dolphin Handbook
Trash Settings in Dolphin’s Preferences Dialog.
• Files which are older than a configurable number of days can be deleted automatically.
• The size of the trash can be limited to a configurable percentage of the disk size. If this limit is
reached, a warning can be issued, or the oldest or largest files can be deleted automatically.
3.1.6 General
This group contains settings which control the general behavior of Dolphin. The group is divided
further into four subgroups which can be accessed using the tab bar at the top.
22The Dolphin Handbook
General Settings in Dolphin’s Preferences Dialog.
3.1.6.1 Behavior Tab
• In the View section, you can configure whether the view properties are stored for each folder
or if common view properties are to be used for all folders.
• When hovering over a file or folder with the mouse, a small window with relevant information
is shown if Show tooltips is enabled.
• Show selection marker shows a small + or - button above an item’s icon if the item is hovered
over with the mouse. These can be used to select or deselect the item.
• Natural sorting of items controls how items are sorted in the view. If this option is enabled,
the sort order of three example files will be
1. File1,
2. File2,
3. File10.
If this option is disabled, the normal alphabetical sorting will be used, which leads to the sort
order
1. File1,
2. File10,
3. File2.
• Enable Rename inline to use this mode if only one item is currently selected. If this option is
disabled or several items are selected, a dialog will be displayed for renaming.
3.1.6.2 Previews Tab
In this tab, you can configure for which file types previews are shown. Moreover, the maximum
size of remote files for which previews are generated can be chosen.
If previews are enabled for folders, previews of some files in the folder will be shown inside a
folder’s icon.
23The Dolphin Handbook
3.1.6.3 Confirmations Tab
In the ask for confirmation section, you can enable warning dialogs that are shown before poten-
tially harmful actions .
WARNING
The confirmation settings for Moving files or folders to trash and Deleting files or folders affect
file operations in Dolphin, Konqueror, Gwenview and all KDE applications using the default KDE file
dialog, whereas Closing Dolphin windows with multiple tabs is a Dolphin specific setting.
3.1.6.4 Status Bar Tab
In this tab, some additional items can be enabled for the status bar, provided the status bar is
wide enough:
• A zoom slider which can be used to change the icon size quickly.
• A bar that shows how much space is free on the current drive.
N OTE
Since Dolphin 4.9 the Delete, Copy To, and Move To commands of the context menu have to be
enabled on the Services page.
3.2 Folder View Properties
The following settings control how the contents of a folder are displayed in the Dolphin view,
and are stored on a per-folder basis by default:
• The view mode (Icons, Compact, Details)
• The sorting of items, which is determined by the sort order (ascending, descending) and the
attribute (such as name, size,...) that the items are sorted by
• Sorting of folders and files – are folders shown first or not?
• Previews – are they shown instead of icons (based on the settings made in Previews tab of
Dolphin’s General settings) or not?
• Are items shown in groups in the views?
• Are hidden files shown?
• What additional information (besides the name) is shown in the Icons or Details view?
The view properties can be configured in the View menu, some (such as the view mode) can also
be changed using toolbar buttons.
24The Dolphin Handbook
3.2.1 The View Properties Dialog
The View Properties Dialog.
The View Properties dialog can be used to quickly modify several view properties at once. This is
done for the current folder, for the current folder including all subfolders, or even for all folders,
depending on the choice made in the Apply View Properties To section.
If Use these view properties as default is enabled, the chosen view properties will also be used
for all folders which do not have customized view properties yet.
25The Dolphin Handbook
Chapter 4
Command Reference
By default the menubar is not shown. All actions described here either can be accessed with
toolbar buttons or with items in the menu of the Control toolbar button.
4.1 The Menubar in Dolphin’s Main Window
4.1.1 The File Menu
File → Create New
Creates a new object (such as a folder or a text file) in the current folder.
You will find an explanation of all available objects in Konqueror’s handbook in the chapter
Create New.
File → New Window (Ctrl+N)
Opens a new Dolphin window.
File → New Tab (Ctrl+T)
Opens a new tab.
File → Close Tab (Ctrl+W)
Closes the current tab.
File → Rename (F2)
Renames one currently selected item inline. Opens the batch rename dialog if several items
are selected.
File → Move to Trash (Del)
Moves the currently selected item(s) to the trash.
File → Delete (Shift+Del)
Permanently deletes the currently selected item(s). The items are not moved to the trash
and cannot be restored.
File → Properties (Alt+Return)
Shows the properties dialog for the currently selected item(s).
File → Quit (Ctrl+Q)
Exits Dolphin.
26The Dolphin Handbook
4.1.2 The Edit Menu
Edit → Undo (Ctrl+Z)
Undoes the last action performed by Dolphin.
Edit → Cut (Ctrl+X)
Cuts the currently selected item(s).
Edit → Copy (Ctrl+C)
Copies the currently selected item(s).
Edit → Paste Clipboard Contents... (Ctrl+V)
Pastes the currently copied/cut items to the current folder. If the clipboard does not contain
files or folders, the clipboard contents (such as text or image data) will be pasted into a new
file. The name of this file has to be entered in a dialog.
Edit → Find... (Ctrl+F)
Opens the find bar. Enter a search term into the edit box and select to search for filename
or in contents of files starting from the current folder or everywhere.
Edit → Select All (Ctrl+A)
Selects all files and folders in the current folder.
Edit → Invert Selection (Ctrl+Shift+A)
Selects all unselected items and deselects all selected items in the current folder.
4.1.3 The View Menu
View → Zoom In (Ctrl++)
Increases the size of icons in the view.
View → Zoom Out (Ctrl+-)
Decreases the size of icons in the view.
View → View Mode
Changes the view mode to Icons (Ctrl+1), Compact (Ctrl+2) or Details (Ctrl+3).
View → Sort By
Changes whether items are sorted by Name or other criteria described in Information in
the View.
Descending reverses the sort order. Folders First sorts folders before files.
View → Additional Information
Displays additional information described in Information in the View.
View → Preview
Displays a symbolic preview of the file contents in the different view modes.
View → Show in Groups
Displays the content of the current folder grouped by the option selected in Sort By.
View → Show Hidden Files (Alt+.)
Shows all the hidden files and sub-folders within the current folder.
View → Split (F3)
Enables and disables the split view mode.
27The Dolphin Handbook
View → Reload (F5)
Reloads the current folder.
View → Stop
Stops loading/reading the contents of the current folder.
View → Panels
Enables and disables the different panels: Places (F9), Information (F11), Folders (F7), Ter-
minal (F4). With Lock Panels the panel header with caption and two buttons is hidden to
save space and the panels are immutable, with Unlock Panels the header is visible and the
panel can be moved to the right or left or even outside the main window.
View → Location Bar → Editable Location (F6)
Changes the location bar between the two modes; the bread crumb mode and the editable
mode.
View → Location Bar → Replace Location (Ctrl+L)
Switches the location bar to editable mode, if necessary, and selects the location such that it
can be replaced quickly.
View → Adjust View Properties...
Opens the View Properties Dialog.
4.1.4 The Go Menu
Go → Up (Alt+Up)
Changes to the folder above the current folder.
Go → Back (Alt+Left)
Changes to the previously viewed folder.
Go → Forward (Alt+Right)
Undoes a ‘Go Back’ action.
Go → Home (Alt+Home)
Changes to the users home folder, e.g. /home/Peter/.
Go → Recently Closed Tabs
Shows a list of recently closed tabs which can be reopened.
4.1.5 The Tools Menu
Tools → Show Filter Bar (Ctrl+I)
Enables and disables the filter bar.
Tools → Open Terminal (Shift+F4)
Opens Konsole within the current folder.
Tools → Compare Files
Compare the currently selected files or folders with Kompare. This action is only enabled
if two files or folders are selected.
Tools → Select Remote Charset
Allows you to choose the charset used by a remote connection manually.
4.1.6 The Settings and Help Menu
Dolphin has the common KDE Settings and Help menu items, for more information read the
sections about the Settings Menu and Help Menu of the KDE Fundamentals.
28The Dolphin Handbook
Chapter 5
Miscellaneous Questions
1. Has Dolphin replaced Konqueror?
Dolphin is not intended to be a competitor to Konqueror: Konqueror acts as a universal
viewer being able to show HTML pages, text documents, folders and a lot more, whereas
Dolphin focuses on being only a file manager. This approach allows the optimization of the
user interface for the task of file management.
2. How can I get involved with the development of Dolphin?
The easiest way to get involved with Dolphin is to subscribe to the developer mailing list
kfm-devel and drop an email to the developer mailing list. Email what you can do, how
much time you can devote etc., the developers will let you know what you can do in the
project. If you wish to contribute to the documentation please email the KDE Documenta-
tion Team list.
3. How can I submit bug reports?
The official channel for submitting bug reports is via the KDE bug tracking system. The
KDE bug tracker can be found at http://bugs.kde.org.
4. How can I submit feature requests?
The official channel for submitting feature requests is via the KDE bug tracking system. The
KDE bug tracker can be found at http://bugs.kde.org.
29The Dolphin Handbook
Chapter 6
Credits and License
Dolphin
Program copyright 2006–2013 Peter Penz peter.penz@gmx.at and Frank Reininghaus
frank78ac@googlemail.com
Contributors:
• Cvetoslav Ludmiloff ludmiloff@gmail.com
• Stefan Monov logixoul@gmail.com
• Michael Austin tuxedup@users.sourceforge.net
• Orville Bennett obennett@hartford.edu
Documentation copyright 2005 Peter Penz peter.penz@gmx.at
Documentation copyright 2006 Orville Bennett obennett@hartford.edu
Documentation copyright 2006 Michael Austin tuxedup@users.sourceforge.net
Documentation copyright 2009 Frank Reininghaus frank78ac@googlemail.com
This documentation is licensed under the terms of the GNU Free Documentation License.
This program is licensed under the terms of the GNU General Public License.
30The Dolphin Handbook
Appendix A
How to get Dolphin
Dolphin is part of the kde-baseapps package which is an essential part of KDE.
For instructions on acquiring KDE please see http://www.kde.org or read the chapter Installing
KDE in the KDE Fundamentals.
For further information about Dolphin you might want to visit http://dolphin.kde.org or
http://userbase.kde.org/Dolphin.
31You can also read