GETTING TO KNOW YOUR 2019 - Chevrolet Owner Center
←
→
Page content transcription
If your browser does not render page correctly, please read the page content below
GETTING TO KNOW YOUR 2019

                                                     Pantone Spot Colors

                                                     Pantone     Pantone
                                                      Cool        300 C
                                                     Gray 7C

                                            chevrolet.com

Congratulations on your new Chevrolet Bolt EV. For a quick introduction, review this Quick Reference
    Guide. It provides the basic information needed to charge it, start it, and hit the road. More
        information can be found in your Owner’s Manual and at my.chevrolet.com/learn.
         Questions? Contact a Chevrolet Customer Assistance Advisor at 1-800-222-1020.

                Certain restrictions, precautions, and safety procedures apply to your vehicle.
                         Please read your Owner’s Manual for complete instructions.
                                                                                                       1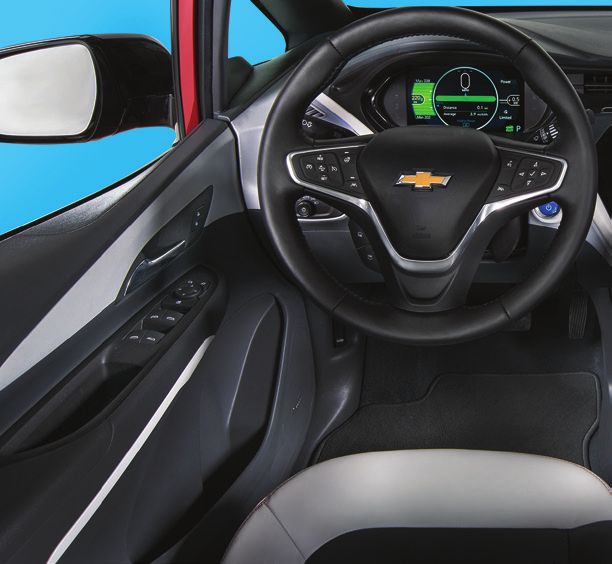
INSTRUMENT PANEL
       Regen on          Exterior/       Cruise Control/Forward     Turn Signal    Instrument
     Demand Paddle        Interior      Collision Alert/Lane Keep      Lever/     Cluster/Driver     Windshield
    (behind steering       Lamp          Assist/Heated Steering     IntelliBeam    Information        Wipers
         wheel)          Controls             Wheel Controls          Control         Center           Lever

       Power Mirror            Audio Favorite     Tilt/Telescopic          Voice          Audio Volume      Power
      Controls/Power             Stations             Steering         Recognition/         Buttons         Button
     Window Controls/             Buttons          Wheel Lever      Driver Information      (behind
    Rear Windows Lock                              (on steering      Center Controls        steering
                                                      column)                                wheel)
       Symbols

        BRAKE   Brake System                        IntelliBeam Lighting                 Service Vehicle Soon
                Seat Belt Reminder                  12V Charging System                  Electric Parking
                                                                                  PARK   Brake Set
                Passenger Seat Belt                 Vehicle Ahead
          2
                Reminder                                                                 Cruise Control
                                                    Lane Keep Assist Warning
                Airbag Readiness                                                         Door Ajar
                                                    Security

2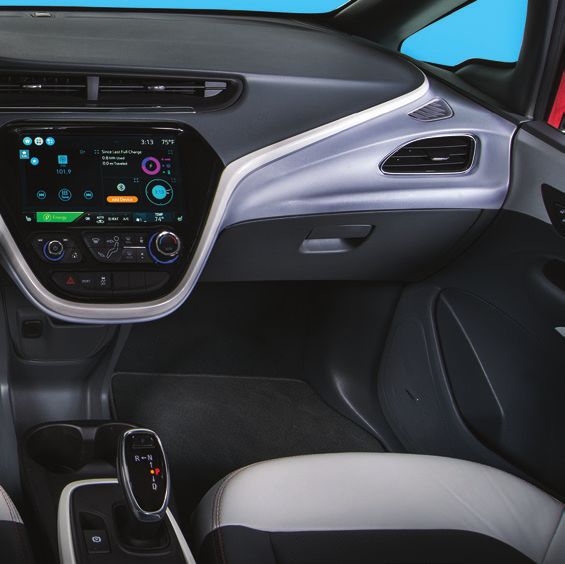
Charging          Driver’s      Infotainment                           Passenger’s
  Status        Heated Seat        System                  Climate     Heated Seat
Indicator         Control       Touchscreen                Controls      Control

Electric      Accessory               Electronic               Hazard Warning
Parking      Power Outlet           Precision Shift         Flashers/Sport Mode/
 Brake                                  Lever                Traction Control and
                                                              StabiliTrak Buttons

                                                                           Refer to your Owner’s Manual to
     Antilock Brake System                   Traction                      learn about the information being
                                             Control Off                   relayed by the lights, gauges
     Lights On Reminder                                                    and indicators of the instrument
                                             StabiliTrak Off               cluster.
     Pedestrian Ahead
                                             Vehicle Ready
     Low Tire Pressure                                                      See In Brief in your Owner’s Manual.
     StabiliTrak/Traction Control

                                                                                                              3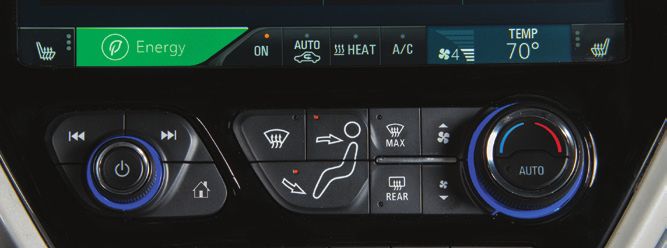
GETTING STARTED
REMOTE KEYLESS ENTRY (RKE)
The RKE transmitter (key fob) performs several remote functions and must be in the
vehicle to start the Bolt EV.
Keyless Access
With the RKE transmitter within 3 ft. Remote Start
(1 m) of the door, press the button on the Press the Lock
driver’s door handle to unlock the door. button and then
Press it again within 5 seconds to unlock press and hold the
all doors and the liftgate. button until the
Press the turn signal lamps
button on flash to start the
a passen- vehicle and condi-
ger’s door tion the passenger
handle cabin temperature
to unlock from outside the vehicle. The heating or
all doors air conditioning system and rear w indow
and the defogger (if needed) will turn on.
liftgate. After entering the vehicle, press the brake
When unlocked, press the button on pedal and then press the POWER
any door handle to lock all doors and button before driving.
the liftgate. Note:
Key Release • Press and hold the Remote Start
Press the side button on the transmitter button until the parking lamps turn off
to remove the key, which can be used to to cancel a remote start.
unlock the driver’s door. • Only two remote starts are allowed
between ignition cycles.
Unlock
Press to unlock the driver’s door. Press • It’s RECOMMENDED to use this feature
again to unlock all doors. when the vehicle is plugged in to allow
energy from the wall outlet to assist
Lock in getting the cabin to a comfortable
Press to lock all doors. temperature and to leave more battery
energy for driving.
Panic Alarm
Press and release to locate the vehicle.
Press and hold for 3 seconds to sound the
panic alarm.
See Keys, Doors and Windows in your Owner’s Manual.
4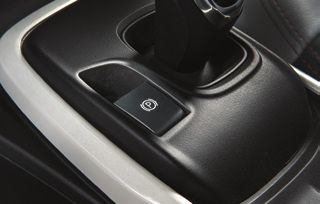
GETTING STARTED
POWER BUTTON
The Bolt EV features an electronic pushbutton start. The POWER button flashes when
the driver’s door is opened upon entry. Once the vehicle is ON, the button illuminates.
Note: The air conditioning compressor, pumps and fan may run at any time — even when the vehicle is
OFF — to cool or warm the propulsion battery.
STARTING THE VEHICLE/ON
With the vehicle in Park or Neutral, press
the brake pedal and then press the
POWER button. A power ON audio cue
will sound.
The vehicle will not shift out of Park and a
Charge Cord Connected message will display
if the vehicle is still plugged in.
The instrument cluster will display an active
battery gauge and the READY READY icon will
appear when the vehicle is ready to be driven.
STOPPING THE VEHICLE/OFF
Shift to Park and then press the POWER button. A power OFF audio cue will sound.
PEDESTRIAN SAFETY SIGNAL
The vehicle is equipped with an automatic sound generator. The sound is automatically
generated at speeds below 14 mph to indicate the vehicle’s presence to pedestrians.
See Driving and Operating in your Owner’s Manual.
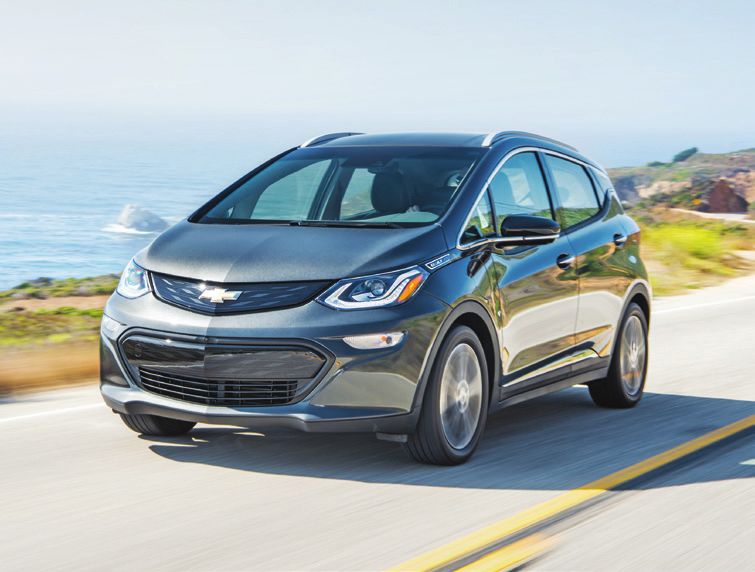
DRIVER’S SEAT AND STEERING WHEEL ADJUSTMENT
Before driving, adjust the steering wheel and seat
to a comfortable position.
Pull down the lever (A) to unlock the steering A
wheel and adjust its position.
Lift the handle (B) under the right-front side of
the seat to slide the seat forward or rearward.
Ratchet the side lever (C) up or down to raise or B
lower the seat.
C D
Lift the rear lever (D) to adjust the seatback.
See Seats and Restraints in your Owner’s Manual.
5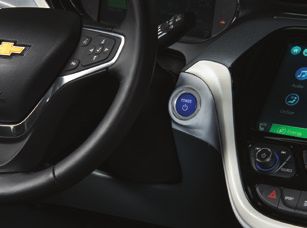
ELECTRONIC PRECISION SHIFT
The electronic drive unit shift lever always starts in a center position, represented by a
dot on the shift pattern on top of the shift lever. The selected gear position illuminates in
red. After shifting, the shift lever returns to the center position.
Park – Press the button on top of the lever
(A) to shift into Park.
A
To shift out of Park, with the vehicle ON and
the brake pedal applied, press and hold the
shift lock button on the side of the lever (B) B
and select the desired gear.
Reverse – Press and hold the shift lock
button on the side of the lever (B) and move
the lever forward and then left to shift into
Reverse.
Neutral – Move and hold the lever forward for 1/2 second to shift into Neutral.
Note: The transmission will not stay in Neutral for an extended period. It will automatically shift
into Park.
Drive – Move the lever rearward to shift into Drive.
One-Pedal Driving – With the transmission in Drive, pull the lever rearward to the L
(Low) position to enable “one-pedal” driving. When the accelerator pedal is not applied,
regenerative braking is active to help slow the vehicle. Use the brake pedal for additional
braking or panic stops. Pull the lever rearward again to return to Drive.
Note: Regenerative braking features may be limited when the battery is near full charge or cold. Always
use the brake pedal if you need to stop immediately.
AUTOMATED CAR WASH MODE
To place the transmission in Neutral with the vehicle running:
1. While pressing the brake pedal, open the driver’s door and then shift to Neutral.
2. The indicator should show N. If it does not, select Neutral again.
3. Upon returning to the vehicle, shift
into Park.
ELECTRIC PARKING BRAKE
To apply the parking brake, pull up the
Parking Brake switch by the shift
lever.
To release the parking brake, turn on the
vehicle, press the brake pedal, and then
press the switch.
See Driving and Operating in your Owner’s Manual.
6
INSTRUMENT CLUSTER
The instrument cluster features a digital
screen that can be configured in 3 different
themes.
Classic – Displays basic information on
speed, range and other operations along
with an efficiency bar that glows green to
yellow based on driving efficiency.
Modern – Displays basic information plus
power usage and an efficiency ball that Enhanced display shown
moves up and down based on driving
efficiency.
Enhanced – Displays basic information plus
a maximum and minimum range indicator,
power usage and an efficiency ring that
glows green to yellow based on driving
efficiency.
CLUSTER DISPLAY ZONES
Press the or on the Driver
Information Center (DIC) controls, locat-
ed on the right side of the steering
wheel, to move between the different
display zones.
Press the or on the DIC controls to
scroll through the display menus.
Press the on the DIC controls to
select a highlighted item.
CLUSTER LAYOUTS
1. Use the DIC controls to select the Layout
menu in the left display zone on the
cluster.
2. Press to display the Layout menu.
3. Scroll to highlight one of the cluster
layouts; press .
4. Press to exit the menu.
CLUSTER HELP
To view helpful information about the
features of the instrument cluster, with the vehicle in Park, use the DIC controls to select
Help from the Options menu.
See Instruments and Controls in your Owner’s Manual.
7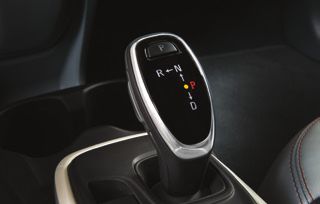
EFFICIENCY
ELECTRIC RANGE
Electric range is affected by colder outside temperatures. During colder months, the
energy needed to warm the vehicle’s cabin and propulsion battery can cause the vehi-
cle’s electric range to decline. See Driving for Better Energy Efficiency in the Driving and
Operating section in your Owner’s Manual.
DRIVING STYLE
Your driving style plays a large role in the efficiency of the vehicle. Avoid rapid accelera-
tion or deceleration to help maximize energy efficiency and range. Electric range is maxi-
mized at 50 mph and below; higher speeds use more energy and significantly reduce
electric range.
EFFICIENCY GAUGES
Use the Driver Information Center controls
to select an instrument cluster layout that
displays the green efficiency bar, ball or
ring indicator.
While driving, try to keep the bar or ring
green, or the ball in the center of the gauge,
depending on the cluster theme selected.
The bar or ring will turn yellow or the ball
will move up or down during inefficient
acceleration or aggressive braking.
SPORT MODE
Press the SPORT button on the center of the instrument panel to select the Normal or
Sport driving mode.
Normal (Default)
Use in normal driving conditions for efficient operation. This mode is active each time the
vehicle is started.
Sport
Use when more performance is needed. This mode increases throttle response. The
Sport indicator will illuminate on the instrument cluster.
REGEN ON DEMAND™
Regen on Demand temporarily regener-
ates energy from the vehicle’s momentum
and stores it in the high voltage propulsion
battery for later use.
To activate Regen on Demand, pull and
hold the left paddle on the back of the
steering wheel without pressing the
brake pedal or accelerator pedal.
While pulling the paddle, the vehicle will begin to decelerate using regenerative braking.
Regen on Demand is deactivated once the paddle is released or the accelerator pedal is
pressed.
8 See Driving and Operating in your Owner’s Manual.CLIMATE CONTROLS
Passenger’s
Driver’s Heated Climate Recirculation Heat A/C Fan Speed Temperature Heated Seat
Seat Button On/Off Mode Power Power Display Display Button
AUTO
Automatic Temperature
REAR
MAX
Defrost/ Air Delivery MAX Rear Window Fan
Defog Mode Defogger Operation Control
Controls Defrost Controls
CLIMATE SETTINGS
Optimal efficiency is achieved with the climate system off (Climate ON indicator is off).
Each mode setting impacts the vehicle’s electric range.
Use the Fan only to distribute air through the cabin without active electric heating/
cooling (Heat and A/C indicators are off).
Select Heat or A/C (Heat or A/C indicator is on) for active electric heating/cooling.
This setting uses more energy.
AUTOMATIC OPERATION MAXIMUM DEFROST
1. Press AUTO. To defrost the windshield and rear window
2. Set the temperature. as quickly as possible (using the most
energy):
If fan speed, air delivery, air conditioning,
electric heating or recirculation is manu- 1. Press MAX Defrost.
MAX
ally adjusted, automatic operation for that 2. Press Rear Window Defog.
REAR
function is turned off.
AUTO HEATED SEATS AND STEERING WHEEL
Use the heated seats and steering wheel to reduce demand and use less energy.
To turn the automatic heated seats and steering wheel on or off, go to Settings >
Vehicle > Climate and Air Quality. When turned on, the heated seats and steering
wheel will activate automatically based on the vehicle’s interior temperature.
To turn the remote start automatic heated seats and steering wheel on or off, go to
Settings > Vehicle > Remote Lock, Unlock, Start.
See Climate Controls in your Owner’s Manual. 9INFOTAINMENT SYSTEM
INFORMATION DISPLAYS
Press the Energy button on the touchscreen and then touch the Flow, Charging,
Information, or Charging Options icon to display the desired energy information.
Flow
The Power Flow screen indicates the cur-
rent system operating condition, showing
the power flow between the high voltage
propulsion battery and electric drive unit.
Charging
The Charging screens show the Charge Mode
and Charge Limit status. The vehicle has three
programmable charge modes:
• Immediately upon plug-in
• Delayed based on departure time or
electric rates
• Target charge level for needed range
Touch each screen button to change the
settings. See Charging (page 12).
Information
The Information screens show the Energy
Detail since the last time the vehicle was
fully recharged. The Range Impacts provide
an estimate of the factors that influence
energy usage since the last full charge. The
Efficiency History shows the average energy
efficiency over the last 50 miles.
Charging Options
The Charging Options include settings and
alerts for charging the vehicle that can be set
to your preference.
VEHICLE PERSONALIZATION
A number of vehicle features can be
customized using the Settings menus on
the touchscreen.
1. Touch Settings on the Home page.
2. Touch the desired menu item.
3. Touch the desired feature and setting.
4. Touch the Return icon to exit each menu.
For more information, visit my.chevrolet.com/learn or contact Customer Assistance
at 1-855-478-7767.
10 See Instruments and Controls in your Owner’s Manual.INFOTAINMENT SYSTEM
BLUETOOTH SYSTEM
Before using a Bluetooth-enabled device in the vehicle, it must be paired with the in-
vehicle Bluetooth system. Not all devices will support all functions. The pairing process is
disabled when the vehicle is moving.
To pair a Bluetooth phone using voice recognition, press the Push to Talk button
on the steering wheel; after the beep, say “Pair Phone.” To use the touchscreen,
select Settings > Devices > Add Device. Follow the pairing instructions.
To activate Voice Pass-Thru for access to voice recognition commands (i.e. Siri® Eyes
Free or Voice Command) on a paired, compatible phone, press and hold the Push
to Talk button on the steering wheel until a tone sounds.
APPLE CARPLAY
Apple CarPlay capability is available through a compatible smartphone using the
Projection icon on the Home page of the infotainment system. No app is required.
1. Connect your compatible phone by plugging the Lightning cable into a USB data port.
Use your device’s factory-provided Lightning cable. Aftermarket cables may not work.
2. The Projection icon will change to Apple CarPlay. Touch the Apple CarPlay icon to have
your apps displayed.
ANDROID AUTO
Android Auto capability is available through a compatible smartphone using the
Projection icon on the Home page of the infotainment system.
1. Download the Android Auto app to your phone from the Google Play Store.
2. Connect your compatible phone by plugging the phone USB cable into a USB data port.
Use your device’s factory-provided USB cable. Aftermarket cables may not work.
3. The Projection icon will change to Android Auto. Touch the Android Auto icon to have
your apps displayed.
4G LTE WI-FI® HOTSPOT
With the vehicle’s available 4G LTE Wi-Fi hotspot, up to 7 devices (smartphones, tablets
and laptops) can be connected to high-speed internet.
To retrieve the SSID and password for the hotspot, go to Settings > Wi-Fi > Manage
Wi-Fi Networks.
See Infotainment in your Owner’s Manual.
WIRELESS CHARGING FOR MOBILE DEVICESF
The Wireless Charging system is located in the center console. A compatible wireless
charging adapter (not supplied) for the device may be needed. To check device compat-
ibility, visit my.chevrolet.com/learn.
1. The vehicle must be ON.
2. Remove all objects from the charging slot.
3. Place the mobile device upright, facing the driver, in the charging slot.
4. The charging symbol displays on the infotainment screen, when it is charging.
See Instruments and Controls in your Owner’s Manual.
F Optional equipment 11CHARGING
BATTERY
The Bolt EV is powered by a lithium-ion high voltage battery pack, which holds its charge
efficiently and has no memory effect (so it doesn’t have to be run down completely
before recharging). Keep the vehicle plugged in, even when fully charged, to keep the
battery temperature ready for the next drive.
CHARGING TIME
Charging rates and times vary depending on outside temperature and remaining charge.
When using a 120-volt electrical outlet, it will charge at a rate of 4 EV miles per hour
with the 12-amp setting (approximately 50 hours total to charge a depleted battery).
When using a 240-volt charging station, it will charge at a rate of 25 EV miles per hour
at a 32-amp level (approximately 91/2 hours total to charge a depleted battery).
Using a public DC Fast Charging station with the available Fast Charge port, it will take
approximately 30 minutes, at an 80 kW power level, to charge a depleted battery to an
estimated 90 miles of EV range.
PROGRAMMABLE CHARGING
There are 3 programmable charging modes: Immediately upon plug-in; Delayed based on
departure time; and Delayed based on electric rate and departure time.
Touch the Energy icon on the touchscreen and then touch the Charging icon to
view the current Charge Mode and Charge Limit.
Touch the Charge Limit toggle button to select a different charge level.
Touch the desired Charge Mode tab to select a different charge mode.
CHARGING STATUS
The Charging Status indicators are located on the instrument panel near the windshield
and on the illuminated charge port (if available).
Single tone and flashing green indicator –
Vehicle is plugged in; battery is charging. Flashes
indicate current percentage of battery charge.
1 flash: 0–25% charged
2 flashes: 25–50% charged
3 flashes: 50–75% charged
4 flashes: 75–99% charged
Solid light: 100% charged
Slow (long pulse) flashing green indicator with
double tone – Vehicle is plugged in; battery charging is delayed
Solid green indicator – Vehicle is plugged in; battery is fully charged
Solid yellow indicator – Vehicle is plugged in; not charging
No light – Vehicle is not plugged in OR there is an issue with the charger or outlet
No light and repetitive tones – Issue with the charge cord connection
See Driving and Operating in your Owner’s Manual.
12CHARGING
START CHARGING
The provided 120-volt portable charge cord is located under the storage floor in the
cargo area and can be used to charge the vehicle when a 240V charging station is not
available.
1. With the vehicle parked, turn off the vehi-
cle and select the Charging button at the
bottom of the Energy Summary screen.
2. Review the selected Charge Mode and
Charge Limit. Select the Charge Limit
toggle button if an increased charging
limit is desired. Use the 8-amp charge
limit until a qualified electrician inspects
your home’s electrical circuit capacity, or
if the electrical circuit or outlet capacity is not known.
Note: The charge level selection returns to the 8-amp setting each time the vehicle is driven.
3. Plug the charge cord into an electrical
outlet. DO NOT PLUG INTO AN EXTENSION
CORD. Charge cord indicators should be
green. Where possible, secure the charge
cord to the wall.
4. Press and release the rear edge of the
charge port door, located just in front of
the driver’s door, to open it. Plug the charge
cord into the charge port.
5. The Charging Status indicator on top of
the instrument panel will illuminate green
and the horn will chirp when properly
connected.
Note: To change the horn chirp setting, go to Energy
> Charging Options.
6. Periodically check the electrical outlet/
plug while charging. Discontinue use if the
electrical outlet/plug is hot and have the
electrical outlet serviced by a qualified
electrician.
To arm the charge cord theft alert, lock the vehicle twice with the Remote Keyless Entry
transmitter.
Note: When the theft alert is armed, the alarm will sound when the plug is disconnected from the
vehicle. To change charge cord theft alert options, go to Energy > Charging Options.
To temporarily override a delayed charge event, remove and reconnect the charge
cord to the vehicle within 5 seconds. It will begin charging immediately.
See Driving and Operating in your Owner’s Manual.
13CHARGING
END CHARGING
1. Unlock the vehicle with the Remote
Keyless Entry transmitter to disarm the
charge cord theft alert.
2. Unplug the charge cord from the vehicle
by squeezing the top latch button.
3. Unplug the charge cord from the
electrical outlet.
4. Stow the charge cord.
Available accessories shown
See Driving and Operating in your Owner’s Manual.
LOCATION-BASED CHARGING
Customized charging settings can be saved
for your home location. The vehicle will
automatically revert to these settings when
parked at its home location.
1. From the Energy Home screen, select
Charging Options > Location-Based
Charging.
2. Select On to enable Location-Based
Charging.
3. Select Set Home Location. Your vehicle’s current location will be set. Touch OK.
When away from the home location, the Bolt EV will charge immediately when plugged in.
See Instruments and Controls in your Owner’s Manual.
HOME CHARGING STATION
Charging equipment with at least a 240-volt/32-amp rating will provide the fastest
charging time to recharge the propulsion battery.
For more information about an available 240-volt home charging station, contact your
Chevrolet dealer.
See Driving and Operating in your Owner’s Manual.
14DC CHARGING (IF EQUIPPED)
DC charging stations are typically found in public locations.
CHARGING TIME
Using a DC charging station with at least 80 kW of available power, it will take approxi-
mately 30 minutes to recharge a depleted battery to an estimated 90 miles of EV range.
Charge times will vary with outside temperature. Charging will continue to 100%, but at a
slower rate. At 100% state of charge, the vehicle may continue to draw power to c ondition
the battery if needed. Once battery conditioning is complete, the vehicle will stop the
charging session.
START DC CHARGING
1. With the vehicle parked and turned off, push and release the rear edge of the charge
port door, located just in front of the driver’s door, to open the door.
2. Unlatch and lower the DC charging dust cover on the charge port.
3. Plug the charge cord into the vehicle’s charge port.
4. Follow the steps on the charging station to start charging. The electric parking brake
will automatically apply and the DC plug will be locked and cannot be disconnected
while charging is active.
5. The Charging Status Indicator on top of the instrument panel will illuminate green and
the horn will chirp when properly connected.
Note: To change the horn chirp setting, go to Energy > Charging Options.
To arm the charge cord theft alert, lock the vehicle twice with the Remote Keyless Entry
transmitter.
END DC CHARGING
1. Unlock the vehicle with the RKE transmitter to disarm the charge cord theft alert.
2. When the vehicle is fully charged, it will stop charging and the plug will be unlocked.
To stop charging at any time, use the controls on the charging station or touch the
Stop button on the Charging screen on the vehicle touchscreen.
3. When the Charging Status Indicator is solid green or off, unplug the charge cord from
the vehicle.
4. Close the DC charging dust cover and close the charge port door.
5. Disengage the electric parking brake before driving the vehicle.
See Driving and Operating in your Owner’s Manual.
15ROADSIDE ASSISTANCE
1-888-811-1926 TTY Users: 1-888-889-2438
As the owner of a new Chevrolet, you are automatically enrolled in the Chevrolet
Roadside Assistance program for 5 years/60,000 miles, whichever occurs first, at no
expense to you. Chevrolet’s Roadside Assistance toll-free number is staffed by a team of
trained advisors who are available 24 hours a day, 365 days a year, to contact a service
provider for light services (jump-starts, flat tire and lock-outs) or make arrangements to
tow your vehicle to the nearest Bolt EV Authorized Chevrolet dealer.
OnStar Roadside Assistance
If you have a current OnStar Safety & Security plan, push the blue OnStar button or red
Emergency button to get the help you need. An OnStar advisor will use GPS technology
to pinpoint your vehicle location and contact the nearest service provider.
To learn more about OnStar services, press the blue OnStar button, visit onstar.com, call
1-888-4-ONSTAR (1-888-466-7827), or refer to your Owner’s Manual.
MYCHEVROLET MOBILE APP
Download the myChevrolet app to your compatible smartphone (or device) and, if your
vehicle is properly equipped, you can search for charging stations, send remote com-
mands, check the current battery charge level and initiate charging of your Bolt EV.
The app is available on select Apple and Android devices. Service availability, features
and functionality vary by vehicle, device and data plan. Device data connection required.
Visit onstar.com for more details. Download the mobile app from your compatible mobile
device’s app store.
CHEVROLET OWNER CENTER
Get to know your vehicle inside and out with the Chevrolet Owner Center. Check out
personalized information, including an online Owner’s Manual and helpful how-to videos,
track your service history and warranty status, manage your OnStar and Connected
Services vehicle plans, review your current Vehicle Diagnostics report (active service
account required) and more. Create an account today at my.chevrolet.com.
We recommend always using ACDelco or genuine GM service parts.
Certain restrictions, precautions and safety procedures apply to your vehicle. Please read your Owner’s Manual
for complete instructions. All information contained in this guide is based on the latest information available at
the time of printing and is subject to change without notice. Copyright 2018 General Motors. All rights reserved.
!84214432=A! 84214432 A
16You can also read