DBS Online - Guide for Administrators and Verifiers - Hackney Services for Schools
←
→
Page content transcription
If your browser does not render page correctly, please read the page content below
Hackney Learning Trust HR:
                                                                     DBS Online - Guide for Administrators and Verifiers

                                DBS Online - Guide
                            for Administrators and
                                          Verifiers

File: DBS Online - Guide for Administrators and Verifiers   Version: 11.0                                    1   of 48

                                                            Issued: 7 September 2018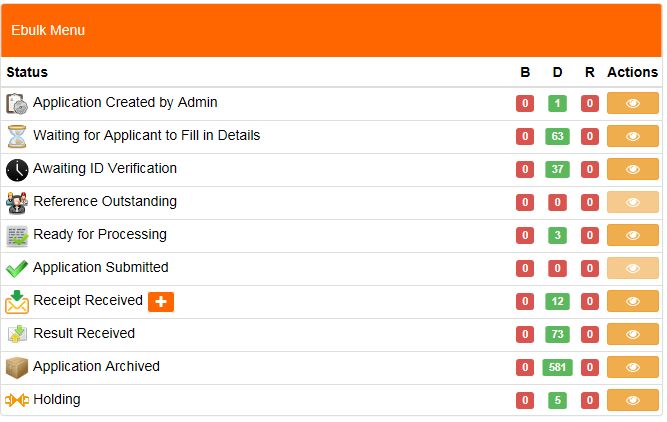
Hackney Learning Trust HR:
DBS Online - Guide for Administrators and Verifiers

About this guide
  Purpose
              This guide explains how those involved in the DBS process (Administrators and ID Verifiers)
              use HLT’s Online DBS system.
              There is a separate guide for the Hackney Learning Trust’s DBS Team covering their internal
              procedures and how the system is configured.

  Contents
              This document covers the following topics:

              1.      Benefits of the system ...................................................................... 6

              2.      Roles .................................................................................................. 6
                      2.1.     DBS Administrator ............................................................................................. 6
                      2.2.     ID Verifier ........................................................................................................... 7

              3.      Accessing the system ....................................................................... 7
                      3.1.     Logging on to the DBS online system ............................................................... 7
                      3.2.     Changing your password (and other details) .................................................... 8
                      3.3.     Logging out ........................................................................................................ 8

              4.      The online DBS Application Process .............................................. 8
                      4.1.     Setting up an applicant ...................................................................................... 9
                      4.2.     Verifying the applicant’s identity and submitting the application ..................... 12

              5.      Finding and editing application details ......................................... 19
                      5.1.     Searching for an application ............................................................................ 19
                      5.2.     Adding a missing National Insurance number ................................................. 20
                      5.3.     Correcting position details or Volunteer flag ................................................... 20
                      5.4.     Entering receipt of a Certificate of Good Conduct........................................... 21
                      5.5.     Moving an application to ‘Holding’ status ........................................................ 21
                      5.6.     Recording a recruitment decision .................................................................... 22
                      5.7.     Adding a note to an application ....................................................................... 23

              6.      Tracking applications and viewing Disclosure results ................ 23
                      6.1.     Viewing a summary of all applications (by status) .......................................... 24
                             6.1.1. Using E-Bulk display the status of all applications .............................................. 24

          2   of 48                                       Version: 11.0                    File: DBS Online - Guide for Administrators and Verifiers

                                          Issued: 7 September 2018
Hackney Learning Trust HR:
                                                                                       DBS Online - Guide for Administrators and Verifiers

                             6.1.2. Understanding the status codes and icons ......................................................... 24
                      6.2.     Tracking Disclosure applications received by the DBS ................................... 27
                             6.2.1. Tracking applications using the system .............................................................. 27
                             6.2.2. Tracking applications using the DBS online service ........................................... 28
                             6.2.3. Reporting applications that have been sent to the DBS ..................................... 29
                      6.3.     Viewing Disclosure results .............................................................................. 30
                             6.3.1. Track Disclosure results on the E-Bulk menu ..................................................... 30
                             6.3.2. Searching for individual applications .................................................................. 31
                             6.3.3. Reporting Disclosure results received ................................................................ 31

               7.     Viewing an application’s history and adding notes ......................32

               8.     Deleting/withdrawing an application ..............................................33
                      8.1.     Charging for withdrawn applications ............................................................... 33
                      8.2.     Archiving an application .................................................................................. 34

               9.     Housekeeping...................................................................................34

               10. Other administration tasks ..............................................................35
                      10.1. Re-setting password and correcting e-mail addresses ................................... 35
                      10.2. Re-activating or deactivating accounts ........................................................... 36

               11. Reporting ..........................................................................................37
                      11.1. Overview of available reports .......................................................................... 37
                      11.2. Running the reports ......................................................................................... 39

               12. Checking invoices received from HLT ...........................................40

               13. Troubleshooting ...............................................................................42
                      13.1. Problem: An applicant has not received their login details ............................. 42
                      13.2. Problem: An applicant has received their login details but can’t access their
                            application form ............................................................................................... 42
                      13.3. Problem: The ID Verifier is not on the list........................................................ 43
                      13.4. Problem: An applicant has been set up in the wrong name............................ 44
                      13.5. Problem: The ID Verifier is absent, but an applicant has presented their documents
                            for verification .................................................................................................. 45
                      13.6. Problem: The applicant cannot provide identity document to satisfy any of the ID
                            verification routes ............................................................................................ 46
                      13.7. Problem: An application is no longer required ................................................ 46
                      13.8. Problem: The applicant has not received their Disclosure certificate ............. 47

File: DBS Online - Guide for Administrators and Verifiers               Version: 11.0                                                       3     of 48

                                                                        Issued: 7 September 2018
Hackney Learning Trust HR:
DBS Online - Guide for Administrators and Verifiers
Version control
The table below shows the history of the document and the changes that were made at each
version:
Version Date Summary of changes
1.0 10 May 2016 First published version to support the Pilot launch of the Hackney
Learning Trust online DBS system.
2.0 2 June 2016 Updated version to coincide with launch of training roll-out.
The following sections have been added:
How to withdraw an application.
How to edit an application created in the wrong name.
How to change the ID verifier.
Status Codes section updated with an additional status.
Clearer guidance provided on using the applicant’s official name,
rather than a ‘known as’ name.
3.0 22 July 2016 Troubleshooting section updated to cover cases where the applicant
does not have any of the required identity documents and needs to
be sent for fingerprinting. A note has also been added to Section
4.2.
Section 5.2 updated to advise that an application can be amended
to add the NI Number at any stage in the process, even after the
result is returned from the DBS.
Section 5.4 updated to clarify that a CGC is only required for new
applicants not renewals.
Document updated throughout to remind that only the ID Verifier
account can be used to record identity verification documents.
Screenshots updated to show more meaningful data.
4.0 27 September 2016 Section 10 updated with details of new reports. These are available
to the Administrators to run.
Document updated to reinforce that a valid e-mail address must be
used when setting up the applicant, otherwise they won’t receive
their login details or reminder e-mails.
5.0 23 October 2016 Explanation of CGC Report changed.
New report added to list applications which required an external ID
check.
Warning added that if the applicant is verified using Route 2 or 3
they will need to provide a Group 2A document.
‘Application Archiving’ explained.
6.0 18 November 2016 New report added to list applications sent to the DBS. This can be
used to cross-check invoices received from HLT.
New section added to explain how to cross-check admin fees, DBS
fees and external ID check fees against invoices.
4 of 48 Version: 11.0 File: DBS Online - Guide for Administrators and Verifiers
Issued: 7 September 2018Hackney Learning Trust HR:
DBS Online - Guide for Administrators and Verifiers
Version Date Summary of changes
7.0 9 January 2017 CGC section updated to reflect that, contrary to previously advised,
the application is not automatically moved from ‘Holding’ status to
‘Result Received’ status when the CGC receipt is recorded. The
Disclosure result is automatically e-mailed to the
manager/Headteacher, but the status is changed manually by the
HLT System Administrator.
Added a ‘Housekeeping’ section to explain that applications in the
‘Waiting for Applicant to Fill in Details’ stage or the ‘Awaiting ID
Verifier’ stage which are no longer required should be archived.
Troubleshooting section also updated with what to do with unwanted
applications.
8.0 8 December 2017 Troubleshooting section updated with what to do if an applicant
requests a certificate reprint.
Minor corrections and typographical errors.
9.0 29 January 2018 The DBS introduced new ID verification rules for non-EEA nationals.
The guide was updated with the new screens and processes.
10.0 13 August 2018 Reflects new screen design and functionality in Version 2 of the
Online DBS system.
The main changes are:
A fresher look-and-feel to the screens and icons.
More guidance when you are verifying an applicant’s identity.
No need to have two separate administrator and ID verifier
accounts.
11.0 7 September 2018 Troubleshooting section updated with what to do if an applicant
receives their log in details but can’t access their application.
Instructions on producing reports clarified.
The most current version is available on the Hackney Learning Trust website.
File: DBS Online - Guide for Administrators and Verifiers Version: 11.0 5 of 48
Issued: 7 September 2018Hackney Learning Trust HR:
DBS Online - Guide for Administrators and Verifiers
1. Benefits of the system
Our Online DBS system provides the following benefits:
Vastly improved average turnaround times mean DBS results are received more
quickly, resulting in safer recruitment decisions.
Online forms mean the process is less laborious for the applicant. Information is
automatically validated reducing the error rate and number of returned forms.
System-generated e-mail reminders to applicants and ID Verifiers, and automated
tracking of the application process.
DBS send online notification when the DBS check is completed so the applicant’s
manager is automatically informed and the system updated. This means reduced
manual chasing and tracking of the application, as we only need to chase the 4%
of Disclosures that are not clear.
2. Roles
There are two main roles in the process for each school or organisation:
DBS Administrator.
ID Verifier.
2.1. DBS Administrator
The main role of a school or organisation’s DBS Administrator is to set up new DBS
applicants. For example:
For a new employee.
On a three-yearly basis when an existing employee’s DBS Disclosure expires.
(This is the HLT policy for our schools; other organisations will have their own
policy.)
Additional tasks for the Administrator are:
Track and monitor all applications for their school/organisation and view results.
Search and edit applications to:
Make corrections or add missing information (such as, NI number).
Enter receipt of a Certificate of Good Conduct.
Enter the recruitment decision (if a Disclosure is returned with content).
Move applications to a different status in the process.
Add notes to the application (for example, to explain delays in the process).
Manage account details (password resets, correct any invalid e-mail addresses,
etc.).
6 of 48 Version: 11.0 File: DBS Online - Guide for Administrators and Verifiers
Issued: 7 September 2018Hackney Learning Trust HR:
DBS Online - Guide for Administrators and Verifiers
2.2. ID Verifier
The ID Verifier can only verify the applicant’s identity and record the details online for the DBS
applications assigned to them. The ID Verifier may also need to chase the applicant to get
them to complete the application.
See Verifying the applicant’s identity and submitting the application, on page 12.
3. Accessing the system
An Administrator and an ID Verifier will have separate access. If the same person is
performing both roles, they will be able to switch between the two accounts.
This section explains:
Logging on to the DBS online system.
Changing your password (and other details).
Logging out.
3.1. Logging on to the DBS online system
Once you have been trained as an Administrator and/or ID Verifier you will receive an
automated e-mail from the HLT DBS Team providing you with your username and password
for the system.
To log on:
1. Click http://learningtrust.employmentcheck.org.uk/ to access the system.
2. Click Login from the left-hand menu:
3. Enter the Username and Password which were provided to you by the HLT DBS
Team, and click the Log in button. If you are verifying identity documents you must
use your ID Verifier access not the Administrator one.
Note: You can click the Forgot my password link to be prompted to reset your
password. If you enter the correct username associated with your e-mail
address you will receive an e-mail with a secure link allowing you to reset
your own password.
4. Read the Terms and Conditions of use, and click Yes to accept. You are logged on
to the system.
File: DBS Online - Guide for Administrators and Verifiers Version: 11.0 7 of 48
Issued: 7 September 2018Hackney Learning Trust HR:
DBS Online - Guide for Administrators and Verifiers
3.2. Changing your password (and other details)
Once logged on you can amend the password you were supplied with (you can also edit your
name and e-mail address on the same screen):
1. Click My Account from the left-hand menu.
2. Type your new password in the Password field.
Note: Password rules:
Must be a minimum ten characters and contain at least one from at least
three of the following four categories: lower case, upper case, numeric
and non-alphabetic characters.
3. Edit other details, as required.
4. Click Save.
3.3. Logging out
Simply click the Logout button from the left-hand menu.
4. The online DBS Application Process
An overview of the online DBS Application Process is:
Administrator: Sets up the application on the system (see page 9).
Applicant: Completes the application online and brings in identity documents.
ID Verifier: Checks identity documents and updates details on the system (see
page 12).
DBS Team: Countersigns the application.
Disclosure and Barring Service (DBS): Conducts checks, e-mails the manager
the Disclosure result and sends the hard-copy Disclosure certificate to the applicant.
Note: The system sends e-mails at each stage to advise each participant what they have
to do next and automatically advises the manager of the Disclosure result.
Result
If the Disclosure is clear, no further action is required; if the Disclosure contains content:
Applicant: Brings in the original Disclosure Certificate to discuss the content with
the manager.
Administrator: Updates the system with the manager’s decision (see page 22).
8 of 48 Version: 11.0 File: DBS Online - Guide for Administrators and Verifiers
Issued: 7 September 2018Hackney Learning Trust HR:
DBS Online - Guide for Administrators and Verifiers
4.1. Setting up an applicant
Setting up an applicant is done in two parts:
Checking that the ID Verifier is set up.
Creating the applicant.
Checking that the ID Verifier is set up
Before you can create the applicant you need to ensure that the person who is going to verify
the applicant’s identity has been created on the system for your school or organisation.
You can skip these steps and continue from Setting up the applicant, below, if you know that
this has already been done.
1. Log onto the system using your Administrator account.
2. Read the Terms and Conditions and click Yes to confirm you agree to them.
3. Click Manage ID Verifiers from the left-hand menu.
4. Type part of the username in the Search box. A list of matches will be displayed
5. Is the ID Verifier displayed?
Yes: Continue from Setting up the applicant, below.
No: Contact the HLT DBS Team. New verifiers have to be trained before they can
be given access to the system.
Setting up the applicant
Once you are sure that the Verifier has a valid account on the system you can set up the
online application for the applicant:
1. Click Manage Applications > Create New Application from the left-hand menu.
2. Click DBS Check.
File: DBS Online - Guide for Administrators and Verifiers Version: 11.0 9 of 48
Issued: 7 September 2018Hackney Learning Trust HR:
DBS Online - Guide for Administrators and Verifiers
3. Complete the fields in the Applicant Information section as follows:
In field… Action…
Forename Type the applicant’s full first name, as it would appear on their official
documents.
Note: Do not use a ‘known as’ name, as the applicant will not be able to
change it on their application form and the ID Verifier will not be
able to validate the name against the identity documents.
If you do enter the name incorrectly it can be amended. See Problem: An
applicant has been set up in the wrong name, on page 44.
Surname Type the applicant’s surname, as it would appear on official documents.
Username Click Generate to create a unique username.
Password Click Generate to produce a random password.
Email address Type the applicant’s e-mail address.
Note: Take care to use a valid e-mail address, otherwise the applicant
will not receive their login details or any reminder e-mails – and
you will be unaware that they have not received them.
Workforce Select as appropriate. Schools should choose ‘Child Workforce’, but
other organisations need to choose the workforce most appropriate to
their organisation.
Position Select the closest matching job from the list of positions.
Note: The jobs are generic. For example, ‘Teacher’ instead of the
specific type of teacher.
If the position is not on the list, contact the HLT DBS Team.
Volunteer Tick Yes or No, as applicable.
In the Business Unit section:
4. Check that the correct school/organisation name is in the Business Unit section.
5. Click the Copy to Organisation button to copy the name to the Organisation field.
This ensures that the name is always consistent, which helps reporting:
6. Click the ID Verifier drop-down and select the person who will verify this applicant’s
identity.
10 of 48 Version: 11.0 File: DBS Online - Guide for Administrators and Verifiers
Issued: 7 September 2018Hackney Learning Trust HR:
DBS Online - Guide for Administrators and Verifiers
7. Is the manager who should receive the Disclosure notification the same person as
the ID Verifier?
Yes: Click the Copy to Manager button to copy their details into the Manager
Details section.
No: Enter the name and e-mail address of the person who should receive a copy
of the Disclosure result in the fields in the Manager details section. Schools
must enter the Headteacher’s details.
In the E-mail group section:
8. Ensure the correct choice is made in the Email type section. Choose:
New – for new applicants.
Renewal – for a three-yearly recheck.
Volunteer – for a volunteer post.
Note: Please do not use any of the other options you might see. These are for
HLT use only.
This ensures that the system sends correctly-worded e-mails throughout the
process (e.g. the reminder e-mails to volunteers are more softly worded).
In the Additional information section:
9. Complete the fields in the Additional information section as follows:
In field… Action…
Type of check required Leave as ‘Enhanced’.
DBS Vulnerable Adults Tick if you want the Vulnerable Adults Barred List
Barred List checked.
Schools should select ‘No’.
DBS Children’s Barred Tick if you want the Children’s Barred List checked.
List Schools should select ‘Yes’.
Does this position involve Tick if the work involves working with children
working… …at the or vulnerable adults at the home address.
applicant’s home address Schools should select ‘No’.
File: DBS Online - Guide for Administrators and Verifiers Version: 11.0 11 of 48
Issued: 7 September 2018Hackney Learning Trust HR:
DBS Online - Guide for Administrators and Verifiers
10. Click Save and send.
A message that the application has been created is displayed and the system will
generate an e-mail to the applicant notifying them of their login details and how to apply.
Application status is now: ‘Waiting for Applicant to Fill in Details’
What happens next?
The applicant will complete the online Disclosure application. If the applicant fails to submit
their form within three days an automated reminder e-mail is sent to them and to the ID
Verifier.
Once complete, a confirmation e-mail is sent to the applicant and an e-mail is sent to the ID
Verifier notifying them that the applicant will be contacting them to arrange verification of their
identity documents. (See Verifying the applicant’s identity and submitting the application, on
page 12.)
4.2. Verifying the applicant’s identity and submitting the application
If you are selected as ID Verifier, once the applicant has completed and submitted their online
form, an e-mail is sent to you instructing you to check and verify the applicant’s identity
documents.
Note: If the applicant does not submit their application within three days, you will be sent
a reminder to chase them. If you become aware of a genuine delay in the process
(sickness, holiday, etc.), you can ask the Administrator to move the application to
the ‘Holding’ status. This will stop reminder e-mails from being sent. (See Moving
an application to ‘Holding’ status, on page 21.)
Another reason for the delay may be that an incorrect e-mail address was entered
for the applicant by the Administrator. In this case the applicant will not have
received their login details or reminder e-mails. If you speak to them and find out
they have not received their login details, the Administrator can correct the e-mail
address so that the details are resent to the applicant. See: Problem: An applicant
has not received their login details, on page 42
You have five days to verify the documents and update the system (e-mail reminders are sent
every five days).
Application status is currently: ‘Awaiting ID Verification’.
12 of 48 Version: 11.0 File: DBS Online - Guide for Administrators and Verifiers
Issued: 7 September 2018Hackney Learning Trust HR:
DBS Online - Guide for Administrators and Verifiers
You should always try to verify an applicant’s identity using documents from Route One (or
Route One A for non-EEA nationals undertaking paid work). For EEA nationals, if you need to
go to Route Two you will be required to submit the applicant’s details for an external validation
check – which incurs an additional charge. The system will also delete details of any
documents you added for Route One.
Note: If the applicant cannot provide documents to satisfy any of the routes they will have
to be sent for fingerprinting and submit their application using the paper form. See
Problem: The applicant cannot provide identity document to satisfy any of the ID
verification routes, on page 46. Contact the HLT DBS Team if you need advice.
Checking the applicant’s identity
If the ID Verifier is absent when the applicant presents their documents, see Problem: The ID
Verifier is absent, but an applicant has presented their documents for verification, on page 45.
When the applicant presents the documents, you should record the details on the system, as
follows:
1. Log onto the system using your ID Verifier account (or click on the Choose Role
drop-down and select ID Verifier).
Note: If you are an Administrator and an ID Verifier you must use your ID
Verifier account to record ID verification documents. Do not use your
Administrator account. This will stop the application from being submitted
to the DBS. Always use your ID Verifier account.
2. Read the Terms and Conditions and click Yes to confirm you agree to them. A list of
all applicants whose identity you need to verify is displayed:
3. Find the applicant and click on the Verify ID (green tick) icon to display details of the
application. The candidate’s Disclosure application is displayed allowing you to verify
the identity documents against this information.
File: DBS Online - Guide for Administrators and Verifiers Version: 11.0 13 of 48
Issued: 7 September 2018Hackney Learning Trust HR:
DBS Online - Guide for Administrators and Verifiers
A message is also displayed at the top of the screen showing the Route you should
follow.
This will change as you answer the remaining questions and start to add documents
you have used to verify the applicant’s identity.
4. Check the first section to make sure the applicant has entered their National
Insurance number. (If not, you will need to get the Administrator to edit the
application form to add the NI number. See Adding a missing National Insurance
number, on page 20.)
5. Check the Position details and Volunteer indicator are correct. (If not, you will need
to get the Administrator to edit the application form to make the corrections. See
Correcting position details or Volunteer flag on page 20.)
6. Answer whether the applicant is an EEA national.
Yes: Continue from Route One – for EEA nationals, on page 16.
No: Continue from step 7.
7. Is the applicant a volunteer?
Yes: Continue from Route One – for non-EEA nationals not undertaking paid work,
on page 15.
No: Continue from step 8.
8. Answer whether the applicant is an adult household member in a fostering
household, a childminding household, a host family or living where 'work with
children' takes place e.g. living in boarding school?
Yes: Continue from Route One – for non-EEA nationals not undertaking paid work,
on page 15.
No: Continue from Route One A – for non-EEA nationals undertaking paid work,
on page 15.
14 of 48 Version: 11.0 File: DBS Online - Guide for Administrators and Verifiers
Issued: 7 September 2018Hackney Learning Trust HR:
DBS Online - Guide for Administrators and Verifiers
Route One – for non-EEA nationals not undertaking paid work
1. Check that the applicant can provide documents from Group 1. Can they?
Yes: Continue from step 2.
No: Scroll to the foot of the screen and click the Click here… button: Continue
from Route One A – for non-EEA nationals undertaking paid work, on page 15
2. Verify photographic evidence and other details such as name, date of birth and
address against the relevant identity documents provided.
3. Tick the relevant boxes to indicate the Route One documents against which you have
checked the applicant’s identity.
Note: Some boxes will expand and ask you to complete additional information.
For example, ticking ‘Passport’ as an identity document will prompt you to
enter the passport number, nationality, date of issue and date of birth.
Once sufficient identity documents have been checked and entered, the message at
the top of the screen asks you to confirm that you have checked the applicant’s
address.
4. Continue from Submitting the application, on page 18.
Route One A – for non-EEA nationals undertaking paid work
This route is for non-EEA nationals undertaking paid work or other EEA nationals (e.g.
volunteers) who cannot satisfy Route One, above.
1. Check that the applicant is able to produce the required documents for Route One A.
Can they?
Yes: Continue from step 2.
No: If the applicant does not have the documents to satisfy this route do not
continue. They will have to be sent for fingerprinting and submit their
application using the paper form. See Problem: The applicant cannot provide
identity document to satisfy any of the ID verification routes, on page 46.
Contact the HLT DBS Team if you need advice.
2. Verify photographic evidence and other details such as name, date of birth and
address against the relevant identity documents provided.
File: DBS Online - Guide for Administrators and Verifiers Version: 11.0 15 of 48
Issued: 7 September 2018Hackney Learning Trust HR:
DBS Online - Guide for Administrators and Verifiers
3. Tick the relevant boxes to indicate the Route One A documents against which you
have checked the applicant’s identity.
Note: Some boxes will expand and ask you to complete additional information.
For example, ticking ‘Passport’ as an identity document will prompt you to
enter the passport number, nationality, date of issue and date of birth.
Once sufficient identity documents have been checked and entered, the message at
the top of the screen asks you to confirm that you have checked the applicant’s
address
4. Continue from Submitting the application, on page 18.
Route One – for EEA nationals
This route is only for EEA nationals:
1. Check that the applicant can provide documents from Group 1. Can they?
Yes: Continue from step 2.
No: Continue from Using Route Two or Route Three, on page 17.
2. Verify photographic evidence and other details such as name, date of birth and
address against the relevant identity documents provided.
3. Tick the relevant boxes to indicate the Route One documents against which you have
checked the applicant’s identity.
Note: Some boxes will expand and ask you to complete additional information.
For example, ticking ‘Passport’ as an identity document will prompt you to
enter the passport number, nationality, date of issue and date of birth.
Once sufficient identity documents have been checked and entered, the message at
the top of the screen asks you to confirm that you have checked the applicant’s
address.
4. Continue from Submitting the application, on page 18.
16 of 48 Version: 11.0 File: DBS Online - Guide for Administrators and Verifiers
Issued: 7 September 2018Hackney Learning Trust HR:
DBS Online - Guide for Administrators and Verifiers
Using Route Two or Route Three
If the applicant is unable to provide documents for Route One:
1. Check that they are able to produce the required documents for Route Two.
Note: If the applicant does not have a document from Group 2A do not
continue as they will not be able to satisfy any of the routes. They will
have to be sent for fingerprinting and submit their application using the
paper form. See Problem: The applicant cannot provide identity
document to satisfy any of the ID verification routes, on page 46. Contact
the HLT DBS Team if you need advice.
2. Scroll to the foot of the screen and click the Click here… button:
A message is displayed warning you that an external ID validation check will need
to be undertaken, and that any data entered for Route One will not be saved.
Note: This will incur an additional charge.
3. Click OK.
4. Tick the relevant boxes to indicate the Route Two documents against which you have
checked the applicant’s identity.
5. Click the Verify ID button. The system sends information to the Experian External ID
Check system. After a few seconds the result is returned; either a tick (pass) or a
cross (fail).
6. Has the applicant passed the external identity verification check and can you verify
sufficient documents to meet Route Two?
Yes: Continue from Submitting the application, on page 18.
No: Continue from step 7.
7. Scroll to the foot of the screen and click the Show Route Three button.
A message is displayed warning you that if the applicant fails Route Three they will
need to be sent for fingerprinting.
8. Click OK.
9. Tick the relevant boxes to indicate the Route Three documents against which you
have checked the applicant’s identity.
File: DBS Online - Guide for Administrators and Verifiers Version: 11.0 17 of 48
Issued: 7 September 2018Hackney Learning Trust HR:
DBS Online - Guide for Administrators and Verifiers
10. Can you verify sufficient documents to meet Route Three?
Yes: Continue from Submitting the application, on page 18.
No: Send the applicant for fingerprinting. See Problem: The applicant cannot
provide identity document to satisfy any of the ID verification routes, on
page 46
Submitting the application
Once the requirements for a particular route have been met:
1. Tick to confirm that you have checked the current address, date of birth, name and
address history.
2. Tick the declaration to acknowledge that you confirm that the information provided in
support of the application is complete and true.
3. A message is displayed confirming that the Route is complete and you can submit
the application:
Note: If you want to take a print of the screen to save with your Single Central
Record, right-click on the screen and choose Print.
4. Click Submit ID verification. The application is sent to the Countersignatory for
checking and submission to the DBS. A message is displayed to confirm this has
been successful.
Application status is now: ‘Ready for Processing’.
Note: The application is removed from your list of ‘pending’ applications and
can no longer be viewed using your ID Verifier account.
What happens next?
The Countersignatory will check and countersign the application. This is automatically sent to
the DBS online. The applicant is sent an e-mail advising them how they can track their
application online using the DBS checking service. Once the DBS checks have been
undertaken, the DBS will post a hard-copy Disclosure Certificate to the applicant and advise
the manager (and other specified parties) by e-mail.
Note: Details of any ‘content’ are not revealed to the various parties. They will just
receive an e-mail advising that they need to see the original hard-copy Disclosure
Certificate before making an employment decision. The certificate should then be
viewed and a recruitment decision based on what is shown on the certificate. See
Recording a recruitment decision, on page 22.
18 of 48 Version: 11.0 File: DBS Online - Guide for Administrators and Verifiers
Issued: 7 September 2018Hackney Learning Trust HR:
DBS Online - Guide for Administrators and Verifiers
5. Finding and editing application details
There are a number of reasons why you might want to edit an application:
Adding a missing National Insurance number.
Correcting position details or Volunteer flag.
Entering receipt of a Certificate of Good Conduct.
Moving an application to ‘Holding’ status.
Recording a recruitment decision.
Adding a note to an application.
The first stage is to find the application you want to edit, as described below.
5.1. Searching for an application
This section explains how to search for an individual application.
Note: You can also find applications using the E-Bulk option. This provides a summary
of the status of all applications. The Viewing a summary of all applications (by
status) section, on page 24, describes how to use the E-Bulk option and explains
each status in the process.
To search for a specific application:
1. Log onto the system using your Administrator account.
2. Read the Terms and Conditions and click Yes to confirm you agree to them.
3. Click Manage Applications from the left-hand menu.
4. Enter known details for the application you are trying to find (e.g. the applicant’s last
name) in the Search box. A list of applications matching the criteria is displayed.
5. Edit the application as required: add NI number (p20); correct position details or
Volunteer flag (p20); enter receipt of a Certificate of Good Conduct (p21); move an
application to ‘Holding’ (or other) status (p21); record a recruitment decision (p22).
File: DBS Online - Guide for Administrators and Verifiers Version: 11.0 19 of 48
Issued: 7 September 2018Hackney Learning Trust HR:
DBS Online - Guide for Administrators and Verifiers
5.2. Adding a missing National Insurance number
DBS rules mean that the National Insurance number is not a mandatory field when the
applicant submits their application. However, the system uses it to uniquely identify an
applicant, so it is imperative that it is included for tracking and reporting purposes.
As part of the identity verification process, the ID Verifier must ensure that a valid NI number is
included on the application.
If not, an Administrator will have to edit the application as follows:
1. Click the Edit (pencil) icon next to the relevant application:
2. Click Expand all to display details of the application.
3. Enter the NI number in the relevant field.
4. Scroll to the foot of the screen and click the Update button.
A message is displayed confirming that the application has been successfully updated.
Note: The application can be amended to add the NI Number at any stage in the
process, even after the result is returned from the DBS.
5.3. Correcting position details or Volunteer flag
As part of the identity verification process, the ID Verifier must ensure that the application has
the correct position details and Volunteer flag recorded against it.
If either of these fields is incorrect, an Administrator will have to edit the application as follows:
1. Click the Edit (pencil) icon next to the relevant application:
2. Click Expand all to display details of the application.
3. Edit the Position field or Volunteer flag to record the correct information.
Note: If you change the Volunteer flag for non-EEA nationals after the
applicant’s identity has been verified, it may make the chosen ID
verification route invalid.
4. Scroll to the foot of the screen and click the Update button.
A message is displayed confirming that the application has been successfully
updated.
20 of 48 Version: 11.0 File: DBS Online - Guide for Administrators and Verifiers
Issued: 7 September 2018Hackney Learning Trust HR:
DBS Online - Guide for Administrators and Verifiers
5.4. Entering receipt of a Certificate of Good Conduct
For new applicants whose five-year address history indicates that they have lived abroad for at
least one period of six or more consecutive months, an automated e-mail is generated to the
applicant (copying in the manager) indicating that a Certificate of Good Conduct (CGC) is
required. This is sent once their identity has been verified.
The Disclosure e-mail will not be sent until both the Disclosure result and CGC have been
received. If a Disclosure result is received from the DBS and a CGC has not been received,
the application will automatically be moved to the ‘Holding’ status.
To add details of the Certificate of Good Conduct:
1. Click the Edit (pencil) icon next to the relevant application:
2. Click Expand all to display details of the application.
3. Scroll to the Additional information section and tick Yes next to the CGC Received
option.
4. Scroll to the foot of the screen and click the Update button. A message is displayed
confirming that the application has been successfully updated.
If the Disclosure has already been received, the manager (and specified parties) are
advised of the Disclosure result and the application is moved from ‘Holding’ status
to ‘Result Received’ status.
5.5. Moving an application to ‘Holding’ status
If you become aware of a delay in the process (for example, the applicant or ID Verifier
contacts you to say that they can’t meet the deadlines, or that the recruitment process is on
hold), you are able to move the application to ‘Holding’ status. This will stop the automatic
reminder e-mails being sent.
If you are advised that a Disclosure result contained ‘content’ you might also want to move the
application to ‘Holding’ status while a recruitment decision is made.
Note: The application is automatically moved to ‘Holding’ status is the Disclosure is
received but the applicant is awaiting a certificate of Good Conduct.
File: DBS Online - Guide for Administrators and Verifiers Version: 11.0 21 of 48
Issued: 7 September 2018Hackney Learning Trust HR:
DBS Online - Guide for Administrators and Verifiers
To move the application to a different status:
1. Click the Edit (pencil) icon next to the relevant application:
2. Click Expand all to display details of the application.
3. Scroll to the foot of the screen, click the Status drop-down and change the status:
4. Click the Update button. A message is displayed confirming that the application has
been successfully updated.
5. Consider adding a note against the application to explain why the status has
changed. See Viewing an application’s history and adding notes, on page 32.
Note: This same process can be used to remove an application (for example, if the
successful candidate decides to withdraw).
5.6. Recording a recruitment decision
If the Disclosure result contained ‘content’, the applicant must bring in the original hard-copy
Disclosure Certificate for the manager to review and make a recruitment decision.
The result of the recruitment decision should be recorded against the application.
Note: This can also be recorded on the E-Bulk screen. See Viewing a summary of all
applications (by status), on page 24.
To record a recruitment decision:
1. Click the Edit (pencil) icon next to the relevant application:
2. Click Expand all to display details of the application.
3. Scroll to the Additional information section of the screen, click the Recruitment
Decision drop-down to ‘Appoint’ or ‘Decline’:
The Confirmation Required pop-up box is displayed prompting you to confirm who
made the recruitment decision. This displays the manager whose name was
entered against the original application.
22 of 48 Version: 11.0 File: DBS Online - Guide for Administrators and Verifiers
Issued: 7 September 2018Hackney Learning Trust HR:
DBS Online - Guide for Administrators and Verifiers
4. Either leave as default or enter a different name, and click OK.
5. Click the Save button. A message is displayed confirming that the application has
been successfully updated.
Details of the recruitment decision can be viewed on the Application History screen.
6. Consider adding a note against the application to explain why this recruitment decision
was taken. See Viewing an application’s history and adding notes, on page 32.
5.7. Adding a note to an application
You may notice that there is a Notes field on this Edit Application screen. Please do not use
this field to records notes about the application, as it is a historic field and is no longer used.
To make a note on the application, add it on the Application History screen. For example, you
may want to add a note to explain why the overall process had been delayed, or why an
application has been withdrawn, etc.
See Viewing an application’s history and adding notes, on page 32.
6. Tracking applications and viewing Disclosure results
This section explains the different methods of tracking an application through the process. It
covers:
Viewing a summary of all applications (by status).
Tracking Disclosure applications received by the DBS.
Viewing Disclosure results.
Please ensure that the applicant completes the form and their ID is verified in a timely manner
Any application in the ‘Waiting for Applicant to Fill in Details’ stage or the ‘Awaiting ID Verifier’
stage which is no longer required should be archived so that it no longer appears with the ‘live’
applications. See Archiving an application, on page 34.
File: DBS Online - Guide for Administrators and Verifiers Version: 11.0 23 of 48
Issued: 7 September 2018Hackney Learning Trust HR:
DBS Online - Guide for Administrators and Verifiers
6.1. Viewing a summary of all applications (by status)
The E-Bulk option allows you to display a breakdown of all ongoing and complete applications
for your school or organisation to help you track progress of applications.
6.1.1. Using E-Bulk display the status of all applications
To display all applications for your school or organisation:
1. Log onto the system using your Administrator account.
2. Read the Terms and Conditions and click Yes to confirm you agree to them.
3. Click E-Bulk from the left-hand menu. The E-Bulk screen is displayed, showing the
number of applications at each stage:
6.1.2. Understanding the status codes and icons
All ongoing and complete applications will be in one of the following statuses:
Status… Meaning…
Application created by The applicant’s details have been partially created but not yet
Admin sent to the applicant. See Problem: An applicant has received
their login details but can’t access their application form, on
page 42.
Waiting for Applicant to The applicant’s details have been set up, but they have yet to
Fill in Details complete and submit the form.
Awaiting ID Verification The applicant has submitted the form but their identity has not
been verified on the system.
See Verifying the applicant’s identity and submitting the
application, on page 12.
24 of 48 Version: 11.0 File: DBS Online - Guide for Administrators and Verifiers
Issued: 7 September 2018Hackney Learning Trust HR:
DBS Online - Guide for Administrators and Verifiers
Status… Meaning…
Ready for Processing The identity has been verified and the application submitted for
countersigning.
Application Submitted Via The application has been countersigned and sent online to the
E-Bulk DBS, but they have yet to receive it on their system.
Receipt Received The application has been received by the DBS. You can click on
this icon to display three further statuses which show at which
stage of the actual DBS checking process the application is
currently at.
See Tracking Disclosure applications received by the DBS, on
page 27.
In Process with DBS Only used by HLT DBS Team. This is for paper application
forms where applicants cannot make an online application.
Applications may be placed here until the hardcopy results are
returned, to ensure these records are included in reporting.
Result Received The Disclosure result has been issued by the DBS. A hard-copy
Disclosure Certificate is sent to the applicant, and manager is
advised by e-mail.
Application Archived The application has been archived. Completed applications are
periodically archived by the HLT Administrator to meet our Data
Protection requirements.
Applications are also archived when they are no longer required
(e.g. they were set up in error, the employee has left, etc.).
After six months the system will remove sensitive information
from the application.
Holding The application has been moved to ‘Holding’ status. This could
be because of a number of reasons, the most common being:
The Disclosure result contained ‘content’ and the
application was manually placed in ‘Holding’ status while a
recruitment decision is made.
There is a known delay in the process and the application
was manually placed in ‘Holding’ status to stop the
automatic reminder e-mails being sent.
The Disclosure has been received but the applicant is
waiting for a Certificate of Good Conduct (CGC) because
their address history shows they have lived abroad. The
application was automatically placed in ‘Holding’ status
awaiting receipt of the CGC.
Error The application has been rejected by the DBS. Speak to the HLT
DBS Team.
File: DBS Online - Guide for Administrators and Verifiers Version: 11.0 25 of 48
Issued: 7 September 2018Hackney Learning Trust HR:
DBS Online - Guide for Administrators and Verifiers
Clicking on the icon, status description or number will show all applications in the selected
status:
This list provides the following details:
Colum title… Description…
Clicking on this icon displays a summary of the application (position, type of check,
barred list checks, ID verifier, volunteer, etc.).
Applicant The applicant’s name. Clicking on this column will allow you to edit application
details. See Finding and editing application details, on page 19.
Organisation Your school or organisation name.
Position The position name for which this Disclosure is being applied.
T Type of check: standard or enhanced.
A Whether the adults’ barred list is being checked as part of the application.
C Whether the children’s barred list is being checked as part of the application.
V Whether the application is for a volunteer.
H Whether the application has indicated the applicant is working from home.
ID The identification route the ID Verifier used to verify this applicant’s identity (will be
blank if the application has yet to be verified). For EEA nationals undertaking paid
work this will be 1a (if their ID was verified after 23 January 2018).
E Whether the applicant is an EEA national. (Please note that applications ID verified
before 23 January 2018 will not have this flag ticked, as recording whether the
applicant was an EEA national or not was not a requirement before this date.)
Actions Clicking on this icon will display the application history and notes.
Clicking on this icon will allow you to edit application details. See Finding and
editing application details, on page 19
Clicking on this icon displays a summary of the application and its status.
Moving between the different statuses
You can move between the different status by clicking the icon or number at the top:
26 of 48 Version: 11.0 File: DBS Online - Guide for Administrators and Verifiers
Issued: 7 September 2018Hackney Learning Trust HR:
DBS Online - Guide for Administrators and Verifiers
6.2. Tracking Disclosure applications received by the DBS
Disclosures submitted online are typically received within one to seven days of submission.
However, the process may be lengthened if an applicant has lived in several areas and
information is required from multiple police forces.
The following will help you track applications received by the DBS:
Tracking applications using the system.
Tracking applications using the DBS online service.
Reporting applications that have been sent to the DBS.
6.2.1. Tracking applications using the system
You can track the progress of applications which have been submitted to the DBS, via the E-
Bulk menu. These are applications in the status of ‘Receipt Received’:
To track these applications:
1. Log onto the system using your Administrator account.
2. Read the Terms and Conditions and click Yes to confirm you agree to them.
3. Click E-Bulk from the left-hand menu. The Status screen is display, showing the
number of applications at each stage.
4. Click the plus next to the Receipt Received status. The list will expand and show
three additional statuses identifying where an application is in the DBS’s checking
process:
5. Click the Information icon next to a specific application:
File: DBS Online - Guide for Administrators and Verifiers Version: 11.0 27 of 48
Issued: 7 September 2018Hackney Learning Trust HR:
DBS Online - Guide for Administrators and Verifiers
The Application Status screen is displayed. Scroll to the Tracking section. This
shows the date and time each stage was completed.
6.2.2. Tracking applications using the DBS online service
You are also able to track individual applications that you know have been received by the
DBS, using their online tracking service.
You will need to know the:
Applicant’s date of birth.
Disclosure application form reference number.
Finding the applicant’s date of birth and Disclosure application form reference number
To track an application using the DBS online service:
1. Log onto the system using your Administrator account.
2. Read the Terms and Conditions and click Yes to confirm you agree to them.
3. Click E-Bulk from the left-hand menu. The Status screen is display, showing the
number of applications at each stage.
4. Click Receipt Received to list applications with the DBS:
5. Click the Information icon next to the application you want to track:
A summary of the application is displayed.
6. Make a note of the applicant’s Date of Birth and DBS Reference number.
28 of 48 Version: 11.0 File: DBS Online - Guide for Administrators and Verifiers
Issued: 7 September 2018Hackney Learning Trust HR:
DBS Online - Guide for Administrators and Verifiers
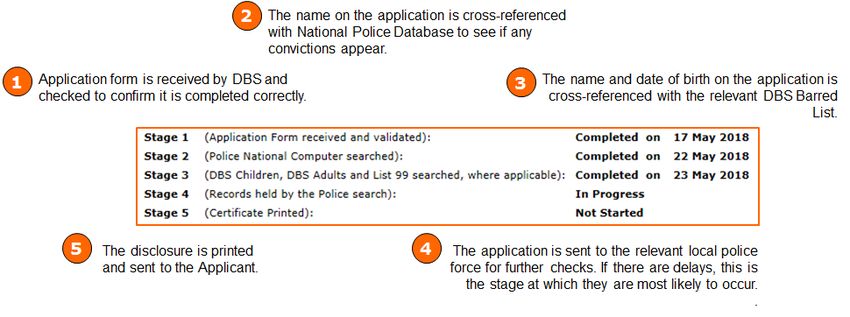
Using the DBS tracking service
Once you have identified the applicant’s date of birth and Disclosure application form
reference number:
7. Click this link https://secure.crbonline.gov.uk/enquiry/enquirySearch.do to go to the
DBS online tracking service.
8. Complete the DBS Applicant Form Reference field and the Applicant Date of
Birth field.
9. Click Search. The Tracking Service will show how far through the process the
application has been progressed and the stages that have already been completed.
There are five stages in the process:
6.2.3. Reporting applications that have been sent to the DBS
To help you track applications, you are able to produce a report of all applications that have
been sent to the DBS.
See Reporting, on page 37.
File: DBS Online - Guide for Administrators and Verifiers Version: 11.0 29 of 48
Issued: 7 September 2018Hackney Learning Trust HR:
DBS Online - Guide for Administrators and Verifiers
6.3. Viewing Disclosure results
Once the DBS send the results of the check, the manager will receive an e-mail advising them
of the result, and a hard-copy Disclosure Certificate is posted to the applicant.
You can also:
Track Disclosure results on the E-Bulk menu.
Search for individual applications.
Run a standard report.
6.3.1. Track Disclosure results on the E-Bulk menu
To view the results of applications in the ‘Result Received’ status:
1. Log onto the system using your Administrator account.
2. Read the Terms and Conditions and click Yes to confirm you agree to them.
3. Click E-Bulk from the left-hand menu. The Status screen is display, showing the
number of applications at each stage.
4. Click Result Received to list applications returned from the DBS:
The list of application where the results have been received is displayed.
5. Enter part of the surname in the Search box to filter the list.
6. Click the Information icon next to the application you want to view:
A summary of the application is displayed.
7. Look at the DBS Results section to find details of the disclosure number and issue
date.
8. Review the list to identify any Disclosures with content (these have a ‘P’ against the
application – ‘Please wait to view applicant certificate’).
Note: Details of any ‘content’ are not revealed to the various parties. The Administrator
will only see the icon, above, and the manager will just receive an e-mail advising
that they need to see the original hard-copy Disclosure Certificate before making
an employment decision.
30 of 48 Version: 11.0 File: DBS Online - Guide for Administrators and Verifiers
Issued: 7 September 2018Hackney Learning Trust HR:
DBS Online - Guide for Administrators and Verifiers
If you did not find the application in Result Received it may be because it has already been
archived:
9. Click the Application Archived icon:
10. Enter part of the surname in the Search box to filter the list.
11. Click the Information icon next to the application you want to view:
A summary of the application is displayed.
12. Look at the DBS Results section to find details of the disclosure number and issue
date.
What happens next
Once the manager has viewed the hard-copy Disclosure Certificate and made the recruitment
decision, you will need to update the system with the result.
See Recording a recruitment decision, on page 22.
6.3.2. Searching for individual applications
To search for an individual application:
1. Click Manage Applications from the left-hand menu.
2. Click the Result Received icon:
A summary of the application is displayed.
3. Look at the DBS Results section to find details of the disclosure number and issue
date.
6.3.3. Reporting Disclosure results received
To help you track applications, you are able to produce a report of all applications where the
Disclosure result has been received from the DBS (the ‘Disclosure Results Received V2’
report).
See Reporting, on page 37.
File: DBS Online - Guide for Administrators and Verifiers Version: 11.0 31 of 48
Issued: 7 September 2018You can also read