DOPDF DOPDF DOES PDF. FOR FREE - DOPDF USER MANUAL
←
→
Page content transcription
If your browser does not render page correctly, please read the page content below
doPDF
doPDF does PDF. For free.

               doPDF User Manual
                            Copyright © 2019 Softland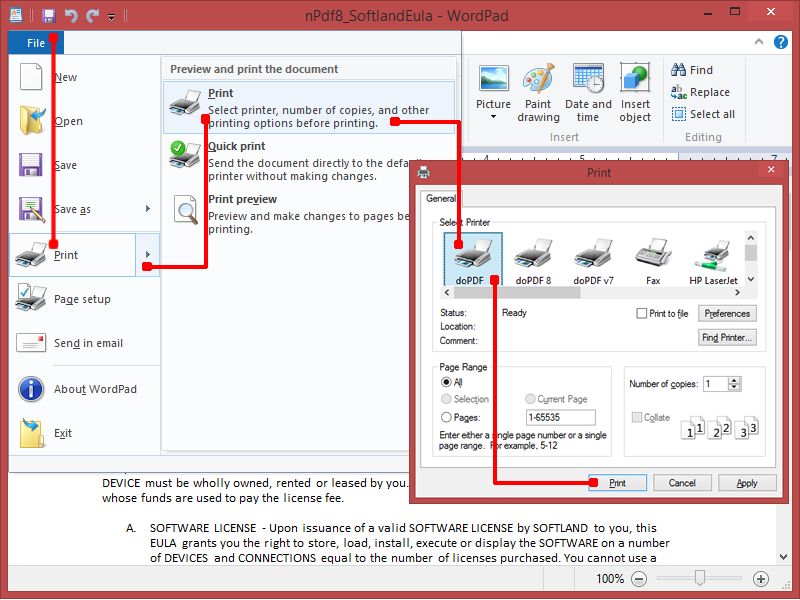
doPDF User Manual
                                                   for doPDF version 10
                                                                       by Softland

This documentation contains proprietary information of Softland.
All rights reserved. No part of this documentation shall be reproduced, stored in a
retrieval system or transmitted by any means, electronic, mechanical,
photocopying, recoding, or otherwise, without permission from Softland. No patent
liability is assumed with respect to the use of the information contained herein.

The information in this document is subject to change without notice. Although
every precaution has been taken in the preparation of this book, Softland assumes
no responsibility for errors and omissions. Nor is any liability assumed for damages
resulting from the information contained herein.

Windows ® is a registered trademark of the Microsoft Corporation. All other
products or company names in this document are used for identification purposes
only, and may be trademarks of their respective owners.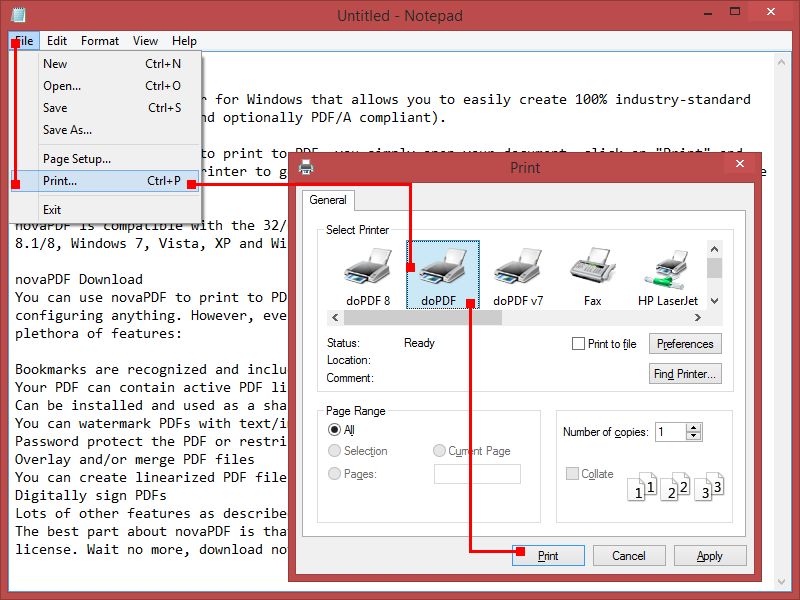
Contents                          3

Table of Contents

    Part I doPDF                                                                                                                                                                                        5
           1 Installing doPDF
                           ................................................................................................................................... 5
                      System requirements
                                     ..........................................................................................................................................................          5
                      What edition to..........................................................................................................................................................
                                        choose?                                                                                                                                                          5
                         License types.........................................................................................................................................................          7
           2 Using doPDF................................................................................................................................... 7
                      Introduction ..........................................................................................................................................................            7
                      Getting Started
                                    ..........................................................................................................................................................          11
                          Create one .........................................................................................................................................................
                                      document                                                                                                                                                          11
                          Tools      .........................................................................................................................................................          12
                             Language                 .........................................................................................................................................         13
                             Updates                  .........................................................................................................................................         14
                          About      .........................................................................................................................................................          15
                      Create PDF from
                                    ..........................................................................................................................................................
                                           any application                                                                                                                                              16
                          Save PDF file
                                     .........................................................................................................................................................          20
                             Document info .........................................................................................................................................                    22
           3 Configuring ...................................................................................................................................
                          doPDF                                                                                                                              24
                      Printing Preferences
                                     ..........................................................................................................................................................         24
                         Settings .........................................................................................................................................................             24
                         Tools        .........................................................................................................................................................         25
                              Language                 .........................................................................................................................................        26
                              Updates                  .........................................................................................................................................        27
                         About        .........................................................................................................................................................         28
                      Printer Manager..........................................................................................................................................................         29
                         Licensing .........................................................................................................................................................            29
                              Manage licenses .........................................................................................................................................                 30
                      Profile Manager..........................................................................................................................................................         31
                         Other        .........................................................................................................................................................         34
                              User tags                .........................................................................................................................................        35
                              Save rules               .........................................................................................................................................        36
                         Manage Presets
                                      .........................................................................................................................................................         37
                              Other                    .........................................................................................................................................        37
                                  User tags                  ...................................................................................................................................        37
                                  Save rules                 ...................................................................................................................................        40
                              Email                    .........................................................................................................................................        42
                                  Outlook                    ...................................................................................................................................        42

   Part II PDF Add-in for Office                                                                                                                                                                        47
           1 Configuring ...................................................................................................................................
                          PDF Add-in                                                                                                                         47
                      Settings             ..........................................................................................................................................................   47
                         Printers           .........................................................................................................................................................   47

              Index                                                                                                                                                                                     0

doPDF 10 User Manual                                                                                                                                             Copyright © 2019 Softland

                                                                                                                                                                                                             3
doPDF

Part

        I
doPDF 5
1 doPDF
1.1 Installing doPDF
1.1.1 System requirements
To install doPDF you need administrator rights and one of the following operating systems:
· Windows 10
· Windows 8/8.1 (64-bit)
· Windows 7
· Windows 7 (64-bit)
· Windows Server 2016
· Windows Server 2012
· Windows 2008 Server R2 (64-bit)
· Windows Vista
· Windows Vista (64-bit)
doPDF requires .NET framework installed (version 4.6). If it's not already installed, it will prompt the
installation of .NET during the setup. Installation of doPDF will resume automatically after the
framework is installed.
It needs approximately 200MB of free space.
1.1.2 What edition to choose?
There are three licensing options for doPDF: Lite, Standard and Professional.
novaPDF Lite implements the basic functionality of a printer driver, giving users the possibility to
create high-quality searchable PDF files from any Windows application.
Main features:
· PDF Linearization - this give you the option to create PDF files optimized for loading on
webpages (fast web view).
· PDF/A Compliance. Creates PDFs compliant with PDF/A-1a and PDF/A-1b specifications.
· Merge PDF Files. Append or insert content to an existing PDF file.
· Document Information. Include title, author, keywords in your PDF file.
· PDF Viewer Options. You can control how the PDF file will be displayed after it's generated in
the default PDF viewer.
· Custom Save Options. Configure it to use predefined save settings.
· After Save Actions. Custom actions can be defined to be performed after the PDF was
successfully generated.
· Create Private Profiles. Define different profiles for future use, each with its own printing
settings.
· Import/Export Profiles. The printing profiles can be exported or imported into different
installations.
· Predefined/Custom Page Sizes. Choose a default page size (like Letter, Legal, A3, A4, A5, A6,
...) or define your own.
· Fonts embedding and font subsets embedding - Fonts (TrueType, OpenType and Type1) can
doPDF 10 User Manual Copyright © 2019 Softland6 doPDF 10
be embedded in the PDF file to ensure perfect portability.
· Multi-language support - choose a language for the user interface
· Network printer sharing - can be installed on one computer in a network environment and
used by any other computer in that network.
· Save PDF to Server - can save the PDF from a client computer directly to the server.
· Public Profiles - Define profiles on the server computer and they will automatically be
propagated to all client computers.
· Add-ins for Microsoft Office. novaPDF installs several add-ins for Microsoft® Office
applications (Word, Excel, PowerPoint, Publisher, Visio) that allows one-click conversion to
PDF.
· PDF Bookmarks - it can detect the headings in the printed document and add bookmarks in
the generated PDF files. You have to define the text attributes for the document headings
(font, size, style, color) and for the generated bookmarks.
· Create PDF links - recognizes links to files and formatted URLs (starting with "http://", "www",
"mailto:" or "ftp://") visible in the original document, and creates them in the generated PDF
file as links, so they can be opened by clicking them in the PDF viewer.
· Printer Manager - Add multiple virtual printers all using the same application driver.
· Printer Monitor - Monitor the printing jobs in realtime and filter saved printing logs.
novaPDF Standard has all the features of novaPDF Lite plus:
· Graphics options - You can compress, downsample or convert text and graphics to reduce PDF
size.
· PDF Watermarks - You can define multiple image watermarks and add them to individual
pages or the entire PDF document.
· Page Left, Right, Top and Bottom Margins - You can set a margin region that will remain
empty when printing.
· Page zoom (1%-400% zoom factor) - You can zoom a page if you need advanced settings of
how the document should be positioned on the PDF page.
· Network printer sharing - can be installed on one computer in a network environment and
used by any other computer in that network.
· Save PDF to Server - can save the PDF from a client computer directly to the server.
· Public Profiles - Define profiles on the server computer and they will automatically be
propagated to all client computers.
novaPDF Professional has all the features of novaPDF Standard plus:
· Digitally sign PDF files - you will be able to apply digital signatures to generated PDF files.
· 128 bit/256 bit AES and RC4 encryption - full 128-bit and 256-bit AES encryption and RC4 is
supported by novaPDF Professional and the user is able to control whether the PDF can be
viewed, printed, modified, annotated or if it should permit copying/pasting content from it.
· Send PDF via email - once created, the PDF file can be automatically sent via email to
different recipients, either using the default email client or directly from the application (using
SMTP configuration). Additionally you can choose to zip the PDF and send it as attachment.
· PDF Overlay - this allows adding the content of the document currently being printed via
novaPDF Professional as the background or foreground of an existing PDF file, with options to
customize the position of that added content.
· Network printer sharing - can be installed on one computer in a network environment and
doPDF 10 User Manual Copyright © 2019 SoftlanddoPDF 7
used by any other computer in that network.
· Save PDF to Server - can save the PDF from a client computer directly to the server.
· Upload PDF to FTP/SFTP - once the PDF is generated you can upload it (or another file) to an
FTP or SFTP server.
· Public Profiles - Define profiles on the server computer and they will automatically be
propagated to all client computers.
1.1.2.1 License types
doPDF offers a wide array of licensing options suitable for anyone, from home users to enterprise
entities. These licenses can be fixed based on Computers / Users or concurrent like the Floating
User / Floating Computer licenses.
Fixed Computer Licenses
Fixed license activated on the desktop or server and permanently assigned to the Computer that
prints to novaPDF (directly, via the shared network printer or remotely). Unlicensed computers are
not allowed to print.
Floating Computer Licenses
Floating computer license activated on the server assigned temporarily (for 1 hour) to the Computer
that prints to novaPDF (directly, via the shared network printer or remotely). Unlicensed computers
are not allowed to print.
Fixed User Licenses
Fixed user license activated on the server assigned permanently to the Windows User that prints to
novaPDF (directly, via the shared network printer or remotely). Unlicensed users are not allowed to
print.
Floating User Licenses
Floating user license activated on the server assigned temporarily (for 1 hour) to the Windows User
that prints to novaPDF (directly, via the shared network printer or remotely). Unlicensed users are
not allowed to print.
All editions have both Desktop and Server functionality. doPDF can be used as shared network PDF
printer, via Remote Desktop Connection or Terminal Servers only if you own a license for each
connecting computer or user that prints to it (directly, via the shared network printer or remotely).
1.2 Using doPDF
1.2.1 Introduction
With doPDF you can create PDF files in several ways: using the doPDF Start page, the add-ins for
Microsoft Office or printing directly to the doPDF driver.
DOPDF START PAGE
This start page can be opened from the program's start group. In Windows 10/8 type doPDF on the
Start page and click on doPDF from Apps to open it. In Windows 7 or previous go to Start-
>Programs->doPDF and click on the executable file called doPDF.
doPDF 10 User Manual Copyright © 2019 Softland8 doPDF 10
The doPDF start page will let you quickly convert a document to PDF by selecting the document and
clicking on Create. However, it will use the default settings of doPDF to create the PDF file. So, if you
need those changed either modify them before creating the PDF or create the PDF by printing it
directly to the doPDF printer driver.
Create one document
The Create one document tab is selected by default when you first open the application. Using the
options here you can convert a single document to PDF at a time. You can read more about the
single document conversion here: Create one document
This start page also contains some details on how you can create PDF files. These are only
informative and offer the user more information about the other options that can be used to create
PDF files.
ADD-INS FOR MICROSOFT OFFICE
doPDF 10 User Manual Copyright © 2019 SoftlanddoPDF 9
During installation doPDF gives the option to install add-ins for Microsoft Office applications. By
default is checked and it will add in the supported Microsoft Office applications (for now is available
in Microsoft Word, Microsoft Excel, Microsoft PowerPoint, Microsoft Publisher and Microsoft Visio)
another tab called novaPDF that will let users create PDF files directly from the Office interface by
simply clicking a button.
Using add-ins for Microsoft Office to create PDF files - advantages:
· Converts hidden hyperlinks. When the Office document contains a hyperlink (clickable text
that points to an external site or file) that can be converted to a clickable active link in the
resulting PDF document too. The other two methods for creating PDF files with doPDF cannot
convert hidden hyperlinks (only visible ones).
· Easier bookmark conversion. When converting a document created with Microsoft Word to a
PDF using the add-in, you have the option to automatically detect bookmarks and add them in
the PDF too. This means that you don't have to define any bookmark rules for the conversion,
as needed when printing directly to the printer driver.
Using add-ins for Microsoft Office to create PDF files - disadvantages:
doPDF 10 User Manual Copyright © 2019 Softland10 doPDF 10
· Office applications only. The add-ins work only with Microsoft Office applications, so it cannot
be used from other applications.
Read more about doPDF add-ins for Microsoft Office on the Create PDF from Microsoft Word,
Create PDF from Microsoft Excel, Create PDF from Microsoft PowerPoint, Create PDF from
Microsoft Publisher and Create PDF from Microsoft Visio sections.
DOPDF DRIVER
The previous two options mentioned for creating PDF files rely on the doPDF printer driver, as this is
the program that actually does the conversion. doPDF is installed as a virtual printer, so it will be
shown as an actual printer in the Printers list. This means that you can create PDF files from any
application that allows printing if you "print" that document to the doPDF printer driver. This is done
in the same way you would print to a regular printer, meaning you have to open the document, go
to File->Print, select doPDF as the printer and then click on Print.
Using doPDF printer driver - advantages:
· Converts to PDF from any applications. It will let you convert to PDF any type of document
that supports printing. The conversion is done in the same way you would print to a regular
printer, just that instead of the regular printer you'll have to select the doPDF printer driver.
Using doPDF printer driver disadvantages:
· Convert hidden hyperlinks. It can convert only visible links in the PDF document (i.e. www.
novapdf.com will be converted, but not novapdf.com), unlike the doPDF add-ins for Microsoft
doPDF 10 User Manual Copyright © 2019 SoftlanddoPDF 11
Office (which can convert hidden hyperlinks too).
Read more about doPDF printer driver on the Create PDF from any application section.
1.2.2 Getting Started
1.2.2.1 Create one document
The Create one document tab is selected by default when you first open the application. Using the
options here you can convert a single document to PDF at a time.
The Create one document tab is selected by default when you first open the application. Using the
options here you can convert a single document to PDF at a time.
To convert a file to PDF in the Select file field enter the path to the document you want converted
into PDF or use the Browse button to select it. Once you selected the document click on the Create
button. This will start the application associated with the document you selected and will ask you
where to save the PDF file.
This start page also contains some details on how you can create PDF files. These are only
informative and offer the user more information about the other options that can be used to create
doPDF 10 User Manual Copyright © 2019 Softland12 doPDF 10
PDF files.
Using doPDF start page to create PDF files - advantages:
· Quick access. The start page is quickly accessible from the doPDF start menu group. Simply
type for doPDF in Windows 8's Start page and click on doPDF from the Apps results, or click on
the Windows button, go to Start->Programs->doPDF group and click on the executable file in
Windows 7 or previous. This will launch the start page and let you select a document to
convert to PDF.
Using doPDF start page to create PDF files - disadvantages:
· Difficult to change preferences. The start page is meant for quick access to convert a
document. Thus it will use the default settings of the doPDF printer for creating the PDF files.
In order to use custom settings, you'll have to change those before the printing.
· Convert hidden hyperlinks. It can convert only visible links in the PDF document (i.e. www.
novapdf.com will be converted, but not novapdf.com), unlike the doPDF add-ins for
Microsoft Office (which can convert hidden hyperlinks too).
1.2.2.2 Tools
The Tools section gives you quick access to print one/multiple documents, manage the printers,
monitor printing progress, check for updates, change language and password protect the interface.
doPDF 10 User Manual Copyright © 2019 SoftlanddoPDF 13
Getting started
Shows shortcuts to go to the printing documents tab (you can also click on the tabs to visit those
sections).
Tools
From this section you can set the user interface Language and configure the frequency of Updates.
1.2.2.2.1 Language
The Language page allows you to set the language for the interface of the program.
doPDF 10 User Manual Copyright © 2019 Softland14 doPDF 10
LANGUAGE
Use user's regional settings
If you check this option, the language will be automatically selected depending on each user's
regional setting. If the user language is not available in doPDF, the default language is chosen
(English).
Select Language
If you want all users to use the same language, select one of the languages available from the Select
language combo-box.
TRANSLATOR
For each language you'll see here details regarding the person/company that translated the
interface of doPDF.
1.2.2.2.2 Updates
The Updates window allows you to set how often to check for updates and to disable it.
doPDF 10 User Manual Copyright © 2019 SoftlanddoPDF 15
CHECK FOR UPDATES
Automatic check for updates
This option is checked by default and will connect to the Internet to see if there are new updates for
the application with the defined frequency. If you uncheck this option you won't be notified of new
updates until you check manually by clicking on the Start check for updates button.
Frequency
You can choose to check for updates Daily (not recommended), Weekly (default value) or Monthly.
When an update is found it will display the doPDF Updates window with details about the update.
DOPDF UPDATES
Version history
If updates are detected you'll see a list of fixes, updates and new features in the version history
section, grouped by version and build number. You can start the download of the new version by
accessing the Click to download link.
News
Occasionally we will post news items that will show in the update window. When this window is
opened you can re-check for updates by clicking on the Refresh button.
1.2.2.3 About
The About page contains information about the version you have installed plus the option to access
the licensing information.
doPDF 10 User Manual Copyright © 2019 Softland16 doPDF 10
The about window will show the following information:
· Version and build number of the profile manager and printer manager, in parenthesis you'll
also the the version of the printer driver used
· Windows version and edition (for support inquiry purposes)
·
· Miscellaneous information regarding the other products developed by the company as well as
copyright information
1.2.3 Create PDF from any application
Creating PDF Files
doPDF installs itself as a virtual printer driver. To create PDF files from any application, you just have
to print your documents to the doPDF like you would print to a normal printer, or you can start the
doPDF Start page from the program group, Browse for the document you want to convert and
press Create.
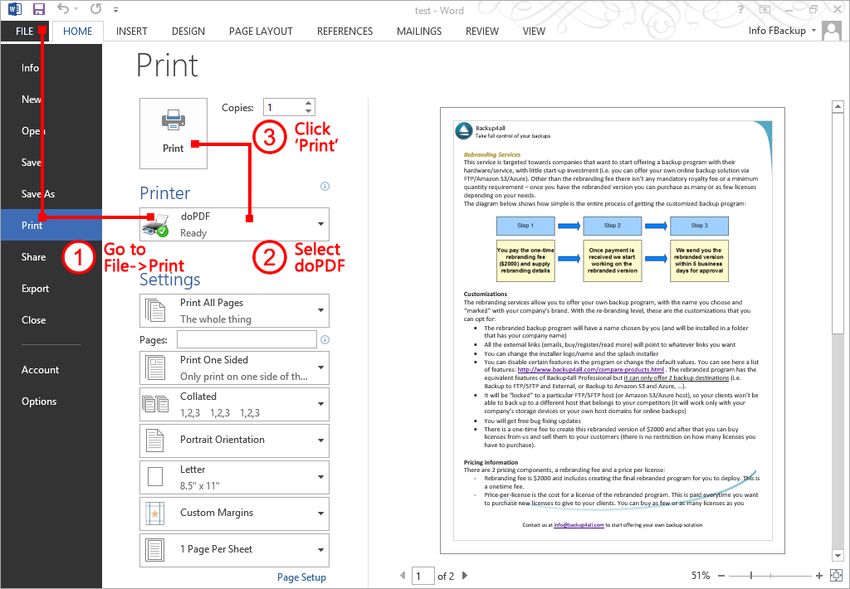
HOW TO CREATE PDF FILES FROM DOCUMENTS CREATED WITH MICROSOFT WORD
doPDF 10 User Manual Copyright © 2019 SoftlanddoPDF 17
During installation, doPDF will ask if you want to install an add-in for Microsoft Office. With that add-
in installed, you can create PDF files from any Office application without having to go to File->Print.
You just have to click on the doPDF tab, and then on the Save as PDF button to create the PDF file.
However, if you chose not to install the add-in, you can still create PDF files from all Microsoft Office
applications, but in the general form that of printing to it like to a regular printing. To create PDF
files from documents created with Microsoft Word (without using the add-in), follow these steps:
1. Open the document that you want to convert to a PDF file
2. Go to File->Print and select doPDF from the printers combo-box
3. Click on Print and choose a location for your PDF file
HOW TO CREATE PDF FILES FROM MICROSOFT WORDPAD
1. Open the document that you want to convert to a PDF file
2. Go to File->Print, click Print and select doPDF from the list of printers
3. Click on Print and choose a location for your PDF file
doPDF 10 User Manual Copyright © 2019 Softland18 doPDF 10
HOW TO CREATE PDF FILES FROM NOTEPAD
1. Open the NotePad document that you want to convert to a PDF file
2. Go to File->Print and select doPDF from the list of printers
3. Click on Print and choose a location for your PDF file
doPDF 10 User Manual Copyright © 2019 SoftlanddoPDF 19
Printing a test page
After installation you can test if doPDF is working properly by printing a test page.
To print a test page in Windows 10/8:
1. Go to Start, type printers and open from the Settings results Devices and Printers
2. In the Printers section, right-click doPDF and select Printer Properties
3. In the doPDF Printer Properties window, click on Print Test Page
4. You will be prompted to select a location and name for the test PDF file. Choose one and
click Save.
5. After the PDF was created and saved, it will open in your default PDF reader and you will see
the printed test page.
To print a test page in Windows 7:
6. Go to Start and click on Devices and Printers
7. In the Printers window, right-click doPDF and select Printer Properties
8. In the doPDF Printer Properties window, click on Print Test Page
9. You will be prompted to select a location and name for the test PDF file. Choose one and
click Save.
10.After the PDF was created and saved, it will open in your default PDF reader and you will see
the printed test page.
To print a test page in Windows Vista, XP or Windows 2003 Server:
doPDF 10 User Manual Copyright © 2019 Softland20 doPDF 10
1. Go to Start and click on Printers and Faxes (if you have the Classic menu go to Start-
>Settings->Printers and Faxes)
2. In the Printers and Faxes window, right-click doPDF and select Properties
3. In the doPDF Properties window, click on Print Test Page
4. You will be prompted to select a location and name for the test PDF file. Choose one and
click Save.
5. After the PDF was created and saved, it will open in your default PDF reader and you will see
the printed test page.
Accessing the doPDF Printing Preferences
You can access the Printing Preferences window and change the various settings available.
To access the doPDF Printing Preferences window in Windows 10/8:
1. Go to Start, type printers and open from the Settings results Devices and Printers
2. In the Printers section, right-click doPDF and select Printing Preferences
3. doPDF Printing Preferences window will be displayed and you will have the option to change
the various settings available
To access the doPDF Printing Preferences window in Windows 7, Vista, XP and Windows 2003
Server:
1. Go to Start and click on Printers
2. In the Printers window, right-click doPDF and select Printing Preferences
3. doPDF Printing Preferences window will be displayed and you will have the option to change
the various settings available
To access the doPDF Printing Preferences window in Windows 2000:
1. Go to Start and click on Printers
2. In the Printers window, right-click doPDF and select Printing Preferences
3. doPDF Printing Preferences window will be displayed and you will have the option to change
the various settings available
1.2.3.1 Save PDF file
This window lets you choose where to save the PDF file, whether to remember the folder you saved
it in for the future or not, to embed or not the used fonts and choose the quality of the images in
the resulting PDF.
doPDF 10 User Manual Copyright © 2019 SoftlanddoPDF 21
File selection/name
Enter a filename (including its path) for the PDF that will be generated, or use the Browse button to
select a location for it. Once the location is selected, click OK to actually create and save the PDF.
PDF OPTIONS
Choose a the printing quality for the resulting PDF. The Smallest file will result in creating a PDF with
a small size, while the Best quality will create one with better image quality.
Best quality
If this option is checked the resulting PDF file will be larger than by using the Small file option,
however the quality of the images will be better. This option is recommended if you need a PDF file
that's suitable for printing, where the quality of images is important. If you need a PDF file to put on
the web or to send via email, you should use the Small file option to reduce its size.
Medium
You can choose this option if you want a balance between the quality of the resulting PDF and its
size.
Smallest file
This option is checked by default and the compression engine used in this case optimizes the
doPDF 10 User Manual Copyright © 2019 Softland22 doPDF 10
resulting size of the PDF file. This option is recommended in most cases when you need to send the
resulting PDF file via email, put it on the web or use it for distribution. It's a balance between size of
the resulting PDF file and the quality of images, so if you need to have higher quality images in the
resulting PDF files select the Best quality option.
Embed all used fonts
If this option is checked, the fonts used in the original document will be embedded in the PDF file.
While this ensures you that the recipient will see the PDF with the same fonts used in the original
document, it also has the disadvantage that the filesize of the resulting PDF is larger than without
using the Embed fonts option. Only the characters used in the original document will be embedded,
to avoid having unnecessary font characters included (doPDF does font subset embedding).
PREFERENCES
Add document info
If this option is checked, the resulting PDF file will have the metadata information that you set in
Document info (title, subject, keywords, author, creator).
Always use this folder
If you check this option, the path where you will save the PDF will be remembered and offered as a
default saving location the next time you will save a PDF. By default this is unchecked.
ACTIONS
Open file
If this option is checked, the resulting PDF file will be opened in the default PDF reader. If you don't
want to see the resulting PDF file automatically, uncheck it and click OK.
The resulting PDF will be opened automatically with the default PDF viewer (i.e. Adobe Reader). The
PDF will be displayed according to the PDF view options set by default in your viewer. If you want to
display the PDF in a different view (i.e. Single Page Continuous which allows scrolling pages, or Two
Pages side by side) you'll have to go into preferences/options for the PDF viewer and change the
default viewing options.
1.2.3.1.1 Document info
The Document Info allows you to define what metadata information gets saved in the resulting PDF
file. This information will be displayed in the properties of the PDF.
doPDF 10 User Manual Copyright © 2019 SoftlanddoPDF 23
Title
Sets the title for the printed document. Default is empty. This title will only show up when viewing
the properties of the resulting PDF, only changes in the document metadata.
Subject
Sets the subject for the printed document. Just as the Title, it will only show up in the metadata
properties for the document. Default is empty.
Keywords
Sets the keywords for the printed document as it will be displayed in the document properties.
Default is empty.
Author
Sets the author of the printed document as it will be displayed in the document properties.
Creator
By default it shows information about the application that generated the PDF file, however this field
can be modified to any custom value.
doPDF 10 User Manual Copyright © 2019 Softland24 doPDF 10
1.3 Configuring doPDF
1.3.1 Printing Preferences
1.3.1.1 Settings
The main page of the Printing Preferences window allows you to set basic options for the resulting
PDF:
· select the page size (i.e. A4, Letter)
· choose a different orientation (portrait, landscape)
· create multiple copies of the same document
· set resolution for images or scale the entire page
PAGE SIZE
This group allows you to modify the size of the resulting PDF document. You can select a predefined
doPDF 10 User Manual Copyright © 2019 SoftlanddoPDF 25
form from the drop down list.
You can also select Custom and enter your own Width, Height and Unit for the current conversion.
ORIENTATION
Specifies how the page is positioned. Available options are Portrait and Landscape. The orientation
can also be set from the printing application.
Portrait
Portrait orients the print vertically (longest edge of the page is vertical).
Landscape
Landscape orients the print horizontally (longest edge of the page is horizontal).
COPIES
Specifies how many copies of the original document you want to include into the PDF and if you
want the pages collated.
Collate
If you need multiple copies of the original document in the PDF you can set here if you want the
pages collated (ordered as P1-P2-P3-P1-P2-P3) or grouped (ordered as P1-P1-P2-P2-P3-P3).
GRAPHIC
Specifies the resolution and scale of the document.
Resolution
You can set the printing resolution between 72 and 2400 dpi by selecting the default values from the
drop down list or entering a different value. A smaller resolution results in smaller PDF file, but
lower image quality, while a higher resolution means better image quality, but bigger PDF file. The
default value is 300 dpi. The resolution can also be set from the printing application.
Scale
You can set the scale of the document from 1% to 400% by entering a value or pressing the Up and
Down arrows. The scale factor can also be set from the printing application.
NOTE
Some applications allow you to set page size, orientation, number of copies, scale and resolution
from their own printing dialogs. If you open the doPDF Printing Preferences dialog from the printing
application, you will see these settings are automatically updated on the first page.
1.3.1.2 Tools
The Tools section gives you quick access to print one/multiple documents, manage the printers,
monitor printing progress, check for updates, change language and password protect the interface.
doPDF 10 User Manual Copyright © 2019 Softland26 doPDF 10
Getting started
Shows shortcuts to go to the printing documents tab (you can also click on the tabs to visit those
sections).
Tools
From this section you can set the user interface Language and configure the frequency of Updates.
1.3.1.2.1 Language
The Language page allows you to set the language for the interface of the program.
doPDF 10 User Manual Copyright © 2019 SoftlanddoPDF 27
LANGUAGE
Use user's regional settings
If you check this option, the language will be automatically selected depending on each user's
regional setting. If the user language is not available in doPDF, the default language is chosen
(English).
Select Language
If you want all users to use the same language, select one of the languages available from the Select
language combo-box.
TRANSLATOR
For each language you'll see here details regarding the person/company that translated the
interface of doPDF.
1.3.1.2.2 Updates
The Updates window allows you to set how often to check for updates and to disable it.
doPDF 10 User Manual Copyright © 2019 Softland28 doPDF 10
CHECK FOR UPDATES
Automatic check for updates
This option is checked by default and will connect to the Internet to see if there are new updates for
the application with the defined frequency. If you uncheck this option you won't be notified of new
updates until you check manually by clicking on the Start check for updates button.
Frequency
You can choose to check for updates Daily (not recommended), Weekly (default value) or Monthly.
When an update is found it will display the doPDF Updates window with details about the update.
DOPDF UPDATES
Version history
If updates are detected you'll see a list of fixes, updates and new features in the version history
section, grouped by version and build number. You can start the download of the new version by
accessing the Click to download link.
News
Occasionally we will post news items that will show in the update window. When this window is
opened you can re-check for updates by clicking on the Refresh button.
1.3.1.3 About
The About page of the Printing Preferences contains information about the version you have
installed as well as information about other projects developed by Softland, link to change the
Language and Check for updates.
doPDF 10 User Manual Copyright © 2019 SoftlanddoPDF 29
1.3.2 Printer Manager
1.3.2.1 Licensing
This will allow you to manage the licenses for the printer currently selected. Managing licenses is
useful when using the current printer as a print server to add/remove/license and un-license client
computers.
doPDF 10 User Manual Copyright © 2019 Softland30 doPDF 10
Licensing information
This section shows information about the licensing status. It will display the product name and
version, quantity, type of license (permanent/trial), activation status and activation details (name,
company, email, comment, ...). For trial versions it will display how many days you have before the
trial expires.
Manage licenses
This allows you to manage the licenses for the installed printer driver. Managing licenses is useful
when using the installed printer driver as a print server (via the shared network printer or remotely)
to add, license, un-license computers/users, and release licenses. See the Manage licenses section
for details.
From this window you can also access the Activation section to activate/deactivate your license.
1.3.2.1.1 Manage licenses
This allows you to manage the licenses for the installed printer driver. Managing licenses is useful
when using the installed printer driver as a print server (via the shared network printer or remotely)
to add, license, un-license computers/users, and release licenses.
doPDF 10 User Manual Copyright © 2019 SoftlanddoPDF 31
You can share a PDF printer to be accessible via other computers in the same network. If a print job
is started from a computer in the network through the print server, the computer/user name is
occupies automatically a license, as long as there are available licenses. If you have enough licenses,
you don't have to configure anything, all computers/users will be automatically licensed when they
initiate their first print job on the printer server. As the computers/users are being assigned a
license, you will see the number of Available licenses decreasing, and the licensed status Yes near
the name of the licensed computers/users.
The computers/users are automatically added in the license list even when the server is not licensed
(in trial mode). In this case all computers will be listed as unlicensed. When the server is licensed,
the computers/users in the list are licensed automatically as they print. If you have more
computers/users in the list then the number of licenses, the computers/users that will not be able to
secure a license.
You can see the number of the current available licenses in the lower right-hand part under the
Available licenses text. If you wish, you can manage the licensed computers/users manually. You
can Add licenses for the computers/users that connect via the shared network printer or remotely.
By clicking on a computer/user from the list you will also be able to License, Unlicense or Release
them (you'll see how the status from the Licensed column will change to Yes, No or -).
Depending on your network configuration, you can choose what machine names to use for
licensing: NetBIOS names or DNS names. You can switch at any time between NetBIOS and DNS
names. Just remember that if you already have machines licensed with one name they will not be
recognized with the other name. You will have Unlicense all computers/users from the licensed list
which became obsolete. The licenses made available will be reused by the new computers/users
when they first print.
For floating computer/user licenses you can also control how long the license will be occupied by
the computer/user. The minimum is 1h, but you can increase this period or set the license to be
occupied permanently. Press the Apply button to make the changes or the Reset button to reset all
the changes to the default 1h.
1.3.3 Profile Manager
The Profile Manager allows you to manage profiles (new, copy, edit, delete), their individual settings
and access profile presets. Profiles are a set of configurations that will be used when creating the
PDF file. As an example you can create different printing profiles based on what the output should
be: a profile that outputs PDF documents intended for distribution, or another one for high quality
PDF files printing, PDFs for review, marked confidential, ....
You can open Profile Manager as an administrator or as a regular user:
· to open Profile Manager as an administrator, open Printer Manager (go to Start and type "
printer manager") then Profiles->Manage Profiles. If you set an administrator password, you'll
be required to enter it to make changes.
· to open Profile Manager as a regular user, open Devices and Printers (go to Start and type "
devices and printers"), right click on doPDF and select Printing Preferences. Click on the
Manager Profiles button.
Opening Profile Manager as an administrator gives you access to more options than when opening it
as a regular user.
doPDF 10 User Manual Copyright © 2019 Softland32 doPDF 10
PROFILES LIST
When the doPDF is installed, a default profile is created. This profile uses its own default printing
settings to create the PDF files.
However you can change those settings and create a custom profile, that when used, will create
PDFs using the options you've chosen. In doPDF there are two types of profiles, private and public:
1. Private profiles. A private profile is visible only to the current user. By default new profiles
are created as private and only the users from the computer where it was created will be able
to see it and create PDFs using it.
2. Public profiles. Public profiles are visible from all client computers (or other users on the
same computer) that connect to and print via the computer where they are defined (the
printer server). When a public profile will be used, all the settings from that profile will be
propagated to the client computers.
This list shows the profiles (both private and public) that were defined. The icon on the right of the
profile name shows what type of profile it is (public or private). You can filter the shown profiles by
starting to type in the search field and also use the Public/Private checkboxes to filter them by type.
MANAGE PROFILES
New
This will create a new profile based on the default one. You can change its settings by clicking on the
different tabs available (General, Emails, ...) and use the Save button to record your changes and
create the profile. It is created only after you click on the Save button, if you click on Cancel or select
a different profile the current one will be discarded
Copy
This allows you to duplicate an existing profile. To do so, just select an existing profile and click on
Copy. Unlike the New option, when you copy an existing profile the duplicate is automatically saved
with a different name (original name of the profile plus the word Copy). Removing the original
profile doesn't affect in any way the existing copy of it.
Delete
Deletes the profile selected in the profiles list. You cannot delete the current active profile. You have
to set another profile as active profile first. There will always be at least one profile.
Set active
Set the profile selected in the profiles list as current active profile. The active profile settings will be
used in the subsequent printing jobs. Optionally you can check the Show Select Profiles dialog to
show a prompt on each print job that will let you choose what profile you want to use for printing.
Show Select Profiles dialog
If this option is checked, before creating the PDF file from a document a window will prompt you to
choose which profile to use for that printing job.
Advanced
doPDF 10 User Manual Copyright © 2019 SoftlanddoPDF 33
When you click on the Advanced settings icon (grey gear on the right), you will see additional
options:
· Delete my profiles - if you click on this you'll get a confirmation window that lets you choose if
you want to delete all your defined profiles (the private profiles). Once the profiles are
deleted, they cannot be recovered anymore
· Delete all profiles - this will prompt a confirmation window to remove all the existing profiles
(both private and public).
You can also click on the question mark to access the About window or open the Help file.
PROFILE SETTINGS
The profile settings group allows you to customize the current profile and change various options
such as the possibility to send emails, add watermarks/bookmarks/overlays, protect the PDF, embed
fonts and many others. You can visit each tab and change the options for:
1. General - this lets you select the profile type, describe it, set the PDF version, enable PDF
linearization, set file saving options and after save actions.
2. Info -you can add document information (subject, author, keywords) and set PDF viewer
options.
3. Fonts - this lets you embed all fonts, only subsets, protected fonts or disable embedding.
4. Graphics - you can compress the content, convert or downsample images to reduce the size
of the resulting PDF.
5. Bookmarks - predefined bookmark configurations can be used or customized.
6. Security - you can password-protect a PDF document to restrict printing, copying or even
opening it.
7. Other - this lets you customize the active PDF links in the resulting file and also set advanced
options (such as text optimization).
8. Layout: watermarks, overlays and signatures - in the Layout section you can choose display
options for the resulting PDF. You can use predefined forms (or add a custom ones), page
orientation (portrait/landscape), add text/image watermarks, overlays or digitally sign the
PDF.
9. Actions, email, upload - you can opt to send emails after a PDF is created, customize the
recipients/email templates and define the SMTP server connections.
Each of the profile setting changes you modify will be available for the currently selected profile. You
have to click on the Save button when you finish modifying the settings, or on Cancel if you wish to
discard them all.
PROFILE SETTINGS PRESETS
Each of the profile settings tabs uses predefined configurations for certain sections. You can modify
those presets either from the profile setting tab or open the separate preset window for each
individual set of options. To do so, click on the right arrow next to the Profile text field (top-right
corner of the Profile Manager window). This will show a drop-down list of all the profile settings
presets that you can modify individually.
Each preset created for profile settings will show up on the main tab and available as a drop-down
option. For example, the presets that you create for the Save section, will show up as a drop down
doPDF 10 User Manual Copyright © 2019 Softland34 doPDF 10
in General -> File saving options -> Save options. Each preset section has already defined default
preset profiles, which cannot be modified. If you want to create a preset based on the default one,
you can use the Copy option and Save it after you've done the necessary changes.
The navigation arrows (left/right) next to the Profile field allow you to browse between a preset
profile window and the main profile settings window. You can read more about the presets in the
Manage Presets help section.
Note: Some of the features mentioned on this page might not be available in your edition. The
Professional edition includes all the features, while Standard and Lite have limited functionality. For
a comparison between editions, please check feature matrix topic.
1.3.3.1 Other
The Other profile manager tab allows you to choose predefined link detection and advanced presets
or customize those to enable active PDF links in the resulting PDF file (with various styling options)
and do optimizations. You can also define user tags to be used in the PDF document and create
custom save rules.
Detect links
If this option is checked, it will allow you to enable automatic detection of visible links in text (both
local and remote links) and customize the links' appearance in the resulting PDF file. In order to be
detected and converted, the URLs must be visible in the original document and formatted to start
with: "http://", "www", "mailto:", "ftp://" (unless when printing via the add-in for Microsoft Office
that is able to detect hidden links too). By default a link detection preset is selected but you can
manage the existing presets if you click on New/Manage. For detailed explanation of each link
detection options see the Link formatting section.
Advanced
You can set some advanced options regarding how the printed documents will be processed and
saved as a PDFs. By default an advanced preset is selected but you can manage the existing presets
if you click on New/Manage. For detailed explanation of each of the advanced options see the
Advanced options section.
Add user tags
You can define pairs of tag/value to be detected before the PDF is generated. doPDF can then detect
those tags from the original document and allows you to use those values as Macro names. It can
also remove the whole page where a particular tag/value is present or removing only some parts of
the text based on font formatting.
Example:
· Your original document (before sending it to doPDF for converting) has the text
MyTag=sales@novapdf.com
· You define in doPDF - Profile Manager - Other - User tags the tag MyTag
· After it's defined, you can use it as a macro value by entering it in this format [K:MyTag]
· You can add an action to email the PDF and in the TO field you can enter the macro value [K:
MyTag] - this will generate the PDF and send it afterwise to the sales@novapdf.com email
address
doPDF 10 User Manual Copyright © 2019 SoftlanddoPDF 35
· Optionally you can configure the application to remove that text when generating the PDF or
the entire page where that text is present
By default an Email user tags preset is defined and can be selected, but you can manage the existing
presets if you click on New/Manage. For detailed explanation of each of the advanced options see
the User tags section.
Add save rules
You can configure file saving rules that will modify the resulting filename of the PDF file. Some
applications (i.e. Crystal Reports) will add by default their own name to the filename of an unsaved
document, the result being (in the case of Crystal Reports) Crystal Reports – Document1.rpt. That's
why you can define your own save rule that will remove the application name from the filename.
Save rules can use regular expressions to alter filenames, and by default there is a preset included as
an example. You can define your own preset if you click on New/Manage. For detailed explanation
see the Save rules section.
Note: Some of the features mentioned on this page might not be available in your edition. The
Professional edition includes all the features, while Standard and Lite have limited functionality. For
a comparison between editions, please check feature matrix topic.
1.3.3.1.1 User tags
The User tags section is embedded in the Other tab of the Profile Manager and allows you to set
some advanced options regarding how the user tags will be processed.
USER TAGS
This group allows you to choose a predefined preset for user tags or use a custom one. By default
there are several predefined advanced presets defined but you can add new or manage those by
clicking on New/Manage. You can read more about predefined user tags presets in the Manage
Presets->User tags help section. A predefined user tags preset can be used by multiple profiles,
while Custom settings only affect the current profile.
You can define pairs of tag/value to be detected before the PDF is generated. doPDF can then detect
those tags from the original document and allows you to use those values as Macro names.
Here's an example on how you can use user tags to send a particular document to the Sales
department via email:
· Your original document (before sending it to doPDF for converting) has the text
MyTag=sales@novapdf.com
· You define in doPDF - Profile Manager - Other - User tags the tag MyTag
· After it's defined, you can use it as a macro value by entering it in this format [K:MyTag]
· You can add an action to email the PDF and in the TO field you can enter the macro value [K:
MyTag] - this will generate the PDF and send it afterwise to the sales@novapdf.com email
address
· Optionally you can configure the application to remove that text when generating the PDF or
the entire page where that text is present
Add/Copy/Remove/Up/Down
Click on Add and then the Tag/Default value fields will be enabled for you to enter the new user tag
doPDF 10 User Manual Copyright © 2019 Softland36 doPDF 10
pair. You can define multiple user tags and only enable a few for the current profile. The application
will search the document for the user tag value in the order that they are defined in this list. You can
re-order them using the Up/Down buttons and Remove the ones you don't want to use anymore.
The Default value field can be empty, however you can enter a value to replace with if the original
document has the tag but without a value.
IMPORTANT:
In order to use the defined user tag as a Macro value, you will have to enter it in the field in this
format [K:MyTag]
In this example, the name of the user tag is MyTag.
REMOVE USER TAGS POLICY
Do not remove anything
By default, doPDF will convert the original document sent to it exactly as it comes without altering
its content. Even if it detects user tags in the document, it will leave the content unchanged.
Remove pages with tags
If this option is selected and the application detects user tags in the document, it will exclude the
pages that contain user tags from the original document when creating the PDF file.
Remove all text with specific font
doPDF cannot remove the user tag (and its value) when converting the original document into PDF
solely based on its content. If user tags are present in the original document and you don't want
those included in the resulting PDF, you can style its font/size/color in a particular way so that
doPDF can detect it. Simply enable the Remove all text with specific font option here and then
choose exactly the same font, size, style (bold/italic) and color as it is in the original document.
IMPORTANT: If this option is checked, doPDF will remove any content that matches the formatting
specified by you, not only user tags.
Note: Some of the features mentioned on this page might not be available in your edition. The
Professional edition includes all the features, while Standard and Lite have limited functionality. For
a comparison between editions, please check feature matrix topic.
1.3.3.1.2 Save rules
The Save rules section is embedded in the Other tab of the Profile Manager and allows you to define
and use advanced filename/path saving rules.
SAVE RULES
This group allows you to choose a predefined preset for save rules or use a custom one. By default
there are several predefined save rules presets defined, but you can add new or manage those by
clicking on New/Manage. You can read more about predefined save rules presets in the Manage
Presets->Save Rules help section. A predefined user tags preset can be used by multiple profiles,
while Custom settings only affect the current profile.
doPDF 10 User Manual Copyright © 2019 SoftlandYou can also read