Mediant Virtual Edition (VE) SBC - Deployment in Amazon AWS Installation Manual
←
→
Page content transcription
If your browser does not render page correctly, please read the page content below
Installation Manual
AudioCodes Mediant™ Family of Session Border Controllers (SBC)

Mediant Virtual Edition (VE) SBC

Deployment in Amazon AWS

Version 7.4
Installation Manual                                                                                                                Contents

                                                 Table of Contents
1   Introduction ......................................................................................................... 7
2   Deployment Methods .......................................................................................... 9
3   Prerequisites ..................................................................................................... 11
    3.1    Subscribing to AudioCodes Mediant VE Product in AWS Marketplace ................. 11
    3.2    CloudFormation Template for Mediant VE HA Deployment .................................. 12
    3.3    IAM Role for Mediant VE HA Deployment ............................................................ 13
           3.3.1      IAM Role for Initial Configuration from S3 URL .......................................................14
    3.4    Network Prerequisites ..........................................................................................15
           3.4.1      HA Subnet ...............................................................................................................17
    3.5    Instance Type .......................................................................................................22
    3.6    Automatic Configuration .......................................................................................22
4   Deploying Standalone Mediant VE via AWS EC2 Console ............................ 23
    4.1    Assigning Elastic IP Addresses to the Instance .................................................... 31
    4.2    Post-Installation Configuration of Mediant VE SBC – PAYG Product .................... 33
5   Deploying High-Availability (HA) Mediant VE via CloudFormation Service . 35
    5.1    Deleting HA Mediant VE Deployment ................................................................... 40
6   Deploying Mediant VE via Stack Manager ...................................................... 41
    6.1    Public IP Addresses .............................................................................................43
    6.2    Private IP Addresses ............................................................................................44
7   Adjusting Security Groups ............................................................................... 47
8   Upgrading the Software Version ...................................................................... 49
    8.1    Method 1 – Side-By-Side Deployment of New Version ......................................... 50
    8.2    Method 2 – Rebuild Existing Mediant VE Instance from New Image ..................... 51
           8.2.1 Rebuilding Existing Standalone Mediant VE Instance Deployed via AWS EC2
           Console from New Image .....................................................................................................51
           8.2.2 Rebuilding Existing High-Availability (HA) Mediant VE Deployed via AWS EC2
           Console from New Image .....................................................................................................54
           8.2.3 Rebuilding Existing Mediant VE Deployed via Stack Manager ...............................56
9   Licensing the Product....................................................................................... 57
    9.1    Obtaining and Activating a Purchased License Key .............................................. 57
    9.2    Installing the License Key .....................................................................................59
    9.3    Product Key ..........................................................................................................59

Ver. 7.4                                                            3                                                          SBC Series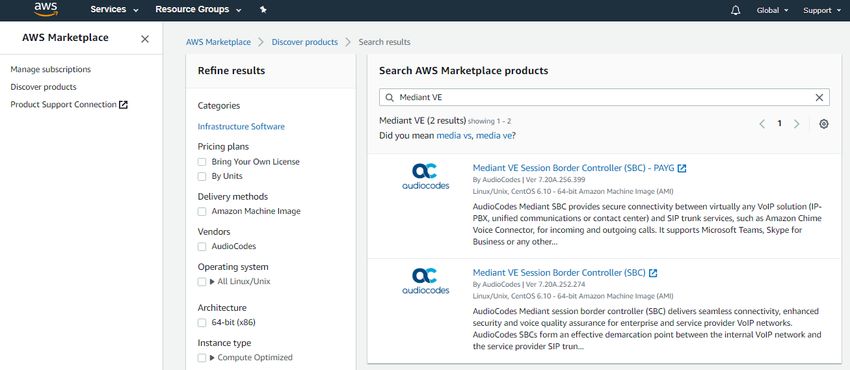
Mediant VE SBC for AWS
List of Figures
Figure 3-1: Searching for Mediant VE Product in the AWS Marketplace ...............................................11
Figure 3-2: Network Architecture for Standalone Deployment ...............................................................15
Figure 3-3: Network Architecture for HA Deployment ............................................................................16
Figure 3-4: Creating Route Table ...........................................................................................................17
Figure 3-5: Creating Cluster Subnet .......................................................................................................18
Figure 3-6: Changing Cluster Subnet Route Table ................................................................................18
Figure 3-7: Editing Route Table Association ..........................................................................................19
Figure 3-8: Creating Private EC2 Endpoint ............................................................................................20
Figure 3-9: Creating NAT Gateway ........................................................................................................21
Figure 3-10: Editing Route Table ...........................................................................................................22
Figure 3-11: Creating Default Route ......................................................................................................22
Figure 4-1: Searching for Mediant VE Product in the AWS Marketplace ...............................................23
Figure 4-2: Mediant VE Product Page in AWS Marketplace ..................................................................24
Figure 4-3: Mediant VE Configuration Page in AWS Marketplace ........................................................24
Figure 4-4: Mediant VE Launch Page in AWS Marketplace .................................................................25
Figure 4-5: Choose Instance Type Page................................................................................................26
Figure 4-6: Configure Instance Page .....................................................................................................26
Figure 4-7: Add Storage Page ................................................................................................................28
Figure 4-8: Tag Instance Page ...............................................................................................................28
Figure 4-9: Configure Security Group Page ...........................................................................................29
Figure 4-10: Review Page ......................................................................................................................30
Figure 4-11: Elastic IPs Page .................................................................................................................31
Figure 4-12: Allocated IP Address ..........................................................................................................32
Figure 4-13: Associate Address Window ...............................................................................................32
Figure 4-14: Metering License Page ......................................................................................................33
Figure 5-1: CloudFormation Console .....................................................................................................35
Figure 5-2: CloudFormation – Create Stack Page .................................................................................36
Figure 5-3: CloudFormation - Specify Details Page (Stack Name) ........................................................36
Figure 5-4: CloudFormation – Stack Creation Progress ........................................................................38
Figure 5-5: CloudFormation – Stack Outputs .........................................................................................38
Figure 6-1: Creating New Instance via Stack Manager ..........................................................................42
Table 7-1: Inbound Rules for Default Security Groups ..........................................................................47
Table 7-2: Minimal Required Outbound Rules for HA Security Group ...................................................48
Figure 8-1: Opening Web Interface's Software Upgrade Wizard ...........................................................49
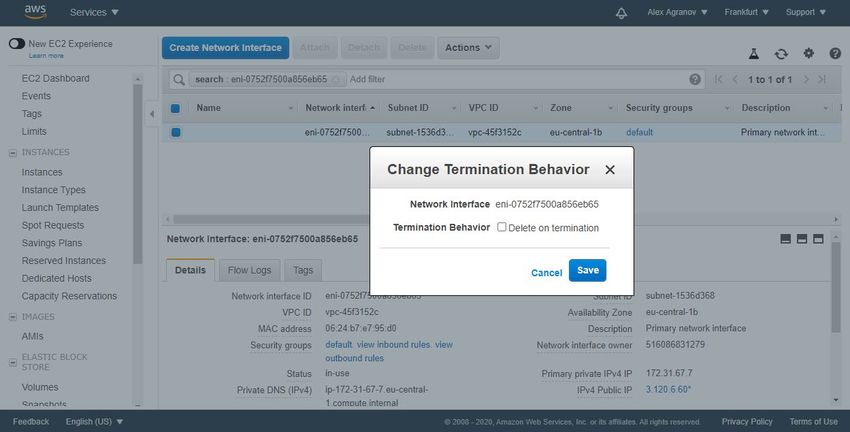
Figure 8-2: Finding Network Instances associated with EC2 Instance ..................................................52
Figure 8-3: Changing Termination Behavior of Network Interface .........................................................52
Figure 8-4: Choosing Existing Network Interfaces during EC2 Instance Creation.................................53
Figure 8-5: Updating Cloud Formation stack..........................................................................................55
Figure 8-6: Upgrading Mediant VE to New Image Based on OS Version 8 via Stack Manager ............56
Figure 9-1: Software License Activation Tool .........................................................................................58
Figure 9-2: Product Key in Order Confirmation E-mail ...........................................................................58
Figure 9-3: Viewing Product Key ............................................................................................................59
Figure 9-4: Empty Product Key Field .....................................................................................................59
Figure 9-5: Entering Product Key ...........................................................................................................60
Installation Manual 4 Document #: LTRT-10877
Installation Manual                                                                            Notices

                                               Notice
     Information contained in this document is believed to be accurate and reliable at the time of
     printing. However, due to ongoing product improvements and revisions, AudioCodes cannot
     guarantee accuracy of printed material after the Date Published nor can it accept
     responsibility for errors or omissions. Updates to this document can be downloaded from
     https://www.audiocodes.com/library/technical-documents.
                           This document is subject to change without notice.
                                  Date Published: November-01-2021

WEEE EU Directive
           Pursuant to the WEEE EU Directive, electronic and electrical waste must not be disposed
           of with unsorted waste. Please contact your local recycling authority for disposal of this
           product.

Customer Support
           Customer technical support and services are provided by AudioCodes or by an authorized
           AudioCodes Service Partner. For more information on how to buy technical support for
           AudioCodes products and for contact information, please visit our website at
           https://www.audiocodes.com/services-support/maintenance-and-support.

Stay in the Loop with AudioCodes

Abbreviations and Terminology
           Each abbreviation, unless widely used, is spelled out in full when first used.

Related Documentation

                                             Manual Name

Mediant Software SBC User's Manual
SBC Series Release Notes

Document Revision Record

   LTRT                                                Description

   10867       Initial document release for Version 7.4.
   10871       Creating private EC2 updated.

Ver. 7.4                                           5                                        SBC Series
Mediant VE SBC for AWS

   LTRT                                              Description

   10874       CloudFormation template download site; instance type c5.9xlarge and c4.8xlarge; new
               sections for post-installation configuration and troubleshooting of Mediant VE SBC –
               PAYG product; miscellaneous
   10877       Note added to Deploying Standalone Mediant VE via AWS EC2 Console re
               adding/removing network interfaces or secondary IP addresses.

Documentation Feedback
           AudioCodes continually strives to produce high quality documentation. If you have any
           comments (suggestions or errors) regarding this document, please fill out the
           Documentation          Feedback       form        on       our        website      at
           https://online.audiocodes.com/documentation-feedback.

Installation Manual                              6                        Document #: LTRT-10877
Installation Manual                                                                    1. Introduction

1          Introduction
           This document describes deployment of AudioCodes' Mediant Virtual Edition (VE) Session
           Border Controller (SBC), hereafter referred to as Mediant VE, in an Amazon Web Services
           (AWS) environment.
           For detailed instructions on Mediant VE installation in other virtual environments (for
           example, VMware), refer to the Mediant VE SBC Installation Manual.

             Note:
             • The scope of this document does not fully cover security aspects for deploying the
               product in the AWS cloud. Security measures should be done in accordance with
               AWS security policies and recommendations.
             • For configuring Mediant VE SBC, refer to the Mediant Software SBC User's Manual.

Ver. 7.4                                          7                                      SBC Series
Mediant VE SBC for AWS

                      This page is intentionally left blank.

Installation Manual                     8                      Document #: LTRT-10877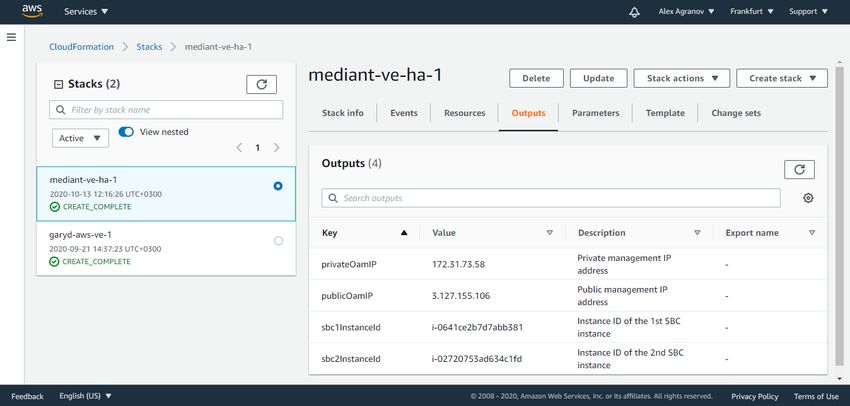
Installation Manual 2. Deployment Methods
2 Deployment Methods
Mediant VE SBC is available in AWS Marketplace as two different products:
Mediant VE Session Border Controller (SBC): This product includes a trial license
(limited to three SBC sessions) and requires a purchase of production license from
AudioCodes.
Mediant VE Session Border Controller (SBC) – PAYG: This product includes a pay-
as-you-go license that enables Customers to use the SBC as much as needed and
pay for the actual service consumed via their AWS account billing.
Mediant VE SBC supports the following deployment topologies:
Standalone topology: Mediant VE SBC is deployed on a single EC2 instance.
Deployment is performed using the AWS EC2 console, as described in Section
Deploying Standalone Mediant VE via AWS EC2 Console.
High-availability (HA) topology: Mediant VE SBC is deployed on two EC2 instances,
operating in 1+1 Active/Standby mode. Deployment is performed using an AWS
CloudFormation template, as described in Section Deploying High-Availability (HA)
Mediant VE via CloudFormation Service
Notes:
• The Mediant VE SBC – PAYG product supports only Standalone deployment
topology (not HA).
• All Mediant VE SBC for AWS products and deployment topologies support only IPv4
addresses (not IPv6).
Ver. 7.4 9 SBC Series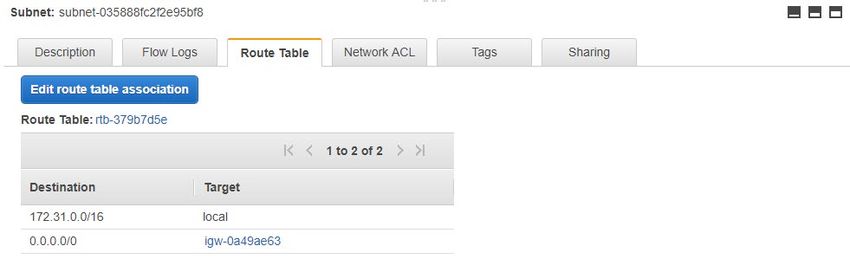
Mediant VE SBC for AWS

                      This page is intentionally left blank.

Installation Manual                    10                      Document #: LTRT-10877
Installation Manual 3. Prerequisites
3 Prerequisites
Prior to deploying Mediant VE SBC on Amazon AWS, make sure that you meet the
following prerequisites:
You have an AWS account. If you don't have an AWS account, you can sign up for
one on Amazon's website at http://aws.amazon.com/.
You have subscribed to the AudioCodes Mediant VE offer in AWS Marketplace. Refer
to Section Subscribing to AudioCodes Mediant VE Product in AWS Marketplace for
additional information.
You have created all subnets needed for Mediant VE deployment. Refer to Section
Network Prerequisites for additional information.
For HA deployment:
• If you are going to perform deployment via CloudFormation template, make sure
that you have received Mediant VE CloudFormation Template that is distributed
as part of Mediant VE Installation Kit. Refer to Section CloudFormation Template
for Mediant VE HA Deployment for additional information.
• You have created an Identity and Access Management (IAM) role that enables
Mediant VE to manage its network interfaces. Refer to Section IAM Role for
Mediant VE HA Deployment for additional information.
• You have created an HA subnet that is used for internal communication between
Mediant VE instances and for accessing the AWS API during the activity
switchover. Refer to Section HA Subnet for additional information.
3.1 Subscribing to AudioCodes Mediant VE Product in
AWS Marketplace
Prior to deploying the Mediant VE instance, you must subscribe to the AudioCodes
Mediant VE product in AWS Marketplace as follows:
1. Open the AWS Marketplace console at https://console.aws.amazon.com/marketplace.
2. In the Discover Products tab, search for the "Mediant VE" product.
Figure 3-1: Searching for Mediant VE Product in the AWS Marketplace
Ver. 7.4 11 SBC SeriesMediant VE SBC for AWS
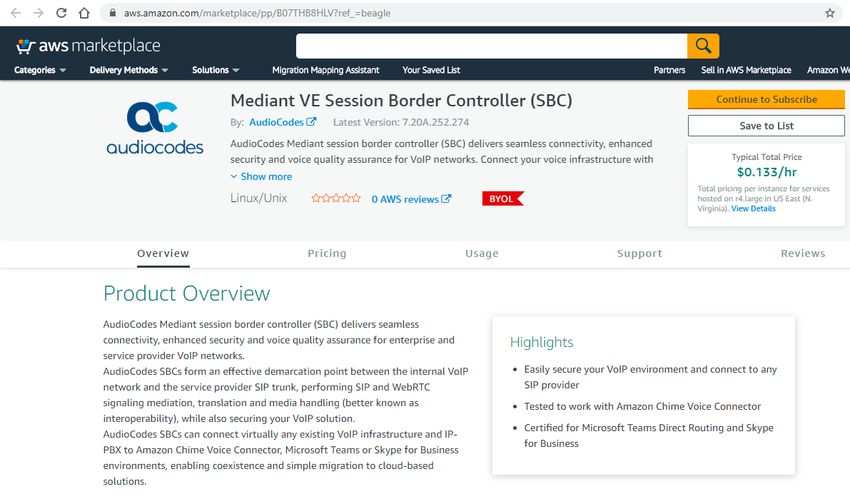
3. Click the Mediant VE Session Border Controller (SBC) product.
Figure 3-2: Mediant VE Product in AWS Marketplace
4. Click Continue to Subscribe to subscribe to the Mediant VE product.
3.2 CloudFormation Template for Mediant VE HA
Deployment
The CloudFormation template for high-availability (HA) Mediant VE deployment is
distributed as part of the Mediant VE Installation Kit, which can be downloaded from
https://services.audiocodes.com/app/answers/detail/a_id/8.
Two CloudFormation templates are included:
sbc_ha_cloudformation.txt: For regular AWS regions
sbc_ha_cloudformation_cn.txt: For AWS China regions, for example, cn-north-1
and cn-northwest-1
Installation Manual 12 Document #: LTRT-10877Installation Manual 3. Prerequisites
3.3 IAM Role for Mediant VE HA Deployment
For HA deployment, the following IAM role must be created prior to deploying the Mediant
VE instance. This role ensures that Mediant VE can manage its network interfaces and re-
assign IP addresses during a switchover.
Note: IAM Role described below is needed only for HA deployment of Mediant VE, as
described in Sections
Deploying High-Availability (HA) Mediant VE via CloudFormation Service and Deploying
Mediant VE via Stack Manager. It is not needed for standalone deployment of Mediant
VE, as described in Section Deploying Standalone Mediant VE via AWS EC2 Console.
IAM Role for HA Mediant VE deployment:
{
"Version": "2012-10-17",
"Statement": [
{
"Action": [
"ec2:AssignPrivateIpAddresses",
"ec2:UnassignPrivateIpAddresses",
"ec2:AssociateAddress",
"ec2:DescribeAddresses",
"ec2:DescribeNetworkInterfaceAttribute",
"ec2:DescribeNetworkInterfaces"
],
"Effect": "Allow",
"Resource": "*"
}
]
}
To create an IAM Role:
1. Open the AWS IAM console (https://console.aws.amazon.com/iam).
2. Navigate to the Policies screen, and then:
a. Click Create.
b. Select the JSON tab, copy-and-paste the IAM policy rules listed above, and then
click Review policy.
c. Enter the IAM policy name (e.g., “SBC_HA”), and then click Create policy.
3. Navigate to the Roles screen, and then:
a. Click Create role.
b. Choose EC2 use case, and then click Next: permissions.
c. Search for the IAM policy created in the previous step, select it, and then click
Next: tags.
d. Click Next: review.
e. Enter the IAM role name (e.g. “SBC_HA”), and then click Create role.
Ver. 7.4 13 SBC SeriesMediant VE SBC for AWS
3.3.1 IAM Role for Initial Configuration from S3 URL
Mediant VE SBC may be provided with an initial configuration INI file, stored on AWS
Simple Storage Service (S3), during its launch. This is done by including the #s3-url
element in the instance user-data, as described in Automatic Provisioning of Mediant VE-
CE SBC via Cloud-Init Configuration Note.
If you use this option, add the following rules to the IAM Role created previously, to enable
Mediant VE SBC access to the corresponding S3 bucket (replace “sbc” in the example
below with the actual bucket name).
{
"Version": "2012-10-17",
"Statement": [
{
"Effect": "Allow",
"Action": [
"s3:ListBucket"
],
"Resource": "arn:aws:s3:::sbc"
},
{
"Effect": "Allow",
"Action": [
"s3:GetObject"
],
"Resource": "arn:aws:s3:::sbc/*"
}
}
Installation Manual 14 Document #: LTRT-10877Installation Manual 3. Prerequisites
3.4 Network Prerequisites
Mediant VE on AWS uses the following subnets:
Main Subnet: Carries management (e.g. HTTP and SSH), signaling (SIP) and media
(RTP, RTCP) traffic.
Additional Subnets: Carries signaling (SIP) and media (RTP, RTCP) traffic. These
subnets are optional and may be omitted if your network architecture doesn’t require
them.
HA Subnet: Used for HA deployment only. Carries internal communication between
Mediant VE instances. It's also used for accessing the AWS API during the
switchover. Refer to Section HA Subnet for detailed instructions on how to correctly
create the HA Subnet.
All subnets must reside in the same Availability Zone of the Virtual Private Cloud (VPC)
and be created prior to the Mediant VE deployment
Figure 3-2: Network Architecture for Standalone Deployment
Mediant VE Legend:
ip ip ip ip
Instance - EC2 Instance
EC2 Instance
eth0 eth1 eth2 eth3
ip - Elastic IP
Main Subnet: management (HTTP, SSH), signaling (SIP), media (RTP, RTCP)
1st Additional Subnet: signaling (SIP), media (RTP, RTCP)
2nd Additional Subnet: signaling (SIP), media (RTP, RTCP)
3rd Additional Subnet: signaling (SIP), media (RTP, RTCP)
Ver. 7.4 15 SBC SeriesMediant VE SBC for AWS
Figure 3-3: Network Architecture for HA Deployment
Legend:
Instance - EC2 Instance
ip - Elastic IP
Mediant VE
ip ip ip
Active Instance Standby Instance
eth0 eth1 eth2 eth3 eth0 eth1 eth2 eth3
VPC
HA Subnet: internal communication between Active and Standby instances
AWS API
Main Subnet: management (HTTP, SSH), signaling (SIP), media (RTP, RTCP)
1st Additional Subnet: signaling (SIP), media (RTP, RTCP)
2nd Additional Subnet: signaling (SIP), media (RTP, RTCP)
Mediant VE may communicate with its peers (e.g. IP-PBX or SIP Trunk) via both private
and public (Elastic) IP addresses. Use of Elastic IPs is optional and they may be omitted if
your network design doesn’t require them (i.e., if all communication occurs inside the VPC).
HA deployments operate in 1+1 Active/Standby mode and use “floating” IP addresses,
reassigned via the AWS API during activity switchover. Since AWS does not support
reassignment of primary IP addresses, Mediant VE never uses them, but uses secondary
IP addresses instead (except for the HA subnet).
Installation Manual 16 Document #: LTRT-10877Installation Manual 3. Prerequisites
3.4.1 HA Subnet
The HA subnet is used in high-availability (HA) Mediant VE deployments for the following
tasks:
Internal communication between Mediant VE instances
Accessing AWS API (for IP address reassignment during activity switchover)
Mediant VE uses private addresses in the HA subnet. Therefore, to enable Mediant VE to
access the AWS API via the HA subnet, you must do one of the following:
(Recommended Method) Create a private EC2 endpoint in the HA subnet. This
method creates a private AWS API endpoint inside the HA subnet, thereby enabling
Mediant VE to access it via the private IP address.
(Alternative Method) Attach a NAT gateway to the HA subnet. This method uses
network address translation (performed by the NAT gateway) to enable access to
public AWS API endpoint from Mediant VE SBC’s private IP address.
In addition, since the HA subnet carries sensitive information, it is recommended to create
a dedicated subnet and protect it from unauthorized access.
To create the HA subnet:
1. Open the AWS VPC management console at https://console.aws.amazon.com/vpc.
2. Open the Route Tables page, and then click Create route table:
a. In the ‘Name tag’ field, enter the new route table name (e.g. ‘ha-route-table’).
b. In the ‘VPC’ drop-down list, select the VPC where Mediant VE will be deployed.
c. Click Create to create the route table.
Figure 3-4: Creating Route Table
Ver. 7.4 17 SBC SeriesMediant VE SBC for AWS
3. Open the Subnets page, and then click Create Subnet.
a. In the ‘Name tag’ field, enter the new subnet name (e.g. ‘ha-subnet’).
b. From the 'Availability Zone' drop-down list, select the Availability Zone where
Mediant VE will be deployed.
c. In the 'IPv4 CIDR block' field, enter the IPv4 CIDR for the subnet.
d. Click Yes, Create to create the route table.
Figure 3-5: Creating Cluster Subnet
4. Select the created subnet, switch to the Route Table tab, and then click Edit route
table association.
Figure 3-6: Changing Cluster Subnet Route Table
Installation Manual 18 Document #: LTRT-10877Installation Manual 3. Prerequisites
5. Choose the HA route table created in the previous steps, and then click Save.
Figure 3-7: Editing Route Table Association
Note: Make sure that the HA subnet has a dedicated route table. Other subnets (i.e.,
Main subnet and Additional subnets) should be attached to different route table(s), that
would typically have the Internet Gateway configured as the default route to ensure
proper functionality of Elastic IPs attached to the corresponding network interfaces of
EC2 instances .
After you successfully created the HA subnet, you need to enable access to AWS API via
it. The recommended method is to create a private EC2 endpoint in the HA subnet.
To create the private EC2 endpoint in HA subnet:
1. Open the Security Groups page, and then click Create security group.
a. In the ‘Security group name’ field, enter the security group name (e.g., "Endpoint
Security Group").
b. In the ‘VPC’ drop-down list, select the VPC where Mediant VE will be deployed.
c. Under ‘Inbound rules’, click Add rule, and then configure the rule as follows:
• 'Type': Custom TCP
• 'Port range': 443
• 'Source': Anywhere
d. Click Create security group to create the new security group.
2. Open the Endpoints page, and then click Create Endpoint.
a. In the ‘Service Category’ field, select AWS services.
b. In the ‘Service Name’ field, enter "ec2" in the search box, and then press Enter.
Select the EC2 endpoint from the list (e.g., com.amazonaws.eu-central-1.ec2).
c. In the ‘VPC’ drop-down list, select the VPC where Mediant VE will be deployed.
d. In the ‘Subnets’ field, select the HA subnet.
e. Select the ‘Enable DNS name’ checkbox.
f. In the ‘Security group’ field, remove the default security group and select the
‘Endpoint Security Group’ that you created in the previous step.
g. Click Create Endpoint to create the new endpoint.
Ver. 7.4 19 SBC SeriesMediant VE SBC for AWS
Figure 3-8: Creating Private EC2 Endpoint
Installation Manual 20 Document #: LTRT-10877Installation Manual 3. Prerequisites
An alternative method for enabling access to the AWS API via the HA subnet is by
attaching a NAT Gateway to the Cluster subnet.
Note: You don't need to perform the below steps if you created a private EC2 endpoint,
as described above.
To create NAT Gateway and attach it to the HA subnet:
1. Open the NAT Gateways page, and then click Create NAT Gateway:
a. From the 'Subnet' drop-down list, select a subnet that belongs to the same
Availability Zone where the HA subnet was created (and where Mediant VE will
be deployed) and that has an Internet Gateway attached to it. For example, select
Main Subnet.
Note: Do not select HA Subnet at this stage. The NAT Gateway itself will be configured
as a default route in the HA Subnet and therefore, it won’t be able to access the Internet
from it.
b. From the 'Elastic IP Allocation ID' drop-down list, select an existing Elastic IP if
you have pre-allocated Elastic IPs in your VPC, or click Create New EIP to create
a new one.
c. Click Create a NAT Gateway to create the NAT gateway.
Figure 3-9: Creating NAT Gateway
2. Open the Route Tables page, and then select the HA route table created in the
previous steps.
Ver. 7.4 21 SBC SeriesMediant VE SBC for AWS
3. Switch to the Routes tab, and then click Edit routes to edit the routes.
Figure 3-10: Editing Route Table
4. Create the default route entry (0.0.0.0/0) that points to the created NAT gateway, and
then click Save to save your changes.
Figure 3-11: Creating Default Route
3.5 Instance Type
The following instance types are recommended for Mediant VE SBC deployment:
For versions from 7.20CO or 7.40A streams based on OS Version 8:
• m5.large: This instance type is recommended for deployments that don’t require
transcoding and/or other DSP capabilities.
• c5.2xlarge or c5.9xlarge: These instance types are recommended for
deployments that require transcoding and/or other DSP capabilities.
For versions from 7.20A stream based on OS Version 6:
• r4.large: This instance type is recommended for deployments that don’t require
transcoding and/or other DSP capabilities.
• c4.2xlarge or c4.8xlarge: These instance types are recommended for
deployments that require transcoding and/or other DSP capabilities.
Refer to the SBC Series Release Notes for a complete list of instance types supported by
Mediant VE SBC, their capacities and capabilities.
3.6 Automatic Configuration
Mediant VE SBC supports automatic configuration through the cloud-init mechanism. For
more information, refer to the Automatic Provisioning of Mediant VE SBC via Cloud-Init
Configuration Note.
Installation Manual 22 Document #: LTRT-10877Installation Manual 4. Deploying Standalone Mediant VE via AWS EC2 Console
4 Deploying Standalone Mediant VE via
AWS EC2 Console
This section describes deployment for a standalone Mediant VE SBC via the AWS EC2
console.
Note: This deployment method is applicable only to standalone (i.e., non-HA)
deployments.
To deploy the standalone Mediant VE SBC instance:
1. Open the AWS Marketplace console at https://console.aws.amazon.com/marketplace.
2. In the Discover Products tab, search for the "Mediant VE" product.
Figure 4-1: Searching for Mediant VE Product in the AWS Marketplace
Two products are displayed:
• "Mediant VE Session Border Controller (SBC)": This product includes a trial
license (limited to three SBC sessions) and requires a purchase of production
license from AudioCodes.
• "Mediant VE Session Border Controller (SBC) – PAYG": This product includes a
pay-as-you-go license that enables Customers to use the SBC as much as
needed and pay for the actual service consumed via their AWS account billing.
Ver. 7.4 23 SBC SeriesMediant VE SBC for AWS
3. Choose the Mediant VE product that matches your licensing needs. For example,
choose Mediant VE Session Border Controller (SBC) product.
Figure 4-2: Mediant VE Product Page in AWS Marketplace
4. Click Continue to Subscribe to subscribe to the Mediant VE SBC product.
5. Click Continue to Configuration to proceed with SBC deployment.
Figure 4-3: Mediant VE Configuration Page in AWS Marketplace
Installation Manual 24 Document #: LTRT-10877Installation Manual 4. Deploying Standalone Mediant VE via AWS EC2 Console
6. Choose the software version that you want to deploy:
• 7.20A stream is based on OS Version 6.
• 7.20CO and 7.40A streams are based on OS Version 8 and provide significantly
better performance and capacity (refer to the SBC-Gateway Series Release
Notes for details).
7. Choose the Region where you want to launch the SBC.
Note: For the Mediant VE SBC – PAYG product, support is currently provided for
installations in US regions only. For support in other regions, please contact us at
https://online.audiocodes.com/aws-support-cloud.
8. Click Continue to Launch.
Figure 4-4: Mediant VE Launch Page in AWS Marketplace
9. From the 'Choose Action' drop-down list, select Launch through EC2, and then click
Launch; the Choose Instance Type page appears:
Ver. 7.4 25 SBC SeriesMediant VE SBC for AWS
Figure 4-5: Choose Instance Type Page
10. Choose the instance type as follows:
• If your deployment does not require transcoding and/or other DSP capabilities,
choose the m5.large instance type for 7.20CO or 7.40A software version or
r4.large instance type for 7.20A software version.
• If your deployment requires transcoding and/or other DSP capabilities, choose
the c5.2xlarge / c5.9xlarge instance type for 7.20CO or 7.40A software version
or c4.2xlarge / c4.8xlarge instance type for 7.20A software version.
Refer to the SBC Series Release Notes for a complete list of instance types supported
by Mediant VE SBC, their capacities and capabilities.
11. Click Next; the Configure Instance page appears:
Figure 4-6: Configure Instance Page
12. Configure network devices and IP addresses:
• For Network, select the VPC where SBC should be deployed.
• For Subnet, select the LAN Subnet. This subnet is used to communicate with the
Enterprise IP-PBX and for accessing the SBC management interface (Web or
CLI).
Installation Manual 26 Document #: LTRT-10877Installation Manual 4. Deploying Standalone Mediant VE via AWS EC2 Console
• For IAM role:
♦ If you are deploying the Mediant VE SBC – PAYG product, select
Automatically create an IAM role with the required permission and the name
below, and then enter the IAM role name (e.g., "metering-role").
♦ If you are deploying the Mediant VE SBC product, leave IAM role empty.
Note: The Mediant VE SBC – PAYG product requires an IAM role with the following
policy:
{
"Version": "2012-10-17",
"Statement": [
{
"Action": [
aws-marketplace:MeterUsage
],
"Effect": "Allow",
"Resource": "*"
}
]
}
This role allows Mediant VE SBC PAYG instance to communicate with the AWS
Metering API and must be assigned to the launched instance – either automatically (as
described above) or manually.
• If you want the deployed instance to have multiple network interfaces, in the
Network Interfaces section located at the bottom of the page, click Add Device,
and then select the subnet for the added device (eth1).
• If you want the deployed instance to have multiple IP addresses on the same
network interface, in the Network Interfaces section located at the bottom of the
page, click Add IP.
Notes:
• If your instance has only one network interface, AWS EC2 may automatically assign
a public IP address to the instance. The exact behavior depends on the VPC and/or
Subnet configuration. This address however changes if you stop/start the instance
and therefore is typically not useful for production environment.
• If you configure multiple network interfaces, AWS EC2 does not automatically assign
public IP addresses for the instance.
• To make the Mediant VE SBC instance properly reachable from the Internet, you
should assign Elastic IP addresses to it, as described in Section Assigning Elastic IP
Addresses to the Instance.
• AWS EC2 Web console supports the configuration of up to two network devices
during instance launch. To overcome this limitation and define additional network
devices during initial instance launch, consider using AWS EC2 CLI or AWS
CloudFormation instead.
• If you need to add/remove network interfaces and/or secondary IP addresses after
the initial instance deployment, do this through AWS EC2 management interfaces
(i.e., AWS EC2 Web console or AWS EC2 CLI). Mediant VE SBC software
automatically detects these changes and updates its networking configuration
accordingly.
Ver. 7.4 27 SBC SeriesMediant VE SBC for AWS
13. Click Next; the Add Storage page appears:
Figure 4-7: Add Storage Page
14. From the 'Volume Type' drop-down list, select the required volume of the instance.
This setting does not affect SBC performance and may be set to any value.
15. Click Next; the Tag Instance page appears:
Figure 4-8: Tag Instance Page
Installation Manual 28 Document #: LTRT-10877Installation Manual 4. Deploying Standalone Mediant VE via AWS EC2 Console
16. In the 'Value' field, enter a name for your instance, and then click Next; the Configure
Security Group page appears:
Figure 4-9: Configure Security Group Page
17. Configure firewall rules to allow management (SSH, HTTP, and HTTPS), signaling
(SIP) and media (RTP/RTCP) traffic with your instance. Use default rules as a starting
point and modify them to match your actual deployment needs.
Ver. 7.4 29 SBC SeriesMediant VE SBC for AWS
18. Click Review and Launch; the Review page appears displaying a summary of your
instance configuration:
Figure 4-10: Review Page
19. Click Launch; the Select an existing key pair window appears.
20. Select a key pair to authenticate SSH connection with the SBC instance, click the I
acknowledge check box, and then click Launch Instances.
21. Wait until the new Mediant VE instance is deployed and fully starts (it may take up to 5
minutes). Navigate to the Instances page and check the instance-id of the deployed
instance.
22. Proceed to the next step to assign Elastic IPs to the launched SBC instance.
23. Once you’re finished with networking configuration, log in to the deployed instance
using the following default credentials:
• Username: Admin
• Password: instance-id
Installation Manual 30 Document #: LTRT-10877Installation Manual 4. Deploying Standalone Mediant VE via AWS EC2 Console
4.1 Assigning Elastic IP Addresses to the Instance
The AWS EC2 environment assigns “private” IP addresses to the instances running in it.
These addresses may be used for communication between the instances running inside
the same network (VPC); however, they may not be used to connect to the instance over
the Internet.
If the instance has only one network device, AWS EC2 may automatically assign a public
IP address to it. The exact behavior depends on the VPC and/or Subnet configuration. This
address however is taken from a “shared pool” and changes if you stop/start the instance.
Therefore, it is not very useful for production environment.
To make SBC properly reachable over the internet, you must allocate Elastic IP addresses
and assign them to your instance. Multiple Elastic IP addresses may be assigned to the
same AWS EC2 instance, depending on the number of configured private IP addresses.
When an Elastic IP address is associated with the specific instance’s private IP address,
AWS EC2 environment performs NAT translation by converting elastic IP address to the
private IP address, while preserving the port range. If the SBC needs to communicate with
a SIP entity using the Elastic IP address, the latter must be configured in the NAT
Translation table to ensure proper modification of SIP / SDP messages for NAT traversal.
To allocate Elastic IP address to SBC instance:
1. Open the EC2 console at https://console.aws.amazon.com/ec2.
2. Navigate to the Elastic IPs page under NETWORK & SECURITY:
Figure 4-11: Elastic IPs Page
3. Click Allocate New Address; a message box appears requesting you to confirm.
Ver. 7.4 31 SBC SeriesMediant VE SBC for AWS
4. Click Yes, Allocate to confirm; a message box appears displaying the allocated IP
address:
Figure 4-12: Allocated IP Address
5. Click Close to close the message box.
6. From the Actions drop-down list, select Associate Address.
Figure 4-13: Associate Address Window
7. Select the instance or network interface and private IP address to which you want to
associate the Elastic IP address, and then click Associate.
8. If you have configured multiple IP addresses and want to make them reachable over
the Internet as well, repeat the procedure for additional IP addresses.
Installation Manual 32 Document #: LTRT-10877Installation Manual 4. Deploying Standalone Mediant VE via AWS EC2 Console
4.2 Post-Installation Configuration of Mediant VE SBC –
PAYG Product
The "Mediant VE SBC – PAYG" product includes a pay-as-you-go (PAYG) license that
requires a persistent connection between the SBC and the AWS Metering API. This
connection is performed using public IP addresses. Therefore, you must assign an Elastic
IP address to one of the Mediant VE SBC’s network interfaces, as described in the
previous section. You must also configure the Mediant VE SBC to use this interface, as
described below.
Notes:
• This section is applicable only to the "Mediant VE SBC – PAYG" product that uses
the pay-as-you-go (PAYG) license.
• The following procedure is extremely important, as without it the SBC will be unable
to communicate with the AWS Metering API and will seize its service.
To perform post-installation configuration of Mediant VE SBC – PAYG product:
1. Open the SBC Web interface.
2. Log in using default credentials:
• Username: Admin
• Password: instance-id
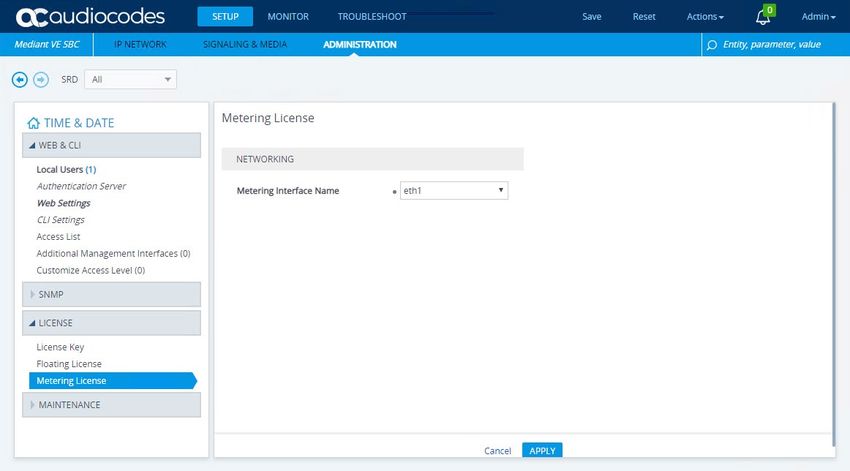
3. Navigate to the Metering License page (ADMINISTRATION > LICENSE > Metering
License).
Figure 4-14: Metering License Page
4. From the 'Metering Interface Name' drop-down list, select the network interface that
has an Elastic IP address attached. This network interface will be used to
communicate with the AWS Metering API.
5. Click Apply to apply your settings.
6. On the toolbar, click Save to save your settings.
Ver. 7.4 33 SBC SeriesMediant VE SBC for AWS
4.2.1 Troubleshooting Mediant VE SBC – PAYG Deployment
Mediant VE SBC – PAYG deployment requires persistent connection between the SBC
and AWS Metering API. If this connection is unavailable, SBC seizes its operation and
raises the "No connection to Metering API" alarm.
SBC contacts the AWS Metering API after the call is completed. Therefore, you will not be
able to detect if there is a problem until you have perform a few calls.
Typical reasons that may prevent proper connection between the SBC and the AWS
Metering API include the following:
No "metering" IAM role (with aws-marketplace:MeterUsage action) assigned to
the SBC instance.
No Elastic IP address on the network interface used for communication with the AWS
Metering API (ADMINISTRATION > LICENSE > Metering License).
A Network Security Group or some other firewall device is blocking communication
between the SBC and the AWS Metering API endpoint
(https://metering.marketplace..amazonaws.com).
Incorrect UTC time configured on the SBC (ADMINISTRATION > TIME & DATE).
While troubleshooting, it may be useful to enable the detailed metering logs, by connecting
to the SBC’s CLI interface and issuing the following commands:
enable
(default: Admin)
debug cloud-license toggle-cl-debug
Collect the logged messages via one of the following means:
Web interface’s TROUBLESHOOT > MESSAGE LOG page
CLI interface’s debug log command
Syslog Viewer utility available at https://tools.audiocodes.com/install/
You may need to wait up to 15 minutes for the metering logs to accumulate after enabling
them.
Installation Manual 34 Document #: LTRT-10877Installation Manual 5. Deploying High-Availability (HA) Mediant VE via CloudFormation Service
5 Deploying High-Availability (HA) Mediant
VE via CloudFormation Service
This section describes deployment of high-availability (HA) Mediant VE that includes two
EC2 instances, operating in 1+1 Active/Standby mode. The deployment is performed via
the CloudFormation service. The corresponding CloudFormation template is included in the
Mediant VE Installation Kit, which can be downloaded from
https://services.audiocodes.com/app/answers/detail/a_id/8.
Note:
• This deployment method is applicable only to HA (i.e. not standalone) deployments.
• HA deployment is supported only by the Mediant VE SBC product (and not by the
Mediant VE SBC – PAYG product).
The CloudFormation template provided by AudioCodes has certain limitations. For
example, it attaches the Elastic IP to the management interface of the deployed Mediant
VE instance, but not to the additional interfaces (if used). Customers should use the
provided CloudFormation as a reference and modify it to match their deployment needs.
To deploy high-availability (HA) Mediant VE via AWS CloudFormation service:
1. Open the CloudFormation console at https://console.aws.amazon.com/cloudformation
Figure 5-1: CloudFormation Console
2. Select the Region (in the upper right corner) in which to perform the deployment.
Ver. 7.4 35 SBC SeriesMediant VE SBC for AWS
3. Click Create Stack to create a new stack, and then select With new resources
(standard) from the drop-down menu; the Create Stack page appears:
Figure 5-2: CloudFormation – Create Stack Page
4. Under the Specify template group, select the Upload a template file, click Choose
File, and then select the Mediant VE HA CloudFormation template file provided by
AudioCodes.
5. Click Next; the Specify Stack Details page appears with the fields populated with
parameter settings from the template file that you loaded in the previous step:
Figure 5-3: CloudFormation - Specify Details Page (Stack Name)
6. In the Stack Name field, type in a meaningful stack name. The stack name is an
identifier that helps you find a particular stack from a list of stacks. A stack name can
contain only alphanumeric characters (case-sensitive) and hyphens. It must start with
an alphabetic character and can't be longer than 128 characters.
Installation Manual 36 Document #: LTRT-10877Installation Manual 5. Deploying High-Availability (HA) Mediant VE via CloudFormation Service
7. Under the Parameters section, configure parameters to match the desired stack
configuration:
• Amazon EC2 Configuration:
♦ Instance type: AWS EC2 instance type for the stack.
♦ Amazon Machine Image (AMI): Amazon Machine Image (AMI) ID of
Mediant VE SBC (check the Mediant VE product in the AWS Marketplace to
find AMI ID for the specific region).
♦ IAM Role: Name of the existing IAM role that enables Mediant VE to
manage its network interface, as created in Section IAM Role for Mediant VE
HA Deployment.
♦ Key Name: Name of the existing Key Pair used to secure access to the
Mediant VE’s SSH interface.
♦ S3 URL of INI Configuration File: (Optional) Amazon S3 URL of initial
Mediant VE configuration file.
Note: If you configure a value for “S3 URL of INI Configuration File”, make sure that the
IAM role allows access to the corresponding S3 bucket, as described in Section IAM
Role for Initial Configuration from S3 URL.
• Network Configuration:
♦ Which VPC should the SBC be deployed to? VPC ID of the existing
Amazon Virtual Private Cloud (VPC) where Mediant VE should be deployed.
♦ Number or Network Interfaces: Number of network interfaces to be
attached to Mediant VE SBC instances. Minimum number is 2; maximum
number depends on the instance type used. Refer to Section Network
Prerequisites for details.
♦ HA Subnet: Subnet ID of existing subnet in your VPC. The subnet is used
for internal traffic between two SBC instances and for accessing AWS API.
The subnet must have a private EC2 API endpoint or a NAT Gateway set as
default route, as described in Section HA Subnet. It is attached to the 1st
network interface (eth0).
♦ Main Subnet: Subnet ID of existing subnet in your VPC. The subnet is used
for Management traffic (e.g., for accessing the SBC's Web interface). It may
also be used for VoIP traffic (signaling and media). It is attached to the 2nd
network interface (eth1).
♦ 1st Additional Subnet: Subnet ID of existing subnet in your VPC. The
subnet is used for VoIP traffic (signaling and media). It is attached as the 3rd
network interface (eth2). If 'Number of Network Interfaces' is less than 3, set
this parameter to the same value as 'Main Subnet'.
♦ 2nd Additional Subnet: Subnet ID of existing subnet in your VPC. The
subnet is used for VoIP traffic (signaling and media). It is attached as the 4th
network interface (eth3). If 'Number of Network Interfaces' is less than 4, set
this parameter to the same value as 'Main Subnet'.
♦ Public IPs: Select which network interfaces should be assigned with public
(Elastic) IP addresses. Keep in mind that for Elastic IPs to operate correctly,
corresponding subnets must have an Internet Gateway set as the default
route.
8. Click Next; the Options page appears. Leave this page at its default settings.
Ver. 7.4 37 SBC SeriesMediant VE SBC for AWS
9. Click Next; the Review page appears, showing a summary of your stack settings:
10. Click Create; CloudFormation starts creating the stack. During stack creation, its state
changes to "CREATE_IN_PROGRESS".
Figure 5-4: CloudFormation – Stack Creation Progress
11. Wait until the stack is created and its state changes to "CREATE_COMPLETE". Two
SBC instances are created and configured to operate in 1+1 active/standby mode.
Their instance-ids, management IPs and default admin credentials are listed in the
Outputs tab.
Figure 5-5: CloudFormation – Stack Outputs
Installation Manual 38 Document #: LTRT-10877Installation Manual 5. Deploying High-Availability (HA) Mediant VE via CloudFormation Service
12. Access the SSH or Web interface of the deployed Mediant VE SBC using the IP
address from the privateOamIP or publicOamIP field, listed in the Outputs tab. Use
the default admin credentials – from adminUsername and adminPassword fields –
to log in.
Note: If you copy/paste the instance-id from the Outputs tab, the browser may append
a space to the copied value, thus making it invalid. Therefore, it is recommended to type
instance-id manually.
Ver. 7.4 39 SBC SeriesMediant VE SBC for AWS
5.1 Deleting HA Mediant VE Deployment
To delete deployed Mediant VE stack, use Delete action from the CloudFormation screen.
Installation Manual 40 Document #: LTRT-10877Installation Manual 6. Deploying Mediant VE via Stack Manager
6 Deploying Mediant VE via Stack Manager
This section describes the deployment of Mediant VE via Stack Manager.
Note: This method is applicable only to the Mediant VE SBC product (and not the
Mediant VE SBC – PAYG product). Both standalone and HA deployment topologies
are supported.
To deploy Mediant VE via Stack Manager:
1. Install the Stack Manager tool, as described in the Stack Manager User's Manual,
which you can download from AudioCodes website at
https://www.audiocodes.com/library/technical-documents.
2. Create a new Mediant VE stack via Stack Manager’s create command, as described
in the Stack Manager User's Manual.
Ver. 7.4 41 SBC SeriesMediant VE SBC for AWS
Figure 6-1: Creating New Instance via Stack Manager
Installation Manual 42 Document #: LTRT-10877Installation Manual 6. Deploying Mediant VE via Stack Manager
6.1 Public IP Addresses
During Mediant VE stack creation, Stack Manager lets you specify which subnets (and
corresponding network interfaces) will be assigned with public (Elastic) IP addresses via
the Public IPs parameter in the Networking section.
For each assigned Elastic IP address, Stack Manager creates corresponding entries in the
NAT Translation SBC configuration table, thus ensuring that when the SIP application
attached to the corresponding private IP addresses communicates with external SIP peers,
it essentially does this via the Elastic IP address.
It is also possible to attach multiple Elastic IP addresses to the same network interface.
This may be done by configuring the public_ips advanced configuration parameter (via
Advanced Config section).
Note: When the public_ips advanced configuration parameter is specified (via
Advanced Config section), it overrides any value configured via the Public IPs
parameter in the Networking section.
public_ips
Contains comma-separated list of subnet names (main, additional1, and additional2),
which will be assigned with Elastic IP addresses and optionally, with the number of
Elastic IP addresses on the corresponding network interface.
For example:
public_ips = main:2,additional1
attaches two Elastic IP addresses to the network interface connected to the Main
subnet (eth0 for standalone deployment, eth1 for HA deployment) and one Elastic IP
address to the network interface connected to the Additional 1 subnet (eth1 for
standalone deployment, eth2 for HA deployment).
When the public_ips advanced configuration parameter is specified, Stack Manager
automatically creates secondary private IP addresses on the network interfaces that
may be required for Elastic IP attachment. The exact behavior depends on the
deployment type:
• Standalone deployments: first Elastic IP address is attached to the primary
private IP address. For each additional Elastic IP address, corresponding
secondary IP addresses are implicitly created.
• HA deployments: Elastic IP addresses are always attached to the secondary
private IP addresses. For each Elastic IP address, corresponding secondary IP
addresses are implicitly created.
Ver. 7.4 43 SBC SeriesMediant VE SBC for AWS
6.2 Private IP Addresses
Stack Manager always creates one “operational” private IP address on each network
interface. The exact behavior depends on the deployment type:
Standalone deployments: primary IP address is used on each interface
HA deployments: primary IP addresses on eth1, eth2 and eth3 interfaces (connected
to Main, 1st and 2nd Additional subnets correspondingly) are not used, because they
can’t be moved between two Mediant VE instances during activity switchover; instead,
secondary IP addresses are created and used.
It is also possible to create multiple “operational” private IP addresses on the same network
interface. This may be done by using the additional_ips advanced configuration
parameter (via Advanced Config section).
additional_ips
Contains a comma-separated list of subnet names (main, additional1, and
additional2), which will be assigned with additional private IP addresses and
optionally, with the number of additional private IP addresses on the corresponding
network interface.
For example:
additional_ips = main,additional1:2
creates one additional private IP address on the network interface connected to the
Main subnet (eth0 for standalone deployment, eth1 for HA deployment) and two
additional private IP addresses on the network interface connected to the Additional 1
subnet (eth1 for standalone deployment, eth2 for HA deployment).
The number of additional private IP addresses specified via the additional_ips advanced
configuration parameter is added on top of any private IP addresses created by Stack
Manager by default and/or due to the public (Elastic) IP addresses assigned to the specific
network interface.
For example, the following configuration:
HA Mode: "enable"
HA Subnet:
Main Subnet:
1st Additional Subnet:
Public IPs: "Main subnet"
Advanced Config:
additional_ips = main,additional1
creates the following networking configuration:
eth0 – one primary IP addresses (used for internal communication between Mediant
VE instances)
eth1 – one primary and two secondary IP addresses:
• Primary IP address is not used because it can’t be moved between Mediant VE
instances in case of switchover
• 1st secondary IP address - first “operational” private IP address, created implicitly
and assigned with an Elastic IP address (due to the Public IPs configuration
parameter)
• 2nd secondary IP address - created due to the additional_ips advanced
configuration parameter
Installation Manual 44 Document #: LTRT-10877Installation Manual 6. Deploying Mediant VE via Stack Manager
eth2 – one primary and two secondary IP addresses:
• primary IP address is not used because it can’t be moved between Mediant VE
instances in case of switchover
• 1st secondary IP address – first “operational” private IP address, created implicitly
• 2nd secondary IP address – created due to the additional_ips advanced
configuration parameter
Ver. 7.4 45 SBC SeriesMediant VE SBC for AWS
This page is intentionally left blank.
Installation Manual 46 Document #: LTRT-10877You can also read