ONE ID Identity and Access Management System - Local Registration Authority User Guide - eHealth Ontario
←
→
Page content transcription
If your browser does not render page correctly, please read the page content below
ONE® ID Identity and Access
        Management System
       Local Registration Authority User
                     Guide

Document Identifier: 2274
Version: 2.3

Document Identifier: 2274   Sensitivity: High   Page 1
Document Version: 2.1
Copyright Notice

Copyright © 2011, eHealth Ontario

All rights reserved

No part of this document may be reproduced in any form, including photocopying or transmission electronically to any
computer, without prior written consent of eHealth Ontario. The information contained in this document is proprietary to
eHealth Ontario and may not be used or disclosed except as expressly authorized in writing by eHealth Ontario.

Trademarks

Other product names mentioned in this document may be trademarks or registered trademarks of their respective
companies and are hereby acknowledged.

Revision History

                            Date          Version                                Revision

                 March 4, 2021               2.3        Revisions to reflect RSA SecurID token management
                                                        Update to Appendix F – 13.3.6 do not add PD to TR
                 August 13, 2018             2.2        accounts
                                                        Added Appendix G – Diagnostic Imaging and updated
                 August 21, 2017            2.1
                                                        available CCO roles
                 September 22, 2015         2.o         Added Appendix F - Panorama
                                                        Added sections 5.4, RSA SecurID Token Modification and
                                                        4.6.2 Registering Organizations
                 April 15, 2015             1.9
                                                        Updates to Account Statuses
                 December 1, 2014           1.8         Changes to “Identify Individual” page

                 June 8, 2014               1.7         Added enrolments in Appendix C; updated images

                 March 2, 2014              1.6         Added section 4.6.1, Supplemental Identity Verification

                 January 21, 2014           1.5         Updates to enrolment listing and sections 4.7, 5.2.6 & 5.2.7

                                                        Addition 0f “Guidelines to Protecting Personal Information”
                 March 20, 2013             1.4
                                                        and updated enrolments listing

                                                        Updates to Home page image with Dashboard and sections
                 June 19, 2012              1.3
                                                        4.7, 5.2.6 & 5.2.7

                 December 5, 2011           1.2         Mandatory phone number and new banner

                 August 15, 2011            1.1         Added enrolments in Appendix C

                 June 6, 2o11               1.0         Initial Release

Document Identifier: 2274                              Sensitivity: High                                               Page 2
Document Version: 2.1
Table of Contents
1.0      About This Document                                                                                                                                                      5
         1.1  Purpose .......................................................................................................................................................... 5
         1.2  Scope .............................................................................................................................................................. 5
         1.3  References ...................................................................................................................................................... 5

2.0      Introduction                                                                                                                                                             6

3.0      Logging In                                                                                                                                                           7
         3.1  Home Page ..................................................................................................................................................... 9

4.0      Register and Enrol Individuals                                                                                                                                   11
         4.1  Verification and Sponsorship .......................................................................................................................11
         4.2  Identify Individual ....................................................................................................................................... 13
         4.3  View Registrant Profile ................................................................................................................................ 15
         4.4  Add Preferences ........................................................................................................................................... 16
         4.5  Add Service Desk Challenge Questions ...................................................................................................... 17
         4.6  Add Professional Designation ..................................................................................................................... 18
         4.7  Add Identity Documents ............................................................................................................................ 20
         4.8  Add Enrolments ...........................................................................................................................................23

5.0      Registrant Maintenance                                                                                                                                      27
         5.1  Modifying a Registrant ................................................................................................................................ 27
         5.2  Registrant Profile Modifications ................................................................................................................. 31
         5.3  Enrolment Modifications ............................................................................................................................43

6.0      Guidelines to Protecting Personal Information                                                                                                                          55

7.0      Glossary                                                                                                                                                               56

8.0      Appendix A – Valid Values                                                                                                                                                57
         8.1  Service Desk Challenge Questions .............................................................................................................. 57
         8.2  Titles ............................................................................................................................................................. 57
         8.3  Preferred Languages .................................................................................................................................... 57
         8.4  Identity Documents .....................................................................................................................................58
         8.5  Sponsorship Suspend Reasons ...................................................................................................................58
         8.6  Sponsorship Reinstate Reasons .................................................................................................................. 59
         8.7  Sponsorship Revoke Reasons ..................................................................................................................... 59

9.0      Appendix B – Verification and Sponsorship                                                                                                                              60

10.0 Appendix C – Enrolments                                                                                                                                                    61

11.0 Appendix D – Requesting Replacement Tokens                                                                                                 62
     11.1 No tokens for New Registration or enrolment ...........................................................................................62
     11.2 Replacement tokens for Lost, Damaged or Reinstated Enrolments .........................................................62

12.0 Appendix E – Account Status                                                                                                                                                63

Document Identifier: 2274                                                             Sensitivity: High                                                                                 Page 3
Document Version: 2.1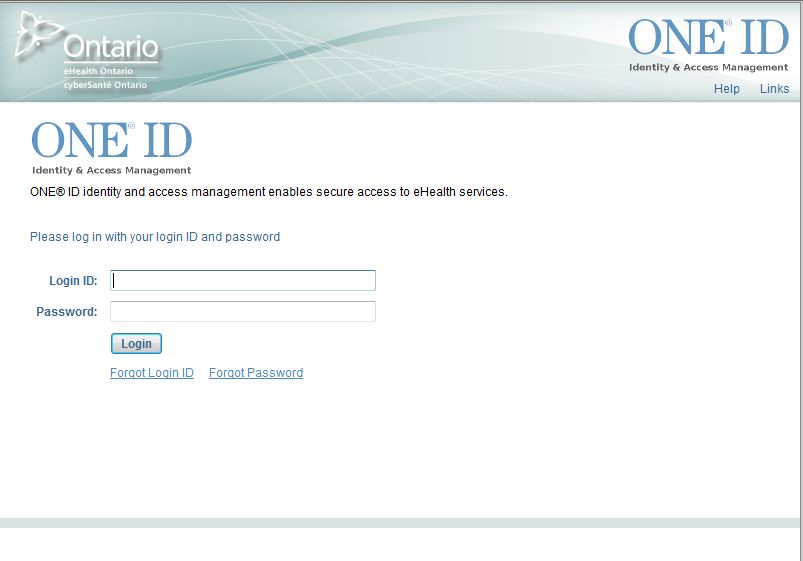
13.0 Appendix F – Panorama                                                                                                                                             64
     13.1 Sponsorship .................................................................................................................................................64
     13.2 Registration .................................................................................................................................................64
     13.3 Enrolment ....................................................................................................................................................64
     13.4 Requesting multiple enrolments for a user’s access .................................................................................. 75

14.0 Appendix G – Diagnostic Imaging Enrolments                                                                                                                      80

Document Identifier: 2274                                                        Sensitivity: High                                                                           Page 4
Document Version: 2.1
1.0 About This Document
1.1 Purpose
The purpose of this manual is to describe the detailed procedures of the various registration functions that a Local
Registration Authority can perform in the ONE® ID Identity and Access Management System. Each function has a brief
description, followed by steps on how to perform the function in the system.
1.2 Scope
This document contains procedures for the following:
Registering and Enrolling Individual Users
Viewing Account Information
Modifying Registrant Information
Modifying Enrolment information
Suspending, Reinstating and Revoking an Enrolment
1.3 References
For more detailed procedures on processes and policies, see the ONE® ID LRA Procedures Manual, located on the
Registration Community Site – http://www.ehealthontario.on.ca/one-id-lra
Document Identifier: 2274 Sensitivity: High Page 5
Document Version: 2.1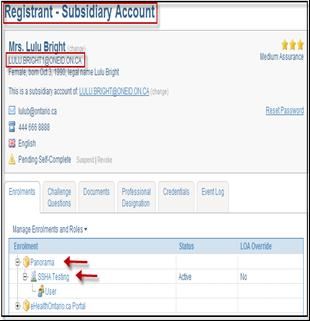
2.0 Introduction
   ONE® ID is a set of systems and business processes that provides trusted and secure access to eHealth applications and
   services to healthcare providers registered with Ontario Health.

   ONE® ID enables registration, authentication and authorization security for access to designated eHealth systems. The
   purpose of the ONE® ID system is to ensure that only those people who are authorized to electronically access personal
   health information under the control of Ontario Health are capable of doing so.

Document Identifier: 2274                               Sensitivity: High                                            Page 6
Document Version: 2.1
3.0 Logging In
   Prior to logging into the ONE® ID system, you must have been registered and enrolled as a Local Registration Authority;
   received a RSA SecurID token; self completed your registration online and activated your RSA token. Logging into the
   ONE® ID system requires two factors of authentication: Login ID and password, along with an RSA token challenge.

   To login, navigate to the URL http://www.ehealthontario.on.ca/en/support-topics/one-id-lra . Click Access the ONE®
   ID Application button.

               1.     Enter your Login ID and Password.

               2.     Click Login.

               3.     Enter your token PIN and the 6-digit Token code.

               4.     Click Confirm.

   If logging in for the first time or your PIN has been reset by the Ontario Health Digital Support Desk, you must create
   your token PIN number.

Document Identifier: 2274                                  Sensitivity: High                                            Page 7
Document Version: 2.1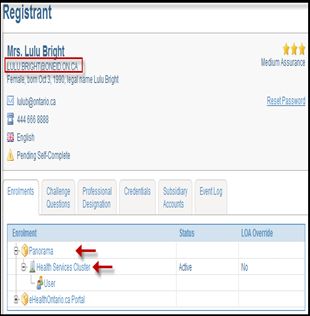
5.     Leave the PIN field blank and enter the 6-digit Token code.

               6.     Enter a 4 to 8 digit PIN number.

               7.     Click Confirm.

You will receive a confirmation that your new PIN number has been created. You can now proceed with logging into the
ONE® ID System.

               8.     Enter your token PIN and the 6-digit Token code.

               9.     Click Confirm.

Document Identifier: 2274                                   Sensitivity: High                                     Page 8
Document Version: 2.1
Upon successful authentication, the Home Page opens.
3.1 Home Page
From the Home Page, you can make a new registration request and view your profile.
3.1.1 Home
If at any time you wish to return to the Home Page, click Home.
3.1.2 User Status Dashboard
The User Status Dashboard allows LRAs to view the status their registrants newly added service enrolment. Names under
Successful Status are users whose service enrolments have successfully provisioned while names under Pending Status are
users whose service enrolments are still in the process of being provisioned
3.1.3 New Request
Click here to initiate a new request such as a new registration, add a new enrolment, or modify an enrolment or account
information.
3.1.4 My Profile
To verify the information in your profile, change your password or online and Service Desk challenge questions, click My
Profile. You can also view your enrolment information, identity documents and professional designations. For more
information and on how to manage your account, see the ONE® ID Registrant Reference Guide.
3.1.5 Help
In subsequent releases, this link opens a new window with Help information.
Document Identifier: 2274 Sensitivity: High Page 9
Document Version: 2.13.1.6 Logout When you have completed using the ONE® ID system, click Logout. 3.1.7 Acceptable Use Policy To view the Acceptable Use Policy, click this link located at the bottom of the Home screen. 3.1.8 Privacy Statement To view the Privacy Statement, click this link located at the bottom of the Home screen. Document Identifier: 2274 Sensitivity: High Page 10 Document Version: 2.1
4.0 Register and Enrol Individuals
Registration and enrolment of an individual into a ONE® ID service using the ONE® ID Identity and Access Management
System consists of three main steps:

               1.     Verification and Sponsorship – Your name appears as the individual who verified the new request.
                      Select the organization sponsoring the registrant’s access.

               2.     Identify the Individual – Identify information about the new registrant and by matching the
                      information provided, determine if the registrant already exists.

               3.     Enrolment – Provide the Registrant with access to the enrolment(s) in which they have been sponsored
                      by their organization.

         4.1 Verification and Sponsorship
The following is the process of collecting the necessary information about verification and sponsorship that is required to
register a new individual. The verifier and selected sponsor determine your ability to register an individual.

After you login, the Home Page opens. From here, select the type of request to process.

               1.     Click New Request.

               2.     From the New Request menu, select Individual. This takes you to the Verification and
                      Sponsorship screen.

Document Identifier: 2274                                   Sensitivity: High                                          Page 11
Document Version: 2.1
The system displays your name as the LRA performing the registration and/or enrolment and cannot be changed.
3. Select the Verified On date. Date selected should be the same date you verified the identity information.
Document Identifier: 2274 Sensitivity: High Page 12
Document Version: 2.14. Confirm that sponsorship has been received for the request. If the request has been authorized, select
Authorization for this request was received from a recognized sponsor. The system then
displays a list of sponsoring organization(s) in which you have been enrolled as an LRA
Note: If sponsorship was not received for the request, you cannot register a new individual.
5. From the list of Sponsoring Organization, select the organization that has authorized the request.
Registering Organizations can be identified by the icon located next to the organization’s name.
6. From the list of Available Services, verify that the service being requested is available for the selected
sponsoring organization and select Next. If the requested service is not listed, contact the Ontario Health
ONE ID Registration Agents for further assistance.
The system then opens the Identify Individual screen.
4.2 Identify Individual
To prevent duplicate registration records, you must determine whether a registrant already exists prior to creating a new
registration record. A search is conducted for registrants matching the identity information provided. If the registrant
already exists, you can modify the existing registrant. If the registrant does not exist, you create a new registrant.
1. Enter the login ID (first.last@oneid.on.ca)or Regulatory College to search for an existing registrant. If you
do not have this information, enter the full identity information for the registrant under “Provide Identity
Information” on the right of this screen.
2. Click Search.
Note: The New Registration button is greyed out until you have performed a search for an existing
registrant. Wildcard (* or %) searches are not permitted. Maximum characters that can be used for Name
fields is 25
Document Identifier: 2274 Sensitivity: High Page 13
Document Version: 2.1If matching results:
The system displays all registrants that exactly match the information provided. You may click on the registrant’s name to
view a read-only profile for that registrant to confirm you are selecting the correct account. The status of the registrant
account is also displayed. See Appendix E – Account status for a listing of statuses a registrant’s account can have.
1. Select the radio button next to the registrant’s profile you wish to modify. The Modify Registration
button is now active.
2. Select New Registration. See section 5.2 Registrant Profile Modifications, for more information on
modifying a registrant’s profile.
If potential matching results:
Confirm that the identity information provided has been entered correctly. If not, make the necessary changes and click
Search. Once you have confirmed that the correct identity information has been entered, you may proceed with creating a
new registration.
1. Select the check box Double Checked. The New Registration button is now active.
2. Select New Registration to create a new registrant record.
If no matching results:
The New Registration button becomes active and may now be selected and you may proceed with creating a new registrant
record.
Document Identifier: 2274 Sensitivity: High Page 14
Document Version: 2.11. Select New Registration to create a new registrant record.
Note: If the registrant is less than the minimum age of fourteen (14) required for Assurance Level One
(AL1), or sixteen (16) for Assurance Level Two (AL2) you must submit a request directly to Ontario
Health ONE ID Registration Agents.
4.3 View Registrant Profile
Once you have collected the identity information, an incomplete set of the registrant’s details are displayed. You can enter
any remaining detail here before you save the registration. If the identify information is not correct, click cancel to return
to the previous screen to re-enter the information and perform a duplicate search on the corrected information.
Note: You may cancel the registration at any time by selecting Cancel. In this case, all data entered
for the account is discarded. A cancel confirmation warning appears, asking you to confirm the
cancellation.
Document Identifier: 2274 Sensitivity: High Page 15
Document Version: 2.1Note: The highlighted field at the bottom of the screen provides you with the necessary tasks to
complete before the registrant record can be saved.
4.4 Add Preferences
The following steps outline the process for adding the registrant’s contact preferences.
1. From the Registrant screen, just below the registrant’s name, click on set contact email. This opens
the Preferences screen.
2. Enter the Contact Email and Contact Phone Number and select the Preferred Language. The
fields marked with an asterisk are mandatory fields.
Document Identifier: 2274 Sensitivity: High Page 16
Document Version: 2.1Note: The email address entered will be used to notify the Individual when their password is due to
expire.
3. When you are done entering the information, click OK to save it. You then return to the registrant’s
profile.
Once you have added the preferences, you will see a change link. To make a modification to any of the preferences, select
change next to the preference you wish to modify. The Preferences screen opens where you can complete the
modification.
4.5 Add Service Desk Challenge Questions
The following steps outline the process for adding the registrant’s Service Desk Challenge Questions.
1. On the Challenge Questions tab, click Add. This takes you to the Service Desk Challenge Questions
screen.
2. From the drop-down menu, select two challenge questions.
3. Enter the responses.
Document Identifier: 2274 Sensitivity: High Page 17
Document Version: 2.14. Click OK. The updated Registrant Profile is displayed, masking the Answers to the Challenge Questions
for security purposes.
Note: If either the challenge questions or the answers are the same (i.e., same question chosen or same
answer provided), the system displays a SAME QUESTION or SAME ANSWER message and a different
question or answer must be provided. See Appendix A for a list of available questions.
Once you have added the challenge questions, a change link appears. To modify either of the challenge questions, click
change. The Service Desk Challenge Questions screen opens, so you can modify the challenge questions.
4.6 Add Professional Designation
The ONE® ID system validates a registrant’s legal name, Regulatory College and Registration Number against the Provider
Registry when entering the Professional Designation. If the college registration number does not match against the
Provider Registry, the ONE® ID system will display an error message.
The following steps describe the process for adding the registrant’s professional designation.
1. On the Professional Designation tab, click Add. The Professional Designation screen opens.
The Professional Designation tab is visible for both Rudimentary and Medium level of assurance registrants.
However, the addition of a professional designation is mandatory only for medium level of assurance
registrations.
Document Identifier: 2274 Sensitivity: High Page 18
Document Version: 2.12. From the drop-down menu, select the Regulatory College provided. If no Regulatory College has been
provided, select Not Applicable. In this case, you do not need to enter a Registration Number.
3. Enter the Registration Number. The Registration Number is mandatory only if a Regulatory College is
selected.
4. Click OK.
Note: The ONE® ID system validates a registrant’s first name (legal and/or preferred), legal last
name, Regulatory College and Registration Number against the Provider Registry when entering the
Professional Designation. If the college registration number does not match against the Provider
Registry, the ONE® ID system will display an error message.
5. The updated Registrant’s profile is displayed.
Once you have added the professional designation, a (change) link appears next to the document. To modify the
professional designation, click (change). The Professional Designation screen opens, where you can modify the
professional designation and/or registration number. You may also add additional professional designations as required
by selecting the Add link.
Document Identifier: 2274 Sensitivity: High Page 19
Document Version: 2.1Now that the Preferences, Service Desk Challenge Questions and Professional Designation have been entered, the system
indicates that the record is complete and can be saved. To save the record at Assurance Level 1 (AL1), go to Step 6 or
continue to section 4.6 Add Identity Documents to create an - Assurance Level Two (AL2) registration.
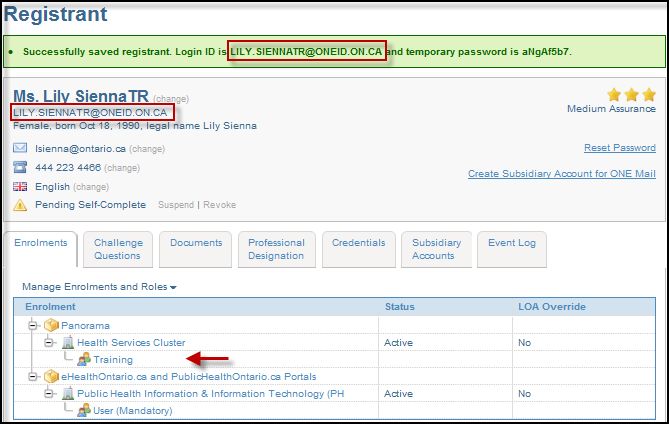
6. From the Registrant profile screen, click Save
a. The registrant record is created at Assurance Level One (AL1).
b. You receive confirmation that the registrant record has been successfully saved. The record displays
with the Login ID and temporary password.
c. The registrant receives an automatic enrolment into the eHealthOntario.ca portal
Note: Record the registrant’s Login ID and temporary password and provide the credentials to the
registrant. The temporary password is not displayed again and the registrant must call the Ontario Health
Digital Support Desk to obtain a new temporary password if it is not recorded.
4.7 Add Identity Documents
The following steps describe the process for adding the registrant’s identity documents.
Document Identifier: 2274 Sensitivity: High Page 20
Document Version: 2.11. On the Documents tab, click Add Primary Document. The Identity Document screen opens.
2. From the Document Type drop-down menu, make a selection.
3. Enter the document number. The document number must be recorded for the primary document and
impacts the Level of Assurance if not entered. The document number is not mandatory for the secondary
document.
4. Enter the Expiry Date (if applicable).
5. Click OK.
To add the second document, click Add Document and repeat the process.
The updated Registrant’s profile is displayed.
4.7.1 Supplemental Identity Verification
You may select Supplemental Identity Verification through the Add Document interface. This option may be used in
lieu of Secondary Identity Document.
1. From the Document Type drop-down menu, select Supplemental Identity Verification
Document Identifier: 2274 Sensitivity: High Page 21
Document Version: 2.12. The Number and Expiry Date fields become locked and a new drop-down menu, Registration Context
appears.
3. Select the relevant context from the Registration Context drop-down.
4. Click OK.
Supplemental Identity Verification is sufficient to establish Medium Level of Assurance when used in
conjunction with a Photo ID from the Primary Documents list.
4.7.2 Registering Organizations
In the ONE® ID system, Registering Organizations have an additional identity validation option. If you are an LRA at a
Registering Organization, please proceed with the following steps to capture the unique identifier as part of validating the
user’s identity. If you are registering a user who has not met your organization’s onboarding process requirements (e.g.
third party staff or contractor), please follow steps 1-5 in the above 4.7 Identity Document section.
1. On the Documents tab, click Add Employee Identifier
2. Enter the
Identification Number (e.g. Health Service Provider ID or Professional License Number).
Note: Document Type is preset to “Employee Identifier” and the Organization is displayed
3. Click OK.
Document Identifier: 2274 Sensitivity: High Page 22
Document Version: 2.1Note: The unique identifier is sufficient to grant Assurance Level 2 (AL2). There is no need to
review additional documents.
Once you have added the identity document(s), a (change) link appears next to each document. To modify an
identity document, click (change). You will be directed to the Identity Document screen, where you can modify
the document type, number and/or expiry date. You may also add additional identity documents as required.
The registrant’s profile is updated with the Level of Assurance, represented by stars. 1 star denotes Assurance
Level One (AL1) and 3 stars denotes Assurance Level Two (AL2).
Place your mouse over the stars to show the list of requirements required to fulfill Assurance Level Two.
4.8 Add Enrolments
The following steps outline the process for requesting a new enrolment or role for which the sponsor of the request (as
selected on the Verification and Sponsorship screen) has provided authorization.
Document Identifier: 2274 Sensitivity: High Page 23
Document Version: 2.1Note: If authorization from a recognized sponsor was not selected on the Verification and Sponsorship
screen, you cannot add any enrolments.
1. On the Enrolments tab, click Add Enrolments or Roles. This takes you to the Add Enrolments or Roles
screen.
Note: This screen displays the services available to the sponsoring organization as indicated on the
Sponsorship and Verification screen, as well as the level of assurance required for each service enrolment.
If the registrant does not have the correct level of assurance for the requested service, you cannot add the
service.
2. Select the enrolment(s) and role(s) that have been authorized for the registrant by the sponsoring
organization.
Note: To expand and view the list of roles available for the selected enrolment, click +. Mandatory
roles are not displayed as they are automatically provisioned.
Document Identifier: 2274 Sensitivity: High Page 24
Document Version: 2.13. Enter the attributes associated to the selected enrolment. Incomplete is indicated next to each enrolment
that requires attributes to be entered. If multiple enrolments are being added, you must select each
enrolment to display the attributes required. All attributes for each enrolment must be completed before
you can proceed. For more information regarding enrolment attributes, see Appendix C.
For enrolments requiring a token, enter the token serial number. You will need to assign the token to the
user in the RSA Console, please refer to the RSA Console User Guide for ONE ID Local Registration
Authorities for further details.
If you are adding an enrolment that requires a token and the registrant has an existing token, you are not
prompted to enter a token serial number.
In the event that you have run out of tokens, enter 00000000 in the Token Serial Number field and
contact the Ontario Health ONE ID Registration Agents to assign a token. See Appendix D for Details
4. Click Finish. The registration and enrolment tasks are complete.
5. From the Registrant profile, click Save.
Document Identifier: 2274 Sensitivity: High Page 25
Document Version: 2.1Note: You must complete the Challenge Questions, Documents, Professional Designation, and
Enrolments along with Email Contact prior to clicking Save. Once you have completed the record with
the mandatory information, the system displays a confirmation that the record is complete and can be
saved.
Select the plus (+) sign next to the enrolment to expand and view the following enrolment information:
a. Status of enrolment.
Active – If sponsorship of the enrolment is not suspended or revoked
Temporarily Unavailable – If the enrolment is in the process of being completed or provisioned
b. Organization that sponsored the enrolment.
c. Attributes associated to the enrolment. Click on the enrolment to view the attributes.
d. Role(s).
Confirmation that the registrant record has been successfully saved is displayed along with the Login ID and temporary
password. The registrant receives an automatic enrolment into the eHealth Ontario Portal.
If you have added an enrolment with a token you must assign the token to the users account in the RSA Console. Please
refer to the RSA Console User Guide for Local Registration Authorities for further information or contact the Ontario
Health Digital Support Desk.
Note: Record the registrant’s Login ID and temporary password and provide the credentials to the
registrant. The temporary password is not displayed again and the registrant must call the Ontario Health
Digital Support Desk to obtain a new temporary password if it is not recorded.
Document Identifier: 2274 Sensitivity: High Page 26
Document Version: 2.15.0 Registrant Maintenance
Registrant maintenance and modification using the ONE® ID Identity and Access Management System is comprised of 3
main steps:
1. Verification and Sponsorship – Your name appears as the verifier for the request. Select the
organization that is sponsoring the change.
2. Identify the Individual – Identify information about the registrant and determine by matching the
information provided, the correct registrant in order to perform the change.
3. Modify – Modify the Registrant details or access to the service(s) in which they have been sponsored by
their organization
5.1 Modifying a Registrant
5.1.1 Verification and Sponsorship
The following process describes how to collect the necessary information about verification and sponsorship that is
required for you to modify a registrant account. Your previous selections of verifier and selected sponsor determine which
aspects of the Registrant’s record you can modify.
1. From the New Request menu, select Individual. This takes you to the Verification and
Sponsorship screen.
Document Identifier: 2274 Sensitivity: High Page 27
Document Version: 2.1The system displays your name as the LRA
2. Select the Verified On date. The date should be the same date you verified the request to modify a
registrant’s account information.
Document Identifier: 2274 Sensitivity: High Page 28
Document Version: 2.13. Confirm that you have received sponsorship for the request. If the request has been authorized, select
Authorization for this request was received from a recognized sponsor. The system then
displays the sponsoring organization(s) in which you have been enrolled as an LRA.
If sponsorship was not received for the request, you cannot add or modify enrolments. See Appendix B –
Verification and Sponsorship for a complete list of functions that can be performed based on this
selection.
4. From the list of Sponsoring Organization, select the organization that has authorized the request.
5. From the list of Available Services, verify that the service being modified is available for the selected
sponsoring organization and select Next. If the requested service is not listed, contact the Ontario Health
ONE ID Registration Agents for further assistance.
The system then takes you to the Identify Individual screen.
5.1.2 Search for Registrant
The following process is necessary to determine if the registrant exists. A search is conducted for records matching the
identity information and login ID provided.
1. Enter the login ID (first.last@oneid.on.ca)or Regulatory College to search for an existing registrant. If you
do not have this information, enter the full identity information for the registrant under “Provide Identity
Information” on the right of this screen.
2. Click Search.
Note: The New Registration button is greyed out until a search for existing registrant has been
performed. Numerical values for Name fields cannot be used. Wildcard (* or %) searches are not
permitted.
Document Identifier: 2274 Sensitivity: High Page 29
Document Version: 2.1If matching results:
The system displays all registrants that exactly match the information provided. Click on the registrant’s name to view a
read-only profile and display more information about the registrant. Validate and determine that the correct account is
selected. The status of the registrant account is also displayed. See Appendix E – Account status for a listing of statuses a
registrant’s account can have.
3. If registrant is an exact match, select the radio button next to the registrant’s profile you wish to modify.
The Modify Registration button becomes active and you can select it.
If no matching results:
Confirm the identity information provided has been entered correctly. If required, modify the information and perform a
search on the corrected information. If no matching results, select New Registration to create a new registrant record.
Document Identifier: 2274 Sensitivity: High Page 30
Document Version: 2.11. Select New Registration to create a new registrant record. See Section 4.3 – View Registrant Profile for
more information on creating a new registrant record.
5.1.3 Registrant Profile
The Registrant profile screen displays a complete set of the registrant’s details and provides options for their
modifications.
View the registrant’s profile to determine which information you want to modify.
5.2 Registrant Profile Modifications
5.2.1 Modify Identity Information
The following steps outline the process to modifying a registrant’s identity information such as Login ID, Legal First name,
Legal Last name, Gender or Date of Birth. Identity documents are used to validate any changes to the core identity
information and may be required to validate a modification. Changes to a Registrant’s Login ID are allowed only when a
name change has occurred.
Note: If a registrant has active medium level of assurance enrolments, modification of a registrant’s
DOB to less than the minimum age of sixteen (16) is not permitted as this would cause the registrant’s
level of assurance to drop below the level required for the enrolments. This request must be submitted to
Ontario Health ONE ID Registration Agents.
Note: Modification of a registrant’s DOB to less than the minimum age of fourteen (14) must be
submitted to Ontario Health ONE ID Registration Agents.
Document Identifier: 2274 Sensitivity: High Page 31
Document Version: 2.11. On the Registrant profile screen, click Change next to the registrant’s name.
a. If the registrant is a medium level of assurance user, the Verify Identity Information Change
screen appears.
b. If the registrant is a rudimentary user, the Change Identity Information screen appears.
2. In the Verify Identity Information Change screen, select which verification method was provided for
the request.
An identity document was not verified for this request; or
One or more of the documents verified for this registrant in the past were verified for this request; or
A new identity document was verified for this request.
Legal First or Legal Last name cannot be modified if:
the registrant is registered at a Medium Level of Assurance and you have selected the first option; or
If document provided in the third option is not a Legal Change of Name Certificate. Only in the event
that the legal name was mistyped, you may select the second option.
Gender or Date of Birth cannot be modified if:
The registrant is registered at a Medium Level of Assurance and you have selected the first option. In
this case select the third option and provide new document.
For a gender change, the registrant must provide a new birth certificate. You can select the second option only in the event
that the gender or date of birth was mistyped.
Document Identifier: 2274 Sensitivity: High Page 32
Document Version: 2.1If you have selected the first option, you can modify Login ID, Title, First, Last and Middle Names.
3. Click Next. This takes you to the Change Identity Information screen.
You may be able to modify the fields, depending on the selection made on the Verify Identity Information Change screen.
The fields that you cannot modify are greyed out.
4. Make the requested modification to the registrant.
Note: When modifying the Login ID, you must provide a unique login ID. If the login ID you provide is
not unique, the system displays a duplicate login message and suggest an alternate login ID.
5. Update the Login ID to ensure it is unique (if required) and Click OK. The updated Registrant profile
screen displays with modified information. The modified information is provisioned for all service
enrolments.
6. Confirm the identity modification has been made correctly.
5.2.2 Modify Preferences
The following steps outline the process to modify a registrant’s preferences such as email address, phone number and
language preference.
Document Identifier: 2274 Sensitivity: High Page 33
Document Version: 2.11. From the Registrant profile screen, beside the email, phone or language preference, click change. This
takes you to the Preferences screen.
2. Modify the Contact Email, Contact Phone Number and/or Preferred Language. The preferred
language is only applicable to the eHealth Ontario portal enrolment.
3. Click OK. The registrant profile screen is displayed with the modified preferences. The modified
preferences are provisioned to any systems that require it.
4. Confirm the modified information is correct.
5.2.3 Modify Service Desk Challenge Questions
Service Desk Challenge Questions are collected for support purposes. A registrant is asked these questions when he/she
calls in to the Service Desk to verify his/her identity. The following steps outline the process to modify a registrant’s
Service Desk Challenge Questions.
Document Identifier: 2274 Sensitivity: High Page 34
Document Version: 2.11. From the Registrant profile screen, go the Challenge Questions tab and click Change. This takes you
to the Service Desk Challenge Questions screen.
2. From the drop-down menu, select the challenge questions.
3. Enter the responses.
Note: If either challenge questions or answers are the same (i.e., same question or answer chosen in
the fields provided) the system displays a SAME QUESTION or SAME ANSWER message and a different
question or answer must be provided. See Appendix A for a list of available questions.
4. Click OK.
Document Identifier: 2274 Sensitivity: High Page 35
Document Version: 2.15. The updated Registrant profile screen is displayed with the modified challenge questions.
5.2.4 Modify Identity Documents
The following steps outline the process to modify a registrant’s identity documents should any document need to be
replaced. If a replacement document has been provided, the document must be verified by the LRA. If an identity
document was found to be fraudulent, report the identity document to the Ontario Health Digital Support Desk.
Warning: Modification of identity documents can, in some cases, result in the level of assurance dropping below the level
required for the enrolments. Ensure that the appropriate replacement Primary or Secondary Identity documents are
provided before proceeding, to ensure the registrant maintains their required level of assurance for the services in which
they are enrolled. To achieve a Medium Level of Assurance, the registrant’s account must contain two identity documents,
one of which must contain a photo, one must be a primary document with the document number recorded, and both
documents must be current and must have been verified. For more information on identity documents and level of identity
assurance, see the LRA Procedure Manual.
1. From the Registrant profile screen, go the Documents tab.
2. Beside the document to be modified, click Change. This takes you to the Change Identity Document
screen.
3. In the Document Type drop-down menu, make a selection in the list provided.
4. Enter the Document Number (if applicable). The document number must be recorded if replacing a
primary document. If not entered, you are affecting the Level of Assurance.
Document Identifier: 2274 Sensitivity: High Page 36
Document Version: 2.15. Enter the Expiry Date (if applicable).
6. Click OK.
7. The updated Registrant profile screen is displayed with the modified identity documents.
5.2.5 Add Identity Document
Identity documents are used to validate identity during the registration and service enrolment of Registrants. Identity
documents are captured as part of the registration record and can be used to uniquely identify a registrant. The following
steps outline the process to add a new identity document to a registrant’s profile.
1. From the Registrant profile screen, go the Documents tab and click Add. This takes you to the
Identity Documents screen.
Document Identifier: 2274 Sensitivity: High Page 37
Document Version: 2.12. From the Document Type drop down menu, make a selection.
3. Enter the Document Number (if applicable). If you are adding a primary document, you must record
the document number. If not entered, it may affect the Level of Assurance.
4. Enter the Expiry Date (if applicable).
Note: If the registrant has a document with the same type and number already existing, this entry is
considered a replacement and you are prompted to confirm the replacement document.
5. Click OK.
6. The updated Registrant profile screen is displayed with the modified identity documents.
Place your mouse over the level of assurance to show a listing of the criteria that is used to determine the level of
assurance.
5.2.6 Modify Professional Designation
The following steps outline the process to modify a registrant’s Professional Designations.
Document Identifier: 2274 Sensitivity: High Page 38
Document Version: 2.11. From the Registrant profile screen, go the Professional Designation tab.
2. Next to the document to be modified, click on Change. This takes you to the Change Professional
Designation screen.
3. In the Regulatory College drop down menu, make a selection.
4. Enter the Registration Number. This is a mandatory field if a Regulatory College is selected.
5. Click OK and a confirmation box appears.
a. Click Replace this professional designation to confirm the change. If you select No, remain on
this page you are returned to the Change Professional Designation page.
Document Identifier: 2274 Sensitivity: High Page 39
Document Version: 2.1Note: The ONE® ID system validates a registrant’s first name (legal and/or preferred), legal last
name, Regulatory College and Registration Number against the Provider Registry when replacing the
Professional Designation. If the college registration number does not match against the Provider
Registry, the ONE® ID system will display an error message.
6. The updated Registrant profile screen is displayed with the modified Professional Designation.
5.2.7 Add Professional Designation
The following steps outline the process to add a registrant’s Professional Designation, should a new or additional
designation be provided.
1. From the Registrant profile screen, go the Professional Designation tab.
Document Identifier: 2274 Sensitivity: High Page 40
Document Version: 2.12. In the Professional Designation tab, click Add. This takes you to the Professional Designation
screen.
3. In the Regulatory College drop down menu, make a selection.
4. Enter the Registration Number. The Registration number is mandatory if you have selected a
Regulatory College.
Note: The ONE® ID system validates a registrant’s name (legal and/or preferred), Regulatory College
and Registration Number against the Provider Registry when adding the Professional Designation. If the
college registration number does not match against the Provider Registry, the ONE® ID system will
display an error message.
5. Click OK.
6. The updated Registrant profile screen displays with the added Professional Designation.
5.2.8 Remove Professional Designation
The following steps outline the process to remove a registrant’s Professional Designation.
Document Identifier: 2274 Sensitivity: High Page 41
Document Version: 2.11. From the Registrant profile screen, go the Professional Designation tab.
2. Next to the document to be removed, click on Change. This takes you to the Change Professional
Designation screen.
3. From the drop down menu, select Not Applicable from the list provided.
4. Click OK and a confirmation box appears.
5. Click Replace this professional designation to confirm the change. If you select No, remain on
this page you are returned to the Change Professional Designation page.
Document Identifier: 2274 Sensitivity: High Page 42
Document Version: 2.16. The updated Registrant profile screen appears, no longer displaying the Professional Designation.
5.3 Enrolment Modifications
This process allows for the modification of Enrolments or Roles. The following modifications can be performed: Addition,
Suspension, Reinstatement or Revocation of Enrolments or Roles. Sponsorship is required in order to perform any of
these modifications. Only those enrolments or roles used by your organization are available for selection.
5.3.1 Manage Enrolments and Roles
Manage Enrolments or Roles lets you select the type of modification required.
1. From the Registrant profile screen, go to the Enrolments tab and click Manage Enrolments and
Roles. This displays the enrolment modification options.
2. Select the modification to be performed:
a. Add Enrolments or Roles
b. Revoke Enrolments
Document Identifier: 2274 Sensitivity: High Page 43
Document Version: 2.1c. Delete Roles
d. Suspend Enrolments
e. Reinstate Enrolments
f. Change Enrolment Attributes
5.3.2 Add Sponsored Enrolment or Role
Adding a sponsored enrolment or role is the process by which one or more enrolments or roles are added to a
registrant at the request of a sponsoring organization. The following is the process of adding a sponsored
enrolment or role.
Note: Before adding a sponsored enrolment, ensure that the eHealth Ontario portal is not suspended.
If suspended, notify Ontario Health ONE ID Registration Agents before attempting to add a sponsored
enrolment.
1. From the Enrolments tab, click Manage Enrolments and Roles. This displays the enrolment
modification options.
2. Click on Add Enrolments or Roles. This takes you to the Add Enrolments or Roles screen.
Document Identifier: 2274 Sensitivity: High Page 44
Document Version: 2.1The top window displays a list of active services in which the user is currently enrolled in. All
available services for the sponsoring organization are listed below. Some Services may appear
greyed out. These Services are currently not available for selection and may be available for future
releases of the ONE® ID System.
3. From the list of Available Services, select the enrolment(s) and/or role(s) to be added.
Note: To display a list of roles available for the selected enrolment, click +. Mandatory roles are not
displayed as they are automatically provisioned
4. The system presents the option of Finish if no attributes are required or Next if the enrolment contains
attributes to be entered.
a. Click Finish, if there are no attributes to enter (proceed to step 7)
b. Click Next, if there are attributes for the selected enrolment that must be entered (proceed to
next Step)
Document Identifier: 2274 Sensitivity: High Page 45
Document Version: 2.15. Enter the attributes associated to the selected enrolment.
For enrolments requiring a token, enter the token serial number. You will need to assign the token to the
user in the RSA Console, please refer to the RSA Console User Guide for ONE ID Local Registration
Authorities for further details.
If you are adding an enrolment that requires a token and the registrant has an existing token, you are
not prompted to enter a token serial number.
If you have run out of tokens, enter 00000000 in the Token Serial Number field and contact the Ontario
Health ONE ID Registration Agents. See Appendix D – Requesting Replacement Tokens for more
details.
6. Click Finish.
7. The updated Registrant profile screen displays. The new enrolment(s) are provisioned and you can view
them in the Enrolments tab.
The status of the enrolment may be displayed as Temporarily Unavailable. The enrolment is in the
process of being provisioned and appears as Active once the provisioning has been completed. Wait a
few minutes and refresh the page to view the updated status. If the enrolment fails to provision after 30
minutes, contact the Ontario Health Digital Support Desk.
5.3.3 Suspend Sponsored Enrolment
Suspending a sponsored enrolment is the process by which one or more enrolments are suspended at the request of a
sponsoring organization. Suspending an enrolment temporarily suspends the registrant’s access to the service. A
registrant’s enrolments may be suspended due to extended leave or absence, compromised credentials, etc. Only the
organization that authorized an enrolment may request that the sponsorship be suspended. The following is the process of
suspending sponsorship.
Document Identifier: 2274 Sensitivity: High Page 46
Document Version: 2.11. On the Enrolments tab click Manage Enrolments and Roles. This displays the enrolment
modification options.
2. Click Suspend Enrolments. This takes you to the Suspend Sponsorship screen.
3. From the list of enrolments:
a. select the enrolment(s) to be suspended;
or
b. Click on Select All Enrolments if all enrolments are to be suspended.
4. Select the Suspension Reason from the drop down menu. See Appendix A for suspension reasons.
5. Enter the Flag as candidate for reinstatement date.
Note: Flag date is for reporting purposes only. Enrolments are not automatically reinstated on that
date.
Document Identifier: 2274 Sensitivity: High Page 47
Document Version: 2.16. Click OK.
7. The updated Registrant profile screen displays. The Enrolment(s) should now have a status of
Suspended.
For suspended enrolments that use a token, the token is automatically disabled unless there are any other
token-dependant enrolments.
The status of the enrolment may be displayed as Temporarily Unavailable. The enrolment is in the process
of being provisioned and appears as Suspended once the provisioning has been completed. Wait a few
minutes and refresh the page to view the updated status.
5.3.4 Reinstate Sponsored Enrolment
Reinstating a sponsored enrolment is the process by which one or more enrolments are reinstated at the request of a
sponsoring organization. Reinstatement of an enrolment allows access to the service to which the registrant had access
prior to the suspension. A registrant’s enrolments may be reinstated due to the registrant returning from an extended
leave of absence, etc. The following is the process of reinstating sponsorship.
1. On the Enrolments tab, click Manage Enrolments and Roles. This displays the enrolment
modification options.
Document Identifier: 2274 Sensitivity: High Page 48
Document Version: 2.12. Click Reinstate Enrolments. This takes you to the Reinstate Sponsorship screen.
3. From the list of enrolments:
a. select the enrolment(s) to be reinstated;
or
b. Click Select All Enrolments if all enrolments are to be reinstated.
Note: Authorization must have been received prior to reinstating an enrolment.
4. Select the Reinstate Reason from the drop down menu. See Appendix A for reinstatement reasons.
5. Click OK.
6. The updated Registrant profile screen is displayed. The Enrolment(s) should now have a status of
Active.
The status of the enrolment may be displayed as Temporarily Unavailable. The enrolment is in the process
of being provisioned and appears as Active once the provisioning has been completed. Wait a few minutes
and refresh the page to view the updated status.
Document Identifier: 2274 Sensitivity: High Page 49
Document Version: 2.1Note: If a new token is to be issued to the registrant as a result of the registrant’s reinstated sponsored
enrolment, you must assign the token to the user in the RSA Console or contact the Ontario Health
Digital Support Desk.
5.3.5 Revoke Sponsored Enrolment
Revoking a sponsored enrolment is the process by which one or more enrolments are revoked at the request of a
sponsoring organization. Once you have revoked an enrolment, you cannot reinstate it. If the registrant subsequently
requires access, the enrolment must be added as a new enrolment, provided that the appropriate authorization has been
received. A registrant’s enrolments may be revoked if access to a service is no longer required; the registrant has left the
organization, etc. The following steps describe the process of revoking sponsorship.
1. On the Enrolments tab click Manage Enrolments and Roles. This displays the enrolment
modification options.
2. Click Revoke Enrolments. This takes you to the Revoke Sponsorship screen.
3. From the list of enrolments:
a. select the enrolment(s) to be revoked;
or
b. Click Select All Enrolments if all enrolments are to be revoked.
Note: If the enrolment to be revoked is needed to maintain use of other active enrolments, the system
notifies you, and then prompts you to confirm the revocation.
Document Identifier: 2274 Sensitivity: High Page 50
Document Version: 2.14. Select the Revoke Reason from the drop down menu. See Appendix A for revocation reasons.
5. Click OK.
6. The updated Registrant profile screen is displayed and the revoked enrolment(s) is longer displayed in
the enrolment listing.
For revoked enrolments using a token, the token is automatically unassigned within 24 hours unless there are
any other token-dependant enrolments.
5.3.6 Delete Roles
Deleting a sponsored role is the process by which one or more roles are revoked at the request of a sponsoring
organization. Once you have revoked a role, you cannot reinstate it. If the registrant subsequently requires the role, it must
be added as a new role; provided that the appropriate authorization has been received. The role(s) may be revoked if the
registrant no longer requires access to the role(s). The following is the process of revoking a role.
Document Identifier: 2274 Sensitivity: High Page 51
Document Version: 2.11. On the Enrolments tab click Manage Enrolments and Roles. This displays the enrolment
modification options.
2. Click Delete Roles. This takes you to the Delete Role screen.
3. A list of all non-mandatory roles is displayed. Expand the enrolment to view the role to be deleted. Select
the role(s) to be revoked.
4. Click Ok.
Document Identifier: 2274 Sensitivity: High Page 52
Document Version: 2.15. The updated registrant profile is displayed and the role no longer shows in the enrolment listing.
5.3.7 Change Enrolment Attributes
A sponsoring organization may request a modification to a registrant’s enrolment attributes. A registrant’s enrolment
attributes may be modified as the result of a role change or if an incorrect value has been entered for the enrolment.
1. On the Enrolments tab, click Manage Enrolments and Roles. This displays the enrolment
modification options.
2. Click Change Enrolment Attributes. This takes you to the Change Enrolment Attributes screen.
Only enrolments that have attributes that can be modified (and which the registrant has an active enrolment for) appears
at the top of the window.
3. Under the Enrolments and Credentials window, select the enrolment for which the attributes
need to be modified.
4. Modify the attributes and click OK.
Document Identifier: 2274 Sensitivity: High Page 53
Document Version: 2.1You can also read