RMS Viewer Documentation - Release 1.7.0 Glück & Kanja Consulting AG
←
→
Page content transcription
If your browser does not render page correctly, please read the page content below

RMS Viewer Documentation
                    Release 1.7.0

     Glück & Kanja Consulting AG

                     Version 2015-02-18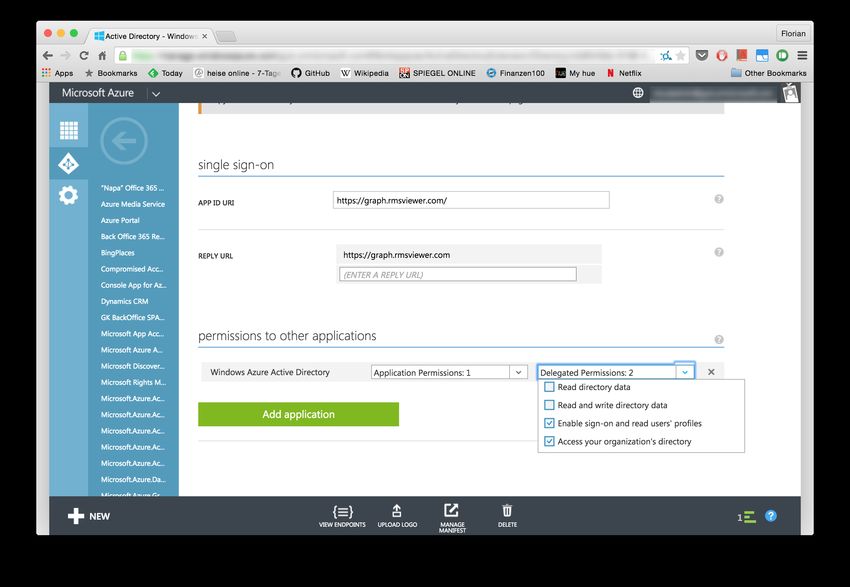
Contents

I   Server Installation Guide                                                                                                                                    2

1   Introduction                                                                                                                                                 3

2   RMS Viewer Feature Overview                                                                                                                                  4
    2.1 Send RMS encrypted mails . .         .   .   .   .   .   .   .   .   .   .   .   .   .   .   .   .   .   .   .   .   .   .   .   .   .   .   .   .   .   4
    2.2 Easy deployment . . . . . . . .      .   .   .   .   .   .   .   .   .   .   .   .   .   .   .   .   .   .   .   .   .   .   .   .   .   .   .   .   .   4
    2.3 Server based management . .          .   .   .   .   .   .   .   .   .   .   .   .   .   .   .   .   .   .   .   .   .   .   .   .   .   .   .   .   .   4
    2.4 Strong security and protection       .   .   .   .   .   .   .   .   .   .   .   .   .   .   .   .   .   .   .   .   .   .   .   .   .   .   .   .   .   4

3   RMS Viewer Server Basic Setup                                                                                                                                5
    3.1 Prerequisites . . . . . . . . . . . . . . . . . . . . . . . . . . . . . . . . . . . . . . .                                                              5
    3.2 RMS Viewer Server Setup . . . . . . . . . . . . . . . . . . . . . . . . . . . . . . . .                                                                  5
    3.3 Manual Web Service Configuration . . . . . . . . . . . . . . . . . . . . . . . . . .                                                                     6

4   HowTo: Enable Mail Sending                                                                                                                                   8
    4.1 Exchange Server Hub Transport Rule . . . . . . . . . . . . . . . . . . . . . . . . .                                                                     8
    4.2 Enable Mail Sending . . . . . . . . . . . . . . . . . . . . . . . . . . . . . . . . . . .                                                                9

5   HowTo: Configure Server Cluster                                                                                                                              11
    5.1 Prerequisites . . . . . . . . . . . . . . . . . . . . . . . . . . . . . . . . . . . . . . .                                                              11
    5.2 Shared Directories . . . . . . . . . . . . . . . . . . . . . . . . . . . . . . . . . . . .                                                               11
    5.3 Configuration Tasks . . . . . . . . . . . . . . . . . . . . . . . . . . . . . . . . . . .                                                                11

6   HowTo: Enable Master Key Encryption                                                             13
    6.1 Scope of Protection . . . . . . . . . . . . . . . . . . . . . . . . . . . . . . . . . . . . 13
    6.2 Prepare environment . . . . . . . . . . . . . . . . . . . . . . . . . . . . . . . . . . . 13

7   HowTo: Enable Server Roles                                                                    15
    7.1 Add Backend Server Role for RMS Viewer Server . . . . . . . . . . . . . . . . . . 15
    7.2 Setup Frontend Server . . . . . . . . . . . . . . . . . . . . . . . . . . . . . . . . . . 15

8   HowTo: Certificate based enrollment                                                             17
    8.1 IIS Configuration . . . . . . . . . . . . . . . . . . . . . . . . . . . . . . . . . . . . . 17
    8.2 RMS Viewer Server Configuration . . . . . . . . . . . . . . . . . . . . . . . . . . . 18

9   HowTo: Azure Connector                                                                       20
    9.1 Rights Management Connector . . . . . . . . . . . . . . . . . . . . . . . . . . . . . 20
    9.2 Setup RMS Viewer . . . . . . . . . . . . . . . . . . . . . . . . . . . . . . . . . . . . 20

                                                                                                                                                                  i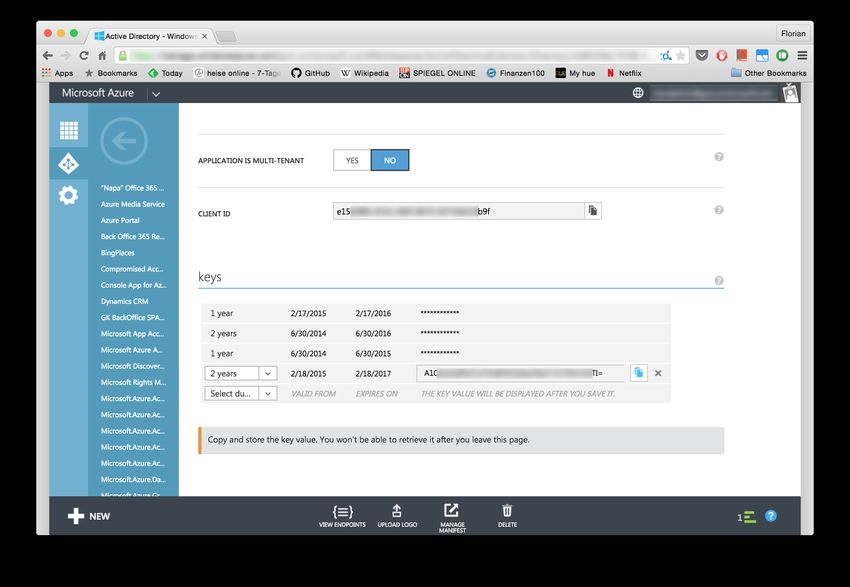
9.3    Install RMS Connector . . . . . . . . . . . . . . . . . . . . . . . . . . . . . . . . . . 21
   9.4    Authorize RMS Viewer Superuser . . . . . . . . . . . . . . . . . . . . . . . . . . . 22
   9.5    Additional Configuration . . . . . . . . . . . . . . . . . . . . . . . . . . . . . . . . 23

10 HowTo: Azure Active Directory                                                               24
   10.1 Get Azure Active Directory Tenant ID . . . . . . . . . . . . . . . . . . . . . . . . . 24
   10.2 Create a new application in Azure Active Directory . . . . . . . . . . . . . . . . . 24
   10.3 Register the application in RMS Viewer . . . . . . . . . . . . . . . . . . . . . . . . 29

11 Frequently Asked Questions                                                                  31
   11.1 Which platforms are supported? . . . . . . . . . . . . . . . . . . . . . . . . . . . . 31

12 Support                                                                                        32
   12.1 Support Contact . . . . . . . . . . . . . . . . . . . . . . . . . . . . . . . . . . . . . 32

13 Changes                                                                                         33
   13.1 Server Version History . . . . . . . . . . . . . . . . . . . . . . . . . . . . . . . . . . 33
   13.2 Client Version History . . . . . . . . . . . . . . . . . . . . . . . . . . . . . . . . . . 34

14 License                                                                                         39

15 Contact                                                                                         42

                                                                                                    ii
RMS Viewer Documentation, Release 1.7.0

RMS Viewer is a client/server ecosystem that extends Windows Rights Management Services
capabilities to mobile devices. It enables iPhones, iPads, Android, Blackberry etc. to securely
receive and store Windows documents and emails.
Additional Information at www.rmsviewer.com.

Contents                                                                                     1
Part I

Server Installation Guide

                            2
CHAPTER 1

                                                                                Introduction

This guide will explain all necessary steps to install the RMS Viewer Server.
The RMS Viewer Server is quite simple to install. However, this guide will explain all necessary
requirements and give you more information on advanced configuration options like cluster
configurations or frontend proxies.

                                                                                              3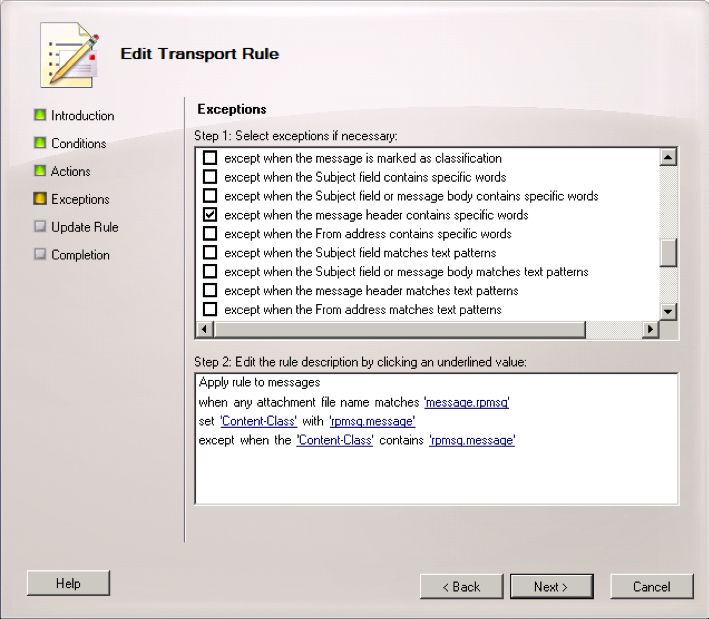
CHAPTER 2

                                                    RMS Viewer Feature Overview

2.1 Send RMS encrypted mails

Improves security by enabling users to send sensitive information while in transit. Send RMS
encrypted mails within the RMS Viewer App with confidential content on Android, iPhone
and iPad.

2.2 Easy deployment

Improves productivity by enabling users to securely send and receive sensitive information
while on the go. Improves user satisfaction by enabling employees to use popular mobile
devices for work.

2.3 Server based management

When the user receives a document or email that is rights management protected, the mobile
app automatically sends it to the RMS Rendering Server hosted on the corporate network. If
the user has permission to view the document or email, RMS Rendering Server decrypts it.

2.4 Strong security and protection

The document or e-mail is received by RMS Viewer and displayed within an app viewer that
prevents the document from being printed or forwarded. Strong encryption protects sensitive
emails and Office documents from unauthorized access. This leverages your current invest-
ment in Windows Rights Management Services to provide must-have mobile data security.

                                                                                          4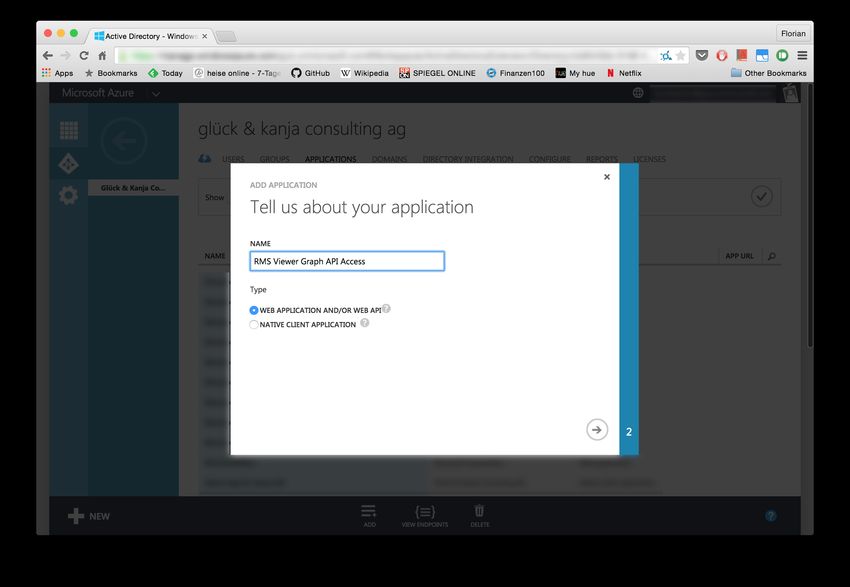
CHAPTER 3

                                                     RMS Viewer Server Basic Setup

The following chapter explains the basic setup for the RMS Viewer Server.

3.1 Prerequisites

3.1.1 Server

The target machine on which to install the RMS Viewer Server has the following requirements:
   • Minimum operating system: Windows Server 2008, UAC is supported
   • Domain member
   • SSL Server Certificate for target URL. The certificate needs to be installed into the per-
     sonal certificate store of the local machine.

Note: Please pay detailed attention to these requirements. Please double check if the SSL
certificate is located in the personal certificate store of the local machine and matches the final
HTTPS-URL you want to use for your installation.

3.1.2 Web Service Account

The account used to operate the RMS Viewer Server needs to fulfil the following requirements:
   • Domain account with user rights
   • RMS super user rights

3.2 RMS Viewer Server Setup

Run RMS-Viewer-Server-Backend-x.x.x.x.exe and follow the setup instructions. You
need to enter the web service account with RMS super user rights.
Also, you need to specify where to store persistent device and user data as well as session data.
If you want to operate a single server, the default directories might be a good choice. If you
want to setup multiple servers, please refer the chapter Configure server cluster.

                                                                                                 5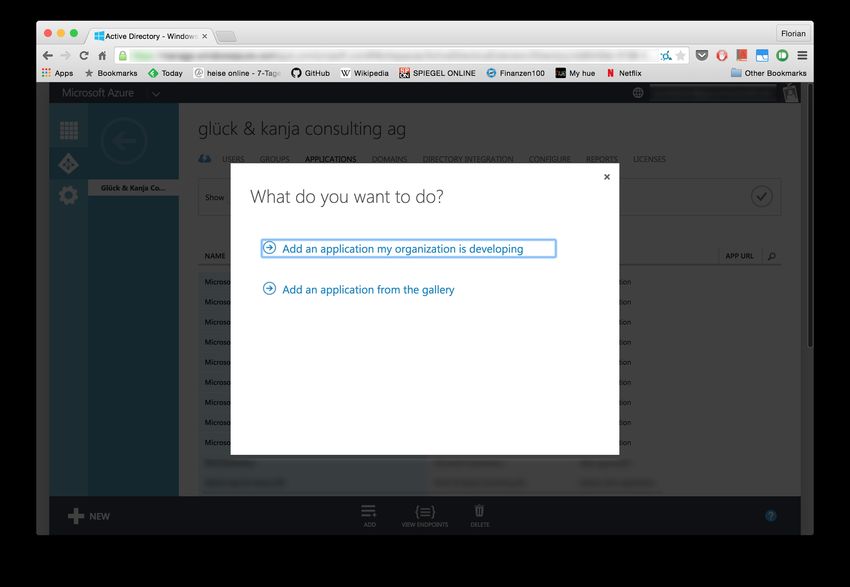
RMS Viewer Documentation, Release 1.7.0

3.3 Manual Web Service Configuration

After running the setup, the RMS Viewer Server is ready to run. However, you might manually
configure some available options. All server settings can be found in the configuration file
located at C:\RMSViewer\webService\webService.ini.
The following configuration options are available:
[General]

ImportDLL=webservice-config.dll

# Enter a valid log path
log=C:\RMSViewer\log\master.log

# Optional TCP port on backend for frontend connection
port=2011

CleanupTask=C:\RMSViewer\webService\Cleanup.cmd

[Imports]

@admin=1
@backend=1
@frontend=0

[Environment]

# Base directory of the RMS Viewer
rv_dir=C:\RMSViewer

# Log directory used by admin webservice to enumerate logfiles
rv_log_dir=C:\RMSViewer\log

# Full path to the session directory
rv_session=C:\RMSViewer\data\session

# Full path to the user database
rv_user=C:\RMSViewer\data\user

# Optional directory used to store temporary rendering data
rv_temp=C:\RMSViewer\data\temp

# Enter AD-domain for user credential check
rv_domain=glueckkanja

rv_debug=0

# Group to check for membership during enrollment
rv_group=rmsViewerUsers

# For certificate-based enrolment
rv_cert_issuer=
rv_server_url=

3.3. Manual Web Service Configuration                                                     6

RMS Viewer Documentation, Release 1.7.0

# User will be deleted if he does not logon after rv_max_userage days, 0 to disable
rv_max_userage=90

# License key
rv_license=

3.3. Manual Web Service Configuration                                        7
CHAPTER 4

                                                       HowTo: Enable Mail Sending

This chapter describes how to enable mail sending in your RMS Viewer infrastructure.

4.1 Exchange Server Hub Transport Rule

Outlook checks some special properties in order to recognize RMS protected e-mails. Not all of
these properties can be set on the mobile clients. Therefore, an exchange server hub transport
rule is necessary to set these missing properties.

The transport rule needs to apply to all messages that contain an attachment named mes-
sage.rpmsg. The content class of the message needs to be set to rpmsg.message, except if they
already contain that message class. The next screenshot shows the rule:

                                                                                            8
RMS Viewer Documentation, Release 1.7.0 Alternatively, you can execute the following PowerShell command: New-TransportRule -Name ’RMS Viewer’ -Comments ’Comment’ -Priority ’0’ -Enabled $true -AttachmentNameMatchesPatterns ’message.rpmsg’ -SetHeaderName ’Content-Class’ -SetHeaderValue ’rpmsg.message’ -ExceptIfHeaderContainsMessageHeader ’Content-Class’ -ExceptIfHeaderContainsWords ’rpmsg.message’ 4.2 Enable Mail Sending In Device Settings on the admin website, enable mail sending for your mobile clients. 4.2. Enable Mail Sending 9
RMS Viewer Documentation, Release 1.7.0

4.2. Enable Mail Sending                                       10
CHAPTER 5

                                                  HowTo: Configure Server Cluster

This chapter describes how to setup an RMS Viewer Server cluster environment. Please adjust
all mentioned paths to your target environment.

5.1 Prerequisites

In order to run the cluster, you need to provide the following infrastructure components:
   • Load balancer: A hardware- or software based load balancer.
   • Shared storage: A shared file system that can be read and written by all cluster nodes.
     A simple way to provide shared storage is a network share which can be accessed by a
     UNC-name from all cluster nodes.

5.2 Shared Directories

The cluster nodes use the provided shared storage to share information between all cluster
nodes. The following directories need to be shared within the cluster:
   • User and device database directory
   • Session directory: Sharing the session directory is necessary unless your load balancer is
     configured to provide sticky sessions.
If you share the session directory, it is recommended to configure a local temporary directory
on each node for temporary data used during the rendering process. Doing so will increase
the performance.

5.3 Configuration Tasks

Inside the cluster, the provided shared storage is used to distribute information to all nodes.
Depending on the node you want to configure, you need to follow the instructions of the
respective configuration scenario:
   • Clean installation of first cluster node
   • Migration of single server to first cluster node
   • Installation of additional cluster nodes

                                                                                            11
RMS Viewer Documentation, Release 1.7.0
5.3.1 Clean installation of first cluster node
If you install the cluster from scratch, you can simply run the setup executable. During the
installation process, enter the path (e.g. UNC-Path) to the shared user directory and optionally
to the shared session directory.
If you share the session directory, it is recommended to define a local temp-directory for in-
termediate data processing. Use the rv_temp variable of the webService.ini to define the
temp-directory.
When the installation process completed, you may enable the master key encryption now.
Please refer to the chapter Enable master key encryption.
5.3.2 Migration of single server to first cluster node
If you already have a single server with active users, you can easily configure this server as a
first cluster node. Please follow the following configuration steps:
• Provide a shared user directory, optionally a shared session directory.
• Stop the IIS Server running the RMS Viewer instance.
• In your webService.ini, edit rv_user to the path of your shared user directory.
• Move the content of the previous user directory to the new shared location.
• If you share the session directory, adjust the path of rv_session in your
webService.ini to the new location. Move existing session data to the shared di-
rectory.
• Start the IIS Server
If you share the session directory, it is recommended to define a local temp-directory for in-
termediate data processing. Use the rv_temp variable of the webService.ini to define the
temp-directory.
When the installation process completed, you may enable the master key encryption now.
Please refer to the chapter Enable master key encryption for details.
5.3.3 Installation of additional cluster nodes
If you install additional cluster nodes, you can simply run the setup executable on the new
node. During the installation process, enter the path (e.g. UNC-Path) to the shared user direc-
tory and optionally to the shared session directory.
If you share the session directory, it is recommended to define a local temp-directory for in-
termediate data processing. Use the rv_temp variable of the webService.ini to define the
temp-directory.
If you enabled the master key encryption on the cluster, copy the master key to the new node.
Set the correct path to the key In your webService.ini, edit rv_masterkey to point to the
key file. Please refer to the chapter Enable master key encryption for further details.
5.3. Configuration Tasks 12CHAPTER 6
HowTo: Enable Master Key Encryption
This chapter describes how to enable master key encryption in a productive environment.
Please adjust all mentioned paths to your target environment. The procedure describes all
steps necessary in an RMS Viewer Server cluster. For a single server, the procedure is almost
the same.
6.1 Scope of Protection
The master key encryption is an additional option that encrypts sensitive data of the user- and
device database. Specifically the following information is encrypted:
• User keys used to encrypt transferred data between devices and the server.
• Device logs which store all encryption requests
The intended use of the master key encryption is a cluster environment where the shared
storage cannot be secured.
Note: Note that a shared session directory is not secured by the master key encryption. If you
share the session directory in an unsecured environment, you need to specify a temp-directory
on every server. Doing so ensures that only files encrypted with the user key is stored on
the session directory. Unencrypted intermediate files are stored into the local temp-directory,
which can be easily secured. Use the rv_temp variable of the webService.ini to define the
temp-directory.
6.2 Prepare environment
• Stop all IIS Servers running the RMS Viewer instance.
6.2.1 Create a master key
• From the console run:
C:\RMSViewer\webService\webCrypt.exe g -o C:\RMSViewer\masterkey
• Copy the master key to all Servers in the cluster.
13RMS Viewer Documentation, Release 1.7.0
6.2.2 Configure web service
• Edit the webService.ini, set rv_masterkey=C:\RMSViewer\masterkey
• Repeat this step on all Servers in the cluster.
6.2.3 Remove existing device logs
Existing device logs are not encrypted and are therefore not readable after enabling master key
encryption. Therefore, they must be deleted or renamed.
• Run a script like this, after adjusting the paths:
@echo off
for /F "usebackq" %%i in (‘dir /s /b C:\RMSViewer\data\user\device.log‘) do
(
echo deleting %%i
rem uncomment one of the following lines after successful testing
rem del %%i
rem echo move %%i %%i-backup
)
6.2.4 Encrypt user keys
Existing user keys are backed up and encrypted.
• Run a script like this, after adjusting the paths:
@echo off
for /F "usebackq" %%i in (‘dir /s /b C:\RMSViewer\data\user\key‘) do
(
echo encrypting key %%i
move %%i %%i-backup
C:\RMSViewer\webService\webcrypt e -bs -i %%i-backup -k \
C:\RMSViewer\masterkey -o %%i
)
6.2.5 Start webservers and test environment
• Verify that existing users can still work with the servers
• Verify that new users can be enrolled
6.2.6 Remove migration data
• Remove all files named key-backup from the user directories. They still hold the unen-
crypted user key.
6.2. Prepare environment 14CHAPTER 7
HowTo: Enable Server Roles
This chapter describes how to enable separate frontend / backend server roles with protocol
transition for an additional layer of security in perimeter network infrastructures.
7.1 Add Backend Server Role for RMS Viewer Server
A TCP-Port needs to be defined and opened on the backend systems if the frontend/proxy
systems are used.
On your RMS Viewer Server, specify a port in the General section of webService.ini:
[General]
; Enter the TCP port used to receive front end connections
port=2011
Note: Please make sure to enable the port in your network and firewall configurations.
7.2 Setup Frontend Server
7.2.1 Installation
• Run RMS-Viewer-Server-Frontend-x.x.x.x.exe to install the frontend server.
• Enter the FQDN of your backend server and the port that you have specified in
webService.ini on your backend server.
Now the RMS Viewer Frontend Server is setup.
7.2.2 Manual Web Service Configuration
Edit C:\RMSViewer\webService\webService.ini:
[General]
; Enter a valid log path
log=C:\RMSViewer\log\master.log
[Environment]
15RMS Viewer Documentation, Release 1.7.0 ; Enter the TCP port used to connect backend servers backend_port=2011 ; Enter the server name of the backend server backend_host=backendrmsviewerserver.company.net 7.2. Setup Frontend Server 16
CHAPTER 8

                                                HowTo: Certificate based enrollment

8.1 IIS Configuration

First, the IIS needs to accept client certificates. You can enable this setting in the IIS Configura-
tion Manager under Sites / RMSViewer / SSL Settings.

Next, you need to add a module mapping for the client requests. This can be done under Sites
/ RMSViewer / Handler Mappings. The settings that need to be entered are shown in the
following screenshot:

                                                                                                  17
RMS Viewer Documentation, Release 1.7.0 Please don’t forget to switch of the setting in the following screenshot: 8.2 RMS Viewer Server Configuration First, you need to add the following values in the section Environment of the file webService.ini: ; Enter the Issuer of the certificate, that your clients are using. ; E.g.: CN=Your Company Ltd. 8.2. RMS Viewer Server Configuration 18
RMS Viewer Documentation, Release 1.7.0

rv_cert_issuer=

; Enter the URL of the RMS Viewer Server to use.
; E.g.: https://rmsviewer.yourcompany.com
rv_server_url=

During enrollment, the script ssoGetUserFromCert.vbs will be executed with the common
name of the client’s certificate as first parameter. This script must return the username as
answer. You need to modify this script according to your environment.

8.2. RMS Viewer Server Configuration                                                     19
CHAPTER 9

                                                           HowTo: Azure Connector

This chapter describes how to setup and use the Rights Management connector with RMS
Viewer.

9.1 Rights Management Connector

The Microsoft Rights Management (RMS) connector enables on-premise servers to use cloud-
based Microsoft Rights Management services.

9.2 Setup RMS Viewer

Note: The Rights Management connector and RMS Viewer Server can be installed on the same
machine. Please keep in mind to specify a custom port for RMS Viewer then.

First setup RMS Viewer Backend on a server, you can leave the RMS Server field empty.

                                                                                        20
RMS Viewer Documentation, Release 1.7.0 9.3 Install RMS Connector The next step is to install the Rights Management connector onto another machine. You can download the RMS connector here. Run RMSConnectorSetup.exe and enter credentials for one of your following admin ac- counts: • Office 365 Tenant Administrator • Microsoft RMS Tenant Global Administrator • Microsoft RMS connector Administrator 9.3. Install RMS Connector 21
RMS Viewer Documentation, Release 1.7.0

Finish the Rights Management connector installation.

9.4 Authorize RMS Viewer Superuser

After the installation is complete the RMS connector admin tool opens. Add your RMS Viewer
Superuser as Exchange Server role.

9.4. Authorize RMS Viewer Superuser                                                    22
RMS Viewer Documentation, Release 1.7.0

9.5 Additional Configuration

Now the Rights Management connector is up and running. To configure RMS Viewer to use
the RMS connector we need some additional information. Therefore please install Microsoft
Online Service Sign-In Assistant and Windows Azure AD Rights Management Administration
Tool. After restarting your machine you can get all needed information.
Open Powershell and execute the following commands, use your Office365 Tenant Adminis-
trator or Microsoft RMS Tenant Global Administrator to logon:
  1. Connect-AadrmService -Verbose
  2. Get-AadrmConfiguration
After running Get-AadrmConfiguration you can see your RightsManagementServiceId.
Copy the FQDN, which contains your RightsManagementServiceId, this is your azure-host.
See below:

  3. Connect-MsolService
  4. Get-MsolDomain
Copy your azure-default-domain (i.e. company.onmicrosoft.com). See below:

Now you have all information needed. Run C:\RMSViewer\webService\rmsUtil.exe
to configure your envirnoment to use the RMS connector.
rmsUtil.exe sc connector-host azure-host azure-default-domain
i.e.
rmsUtil.exe sc rmsconnector.company.net rmsid.rms.eu.aadrm.com company.onmicrosoft.com

9.5. Additional Configuration                                                         23
CHAPTER 10

                                                  HowTo: Azure Active Directory

This chapter describes how to setup and use the Azure Active Directory with RMS Viewer.

10.1 Get Azure Active Directory Tenant ID

  1. Install Azure Powershell.
  2. Open Windows Powershell and execute the following command: Add-AzureAccount.
  3. Execute the following command: Get-AzureSubscription.
  4. Write down the value for TenantId.

10.2 Create a new application in Azure Active Directory

Log into the Azure Management Portal and select the Active Directory to which RMS Viewer
shall have access.

                                                                                          24
RMS Viewer Documentation, Release 1.7.0 Select “Applications”. Click “Add”. Select “Add an application my organization is developing”. 10.2. Create a new application in Azure Active Directory 25
RMS Viewer Documentation, Release 1.7.0

Enter RMS Viewer Graph API Accesss as name. Leave “Web Application And/Or Web
API” selected.

Enter https://graph.rmsviewer.com in both edit fields.

10.2. Create a new application in Azure Active Directory                             26
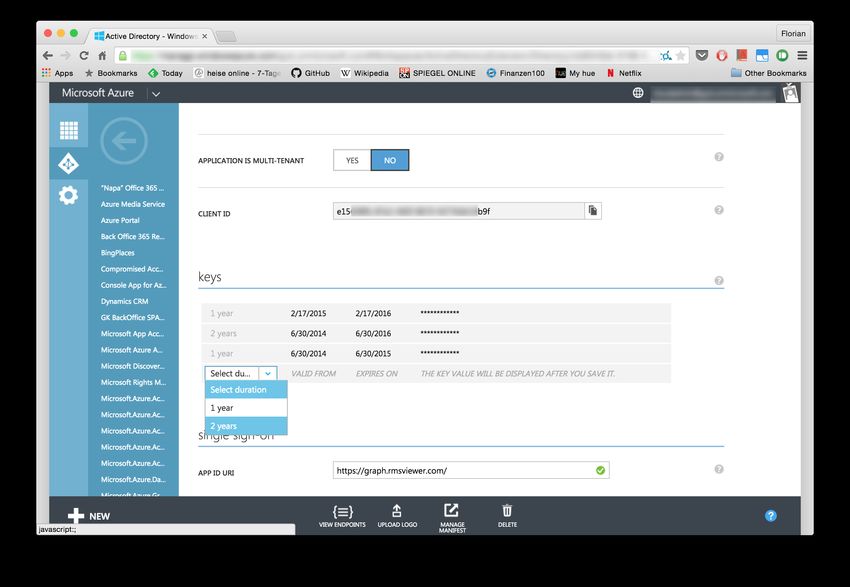
RMS Viewer Documentation, Release 1.7.0

Write down the “Client ID”.

Select “2 years” as durcation for the new key. Click save.

10.2. Create a new application in Azure Active Directory                               27
RMS Viewer Documentation, Release 1.7.0

Write down the key.

Select “Add application” under permissions. Select “Windows Azure Active Directory”.

10.2. Create a new application in Azure Active Directory                               28
RMS Viewer Documentation, Release 1.7.0

Select “Read directory data” permission in “Application Permissions”.

Select “Enable sign-on and read users’ profiles” and “Access your organization’s directory” in
“Delegated Permissions”.

10.3 Register the application in RMS Viewer

RMS Viewer can be configured in two different ways:

10.3. Register the application in RMS Viewer                                               29
RMS Viewer Documentation, Release 1.7.0

  1. Additional Azure Active Directory Access
  2. Exclusive Azure Active Directory Access

10.3.1 Additional access

In this mode, user accounts and groups will be looked up in the local Active Directory. If
a recipient of a document cannot be found in the local Active Directory, the recipient will
addionally also be queried in the Azure Active Directory.
To register RMS Viewer for additional access execute the following command: rmsutil.exe
sda ADTenantId ClientId ClientSecret.

10.3.2 Exclusive Access

In this mode, user accounts and groups will only looked up in the Azure Active Directory.
To register RMS Viewer for exclusive access execute the following command: rmsutil.exe
sde ADTenantId ClientId ClientSecret.

10.3.3 Remove Access

Access to the Azure Active Directory can be removed by executing the following command:
rmsutil.exe sdd.

10.3. Register the application in RMS Viewer                                                30
CHAPTER 11

                                      Frequently Asked Questions

11.1 Which platforms are supported?

Client Operating Systems:
   • iOS 4.3.2.1
   • BB OS 4.7
   • Android 2.2
   • Windows RT
   • OS X 10.7
   • Windows XP
All higher versions are supported.

                                                              31
CHAPTER 12
Support
12.1 Support Contact
Please contact support@rmsviewer.com.
32CHAPTER 13
Changes
13.1 Server Version History
Version 1.7.3
• BUGFIX: inline images in HTML bodies are not displayed
Version 1.7.2
• FEATURE: display file type in device log
• BUGFIX: inline images in HTML bodies are not displayed
Version 1.7.1
• BUGFIX: failed to activate rms environment if UPN is different from mail
address
• BUGFIX: filename is not shown in log if an error occurs
Version 1.7
• FEATURE: UAC awareness
• FEATURE: Support Azure RMS
• FEATURE: Support MS RMS Connector server
• FEATURE: Support for file types introduced in AD RMS 2.1
• FEATURE: Rendering support for RTF and XML files
• FEATURE: Support “Use Document Viewer” for Mac OS clients
Version 1.6
• FEATURE: Support for the new Win32 client
• FEATURE: Support for RMS delegates
• FEATURE: Support for proxy e-mail adresses
• BUGFIX: Decrypting e-mails with RTF body does not decrypt any attach-
ments
Version 1.5.2
• BUGFIX: Cannot decrypt Liquid Machines PDF files
33RMS Viewer Documentation, Release 1.7.0
Version 1.5.1
• BUGFIX: LibreOffice does not start
Version 1.5
• FEATURE: new rendering engine
• FEATURE: MS IRM PDF-Support
• BUGFIX: Code signature verification may fail on systems, depending on
their codepage.
Version 1.4
• FEATURE: new admin website
Version 1.3
• FEATURE: Create RMS protected messages
• FEATURE: iOS QuickView support
Version 1.2
• improved rendering
• bug fixing
Version 1.1
• bug fixing
Version 1.0
• initial release
13.2 Client Version History
13.2.1 iPhone / iPad
Version 1.9.8
• bug fixes
Version 1.9.6
• bug fixes
Version 1.9.4
• bug fixes
Version 1.9.2
• support for file types introduced in AD RMS 2.1
• bug fixes
Version 1.9.1
• bug fixes
Version 1.9
13.2. Client Version History 34RMS Viewer Documentation, Release 1.7.0
• reply to mail messages
• attach multiple files to messages
Version 1.8
• support for MS IRM encrypted PDF files
Version 1.7
• add support for .csv files
• add support for .png files
Version 1.6.2
• iOS 7 support
• better support for umlaut characters
Version 1.6.1
• user interface improvements
Version 1.6
• send RMS protected e-mails
Version 1.5
• iPhone 5 support
• iOS 6 support
• on device document rendering
• bug fixes
Version 1.4
• bug fixes
Version 1.3
• add support for additional file types
Version 1.2
• retina support
Version 1.1
• add support for additional file types
Version 1.0
• initial release
13.2.2 Mac OSX
Version 1.3.1
• bug fixes
Version 1.3
13.2. Client Version History 35RMS Viewer Documentation, Release 1.7.0
• support option “Use Document Viewer”
Version 1.2.1
• bug fixes
Version 1.2
• support MS IRM encrypted PDF files
Version 1.1
• decode msg attachments
• bug fixes
Version 1.0
• initial release
13.2.3 Android
Version 1.8
• protect a single file
• use google’s material design
• bug fixes
Version 1.7.4
• support for file types introduced in AD RMS 2.1
Version 1.7.2
• bug fixes
Version 1.7.1
• bug fixes
Version 1.7
• reply to RMS encrypted messages
• improved contact auto-completion
Version 1.6
• MS IRM PDF-Support
Version 1.5
• New cards based user interface
Version 1.4
• send RMS encrypted messages
13.2. Client Version History 36RMS Viewer Documentation, Release 1.7.0
13.2.4 Windows
Version 1.0.8
• add menu entries for rotating the document
Version 1.0.7
• ppdf file extension is not registered
Version 1.0.6
• provisioning links do not work
Version 1.0.5
• provisioning links do not work
• do not require user enrolment if only an unprotected file is opened
Version 1.0.4
• cannot open unencrypted document that contains chinese characters
Version 1.0.3
• prevent the window from going off screen
Version 1.0.2
• support for file types introduced in AD RMS 2.1
• bug fixes
Version 1.0.1
• bug fixes
Version 1.0
• initial release
13.2.5 Windows RT
Version 1.4
• support for file types introduced in AD RMS 2.1
• improved zoom functionality
Version 1.3
• improved workflow
Version 1.2
• improved rendering
Version 1.1
• improved UI
• bug fixes
Version 1.0
13.2. Client Version History 37RMS Viewer Documentation, Release 1.7.0
• initial release
13.2. Client Version History 38CHAPTER 14
License
Copyright (c) 2008-2014 Glueck & Kanja Consulting AG
Glück & Kanja Consulting AG - License Agreement from March 3, 2012
1. Introduction - This is the license agreement between the end user (below “user” is de-
fined as either an individual person or a legal person) and the Glück & Kanja Consulting
AG, Kaiserstraße 39, 63065 Offenbach, Germany (below “Glück & Kanja”) about the right
to use (license) for all Glück & Kanja products and their respective demo-versions. While
the license agreement covers the legal aspects of all of these products, it is only valid for
the product or products (below “product”), which the user has received free of or with
charge from Glück & Kanja or a distributor.
2. Copyright/Reproduction - All Glück & Kanja products, including the complete docu-
mentation, are protected by copyright. However, the user is entitled to either (a) make
one single copy of the software product solely for back-up or archiving purposes, or (b)
to transfer the software product to one single hard disk, provided the user keeps the
original for the sole purpose of back-up or archiving.
3. Grant of General License - The user, who has purchased a general license for a product
for a respective fee from Glück & Kanja or a distributor, is entitled to operate one copy of
the product on any computer, provided that the product is in use on only one computer at
any given time. The product is in use on one computer if it is loaded in a temporary data
medium (e.g. RAM) or saved on one non-volatile memory (e.g. hard drive, CD-ROM, or
another data medium) of this computer.
4. Multiple-Shift Usage and Network Use - The use of the product within a network or
another multi-station computer system is not permitted, unless the possibility of simul-
taneous multiple-shift usage of the product is created. If the user would like to use the
product within a network or another multi-station computer system, he must prevent a
simultaneous multiple-shift usage through access protection mechanisms or purchase a
special multi-user license. If a user has purchased a multi-user license for a product, the
number of the permitted uses increases depending on the multi-user license. If the possi-
ble number of users in a network exceeds the number of permitted users of a multi-user
license, the user must make arrangements that assure that only the permitted number of
users can use the program simultaneously.
5. Varying License Models - If a special license model is agreed upon with an enterprise
within the context of a contract, these special provisions are valid in reference to the
number and use that differ from the above mentioned provisions through the contract
transferred licenses.
39RMS Viewer Documentation, Release 1.7.0
6. Grant of Demo License - When dealing with a demo-version of the product (also “Eval-
uation Copy”, “Beta Version”, “Pre-Release Version”, etc.), the user receives a temporary
right to use a copy of the product on any computer, provided that the product is in use on
only one computer at any given time. If the product is a pre-release version (also “Beta”,
“Preview”, “Technical Beta”, “Technical Preview”, “Release Candidate“ etc.), then this
license loses its validity with the release of the final version of the same product. If the
product is a free test version (“Evaluation Copy” etc.), this license expires thirty (30) days
after receipt (e.g. download); the license cannot be extended through renewed receipt or
downloading. Glück & Kanja reserves the right to withdraw every temporary license
without giving a reason.
7. Software in Different Versions - If the transferred software covers many versions (e.g.
different language versions, operating system versions), the user may only use one ver-
sion of the supplied files for this software. The user may not use the other versions on a
different computer or computer network, nor may he rent, loan or transfer them to any
other user, unless a part of a transfer or use is expressly permitted in this license. If the
software is an upgrade or should this be increased to an upgrade, the software may only
be used together with previous versions or transferred. Every transfer of the license to a
third party must contain the newest upgrade and all previous versions.
8. Resale, Rental and Leasing - The user may not resale, rent or lease the software to a
third party for the purpose of purchase. The user may sell the product to a third party,
provided that the third party agrees with the present terms of this agreement and agrees
that all terms of this agreement also apply to him. In case of a transfer, the user must
hand over all program copies of the software including available security copies where
applicable and the entire written corollary material and/or destroy the copies that are
not handed over to the third party.
9. Reverse Engineering, Decompilation und Disassembly - The user is not authorized to
reverse engineer, decompile or disassemble the software product, unless and only if the
applicable law, regardless of this restriction, expressly permits this.
10. Support. Glück & Kanja assumes responsibility for technical support for the product,
which the user has purchased from Glück & Kanja or a distributor. The user can con-
tact the support team only via e-mail at product.support@glueckkanja.com. Support for
every license packet is limited to a (1) contact person and a (1) representative on the cus-
tomer side and stretches exclusively to product-conditional installation problems and
debugging, along with that, support from Glück & Kanja is voluntary.
The claim to support expires when one of the following conditions has been reached:
• Six (6) months after purchase of the product
• Three (3) months after a later version of the product (Major Release) is released from
Glück & Kanja.
Glück & Kanja offers further support extensions over the standard support. These are
liable to costs and regulated through a separate contract. Owners of a demo-license as
well as a freeware edition have no claim to support from Glück & Kanja. However,
support is available for these versions and is liable to cost.
11. Warranty. Glück & Kanja warrants that the products primarily fulfill the main functions
in line with the documentation and correspond to the recognized rules of the technology
as well as making sure that the products are not inflicted with mistakes that cancel or
reduce the value or the efficiency of the purpose described in the documentation.
40RMS Viewer Documentation, Release 1.7.0
Faults in the software including the documentation and other documents are remedied
within the warranty period of twelve (12) months after delivery (e.g. download) accord-
ing to corresponding notification through the user. It is Glück & Kanja’s or the distribu-
tor’s option whether this will be done through subsequent improvement or replacement.
When an improvement or replacement fails, the user is entitled to a refund of the price
paid (if any) for the product or reduction. In the case of refund of purchase price, the user
must return the product to Glück & Kanja or a distributor along with a declaration that
all other copies of the product were deleted. Demo versions (also “Evaluation Copy”,
“Beta Version”, “Pre-Release Version”, etc.) that were available for the user at no charge,
do not fall under the warranty for the full version. Such versions are available as re-
stricted functioning versions. Please note that free test versions should only be deployed
in designated testing environments.
12. Liability. Glück & Kanja shall be liable without any limitation for damages due to defects
of the missing of warranted characteristics. Liability for initial inability, delay or impos-
sibility shall be limited to the amount actually paid by the user for the product as well as
to such damages that have to be reckoned with the typically occur in the context of mak-
ing available of software. In any other circumstance, Glück & Kanja shall be liable only
for intent and gross negligence, including its legal representatives and vicarious agents,
unless a specific obligation of Glück & Kanja is involved that must not be infringed and
must be complied with for its major importance for the achievement of the contractual
purpose (cardinal obligation). In case of an infringement upon a cardinal obligation, the
company shall also be liable for slight negligence. However, the limitation of liability for
initial inability shall be considered accordingly.
The user must take notice in carrying out data protection with due diligence. Glück &
Kanja is not liable for damage that occurs due to data loss, unless such damages, that
also would have ensued with correct data protection.
13. Third party rights - Glück & Kanja does not guarantee that the use of the license does not
interfere with third party trademark rights or copyrights or that a third party does not
cause damage to it, as long as Glück & Kanja regulations to the contrary or third party
damage are not known.
14. Should this agreement contain a loophole or if any of the provisions of this agreement
are invalid, ineffective or unenforceable, that will not affect the validity of the remaining
provisions.
15. The user verifies that he has read, understood and accepted these license conditions. The
user also verifies that this license agreement represents the only and exclusive agreement
between the user and Glück & Kanja, which suspends all previous written or oral pro-
posals or agreements, as well as all previous product-relevant communication between
the user, Glück & Kanja and its distributors.
16. This agreement will be governed exclusively by German law. The application of the UN
Sales Convention (CISG) is explicitly excluded.
41CHAPTER 15
Contact
Question? Please contact support@rmsviewer.com.
42You can also read