Exchange Manager Admin Guide - Version 5.0 - July 10, 2019 - Oracle Help Center
←
→
Page content transcription
If your browser does not render page correctly, please read the page content below
Exchange Manager Admin Guide

Version 5.0 — July 10, 2019
Copyright © 2013, 2020, Oracle and/or its affiliates. All rights reserved.

This software and related documentation are provided under a license agreement containing restrictions
on use and disclosure and are protected by intellectual property laws. Except as expressly permitted
in your license agreement or allowed by law, you may not use, copy, reproduce, translate, broadcast,
modify, license, transmit, distribute, exhibit, perform, publish, or display any part, in any form, or by any
means. Reverse engineering, disassembly, or decompilation of this software, unless required by law for
interoperability, is prohibited.

The information contained herein is subject to change without notice and is not warranted to be error-
free. If you find any errors, please report them to us in writing.

If this is software or related documentation that is delivered to the U.S. Government or anyone licensing it
on behalf of the U.S. Government, then the following notice is applicable:

U.S. GOVERNMENT END USERS: Oracle programs, including any operating system, integrated software,
any programs installed on the hardware, and/or documentation, delivered to U.S. Government end
users are "commercial computer software" pursuant to the applicable Federal Acquisition Regulation
and agency-specific supplemental regulations. As such, use, duplication, disclosure, modification, and
adaptation of the programs, including any operating system, integrated software, any programs installed
on the hardware, and/or documentation, shall be subject to license terms and license restrictions
applicable to the programs. No other rights are granted to the U.S. Government.

This software or hardware is developed for general use in a variety of information management
applications. It is not developed or intended for use in any inherently dangerous applications, including
applications that may create a risk of personal injury. If you use this software or hardware in dangerous
applications, then you shall be responsible to take all appropriate fail-safe, backup, redundancy, and other
measures to ensure its safe use. Oracle Corporation and its affiliates disclaim any liability for any damages
caused by use of this software or hardware in dangerous applications.

Oracle and Java are registered trademarks of Oracle and/or its affiliates. Other names may be trademarks
of their respective owners.

Intel and Intel Xeon are trademarks or registered trademarks of Intel Corporation. All SPARC trademarks
are used under license and are trademarks or registered trademarks of SPARC International, Inc.
AMD, Opteron, the AMD logo, and the AMD Opteron logo are trademarks or registered trademarks of
Advanced Micro Devices. UNIX is a registered trademark of The Open Group.

This software or hardware and documentation may provide access to or information about content,
products, and services from third parties. Oracle Corporation and its affiliates are not responsible for and
expressly disclaim all warranties of any kind with respect to third-party content, products, and services
unless otherwise set forth in an applicable agreement between you and Oracle. Oracle Corporation and
its affiliates will not be responsible for any loss, costs, or damages incurred due to your access to or use
of third-party content, products, or services, except as set forth in an applicable agreement between you
and Oracle.

Table of Contents
Overview ............................................................................................................................... 1
   Recommended Setup ......................................................................................................... 1
   IT Information ................................................................................................................... 1
   System Requirements ......................................................................................................... 2
   Getting Started .................................................................................................................. 3
   Overview of OpenAir Exchange Manager Functions ................................................................. 4
Installation ............................................................................................................................ 6
   Installing OpenAir Exchange Manager ................................................................................... 6
   Uninstalling OpenAir Exchange Manager ............................................................................... 9
Configuring OpenAir Exchange Manager .................................................................................. 11
   OpenAir Settings .............................................................................................................. 12
   Integration Settings .......................................................................................................... 13
       Active Directory ............................................................................................................ 14
       Exchange Access .......................................................................................................... 16
       Logging ...................................................................................................................... 18
       Sync ........................................................................................................................... 19
   Map OpenAir and Microsoft Exchange User Accounts ............................................................. 21
   OpenAir Exchange Manager Registry Settings ....................................................................... 26
Running the OpenAir Exchange Engine .................................................................................... 27
Using the Booking Status Feature ........................................................................................... 29
Granting Rights to Mailboxes ................................................................................................. 31
   Instructions for Microsoft Exchange 2007 ............................................................................. 31
   Instructions for Microsoft Exchange 2010 and Later Versions .................................................. 31
References .......................................................................................................................... 32
   Frequently Asked Questions ............................................................................................... 32
Appendix A Outlook Calendar Event Examples .......................................................................... 34
   OpenAir Task Assignment in Outlook ................................................................................... 34
   OpenAir Booking in Outlook ............................................................................................... 34
   OpenAir Schedule Request in Outlook ................................................................................. 35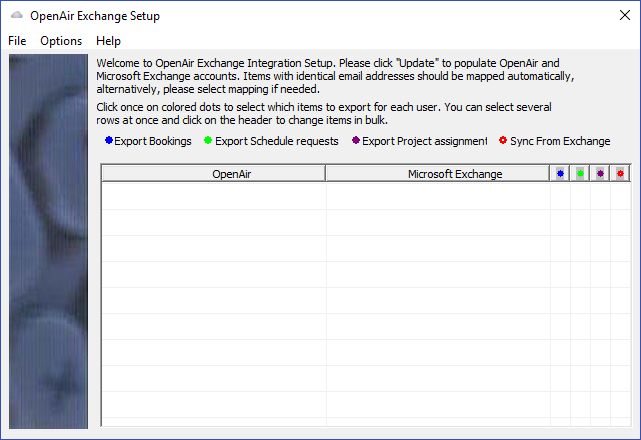
Overview         1

Overview

Introduction
This guide documents the OpenAir Exchange Manager. To simplify terminology in this guide, we may
refer to the OpenAir Exchange Manager as Exchange Manager, Microsoft Outlook as Outlook and
Microsoft Exchange as Exchange.

OpenAir Exchange Manager provides the ability to export project task assignments, resource bookings,
and schedule request calendar commitments from OpenAir to users' Outlook calendars.

In addition, this integration supports updates to bookings based on changes in corresponding Outlook
events as well as conversion of Outlook events to OpenAir bookings. The bi-directional flow (Outlook to
Exchange to OpenAir) allows a certain degree of control over bookings directly in the Outlook calendar. It
also provides visibility into users' Outlook calendars in OpenAir. Refer to the explanations that follow and
the integration settings under Sync.

OpenAir Exchange Manager Applications
The OpenAir Exchange Manager includes the following applications.

■ OpenAirExchange.exe — Use OpenAir Exchange Setup to configure the integration. Enter OpenAir
  Settings, Exchange Settings, and map OpenAir user accounts to Microsoft Exchange ones. When
  necessary, manually edit and map Exchange Users.
■ OpenAirExchangeEngine.exe — Use the OpenAir Exchange Engine to push OpenAir calendar objects
  to each configured Exchange account. The accounts and items designated for export are specified in
  OpenAir Exchange Setup.
■ OpenAirExchangeTrayMonitor.exe — Use the Tray Monitor to control and monitor the status and
  activity of the OpenAir Exchange Engine running as a Windows service.

      Note: Only project task assignments with non-zero planned hours are exported.

Recommended Setup
We recommend that you install OpenAir Exchange Manager on a separate server/workstation on the
same network as the company's Microsoft Exchange Server. This ensures the integration has access to
Microsoft Active Directory (AD) to query users, but does not store the integration on the same server.

■ If Active Directory is unavailable, you need to manually set up mapping between OpenAir and
  Exchange Server users.
■ If the OpenAir Exchange Manager is set up on a remote server outside the company network, the
  integration typically needs VPN access to the network to be able to interface with the Exchange Server.

IT Information

Protocols
The integration uses the following protocols:

Exchange Manager Admin Guide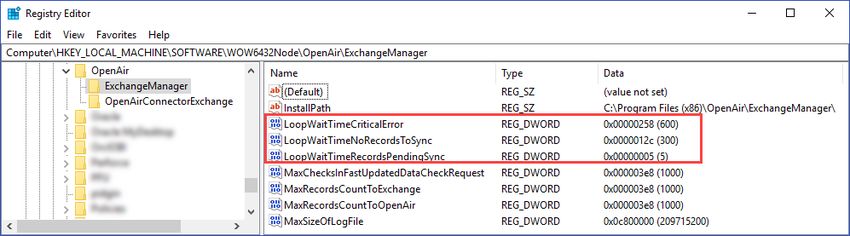
IT Information    2

■ OpenAir Exchange Manager uses the OpenAir XML API over SSL/HTTPS (port 443) to communicate
  with the OpenAir server. It pulls information from OpenAir, so no incoming ports need to be opened
  in the firewall. The integration makes only outgoing connections via SSL to access the OpenAir
  environment.
■ Active Directory Services Interface (ADSI) to obtain the user information for account mapping. Setup
  executes LDAP query against the local domain to determine the email addresses and home mailbox
  servers for the company's Exchange users.
■ Exchange Web Services (EWS) to connect to Exchange Server and create appointments in users'
  Outlook folders.

          Important: As of version 5.0, OpenAir Exchange Manager no longer supports WebDAV. If
          you are using Microsoft Exchange Server 2007, you will be required to use EWS instead.

Permissions
The integration requires the following permissions:

■ OpenAir Administrator to be able to retrieve and update project task assignments, resource bookings,
  and schedule requests.
■ Domain Administrator to retrieve the list of domain users and their mailbox details.
■ Exchange Administrator to grant access to users' mailboxes and modify Exchange settings if
  necessary.
■ Domain User with read/write access to all user Exchange folders configured for the integration. This
  user account does not need to have Exchange or Enterprise administrator privileges and should be
  used for running the Exchange Engine.

Settings
The integration requires the following setting configured:

■ When the ‘Use http' option is checked, ensure that the Secure channel is not required on the
  Exchange virtual directory.

Limitations
The integration has the following limitations:

■ EWS limits the maximum calendar item duration to five years. If you create project task assignments,
  resource bookings or schedule request calendar commitments that exceed five years then during
  synchronization the integration will automatically limit the items created in the Outlook calendars to
  five years (i.e. to the maximum duration supported by EWS).

Periodical Backups
We highly recommend that you backup the oaexchdb.mdb file periodically.

System Requirements
OpenAir Exchange Manager is supported on the following platforms:

■ Microsoft Windows Server 2012, 2012 R2, 2016 or 2019

Exchange Manager Admin Guide
System Requirements           3

■ Microsoft Windows 8, 8.1 and 10
■ Microsoft Office 365

      Important: Microsoft Windows Server 2008/2008 R2 and Microsoft Windows 7 will no longer
      be supported from January 14, 2020. Microsoft will be ending support for both products on that
      date. To continue working with any OpenAir desktop application, you will need to:

      ■ For Microsoft Windows Server 2008 and 2008 R2, upgrade to MS Windows Server 2012,
        2012 R2, 2016 or 2019.
      ■ For Microsoft Windows 7, upgrade to MS Windows 8, 8.1 or 10.

OpenAir Exchange Manager supports communication with:

■ Microsoft Exchange Server 2007 SP1 / 2010 / 2010 SP1 / 2010 SP2 / 2013 / 2013 SP1 / 2016.
   For Microsoft Exchange Server 2007, Full Access Permission for a mailbox is required.
   For Microsoft Exchange Server 2010 or later versions, Exchange Impersonation is required.
   See Granting Rights to Mailboxes for more details.

Other requirements include:

■ Microsoft .NET Framework Version 4.7.2 is required. The installer automatically downloads it if it is not
  currently installed.
■ RAM size of at least 1 GB is recommended.

Getting Started
The following steps outline what you need to do to begin using OpenAir Exchange Manager.

Step 1: Download OpenAir Exchange Manager
Professional Services provides you with a link for downloading OpenAir Exchange Manager. Refer to
Installing OpenAir Exchange Manager.

Step 2: Ensure Appropriate OpenAir Internal Switches are
Enabled
Access to OpenAir Exchange Manager must be enabled. To do so:

■ Ensure that the internal switch labeled “Disable all access to OpenAir Exchange Manager” is NOT
  selected.
■ Ensure that the internal switch labeled “Disable all access to OpenAir Outlook Connector” is selected.
  The Outlook Connector is a client-based integration application to pull OpenAir calendar events into
  a user's Outlook. The Outlook Connector integration is not compatible with the OpenAir Exchange
  Manager integration.

         Note: If OpenAir Outlook Connector was enabled prior to enabling the OpenAir Exchange
         Server, the internal switch to “Disable OpenAir Outlook Connector” must be manually selected.

Step 3: Configure OpenAir Exchange Manager
OpenAir Exchange Setup is used to configure the integration. Specifically:

Exchange Manager Admin Guide
Getting Started    4

■ It is used to map OpenAir user accounts to Exchange accounts.
■ Each Exchange account can be configured to pull one or all of the following: OpenAir project task
  assignments, bookings, and schedule requests.
■ Bidirectional integration can be enabled and configured to push new, modified or deleted Outlook
  events to OpenAir bookings.

Refer to Configuring OpenAir Exchange Manager.

      Note: The OpenAir Exchange Setup must be run by a user with a Windows administrator role.

Step 4: Run OpenAir Exchange Engine
OpenAir Exchange Engine pushes OpenAir calendar information to each configured Exchange account.
Specifically:

■ Each OpenAir calendar event gets exported to a user's Outlook calendar.
■ Modifications or deletions of calendar events in OpenAir are replicated in Outlook.
■ Only new/updated/deleted items are transferred during each export.

If the bidirectional integration is enabled:

■ Calendar events created in Outlook convert into OpenAir bookings.
■ Modifications of calendar events in Outlook are replicated in OpenAir bookings.
■ Deletions in the Outlook calendar can either be ignored, result in the deletion of OpenAir Bookings or
  change the booking type.

Refer to Running the OpenAir Exchange Engine.

      Note: The OpenAir Exchange Engine must be run by a user with a Windows administrator role.

Overview of OpenAir Exchange Manager Functions
Once OpenAir Exchange Manager is installed, you can access five applications from the Windows start
menu — OpenAir Exchange Manager, Show console logs for Engine, Start Engine, Stop Engine and Tray
Monitor — grouped under the OpenAir Exchange Manager program folder.

Click OpenAir Exchange Manager to launch the OpenAir Exchange Setup window.

Exchange Manager Admin Guide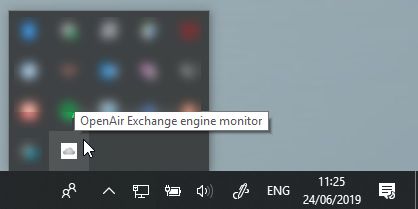
Overview of OpenAir Exchange Manager Functions            5

Tabs organize the following menu functions:

■ File — Select Save, Update, or Exit. To save the results of an exchange, go to File > Save. To populate
  OpenAir and Microsoft Exchange accounts, go to File > Update. You can Exit OpenAir Exchange
  Manager by clicking on the Close button or go to File > Exit.
■ Options — Select OpenAir Settings, Integration Settings, and Manually edit Exchange users. For more
  information of using each, see Configuring OpenAir Exchange Manager.
■ Help — Select Help and then choose one of the following options:
   □ User Guide (pdf) - displays the most recent OpenAir Exchange Admin Guide.
   □ Contents (Release notes) — displays the most recent readme.txt file.
   □ OpenAir Web Site — opens www.openair.com in your default Web browser window.
   □ Display Log — Select one of two options: Configuration or Engine.
      ▬ Configuration launches Notepad that loads OpenAirExchange.log. This log file lists all actions
        related to setup and configuration of the integration.
      ▬ Select Engine to launch Notepad with OpenAirExchangeEngine.log. It lists all engine actions
        with their dates and times.
      ▬ If you are having problems, we recommend that you send a copy of these files with each
        support request to OpenAir. See Troubleshooting.
   □ About OpenAir Exchange — displays the About box with version information.

Exchange Manager Admin Guide
Installation 6
Installation
This chapter provides installation information on the following:
■ Installing OpenAir Exchange Manager
■ Uninstalling OpenAir Exchange Manager
Installing OpenAir Exchange Manager
Important: Before you begin, ensure you have disabled access to OpenAir Outlook Connector
before installing and using OpenAir Exchange Manager. These two OpenAir programs cannot run
simultaneously in your OpenAir account .
To download and install OpenAir Exchange Manager:
1. Click on the following URL:
https://www.openair.com/download/OpenAirExchangeManager.exe
The following confirmation window appears.
2. Click Save File and specify a location. Click Save.
3. Locate the OpenAirExchangeManager.exe file and double click it. Respond to any security
questions.
Note: OpenAirExchangeManager.exe must be run by a user with a Windows
administrator role.
4. If Microsoft .NET framework 4.7.2 is not installed on your system:
a. A dialog displays prompting you to download and install an update supplied by Microsoft.
Click Yes.
Exchange Manager Admin GuideInstalling OpenAir Exchange Manager 7
Note: Microsoft .NET framework 4.7.2 is required to run OpenAir Exchange
Manager 5. If you click No, the installer will close and OpenAir Exchange Manager will
not install.
b. A new window or tab opens in your default browser and the following message displays.
Click Run.
Important: You may have to restart your computer after installing the
Microsoft .NET framework 4.7.2 update. It is recommended you exit all applications
that are using the .NET framework before you install this update.
c. Once Microsoft .NET framework 4.7.2 is successfully installed. If required, restart your
computer and repeat step 3.
5. The Welcome to the OpenAir Exchange Manager Setup Wizard appears. Click Next.
6. The OpenAir Exchange Manager License Agreement appears. Read the agreement carefully
and if you agree with the terms, click the I accept the agreement radio button and click Next to
proceed with the installation.
7. The Select Destination Location window appears. You can click the Browse button to change the
location where Exchange Manager will be installed. Click Next to install Exchange Manager to the
indicated path.
8. The Ready to Install window appears. Click Install.
Exchange Manager Admin GuideInstalling OpenAir Exchange Manager 8 9. An information window with README.TXT appears. Click Next. 10. Click Finish. Exchange Manager Admin Guide
Installing OpenAir Exchange Manager           9

      If you selected View readme.txt, the readme.txt file will open in a separate window. If you selected
      Start tray monitor now OpenAir Exchange Engine Monitor will start and the OpenAir Exchange
      Engine Monitor icon will appear in the Taskbar System Tray.

      Five applications are available from the Windows Start menu under the OpenAir Exchange
      Manager program folder: OpenAir Exchange Manager, Show console logs for Engine, Start Engine,
      Stop Engine and Tray Monitor.

Uninstalling OpenAir Exchange Manager
When a new version of OpenAir Exchange Manager is available, you do not need to uninstall the version
you are using. Simply download the new version and the installation process will update the application

Exchange Manager Admin Guide
Uninstalling OpenAir Exchange Manager 10
accordingly. However, if you will no longer be using OpenAir Exchange Manager and you need to uninstall
it, follow these steps.
To uninstall OpenAir Exchange Manager:
1. Click the Start icon.
2. Select Settings > Control Panel and click Programs and Features.
A list of the programs on your computer appears.
3. Select OpenAir Exchange Manager [version number].
4. Click Uninstall.
A prompt appears to verify the action.
5. Click Yes.
A message appears verifying the action.
6. Click OK.
7. To remove data mapping files manually, go to C:\Program Files\OpenAir\Exchange Server and
delete them manually.
Exchange Manager Admin GuideConfiguring OpenAir Exchange Manager 11
Configuring OpenAir Exchange Manager
You must configure OpenAir Exchange Manager before you can use the OpenAir Exchange Engine to run
the integration and transfer OpenAir project assignments, bookings, and schedule requests through the
Microsoft Exchange Server to users' Outlook accounts.
This chapter describes how to configure OpenAir Exchange Manager using the OpenAir Exchange Setup
application.
To open OpenAir Exchange Setup:
Use one of the following methods to open OpenAir Exchange Setup
1. Go to the application installation directory (the default installation directory is C:\Program Files
(x86)\OpenAir\ExchangeManager ). Click OpenAirExchange.exe.
2. Go to the Windows start menu, scroll down to OpenAir Exchange Manager, expand the program
folder and click OpenAir Exchange Manager.
3. If you installed OpenAir Exchange Manager version 5.0 or later and selected Start tray monitor
now during the installation, right-click the OpenAir Icon in the Taskbar system tray and click Setup.
The following screen displays when you open OpenAir Exchange Setup.
Exchange Manager Admin GuideOpenAir Settings 12
The following settings need to be configured:
■ OpenAir Settings — OpenAir account credentials are required to access OpenAir data.
■ Integration Settings — These include:
□ Active Directory
□ Exchange Access
□ Logging
□ Sync
■ Map OpenAir and Microsoft Exchange User Accounts — To manage the integration options for
individual users
OpenAir Settings
Before you can transfer data from OpenAir to the Microsoft Exchange Server, you need to log in to your
OpenAir account using your OpenAir account credentials.
To enter your OpenAir account credentials:
1. Go to Options > OpenAir Settings...
The following window appears. The credentials you enter here are used to retrieve data from your
OpenAir account.
2. Type your Company ID, User ID, and Password.
If you select the check box to Remember Password, you do not have to enter it again.
Note: The User ID must have Administrator role privileges in OpenAir.
3. Server — Enter the URL for your OpenAir Account.
Exchange Manager Admin GuideOpenAir Settings 13
Note: The server URL includes the domain for your OpenAir account . It is the first part of the URL visible in the address bar of your browser after you
log into the OpenAir web application.
https://
■ The URL must start with https://
■ The domain name contains a unique account identifier . The account
identifier is typically based on your OpenAir Company ID.
■ The domain name depends on the account type:
□ Production account-specific domain: .app.openair.com
□ Sandbox account-specific domain: .app.sandbox.openair.com
□ Demo account-specific domain: .app.demo.openair.com
4. Click OK. In most cases, leave Account ID blank.
Note: By clicking on the OK button, you understand and agree that the use of Oracle's
application is subject to the Oracle.com Terms of Use. Additional details regarding Oracle’s
collection and use of your personal information, including information about access,
retention, rectification, deletion, security, cross-border transfers and other topics, is
available in the Oracle Privacy Policy.
Integration Settings
Before you can transfer data from OpenAir to the Microsoft Exchange Server, you also need to review the
Integration Settings.
To enter Integration Settings:
1. Go to Options > Integration Settings...
The following window appears.
Exchange Manager Admin GuideIntegration Settings 14
2. Select the date to Export records modified after (last update). Click on the down arrow to display a
calendar. Click Today to select today's date.
3. Click the tabs to display the other integration settings.
Each integration settings tab is explained in the following sections:
■ Active Directory — This is the default tab when you select Integration Settings
■ Exchange Access
■ Logging
■ Sync
Active Directory
Use the Active Directory tab to configure retrieval of users' information from AD. In this tab, you can select
whether to use LDAP or, if integrating with Microsoft Office 365, Azure AD.
To configure Exchange Manager to integrate using an LDAP Active Directory:
1. In the Active Directory tab, select LDAP from the Choose the type of your AD drop-down list.
2. Enter the LDAP search filter. The LDAP search filter is for optional complex LDAP searches, and
under normal circumstances, can be left with the default value. You can also query a global catalog.
Exchange Manager Admin GuideIntegration Settings 15
Important: If your organization is large and only a small group are OpenAir users, we
recommend that you create a dedicated OpenAirUsers domain user group. The name
of this group should be included in the LDAP search filter. The narrowed-down search
restricts the global list of users to just OpenAir users. This simplifies the configuration and
maintenance of the integration.
3. In the Active Director container box, select Use global catalog or Use domain.
a. Select Use global catalog if exchange users exist on more than one Exchange Server in the
forest. Provide the domain name for the forest root in the Global catalog or Domain field
and Administrator credentials in the User name and Password fields to access the catalog
of users.
b. Select Use domain to retrieve exchange users from the AD domain. Provide the domain
name in the Global catalog or Domain field and Administrator credentials in the User
name and Password fields to access the catalog of users.
You can also click the Autodetect domain button to use the domain which the user’s PC is
connected to.
4. Click OK.
The Active Directory tab is also used to set up integrations to Microsoft 365 using Azure AD.
To configure Exchange Manager to integrate with Microsoft Office 365:
1. In the Active Directory tab, select Azure AD from the Choose the type of your AD drop-down
list.
2. Type your Tenant, Client ID, UPN, and Password into the fields.
Exchange Manager Admin GuideIntegration Settings 16
3. Click Check connection to test your connection to Microsoft 365. This will verify that you have the
correct logon credentials and that you have set up the information correctly.
4. Click OK.
Exchange Access
Use this tab to enter exchange access information.
1. Click the Exchange Access tab. The following window appears.
Exchange Manager Admin GuideIntegration Settings 17
2. Choose the Authentication Type according to the Exchange Server Authentication configuration
on Outlook Web Access (OWA). In most cases, you should be using Windows Integration
Authentication.
3. Type your Domain (optional), User name (this can be a UPN name), and Password. Provide
a domain account that has read and write access permissions to the mailboxes of all users
configured in the integration.
4. Select the Exchange Version you are using from the dropdown list of supported versions.
Important: The integration does not support access to user mailboxes that can
be accessed only via Exchange servers with different versions. However, access to all
configured users' mailboxes is possible via Exchange servers of the same version.
5. Select the check box Use http if the integration is local to the Exchange Server and the Exchange
Server is not setup to accept https traffic.
6. Select the check box for Override SSL Exceptions if the SSL certificate is not signed, or if the
domain name used by the integration does not match the domain in the SSL certificate.
Important: This is not recommended in remote setups.
7. Select the check box to Use full email address as mailbox name.
8. Select the check box Use EWS Autodiscovery to Autodiscover the correct EWS endpoint for
Exchange users configured for integration.
Exchange Manager Admin GuideIntegration Settings 18
Note: Pleae not ethe following:
■ Selecting Use EWS Autodiscovery disables the Use http checkbox as this is obtained
directly by Autodiscover.
■ If Autodiscover fails for any user, the details are logged and the process continues with
the remaining users.
■ If the EWS URL is changed on the Exchange server side the Update function must be
executed again to set the value in the Exchange Manager database (see To load and
update OpenAir and MS Exchange user accounts: under Map OpenAir and Microsoft
Exchange User Accounts).
Important: The Autodiscover service uses an e-mail address to locate the configuration
information that is needed to create a connection to an Exchange server. Only a
credentialed user of the domain can use the Autodiscover service.
Logging
Use this tab to configure the transmission of the engine log to a designated email address.
To send the engine log to a designated email address:
1. Click the Logging tab. The following window appears.
2. Select the check box for Send results of each run if you want a log of each sync to be mailed to
the email address provided. A message is sent and if errors occur, the number of errors appears in
the title of the message to alert the receiver.
Exchange Manager Admin GuideIntegration Settings 19
3. Type the email address in To Email Address.
4. Type the Server Name.
5. Select whether to Use Authentication. If checked, type the User name and Password.
6. Click OK.
Sync
Use this tab to configure synchronization of OpenAir bookings against Outlook calendar events.
Synchronization currently does not support recurring calendar events. All-day events are brought in as
100% allocation bookings. Events with a start and end time create bookings with a specific number of
hours. The integration can be either:
■ unidirectional — exporting new and modified OpenAir bookings as Outlook calendar events; or
■ bidirectional — updating OpenAir bookings based on calendar events created or modified in Outlook
as well as exporting new and modified OpenAir bookings as Outlook calendar events.
1. Click the Sync tab. The following window appears.
2. Select the check box to Export Booking Notes as-is if you want to export booking notes with no
other booking-related information. This allows the integration administrator to decide whether
booking notes are exported purely with their content or as a formatted meta-field that includes
hours, percentage, project, etc. in addition to the notes themselves. If bi-directional sync is
enabled, this setting is also selected and not editable to allow more straightforward field level
merge logic.
3. Select Enable bi-directional integration if you want the integration to receive information from
Outlook and import it to OpenAir as well as from OpenAir to Outlook. If left unchecked, the flow
of information is unidirectional by default, from OpenAir to Outlook only. See To configure the
bidirectional integration:.
Exchange Manager Admin GuideIntegration Settings 20
4. Click OK.
To configure the bidirectional integration:
1. Select Enable bi-directional integration if you want to send information from Outlook back to
OpenAir as well as the default integration from OpenAir to Outlook. The Bi-Directional Settings
group becomes available.
2. Sync events created or modified after — Specify the threshold date after which events are
synced. When the integration is run, events created or modified after the specified date are
exchanged. After each successful engine run, this date is updated accordingly.
3. Conflict Resolution — This setting determines which records to use when both records from
OpenAir and MS Exchange Server are read. Select OpenAir wins to prioritize OpenAir records over
the MS Exchange Server records, or MS Exchange Server wins to prioritize MS Exchange Server
records over OpenAir records.
Note: The engine does a field-level merge in both directions even if a booking is modified
in OpenAir and the corresponding event is updated in Outlook if the changes are in
different fields. For example, if Notes are modified in the Outlook event and the booking
start date is changed in OpenAir, the engine updates the booking notes in OpenAir and also
changes the start date of the Outlook event. However, if the same field is modified on both
sides, the engine resolves the conflict based on the preference you select.
4. Default Booking Properties — Select the Booking Type and the Project for bookings created
from Outlook events.
Note: These are global settings required for the bidirectional integration and they apply
to all users mapped in this integration. You can override these settings and define a default
Booking Type and Customer-Project for each user on an individual basis. See To override
the global default booking properties for individual users:.
5. Export private outlook events — Select this option if you want Outlook calendar event marked
as private to be exported to OpenAir. Generally, a private event is a calendar event that does not
impact a project or billing, but indicate a user's time is allocated and therefore, not available for
assignment.
Note: This is a global setting and it applies to all users mapped in this integration.
6. Deletion in Outlook — Select the desired behavior determining the action to be taken in OpenAir
when a calendar event is deleted in Outlook. Choose one of the following options
■ is ignored by integration — If an event is deleted in Outlook, no action is taken. The
integration does not delete OpenAir bookings.
■ deletes booking created from Outlook Event — If a booking is initially created from an
Outlook event and the event is subsequently deleted, the integration deletes the matching
booking in OpenAir. However, the integration does not delete bookings that are initially created
in OpenAir.
■ deletes booking regardless of origin — If an Outlook event is deleted and a corresponding
booking exists in OpenAir, the booking is deleted. It does not matter where a booking
originates, it is automatically deleted.
■ changes booking type to — If a booking is deleted in Outlook, the integration automatically
assigns the specified booking type to the corresponding booking in OpenAir. For example,
when a booking is deleted in Outlook, you may change its OpenAir booking type to “Deleted”.
Therefore, when a user logs into OpenAir, the account reflects that a booking has a Deleted
booking type, which indicates the booking was deleted in Outlook.
Exchange Manager Admin GuideIntegration Settings 21
Note: if the event is hard-deleted in Outlook, the integration is not able to detect that
deletion. In addition, retention policy needs to be configure for deleted items so they are
not removed from the store.
7. Click OK.
Important: Enable bi-directional integration is a global application switch. After it is enabled,
Sync From Exchange must be enabled for each user in the Exchange Setup main screen For
more information, see Map OpenAir and Microsoft Exchange User Accounts
Tip: Resize the Integration Settings window to show long text strings such as. project names in
the Default Booking Properties dropdown. The Integration Settings window can be resized if you
are using OpenAir Exchange Manager 5.0 or later.
To override the global default booking properties for individual users:
1. In OpenAir, go to Administration > Custom Fields.
2. Create the following custom fields associated with user records:
■ exchDefault_booking_type as Pick List with the list source set as Booking Type.
■ exchDefault_project as Pick List with the list source set as Project.
3. The custom fields can be used to set the default Booking Type and Project for bookings created
from Outlook events for each user on an individual basis. If there are no values assigned to these
fields, the global default booking properties defined in OpenAir Exchange Integration Settings will
be used.
Map OpenAir and Microsoft Exchange User
Accounts
After you have configured the OpenAir Settings and Integration Settings , use the Update function to
load OpenAir and MS Exchange user account information into the OpenAir Exchange integration. See To
load and update OpenAir and MS Exchange user accounts:.
Where OpenAir user email addresses are identical to those in Microsoft Exchange, they are automatically
mapped. Where email addresses are not identical, you must map MS Exchange users manually. See To
map MS Exchange users manually:.
You can also add, remove or import MS Exchange user accounts manually. See To edit or import MS
Exchange users manually:.
After you have completed the account mapping, you can enable Sync From Exchange for individual users
if the bidirectional integration is enabled. You can also designate which items to export for each user. See
To configure the integration options for each mapped user:.
To load and update OpenAir and MS Exchange user accounts:
1. Open OpenAir Exchange Setup . See To open OpenAir Exchange Setup:
2. Go to File > Update.
OpenAir and Microsoft Exchange user account information displays.
Exchange Manager Admin GuideMap OpenAir and Microsoft Exchange User Accounts 22
To map MS Exchange users manually:
Items with identical email addresses map automatically, however, if they do not map, you can do this
manually.
1. Open OpenAir Exchange Setup . See To open OpenAir Exchange Setup:
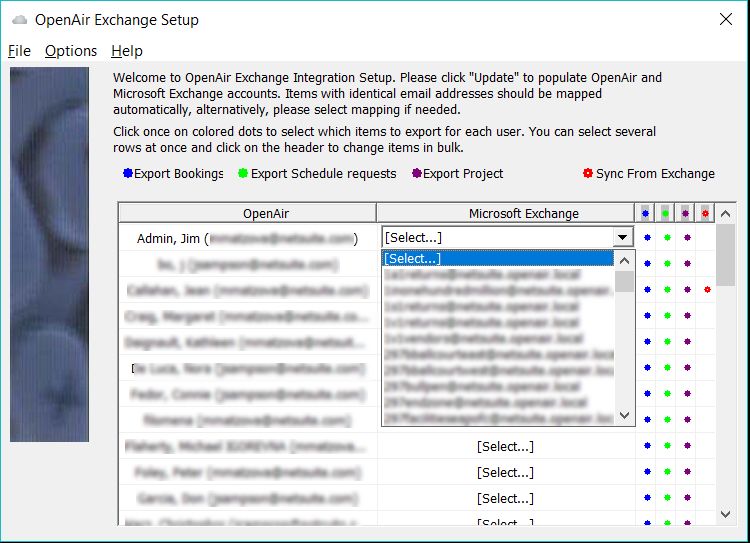
2. If a user account is not mapped the value in the Microsoft Exchange column shows [Select ...].
Click [Select ...]. A dropdown displays listing all the MS Exchange user accounts already present in
the OpenAir Exchange Manager (loaded either automatically or manually) .
Exchange Manager Admin GuideMap OpenAir and Microsoft Exchange User Accounts 23
3. Locate and click the MS Exchange user to map it to the OpenAir user.
4. Repeat for all users showing [Select ...] under Microsoft Exchange.
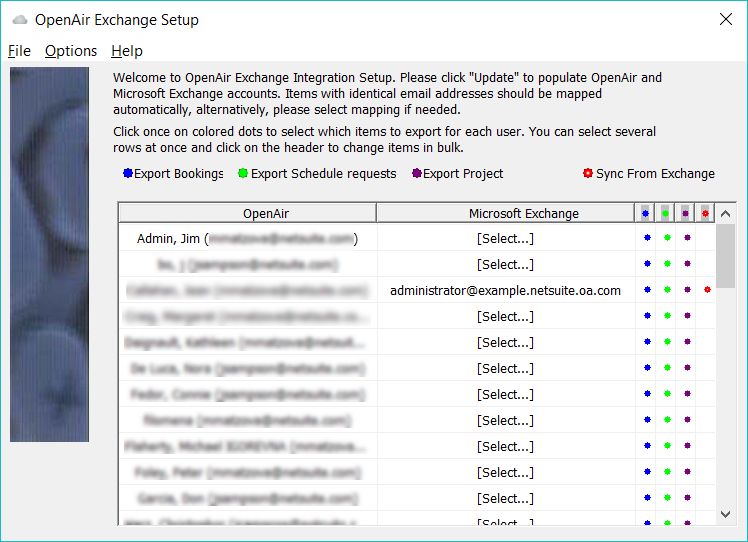
To configure the integration options for each mapped user:
1. Click in the columns next to the user to select which items to export for each user. Colored dots will
display in the user row for the items selected for export:
■ Blue dot — OpenAir bookings will be exported as Outlook calendar events for this user.
■ Green dot — OpenAir schedule requests will be exported as Outlook calendar events for this
user.
■ Purple dot — OpenAir projects will be exported as Outlook calendar events for this user.
■ Red dot — Outlook calendar events will be exported as OpenAir bookings for this user if the
bidirectional integration is enabled. See To configure the bidirectional integration: and Sync.
Exchange Manager Admin GuideMap OpenAir and Microsoft Exchange User Accounts 24
Tip: You can select multiple rows and click on the dots in the column header to change
the items to be exported in bulk.
Important: If users' time zone configuration changes in OpenAir, an administrator need
to go to File > Update to refresh the information in the integration mapping.
To edit or import MS Exchange users manually:
1. Go to Options > Manually edit Exchange users...
The following window appears.
When the window opens, the grid loads all Exchange users already present in the OpenAir
Exchange Manager (loaded either automatically or manually).
Exchange Manager Admin GuideMap OpenAir and Microsoft Exchange User Accounts 25
2. To add new users:
1. Scroll down to the last row in the grid and Type in the values for Exchange email address
and Exchange server in the empty grid fields.
2. Press the Enter key on your keyboard or click the next empty grid field.
3. To remove users:
1. Select user(s) in the Current Exchange users list.
2. Press the Delete key on your keyboard.
4. To set new exchange server names:
1. Select user(s) in the Current Exchange users list.
2. Click Set Exchange server... . A dialog displays.
3. Enter the new Exchange server name.
4. Click OK.
Note: You can use the Shift and Ctrl keys when clicking to select multiple users. The Set
Exchange server button applies to all the users selected in the Current Exchange Users
list.
5. To import users from a CSV file:
1. Click Import from file.... The following window appears:
2. Click the Browse button (...). A file selector dialog displays.
3. Select the desired CSV file. CSV files used for this purpose must contain only 2 columns,
have no headers, include only plain data, and use a comma (,) as separator, as in the
example below:
4. Check the appropriate Import options (at least one must be enabled):
■ If Add new users is checked, the program will import any Exchange user from the CSV
file whose email is not present in OpenAir Exchange Manager.
■ If Replace existing users is checked, the program will replace existing Exchange users
in the OpenAir Exchange Manager with corresponding users found in the CSV file. No
new users will be added unless Add new users is also checked.
5. Click Run import to start processing the CSV file and import the Exchange users to the
grid.
Exchange Manager Admin GuideOpenAir Exchange Manager Registry Settings 26
OpenAir Exchange Manager Registry Settings
Additional configuration settings are available in the Windows Registry.
The following registry keys are available to set the time delay (in seconds) between one synchronization
loop and the next :
■ LoopWaitTimeCriticalError (default: 600 seconds) — Loop delay (in seconds) when the last
synchronization run returned a critical error (A critical error may be returned if, for example, either MS
Exchange Server or OpenAir are not available ).
■ LoopWaitTimeNoRecordsToSync (default: 300 seconds) — Loop delay (in seconds) when no new
records were found for mapped user during the last synchronization run.
■ LoopWaitTimeRecordsPendingSync (default: 5 seconds) — Loop delay (in seconds) when there
are still records waiting to be synchronized between OpenAir and MS Exchange after the last
synchronization run.
The following registry key is available to set the maximum size for the OpenAir Exchange Engine log file :
■ MaxSizeOfLogFile (default: 209715200 bytes) — Maximum Size (in bytes) of the Exchange Engine log
file.
Note: If the log file exceeds the maximum size specified, a new log file is created.
To edit Exchange Manager Registry Settings
1. Open the Windows Run command (shortcut: Ctrl + R).
2. Enter regedit and click Open. The Registry Editor opens.
3. Go to Computer\HKEY_LOCAL_MACHINE\SOFTWARE\WOW6432Node\OpenAir
\ExchangeManager.
4. For each key you want to edit:
a. Double-click the name of the key. A window appear letting you edit the value.
b. Enter the value data.
c. Click OK.
5. Go to File > Exit to exit the Registry Editor.
Important: Care should be taken when editing the Registry. We do not recommend changing
any other settings than those listed above.
Exchange Manager Admin GuideRunning the OpenAir Exchange Engine 27
Running the OpenAir Exchange Engine
Once you have configured OpenAir Exchange Setup, you can use the OpenAir Exchange Engine to export
bookings, schedule requests, and project assignments from OpenAir to users' Outlook accounts. The
OpenAir Exchange Engine must be run by a user with a Windows administrator role. Read/write access to
all user Exchange folders configured for the integration is required. If you are using OpenAir Exchange
Manager 5.0 or later, you can also run OpenAir Exchange Engine as a Windows service.
Note: Only project task assignments with non-zero planned hours are exported.
When OpenAir Exchange Manager 5.0 or later is installed, the following shortcuts are available from the
Windows start menu:
■ OpenAir Exchange Manager — Opens the Exchange Manager interface
■ Start Engine — Runs the OpenAir Exchange Engine in the background
■ Stop Engine — Stops the OpenAir Exchange Engine
■ Show console logs for Engine – Opens a log file which describes Exchange Engine’s current progress if
running, or a notification that it is not currently running.
■ Tray Monitor — Starts the Taskbar System Tray utility to control and monitor the OpenAir Exchange
Engine Windows service.
Once opened, the OpenAir Exchange Engine runs continuously in the background, with the following
process:
1. The Exchange Engine checks for new information in OpenAir. If new information is found, it
downloads all new information from OpenAir.
2. The Exchange Engine sends records to Microsoft Exchange Server and waits for return
information.
3. When return information is received from Microsoft Exchange Server, the Exchange Engine
updates the OpenAir server.
To run the OpenAir Exchange Engine:
1. Go to the location where you installed the Exchange Manager (e.g. C:\Program Files (x86)\OpenAir
\ExchangeManager) and double-click OpenAirExchangeEngine.exe or the Start Engine shortcut.
A command line window opens and runs the OpenAir Exchange Engine as it has been configured.
See Configuring OpenAir Exchange Manager.
Note: There is a known limitation due to the fact that some OpenAir calendar items are
constrained only by dates with no start and end times of day. Such records export as an entire day.
The subject and notes of each exported item specifies similar information to what appears in the
OpenAir calendar.
Warning: Although it was recommended to use Windows Task Scheduler with versions of
Exchange Manager prior to 4.0, as of version 4.0, OpenAir recommends not using Task Scheduler
to run Exchange Manager.
To run the OpenAir Exchange Engine as Windows service
1. Go to the Taskbar system tray, locate and the right-click the OpenAir Exchange Engine Monitor icon
and click Install Service.
Exchange Manager Admin GuideRunning the OpenAir Exchange Engine 28
2. Once the service installed, right-click the OpenAir Exchange Engine Monitor icon and click Start
Service or Stop Service to control the service, or click Stats to open the OpenAir Exchange
Monitor window and review the status and activity of the OpenAir Exchange Engine Windows
service.
Exchange Manager Admin GuideUsing the Booking Status Feature 29
Using the Booking Status Feature
You can export resource bookings from OpenAir to Outlook so that a Status or Show as state appears
on the Outlook appointment form. If you do not use the booking status feature, the default status that
appears is always Free.
To use the booking status feature, ensure you are using OpenAir Exchange Manager version 2.08 or a
later version. Refer to the table that follows for an explanation of OpenAir Calendar Export Types and the
status that appears in Outlook.
When the OpenAir Calendar Export Type is... Status appears in Outlook as...
Set event time as busy Busy*
Set event time as free Free
Set event time as tentative Tentative
Set event time as out of office OOF
Do not export Does not export OpenAir booking to Outlook
Note: *Busy status is set only for bookings that have a Start and End time defined.
To use the booking status feature:
1. Go to Administration > Global Settings > Custom fields > Custom Fields and create a new custom
field. Add a custom field to: Resources > Booking type and select a Dropdown type of field. Click
Continue.
2. Type the Field name: calendar_export_type
3. Type a Description and Display name such as Calendar Export Type.
4. Click anywhere in the Values* field. In the New Field Values window, click the icon, and type “Do
not export” in the field. Click OK.
Exchange Manager Admin GuideUsing the Booking Status Feature 30
Repeat this step for “Set event time as busy”, “Set event time as free”, “Set event time as tentative”,
and “Set event time as out of office”.
Note: You must type each value exactly as shown in the image above.
5. We recommend that you do not select the Required check box unless you require that a Calendar
Export Type be selected on each booking type.
6. Complete the custom field form and click Save.
7. Go to Administration > Application Settings > Resources Settings and select Booking types. Create
new Booking types or select existing ones.
8. Scroll down to the custom field Calendar Export Type, which you just created. Select one of the
following values: Do not export, Set event time as busy, Set event time as free, Set event time as
tentative, and Set event time as out of office.
9. Go to Resources and when you create or edit a booking, choose a Booking type that is associated
with the Calendar Export Type you desire.
10. Run the OpenAir Exchange Engine to export the booking to Outlook. See Using the Booking Status
Feature.
Outlook displays the OpenAir booking type status.
Exchange Manager Admin GuideGranting Rights to Mailboxes 31 Granting Rights to Mailboxes This chapter provides information on granting rights to Microsoft Exchange mailboxes: ■ Instructions for Microsoft Exchange 2007 ■ Instructions for Microsoft Exchange 2010 and Later Versions Instructions for Microsoft Exchange 2007 When using Microsoft Exchange 2007, Full Access permission for a mailbox is required for all Exchange users configured for integration to Sync OpenAir bookings against Outlook calendar events. Please refer to the following Microsoft instructions: http://technet.microsoft.com/en-us/library/aa996343(EXCHG.80).aspx Instructions for Microsoft Exchange 2010 and Later Versions When using Microsoft Exchange 2010 or later versions of Microsoft Exchange, Exchange Impersonation is required for all Exchange users configured for integration to Sync OpenAir bookings against Outlook calendar events. Please refer to the following Microsoft instructions: http://msdn.microsoft.com/en-us/library/bb204095(v=exchg.80).aspx Exchange Manager Admin Guide
References       32

References

Troubleshooting
The first step in troubleshooting is to ensure that you have installed the latest version of the OpenAir
Exchange Manager so that you have the most recent enhancements, fixes, and features. Refer to
Installing OpenAir Exchange Manager for more information and considerations for updating.

Create a Support Case
If you are experiencing difficulties with OpenAir Exchange Manager or would like to enable an internal
switch, please create a support case and submit it through your OpenAir account.

To create a support case:
  1. Log in to your OpenAir account and select Support from the User Center menu.
  2. Click on the Go to SuiteAnswers button.
  3. From the SuiteAnswers site home page, click Contact Support Online.
  4. Enter your question keywords and click Search.

             Note: If you do not have a question, i.e. you need a switch enabled, just click Search.

  5. Very often the answer to your question will be displayed. If you still want to create a support case
     click Continue to Create Case.
  6. Fill out the Create Case form and then click the Submit. You will receive an email
       confirmation with Your OpenAir Customer Care #.

             Note: An asterisk * displays after required fields.

Send the Log File
If you are still experiencing difficulties, please attach a zipped copy of the log file and to the support case,
see Create a Support Case.

To obtain the log file:
  1. Click Help and select Display Log.
       The log file displays.
  2. Save the file, compress it to a zipped file, and attach it to the support case.

Our Support staff and engineers will work with you to find a solution to your problem.

Frequently Asked Questions
Questions may arise as you use OpenAir Exchange Manager.

Exchange Manager Admin Guide
Frequently Asked Questions 33
1. The remote server returned an error: (403) Forbidden. What does it mean?
Answer: There may be a mismatch between the configured version of Exchange Server in the
Integration Settings and the actual version of the Exchange Server.
2. I got the following error message: Exchange Server doesn't support the requested version. What
does it mean?
Answer: This might also indicate there is a mismatch between the configured version of
Exchange Server in the Integration Settings and the actual version of the Exchange Server.
3. An automated task has modified hundreds of old records in my OpenAir account, how can I
exclude these from the Integration?
Answer: In the Integration Settings dialog a user can specify an “Exclude records created” filter.
This filter will only pass records that are considered new i.e. created within the number of days
specified.
Example: Consider the case when records created in 1999 have just been modified by an
automated process. If these records are too old to be of interest you can set “Exclude records
created”, e.g. to 30 days, to filter out these old records despite their modification date being
today.
Exchange Manager Admin GuideAppendix A Outlook Calendar Event Examples 34 Appendix A Outlook Calendar Event Examples Following are examples of Outlook appointments that were created from the OpenAir Exchange Manager integration. They include: ■ OpenAir Task Assignment in Outlook ■ OpenAir Booking in Outlook ■ OpenAir Schedule Request in Outlook OpenAir Task Assignment in Outlook Below is an example of a project task assignment from OpenAir that has been created in Outlook via the OpenAir Exchange Manager integration. It includes task information as well as customer and project information. OpenAir Booking in Outlook Below is an example of a resource booking from OpenAir that has been created in Outlook via the OpenAir Exchange Manager integration. This example includes start time and end time information that was enabled in the associated OpenAir account for resource booking records. Exchange Manager Admin Guide
OpenAir Booking in Outlook     35

OpenAir Schedule Request in Outlook
Below is an example of a schedule request from OpenAir that has been created in Outlook via the
OpenAir Exchange Manager integration. It includes the amount of time requested and approval status as
well as the start time and end time, duration, description, and notes.

Exchange Manager Admin Guide
You can also read