Management Portal Version 9.0 - ADMINISTRATOR'S GUIDE - Acronis
←
→
Page content transcription
If your browser does not render page correctly, please read the page content below
Management Portal
Version 9.0

ADMINISTRATOR'S GUIDE   Revision: 4/24/2020

Table of contents
       1    About this document .......................................................................................................4

       2    About the management portal .........................................................................................4
    2.1     Accounts and units.....................................................................................................................4
    2.2     Quota management ...................................................................................................................5
       2.2.1      Viewing quotas for your organization ........................................................................................................... 6
       2.2.2      Defining quotas for your users ....................................................................................................................... 9
    2.3     Supported web browsers.........................................................................................................10
       3    Step-by-step instructions ............................................................................................... 10
    3.1     Activating an administrator account .......................................................................................11
    3.2     Accessing the management portal and the services ...............................................................11
    3.3     Navigation in the management portal ....................................................................................11
    3.4     Creating a unit .........................................................................................................................11
    3.5     Creating a user account ...........................................................................................................12
    3.6     Changing notification settings for a user .................................................................................13
    3.7     Disabling and enabling a user account ....................................................................................13
    3.8     Deleting a user account ...........................................................................................................14
    3.9     Transferring ownership of a user account ...............................................................................14
    3.10 Setting up two-factor authentication ......................................................................................15
       3.10.1     Two-factor setup propagation across tenant levels ................................................................................... 16
       3.10.2     Setting up two-factor authentication for your tenant ............................................................................... 16
       3.10.3     Managing two-factor configuration for users ............................................................................................. 17
       3.10.4     Resetting two-factor authentication in case of lost second-factor device ............................................... 18
       3.10.5     Brute-force protection .................................................................................................................................. 18
       4    Monitoring .................................................................................................................... 19
    4.1     Usage .......................................................................................................................................19
    4.2     Operations ...............................................................................................................................19
       4.2.1      Protection status ........................................................................................................................................... 20
       4.2.2      CyberFit Score by device ............................................................................................................................... 21
       4.2.3      Disk health forecast....................................................................................................................................... 22
       4.2.4      Data protection map ..................................................................................................................................... 26
       4.2.5      Vulnerability assessment widgets ................................................................................................................ 27
       4.2.6      Patch installation widgets ............................................................................................................................. 28
       4.2.7      Backup scanning details ................................................................................................................................ 30
       4.2.8      Recently affected........................................................................................................................................... 31
       5    Reporting ...................................................................................................................... 31
    5.1     Usage .......................................................................................................................................31
       5.1.1      Usage reports ................................................................................................................................................ 33
    5.2     Operations ...............................................................................................................................33
    5.3     Time zones in reports ..............................................................................................................36

2                                                                                            Copyright © Acronis International GmbH, 2003-2020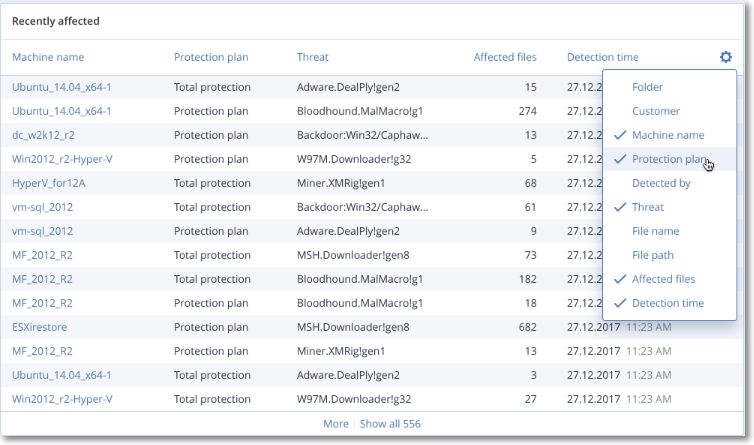
6   Audit log ........................................................................................................................ 37

      7   Advanced scenarios ....................................................................................................... 39
    7.1   Limiting access to the web interface .......................................................................................39
    7.2   Limiting access to your company.............................................................................................39
    7.3   Managing API clients................................................................................................................39
      7.3.1    Creating an API client .................................................................................................................................... 40
      7.3.2    Resetting the secret value of an API client .................................................................................................. 40
      7.3.3    Disabling an API client ................................................................................................................................... 41
      7.3.4    Enabling a disabled API client ....................................................................................................................... 41
      7.3.5    Deleting an API client .................................................................................................................................... 41

3                                                                                        Copyright © Acronis International GmbH, 2003-2020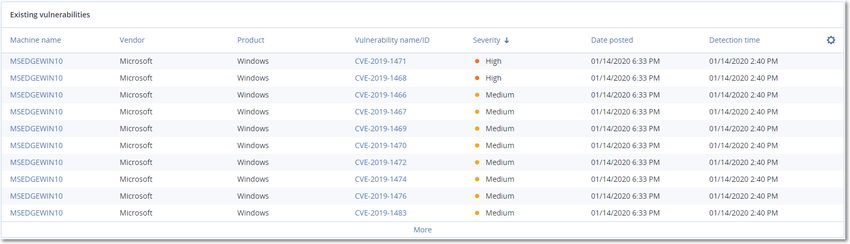
1 About this document
This document is intended for administrators who want to use the management portal.
2 About the management portal
The management portal is a web interface to the cloud platform that provides data protection
services.
While each service has its own web interface, called the service console, the management portal
enables administrators to control services usage, create user accounts and units, generate reports,
and more.
2.1 Accounts and units
There are two user account types: administrator accounts and user accounts.
Administrators have access to the management portal. They have the administrator role in all
services.
Users do not have access to the management portal. Their access to the services and their roles
in the services are defined by an administrator.
Administrators can create units, which typically correspond to units or departments of the
organization. Each account exists either on the company level or in a unit.
An administrator can manage units, administrator accounts, and user accounts on or below their
level in the hierarchy.
4 Copyright © Acronis International GmbH, 2003-2020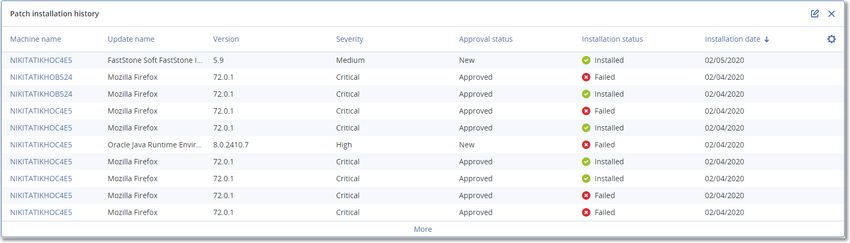
The following diagram illustrates three hierarchy levels – the company and two units. Optional units
and accounts are shown by a dotted line.

The following table summarizes operations that can be performed by the administrators and users.
               Operation                              Users                     Administrators

Create units                                           No                             Yes

Create accounts                                        No                             Yes

Download and install the software                     Yes                             Yes

Use services                                          Yes                             Yes

Create reports about the service usage                 No                             Yes

2.2       Quota management
Quotas limit a tenant's ability to use the service.

In the management portal, you can view the service quotas that were allocated to your organization
by your service provider but you cannot manage them.

You can manage the service quotas for your users.

5                                                             Copyright © Acronis International GmbH, 2003-2020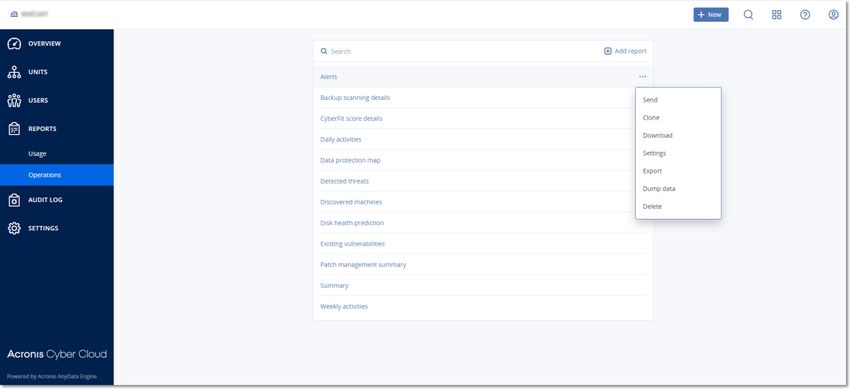
2.2.1 Viewing quotas for your organization
In the management portal, go to Overview > Usage. You will see a dashboard showing the allocated
quotas for your organization. The quotas for each service are shown on a separate tab.
2.2.1.1 Backup quotas
You can specify the cloud storage quota, the quota for local backup, and the maximum number of
machines/devices/websites a user is allowed to protect. The following quotas are available.
Quotas for devices
Workstations
Servers
Virtual machines
Mobile devices
Web hosting servers
Websites
A machine/device/website is considered protected as long as at least one protection plan is applied
to it. A mobile device becomes protected after the first backup.
When the overage for a number of devices is exceeded, the user cannot apply a protection plan to
more devices.
Quotas for cloud data sources
Office 365 seats
This quota is applied by the service provider to the entire company. The company can be allowed
to protect Mailboxes, OneDrive files, or both. Company administrators can view the quota and
the usage in the management portal, but cannot set the quota for a user.
Note Public folders consume licenses from your backup quota for Office 365 seats.
Office 365 SharePoint Online
This quota is applied by the service provider to the entire company. This quota enables or
disables the ability to protect SharePoint Online sites. If the quota is enabled, any number of
SharePoint Online sites can be protected. Company administrators cannot view the quota in the
management portal, but can view the amount of storage occupied by SharePoint Online backups
in the usage reports.
Backing up SharePoint Online sites is only available to customers who have at least one Office
365 seats quota in addition. This quota is only verified and will not be taken up.
G Suite seats
This quota is applied by the service provider to the entire company. The company can be allowed
to protect Gmail mailboxes (including calendar and contacts), Google Drive files, or both.
Company administrators can view the quota and the usage in the management portal, but
cannot set the quota for a user.
G Suite Shared drive
This quota is applied by the service provider to the entire company. This quota enables or
disables the ability to protect G Suite Shared drives. If the quota is enabled, any number of
Shared drives can be protected. Company administrators cannot view the quota in the
management portal, but can view the amount of storage occupied by Shared drive backups in
the usage reports.
6 Copyright © Acronis International GmbH, 2003-2020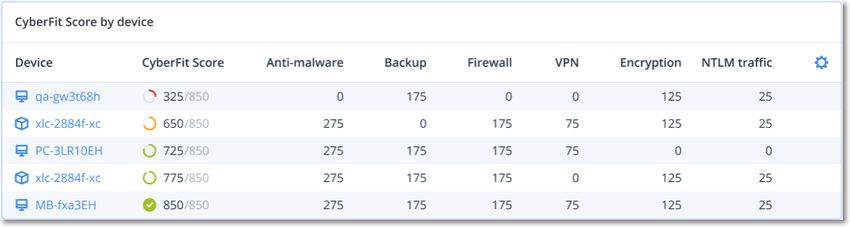
Backing up G Suite Shared drives is only available to customers who have at least one G Suite
seats quota in addition. This quota is only verified and will not be taken up.
An Office 365 seat is considered protected as long as at least one protection plan is applied to the
user's mailbox or OneDrive. A G Suite seat is considered protected as long as at least one protection
plan is applied to the user's mailbox or Google Drive.
When the overage for a number of seats is exceeded, a company administrator cannot apply a
protection plan to more seats.
Quotas for storage
Local backup
The Local backup quota limits the total size of local backups that are created by using the cloud
infrastructure. An overage cannot be set for this quota.
Cloud resources
The Cloud resources quota combines the quota for backup storage and quotas for disaster recovery.
The backup storage quota limits the total size of backups located in the cloud storage. When the
backup storage quota overage is exceeded, backups fail.
2.2.1.2 Disaster Recovery quotas
Note The Disaster Recovery offering items are available only in the Disaster Recovery editions.
These quotas are applied by the service provider to the entire company. Company administrators can
view the quotas and the usage in the management portal, but cannot set quotas for a user.
Disaster recovery storage
This storage is used by primary and recovery servers. If the overage for this quota is reached, it is
not possible to create primary and recovery servers, or add/extend disks of the existing primary
servers. If the overage for this quota is exceeded, it is not possible to initiate a failover or just
start a stopped server. Running servers continue to run.
Compute points
This quota limits the CPU and RAM resources that are consumed by primary and recovery servers
during a billing period. If the overage for this quota is reached, all primary and recovery servers
are shut down. It is not possible to use these servers until the beginning of the next billing period.
The default billing period is a full calendar month.
When the quota is disabled, the servers cannot be used regardless of the billing period.
Public IP addresses
This quota limits the number of public IP addresses that can be assigned to the primary and
recovery servers. If the overage for this quota is reached, it is not possible to enable public IP
addresses for more servers. You can disallow a server to use a public IP address, by clearing the
Public IP address check box in the server settings. After that, you can allow another server to use
a public IP address, which usually will not be the same one.
When the quota is disabled, all of the servers stop using public IP addresses, and thus become
not reachable from the Internet.
Cloud servers
This quota limits the total number of primary and recovery servers. If the overage for this quota
is reached, it is not possible to create primary or recovery servers.
When the quota is disabled, the servers are visible in the service console, but the only available
operation is Delete.
7 Copyright © Acronis International GmbH, 2003-2020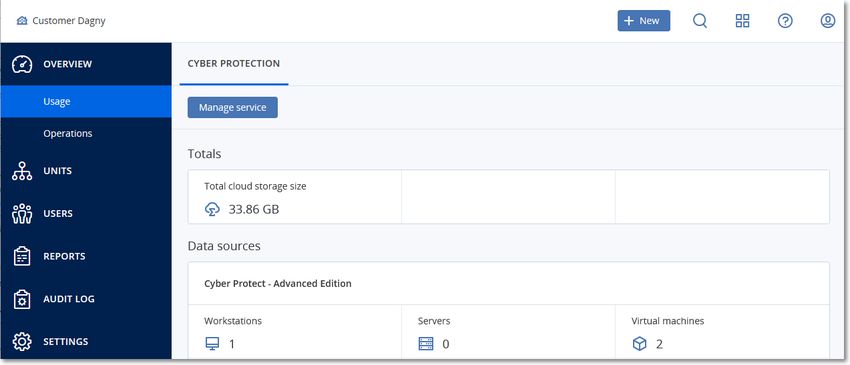
Internet access
This quota enables or disables the Internet access from the primary and recovery servers.
When the quota is disabled, the primary and recovery servers will not be able to establish
connections to the Internet.
2.2.1.3 File Sync & Share quotas
These quotas are applied by the service provider to the entire company. Company administrators can
view the quotas and the usage in the management portal.
Users
The quota defines a number of users that can access this service.
Cloud storage
This is a cloud storage for storing users' files. The quota defines the allocated space for a tenant
in the cloud storage.
2.2.1.4 Physical Data Shipping quotas
The Physical Data Shipping service quotas are consumed on a per-drive basis. You can save initial
backups of multiple machines on one hard drive.
These quotas are applied by the service provider to the entire company. Company administrators can
view the quotas and the usage in the management portal, but cannot set quotas for a user.
To the cloud
Allows sending an initial backup to the cloud data-center by using a hard disk drive. This quota
defines the maximum number of drives to be transferred to the cloud data-center.
2.2.1.5 Notary quotas
These quotas are applied by the service provider to the entire company. Company administrators can
view the quotas and the usage in the management portal.
Notary storage
The notary storage is the cloud storage where the notarized files, signed files, and files whose
notarization or signing is in progress are stored. This quota defines the maximum space that can
be occupied by these files.
To decrease this quota usage, you can delete the already notarized or signed files from the
notary storage.
Notarizations
This quota defines the maximum number of files that can be notarized by using the notary
service. A file is considered notarized as soon as it is uploaded to the notary storage and its
notarization status changes to In progress.
If the same file is notarized multiple times, each notarization counts as a new one.
eSignatures
This quota defines the maximum number of files that can be signed by using the notary service. A
file is considered signed as soon as it is sent for signature.
8 Copyright © Acronis International GmbH, 2003-2020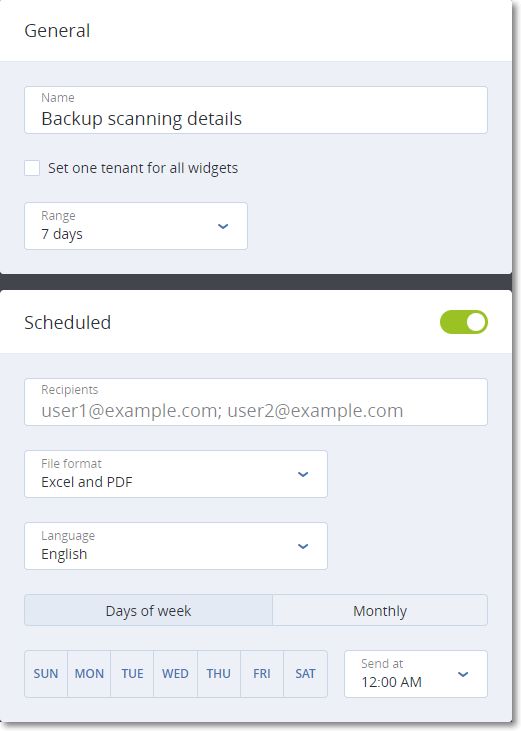
2.2.2 Defining quotas for your users
Quotas enable you to limit a user's ability to use the service. To set the quotas for a user, select the
user on the Users tab, and then click the pencil icon in the Quotas section.
When a quota is exceeded, a notification is sent to the user's email address. If you do not set a quota
overage, the quota is considered "soft." This means that restrictions on using the Cyber Protection
service are not applied.
When you specify the quota overage, then the quota is considered "hard." An overage allows the
user to exceed the quota by the specified value. When the overage is exceeded, restrictions on using
the service are applied.
Example
Soft quota: You have set the quota for workstations equal to 20. When the number of the user's
protected workstations reaches 20, the user will get a notification by email, but the Cyber Protection
service will be still available.
Hard quota: If you have set the quota for workstations equal to 20 and the overage is 5, then the
user will get the notification by email when the number of protected workstations reaches 20, and
the Cyber Protection service will be disabled when the number reaches 25.
2.2.2.1 Backup quotas
You can specify the backup storage quota and the maximum number of machines/devices/websites a
user is allowed to protect. The following quotas are available.
Quotas for devices
Workstations
Servers
Virtual machines
Mobile devices
Web hosting servers (Linux-based physical or virtual servers running Plesk or cPanel control
panels)
Websites
A machine/device/website is considered protected as long as at least one protection plan is applied
to it. A mobile device becomes protected after the first backup.
When the overage for a number of devices is exceeded, a user cannot apply a protection plan to
more devices.
Quota for storage
Backup storage
The backup storage quota limits the total size of backups located in the cloud storage. When the
backup storage quota overage is exceeded, backups fail.
2.2.2.2 File Sync & Share quotas
You can define the following File Sync & Share quotas for a user:
Personal storage space
9 Copyright © Acronis International GmbH, 2003-2020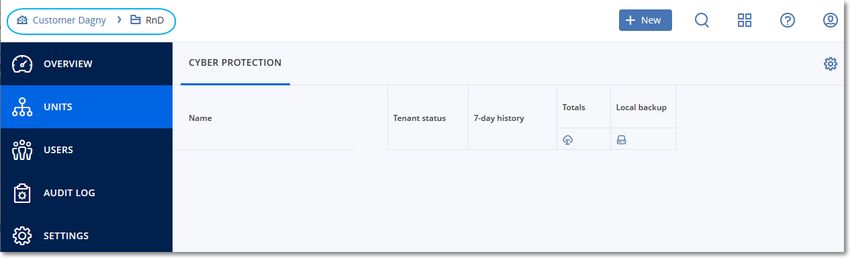
This is a cloud storage for storing a user's files. The quota defines the allocated space for a user in
the cloud storage.
2.2.2.3 Notary quotas
You can define the following Notary quotas for a user:
Notary storage
The notary storage is the cloud storage where the notarized files, signed files, and files whose
notarization or signing is in progress are stored. This quota defines the maximum space that can
be occupied by these files.
To decrease this quota usage, you can delete the already notarized or signed files from the
notary storage.
Notarizations
This quota defines the maximum number of files that can be notarized by using the notary
service. A file is considered notarized as soon as it is uploaded to the notary storage and its
notarization status changes to In progress.
If the same file is notarized multiple times, each notarization counts as a new one.
eSignatures
This quota defines the maximum number of files that can be signed by using the notary service. A
file is considered signed as soon as it is sent for signature.
2.3 Supported web browsers
The web interface supports the following web browsers:
Google Chrome 29 or later
Mozilla Firefox 23 or later
Opera 16 or later
Windows Internet Explorer 11 or later
Microsoft Edge 25 or later
Safari 8 or later running in the macOS and iOS operating systems
In other web browsers (including Safari browsers running in other operating systems), the user
interface might be displayed incorrectly or some functions may be unavailable.
3 Step-by-step instructions
The following steps will guide you through the basic use of the management portal. They describe
how to:
Activate your administrator account
Access the management portal and the services
Create a unit
Create a user account
10 Copyright © Acronis International GmbH, 2003-20203.1 Activating an administrator account
After signing up for a service, you will receive an email message containing the following information:
An account activation link. Click the link and set the password for the administrator account.
Remember the login that is shown on the account activation page.
A link to the login page. The login and password are the same as in the previous step.
3.2 Accessing the management portal and the services
1. Go to the login page. The login page address was included in the activation email message.
2. Type the login, and then click Next.
3. Type the password, and then click Next.
4. Do one of the following:
To log in to the management portal, click Management Portal.
To log in to a service, click the name of the service.
To switch between the management portal and the service consoles, click the icon in the
top-right corner, and then select Management portal or the service that you want to go to.
3.3 Navigation in the management portal
When using the management portal, at any given time you are operating within the company or
within a unit. This is indicated in the top-left corner.
By default, the top-most hierarchy level available to you is selected. Click the unit name to drill down
the hierarchy. To navigate back to an upper level, click its name in the top-left corner.
All parts of the user interface display and affect only the company or a unit in which you are currently
operating. For example:
By using the New button, you can create a unit or a user account only in this company or unit.
The Units tab displays only the units that are direct children of this company or unit.
The Users tab displays only the user accounts that exist in this company or unit.
3.4 Creating a unit
Skip this step if you do not want to organize accounts into units.
11 Copyright © Acronis International GmbH, 2003-2020If you are planning to create units later, please be aware that existing accounts cannot be moved
between units or between the company and units. First, you need to create a unit, and then populate
it with accounts.
To create a unit
1. Log in to the management portal.
2. Navigate to the unit in which you want to create a new unit.
3. In the top-right corner, click New > Unit.
4. In Name, specify a name for the new unit.
5. [Optional] In Language, change the default language of notifications, reports, and the software
that will be used within this unit.
6. Do one of the following:
To create a unit administrator, click Next, and then follow the steps described in "Creating a
user account" (p. 12), starting from step 4.
To create a unit without an administrator, click Save and close. You can add administrators
and users to the unit later.
The newly created unit appears on the Units tab.
If you want to edit the unit settings or specify the contact information, select the unit on the Units
tab, and then click the pencil icon in the section that you want to edit.
3.5 Creating a user account
Skip this step if you do not want to create additional user accounts.
You may want to create additional accounts in the following cases:
Company administrator accounts — to share the management duties with other people.
Unit administrator accounts — to delegate the management to other people whose access
permissions will be limited to the corresponding units.
User accounts — to enable the users to access only a subset of the services.
To create a user account
1. Log in to the management portal.
2. Navigate to the unit in which you want to create a new user account.
3. In the top-right corner, click New > User.
4. Specify the following information for the account:
Email address
[Optional] First name
[Optional] Last name
[Optional] To specify a login that is different from the specified email address, clear the Use
email address as login check box, and then specify the login.
Important Each account must have a unique login.
5. [Optional] In Language, change the default language of notifications, reports, and the software
that will be used for this account.
6. Select the services to which the user will have access and the roles in each service.
12 Copyright © Acronis International GmbH, 2003-2020 If you select the Company administrator check box, the user will have access to the
management portal and the administrator role in all services.
If you select the Unit administrator check box, the user will have access to the management
portal, but may or not have the service administrator role, depending on the service.
Otherwise, the user will have the roles that you select in the services that you select.
7. Click Create.
The newly created user account appears on the Users tab.
If you want to edit the user settings, or specify notification settings and quotas for the user, select
the user on the Users tab, and then click the pencil icon in the section that you want to edit.
To reset a user’s password
1. In the management portal, go to Users.
2. Select the user whose password you want to reset, and then click the ellipsis icon > Reset
password.
3. Confirm your action by clicking Reset.
The user can now complete the resetting process by following the instructions in the email received.
3.6 Changing notification settings for a user
To change the notifications settings for a user, select the user on the Users tab, and then click the
pencil icon in the Settings section. The following notifications settings are available:
Quota overuse notifications (enabled by default)
The notifications about exceeded quotas.
Scheduled usage reports
The usage reports described below that are sent on the first day of each month.
Failure notifications, Warning notifications, and Success notifications (disabled by default)
The notifications about the execution results of protection plans and the results of disaster
recovery operations for each device.
Daily recap about active alerts (enabled by default)
The recap that informs about failed backups, missed backups, and other problems. The recap is
sent at 10:00 (data center time). If there are no problems by this moment, the recap is not sent.
All notifications are sent to the user's email address.
3.7 Disabling and enabling a user account
You may need to disable a user account in order to temporarily restrict its access to the cloud
platform.
To disable a user account
1. In the management portal, go to Users.
2. Select the user account that you want to disable, and then click the ellipsis icon > Disable.
3. Confirm your action by clicking Disable.
As a result, this user will not be able to use the cloud platform or to receive any notifications.
13 Copyright © Acronis International GmbH, 2003-2020To enable a disabled user account, select it in the users list, and then click the ellipsis icon
> Enable.
3.8 Deleting a user account
You may need to delete a user account permanently in order to free up the resources it uses — such
as storage space or license. The usage statistics will be updated within a day after deletion. For
accounts with a lot of data, it might take longer.
Before deleting a user account, you have to disable it. For more information on how to do this, refer
to Disabling and enabling a user account (p. 13).
Important Deleting a user account is irreversible!
To delete a user account
1. In the management portal, go to Users.
2. Select the disabled user account, and then click the ellipsis icon > Delete.
3. To confirm your action, enter your login, and then click Delete.
As a result:
This user account will be deleted.
All data that belongs to this user account will be deleted.
All machines associated with this user account will be unregistered.
3.9 Transferring ownership of a user account
You may need to transfer the ownership of a user account if you want to keep the access to a
restricted user’s data.
Important You cannot reassign the content of a deleted account.
To transfer the ownership of a user account:
1. In the management portal, go to Users.
2. Select the user account whose ownership you want to transfer, and then click the pencil icon in
the General information section.
3. Replace the existing email with the email of the future account owner, and then click Done.
4. Confirm your action by clicking Yes.
5. Let the future account owner verify their email address by following the instructions sent there.
6. Select the user account whose ownership you are transferring, and then click the ellipsis icon
> Reset password.
7. Confirm your action by clicking Reset.
8. Let the future account owner reset the password by following the instructions sent to their email
address.
The new owner can now access this account.
14 Copyright © Acronis International GmbH, 2003-20203.10 Setting up two-factor authentication
Two-factor authentication (2FA) is a type of multi-factor authentication that checks a user identity
by using a combination of two different factors:
Something that a user knows (PIN or password)
Something that a user has (token)
Something that a user is (biometrics)
Two-factor authentication provides extra protection from unauthorized access to your account.
The platform supports Time-based One-Time Password (TOTP) authentication. If TOTP
authentication is enabled in the system, users must enter their traditional password and the
one-time TOTP code in order to access the system. In other words, a user provides the password (the
first factor) and the TOTP code (the second factor). The TOTP code is generated in the authentication
application on a user second-factor device on the basis of the current time and the secret provided
by the platform.
How it works
1. You enable two-factor authentication (p. 16) on your organization level.
2. All of your organization users must install an authentication application on their second-factor
devices (mobile phones, laptops, desktops, or tablets). This application will be used for
generating one-time TOTP codes. The recommended authenticators:
Google Authenticator
iOS app version (https://itunes.apple.com/sg/app/google-authenticator/id388497605?mt=8)
Android version
(https://play.google.com/store/apps/details?id=com.google.android.apps.authenticator2&hl
=en_SG)
Microsoft Authenticator
iOS app version
(https://app.adjust.com/n094ls?campaign=appstore_ios&fallback=https://itunes.apple.com/
app/microsoft-authenticator/id983156458)
Android version
(https://app.adjust.com/n094ls?campaign=appstore_android&fallback=https://play.google.c
om/store/apps/details?id=com.azure.authenticator)
Important Users must ensure that the time on the device where the authentication application is installed
is set correctly and reflects the actual current time.
3. Your organization users must re-log in to the system.
4. After entering their login and password, they will be prompted to set up two-factor
authentication for their user account.
5. They must scan the QR code by using their authentication application. If the QR cannot be
scanned, they can use the TOTP secret shown below the QR code and add it manually in the
authentication application.
Important It is highly recommended to save it (print the QR-code, write down the TOTP secret, use the
application that supports backing up codes in a cloud). You will need the TOTP secret to reset two-factor
authentication in case of lost second-factor device.
6. The one-time TOTP code will be generated in the authentication application. It is automatically
regenerated every 30 seconds.
15 Copyright © Acronis International GmbH, 2003-20207. The users must enter the TOTP code on the "Set up two-factor authentication" screen after entering their password. 8. As a result, two-factor authentication for the users will be set up. Now when users log in to the system, they will be asked to provide the login and password, and the one-time TOTP code generated in the authentication application. Users can mark the browser as trusted when they log in to the system, then the TOTP code will not be requested on subsequent logins via this browser. 3.10.1 Two-factor setup propagation across tenant levels Two-factor authentication is set up on the organization level. You can set up two-factor authentication only for your own organization. The two-factor authentication settings are propagated across tenant levels as follows: Units auto-inherit the two-factor authentication settings from their customer organization. Note 1. It is not possible to set up two-factor authentication on the unit level. 2. You can manage the two-factor authentication settings for users of the child organizations (units). 3.10.2 Setting up two-factor authentication for your tenant To enable two-factor authentication for your tenant 1. In the management portal, go to Settings > Security. 2. To enable two-factor authentication, turn on the slider. To confirm, click Enable. The progress bar shows how many users have set up two-factor authentication for their accounts. As a result, two-factor authentication is enabled for your organization. Now all users of the organization 16 Copyright © Acronis International GmbH, 2003-2020
must set up two-factor authentication in their accounts. After that, the users will be prompted to
enter the login and password, and the TOTP code to log in to the system.

On the Users tab, the 2FA status column will appear. You can track which users have set up
two-factor authentication for their accounts.

To disable two-factor authentication for your tenant
1. In the management portal, go to Settings > Security.
2. To disable two-factor authentication, turn off the slider. To confirm, click Disable.
3. [If at least one user configured two-factor authentication within the organization] Enter the TOTP
   code generated in your authentication application on the mobile device.
As a result, two-factor authentication is disabled for your organization, all secrets are deleted, and all
trusted browsers are forgotten. All users will log in to the system by using only their login and
password. On the Users tab, the 2FA status column will be hidden.

3.10.3 Managing two-factor configuration for users
You can monitor two-factor authentication settings for all your users and reset the settings on the
Users tab in the management portal.

Monitoring
In the management portal on the Users tab, you can see a list of all your organization users. The 2FA
status reflects if the two-factor configuration is set up for a user.

To reset two-factor authentication for a user
1. In the management portal on the Users tab, find a user for whom you want to change the
   settings, and then click the ellipsis icon.
2. Click Reset two-factor authentication.
3. Enter the TOTP code generated in the authentication application on your second-factor device
   and click Reset.
As a result, the user will be able to set up two-factor authentication again.

To reset the trusted browsers for a user
1. In the management portal on the Users tab, find a user for whom you want to change the
   settings, and then click the ellipsis icon.
2. Click Reset all trusted browsers.
3. Enter the TOTP code generated in the authentication application on your second-factor device,
   and then click Reset.
The user for whom you have reset all trusted browsers will have to provide the TOTP code on the
next login.

Users can reset all trusted browsers and reset two-factor authentication settings by themselves. This
can be done when they log in to the system, by clicking the respective link and entering the TOTP
code to confirm the operation.

To disable two-factor authentication for a user
You may need to disable two-factor authentication for a user while the rest users of the account will
use two-factor authentication. This is needed in case this user is used to access the API.

17                                                       Copyright © Acronis International GmbH, 2003-2020
Important Do not switch normal users to service users in order to disable two-factor authentication,
otherwise the users may not be able to log in.
1. In the management portal on the Users tab, find a user for whom you want to change the
settings, and then click the ellipsis icon.
2. Click Mark as service account. As a result, a user gets a special two-factor authentication status
called Service account.
3. [If at least one user within a tenant has configured two-factor authentication] Enter the TOTP
code generated in the authentication application on your second-factor device to confirm
disabling.
To enable two-factor authentication for a user
You may need to enable two-factor authentication for a particular user for whom you have disabled
it previously.
1. In the management portal on the Users tab, find a user for whom you want to change the
settings, and then click the ellipsis icon.
2. Click Mark as regular account. As a result, a user will have to set up two-factor authentication or
provide the TOTP code when entering the system.
3.10.4 Resetting two-factor authentication in case of lost
second-factor device
To reset access to your account in case of lost second-factor device, follow one of the suggested
approaches:
Restore your TOTP secret (QR-code or alphanumeric code) from a backup.
Use another second-factor device and add the saved TOTP secret in the authentication
application installed on this device.
Ask your administrator to reset the two-factor authentication settings for you (p. 17).
3.10.5 Brute-force protection
A brute-force attack is an attack when an intruder tries to get access to the system by submitting
many passwords, with the hope of guessing one correctly.
The brute-force protection mechanism of the platform is based on device cookies.
The settings for brute-force protection that are used in the platform are pre-defined:
Parameter Entering the password Entering the TOTP code
Attempt limit 10 5
Attempt limit period (the 15 min (900 sec) 15 min (900 sec)
limit is reset after
timeout)
Lockout happens on Attempt limit + 1 (11th attempt) Attempt limit
Lockout period 5 min (300 sec) 5 min (300 sec)
If you have enabled two-factor authentication, a device cookie is issued to a client (browser) only
after successful authentication using both factors (password and TOTP code).
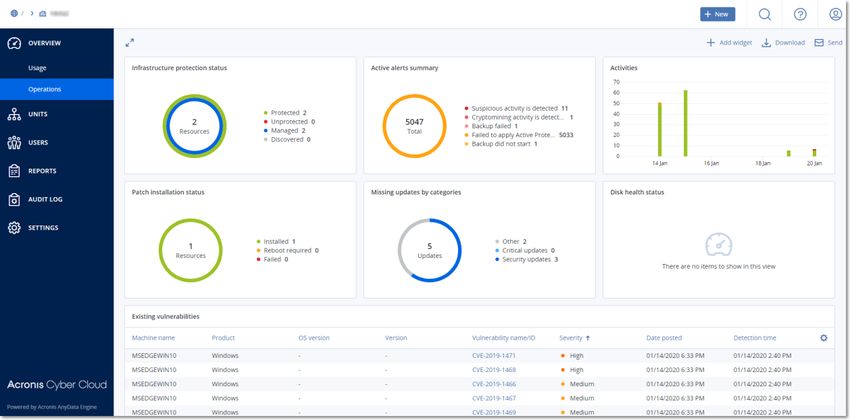
18 Copyright © Acronis International GmbH, 2003-2020For trusted browsers, the device cookie is issued after successful authentication using only one factor (password). The TOTP code entering attempts are registered per user, not per device. This means that even if a user attempts to enter the TOTP code by using different devices, they will still be blocked out. 4 Monitoring To access information about services usage and operations, click Overview. 4.1 Usage The Usage tab provides an overview of the services usage (including the quotas, if any) and enables you to access the service consoles. 4.2 Operations The Operations dashboard is available only to company administrators when operating on the company level. The Operations dashboard provides a number of customizable widgets that give an overview of operations related to the Cyber Protection service. Widgets for other services will be available in future releases. The widgets are updated every two minutes. The widgets have clickable elements that enable you to investigate and troubleshoot issues. You can download the current state of the dashboard or send it via email in the .pdf or/and .xlsx format. 19 Copyright © Acronis International GmbH, 2003-2020
You can choose from a variety of widgets, presented as tables, pie charts, bar charts, lists, and tree
maps. You can add multiple widgets of the same type with different filters.
To rearrange the widgets on the dashboard
Drag and drop the widgets by clicking on their names.
To edit a widget
Click the pencil icon next to the widget name. Editing a widget enables you to rename it, change the
time range, and set filters.
To add a widget
Click Add widget, and then do one of the following:
Click the widget that you want to add. The widget will be added with the default settings.
To edit the widget before adding it, click the pencil icon when the widget is selected. After
editing the widget, click Done.
To remove a widget
Click the X sign next to the widget name.
4.2.1 Protection status
Protection status
This widget shows the current protection status for all machines.
A machine can be in one of the following statuses:
Protected – the machines with the installed protection agent and applied protection plan.
Unprotected – the machines with the installed protection agent but without the applied
protection plan.
Managed – the machines with the installed protection agent.
Discovered – the machines without the installed protection agent.
20 Copyright © Acronis International GmbH, 2003-2020If you click on the machine status, you will be redirected to the list of machines with this status for more details. Discovered machines This widget shows the list of discovered machines during the specified time range. 4.2.2 CyberFit Score by device This widget shows for each device the total CyberFit Score and its compound scores: Anti-malware Backup Firewall VPN Encryption NTLM traffic 21 Copyright © Acronis International GmbH, 2003-2020
For more details about the CyberFit Score, refer to "CyberFit Score for machines
(https://dl.managed-protection.com/u/baas/help/9.0/user/en-US/index.html#47837.html)".
4.2.3 Disk health forecast
The disk health control feature allows you to monitor the current disk health status and get a
forecast of disk health. This information allows you to prevent any problems with data loss related to
disk crashes. Both HDD and SSD types of disk are supported.
Limitations:
1. Disk health forecast is supported only for Windows machines.
2. Only the disks of physical machines can be monitored. The disks of virtual machines cannot be
monitored and shown in the widget.
Disk health can be in one of the following statuses:
OK – disk health is 70-100%
Warning – disk health is 30-70%
Critical – disk health is 0-30%
Calculating disk data – the current disk status and forecast are being calculated
How it works
The Disk Health Prediction Service uses the artificial intelligence based prediction model.
1. The agent collects the SMART parameters of disks and passes this data to Disk Health Prediction
Service:
SMART 5 – reallocated sectors count
SMART 9 – power-on hours
SMART 187 – reported uncorrectable errors
SMART 188 – command timeout
SMART 197 – current pending sector count
SMART 198 – offline uncorrectable sector count
SMART 200 – write error rate
2. Disk Health Prediction Service processes the received SMART parameters, makes forecasts, and
provides the following disk health characteristics:
Disk health current state: OK, Warning, Critical.
Disk health forecast: negative, stable, positive.
22 Copyright © Acronis International GmbH, 2003-2020 Disk health forecast probability in percentage.
The prediction period is always one month.
3. The Monitoring Service gets the disk health characteristics and use this data in disk health
widgets shown to a user in the console.
Disk health widgets
The results of the disk health monitoring can be found on the dashboard in the disk health related
widgets:
Disk health overview – a treemap widget that has two levels of details that can be switched by
drilling down:
23 Copyright © Acronis International GmbH, 2003-2020 Machine level – shows summarized information about disk status per the selected customer
machines. The widget represents the most critical disk status data, other statuses are shown
in the tooltip when you hover over the particular block. The machine block size depends on
the total size of all disks of this machine. The machine block color depends on the most
critical disk status found.
Disk level – shows the current disk status of all disks for the selected machine. Each disk
block shows a forecast of disk status change:
Will be degraded (disk health forecast probability in %)
Will stay stable (disk health forecast probability in %)
24 Copyright © Acronis International GmbH, 2003-2020 Will be improved (disk health forecast probability in %) Disk health status – a pie chart widget showing the number of disks for each status. 25 Copyright © Acronis International GmbH, 2003-2020
Disk health status alerts
Disk health check runs every 30 minutes while the corresponding alert is generated once a day.
When the disk health has changed from Warning to Critical, you will also get the alert even if you
already got another alert during a day.
Alert name Severity Disk health status Description
Disk failure is possible Warning [30;70) The [disk_name] disk on [machine_name]
machine is likely to fail in the future. Please run a
full image backup of this disk as soon as possible,
replace it and then recover the image to the new
disk.
Disk failure is imminent Critical (0;30) The [disk_name] disk on [machine_name]
machine is in a critical state and will most likely
fail very soon. An image backup of this disk is not
recommended at this point as the added stress
can cause the disk to fail. Please back up all the
most important files on this disk right now and
replace it.
4.2.4 Data protection map
The data protection map feature allows you to discover all data that are important for you and get
detailed information about number, size, location, protection status of all important files in a
treemap scalable view.
Each block size depends on the total number/size of all important files that belong to a
customer/machine.
Files can have one of the following protection statuses:
Critical – there are 51-100% of unprotected files with the extensions specified by you that are
not being backed up and will not be backed up with the existing backup settings for the selected
machine/location.
Low – there are 21-50% of unprotected files with the extensions specified by you that are not
being backed up and will not be backed up with the existing backup settings for the selected
machine/location.
Medium – there are 1-20% of unprotected files with the extensions specified by you that are not
being backed up and will not be backed up with the existing backup settings for the selected
machine/location.
High – all files with the extensions specified by you are protected (backed up) for the selected
machine/location.
The results of the data protection examination can be found on the dashboard in the Data Protection
Map widget, a treemap widget that shows details on a machine level:
26 Copyright © Acronis International GmbH, 2003-2020 Machine level – shows information about the protection status of important files per machines
of the selected customer.
To protect files that are not protected, hover over the block and click Protect all files. In the dialog
window, you can find information about the number of unprotected files and their location. To
protect them, click Protect all files.
You can also download a detailed report in CSV format.
4.2.5 Vulnerability assessment widgets
Vulnerable machines
This widget shows the vulnerable machines by the vulnerability severity.
The found vulnerability can have one of the following severity levels according to the Common
Vulnerability Scoring System (CVSS) v3.0:
Secured: no vulnerabilities are found
Critical: 9.0 - 10.0 CVSS
High: 7.0 - 8.9 CVSS
Medium: 4.0 - 6.9 CVSS
Low: 0.1 - 3.9 CVSS
27 Copyright © Acronis International GmbH, 2003-2020 None: 0.0 CVSS Existing vulnerabilities This widget shows currently existing vulnerabilities on machines. In the Existing vulnerabilities widget there are two columns showing timestamps: Detection time – date and time when a vulnerability was detected initially on the machine. Date posted – date and time when a vulnerability was detected the last time on the machine. 4.2.6 Patch installation widgets There are four widgets related to the patch management functionality. Patch installation status This widget shows the number of machines grouped by the patch installation status. Installed – all available patches are installed on a machine Reboot required – after patch installation reboot is required for a machine 28 Copyright © Acronis International GmbH, 2003-2020
Failed – patch installation failed on a machine Patch installation summary This widget shows the summary of patches on machines by the patch installation status. Patch installation history This widget shows the detailed information about patches on machines. Missing updates by categories This widget shows the number of missing updates per category. The following categories are shown: Security updates Critical updates 29 Copyright © Acronis International GmbH, 2003-2020
Other 4.2.7 Backup scanning details This widget shows the detailed information about the detected threats in backups. 30 Copyright © Acronis International GmbH, 2003-2020
4.2.8 Recently affected
This widget shows the detailed information about recently infected machines. You can find
information about what threat was detected and how many files were infected.
5 Reporting
To access reports about services usage and operations, click Reports.
Note This functionality is not available in the Standard editions of the Cyber Protection service.
5.1 Usage
Usage reports provide historical data about use of the services.
Report type
You can select one of the following report types:
Current usage
The report contains the current service usage metrics.
Summary for period
The report contains the service usage metrics for the end of the specified period, and the
difference between the metrics in the beginning and at the end of the specified period.
Day-by-day for period
The report contains the service usage metrics and their changes for each day of the specified
period.
31 Copyright © Acronis International GmbH, 2003-2020Report scope
You can select the scope of the report from the following values:
Direct customers and partners
The report will include the service usage metrics only for the immediate child units of the
company or unit in which you are operating.
All customers and partners
The report will include the service usage metrics for all child units of the company or unit in
which you are operating.
All customers, partners, and users
The report will include the service usage metrics for all child units of the company or unit in
which you are operating, and for all users within the units.
Scheduled reports
A scheduled report covers service usage metrics for the last full calendar month. The reports are
generated at 23:59:59 UTC on the first day of a month and sent on the second day of that month.
The reports are sent to all administrators of your company or unit who have the Scheduled usage
reports check box selected in the user settings.
To enable or disable a scheduled report
1. Log in to the management portal.
2. Ensure that you operate in the company or top-most unit available to you.
3. Click Reports > Usage.
4. Click Scheduled.
5. Select or clear the Send a monthly summary report check box.
6. In Level of detail, select the report scope as described above.
Custom reports
A custom report is generated on demand and cannot be scheduled. The report will be sent to your
email address.
To generate a custom report
1. Log in to the management portal.
2. Navigate to the unit (p. 11) for which you want to create a report.
3. Click Reports > Usage.
4. Click Custom.
5. In Type, select the report type as described above.
6. [Not available for the Current usage report type] In Period, select the reporting period:
Current calendar month
Previous calendar month
Custom
7. [Not available for the Current usage report type] If you want to specify a custom reporting period,
select the start and the end dates. Otherwise, skip this step.
8. In Level of detail, select the report scope as described above.
9. To generate the report, click Generate and send.
32 Copyright © Acronis International GmbH, 2003-20205.1.1 Usage reports
The report about using the Cyber Protection service includes the following data about a company or
a unit:
Size of backups by unit, by user, by device type.
Number of protected devices by unit, by user, by device type.
Price value by unit, by user, by device type.
The total size of backups.
The total amount of protected devices.
Total price value.
Note If the Cyber Protection service cannot detect the a device type, that device appears as untyped in the
report.
5.2 Operations
The Operations reports are available only to company administrators when operating on the
company level.
A report about operations can include any set of the Operations dashboard widgets (p. 19). All of the
widgets show the summary information for the entire company. All of the widgets show the
parameters for the same time range. You can change this range in the report settings.
To view a report, click its name.
To access operations with a report, click the ellipsis icon on the report line. The same operations are
available from within the report.
You can use predefined reports or create a custom report.
The default reports are listed below:
Report name Description Available in service
edition
Alerts Shows alerts that occurred during a specified time period. Cyber Backup, Cyber
Protect
33 Copyright © Acronis International GmbH, 2003-2020Backup scanning Shows the detailed information about detected threats in the Cyber Protect
details backups.
CyberFit Score by Shows the CyberFit Score and its compound metrics for each Cyber Protect
device device.
Daily activities Shows the summary information about activities performed Cyber Backup, Cyber
during a specified time period. Protect
Data protection map Shows the detailed information about the number, size, Cyber Protect
location, protection status of all important files on
machines.
Detected threats Shows the details of the affected machines by number of Cyber Backup, Cyber
blocked threats and the healthy and vulnerable machines. Protect
Discovered machines Shows all found machines in the organization network. Cyber Backup, Cyber
Protect
Disk health Shows predictions when your HDD/SSD will break down and Cyber Protect
prediction current disk status.
Existing Shows the existing vulnerabilities for OS and applications in Cyber Backup, Cyber
vulnerabilities your organization. The report also displays the details of the Protect
affected machines in your network for every product that is
listed.
Patch management Shows the number of missing patches, installed patches, and Cyber Protect
summary applicable patches. You can drill down the reports to get the
missing/installed patch information and details of all the
systems.
Summary Shows the summary information about the protected devices Cyber Backup, Cyber
for a specified time period. Protect
Weekly activities Shows the summary information about activities performed Cyber Backup, Cyber
during a specified time period. Protect
Adding a report
1. Click Add report.
2. Do one of the following:
To add a predefined report, click its name.
To add a custom report, click Custom, click the report name (the names assigned by default
look like Custom(1)), and then add widgets to the report.
3. [Optional] Drag and drop the widgets to rearrange them.
4. [Optional] Edit the report as described below.
Editing a report
To edit a report, click its name, and then click Settings. When editing a report, you can:
Rename the report
Change the time range for all widgets included in the report
34 Copyright © Acronis International GmbH, 2003-2020You can also read