XR/XER/XIR Console Service Manual
←
→
Page content transcription
If your browser does not render page correctly, please read the page content below
XR/XER/XIR Console
  Service Manual

                     1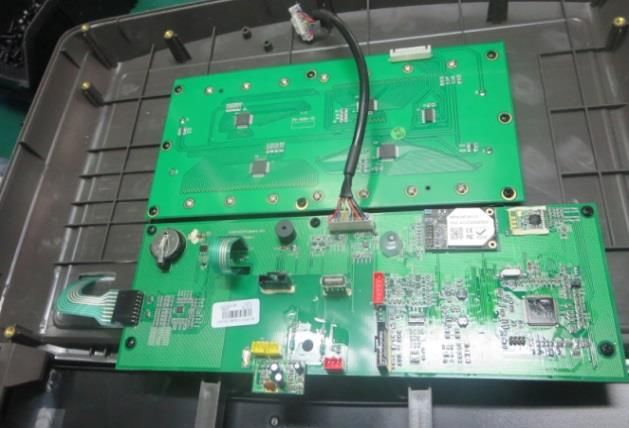
Contents
CHAPTER 1: CONSOLE INSTRUCTION
  1.1 Serial Number Location……………………………………………………………………………………….4
  1.2 XR/XER/XIR Console Overview………………………………………….………………...………….…….5

CHAPTER 2: XR CONSOLE INSTRUCTION
  2.1 XR Console Description……………………………………………………………………………………….6
  2.2 XR Display Description………………………………………………………………………………………..7
  2.3 Set Up XID Account For Via Fit……………………………………………………………………………….8
  2.4 Connect Wi-Fi…………………………………………………………………………………………………...8
  2.5 XR Console Getting Started…………………………………………………………………………………...8

CHAPTER 3: XR CONSOLE ENGINEERING MODE
  3.1 Initial Setup……………………………..……………………………………………………………………10
  3.2 How To Enter Engineering Mode…………………………………………………………………………..10
  3.3 Engineering Mode Functions Description…………………………………………………………………11
  3.4 Other Information………………………………………………………………………………………….....12
  3.5 Software Updating…………………………………………………………………………………………...12

CHAPTER 4: XER/XIR CONSOLE INSTRUCTION
  4.1 XER/XIR Console Description……………………………………………………………………………...13
  4.2 Initial Setup………………………………………………………………………………………………...…19
  4.3 Model Type List………………………………………………………………………………………………20

CHAPTER 5: XER/XIR CONSOLE SETTINGS
  5.1 General………………………………………………………………………………………………………..21
  5.2 Update…………………………………………………………………………………………………...……22
  5.3 Network Setup………………………………………………………………………………………………..23
  5.4 Network Setup (WiFi Setup)………………………………………………………………………………..23
  5.5 Weather……………………………………………………………………………………………………….24
  5.6 Application…………………………………………………………………………………………………….24
  5.7 Hardware……………………………………………………………………………………………………...25
  5.8 Restore Factory Defaults……………………………………………………………………………………25

CHAPTER 6: XER/XIR CONSOLE ENGINEERING MODE
  6.1 How To Enter Engineering Mode…………………………………………………………………………..26
  6.2 Engineering Mode Instruction………………………………………………………………………………26

CHAPTER 7: XER/XIR CONSOLE SERVICE MODE
  7.1 How To Enter Service Mode………………….…………………………………………………………….28
  7.2 General………………………………………………….……………………………………………………29
                                                                          2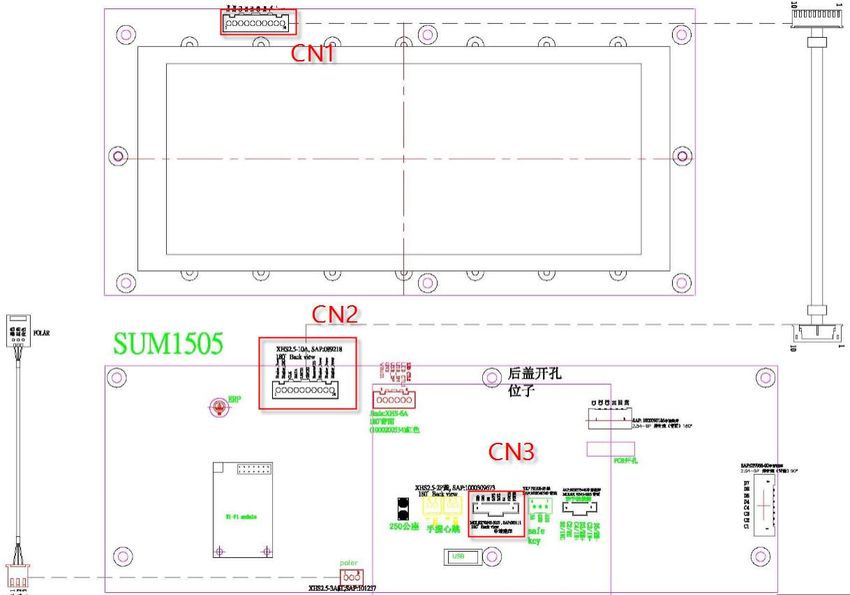
7.3 Workout………………………………………………………….…………………………………………...31
  7.4 Setup Defaults………………………………………………………………….……………………………33
  7.5 Update………………………………………………………………………………….…………………….34
  7.6 Network Setup……………………………………………………………………………………….………36
  7.7 Weather………………………………………………………………………………………………………37
  7.8 Application……………………………………………………………………………………………………38
  7.9 Calibration…………………………………………………………………………………………...….......39
  7.10 Hardware……………………………..…………………………………………………………………….40
  7.11 Service…………………………………………………………………………………………….............41
  7.12 Errors……………………………………………………………………………………………………….42
  7.13 Restore Factory Defaults……………………………………………………......................................43

CHAPTER 8: TROUBLESHOOTING
  8.1 XR/XER/XIR Electrical Diagram…………………………………………………………………………….44
  8.2 Console Doesn’t Light Up…………………………………………………………………………………...49
  8.3 Speed Does Not Display(For BK/EP/AS)………………………………………………………………….49
  8.4 All Or Some Function Keys Do Not Respond (For XR)…………………………………………………..50
  8.5 Speaker and Audio Issue (For XER/XIR)…………………………………………………………………..50

CHAPTER 9: PARTS REPLACEMENT
  9.1 Console Control Board replacement………………………………………………………………………..51
  9.2 Overlay And Keypad Replacement………………………………………………………………………….51
  9.3 Touch Panel Replacement……………………………………………………………………………………52
  9.4 Speaker Replacement………………………………………………………………………………………...52

                                                                                              3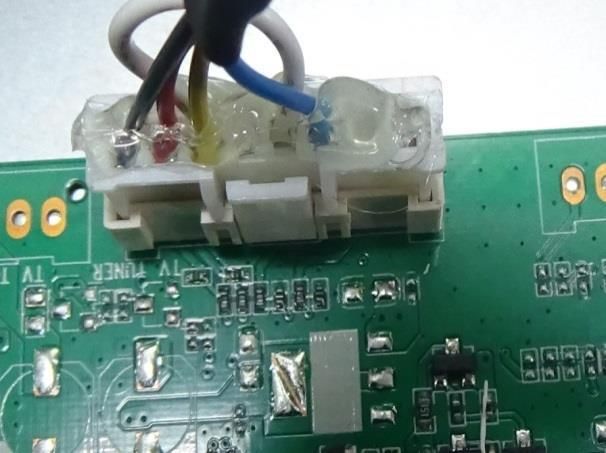
CHAPTER 1:   CONSOLE INSTRUCTION

1.1 SERIAL NUMBER LOCATION

                                                      4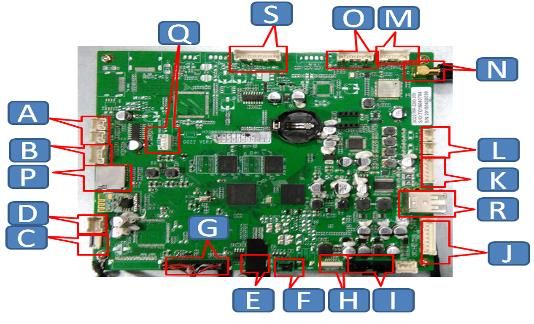
CHAPTER 1:     CONSOLE INSTRUCTION

1.2 XR/XIR/XER CONSOLE OVERVIEW

                                                        5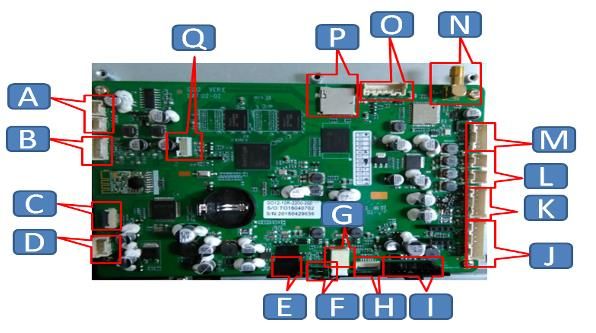
CHAPTER 2:        XR CONSOLE INSTRUCTION

2.1 XR CONSOLE DESCRPITON

Note: There is a thin protective sheet of clear plastic on the overlay of the console that should be
removed before use.
A) LCD DISPLAY WINDOW: Displays workout feedback, program profile and more.
B) GO/PAUSE : Press to start, pause or resume your workout.
C) STOP : Press to stop your workout. Press and hold for 3 seconds to reset console.
D) ENTER : Confirm each program setting. Press to change display feedback during workout.
Press and hold to scan.
E) ARROWS : used to adjust program settings.
                                                                                                       6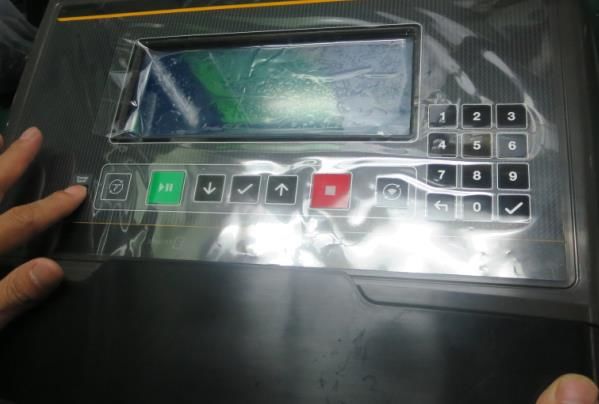
F) NUMBER KEYPAD: Used to enter xID login, to enter program data during program setup and to
adjust speed / resistance level during workout. Press check mark to confirm setting.
G) BACK : Go to previous program setting.
H) WI-FI CONNECT: Press to connect your wireless internet connection. See BEFORE YOU
BEGIN section for more info.
I) PASSPORT CONNECT & SYNC: Press to connect your Passport box for Virtual Active
programming. Passport Player is sold at your Retailer or at www.passportplayer.com
J) ENERGY SAVER LIGHT: Indicates if machine is in energy saver mode. Press any key to wake
up the machine.
K) READING RACK: Holds reading material or electronic device.

2.2 XR DISPLAY DESCRIPTION

A) TIME: Is always shown in the larger central portion of the display. Shown as minutes: seconds.
View the time remaining or the time elapsed in your workout.
B) INCLINE: Shown as percent. Indicates the incline of your walking or running surface (Treadmills
and Ascents only).
C) DISTANCE: Shown as Miles or Kilometers based on your default setting.Indicates distance
traveled or distance remaining during your workout.
D) SPEED: Shown as MPH or KPH based on your default setting.Indicates how fast the user is
moving.
E) CALORIES: Total calories burned or calories remaining to burn during your workout.
F) HEART RATE: Shown as BPM (beats per minute). Used to monitor your heart rate (when
wearing a wireless heart rate strap or when contact is made with both pulse grips).
G) RESISTANCE (RES): Shows the current resistance level (Bikes, Ellipticals, Ascents only).
H) RPM: Revolutions Per Minute (Bikes, Ellipticals, Ascents only).
I) WATTS: Displays current user power output (Bikes, Ellipticals, Ascents only).
J) PACE: Indicates how many minutes it takes to complete a mile based on your current speed
(Treadmills only).
K) PROGRAM PROFILE: The dot matrix will show the program profile as you progress through
wour workout. Profile represents incline,resistance or speed (depending on model type and workout
type).
L) PASSPORT: Indicates Passport box connection is present.
M) WI-FI: Indicates wireless connection is present and the strength(low, medium, high). Flashes
when Wi-Fi is trying to connect.

                                                                                                    7
2.3 SET UP XID ACCOUNT FOR VIA FIT CONNECTIVITY

Creating an xID account will allow you to save and share workout data online at
www.ViaFitness.com.Up to four users can be saved on a machine. This process is the first step in
connecting your equipment. It must be done from a computer, tablet, or mobile device that is
connected to the internet.
1)   Visit the web site: www.ViaFitness.com
2)   Once at the web site, select the CONNECT YOUR EQUIPMENT option on the top menu bar.
3)   The first step in connecting your equipment will to be creating your xID account. This will be
     your login to Via Fit.
4)   Enter your phone number or another easy-to-remember 10-14 digit number. This will be your
     account number. Fill in your profile information to finish the xID account setup process. You will
     be asked to provide an email address not associated with any other xID account. Check your
     email after the set-up process for a link to validate your account.

2.4 CONNECT WI-FI

Once you have created your xID account, you will be able to move on to activating the Wi-Fi on your
equipment. Reminder, this requires you to use your computer, tablet, or mobile device that is
connected to the internet.
1)   Press and hold for 3-5 seconds until you see the message ACTIVATED on your screen.
2)   On your computer or other device, go to your Wi-Fi settings. You should select the network
     with your model name. Doing this enables you to connect your equipment to your wireless
     network.
3)   A new window will pop up with the list of wireless networks your equipment can see. Select
     your home Wi-Fi network and connect.
4)   The remaining step is to reconnect your computer or other device back to your Wi-Fi network.
     Go to your settings again and connect as you normally would.

2.5 XR CONSOLE GETTING STARTED

1)   Check to make sure no objects are nearby that will hinder the movement of the equipment.
2)   Plug in the power cord and turn the equipment ON (Some equipment does not have a power
     switch).

TREADMILLS ONLY:
1)   Stand on the side rails of the treadmill.
2)   Attach the safety key clip to part of your clothing making sure that it is secure and will not
     become detached during operation.
3)   Insert the safety key into the safety keyhole in the console.
                                                                                                      8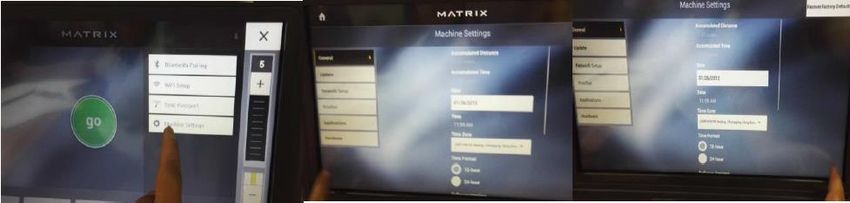
ALL MODELS:
When you log in for the first time as User 1-4, you will be prompted to enter your xID information.
1)   Enter your xID account number using the keypad. After the final input, press “√”. You can
     press← to delete a number.
2)   Enter your Passcode using the keypad. After the final input, press”√”.
3)   You are now logged into your xID.

A) QUICK START UP
Press ”Go/Pause” to begin working out. Time, distance, and calories will all count up from zero.

B) SELECT A PROGRAM
1) Select a PROGRAM using “up/down” and press √.
2) Set workout program information using “up/down” and press√ after each selection.
3) Press ”Go/Pause” to begin workout.

FINISHING YOUR WORKOUT
When your workout is complete, the display will flash “WORKOUT COMPLETE” and beep. Your
workout information will stay displayed on the console for 30 seconds and then reset.

TO CLEAR SELECTION/RESET THE CONSOLE
Hold “stop” for 3 seconds.

                                                                                                      9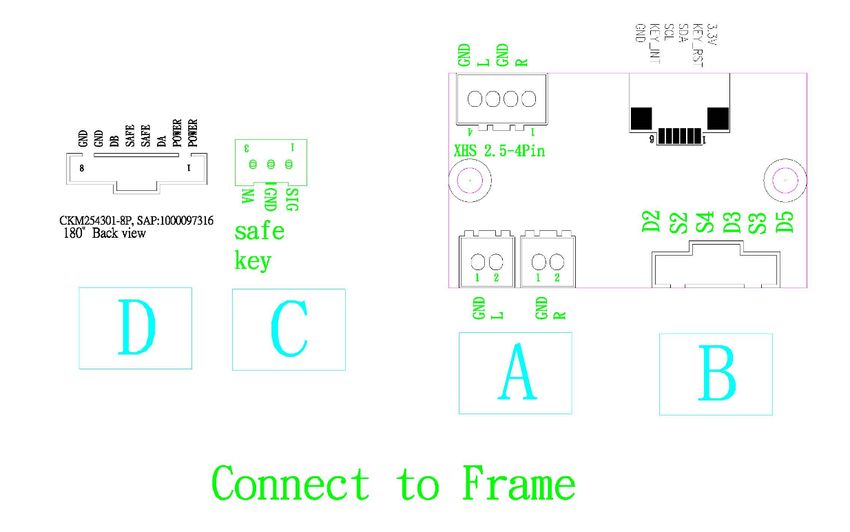
CHAPTER 3:        XR CONSOLE ENGINEER MODE

3.1 Initial setup

When the console is first powered on, it will start in setup wizard.

Step1:
Press UP/DOWN key to select language and press
ENTER to move on to the next setting for Machine type

Step2:
Press UP/DOWN key to select machine type and press
ENTER to save.

Step3:
Press UP/DOWN key to select machine unit (KM or Mile)
And press ENTER to complete setup wizard.

3.2 How to enter engineer mode

Press incline+ and speed- 3seconds to enter engineer mode (TM).
Press resistance+ and resistance- 3seconds to enter engineer
mode(BK&EP&AS)

Use “up” and “down” keys to scroll menu..
  ENG0      DISPLAY TEST
  ENG1      HARDWARE TEST
  ENG2      SWITCH FUNCTION
  ENG3      INFORMATION
  ENG4      SET DAPI
To select, press “enter” to into next level of menu options.
Press “STOP” for 3 seconds to return to previous menu.

                                                                       10
3.3 Engineer function description
MODE FUNCTION DESCRIPTION
Start Key – LCD/LED on including ERP
Stop Key – LCD/LED off including ERP
ENG 0 Display Test Any Other Key - Will show on the display window.
Hold the STOP key for 3 seconds to return to the
ENG 0 Menu.
Resistance or drive Motor Test.
Hardware
ENG 1 Incline motor test
Test
Heart rate grip test
P1- Unit setting. (KM or Mile). Press Enter to save
P2. Language selection (Use ↑↓ button to select
language) Press Enter to save
P3. Machine selection (Use↑ ↓ button to select a
machine type from Treadmill, Elliptical, Bike or
Ascent trainer.) Press Enter to save
P4. Model selection. (Use ↑↓ button to select a
model) Press Enter to save
P5. Energy mode selection. (Use ↑↓ button to switch
between ON/OFF) Press Enter to save
P6. First Boot selection (Switch “First Boot” Flag
Switch using ↑↓ button)
ENG 2
Function
Note:
Model default R30
ERP default(energy mode) ERP ON
11 Accumulated information(Distance &Time)
LCB software version
UCB software version
ENG 3 Information
There are “Production”, “QA”, “Staging” and “DEV”
servers.
Must to select “Production”
ENG 4 SET DAPI
3.4 Other information
PASSPORT SYNC
In standby page to hold Passport icon 3 seconds console will showing “RF SYNC” once completed
console display “PASSPORT READY”
ROOT
In standby page to hold key 9 till console showing “REBOOTING” to reset setting including
Language, Model and Unit then back to standby page.
3.5 Software updating
1 Updating console software with USB Flash Driver, software releases
will be seen on web.
2 Fill U disk with the well-prepared and updated software.
Insert USB Flash Driver into USB port, you will see “software update
press enter”; press enter and then software will update automatically.
3 If software be updated successfully, console will return to user screen.
Remove USB flash disk.
12CHAPTER 4: XER /XIR CONSOLE INSTRUCION
4.1 XER/XIR CONSOLE DESCRIPTION
4.1.1 XER/XIR CONSOLE
Note: There is a thin protective sheet of clear plastic on the overlay of the console that should be
removed before use.The XER and XIR has a fully integrated touch screen display. All information
required for workouts is explained on screen. Exploration of the interface is highly encouraged.
A) GO: Press to begin a quick start program.
B) PROGRAM BUTTONS: Press to select from a number of preset programs.
C) USER MENU: Select an existing User, Guest or Add User.
D) USER SETUP: Allows you to edit User Information.
E) SETTINGS MENU: Access to Volume Controls, Bluetooth Pairing, Wi-Fi Setup, Sync Passport,
Machine defaults and more.
F) HEADPHONE JACK: Plug your headphones into the console to use them instead of the console
speakers.
G) AUDIO IN: Plug your media player into the console using the included audio adaptor cable.
H) ENERGY SAVER LIGHT: Indicates if machine is in energy saver mode. Press a
speed/incline/resistance button to wake up the machine.
I) USB PORT: Access media from compatible devices (XIR only), charging devices and for software
updates (Will not charge USB devices that draw more than 1 amp).
.
13J) SPEAKERS: Audio plays through the speakers.
K) READING RACK: Holds reading material or electronic device.
4.1.2 INITIAL SETUP
When you power on the console for the first time you will be prompted to perform initial setup.
1) Select your language and touch →to confirm.
4.1.3 WIFI SETUP
2) Choose from the available wireless networks detected and shown on screen. If you do not see
your network, you can add it manually via the OTHER option. If you do not want to set up Wi-Fi
at this time, touch →.
3) Use the keyboard to enter your Wi-Fi network password. Touch √ to confirm.
4) Wi-Fi connection status and signal strength will be indicated by the Wi-Fi symbol in the upper
right corner of the display.
4.1.4 MODEL SETUP
5) Select your model type and touch→ to confirm
6) Select your model number and touch to→ confirm.
7) Enter your console and frame serial numbers and touch→ to confirm.
4.1.5 DATE AND TIME SETUP
8) If the console has been connected to Wi-Fi, it will detect your location and fill in time and date
info automatically.
9) Change any time and date settings as desired and touch→ to confirm.
4.1.6 SET UP XID ACCOUNT FOR VIA FIT CONNECTIVITY
Creating an xID account will allow you to save and share workout data online at
ww.ViaFitness.com
1) Create and save up to four xID accounts directly from the console.
2) If you already have an xID, touch Log In. To continue without creating an xID touch Skip xID.
3) Enter your phone number or another easy-to-remember 10-14 digit number. This will be your
account number. Touch→ to confirm.
4) Create an easy to remember 4-digit passcode. Touch to confirm.
5) Enter your email address. This must be an email address not associated with any other xID
account. Touch → to confirm.
6) Continue entering the user information, Touch→ to confirm.
7) Confirm your information and select “I accept the terms and conditions” box to review the
terms and Conditions. Touch√ to complete xID setup.
14CHAPTER 4: XER /XIR CONSOLE INSTRUCTION
4.1.7 GETTING STARTED
Option 1: Touch GO to begin working out immediately. .
Option 2: Touch the WORKOUT CATEGORY button of your choice to customize your workout.
15CHAPTER 4: XER /XIR CONSOLE INSTRUCTION
PROGRAM SETUP
3) After selecting a WORKOUT CATEGORY button, select one of the PROGRAMS listed to the
left. For more information on a selected program and touch icon.
4) Use the SLIDER CONTROLS to adjust your program settings.
5) Touch above number to open a keypad to enter numbers manually.
6) Touch “↓” to return to the GO SCREEN.
7) Touch GO to begin your workout.
16CHAPTER 4: XER /XIR CONSOLE INSTRUCTION
4.1.8 BLUETOOTH (XIR ONLY)*
The XIR console can connect via Bluetooth to one device per category:
Media Players (Music only)
Speakers / Headphones
Heart Rate Monitors
4.1.9 TO CONNECT YOUR COMPATIBLE DEVICE:
1) BLUETOOTH PAIRING can be accessed from the SETTINGS MENU .
2) Turn on Bluetooth on your device and make sure it is discoverable.
3) Touch the appropriate category from the list above. The Bluetooth device should appear to the
right after a few seconds.
4) Touch the device name and follow the onscreen prompts to pair the device. Once paired, the
device name will be highlighted and Bluetooth icon will appear in the top right corner of the
menu bar.
5) Connected Media Players or phones can stream audio in the MY MEDIA APP.
6) You may also connect a Bluetooth Heart Rate Strap.
17CHAPTER 4: XER /XIR CONSOLE INSTRUCTION
4.1.10 USB AUDIO/VIDEO (XIR ONLY)
The XIR console can stream media in the MY MEDIA APP via USB. Supported devices include
USB flash drives, Windows phones/tablets, and Android phones/tablets.
The media types supported are:
Audio
• AAC (.3GP, .MP4, .M4A, .AAC)
• MP3 (.MP3)
• Wave (.WAV)
Video
• H.263 (.3GP, .MP4)
• H.264 (.MP4, .MOV)
TO PLAY MEDIA DURING YOUR WORKOUT:
1) Connect your device to the USB port located beneath the display and make sure it is unlocked.
2) Open the MY MEDIA APP and select the USB device name from the Media Source list.
3) Select the Audio or Video tab at the top to access your files and play your media.
4.1.11 PASSPORT™ MEDIA PLAYER
The Passport player, featuring Virtual Active™ technology, is a high definition experience that uses
real destination footage and matching ambient sounds from stunning destinations around the world.
The ultimate in workout entertainment, Passport lets you escape the confines of a regular workout
routine while enjoying a dynamic experience.A Passport player is available for purchase separately
from your Matrix Retailer. Additional courses are available from your Matrix Retailer. For more
information, go to: www.passportplayer.com
SYNCING CONSOLE WITH PASSPORT
1) Use the arrow keys on the Passport remote to scroll to the setup icon and press select.
2) Follow the on-screen prompts and when prompted, return to the console and open the
SETTINGS MENU and touch PASSPORT SYNC.
3) When the passport sync is complete, the passport icon will appear in the top right corner of the
menu bar. NOTE: See PASSPORT OWNER’S MANUAL for more information.
4.1.12 AUDIO IN/OUT
You can play audio through the console speakers by connecting a device to the audio in jack
located beneath the display. Plug your headphones into the audio out jack to use them instead of
the console speakers.
18CHAPTER 4: XIR/ XER CONSOLE INSTRUCTION
4.2 Initial setup
Please refer to sections 4.1.2-4.1.5.
Step 1 Select Language
Network Setup:
Step 2 Select SSID then enter Password if
necessary.
Step 3
Machine Selection:
19Step 4 Model Type Setup: refer below model
type list.
Date & Time Setup
Step 5
Complete setup and back to
G0/Welcome page
Notes: The console can store a maximum of four (4) users.
4.3 Model type list
Model Console Model ID
XER R30XER/ R50XER
RECUMBENT ( R )
XIR R30XER/ R30XIR
XER U30XER/ U50XER
UPRIGHT ( U )
XIR U50XER/ U50XIR
XER SE30XER/ SE50XER
ELLIPTICAL ( E )
XIR SE30XIR/ SE50XIR
XER A30XER/ A50XIR
ASCENT ( A )
XIR A30XIR/ A50XIR
TF30XRE / TF50XER
XER
T50XER/ T70XER
Treadmill ( T )
TF30XIE / TF50XIR
XIR
T50XIR/ T70XIR
20CHAPTER 5: XIR/ XER CONSOLE SETTINGS
Machine settings -- Note: Access by tapping Machine Settings from the onscreen settings menu.
5.1 General
Category Name Default Range Units Comments
Accumulated
0.00 -- Hours Read Only
Time
Accumulated
0.00 -- Miles/ KM Read Only
Distance
Values are scrollable from a drop
Time Zone Central Time -- --
down list
YY: 2000-2099
Enter using keypad (Birthday
Date RTC Date MM:01-12 --
keypad).
DD:01-31
12/ 24
Time RTC Time 00-23:00-59:00-59 Read Only
Hours
Time Format 12 Hour 12 Hour, 24 Hour --
Language English See Languages
Scrollable list.
General Setup (U.S.) Table
Software Updater,
Native Libraries,
Major Minor Read Only. Current software,
Software Main Apps, 3rd
Build pulled from the update package
Version Party Apps, Media
Revision manifest.
Files, Sprint 8,
Keyboard Apps
OS Version (from
Firmware Manufacturer), IO Read Only. Current software,
Versions Version, LCB pulled from the hardware.
Version
21CHAPTER 5: XIR/ XER CONSOLE SETTINGS
5.2 Update
Category Name Default Range Units Comments
If Automatic Update is checked the
console checks for updates at
1:00am or if it's been more than 24
hours since the last check. If an
update is available the console
downloads it. When all update files
Automatic are downloaded the console waits
Check Check/No Check --
Update for the following events to install the
updates: when the console goes
into ErP or Demo Video Mode (it
installs the updates then enters
these modes); if the user powers
down the console then install the
update when it powers back on.
Update Check a connected USB drive for
Update updates. If updates are found they
Update From
Update From -- will be listed under Available
USB/Install
USB Updates and the button will display
Install.
Check DAPI server for updates. If
Check
Check For Check For updates are found they will be listed
For --
Updates Updates/Install under Available Updates and the
Updates
button will display Install.
Software Updater,
Native Libraries, Main
Available Major.Minor List packages that have updates
-- Apps, 3rd Party Apps,
Updates .Build.Revision available and their version
Media Files, Sprint 8,
Keyboard Apps
22CHAPTER 5: XIR/ XER CONSOLE SETTINGS
\
5.3 Network Setup
Category Name Default Range Units Comments
Mac address is polled from
0.0.0.0.0.0 -
Wifi Mac Hardware Byte.Byte.Byte.Byte.Byte. the installed hardware.Read
255.255.255.25
Address Specified ByteIn Hex Only, should not show up if
Network 5.255.255
not connected to Wifi.
Setup
Wifi
-- -- -- Goes to the Wifi setup page.
Setup
5.4 Network Setup (Wifi Setup)
Category Name Default Range Units Comments
Follows the same look and
function as First Time Setup
for Wifi setup: lists available
wireless networks, their
signal strength on the
If the user selects 'Other console and which one the
Network' they should be console is connected to if it is
prompted to enter the connected to one. Tapping a
Network Name, network name has the
Wireless networks Password and the console prompt the user to
in range with security protocol from enter the network password if
Network 'Other Network' None, WEP, WPA, WPA2, there is one required. If the
Available
always shown at WPAPSK, WPA2PSK.If user inputs the wrong
Setup Wireless --
the bottom of the the user selects the credentials the system
Networks
(Wifi Setup) list in order for the network the console is notifies them that the console
user to specify currently connected to was unable to connect to the
their own network. (indicated by a different network and they are
colored Wifi symbol) they returned to the network list.
should be prompted with Additionally, tapping on the
the option to forget the network the console is
settings for that network. currently connected to
(indicated by a different
colored Wifi symbol) will
present a dialog with the
option to forget the settings
for that network..
23CHAPTER 5: XIR/ XER CONSOLE SETTINGS
5.5 Weather
Category Name Default Range Units Comments
Weather
If it has a weather
Note: Units alert from the website,
Enable Check/N
Check -- the alert mark will be
(Fahrenheit/Imperial Alerts o Check
in red on the workout
vs. Celsius/Metric) are screen.
determined by
Tap to refresh the
language - region. If a web connection to
user authenticates Refresh -- -- -- Bing. Works the same
as the refresh button
using xID, the units will
in a web browser.
respect the preferred Current Location GPS Coordinates
which is determined Note: May or may not
units as set in the Search by touching
by either the display a location
user's profile settings. If and dragging on the
Default location stored in other than GPS
-- map. Double touch a
guest user, the setting City the console or the coordinates. This is
spot on the map to set
IP Address of the an issue with Bing as
in service mode should as your location.
console if a location opposed to the web
be respected. has not been set. app.
5.6 Applications
Category Name Default Range Units Comments
Displays a grid of the app
buttons. Tapping and holding
down on an app will make it
movable to other spots (other
Show all Move, apps will shift automatically).
Applicati
Applications available Hide/Make -- This app can be moved to
on Setup
apps Inactive, Locked the 'Inactive' column in which
case it will not appear on the
run screen. If an app button
is dark with a padlock it is
locked and cannot be moved.
24CHAPTER 5: XIR/ XER CONSOLE SETTINGS
5.7 Hardware
Category Name Default Range Units Comments
Alternates between ErP which puts the
console in a low power mode and launching
the Demo Video. When checked the console
goes into ErP, when not checked the console
launches the Demo Video. These actions
No Check/No occur after a time of inactivity (no workout,
ErP --
Check Check touch events, etc.) determined by the ErP
Timeout setting. Pressing any physical key
wakes up the console from ErP or the Demo
Video and returns it to the Home/Go Screen.
Hardware The Demo Video can also be exited by
touching the screen.
ErP Amount of time after which the console
15 1-60 Minutes
Timeout enters a low power mode or the Demo Video
Backlight
Brightness
100 0-100 -- Set the brightness of the screen.
All apps have their volume maxed, this sets
Master the system-wide volume. The volume
5 0-30 --
Volume matches the DQE standard. Does not affect
the system beep volume.
5.8 Restore Factory Defaults
Always available, not in its own tab .
Category Name Default Range Units Comments
Resets various options, counters, and
Restore Factory
configuration values to defaults given to
Restore
Defaults Always the factory for production. See the
Factory -- -- --
available, not in it's Factory Defaults Table for a list of options
Defaults
and values. It also resets the First Time
own tab Setup wizard to run again
25CHAPTER 6: XIR/ XER CONSOLE ENGINEERING MODE
6.1 How to enter Engineering Mode
Double-tapping the bottom left then bottom right corners of the touch screen when in Machine
Settings or Service Mode.
6.2 Engineering Mode instruction
Engineering Mode
Screen Accumulated Accumulated Serial Serial
Timeout Time Distance Number-Console Number-Frame
Demo Show Setup
Date Time Time Format
General Mode Wizard
Social
Language Software Firmware DAPI
Network
Setup Versions Versions Environment
Post
Keyboard Maximum Maximum Maximum
Disable Workout Workout Workout Pause Time
Workout Threshold Time Calories Distance
Maximum Maximum Cool Down Maximum Cool Down Adjustment
Speed Incline Time Time
Default
Level Age Weight Gender
Workout Time
Setup Default Default Default
Workout Workout Default Web page
Calories Distance
Automatic Update from Check For
Update Available Updates
Update USB Update
Restore Factory
Defaults Always
Restore Factory Defaults
available, not in it's
own tab.
Network Setup Wifi Mac Wifi Setup
26Address
Network Setup (Wifi
Available Wireless Networks
Setup)
Weather
Note: Units
(Fahrenheit/Imperial
vs. Celsius/Metric)
are determined by
language - region. If
a user
authenticates using
Enable
xID, the units will Refresh Default City
Alerts
respect the
preferred units as
set in the user's
profile settings. If
guest user, the
setting in service
mode should be
respected.
Applications Application Setup
Calibration Run Machine
ISB
ERP Backlight
Connection ERP Key Test
Timeout Brightness
Mode
Hardware Play
Play Key Workout Master Headphone
Reset
Sound Countdown Volume Insertions
Sound
Service Service History
Errors Error Log
The categories in Engineering Mode are almost same with Machine settings and Service Mode.
27CHAPTER 7: XIR/ XER CONSOLE SERVICE MODE
7.1 How to enter Service Mode
Hold “Incline Up”+ “Speed Down” on Treadmills and “Resistance Up”+ “Resistance Down” on AURE
for 5 seconds on the Welcome/Go Screen.
For TM
For Bike
For EP without incline For EP with incline
Notes: (T) Treadmill, (A) Ascent Trainer, (E) Elliptical, (U) upright Bike,(R) Recumbent Bike
28CHAPTER 7: XIR/ XER CONSOLE SERVICE MODE
7.2 General
Category Name Model Default Range Units Comments
Dropdown list. Affects
those screens that go
to/from the Welcome
Screen (Go Screen,
Workout Summary
Screen 15, 30, 60, 90,
TAEUR 120 Seconds Screen, etc.). The
Timeout 120, Never
exceptions to this are
Machine Settings,
Service Mode and
Engineering Mode which
do not timeout.
Accumulated
TAEUR 0.00 0.00 - 596523.00 Hours Read Only
Time
0.00 - 1959556.00
Accumulated Miles
TAEUR 0.00 Miles/ KM Read Only
Distance 0 .00 -
3153600.00 Km
Read Only.
This combines with the
frame number to create a
Serial Number
TAEUR -- XER, XIR Consoles machine identifier that will
- Console
show up in Viafit. Format
is Frame Console, e.g.,
R30XIR
General
Read Only.
This combines with the
A30, A50, U30,
console number to create
Serial Number U50, R30, R50,
TAEUR -- Frames a machine identifier that
- Frame E30, E50, TF30,
will show up in Viafit.
TF50, T50, T70
Format is Frame
Console, e.g., R30XIR
Sets the console into a
demo mode that allows
the console to emulate
the MCB/LCB and ignore
errors so that the console
Demo Mode TAEUR No Check Check/No Check --
software can run. Sets
RPM to 30. This does not
control the Demo Video,
that is done by the ErP
setting.
Triggers the First Time
Show Setup
TAEUR No Check Check/No Check -- Setup Wizard to run on
Wizard
the next boot up.
Central Values are scrollable
Time Zone TAEUR -- --
Time from a drop down list
YY: 2000-2099 Enter using keypad
Date TAEUR RTC Date --
MM:01-12 (Birthday keypad).
29DD:01-31
12/ 24
Time TAEUR RTC Time 00-23:00-59:00-59 Read Only
Hours
Time Format TAEUR 12 Hour 12 Hour, 24 Hour --
Language English See Languages
TAEUR Scrollable list.
Setup (U.S.) Table
Software Updater,
Native Libraries, Major
Read Only. Current
Software Main Apps, 3rd Minor
TAEUR software, pulled from the
Version Party Apps, Media Build
update package manifest.
Files, Sprint 8, Revision
Keyboard Apps
OS Version (from
Read Only. Current
Firmware Manufacturer), IO
TAEUR software, pulled from the
Versions Version, LCB
hardware.
Version
Indicates what server
(URL) the console
connects to for web
DAPI Dev, QA, Staging,
TAEUR Production -- connected services
Environment Production
(workout tracking, web
apps, asset
management, DAPI).
30CHAPTER 7: XIR/ XER CONSOLE SERVICE MODE
7.3 Workout
Category Name Model Default Range Units Comments
Keyboard T 2.0MPH/3.2K Machine MPH/KPH Determines the speed
Disable PH Minimum at which the keyboard
Threshold 4.0MPH/6.4KPH is disabled on a
treadmill. Machine
minimum will differ by
frame from
0.1MPH(.016KPH) to
0.5MPH(0.8KPH).
Maximum TAEUR 120 10-120 minutes --
Workout Time
Maximum TAEUR 1000 50-10000 calories For goal workouts.
Workout
Calories
Maximum TAEUR 31.0mile/50.0 (AEUR) Miles/Km For goal workouts.
Workout Km 1.0-62.0Mile
Distance /1.0-100.0Km
(T)
workout 1.0-31.0Mile
/1.0-50.0Km
Pause Time TAEUR 5 1-10 minutes Note: The treadmill
should start at the
machine minimum
speed when resuming
from pause.
Maximum T 12.5MPH/20.0 3.1-Machine Max MPH/KPH For Retail Machine
Speed KPH MPH/5.0-Machin Max =
e Max KPH 12.5MPH/20.0KPH.
Start Speed T Machine Machine MPH/KPH Machine minimum will
Minimum Minimum-1.4MP depend on information
H/ 2.3KPHMPH from the system
engineer. Can be
0.1-0.5MPH/0.1-0.8KP
H. This sets the default
speed during workout
setup and the speed
31the treadmill will start at
if the user presses the
'Go' quick key.
Maximum TA (T)15 (T)1.0-15.0 (T)% Grade
Incline (A)100 (A)1-100 (A)%
Cool Down TAEUR 5 1-20 Minutes Maximum times a user
Time can increase the cool
down time = Maximum
Cool Down Adjustment
Time - Cool Down Time
Maximum TAEUR 5 1-20 Minutes Maximum times a user
Cool Down can increase the cool
Adjustment down time = Maximum
Time Cool Down Adjustment
Time - Cool Down Time
32CHAPTER 7: XIR/ XER CONSOLE SERVICE MODE
7.4 Setup default
Category Name Default Range Units Comments
Age 30 14-99 Years
(TF30)50-350lbs/22-159kg
(TF50/T50/T70)50-400lbs/22-181kg
(E30/E50)50-325lbs/22-148kg
150lbs/6
Weight (A30)50-325lbs/22-148kg lbs/68kg --
8kg
(A50)50-350lbs/22-159kg
(R30/R50)50-350lbs/22-159kg
(U30/U50)50-350lbs/22-159kg
Setup Gender male Male/female -- --
Default Default
For Max See Workout
workout 30 5-max Minutes
Category
time
Default For Max See Workout
workout 300 50-max Calories Category For goal
calories based workout.
Default 3.0mile/ 0.6-max(mile and km) Miles/Km For Max See Workout
workout 5.0km Category For goal
distance based workout.
33CHAPTER 7: XIR/ XER CONSOLE SERVICE MODE
7.5 Update
Category Name Default Range Units Comments
If Automatic Update is
checked the console
checks for updates at
1:00am or if it's been
more than 24 hours
since the last check. If
an update is available
the console
downloads it. When all
update files are
downloaded the
Automatic console waits for the
Check Check/No Check --
Update following events to
install the updates:
when the console goes
into ErP or Demo
Video Mode (it installs
Update the updates then
enters these modes);
if the user powers
down the console then
install the update
when it powers back
on.
Check a connected
USB drive for updates.
If updates are found
Update
Update they will be listed
From Update From USB/Install --
From USB under Available
USB
Updates and the
button will display
Install.
Check Check DAPI server for
Check For
For Check For Updates/Install -- updates. If updates
Updates
Updates are found they will be
34listed under Available
Updates and the
button will display
Install.
Software Updater, Native Libraries, Major.Mi List packages that
Available
30 Main Apps, 3rd Party Apps, Media nor.Build have updates available
Updates
Files, Sprint 8, Keyboard Apps .Revision and their version
Default For Max See Workout
workout 300 50-max Calories Category For goal
calories based workout.
Default 3.0mile/ 0.6-max(mile and km) Miles/Km For Max See Workout
workout 5.0km Category For goal
distance based workout.
Insert well-prepared USB flash driver into console USB, select “automatic update”, software can be
updated.
More details please refer to 2.4
35CHAPTER 7: XIR/ XER CONSOLE SERVICE MODE
7.6 Network setup
Category Name Default Range Units Comments
0.0.0.0.0.0 - Mac address is PULLED.
Wifi Mac Hardware Byte.Byte.Byte.Byte.Byte.
255.255.255.25 Read Only, should not show
Address Specified ByteIn Hex
Network 5.255.255 up if not connected to Wifi.
Setup
Wifi
-- -- -- Goes to the Wifi setup page.
Setup
Follows the same look and
If the user selects 'Other function as First Time Setup
Network' they should be for Wifi setup: lists available
prompted to enter the wireless networks, their
Wireless Network Name, signal strength on the
networks in Password and the console and which one the
range with security protocol from console is connected to if it is
Network 'Other Network' None, WEP, WPA, WPA2, connected to one. Tapping a
Available
always shown at WPAPSK, WPA2PSK.If network name has the
Setup Wireless --
the bottom of the user selects the console prompt the user to
Networks
(Wifi Setup) the list in order network the console is enter the network password if
for the user to currently connected to there is one required. If the
specify their (indicated by a different user inputs the wrong
own network colored Wifi symbol) they credentials the system
should be prompted with notifies them that the console
the option to forget the was unable to connect to the
settings for that network. network and they are
returned to the network list.
36CHAPTER 7: XIR/ XER CONSOLE SERVICE MODE
7.7 Weather
Category Name Default Range Units Comments
Weather
If it has a weather
Note: Units alert from the website,
Enable Check/N
Check -- the alert mark will be
(Fahrenheit/Imperial Alerts o Check
in red on the workout
vs. Celsius/Metric) are screen.
determined by
Tap to refresh the
language - region. If a web connection to
user authenticates Refresh -- -- -- Bing. Works the same
as the refresh button
using xID, the units will
in a web browser.
respect the preferred Current Location GPS Coordinates
which is determined Note: May or may not
units as set in the Search by touching
by either the display a location
user's profile settings. If and dragging on the
Default location stored in other than GPS
-- map. Double touch a
guest user, the setting City the console or the coordinates. This is
spot on the map to set
IP Address of the an issue with Bing as
in service mode should as your location.
console if a location opposed to the web
be respected. has not been set. app.
37CHAPTER 7: XIR/ XER CONSOLE SERVICE MODE
7.8 Application
Category Name Default Range Units Comments
Displays a grid of the app
buttons. Tapping and holding
down on an app will make it
movable to other spots (other
Show all Move, apps will shift automatically).
Applicati
Applications available Hide/Make -- This app can be moved to
on Setup
apps Inactive, Locked the 'Inactive' column in which
case it will not appear on the
run screen. If an app button
is dark with a padlock it is
locked and cannot be moved.
38CHAPTER 7: XIR/ XER CONSOLE SERVICE MODE
7.9 Calibration
Category Name Default Range Units Comments
EUR: Time, RPM,
Runs a 'workout' on a
Calories, Distance, Heart
machine and on a treadmill
Rate, Resistance,
disables Tread Sense. Meant
Resistance Slider. A:
for testing and calibrating the
Machine, Stop Time, RPM, Calories,
hardware. What can be
Machine (button Distance, Heart Rate,
Run Run adjusted and what stats are
Calibration alternates Resistance, Incline,
Machine Machine displayed changes to match
between the Resistance Slider, Incline
the frame being tested.
two) Slider. T: Time, Incline,
Should allow for the testing
Speed, Calories,
of the frames hardware
Distance, Heart Rate,
buttons, heart rate grips and
Incline Slider, Speed
5MHz heart rate detector.
Slider
39CHAPTER 7: XIR/ XER CONSOLE SERVICE MODE
7.10 Hardware
Category Name Default Range Units Comments
Switches the USB port from Host (user can
USB plug in USB/Phone for media) to Device
Connection Host Host, Device (used for ADB and development). Note that
Mode the console must reboot for this switch to
take effect.
Alternates between ErP which puts the
console in a low power mode and launching
the Demo Video. When checked the console
goes into ErP, when not checked the console
launches the Demo Video. These actions
No Check/No occur after a time of inactivity (no workout,
ErP --
Check Check touch events, etc.) determined by the ErP
Timeout setting. Pressing any physical key
wakes up the console from ErP or the Demo
Video and returns it to the Home/Go Screen.
The Demo Video can also be exited by
touching the screen.
Amount of time after which the console
ErP Timeout 15 1-60 Minutes
enters a low power mode or the Demo Video
Backlight
Brightness
100 0-100 -- Set the brightness of the screen.
Hardware
All Read Only. Starts when you enter the test.
physical Causes the console to display the all
Key Test -- --
key subsequent physical key presses on the
presses. console. Exit by selecting a tab.
Sound plays when the user presses the
Play Key Check/No
Check -- frame buttons (e.g., incline up/down,
Sound Check
resistance up/down, etc.)
Play
Workout Check/No
Check -- --
Countdown Check
Sound
All apps have their volume maxed, this sets
Master the system-wide volume. The volume
5 0-30 --
Volume matches the DQE standard. Does not affect
the system beep volume.
Read only. Keeps a count of how many times
Headphone headphones have been inserted and
0 -- --
Insertions removed from the headphone jack. Can be
reset by restoring to factory defaults.
Button that resets the Headphone Insertions
Reset -- -- --
and Removals counts to 0.
40CHAPTER 7: XIR/ XER CONSOLE SERVICE MODE
7.11 Service
Category Name Default Range Units Comments
Battery, Belt: Drive, Belt:
Generator/Flywheel, Belt:
Running and Flip Deck, Generates a service entry
Belt: Running and New from the service items listed
Deck, Chain: Drive, in a log that is kept on the
Service Chain: Stair, Console machine and sent to DAPI
Service -- --
History Cable, Reset Headphone (for things like Asset
Accumulators, Reset Management). Tap Create to
Accumulated Time, Reset create the entry for the
Accumulated Distance, selected Service Type.
Reset Total Floors, Reset
Factory Defaults
41CHAPTER 7: XIR/ XER CONSOLE SERVICE MODE
7.12 Errors
Category Name Default Range Units Comments
Error history that can be
cleared with the Clear All
button. Lists the error codes
Error Code, First
experienced by the console,
Errors Error Log -- Clear All Occurrence, Last
the first and last occurrence
Occurrence, Count
of that error code and how
many times it has happened
since the first occurrence.
42CHAPTER 7: XIR/ XER CONSOLE SERVICE MODE
7.13 Restore Factory Defaults
Category Name Default Range Units Comments
Resets various
options, counters, and
Restore configuration values to
Factory defaults given to the
Defaults Restore factory for production.
Always Factory -- -- -- See the Factory
available, Defaults Defaults Table for a list
not in it's of options and values.
own tab It also resets the First
Time Setup wizard to
run again.
43CHAPTER 8: TROUBLESHOOTING
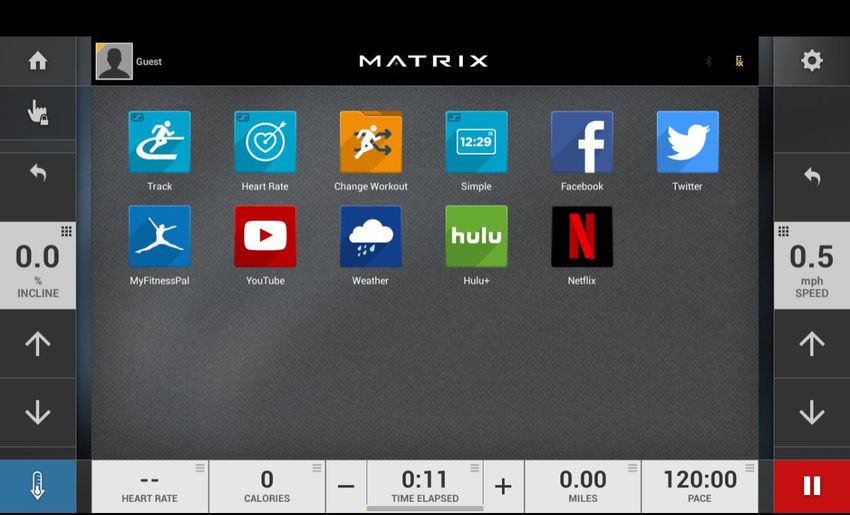
8.1 ELECTRICAL DIAGRAM
8.1.1 XR/XER/XIR Electrical Diagram
CN1 CN2
CN3
44CHAPTER 8: TROUBLESHOOTING
Display connect wire
Polar connect wire
8.1 ELECTRICAL DIAGRAM
45CHAPTER 8: TROUBLESHOOTING
8.1.2 XR UCB Ports Description
A LCD Display
Port
A Program Keypad G Safety Key
B Quick Key H Digital Interface
C USB Port I GND wire
D LCD Display Port J Hand Grip L
E Program Keypad K Hand Grip R
F USB Interface L Polar Interface
46CHAPTER 8: TROUBLESHOOTING
8.1.3 XER UCB Ports Description
A Hand Grip J USB+ErP LED
B Wireless HR K USB+Audio in
C MCU debug L Speaker
D Fan M Earphone
E Touch Panel N WiFi antenna
F Safety Key O NFC (Reseved)
G TFT back light P TF card
H 12C keypad Q Uart print port
I Digital Interface
47CHAPTER 8: TROUBLESHOOTING
8.1.4 XIR UCB Ports Description
A Hand Grip K USB+Bluetooth sink
B Wireless HR L Speaker
C MCU debug M Earphone
D Fan N WiFi antenna
E Touch Panel O NFC (Reseved)
F Safety Key P TF card
G TFT back light Q Uart print port
H 12C keypad R USB
I Digital Interface S Audio line in
J USB+ErP LED
48CHAPTER 8: TROUBLESHOOTING
8.2 CONSOLE DOES NOT LIGHT UP
1) SYMPTOM:
The power switch is in the on position, but the console will not turn on.
2) Reasons:
a. The console is damaged or the console cable is not connected properly.
b. Poor connection to the terminals on the lower control board.
c. The lower control board is damaged.
3) SOLUTION:
1. Verify the outlet the machine is plugged into is functional.
2. Verify the correct power cord is being used. Only use the power cord included with the unit or
contact Customer Tech Support
3. Verify the power cord is not pinched or damaged and is properly plugged into the outlet and the
machine.
4. If the voltage through the console cable is 12VDC, the console is defective, replace it.
5. Remove the console and check to see if the console wire has a good CONNECTION with the
console.
6. For treadmills only: remove the bolts attaching the console base to the right console mast. Check
to see if the upper console cable and lower console cable are well connected.
7. Check the lower console cable connection to the lower control board. For treadmills, remove the
motor cover. For bikes and elliptical, remove the side cover. For ascents, remove the front
service panel.
8.3 SPEED DOES NOT DISPLAY(For BK/EP/AS)
1) SYMPTOM:
The speed value do not display on console
2) SOLUTION:
1. Unplug power cord, remove the console and check that all connections to the console are secure
and not damaged or pinched.
2. Remove the side cover and check to see if the sensor wire is connected well.
3. Check to see if one corner of the sensor is aligned with the magnet and the distance less than
5mm.
49CHAPTER 8: TROUBLESHOOTING
8.4 All or Some of the Function Keys Do Not Respond (For XR only)
1) SYMPTOM:
All or Some of the Function Keys Do Not Respond.
2) SOLUTION:
a. The keypad connection ribbon cable has not been plugged in correctly.
Check the connections of the keypad at the UCB.
Remove the console from the console bracket.
Remove the 6 screws holding the back of the console to the front.
Inspect the keypad ribbon cable connection at the UCB .
Even if the keypad ribbon cable appears to be connected correctly, unplug and reseat the cable, then
retest.
b.The keypad is damaged, please refer to section 9.2-overlay replacement.
Replace the keypad.
c. The UCB is damaged.
Replace the UCB.
8.5 Speaker /Audio Issues (For XER/XIR)
1) SYMPTOM:
The speaker or headphones have no sound output.
2) SOLUTION:
a. Confirm whether the speaker wire is well-connected with the UCB.
b. If well-connected, make sure that the audio output short-circuit terminal is present and tight.
c. Update the console software
d. If the speakers have sound output, but headphones have no sound output, replace the headphone wire.
If problems persist, replace the headphone board
50CHAPTER 9: PARTS REPLACEMENT GUIDE
9.1 XR CONSOLECONTROL BOARD REPLACEMENT
1). Remove six screws to separate upper and lower console cover. (Figure A)
2). Again to remove six screws to open back cover. (Figure B)
3). Unplug console connected wire from control board. (Figure C)
4). Remove 14 screws to replace upper control board.
Figure A Figure B
Figure C Figure D
9.2 OVERLAY REPLACEMENT (For XR)
1) Open the back of the console (refer to section 9.1)
2) Unplug the overlay ribbon cables
3) Remove the keypad from the front of the console
4) Remove the overlay from the console, replace with new parts
51CHAPTER 9: PARTS REPLACEMENT GUIDE
Figure A Figure B
9.3 TOUCH PANEL REPLACEMENT (For XIR and XER)
1) Open console cover, remove four screws securing TFT module.
2) Remove the yellow wire, and then replace TFT module.
3) Place new TFT module in the tray of water-proof rubber gasket;
9.4 SPEAKER REPLACEMENT
1) Remove audio input and output wire (figure 1 ) and (figure 2)
2) Remove the four screws (figure 3) and then take two speakers (figure 4) off to replace with new speakers;
52CHAPTER 9: PARTS REPLACEMENT GUIDE
Fig 1 Fig 2
Fig 3 Fig 4
53You can also read