AWS Amplify Console User Guide - AWS Amplify: Console User Guide - Amazon ...
←
→
Page content transcription
If your browser does not render page correctly, please read the page content below
AWS Amplify
                             Console User Guide

AWS Amplify: Console User Guide
Copyright © 2019 Amazon Web Services, Inc. and/or its affiliates. All rights reserved.
AWS Amplify Console User Guide

Amazon's trademarks and trade dress may not be used in connection with any product or service that is not
Amazon's, in any manner that is likely to cause confusion among customers, or in any manner that disparages or
discredits Amazon. All other trademarks not owned by Amazon are the property of their respective owners, who may
or may not be affiliated with, connected to, or sponsored by Amazon.
AWS Amplify Console User Guide

Table of Contents
  What is the AWS Amplify Console? ...................................................................................................... 1
        What are Modern Web Applications? ............................................................................................ 1
        Amplify Console Features ............................................................................................................ 1
        Next Step .................................................................................................................................. 2
  Getting Started .................................................................................................................................. 3
        Step 1: Connect Repository ......................................................................................................... 3
        Step 2: Confirm Build Settings for the Front End ........................................................................... 4
        Step 3: Confirm Build Settings for the Backend ............................................................................. 5
        Step 4: Add Environment Variables (Optional) ............................................................................... 6
        Step 5: Save and Deploy ............................................................................................................. 6
        Next Steps ................................................................................................................................ 7
  Setting Up Custom Domains ............................................................................................................... 8
        Adding a Custom Domain Managed in Amazon Route 53 ................................................................ 8
        Adding a Custom Domain Managed by a Third-Party DNS Provider ................................................... 9
        Adding Subdomains .................................................................................................................. 11
        Troubleshooting Guide .............................................................................................................. 12
               Technical Terminology ...................................................................................................... 12
               How do I verify that my CNAME resolves? ........................................................................... 14
               My domain hosted with a third party is stuck in Pending Verification state ............................... 15
               My domain hosted with AWS Route53 is stuck in Pending Verification state ............................. 15
               CNAMEAlreadyExistsException Error .................................................................................... 16
  Connecting to Third-Party Custom Domains ........................................................................................ 17
        Connecting to a GoDaddy Domain .............................................................................................. 17
        Connecting to a Google Domain ................................................................................................ 20
  Configuring Build Settings ................................................................................................................. 21
        YML Specification Syntax .......................................................................................................... 21
        Branch-Specific Build Settings .................................................................................................... 22
        Navigating to a Subfolder ......................................................................................................... 22
        Deploying the Backend with Your Front End ................................................................................ 23
        Setting the Output Folder ......................................................................................................... 23
        Installing Packages as Part of Your Build ..................................................................................... 23
        Using a Private npm Registry ..................................................................................................... 23
        Installing OS packages .............................................................................................................. 24
        Key-value storage for every build ............................................................................................... 24
  Deploying Fullstack Serverless Web Apps ............................................................................................ 25
  Feature Branch Deployments ............................................................................................................. 28
        Team workflows with Amplify CLI backend environments .............................................................. 28
               Feature branch workflow ................................................................................................... 12
               GitFlow workflow ............................................................................................................. 32
               Per-developer sandbox ...................................................................................................... 32
  One-click Deploy Button ................................................................................................................... 35
        Add 'Deploy to Amplify Console' button to your repository or blog ................................................. 35
  Using Redirects ................................................................................................................................ 36
        Types of Redirects .................................................................................................................... 36
        Parts of a Redirect ................................................................................................................... 37
        Order of Redirects .................................................................................................................... 37
        Simple Redirects and Rewrites ................................................................................................... 38
        Redirects for Single Page Web Apps (SPA) ................................................................................... 39
        Reverse Proxy Rewrite ............................................................................................................... 39
        Trailing slashes and Clean URLs ................................................................................................. 39
        Placeholders ............................................................................................................................ 40
        Query Strings and Path Parameters ............................................................................................ 40
        Region-based Redirects ............................................................................................................. 40
  Restricting Access ............................................................................................................................. 42

                                                                        iii
AWS Amplify Console User Guide

Environment Variables ......................................................................................................................     43
      Setting Environment Variables ...................................................................................................          43
      Accessing Environment Variables ................................................................................................           44
      Amplify Console Environment Variables ......................................................................................               44
Custom Headers ...............................................................................................................................   46
      Example: Security Headers ........................................................................................................         46
Incoming Webhooks .........................................................................................................................      48
CloudFormation Support ...................................................................................................................       50
Creating a Service Role .....................................................................................................................    51
      Step 1: Login to the IAM Console ...............................................................................................           51
      Step 2: Create Amplify role .......................................................................................................        51
      Step 3: Return to the Amplify Console ........................................................................................             51
Managing Your App's Performance .....................................................................................................            53

                                                                     iv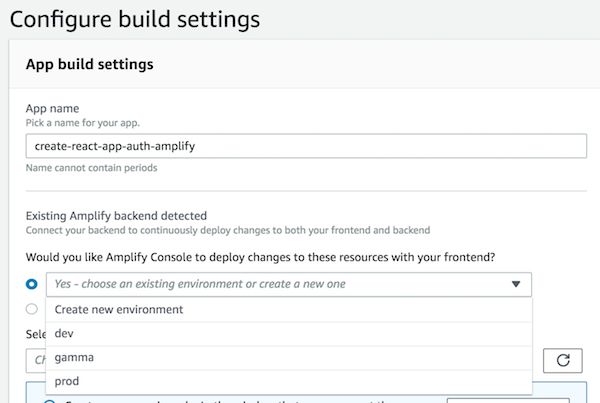
AWS Amplify Console User Guide
                                 What are Modern Web Applications?

What is the AWS Amplify Console?
    The AWS Amplify Console is a continuous delivery and hosting service for modern web applications. The
    AWS Amplify Console simplifies the deployment of your application front end and backend. Connect to
    your code repository and your front end and backend are deployed in a single workflow, on every code
    commit. This ensures that your web application is only updated after the deployment is successfully
    completed, eliminating inconsistencies between your application front end and backend. AWS Amplify
    Console makes it easier for you to build, deploy, and host your mobile web applications, enabling you to
    quickly iterate on feedback and get new features to your users faster.

What are Modern Web Applications?
    Modern web applications are constructed as single page web applications that package all application
    components into static files. Traditional client-server web architectures led to poor experiences--
    every button click or search required a round trip to the server, re-rendering the entire application.
    Modern web apps offer a native app-like user experience by serving the app front end, or user interface,
    efficiently to browsers as prebuilt HTML/JavaScript files that can then invoke backend functionality
    without reloading the page.

    Modern web applications functionality is often spread across multiple places--such as databases,
    authentication services, front end code running in the browser, and backend business logic, or AWS
    Lambda functions, running in the cloud. This makes application deployments complex and time-
    consuming as developers need to carefully coordinate deployments across the front end and backend to
    avoid partial or failed deployments. The AWS Amplify Console simplifies deployment of the front end
    and backend in a single workflow.

    AWS Amplify Console supports common Single Page App (SPA) frameworks (e.g. React, Angular, Vue.js,
    Ionic, Ember), as well as static-site generators like Gatsby, Eleventy, Hugo, VuePress, and Jekyll.

Amplify Console Features
    With the Amplify Console, you can do the following:

    • Connect your repository (GitHub, BitBucket, GitLab, and AWS CodeCommit), and the Amplify Console
      automatically detects the front end build settings along with any backend functionality provisioned
      with the Amplify CLI (command-line toolchain for creating serverless backends).
    • Manage production and staging environments for your front end and backend by connecting new
      branches.
    • Atomic deployments eliminate maintenance windows by ensuring that the web app is only updated
      when the entire deployment has finished. This eliminates scenarios where files fail to upload properly.
    • Connect your custom domain. If you manage your domain in Amazon Route 53, the Amplify Console
      automatically connects the root (yourdomain.com), www subdomains (www.yourdomain.com), and
      branch (https://dev.yourdomain.com) subdomains.
    • Get screen shots of your app rendered on different mobile devices to pinpoint layout issues.
    • Set up rewrites and redirects to maintain SEO rankings.
    • Password protect your web app so you can work on new features without making them publicly
      accessible.

                                                  1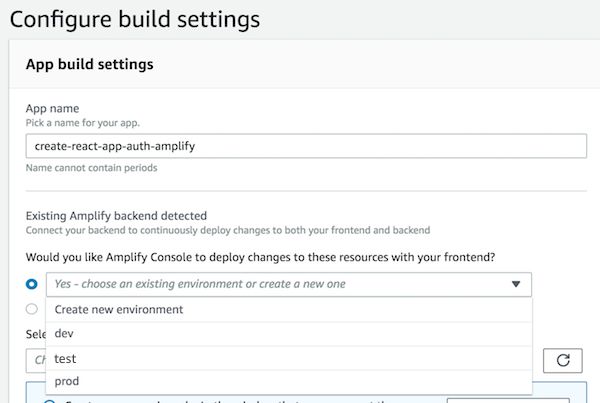
AWS Amplify Console User Guide
                                             Next Step

Next Step
    Get started (p. 3) with the Amplify Console.

                                                   2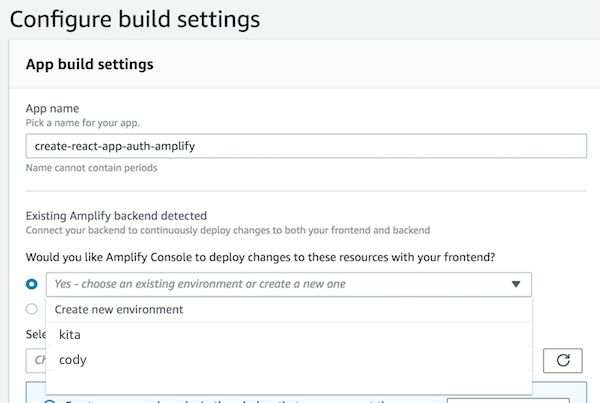
AWS Amplify Console User Guide
                                     Step 1: Connect Repository

Getting Started
    In this walkthrough, you learn how to continuously build, deploy, and host a modern web app. Modern
    web apps include Single Page App (SPA) frameworks (for example, React, Angular, or Vue) and static-site
    generators (SSGs) (for example, Hugo, Jekyll, or Gatsby).

    To get started, log in to the Amplify Console and choose Get Started under Deploy.

Step 1: Connect Repository
    Connect your GitHub, Bitbucket, GitLab, or AWS CodeCommit repositories. After you authorize the
    Amplify Console, Amplify fetches an access token from the repository provider, but it doesn't store the
    token on the AWS servers. Amplify accesses your repository using deploy keys installed in a specific
    repository only.

    After you connect the repository service provider, choose a repository, and then choose a corresponding
    branch to build and deploy.

                                                  3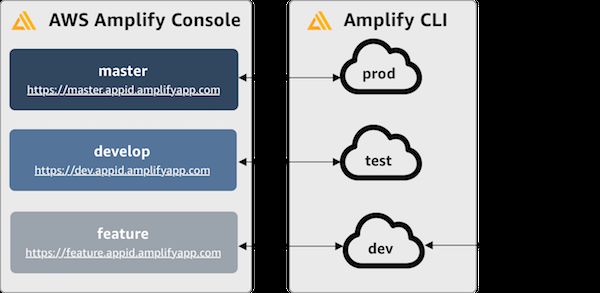
AWS Amplify Console User Guide
                           Step 2: Confirm Build Settings for the Front End

Step 2: Confirm Build Settings for the Front End
    For the selected branch, Amplify inspects your repository to automatically detect the sequence of build
    commands to be executed.

    Important: Verify that the build commands and build output directory (that is, artifacts > baseDirectory)
    is accurate. If you need to modify this information, choose Edit to open the YML editor. You can save
    your build settings on our servers, or you can download the YML and add it to the root of your repo (for
    monorepos, store the YML at the app's root directory).

                                                  4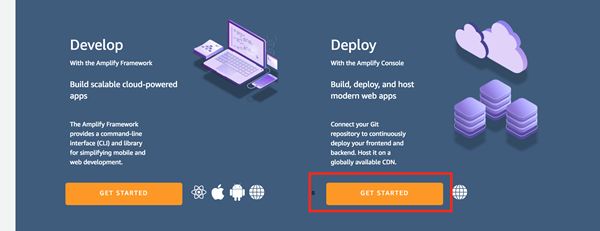
AWS Amplify Console User Guide
                            Step 3: Confirm Build Settings for the Backend

    For more information, see YML structure (p. 21).

Step 3: Confirm Build Settings for the Backend
    If you connected a repository provisioned by the Amplify CLI v1.0+ (run amplify -v to find CLI version),
    the Amplify Console will deploy or automatically update backend resources (any resource provisioned
    by the Amplify CLI) in a single workflow with the frontend build. You can choose to point an existing
    backend environment to your branch, or create a completely new environment. For a step-by-step
    tutorial, see Deploying a Backend with your Frontend (p. 25).

    To deploy backend functionality using the Amplify CLI during your build, create or reuse an IAM service
    role. IAM roles are a secure way to grant the Amplify Console permissions to act on resources in your
    account.

    Note: The Amplify CLI won't run without an IAM service role enabled.

                                                  5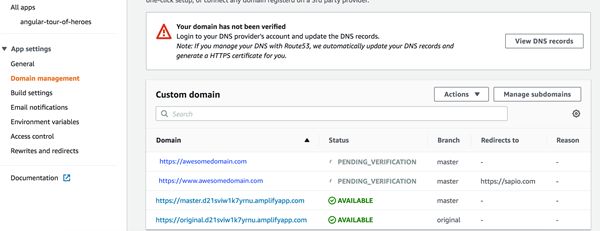
AWS Amplify Console User Guide
                             Step 4: Add Environment Variables (Optional)

Step 4: Add Environment Variables (Optional)
    Almost every app needs to get configuration information at runtime. These configurations can be
    database connection details, API keys, or different parameters. Environment variables provide a means to
    expose these configurations at build time.

Step 5: Save and Deploy
    Review all of your settings to ensure everything is set up correctly. Choose Save and deploy to deploy
    your web app to a global content delivery network (CDN). Your front end build typically takes 1 to 2
    minutes but can vary based on size of the app.

    Access the build logs screen by selecting a progress indicator on the branch tile. A build has the following
    stages:

    1. Provision - Your build environment is set up using a Docker image on a host with 4 vCPU, 7GB
       memory. Each build gets its own host instance, ensuring that all resources are securely isolated. The
       contents of the Docker file are displayed to ensure that the default image supports your requirements.
    2. Build - The build phase consists of three stages: setup (clones repository into container), deploy
       backend (runs the Amplify CLI to deploy backend resources), and build front end (builds your front-
       end artifacts).
    3. Deploy - When the build is complete, all artifacts are deployed to a hosting environment managed
       by Amplify. Every deployment is atomic - atomic deployments eliminate maintenance windows by
       ensuring that the web app is only updated after the entire deployment has completed.
    4. Verify - To verify that your app works correctly, Amplify renders screen shots of the index.html in
       multiple device resolutions using Headless Chrome.

                                                   6
AWS Amplify Console User Guide
Next Steps
Next Steps
• Add a custom domain to your app (p. 8)
• Manage multiple environments (p. 28)
7AWS Amplify Console User Guide
Adding a Custom Domain Managed in Amazon Route 53
Setting Up Custom Domains
You can connect a custom domain purchased through domain registrars (for example, Amazon Route 53,
GoDaddy, and Google Domains) to your app. When you deploy your web app with the Amplify Console, it
is hosted at:
https://branch-name.d1m7bkiki6tdw1.amplifyapp.com
When you use a custom domain, users see that your app is hosted from a URL, such as the following:
https://www.awesomedomain.com
The Amplify Console issues an SSL certificate for all domains connected to your app so that all traffic is
secured through HTTPS/2. The SSL certificate generated by Amazon Certificate Manager is valid for 30
days and renews automatically as long as your app is hosted with Amplify.
Topics
• Adding a Custom Domain Managed in Amazon Route 53 (p. 8)
• Adding a Custom Domain Managed by a Third-Party DNS Provider (p. 9)
• Adding Subdomains (p. 11)
• Troubleshooting Guide (p. 12)
Adding a Custom Domain Managed in Amazon
Route 53
After you deploy your app, you can add a custom domain that you manage using Amazon Route 53.
1. On the left navigation pane, choose App Settings, Domain management, and then choose Add
domain.
2. In Enter your root domain, enter your root domain (https://awesomedomain.com). As you
start typing, root domains that you manage in Amazon Route 53 appear in the list (https://
awesomedomain.com). Select the domain you want to use and then choose Configure Domain.
8AWS Amplify Console User Guide
Adding a Custom Domain Managed
by a Third-Party DNS Provider
3. By default, the Amplify Console automatically adds two entries for https://
www.myroute53domain.com and https://myroute53domain.com with a redirect set up from the www
subdomain to the root domain (you can change this by choosing Rewrites and redirects from the left
menu). You can modify the default configuration if you want to add subdomains only, see: Connecting
subdomains (p. 11). Choose Save after configuring your domain.
Note: It can take up to 24 hours for the DNS to propagate and to issue the SSL certificate. For more
information about the status messages, see Associating a Domain.
Adding a Custom Domain Managed by a Third-
Party DNS Provider
After you deploy your app, you can add a custom domain that you manage using a third-party DNS
provider if you don't use Amazon Route 53.
1. On the left navigation pane, choose App Settings, Domain management, and then choose Add
domain.
2. In Enter your root domain, enter your root domain (https://awesomedomain.com) and then choose
Configure domain. If the domain is registered, a green alert notifies you to proceed as long you are
the owner of the domain. If the domain is available, purchase a domain at Amazon Route 53.
9AWS Amplify Console User Guide
Adding a Custom Domain Managed
by a Third-Party DNS Provider
3. By default, the Amplify Console adds two entries for https://www.awesomedomain.com and
https://awesomedomain.com with a redirect set up from the www subdomain to the root domain.
You can modify the default configuration if you want to add subdomains only, see: Connecting
subdomains (p. 11). Choose Save after configuring your domain.
4. Because the domain is managed externally you must manually configure your DNS provider (for
example, GoDaddy or Google domains). Choose View DNS records in the alert banner.
5. Update your DNS providers' CNAME and ALIAS records as follows. For GoDaddy and Google Domains,
see the step-by-step instructions in Connecting to Third-Party Custom Domains (p. 17).
a. To generate a SSL certificate for your domain, Amplify Console needs to verify ownership.
Configure a CNAME to point to the validation server. Once Amplify Console validates ownership of
your domain, all traffic will be served using HTTPS/2.
b. Configure CNAME record to point your subdomains (https://*.awesomedomain.com) to the
amplifyapp domain. NOTE: If you have production traffic it is recommended you update your
CNAME record after your domain status shows AVAILABLE.
c. Configure ANAME/ALIAS record to point the root domain (https://awesomedomain.com) to your
amplifyapp domain. ANAME records enable you to point the root of your domain to a hostname.
For DNS providers that do not have ANAME/ALIAS support, we strongly recommend migrating your
DNS to Amazon Route 53.
**
NOTE: If you have production traffic it is recommended you update your ANAME record after your
domain status shows AVAILABLE.*
10AWS Amplify Console User Guide
Adding Subdomains
Important: Verification of domain ownership and DNS propagation for third-party domains can take up
to 48 hours. For more information about status messages, see Associating a Domain.
Adding Subdomains
A subdomain is the part of your URL that appears before your domain name (for example,
www.amazon.com or aws.amazon.com).
1. Add a subdomain only: If you already have a production website, you might only want to connect
a subdomain (eg https://alpha.mydomain.com). You can do this by choosing Exclude root and
modifying the subdomain to alpha as shown below.
2. Add a multi-level subdomain: You might want to connect a multi-level subdomain (eg https://
beta.alpha.mydomain.com). You can do this by entering alpha.mydomain.com in the domain search
bar, choosing Exclude root, and modifying the subdomain to beta as shown below.
11AWS Amplify Console User Guide
Troubleshooting Guide
3. Manage subdomains After adding your domain, you might want to add more subdomains. Choose
Manage subdomains from the Domain management screen and edit your subdomains.
Troubleshooting Guide
This guide will help you troubleshoot issues regarding the setup of a custom domain in the AWS Amplify
Console.
Topics
• Technical Terminology (p. 12)
• How do I verify that my CNAME resolves? (p. 14)
• My domain hosted with a third party is stuck in Pending Verification state (p. 15)
• My domain hosted with AWS Route53 is stuck in Pending Verification state (p. 15)
• CNAMEAlreadyExistsException Error (p. 16)
Technical Terminology
1. CNAME - A CNAME (Canonical Record Name) is a type of DNS record which allows you to mask the
domain for a set of webpages and make them appear as though they are located elsewhere. CNAMES
12AWS Amplify Console User Guide
Technical Terminology
point a subdomain to a Fully Qualified Domain name (FQDN). For example, we can create a new
CNAME record to map the subdomain www.myawesomesite.com to the FQDN domain branch-
name.d1m7bkiki6tdw1.amplifyapp.com assigned to our App.
2. ANAME - An ANAME record is like a CNAME record, but at the root level. An ANAME will point the root
of your domain to a FQDN. That FQDN will actually point to an IP address.
3. Nameserver - A Nameserver is a server on the internet specialized in handling queries regarding the
location of a domain name's various services. If you have your domain setup in AWS Route53, you will
have a list of nameservers assigned to your domain.
Custom Domain Setup in AWS Amplify Console
When you create a new domain on the Amplify Console, there are a number of steps which need to
happen before you can view your app via your custom domain.
1. SSL Create - AWS Amplify Console is issuing an SSL certificate for setting up a secure custom domain.
2. SSL Configuration/Verification - Before issuing an SSL certificate, Amplify Console must verify that
you are the owner of the domain. For domains managed by Route53, we will automatic update the
DNS verification record. For domains managed outside of Route53, you will need to manually add the
displayed DNS verification record into your domain’s DNS provider.
3. Domain activation - The domain is successfully verified. For domains managed outside of Route53,
you will need to manually add the CNAME records provided in the console into your domain's DNS
provider.
Understanding DNS Verification
DNS stands for Domain Name System, and is commonly referred to being a phone book, translating
human-readable names (domains) to computer-friendly addresses (IP Addresses).
When you type https://google.com in the browser, a lookup is done in the DNS provider to find the IP
Address of server which hosts the website.
13AWS Amplify Console User Guide
How do I verify that my CNAME resolves?
DNS providers contain records of domains and their corresponding IP Addresses. Here are the most
commonly used DNS records.
1. A record - points the root domain or subdomain to an IP Address
2. CNAME record - Points a subdomain to a FQDN (Fully Qualified Domain Name)
3. NS record - Points to servers which will lookup your domain details
There are a number of free services on the internet you can use to verify your DNS records. For example,
whatsmydns.net.
The Amplify Console uses a CNAME record to verify that you own your custom domain. If you host your
domain with AWS Route53, verification is done on your behalf. However, if you host your domain with a
Third party, you'll have to manually go into your DNS settings and add a new CNAME record.
How do I verify that my CNAME resolves?
After your DNS update, you can use a tool like dig or a free website like whatsmydns.net to verify that
your CNAME records are resolving.
When you click search, you should that the results show that your CNAME is resolving correctly.
You can similarly check the other DNS records.
14AWS Amplify Console User Guide
My domain hosted with a third party
is stuck in Pending Verification state
My domain hosted with a third party is stuck in
Pending Verification state
The first thing you'll want to do is to verify if your CNAME records are resolving. See previous step for
instructions. If you CNAME records are not resolving, then you should confirm that the CNAME entry
exists in the your DNS Provider.
Note: If you added or updated your CNAME records a few hours after you
created your app, this will most likely cause your app to get stuck in
the pending verification state. It is important that you update your
CNAME records as soon as you create your custom domain.
Once your app is created in the Amplify Console, your CNAME records are checked every few minutes to
determine if it resolves. If it doesn't resolve after an hour, the check is made every few hours which can
lead to a delay in your domain being ready to use.
Lastly, if you have confirmed that the CNAME records exists, then there might be an issue with your DNS
provider. You can either contact the DNS provider to diagnose why the DNS verification CNAME is not
resolving or migrate your DNS to Route53.
My domain hosted with AWS Route53 is stuck in
Pending Verification state
If you transferred your domain to AWS Route53 then it's possible that your domain has different
nameservers then those issued by the Amplify Console when your app was created. Login to the Route53
console, choose Hosted Zones from the left navigation, and pick the domain you are connecting. Record
the nameserver values.
Next, choose Registered domains from the left navigation. Ensure the nameservers on the registered
domain screen match what you copied from the Hosted Zone.
15AWS Amplify Console User Guide
CNAMEAlreadyExistsException Error
If this did not resolve the issue, please email aws-amplify-customer@amazon.com.
CNAMEAlreadyExistsException Error
This means that one of the hostnames you tried to connect (could be a subdomain, or the apex domain)
is already deployed to another AWS CloudFront distribution. Here's how you can diagnose the issue:
1. Check the AWS CloudFront Console to see if you have this domain deployed to any other distribution.
At a time, you can only have a single CNAME record attached to a one CloudFront distribution.
2. Is this domain connected to a different Amplify App that you own? If so, make sure you are not trying
to reuse one of the hostnames. If you are using www.domain.com on the other app, you cannot use
www.domain.com with this appYou can use other subdomains such as blog.domain.com.
3. If you had this domain successfully connected to another app and then recently (within the last hour)
deleted it, please wait and try again after some time. If you still see this exception after 6 hours,
please contact us at aws-amplify-customer@amazon.com.
16AWS Amplify Console User Guide
Connecting to a GoDaddy Domain
Connecting to Third-Party Custom
Domains
Connecting to a GoDaddy Domain
1. Follow the instructions to add a domain (p. 8) for third-party providers.
2. Log in to your account at GoDaddy and choose DNS.
3. Add CNAME records to to point your subdomains to the Amplify domain, and another CNAME record
to point to Amazon Certificate Manager's validation server. A single validated ACM generates an SSL
certificate for your domain. Make sure you only enter the subdomain (for example, ) in **Host* as
shown below (don't enter yourdomainname.com).
GoDaddy doesn't support ANAME/ALIAS records. For DNS providers that don't have ANAME/ALIAS
support, we strongly recommend migrating your DNS to Amazon Route 53. If you want to keep your
17AWS Amplify Console User Guide
Connecting to a GoDaddy Domain
current provider and update the root domain, add Forwarding and set up a domain forward. In Forward
to, enter the information as shown following:
18AWS Amplify Console User Guide
Connecting to a GoDaddy Domain
19AWS Amplify Console User Guide
Connecting to a Google Domain
Connecting to a Google Domain
1. Follow the instructions to add a domain (p. 8) for third-party providers.
2. Log in to your account at https://domains.google and choose DNS.
3. In Custom resource records, enter CNAME records that you want to point all subdomains (https://
*.awesomedomain.com) to the amplifyapp domain, and another CNAME record to point to Amazon
Certificate Manager's validation server. A single validated ACM generates an SSL certificate for your
domain.
Google domains don't support ANAME/ALIAS records. For DNS providers that don't have ANAME/
ALIAS support, we strongly recommend migrating your DNS to Amazon Route 53. If you want to keep
your current provider and update the root domain, add a Synthetic Record, and set up a Subdomain
Forward. In Subdomain, enter the @ symbol and then choose Forward path as shown following:
20AWS Amplify Console User Guide
YML Specification Syntax
Configuring Build Settings
The Amplify Console automatically detects the front end framework and associated build settings by
inspecting the package.json file in your repository. You have the following options:
• Save the build settings in the Amplify Console - The Amplify Console autodetects build settings and
saves it so that they can be accessed via the Amplify Console. These settings are applied to all of your
branches unless there is a YML file found in your repository.
• Save the build settings in your repository - Download the amplify.yml file and add it to the root of
your repository (or root of the app folder for monorepos).
You can edit these settings in the Amplify Console by choosing App Settings>Build settings. These build
settings are applied to all the branches in your app, except for the branches that have a YML file saved in
the repository.
YML Specification Syntax
The build specification YML contains a collection of build commands and related settings that the
Amplify Console uses to run your build. The YML is structured as follows:
version: 1.0
env:
variables:
key: value
backend:
phases:
preBuild:
commands:
- *enter command*
build:
commands:
- *enter command*
postBuild:
commands:
- *enter command*
frontend:
phases:
preBuild:
commands:
- cd react-app
- npm ci
build:
commands:
- npm run build
artifacts:
files:
- location
- location
discard-paths: yes
baseDirectory: location
cache:
paths:
- path
- path
21AWS Amplify Console User Guide
Branch-Specific Build Settings
customHeaders:
- pattern: 'file-pattern'
headers:
- key: 'custom-header-name'
value: 'custom-header-value'
- key: 'custom-header-name'
value: 'custom-header-value'
• version - Represents the Amplify Console YML version number.
• env - Add environment variables to this section. You can also add environment variables using the
console.
• backend - Run Amplify CLI commands to provision a backend, update Lambda functions, or
GraphQL schemas as part of continuous deployment. Learn how to deploy a backend with your
frontend (p. 25).
• frontend - Run frontend build commands.
• Both the frontend and backend have three phases that represent the commands run during each
sequence of the build.
• preBuild - The preBuild script runs before the actual build starts, but after we have installed
dependencies.
• build - Your build commands.
• postBuild - The post-build script runs after the build has finished and we have copied all the
necessary artifacts to the output directory.
• artifacts>base-directory - The directory in which your build artifacts exist.
• artifacts>files - Specify files from your artifact you want to deploy. **/* is to include all files.
• customHeaders - Custom header rules set on deployed files. See custom headers (p. 46).
Branch-Specific Build Settings
You can use bash shell scripting to set branch-specific build settings. For example, the following script
uses the system environment variable $AWS_BRANCH to execute one set of commands if the branch
name is master and a different set of commands if the branch name is dev.
frontend:
phases:
build:
commands:
- if [ "${AWS_BRANCH}" = "master" ]; then echo "master branch"; fi
- if [ "${AWS_BRANCH}" = "dev" ]; then echo "dev branch"; fi
Navigating to a Subfolder
For monorepos, users want to be able to cd into a folder to run the build. After you run the cd command,
it applies to all stages of your build so you don't need to repeat the command in separate phases.
version: 1.0
env:
variables:
key: value
frontend:
phases:
preBuild:
commands:
22AWS Amplify Console User Guide
Deploying the Backend with Your Front End
- cd react-app
- npm ci
build:
commands:
- npm run build
Deploying the Backend with Your Front End
The amplifyPush is a helper script that helps you with backend deployments. The build settings below
automatically determine the correct backend environment to deploy for the current branch.
version: 1.0
env:
variables:
key: value
backend:
phases:
build:
commands:
- amplifyPush --simple
Setting the Output Folder
The following build settings set the output directory to the public folder.
frontend:
phases:
commands:
build:
- yarn run build
artifacts:
baseDirectory: public
Installing Packages as Part of Your Build
You can use npm or yarn to install packages during the build.
frontend:
phases:
build:
commands:
- npm install -g pkg-foo
- pkg-foo deploy
- yarn run build
artifacts:
baseDirectory: public
Using a Private npm Registry
You can add references to a private registry in your build settings or add it as an environment variable.
23AWS Amplify Console User Guide
Installing OS packages
build:
phases:
preBuild:
commands:
- npm config set
- npm config set registry https://registry.npmjs.org
- npm config set always-auth true
- npm config set email hello@amplifyapp.com
- yarn install
Installing OS packages
You can install OS packages for missing dependencies.
build:
phases:
preBuild:
commands:
- yum install -y
Key-value storage for every build
The envCache provides key-value storage at build time. Values stored in the envCache can only
be modified during a build and can be re-used at the next build. Using the envCache, we can store
information on the deployed environment and make it available to the build container in successive
builds. Unlike values stored in the envCache, changes to environment variables during a build are not
persisted to future builds.
Example usage:
envCache --set
envCache --get
24AWS Amplify Console User Guide
Serverless Tutorial: Deploying
Backend with your Frontend
The Amplify Console enables developers building apps with the Amplify Framework to continuously
deploy updates to their backend and frontend on every code commit. With the Amplify Console you can
deploy serverless backends with GraphQL/REST APIs, authentication, analytics, and storage created by
the Amplify CLI. Note: This feature only works with the Amplify CLI v1.0+.
In this tutorial, we are going to create and deploy a React app which implements a basic authentication
flow for signing up/signing in users as well as protected client side routing using AWS Amplify.
• If you are using another frontend framework or Amplify backend category, the same steps can be
applied to deploying your backend and frontend with the Amplify Console. The final code for this
project is available as a sample on GitHub.
• If you already have an existing Amplify app, please jump to step 6.
1. Install the Amplify CLI to initialize a new Amplify project.
npm install -g @aws-amplify/cli
2. Initialize the CLI at the root of your project and name your environment prod. You can use the Amplify
CLI to add backend functionality to your app. Backend functionality includes all cloud categories such
as authentication, analytics, APIs, and storage.
create-react-app myapp
cd myapp
amplify init
Enter a name for the environment: prod
3. Add authentication with sign-in, sign-up, multi-factor auth to your app. Accept all defaults and push
the updated project configuration to AWS. It will deploy an Amazon Cognito resource that enables
user authentication.
amplify add auth
...
amplify push
4. Update your frontend code to add the withAuthenticator HOC component to your App.js as shown
here. Test your app locally to make sure you see a sign-in screen.
npm start
5. Commit your code and upload it to a Git provider of your choice (the Amplify Console supports
GitHub, BitBucket, GitLab, and AWS CodeCommit).
6. Log in to the Amplify Console and choose Get Started under Deploy. Connect your Git provider,
repository and branch and then choose Next.
7. The Amplify Console automatically detects that your repository has an Amplify backend. From the
dropdown, choose prod (the environment you just created with the CLI). This will cause the Console to
automatically update the prod backend anytime you commit changes to your repository.
25AWS Amplify Console User Guide
8. Choose Next and Save and deploy. Your app build will start by deploying the backend followed by the
frontend. Click on your branch name to see the running build. When your build succeeds, you should
be able to access your app.
26AWS Amplify Console User Guide
27AWS Amplify Console User Guide
Team workflows with Amplify CLI backend environments
Feature branch deployments and
team workflows
The Amplify Console is designed to work with feature branch and GitFlow workflows. The Amplify
Console leverages Git branches to create new deployments every time a developer connects a new
branch in their repository. After connecting your first branch, you can create a new feature branch
deployment by adding a branch as follows:
1. On the branch list page, choose Connect branch.
2. Choose a branch from your repository.
3. Save and then deploy your app.
Your app now has two deployments available at https://master.appid.amplifyapp.com and https://
dev.appid.amplifyapp.com. This may vary from team-to-team, but typically the master branch tracks
release code and is your production branch. The develop branch is used as an integration branch to test
new features. This way beta testers can test unreleased features on the develop branch deployment,
without affecting any of the production end users on the master branch deployment.
Team workflows with Amplify CLI backend
environments
A feature branch deployment can consist of a frontend and [(optionally) a backend](https://
docs.aws.amazon.com/amplify/latest/userguide/deploy-backend.html). The frontend is built and
deployed to a global CDN, while the backend is deployed by the Amplify CLI to AWS. You can use the
Amplify Console to continuously deploy backend resources such as GraphQL APIs and Lambda functions
with your feature branch deployment. You can use the following models to deploy your backend and
frontend with the Amplify Console:
Topics
• Feature branch workflow (p. 12)
28AWS Amplify Console User Guide
Feature branch workflow
• GitFlow workflow (p. 32)
• Per-developer sandbox (p. 32)
Feature branch workflow
• Create prod, test, and dev backend environments with the Amplify CLI.
• Map prod and test to master and develop branches.
• Teammates can use the dev backend environment to test against feature branches.
1. Install the Amplify CLI to initialize a new Amplify project.
npm install -g @aws-amplify/cli
2. Initialize a prod backend environment for your project. If you don't have a project, create one using
bootstrap tools like create-react-app or Gatsby.
create-react-app next-unicorn
cd next-unicorn
amplify init
? Do you want to use an existing environment? (Y/n): n
? Enter a name for the environment: prod
...
amplify push
3. Add test and dev backend environments.
amplify env add
? Do you want to use an existing environment? (Y/n): n
? Enter a name for the environment: test
...
amplify push
amplify env add
? Do you want to use an existing environment? (Y/n): n
? Enter a name for the environment: dev
29AWS Amplify Console User Guide
Feature branch workflow
...
amplify push
4. Push code to a Git repository of your choice (in this example we'll assume you pushed to master).
git commit -am 'Added dev, test, and prod environments'
git push origin master
5. Connect your repo > branch master to the Amplify Console.
6. The Amplify Console will detect backend environments created by the Amplify CLI. Choose prod from
the dropdown and grant the service role to Amplify Console. Choose Save and deploy. After the build
completes you will get a master branch deployment available at https://master.appid.amplifyapp.com.
7. Connect develop branch in Amplify Console (assume develop and master branch are the same at this
point). Choose the test backend environment.
30AWS Amplify Console User Guide
Feature branch workflow
8. The Amplify Console is now setup. You can start working on new features in a feature branch. Add
backend functionality by using the dev backend environment from your local workstation.
git checkout -b newinternet
amplify env checkout dev
amplify add api
...
amplify push
9. After you finish working on the feature, commit your code, create a pull request to review internally.
git commit -am 'Decentralized internet v0.1'
git push origin newinternet
10.To preview what the changes will look like, go to the Console and connect your feature branch. Note:
If you have the AWS CLI installed on your system (Not the Amplify CLI), you can connect a branch
directly from your terminal. You can find your appid by going to App settings > General > AppARN:
arn:aws:amplify:::apps/
aws amplify create-branch --app-id --branch-name
aws amplify start-job --app-id --branch-name --job-type RELEASE
11.Your feature will be accessible at https://newinternet.appid.amplifyapp.com to share with your
teammates. If everything looks good merge the PR to the develop branch.
git checkout develop
git merge newinternet
git push
12.This will kickoff a build that will update the backend as well as the frontend in the Amplify Console
with a branch deployment at https://dev.appid.amplifyapp.com. You can share this link with internal
stakeholders so they can review the new feature.
31AWS Amplify Console User Guide
GitFlow workflow
13.Delete your feature branch from Git, Amplify Console, and remove the backend environment from the
cloud (you can always spin up a new one based on by running 'amplify env checkout prod' and running
'amplify env add').
git push origin --delete newinternet
aws amplify delete-branch --app-id --branch-name
amplify env remove dev
GitFlow workflow
GitFlow uses two branches to record the history of the project. The master branch tracks release code
only, and the develop branch is used as an integration branch for new features. GitFlow simplifies parallel
development by isolating new development from completed work. New development (such as features
and non-emergency bug fixes) is done in feature branches. When the developer is satisfied that the code
is ready for release, the feature branch is merged back into the integration develop branch. The only
commits to the master branch are merges from release branches and hotfix branches (to fix emergency
bugs).
The diagram below shows a recommended setup with GitFlow. You can follow the same process as
described in the feature branch workflow section above.
Per-developer sandbox
• Each developer in a team creates a sandbox environment in the cloud that is separate from their local
computer. This allows developers to work in isolation from each other without overwriting other team
members' changes.
• Each branch in the Amplify Console has its own backend. This ensures that the Amplify Console uses
the Git repository as a single source of truth from which to deploy changes, rather than relying on
developers on the team to manually push their backend or front end to production from their local
computers.
32AWS Amplify Console User Guide
Per-developer sandbox
1. Install the Amplify CLI to initialize a new Amplify project.
npm install -g @aws-amplify/cli
2. Initialize a kita backend environment for your project. If you don't have a project, create one using
bootstrap tools like create-react-app or Gatsby.
cd next-unicorn
amplify init
? Do you want to use an existing environment? (Y/n): n
? Enter a name for the environment: kita
...
amplify push
1. Push code to a Git repository of your choice (in this example we'll assume you pushed to master).
git commit -am 'Added kita sandbox'
git push origin master
2. Connect your repo > master to the Amplify Console.
33AWS Amplify Console User Guide
Per-developer sandbox
3. The Amplify Console will detect backend environments created by the Amplify CLI. Choose Create
new environment from the dropdown and grant the service role to Amplify Console. Choose Save
and deploy. After the build completes you will get a master branch deployment available at https://
master.appid.amplifyapp.com with a new backend environment that is linked to the branch.
4. Connect develop branch in Amplify Console (assume develop and master branch are the same at this
point) and choose Create new environment. After the build completes you will get a develop branch
deployment available at https://develop.appid.amplifyapp.com with a new backend environment that
is linked to the branch.
34AWS Amplify Console User Guide
Add 'Deploy to Amplify Console'
button to your repository or blog
Deploy to Amplify Console Button
The Deploy to Amplify Console button enables you to share GitHub projects publicly or within your
team. The button looks like:
Add 'Deploy to Amplify Console' button to your
repository or blog
Add this button to your GitHub README.md file, blog post, or any other markup page that renders
HTML. The button has two components:
1. An SVG image: https://oneclick.amplifyapp.com/button.svg
2. The Amplify Console URL with a link to your GitHub repository. Please copy your repo URL (e.g.
https://github.com/username/repository) only or provide a deep link into a specific folder
(e.g. https://github.com/username/repository/tree/master/folder). The Amplify
Console will deploy the default branch in your repository. Additional branches can be connected after
the app is connected.
3. Add the button to a markdown file (e.g. your GitHub README.md). Please replace https://
github.com/username/repository with your repository name.
[](https://
console.aws.amazon.com/amplify/home#/deploy?repo=https://github.com/username/repository)
1. You can also add the button to any HTML document:
35AWS Amplify Console User Guide
Types of Redirects
Using Redirects
Redirects enable a web server to reroute navigation from one URL to another. Common reasons for
using redirects include: to customize the appearance of URL, to avoid broken links, to move the hosting
location of an app or site without changing its address, and to change a requested URL to the form
needed by a web app.
Types of Redirects
There are several types of redirects that support specific scenarios.
Permanent redirect (301)
301 redirects are intended for lasting changes to the destination of a web address. Search engine ranking
history of the original address applies to the new destination address. Redirection occurs on the client-
side, so a browser navigation bar shows the destination address after redirection. Common reasons to
use 301 redirects include:
• To avoid a broken link when the address of a page changes.
• To avoid a broken link when a user makes a predictable typo in an address.
Temporary redirect (302)
302 redirects are intended for temporary changes to the destination of a web address. Search engine
ranking history of the original address doesn't apply to the new destination address. Redirection occurs
on the client-side, so a browser navigation bar shows the destination address after redirection. Common
reasons to use 302 redirects include:
• To provide a detour destination while repairs are made to an original address.
• To provide test pages for A/B comparison of user interface.
Rewrite (200)
200 redirects (rewrites) are intended to show content from the destination address as if it were served
from the original address. Search engine ranking history continues to apply to the original address.
Redirection occurs on the server-side, so a browser navigation bar shows the original address after
redirection. Common reasons to use 200 redirects include:
• To redirect an entire site to a new hosting location without changing the address of the site.
• To redirect all traffic to a single page web app (SPA) to its index.html page for handling by a client-side
router function.
Not Found (404)
404 redirects occur when a request points to an address that doesn't exist. The destination page of a 404
is displayed instead of the requested one. Common reasons a 404 redirect occurs include:
• To avoid a broken link message when a user enters a bad URL.
• To point requests to nonexistent pages of a web app to its index.html page for handling by a client-
side router function.
36AWS Amplify Console User Guide
Parts of a Redirect
Parts of a Redirect
Redirects consist of the following:
• An original address - The address the user requested.
• A destination address - The address that actually serves the content that the user sees.
• A redirect type - Types include a permanent redirect (301), a temporary redirect (302), a rewrite (200),
or not found (404).
• A two letter country code (optional) - a value you can include to segment the user experience of your
app by region
To create and edit redirects, choose Rewrites and redirects settings in the left navigation pane.
To bulk edit redirects in a JSON editor, choose Open text editor.
Order of Redirects
Redirects are executed from the top of the list down. Make sure that your ordering has the effect you
intend. For example, the following order of redirects causes all requests for a given path under /docs/ to
redirect to the same path under /documents/, except /docs/specific-filename.html which redirects to /
documents/different-filename.html:
/docs/specific-filename.html /documents/diferent-filename.html 301
/docs/ /documents/
The following order of redirects ignores the redirection of specific-filename.html to different-
filename.html:
/docs/ /documents/
/docs/specific-filename.html /documents/diferent-filename.html 301
37AWS Amplify Console User Guide
Simple Redirects and Rewrites
Simple Redirects and Rewrites
In this section we include example code for common redirect scenarios.
You can use the following example code to permanently redirect a specific page to a new address.
Original address Destination Address Redirect Type Country Code
/original.html /destination.html permanent redirect
(301)
JSON: [{"source": "/original.html", "status": "301", "target": "/destination.html", "condition": null}]
You can use the following example code to redirect any path under a folder to the same path under a
different folder.
Original address Destination Address Redirect Type Country Code
docs/ /documents/ permanent redirect
(301)
JSON [{"source": "/docs/", "status": "301", "target": "/documents/", "condition": null}]
You can use the following example code to redirect all traffic to index.html as a rewrite. In this scenario,
the rewrite makes it appear to the user that they have arrived at the original address.
Original address Destination Address Redirect Type Country Code
/index.html rewrite (200)
JSON [{"source": "/", "status": "200", "target": "/index.html", "condition": null}]
You can use the following example code to use a rewrite to change the subdomain that appears to the
user.
Original address Destination Address Redirect Type Country Code
https:// https:// rewrite (200)
mydomain.com www.mydomain.com
JSON [{"source": "https://mydomain.com", "status": "200", "target": "https://www.mydomain.com", "condition": null}]
You can use the following example code to redirect paths under a folder that can't be found to a custom
404 page.
Original address Destination Address Redirect Type Country Code
/ /404.html not found (404)
38AWS Amplify Console User Guide
Redirects for Single Page Web Apps (SPA)
JSON [{"source": "/", "status": "404", "target": "/404.html", "condition": null}]
Redirects for Single Page Web Apps (SPA)
Most SPA frameworks support HTML5 history.pushState() to change browser location without triggering
a server request. This works for users who begin their journey from the root (or /index.html), but fails
for users who navigate directly to any other page. Using regular expressions, the following example sets
up a 200 rewrite for all files to index.html except for the specific file extensions specified in the regular
expression.
Original address Destination Address Redirect Type Country Code
JSON [{"source": "", "status": "200", "target": "index.html",
"condition": null}]
Reverse Proxy Rewrite
The following example uses a rewrite to proxy content from another location so that it appears to user
that the domain hasn't changed:
Original address Destination Address Redirect Type Country Code
/images https:// rewrite (200)
images.otherdomain.com
JSON [{"source": "/images", "status": "200", "target": "https://images.otherdomain.com", "condition": null}]
Trailing slashes and Clean URLs
To create clean URL structures like about instead of about.html, static site generators such as
Hugo generate directories for pages with an index.html (/about/index.html). The Amplify Console
automatically creates clean URLs by adding a trailing slash when required. The table below highlights
different scenarios:
User inputs in browser URL in the address bar Document served
/about /about /about.html
/about (when about.html /about/ /about/index.html
returns 404)
/about/ /about/ /about/index.html
39You can also read