TEACHER TRAINING GUIDE - On Demand Testing VCAA ASSESSMENT ONLINE - May 2013
←
→
Page content transcription
If your browser does not render page correctly, please read the page content below

VCAA ASSESSMENT ONLINE

On Demand Testing

   TEACHER
TRAINING GUIDE

          May 2013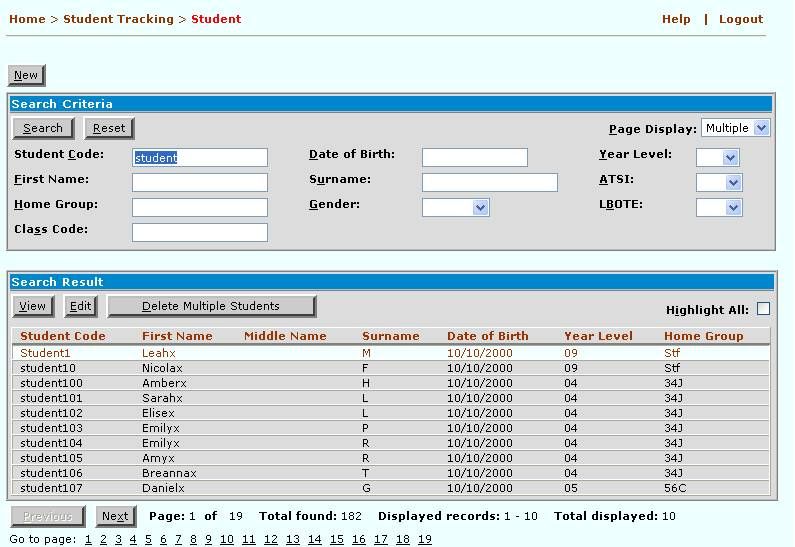
ON DEMAND TESTING TEACHER TRAINING GUIDE 2013 APRIL
(This page has been intentionally left blank)
1 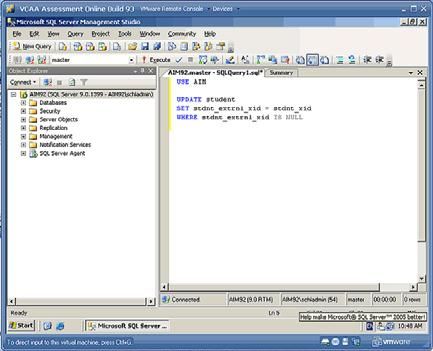
ON DEMAND TESTING TEACHER TRAINING GUIDE 2013 APRIL
CONTENTS
SECTION 1 - INTRODUCTION 4
1.1 Overview 4
1.2 The Central Server 5
1.3 The School Server 5
1.4 Types of On Demand Assessments 5
1.4.1 Linear Tests 6
1.4.2 Progress Tests 7
1.4.3 Computer Adaptive Tests 7
1.4.4 Interpreting On Demand Reports 8
1.5 Technical Requirements 8
1.5.1 On Demand Server Requirements 8
1.5.2 On Demand Workstation Requirements 9
1.6 Useful Information & Contacts 10
SECTION 2 – THE CENTRAL SERVER 11
2.1 Logging On 11
2.2 Searching for Tests 13
2.3 Linear Tests 14
2.3.1 Previewing Linear Tests 14
2.3.2 Printing a Preview of a Linear Test 16
2.3.3 Downloading a Linear Test 16
2.3.4 Downloading Progress Tests as a PDF 17
2.4 Previewing & Downloading Adaptive Tests 17
2.4.1 Previewing an Adaptive Test 17
SECTION 3 – THE SCHOOL SERVER 19
3.1 Logging On 19
3.2 User Types 21
3.2.1 Creating Users 21
3.2.2 Resetting Users 23
3.3 Managing Existing Students 24
2 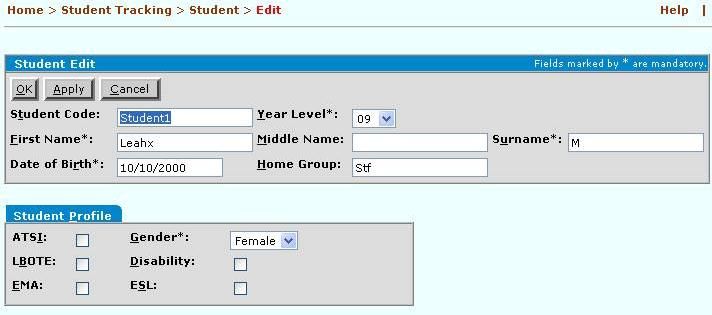
ON DEMAND TESTING TEACHER TRAINING GUIDE 2013 APRIL
3.3.1 Viewing an Existing Student 24
3.3.2 Editing an Existing Student 25
3.4 Creating New Students 26
3.4.1 Manually Creating a New Student 26
3.4.2 Un-Deleting Students 27
3.4.3 Importing Student Details 28
3.4.4 Import Problems 32
3.4.5 Confirming the success of the Import 36
3.5 Maintaining Classes 37
3.5.1 Creating classes 37
3.5.2 Assigning students to a class 38
3.6 Creating a Test Session 39
3.7 Logging Students into a test 42
3.8 Completing a test 43
3.9 Interrupting a test 44
3.10 Generating Reports 46
SECTION 4 - INTERPRETING ON DEMAND REPORTS 50
4.1 Estimated AusVELS Standard Scores 50
4.2 Using Computer Adaptive Tests 50
SECTION 5 - FREQUENTLY ASKED QUESTIONS AND TROUBLESHOOTING 53
5.1 Frequently Asked Questions 53
5.2 Allowing Pop-ups 54
5.2.1 Microsoft Internet Explorer 54
5.2.2 Norton Internet Security / Personal Firewall 56
5.3 Unauthorised Access error message 56
5.4 Setting Trusted Sites 58
5.5 Setting Compatibility View on Internet Explorer 10 60
3 
ON DEMAND TESTING TEACHER TRAINING GUIDE 2013 APRIL
Section 1 - Introduction
1.1 Overview
On Demand Testing is an online resource for teachers to use
when, where and how they choose. Tests can be administered
to a whole class or to individual students.
The current pool of questions reflects the Australian Curriculum
in Victoria - AusVELS.
Schools can use the On Demand Testing Program to:
Pre-test students prior to the beginning of a topic,
Applying the same test at the conclusion of a topic,
Testing new students,
Corroborating teacher judgements,
Assisting in forward planning of teaching programs,
Identifying the strengths or weaknesses of individual
students.
As the assessment tasks are marked by the computer there is
immediate feedback on the computer generated class and
individual student reports.
There are two components to the VCAA Assessment Online
application – the Central Server and the School Server (see
Figure 1.1).
Non Government School
?
Teacher @ Home
School Server
The Internet
Central Server
Router separates Admin
and Curriculum networks CASES Server
but allows through:
Port 80 to 10.x.y.23
Vic Smart
(Which is required for On
Demand to work)
Admin Network
DEECD VCAA
Curriculum
Network Government School
Figure 1.1 - VCAA Assessment Online
4 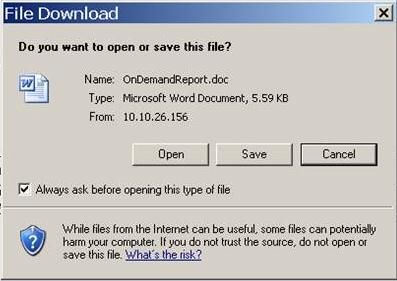
ON DEMAND TESTING TEACHER TRAINING GUIDE 2013 APRIL
1.2 The Central Server
The Central Server is essentially a database that stores the tests
the VCAA has created for the On Demand Testing. The Central
Server is available via the internet and is accessed from the
following web address: http://www.aimonline.vic.edu.au
Each school is provided with a unique username and password
for the VCAA Central Server.
Schools log into the Central Server to search, preview and
download tests. Contact the VCAA On Demand helpdesk if
you do not have the appropriate login for this site (see Section
1.6).
The Central Server home page is peach in colour.
1.3 The School Server
The School Server is the other component of On Demand
Testing. The school is required to install software on a
compatible server at the school. This software is supplied free
by the VCAA. In government schools, this software is installed
on the CASES21 Server. Once this software has been installed
and configured, schools can download tests from the VCAA
Central Server.
The School Server operates on the school’s local network and
relies on the internet only for downloading tests from the
VCAA Central Server. Once the software is installed and
configured, a dedicated website address is used to access the
application within the school’s network via an Internet Explorer
browser. The address for the School Server homepage is unique
in each school but will consist of four groups of digits, for
example: http://10.10.27.23.
Teachers and students access the School Server application and
sit the tests within the school’s local area network (LAN) and
do not rely on the internet during this time. In government
schools, the School Server is accessible from the Curriculum
Network even though the server resides on the CASES server
on the Administration Network.
Tests that are downloaded remain permanently on the School
Server. You will need to import student details and create user
accounts for other teachers at your school before you start
testing online.
The School Server home page is blue in colour.
1.4 Types of On Demand Assessments
The On Demand Testing system is capable of providing two
types of assessment instruments designed to provide different
approaches to evaluation of a student’s ability:
Linear Tests,
Computer Adaptive Tests.
5 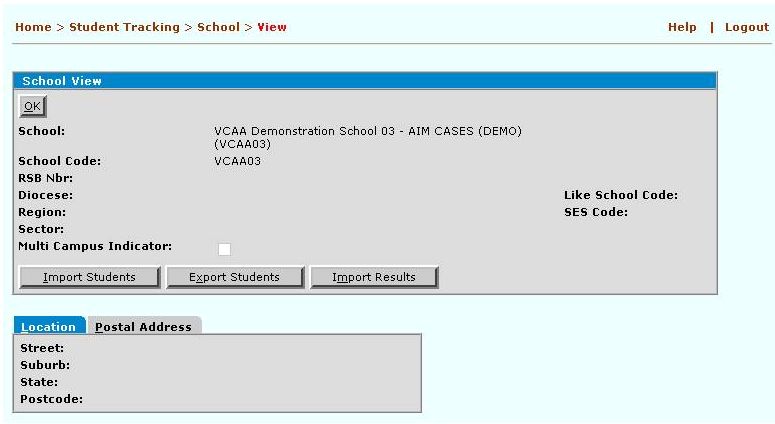
ON DEMAND TESTING TEACHER TRAINING GUIDE 2013 APRIL
Tests use a variety of question formats:
Multiple choice,
Type in short answer,
Hot spot,
Drag and drop,
Mathematical calculator,
Open text response.
All tests administered online are automatically marked, and
provide immediate feedback on student results via a number of
computer generated reports.
Only the English and Mathematics domains are currently
available.
All tests have the same Tutorial section at the beginning of the
test which cannot be deactivated.
All test items in the On Demand system have been calibrated to
the AusVELS curriculum and expected learning outcomes. For
more information about curriculum and learning outcomes visit
the VCAA web site at: http://ausvels.vcaa.vic.edu.au/
1.4.1 Linear Tests
NOTE: THERE ARE NO LINEAR TESTS AVAILABLE AT
THIS TIME
A standard linear test is a test which has a set number of
questions using a variety of question types. All students are
presented with the same questions in the same order during the
test.
Student responses are saved and stored by the computer and
teachers are able to view and analyse the results at a student,
class or question level.
When a student sits a standard linear test, they will have a [Next
Question], [Previous Question], and a [Summary List] button
from which they can navigate their way through the test (see
Figure 1.2).
Figure 1.2 – A Standard Linear Test
6 
ON DEMAND TESTING TEACHER TRAINING GUIDE 2013 APRIL
The student’s score of correctly answered questions can be
displayed to the student at the end of the test if this option has
been selected when the Session Key is created.
1.4.2 Progress Tests
A Progress Test is a type of linear test that were designed to
measure outcomes around the expected Victorian Essential
Learning Standards (VELS) range for a given year level.
Results from these tests provide an estimated VELS Progression
Point score that can be used to corroborate teacher judgment in
the specific area assessed. Progress Tests are available in
Reading and Number for Years 3 to 8.
PDF copies of the VELS Progress Tests are available and
can be downloaded from the VCAA website to be
administered as pencil and paper tests. A marking rubric and
VELS translation table is provided for teachers with the PDF
version of these tests.
With the transition from the VELS to the AusVELS
Curriculum, the Progress Tests are no longer available
through the On Demand system.
1.4.3 Computer Adaptive Tests
Computer Adaptive Tests deliver sets of questions to students
that vary according to the student’s ability. Depending on the
responses given in previous questions, the system presents
progressively easier or more difficult questions to the student
(see Figure 1.3). As the student progresses through the test they
will be presented with a unique variety of questions to suit their
ability.
Figure 1.3 –Adaptive Test Roadmap – AusVELS Range:L = Low, U= Upper
* The system contains general Adaptive Tests containing 60
questions and single strand tests of 30 questions.
* Adaptive Tests take about 15 to 30 minutes to complete and
have a time out function e.g., each question is presented to the
student for a variable period of time, i.e., 60, 90 or 120 seconds
depending on the difficulty of the question.
7 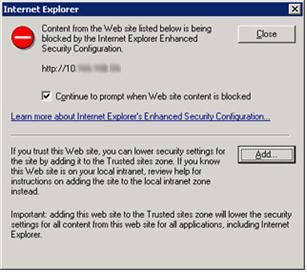
ON DEMAND TESTING TEACHER TRAINING GUIDE 2013 APRIL
* Due to the nature of Adaptive Tests, it is NOT possible to go
back to previous questions to change or review responses.
Students can only move forward to the next question (see Figure
1.4).
* Adaptive Test reports provide an estimated AusVELS ability
score for the performance of the students.
* Interpreting Computer Adaptive Test reports is discussed in
Section 4. Further information about the composition of
adaptive tests, including interpreting results and reports, is also
available in a downloadable PDF document from the VCAA
website.
* If a student skips a question or the question times out before
they have given a response, then that question will be marked as
incorrect.
Figure 1.4 -An Adaptive test.
1.4.4 Interpreting On Demand Reports
* As with any assessment instrument, a single On Demand test
cannot provide a definitive summary of a student’s ability in
any given subject area. The tests are intended to be used in
conjunction with other classroom assessments and should not be
used in isolation. See Section 4 for further details.
1.5 Technical Requirements
1.5.1 On Demand Server Requirements
* For Government Schools, the On Demand School Server is
hosted on the CASES21 Server which has been pre-configured
and deployed to also support On Demand Testing.
* For Non-Government Schools, the On Demand School Server
can be hosted on any Hyper-V host server. The VM will require
the following resources:
2 Virtual CPU Cores,
512Mb RAM minimum with a maximum of 2048Mb
10GB Hard Drive space available for VM Image with
60GB maximum growth,
* All software contained within the VM so no additional
installation is required, however schools will need to have their
8 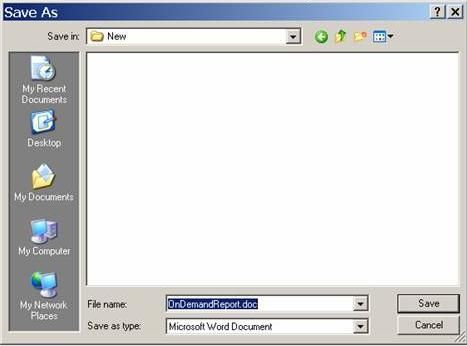
ON DEMAND TESTING TEACHER TRAINING GUIDE 2013 APRIL
own licenses for the software as per the disclaimer signed when
requesting the VM Image. Government schools are covered by
the DEECD licensing policies.
* The school server needs to be able to access the VCAA
Assessment Online Central Server site through the Internet.
* The On Demand Server requires the following software:
Microsoft Hyper-V role on Server 2008 R2 SP1 or greater
1.5.2 On Demand Workstation Requirements
* The On Demand tests can be accessed from any PC in the
school that has network access to the On Demand School
Server. The workstations require:
Microsoft XP and above,
Microsoft Internet Explorer (IE) 6 and above,
ActiveX Controls and Plug-ins,
Macromedia Flash Plug-in.
* Macintosh computers can only be used if they have a dual
emulator eg: start up in a Microsoft Windows and Internet
Explorer environment.
* On Demand Test cannot be accessed from IPad or other hand
held devices.
9 ON DEMAND TESTING TEACHER TRAINING GUIDE 2013 APRIL
1.6 Useful Information & Contacts
* The Victorian Curriculum and Assessment Authority (VCAA)
have a helpdesk for schools that can be accessed using a free
call telephone service or by email. A list of useful information
can be found in Table 1.
Information Available source
VCAA On Demand web site http://www.vcaa.vic.edu.au/prep10/ondemand/index.html
On Demand Central Server web site http://www.aimonline.vic.edu.au
School Registration for On Demand https://registration.vcaa.vic.edu.au/school/eoilogin.asp
VCAA website http://www.vcaa.vic.edu.au/
Table 1 – Useful Information
* The On Demand Testing Help Desk can be contacted on:
Phone 1800 827 721
Fax (03) 9032 1590
Email vcaa.ondemand.support@edumail.vic.gov.au
* For information on the interpretation of reports contact the On
Demand Testing Manager: Phone (03) 9225 2369
10 ON DEMAND TESTING TEACHER TRAINING GUIDE 2013 APRIL
Section 2 – The Central Server
2.1 Logging On
* The VCAA Assessment Online Central Server is where School
Administrators and Teachers can go to search, preview and
download On Demand Tests. The Central Server is accessed via
the internet. Each school is supplied with a unique User ID and
Password for the VCAA Central Server.
1. Open Internet Explorer.
2. Enter http://www.aimonline.vic.edu.au in the Address field and
press the [Enter] key. The VCAA Assessment Online Central
Server homepage will appear (see Figure 2.1).
Figure 2.1 - VCAA Assessment Online – On Demand Testing homepage.
3. Click on the On Demand Testing link on this page to get to the
homepage for the On Demand program (see Figure 2.2).
11 ON DEMAND TESTING TEACHER TRAINING GUIDE 2013 APRIL
Figure 2.2 - On Demand home page
4. Click on the On Demand Testing Login link under Teachers and
Administrators and the following login window will appear (see
Figure 2.3).
Figure 2.3 - Login window
5. Enter the User ID and Password supplied and click on the
[Login] button. This will take you to the Home menu (see
Figure 2.4). Passwords are case sensitive.
Figure 2.4 - VCAA Central Server Home menu
12 ON DEMAND TESTING TEACHER TRAINING GUIDE 2013 APRIL
2.2 Searching for Tests
1. To display the Download Test Search window select: Test
Bank Download Test Public (see Figure 2.5).
Figure 2.5 - Search Criteria window
* From the Download Test Search window you can narrow down
your search by:
Selecting a Domain menu (English or Mathematics), and/or
Selecting or entering other criteria in the Search Criteria
section, such as:
o Year Level,
o Progress Test (yes or no) – Progress Tests are a type of
linear test,*
o Test Flow (adaptive or linear)*.
*Note – there are no linear or progress tests available at this time
2. Enter the required Search Criteria and click on the [Search]
button. A Search Result list will appear with a list of tests
matching the parameters entered (see Figure 2.6).
3. To start a new search click on the [Reset] button.
* If no tests appear in the Search Result list, the criteria you have
selected maybe too narrow.
* The Test Flow column indicates which tests are ‘Linear’ or
‘Adaptive’.
13 ON DEMAND TESTING TEACHER TRAINING GUIDE 2013 APRIL
Figure 2.6 - Test Search Results list with both Linear & Adaptive tests.
2.3 Linear Tests
* NOTE: THERE ARE NO LINEAR TESTS AVAILABLE AT
THIS TIME
2.3.1 Previewing Linear Tests
* Standard Linear Tests and Progress Tests are both types of
Linear Tests.
* The Linear Test View lists details of all the questions contained
within a test such as the dimension, key area, skill and standard
level of the question.
1. To preview a test, highlight the required test from the Search
Result list and then click on the [View] button. The Linear Test
View screen will appear containing information about the test
you have selected (see Figure 2.7).
14 ON DEMAND TESTING TEACHER TRAINING GUIDE 2013 APRIL
Figure 2.7 - Linear Test View window
2. Left click on the [Preview] button. This enables you to preview
the actual questions that will be presented to the students when
they sit the linear test (see Figure 2.8).
Figure 2.8 - Preview of a linear test
15 ON DEMAND TESTING TEACHER TRAINING GUIDE 2013 APRIL
2.3.2 Printing a Preview of a Linear Test
* It is possible to print the preview of linear tests.
1. While in the preview mode, go to the File menu in the top left
hand corner of your screen and select the Print option from the
drop down menu.
2. Select your printing requirements and click on the [Print]
button.
3. Scroll to the end of the Test Preview window and click on the
[OK] button to close the window and be returned to the
previous screen.
* An Answer Sheet is also available from the Linear Test View
window and can be printed by clicking on the [Answer Sheet]
button.
2.3.3 Downloading a Linear Test
1. To download a selected test, click on the [Download] button
from the Linear Test View page.
2. A message box will appear to advise that the download has been
successfully queued (see Figure 2.9). Click on the [OK] button
to close the message box.
* The request for the download will be placed in a queue and the
test will be downloaded to your school. This occurs in the
background and you do not have to wait for the process to
occur. You can proceed to search, view and download other
tests. The test should take much less than 45 minutes to
download as the School Server in your school and the Central
Server communicate with each other every 15 minutes.
Figure 2.9 - Message Box
3. To return to the Search Criteria window and continue to search,
view and download other tests click on the [OK] button at the
top of the Linear Test View screen (see Figure 2.7).
16 ON DEMAND TESTING TEACHER TRAINING GUIDE 2013 APRIL
2.3.4 Downloading Progress Tests as a PDF
* With the transition from the VELS to the AusVELS
Curriculum, the Progress Tests are no longer available through
the On Demand system.
* PDF copies of the VELS Progress Tests are available and can
be downloaded from the VCAA website and can be
administered as pencil and paper tests. A marking rubric and
VELS translation table is provided for teachers with the PDF
version of these tests.
2.4 Previewing & Downloading Adaptive Tests
* Adaptive tests can only be administered online and therefore
cannot be printed or previewed.
2.4.1 Previewing an Adaptive Test
1. Select an Adaptive test from the Search Result list and click on
the [View] button. The Adaptive Test View screen will appear
containing information about the test you have selected (see
Figure 2.13).
Figure 2.13 - Adaptive Test View screen.
* The Adaptive Test View does not show details of the test
questions. There is no option to preview any of the questions, so
there is no preview button for these tests.
* Answer Sheets are not available for Adaptive tests.
2. To download the selected test, click on the [Download] button
from the Adaptive Test View page (see Figure 2.13).
3. A message box will appear to advise that the download has been
successfully queued (see Figure 2.9). Click on the [OK] button
to close the message box.
* The request for the download will be placed in a queue and the
test will be downloaded to your school. This occurs in the
background and you do not have to wait for the process to
occur. You can proceed to search, view and download other
tests. The test should take much less than 45 minutes to
17 ON DEMAND TESTING TEACHER TRAINING GUIDE 2013 APRIL
download as the School Server in your school and the Central
Server communicate with each other every 15 minutes.
4. From the Adaptive Test View window, click on the [OK] button
to return to the Search Criteria window and continue to search,
view and download other tests.
18 ON DEMAND TESTING TEACHER TRAINING GUIDE 2013 APRIL
Section 3 – The School Server
3.1 Logging On
* The School Server IP address should be placed as a favourite or
a link on the school’s intranet for easy access by students and
teachers.
1. On a workstation open Internet Explorer.
2. Enter the On Demand School Server IP Address. Typically this
address will be 10.x.y.23 for Government schools. The values
of x and y will be unique to each school. The School Server
Homepage will appear (see Figure 3.1).
Figure 3.1 – School Server Homepage.
1. If you are prompted with a security warning (see Figure 3.2)
then it is advised to add this site as a trusted site. This will
avoid further security warnings from this site. To set a Trusted
Site see the ‘Setting a Trusted Site’ see Section 5.5.
19 ON DEMAND TESTING TEACHER TRAINING GUIDE 2013 APRIL
Figure 3.2 – Security warning.
2. On the School Server Homepage click on ‘Administrative
System (authorised users only)’ link. The login screen will
appear (see Figure 3.3).
Figure 3.3 – The Log in Screen.
3. Enter the School Server User ID and the Password. School
Server login details are provided to each school on registration.
Contact the helpdesk if you do not have these details.. The
School Server main Menu will be displayed (see Figure 3.4).
Figure 3.4 – School Server main menu.
20 ON DEMAND TESTING TEACHER TRAINING GUIDE 2013 APRIL
3.2 User Types
* On Demand security is role-based, allowing access to
assessment material and results only to those with appropriate
access authority. Students cannot access the assessment items,
other than by undertaking the assessment.
* As an added security measure, the marking mechanisms are
isolated from assessments and are protected.
* There are only two valid user types:
School Administrator
Teacher
* Both roles can set up test sessions and view reports on student
test results.
* The School Administrator Role has additional functions to the
Teacher Role on the School Server. This includes importing
and maintaining student details and managing users. It is
recommended that schools have more than one School
Administrator as this role is also able to reset users if required.
* Only the Teacher user can create new classes so a School
Administrator needs to assign both roles to their login.
3.2.1 Creating Users
* When creating user accounts for teachers on the School Server,
the Login ID must be unique. One suggestion is to use DEECD
Employee Number or PIN codes as this is something that
teachers will easily remember. The password may be set as
‘password’ in the first instance and then teachers should be
advised to change their password when they first log in.
* Users can be assigned either a ‘Teacher’ role or a ‘School
Administrator’ role or both as required.
1. To create a new user, go to: Home Security Users (see
Figure 3.5).
Figure 3.5 – Users Search Criteria screen.
2. Left click on the [New] button. This will open the User Edit
window (see Figure 3.6).
21 ON DEMAND TESTING TEACHER TRAINING GUIDE 2013 APRIL
Figure 3.6 – New User Edit window
3. The following information is required to create a new user (see
Table 2).
Field Information
Logon Id User ID
First Name User’s first name
Middle Name User’s middle name (optional)
Surname User’s family name
Source Select ‘School’ from dropdown list
Password User’s password (mandatory when creating a user)
Confirm Password User’s password (mandatory when creating a user)
School User’s school
Role Select one or more roles for the user
Table 2 – Information required when creating a new User
4. Enter the required information in each field. Click on the
button to open the School Search window.
5. Click on the [Search] button to display the school name and the
click on the [Select] button.
6. To select the role click on the [Add] button. Multiple roles can
be selected by clicking on the [Add] button again. Click on the
[OK] button to save the data.
22 ON DEMAND TESTING TEACHER TRAINING GUIDE 2013 APRIL
3.2.2 Resetting Users
* As a security measure a user is deactivated after three failed log
in attempts.
1. To reset a user, go to: Home Security Users (see Figure
3.5).
2. Either enter details in the Search Criteria window to find a
specific user or leave blank to find all users. Click on the
[Search] button. A list of users will be displayed matching the
search criteria (see Figure 3.7).
Figure 3.7 - Users Search Result list
3. Highlight the required user and click on the [View] button. The
User View window will be displayed (see Figure 3.8).
Figure 3.8 - User View window.
23 ON DEMAND TESTING TEACHER TRAINING GUIDE 2013 APRIL
4. The number of Logon Attempts will be a number greater than 3.
Click on the [Make Active] button to reset the user (see Figure
3.8). The Logon Attempts will change back to 0 and the user is
re-activated.
3.3 Managing Existing Students
3.3.1 Viewing an Existing Student
1. To view a student, go to: Home Student Tracking
Student.
2. Enter the search criteria that will locate the required student and
click on the [Search] button.
3. A list of students who meet the search criteria will be displayed
(see Figure 3.9).
Figure 3.9 – Student Search Result screen.
4. Highlight the required student and click on the [View] button.
The student details will be displayed (see Figure 3.10).
24 ON DEMAND TESTING TEACHER TRAINING GUIDE 2013 APRIL
Figure 3.10 – Student View screen.
3.3.2 Editing an Existing Student
1. To edit an existing student, go to: Home Student Tracking
Student.
2. Enter the search criteria that will locate the required student and
click on the [Search] button.
3. Select the required student and then click on the [Edit] button.
The Student Edit screen will be displayed (see Figure 3.11).
Figure 3.11 – Student Edit screen.
4. Make the required changes and click on the [OK] button to save
the record.
25 ON DEMAND TESTING TEACHER TRAINING GUIDE 2013 APRIL
3.4 Creating New Students
* New students can be created:
Manually, or by
Import.
3.4.1 Manually Creating a New Student
1. To create a new student manually, go to: Home Student
Tracking Student.
2. Click on the [New] button to display the New Student Edit
screen (see Figure 3.12).
Figure 3.12 – Student Edit screen.
3. Enter the required information for the student. Fields marked
with an asterisk are mandatory.
4. Click on the [OK] button to save the record.
If an error message appears “You have entered a record that
already exists or has been used” the student record may have
been deleted. (see figure 3.13)
26 ON DEMAND TESTING TEACHER TRAINING GUIDE 2013 APRIL
Figure 3.13 – Student Edit screen with error message
3.4.2 Un-Deleting Students
1. To un-delete a student, go to: Home Administration
Undelete student
2. Enter the student code and click on [Undelete]
3. A message will appear “The Student has been successfully
undeleted” (See figure 3.14)
Figure 3.14 – Undelete a Student screen
The student can now be found by going to Home Student
Tracking Student and searching by either the student name
or code.
27 ON DEMAND TESTING TEACHER TRAINING GUIDE 2013 APRIL
3.4.3 Importing Student Details
It is possible to import student details in bulk from student
management systems such as CASES or SAS, etc.
Student details can be imported by the School Administrator.
A student details import file must be a comma delimited text file
(CSV) containing the fields in Table 3.
The Import function can be used to create new students or to
update the details of existing students, e.g., Year Level.
Government Schools
Following the mid-year release of CASES in 2008, the On
Demand software now resides within Hyper-V on the
CASES server.
As a result of the CASES upgrade the [Sync From
CASES] function is no longer available and a new process
exists for importing Student details.
Government school technicians have access to a .vbs file
which extracts the student’s details out of CASES in the
correct format that can be saved and then imported into the
On Demand database. Technicians can obtain written
instructions from the On Demand Support help desk for
extracting the data. Contact details are provide in section
1.6 of this guide.
Non-Government Schools
Non-government schools can import student details using a
correctly formatted CSV file containing the fields specified
in Table 3.
This file may be created by extracting student data from the
school’s administrative package. It is essential that the
order and format of the data is correct. The file must be
saved in comma delimited (CSV) format. A sample of a
student import file is shown in Figure 3.15.
If a student has no data for a particular field and it is not a
mandatory field then the empty field must still exist in the
file. In other words the file must always contain 13 fields.
28 ON DEMAND TESTING TEACHER TRAINING GUIDE 2013 APRIL
FIELD IN THE FIELD ENTER THIS INFORMATION MANDATORY?
1 Student Code This is the unique student identifier, e.g., CASES ID Yes
2 First Name Student’s first name Yes
3 Middle Name Student’s middle name. If the student doesn’t have a middle No
name then you must still include the field, e.g. John Anderson
would be ,John, Anderson,
4 Surname Student’s surname Yes
5 Gender MALE for male and FEMAL for females Yes
Will also accept M, MALE, F , FEMALE values
6 Date of Birth Student’s birth date in: Yes
MMM dd yyyy format, e.g. Apr 3 1994, or
dd/mm/yyyy format, e.g. 24/03/1994
(Ensure PC is in Australian or United Kingdom date setting to
ensure date and month are not switched around inadvertently)
7 LBOTE 1 if the student has a language background other than English, Yes
Language 0 if not
Background Other Will also accept Y, Yes, T, True for 1
Than English Will also accept N, No, F, False for 0
8 ATSI 1 if the student is an Aboriginal or Yes
Aboriginal or Torres Torres Strait Islander, 0 if not
Strait Islander Will also accept Y, Yes, T, True for 1
Will also accept N, No, F, False for 0
9 Disability 1 if the student has a disability, 0 if not Yes
Will also accept Y, Yes, T, True for 1
Will also accept N, No, F, False for 0
10 EMAEducation 1 if the student is receiving the Education Yes
Maintenance Maintenance Allowance, 0 if not
Allowance Will also accept Y, Yes, T, True for 1
Will also accept N, No, F, False for 0
11 ESL 1 if English is the student’s second language, 0 if not Yes
English as a Second Will also accept Y, Yes, T, True for 1
Language Will also accept N, No, F, False for 0
12 Home Group Student’s home group. If empty then you must still include the No
field
13 Year Level Can be as 7, 8, 9 etc or with leading zeros ,i.e. 07, 08, 09 etc Yes
Table 3 – Format for Student Details Import File
Figure 3.15 - Sample Student Details Import file in the correct format
29 ON DEMAND TESTING TEACHER TRAINING GUIDE 2013 APRIL
1. To import students, go to: Home Student Tracking
School (see Figure 3.16).
Figure 3.16 – Search Criteria screen.
2. Click on the [Search] button to display the Search Results
Screen (see Figure 3.17).
Figure 3.17 – Search results screen.
3. Click on the [View] button to display the School View screen
(see Figure 3.17).
30 ON DEMAND TESTING TEACHER TRAINING GUIDE 2013 APRIL
Figure 3.18 – School View screen.
4. Click on [Import Students] button to display the Import
Students screen (see Figure 3.19).
Figure 3.19 – The Import Student Screen.
5. Click on the [Browse] button to display the Choose File screen.
Browse to the directory where you previously stored the CSV
file (see Figure 3.20).
Figure 3.20 – The Choose File Screen.
6. Select the desired CSV file and click on the [Open] button. The
Import Student screen will be displayed with the file path and
name in the File Name field (see Figure 3.21).
31 ON DEMAND TESTING TEACHER TRAINING GUIDE 2013 APRIL
Figure 3.21 – The Import Student screen with CSV file selected.
7. Click on the [Import] button. A confirmation screen will
appear. Click on the [OK] button (see Figure 3.22).
Figure 3.22 – The Confirmation screen.
8. If the import is successful, the School View window will be
displayed and the process will be complete.
9. Repeat process for all year levels required.
3.4.4 Import Problems
The import of students can fail for a number of reasons. The
most common of those can be fairly easily fixed.
1. If the import is unsuccessful, a File Download dialogue box will
appear (see Figure 3.23) and a log file will be produced
describing the reason for the import failing (see Figure 3.24).
Figure 3.23 - File Download dialogue box
Figure 3.24 – The Import Error Message.
32 ON DEMAND TESTING TEACHER TRAINING GUIDE 2013 APRIL
2. Common reasons for import errors are:
The file is not saved in comma delimited (CSV) format,
There are fields missing,
There are fields in the wrong order,
Field lengths are wrong,
Data formats of fields are wrong,
Columns still have their headings.
Two other possible reasons for the import to fail are detailed in
Table 4:
PROBLEM SOLUTION
Unable to save to database The problem is that the field stdnt_extrnl_xid does not match the
If the import fails with the message stdnt_xid field in the database and is causing errors. This can be
of: fixed fairly quickly but will require someone with administration
Import failed: Unable to save to access to the On Demand server, e.g., a school technician.
database ['You have entered a
record that already exists or has
1. Log into the On Demand server. Open “Query Analyser” and
been used.' (-2147220991)]
connect to (local) using Windows Authentication [On Demand
Followed by a series of failures VM, Start -> All Programs -> Microsoft SQL Server 2005 -
with message: >SQL Server Management Studio] (see Figure 1)
Import failed: Unable to save to
database ['Method '~' of object '~'
failed' (-2147220991)]
Figure 1 – Open SQL Management Studio.
33 ON DEMAND TESTING TEACHER TRAINING GUIDE 2013 APRIL
Figure 2 – Connect to SQL Server.
2. Click ‘Connect’
Figure 3 – Open a ‘New Query”
3. Enter the following SQL command in the Query window
EXACTLY as it appears below.
USE AIM
UPDATE student
SET stdnt_extrnl_xid = stdnt_xid
WHERE stdnt_extrnl_xid IS NULL
34 ON DEMAND TESTING TEACHER TRAINING GUIDE 2013 APRIL
Figure 4 – the new query exactly as written
1. Once you have entered the query, click on the red “!” symbol
to execute the query. Alternatively you can press [F5] on the
keyboard to execute the query.
2. You will see a confirmation along the lines of “(16 row(s)
affected)”.
3. Once you have done this exit from Query Analyser and try
the import again.
Duplicate student external XID The students name and/or date of birth has been changed in
The import fails with the message: CASES and no longer matches what is recorded in On Demand.
Import failed: Duplicate Student On Demand then thinks that you are trying to create a new
External Number XID student with the same ID as an existing student. Unfortunately
students with this error will have to be updated manually. Once
their name and date of birth match in both On Demand and
CASES then future imports will work without issue.
The most common cause of this problem is that a middle name
has been recorded for students where previously it was blank.
As with all import error messages the import has only failed for
the records shown in the error log, all other students will have
been imported successfully.
Table 4 – Causes of the Failure of an Import File
3. After rectifying the errors, re-import the Student Details.
35 ON DEMAND TESTING TEACHER TRAINING GUIDE 2013 APRIL
3.4.5 Confirming the success of the Import
1. To confirm the success of the import, go to: Home Student
Tracking Student (see Figure 3.26).
Figure 3.26 – The Search Criteria screen.
2. Either click on the [Search] button to display all students or
enter some information such as Year Level to filter the search.
3. Confirm that your students have imported (see Figure 3.27).
Figure 3.27 – The Search Criteria screen.
36 ON DEMAND TESTING TEACHER TRAINING GUIDE 2013 APRIL
3.5 Maintaining Classes
3.5.1 Creating classes
Classes can be set up for administrative purposes but students
can sit a test without being in a class.
Administrators must have the Teacher Role assigned to their
login to see the [New] button.
1. To create classes, go to: Home Student Tracking Class
(see Figure 3.28).
Figure 3.28 – The Class Search screen.
2. Click on the [New] button. The Class Edit screen will appear
(see Figure 3.29).
Figure 3.29 – The Class Edit screen.
3. Enter the following information:
Class Code, e.g. 7,
Class – description of class, e.g. Year 7,
Teacher – Click to open the User Search screen (see
Figure 3.30).
37 ON DEMAND TESTING TEACHER TRAINING GUIDE 2013 APRIL
Figure 3.30 – The User Search screen.
4. Either enter the teacher’s ID or click on the [Search] button to
list all the teachers. Highlight the required teacher and click on
the [Select] button.
5. To add a Domain, click on the [Add] button and select the
relevant Domain from the dropdown list.
3.5.2 Assigning students to a class
1. To add a student to the class, click on the [ADD] button to
display the Student Search Criteria screen (see Figure 3.31).
Figure 3.31 – The Student Search screen.
2. Either enter the student’s ID or click on the [Search] button to
list all the students. Highlight the required student and click on
the [Select] button.
3. When all the required students have been selected, click on the
[OK] button.
38 ON DEMAND TESTING TEACHER TRAINING GUIDE 2013 APRIL
3.6 Creating a Test Session
1. To create a test session, go to: Home Test Delivery
Public (see Figure 3.32).
Figure 3.32 – The Test Search screen.
If you do not select a domain or make a selection from the
Selection Criteria section, then all the tests that have been
downloaded to the school server at your school will be
displayed.
To narrow down your search you can:
Selecting a Domain menu (English or Mathematics), and/or
Selecting or entering other criteria in the Selection Criteria
section, such as, Year Level or Test Flow.
2. When you have made a selection, click on the [Search] button.
A Search Result list will appear with a list of tests with the
selection (highlight) defaulted to the top of the Search Results
list (see Figure 3.33).
39 ON DEMAND TESTING TEACHER TRAINING GUIDE 2013 APRIL
Figure 3.33 – The Test Search list.
If no tests appear in the Search Result list, then there are no tests
that match the selected criteria or the search criteria may be too
narrow. Click on the [Reset] button to start a new search.
3. From the Result List, highlight the required test and then click
on the [Sessions] button. If a test line is not selected, the
selection defaults to the top of the Search Results list. A
Session Key will be inadvertently created for the test at the top
of the search list. A Test Sessions Search window will appear
(see Figure 3.34).
Figure 3.34 – Test Sessions Search screen.
4. Left click on the [New] button. The Test Session Edit window
will appear (see Figure 3.35).
40 ON DEMAND TESTING TEACHER TRAINING GUIDE 2013 APRIL
Figure 3.35 - The Test Session Edit window.
5. When the required information has been entered in the Test
Session Edit screen (see Table 5) click on the [Apply] button.
(The first 3 fields are the only ones you will need to enter data
into to generate a session key.)
Field Description
Activation Date (mandatory) Defaults to the current date. Edit if desired.
Activation Time (mandatory) Defaults to the current time. Edit if desired.
Key Life (hours) (mandatory) The maximum Key Life is 9999 hours.
Test Session Length (Minutes) For Linear Tests only. Can be entered to control how long
students will have to do their test.
Raw Score Displayed Only available for linear tests. If checked will display the
raw score to the students at the completion of the test.
Raw Score by Dimension Displayed No longer applicable.
Enrolment Required This field should NOT be checked unless the students
have been enrolled in an On Demand class before the test
session.
Table 5 – Information Required for a Test Session.
6. A dialogue box will be displayed containing a session key (see
Figure 3.36). Note down the session key then click on the [OK]
button to close the dialogue box. The students require the
Session Key, their Student Code, Day and Month of birth in
order to log into a test.
Figure 3.36 – Session key dialogue box.
41 ON DEMAND TESTING TEACHER TRAINING GUIDE 2013 APRIL
7. Click on the [Cancel] button in the Test Session Edit window
(see Figure 3.35) to return to the Search Criteria screen. A list
of all Session Keys for this test including the one you have just
created (see Figure 3.35) will be displayed.
Figure 3.37 - Session Key list.
If the Session Key is copied and pasted from this Search Result
screen into a Word document and the font is then enlarged to
maximum, errors will be kept to a minimum. The 4 digit Test
number can also be added as it will be needed for generating
Reports.
Session Keys that have expired can be reactivated by editing the
key life, date or time. This will replace the expired Session
Key with a different alphanumeric key but it will still be the
same session.
3.7 Logging Students into a test
1. The students should open Internet Explorer and go to the School
Server homepage.
2. The students should then click on the Start Test link (see Figure
3.1).
3. The Login Screen will appear (see Figure 3.38). Students will
need to be provided with the following information:
The test Session Key,
Their Student Code (CASES ID for Government schools),
and
Their Day and Month of birth.
42 ON DEMAND TESTING TEACHER TRAINING GUIDE 2013 APRIL
Figure 3.38 - Student Login screen.
4. Once they have entered the required details, the students should
click on the [Login] button. The student’s details will be
displayed and the student will need to confirm that this is
correct before proceeding with the test (see Figure 3.39) by
clicking on the [OK] button.
Figure 3.39 - Student confirmation screen.
Problems starting a test:
Check students are using Internet Explorer
Check pop-up blockers are disabled,
Check that ActiveX controls are enabled,
Check that the session key is correct
Students can only complete a test once with a session key.
If students are required to sit the test a second time, please
generate a new session key.
3.8 Completing a test
1. When the test has been completed a Summary list will be
displayed for Linear tests (see Figure 3.40). Students can select
any question number to review their answer by selecting the
question and clicking on the [Answer] button.
43 ON DEMAND TESTING TEACHER TRAINING GUIDE 2013 APRIL
Figure 3.40 – Summary list.
2. To end the test session click on [End Test] button.
3. A Test Completed screen will be displayed (see Figure 3.41).
Click on the [OK] button.
4. If the page ‘hangs’ after clicking on [OK] one of the
components of the ActiveX has not been installed. See your
technician. Ctrl-Alt-Del to exit the test. Test data will not be
lost.
Figure 3.41 – The Test Completed screen.
3.9 Interrupting a test
Tests can be temporarily or permanently stopped if required.
1. To temporarily or permanently stop a student’s test press the
[Ctrl] and [K] keys on the key board at the same time.
2. An administration login window will appear (see Figure 3.42).
Enter your own On Demand administrator or teacher
username and password in the fields and left click on the
[Login] button.
44 ON DEMAND TESTING TEACHER TRAINING GUIDE 2013 APRIL
Figure 3.42 - Administration Login page for interrupting tests.
3. The Student Test Administration window will appear (see
Figure 3.43) where you can make one of the following
selections:
[Pause] – will temporarily pause the test and any associated
timers. The student can click on the [Continue] button on
the screen when they return, to resume from the last
question they were at.
[End Test] – will end the test and save all responses that
the student has competed up to this point. It is
recommended that the END TEST feature is NOT used for
Adaptive tests. Students need to complete all questions of
an Adaptive test in order to generate a valid score.
[Cancel Session] – will end the session but will NOT save
any of the responses that the student has completed.
Students can login to the same test at a later date using the
same session key.
Figure 3.43 - Student Test Administration screen
45 ON DEMAND TESTING TEACHER TRAINING GUIDE 2013 APRIL
3.10 Generating Reports
It is possible for either the teacher or administrator to generate
reports immediately after students have completed tests.
To check which students have sat a test using a particular
session key, go to Home Test Delivery Public enter the
4 digit Test Number in the search criteria field and click on
[Search] highlight the displayed row and click on [Sessions]. In
the next screen, click on [Search] select the required Session
Key and click on [Students] A list of all the students who have
sat the test with this session key will be displayed.
1. To generate a report, go to: Home Reports to open the
VCAA Assessment Online Reports Parameters screen (see
Figure 3.44).
If the Report Parameters page is not displayed, the pop-up
blockers are turned on. See Section 5, Frequently Asked
Questions and Trouble Shooting, for further information on
disabling Pop-up blockers.
Figure 3.44 - Report Parameters window
2. Select the required Report Type and Report Name. This will
display a Selection Criteria window (see Figure 3.45).
46 ON DEMAND TESTING TEACHER TRAINING GUIDE 2013 APRIL
Figure 3.45 – The Selection Criteria screen.
3. Enter the four digit Test Number then press the [Enter] key on
your keyboard.
4. Make further selections from the Selection Criteria options to
narrow down to the data and result you wish to view, e.g. you
may want to run the report for a particular Home Group, Year
Level or date.
5. If a Report does not appear, the search criteria may be too
narrow or the session key was not created for this test. See
Section 3.6.
6. Click on the [Preview Report] button. The Report page will
open in a new window (see Figure 3.46).
47 ON DEMAND TESTING TEACHER TRAINING GUIDE 2013 APRIL
Figure 3.46 - Preview Report window
7. To print reports, click on the Print link to open a Print Dialogue
box. You may need to change the print orientation to
Landscape. The [Print] button can be found in the top right
corner of the Preview Report window (see Figure 3.46).
8. Reports can also be exported into as a Word document or an
Excel spreadsheet. Click on the [Export] button in the top right
corner of the Preview Report window (see Figure 3.46).
9. A File Download dialogue box will appear (see Figure 3.47).
Figure 3.47 – File Download dialogue box.
10. Click on the [Save] button to open the ‘Save As’ dialogue box
(see Figure 3.48).
48 ON DEMAND TESTING TEACHER TRAINING GUIDE 2013 APRIL
Figure 3.48 – Save As dialogue box.
11. To save the file as an Excel spreadsheet in the ‘File name’ field
change the file extension from ‘.doc’ to ‘.xls’.(for Windows XP)
If you leave the file extension as ‘.doc’ the save function will
create a Word document with a data table embedded.
12. When you have finished, click on the [Close] button in the top
right corner of the Preview Report window (see Figure 3.46).
49 ON DEMAND TESTING TEACHER TRAINING GUIDE 2013 APRIL
Section 4 - Interpreting On Demand Reports
4.1 Estimated AusVELS Standard Scores
As with any assessment instrument, a single On Demand test
cannot provide a definitive summary of a student’s ability in any
given subject area. The tests are intended to be used in
conjunction with other classroom assessments and should not be
used in isolation.
All test items in the On Demand system have been calibrated to
the AusVELS curriculum and expected learning outcomes.
The On Demand Computer Adaptive Test Reports provide
Standard Score results which reference the AusVELS scale. The
standard score is based on the difficulty of questions presented
to, and answered correctly by, the student and indicates the
AusVELS level at which the student is working, as suggested by
the particular test results. Standard scores are interpolated
between the AusVELS levels, and given to 1 decimal place..
For more information about curriculum and learning outcomes
visit the VCAA website at: http://ausvels.vcaa.vic.edu.au
4.2 Using Computer Adaptive Tests
These tests are designed to provide an estimated AusVELS
score for a student. This is reported as a Standard Score based
on the difficulty of test items presented to, and answered
correctly by, the student.
Questions within each AusVELS level are categorised into sub-
levels labelled as Low or Upper depending on their relative
difficulty.
In a 60 question general test students are presented with a group
of three questions from a given sub-level. A minimum of two
correct answers allows the student to move to a higher sub-
level; otherwise the next group of questions presented will be
from the next lowest sub-level.
In a 30 question single dimension test students are presented
with one question from a given sub-level. A correct answer
allows the student to move to a higher sub-level; otherwise the
next question presented will be from the next lowest sub-level.
Because Computer Adaptive Tests are not bounded by a limited
range it is possible for a student to demonstrate a higher or
lower score than would be possible using a test with a limited
range, such as a linear test.
Figure 4.1 is an example of results from a Computer Adaptive
Year 5 Maths Number & Algebra test, showing outcomes
spread across a wide range.
50 ON DEMAND TESTING TEACHER TRAINING GUIDE 2013 APRIL
Figure 4.1 - An example of results from a Computer Adaptive Year 5 Number & Algebra test, showing outcomes
spread across a wide range.
Note that for the student (Nick Nolte) with a perfect score of
30/30, the standard score is reported as ‘Above 10.9’, which is
the highest reportable score for this test. For Paul Newman,
who has a zero score, the standard score is reported as ‘0.0’.
This is the system default for any score of zero.
It is not possible to provide accurate information for zero or
perfect scores, and in both cases, testing at a more appropriate
level is recommended.
The ‘Student Test Session Performance Report’ is a diagnostic
report. This report shows each question presented to the student,
the question ID, which will be a link to the actual question, the
correct response, the students response, Standard level, Key area
and Skill Descriptor. See figure 4.2.
51 ON DEMAND TESTING TEACHER TRAINING GUIDE 2013 APRIL
Figure 4.2Example of results from the Student Test Session Performance Report with links to the questions.
52 ON DEMAND TESTING TEACHER TRAINING GUIDE 2013 APRIL
Section 5 - Frequently Asked Questions and
Troubleshooting
5.1 Frequently Asked Questions
The answers to some frequently asked questions are outlined in
Table 8:
Question Answer
1. What is the current software On the School Server login page, click on the School Server Links
application build on the School – ‘Administration System – (authorised users only). Don’t log in.
Server?
Click on the ‘Problems logging in?’ link below the login box. The
application is displayed in the top right hand corner of the
following page.
The current application build is 095.
2. The page cannot be displayed The On Demand software has not been installed on the server.
when trying to login to the
school server homepage. IP address for the School Server homepage should be entered in
the “Exceptions” field to bypass the proxy. Tools > Internet
Options > Connections TAB > LAN settings > Advanced > IP
address entered in the Exceptions field.
3. The page cannot be displayed An older version of the On Demand software has been ‘restored’
when trying to search for to the new server.
downloaded tests.
4. Requested tests failed to Either an old version of the On Demand software has been
download. installed on the server or there is no On Demand software
installed on the server.
5. Students cannot log into a test. Students can only complete the same test once using the same
session key. A new session key has to be generated for the second
attempt at the same test.
Sessions key written down incorrectly
6. Why can’t I see the NEW Only a teacher user can set up new classes.
button when trying to setup If the School Administrator needs to set up classes then they must
new classes? be assigned both a teacher as well as an administrator role. See
Section 3.2.
7. Problems generating reports? If you cannot display the Report Parameters window or the
Preview Report window, you may need to check that pop-up
blockers have been disabled for this site. Refer to section 5.2.
There are several places to turn off the pop-up blockers; the tool
bars at the top of the page and Tools Internet Options. Refer
to the following pages if you require assistance with this.
8. During the test, a dialog box Internet Explorer 7 and above will ask the user every time it
appears saying ‘Do you want copies or clears the clipboard. In Internet Explorer: go to Tools
to allow this webpage to access Internet Options Security Custom Level Scripting. Set
your clipboard? the option ‘Allow Programmatic Clipboard Access’ to Disable.
Students using Windows XP SP2 ActiveX problems with Windows XP SP2 and VISTA. There is a
& VISTA workstations will have default security setting that prevents any Internet Explorer
problems both starting and ending browser window from being opened full screen with the windows
tests. border and the windows title bar removed. The On Demand tests
53 ON DEMAND TESTING TEACHER TRAINING GUIDE 2013 APRIL
are designed to start up full screen with the windows border and
the windows title bar removed.
If the message: ‘Some required setting on this machine is missing.
Please check with your system administrator.’ is displayed when
the ‘Start Test’ link is clicked, then the School Network
Administrator needs to update the settings on the workstation.
A fix is available on:http://www.aimonline.vic.edu.au/downloads/
Open ‘ActiveX Controll.zip’ and run: Assessment Online
ActiveX.msi
Check that both components of ActiveX have downloaded. My
Computer and browse to C:\Windows\Downloaded Program
Files. The files are called AIM Taskbar.ocx and AIM Taskbar.inf
Table 8 – Frequently Asked Questions.
5.2 Allowing Pop-ups
The On Demand program requires the use of Pop-ups.
Browsers, tool bars such as Google & Yahoo feature Pop-up
blockers and even anti-virus software such as Norton
Antivirus/Personal Firewall and Symantec can be set to block
Pop-ups.
The instructions are below on how to disable Pop-up blocking
on some popular blockers.
5.2.1 Microsoft Internet Explorer
To temporarily disable the pop-up blocker when accessing a
site, select Tools Pop-up Blocker and click on ‘Turn Off
Pop-up Blocker’ (see Figure 5.1).
Figure 5.1 – Turning off the Pop-up Blocker
To permanently allow the pop-ups for On Demand go to:
Open Internet Explorer
Click on Tools Internet Options and select the Privacy
tab (see Figure 5.2).
54 ON DEMAND TESTING TEACHER TRAINING GUIDE 2013 APRIL
Figure 5.2 – The Privacy Tab.
Click on the [Settings] button (see Figure 5.2). If the
[Settings] button is not active place a tick next to ‘Block
pop-ups’.
Enter the school server IP address in the box under
‘Address of Web site to allow’,
Click on [Add] button (see Figure 5.3),
Figure 5.3 – Pop-up Blocker Settings.
55 ON DEMAND TESTING TEACHER TRAINING GUIDE 2013 APRIL
The school server IP address should be displayed in the
‘Allowed sites’ box,
Click on [Close], then [OK].
5.2.2 Norton Internet Security / Personal Firewall
Open Norton Internet Security/Person Firewall main window by
clicking Start Programs Norton Firewall (see Figure 5.4).
Select the ‘Ad Blocking’ line (the line should be
highlighted),
Then click [Turn Off] button,
Open Internet Explorer and try to access the web site as
normal.
Figure 5.4 – Norton Personal Firewall.
5.3 Unauthorised Access error message
Users of a web site may receive the ‘Unauthorised Access’
message (see Figure 5.5).
Figure 5.5 – Unauthorised Access message.
56 You can also read