CLOUDLINK GATEWAY CLOUDLINK GATEWAY USER GUIDE - 22 NOVEMBER 2021 - MITEL
←
→
Page content transcription
If your browser does not render page correctly, please read the page content below
CloudLink Gateway
CloudLink Gateway User Guide
22 November 2021

Notices
   The information contained in this document is believed to be accurate in all respects
   but is not warranted by Mitel Networks™ Corporation (MITEL®).The information is
subject to change without notice and should not be construed in any way as a commitment
   by Mitel or any of its affiliates or subsidiaries. Mitel and its affiliates and subsidiaries
  assume no responsibility for any errors or omissions in this document. Revisions of this
document or new editions of it may be issued to incorporate such changes. No part of this
 document can be reproduced or transmitted in any form or by any means - electronic or
mechanical - for any purpose without written permission from Mitel Networks Corporation.

                                       Trademarks
      The trademarks, service marks, logos and graphics (collectively “Trademarks”)
         appearing on Mitel's Internet sites or in its publications are registered and
     unregistered trademarks of Mitel Networks Corporation (MNC) or its subsidiaries
      (collectively "Mitel") or others. Use of the Trademarks is prohibited without the
   express consent from Mitel. Please contact our legal department at legal@mitel.com
     for additional information. For a list of the worldwide Mitel Networks Corporation
   registered trademarks, please refer to the website:http://www.mitel.com/trademarks.

                       ®,™   Trademark of Mitel Networks Corporation

                       ©   Copyright 2021, Mitel Networks Corporation

                                      All rights reserved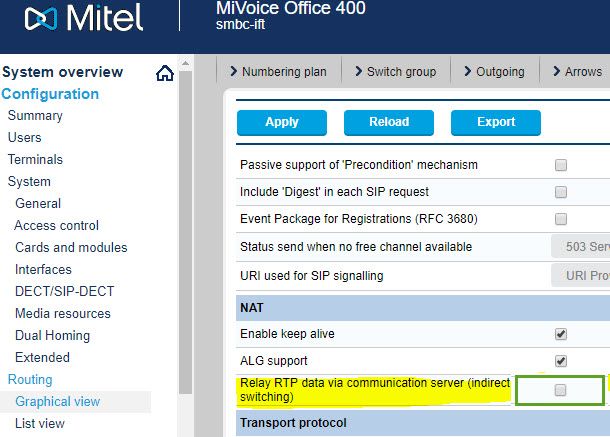
Contents
1 Overview..................................................................................1
1.1 What is CloudLink?............................................................................................1
1.2 Deployment Workflow........................................................................................ 2
1.3 Partner Dashboard.............................................................................................3
1.4 Best Practices for Site Deployments................................................................. 7
2 Install and access the CloudLink Gateway..........................9
2.1 Install the CloudLink Gateway Appliance.......................................................... 9
2.2 Gateway Appliance Software Update..............................................................11
2.3 Access the CloudLink Gateway.......................................................................14
2.3.1 Update Progress..................................................................................... 14
2.3.2 CloudLink Policy..................................................................................... 15
2.3.3 Port information.......................................................................................15
2.3.4 Portal Access for Standalone Platforms................................................. 17
2.3.5 Portal Access for SMBC Platforms.........................................................18
2.3.6 Portal Access for All Platforms............................................................... 18
2.4 Install the CloudLink Gateway in a VMware Virtual Environment.................... 19
2.4.1 VMware Requirements........................................................................... 19
2.4.2 System Requirements.............................................................................20
2.4.3 Assigning IP Address............................................................................. 20
2.4.4 Deployment............................................................................................. 20
2.5 Replace a Gateway Appliance........................................................................ 22
2.6 Console Menu for CloudLink Gateway............................................................25
3 Onboard Customers.............................................................27
3.1 Log in to CloudLink Gateway Portal................................................................27
3.2 Onboard Customers Using Navigation Bar or a Single Page..........................29
3.3 Enter Customer Information.............................................................................30
3.4 Configure the Customer Site........................................................................... 32
3.5 Enter PBX Information.....................................................................................34
3.6 Connect or Sync the PBX............................................................................... 34
3.7 Deploy the CloudLink App (optional)...............................................................36
3.8 Configure Advanced Settings and Options......................................................39
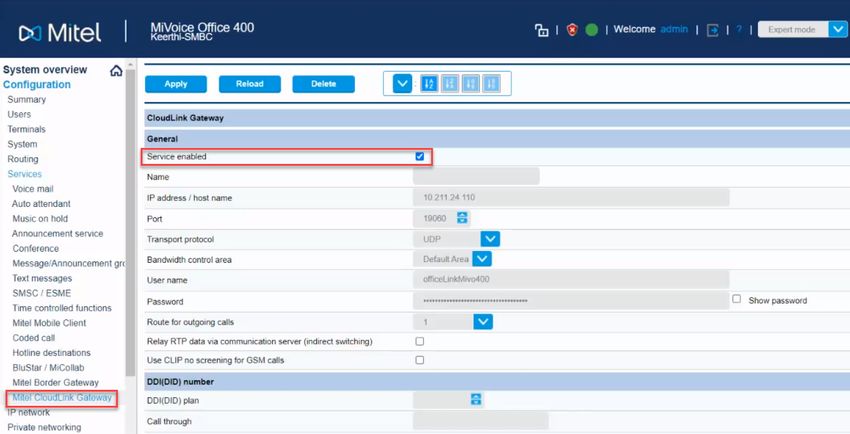
4 Configure a MiVoice Office 400 PBX.................................. 43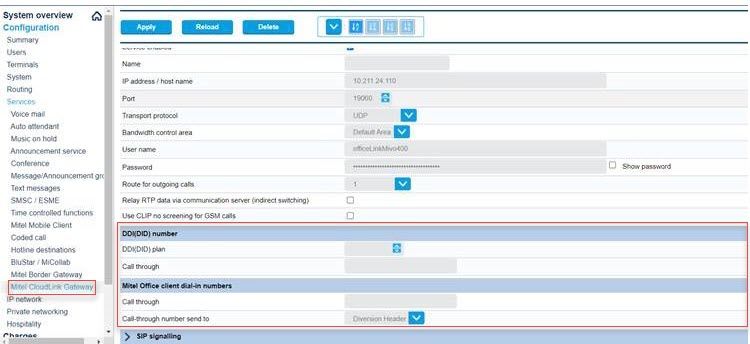
4.1 Configure MiVO400 on Standalone Platform.................................................. 46
   4.2 Configure MiVO400 on SMBC Platform.......................................................... 56

5 Manage a Customer............................................................. 65
   5.1 Edit a Customer...............................................................................................65
   5.2 Deactivate an Existing Customer.................................................................... 65
   5.3 Delete an Administrator................................................................................... 66

6 Customer Accounts and Admin Contacts......................... 68

7 Troubleshoot Errors............................................................. 69

Overview                                                                                 1
   This chapter contains the following sections:
   •   What is CloudLink?
   •   Deployment Workflow
   •   Partner Dashboard
   •   Best Practices for Site Deployments

   Welcome to CloudLink! Before you onboard your first customer, see the topics listed below,
   which will provide answers to the following questions:

   What are the components of the CloudLink platform?

   What are the processes required to deploy CloudLink applications for a customer?

   What is the Partner Dashboard?

   1.1 What is CloudLink?

        Mitel CloudLink is a platform that enables communication between the on-premise PBX
        (such as MiVoice Office 400) and cloud-based applications such as Mitel One and Mitel
        MiVoice Office.

CloudLink Gateway User Guide                                                                    1
Overview

        CloudLink includes:

        • CloudLink Platform- The technology platform that provides services for CloudLink
          apps.
        • CloudLink Gateway-Technology that connects premise-based PBXs to the CloudLink
          platform and CloudLink applications.
        • CloudLink Apps-The applications that use the CloudLink Application Programming
          Interfaces (APIs) and micro-services to provide hybrid communications services to our
          customers. For example, Mitel One application, or MiVoice Office application.

   1.2 Deployment Workflow

        The following topics document the most important processes for deploying Mitel
        CloudLink applications for your customers:

        •   Configure MiVoice Office 400 PBX
        •   Install the CloudLink Gateway Appliance
        •   Access the CloudLink Gateway
        •   Onboard Customers

        Within the above topics you will find different instructions for the different supported
        MiVoice Office PBX models and platforms listed below:

CloudLink Gateway User Guide                                                                            2
Overview

           Supported PBX              Supported Platforms (type of   Customer Market
                                      Gateway)

           MiVO400                    standalone (connects to an Europe
                                      external Gateway)

                                      SMBC (has an embedded          Europe
                                      Gateway)

       Customers will be able to utilize a CloudLink application by doing the following:

       • Downloading and installing the CloudLink app
       • Registering the CloudLink app

     1.3 Partner Dashboard

       The home page of the CloudLink Gateway Portal, which is also known as the Partner
       Dashboard, can be used to do the following:

       •    Create customers in the CloudLink platform.
       •    Associate a CloudLink Gateway with a customer.
       •    Connect a CloudLink Gateway to a PBX.
       •    View and manage previously created CloudLink customers.

       After you create a customer in the CloudLink Platform, that customer is listed in the
       Partner Dashboard.

       Follow these instructions to log into the CloudLink Gateway Portal.

       Welcome to CloudLink

       The following image shows an example of the Partner Dashboard the first time a partner
       logs into the CloudLink Gateway Portal:

 3                                                                            CloudLink Gateway User Guide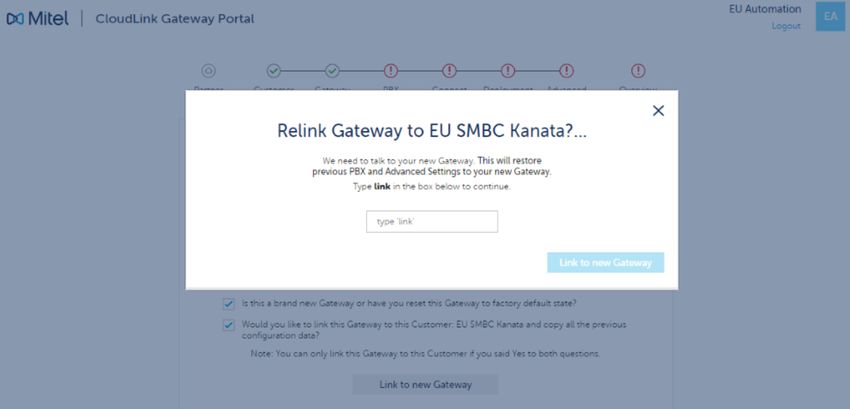
Overview

        When you log into the CloudLink Gateway Portal via the Mitel MiAccess Portal, your
        MiAccess account is created as a customer in the CloudLink Platform.

        If you have a CloudLink Gateway and a PBX on your LAN, you can onboard your own
        MiAccess account into CloudLink to become familiar with the process. Doing this also
        enables your account to use CloudLink applications such as Mitel One, and MiVoice
        Office.

            Note:
            Every customer in the CloudLink Platform is assigned a unique identifier known as
            the 'Account ID'.

        User Interface Elements

        The following diagram shows the user interface elements of the Partner Dashboard:

CloudLink Gateway User Guide                                                                      4
Overview

       The following table describes the user interface elements of the Partner Dashboard:

           User            Function
           Interface
           Element

           Mitel           This is your name as provisioned in the Mitel MiAccess system. To
           MiAccess        change this name, update your MiAccess profile.
           Identity

           Mitel           This is the name of your organization as provisioned in the Mitel
           MiAccess        MiAccess system. To change this, an administrator can update your
           Organization    organization.
           Name

           Avatar          You can click this control and choose a photo or image to represent
                           you. This image will be present in CloudLink applications (e.g. Mitel
                           One, and MiVoice Office).

           Create          Use the Create Customer button to create a new customer in the
           Customer        CloudLink platform.

           Customer List A table appears below the Create Customer button displaying one
                         row with the following four columns of data for each of your customer
                         accounts.

                           • Customer Name - Name of the customer account.
                           • Account ID - Unique ID for the account.
                           • Registered Users - Number of registered users for the account.
                             Click the linked number to view the Registered User List that shows
                             the Name, Extension, and Email Address for each registered user.
                           • Status Message - The current status indicates the next step in the
                             onboarding process (shown in blue) or an error that needs to be
                             resolved (shown in red). When the status displays Overview, this
                             indicates a successful customer deployment.

 5                                                                            CloudLink Gateway User Guide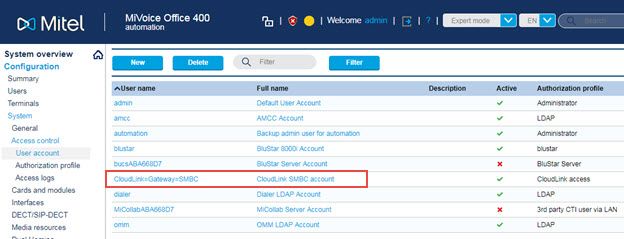
Overview

         User                  Function
         Interface
         Element

         Links                 At the bottom of the Gateway Portal are the following links:

                               • Shortcuts - Useful keyboard shortcuts you can use while managing
                                 customer accounts.
                               • Legal - Access to the CloudLink applications end user license
                                 agreement.
                               • Help - Access to the online CloudLink help.
                               • Feedback - Access to the Mitel CloudLink UserVoice site where you
                                 can suggest new or vote on existing ideas for future development.
                               • Status - Access to the online status page for Mitel systems.

        Customer List Status Messages

        The current status of each customer is shown as a link on the right side of your list of
        customers. Click anywhere in the list to navigate to an existing customer account. If there
        is a problem with a customer's account, that information is displayed in red with a brief
        explanation to help troubleshoot the issue. Click the linked error message to learn more.
        When the status displays Overview this indicates a successful customer deployment.
        The following shows typical status messages for a customer account.

CloudLink Gateway User Guide                                                                          6
Overview
Creating a New Customer
Click the Create Customer button to create a new customer in the CloudLink Platform
then follow the instructions in Enter Customer Information. From here you can proceed
to associate the customer with a CloudLink Gateway and connect or sync the CloudLink
Gateway to the PBX.
Modifying an Existing Customer
Click anywhere in the row of an existing customer to navigate to the customer and modify
the existing connection to the CloudLink Platform or the PBX. You can also do this to
perform troubleshooting.
The CloudLink Gateway Portal can be accessed from anywhere with an Internet
connection to modify or delete an existing customer.
Note:
To properly associate a Gateway with a new customer on the CloudLink platform,
you must first access the CloudLink Gateway Portal by connecting to the Gateway.
After a customer has already been associated with a Gateway, you can access the
CloudLink Gateway Portal directly or via Mitel MiAccess to onboard and manage
customers. To learn more, see Access the CloudLink Gateway.
1.4 Best Practices for Site Deployments
The following is a list of best practices recommended for CloudLink site deployments:
• If there is no DHCP server on site, configure a MiVoice Office PBX or use another
DHCP server.
• For standalone platforms, the CloudLink Gateway appliance and MiVoice Office PBX
should be installed on the same LAN subnet. If this is not done, disable all SIP ALG
functions in the firewall to enable communication between these two components.
Additionally, ensure that port blocking is disabled.
• When you configure a firewall, ensure that the path to the Internet is open before you
set the site rules.
• For remote access management, separate the data networks from the voice networks.
• Ensure that your end-user mobile carrier supports propagation of incoming caller ID.
• To ensure that the Welcome/Deployment emails do not get rejected by the mailbox,
you must include the * .mitel.io alias in the user's e-mail whitelist.
7 CloudLink Gateway User Guide• Ensure that the user database in the MiVoice Office PBX is updated accurately and User Groups are labeled with informative names to enable importing contacts into CloudLink applications such as Mitel One, and Mitel MiVoice Office. • CloudLink solution supports the following emergency numbers: 000, 110, 111, 112, 118 119, 911, and 999, which are specific to each supported country. To ensure that there are no dialing conflicts, the administrator must configure these emergency numbers in MiVoice Office 400. • To ensure optimal network efficiency with free flow of data using minimum network bandwidth, you must enable Bandwidth Optimization. For more information about how to enable Bandwidth Optimization, see Account Information in CloudLink Accounts documentation. To learn more about Bandwidth Optimization, see System Requirements in CloudLink Platform documentation. • It is strongly recommended not to deploy CloudLink directly on the Wide Area Network to ensure that the CloudLink solution is properly secured. See the following Mitel KMS articles related to Network Security and Toll Fraud prevention for the Mitel Office PBX installations: • Preventing Toll Fraud • Toll Fraud prevention on SIP trunks • General Guidelines to Secure SIP trunks for Toll Fraud prevention For more information about configuring the firewall for CloudLink deployments, see Port Information.
Install and access the CloudLink
   Gateway
                                                                                                2
   This chapter contains the following sections:
   •   Install the CloudLink Gateway Appliance
   •   Gateway Appliance Software Update
   •   Access the CloudLink Gateway
   •   Install the CloudLink Gateway in a VMware Virtual Environment
   •   Replace a Gateway Appliance
   •   Console Menu for CloudLink Gateway

   The CloudLink Gateway appliance has the following characteristics:

   • For standalone platforms,

       • it is an external device installed on premise to provide a connection from the PBX to the
         CloudLink platform.
       • it is a virtual instance of CloudLink platform installed in the VMware vCenter server.

   • For SMBC platforms, it is an embedded device installed within the PBX to provide a
     connection to the CloudLink platform.

   See the topics listed below to learn how to install and access the CloudLink Gateway.

   2.1 Install the CloudLink Gateway Appliance

         The CloudLink Gateway appliance, which connects your PBX to the Mitel CloudLink
         platform, should be connected to a DHCP-enabled LAN.

         Prerequisites

         This CloudLink Gateway requires the following:

         • Outbound ports 443 and 5061 from the Gateway to the following domains are allowed
           by any corporate firewall.

           • *.ngrok.io
           • *.ngrok.com
           • *.mitel.io
         • An Internet connection that provides sufficient bandwidth.

CloudLink Gateway User Guide                                                                         9
Install and access the CloudLink Gateway
• A DHCP server to assign an IP address to the Gateway (not mandatory in VMware
environments).
• A DNS server that the Gateway uses to resolve domain names.
• An Ethernet connection to the LAN.
Virtual Environment
To install CloudLink Gateway in a virtual environment, see Install the CloudLink Gateway
in a VMware Virtual Environment.
SMBC Platforms
If you have a MiVO400 PBX on an SMBC platform, which has an embedded Gateway,
the following information about assigning an IP address and connecting the appliance is
not applicable. Click here to go to the Gateway Applicance Software Update topic.
Assigning an IP Address
When the Gateway is powered up, it will acquire an IP Address from a DHCP Server on
the LAN
The PBX needs to be programmed with the IP address of the CloudLink Gateway. This
means a fixed IP address must be allocated to the Gateway.
There are several different ways you can do this:
• Configure a static IP address (recommended). See Configure the Customer Site for
related information.
• Configure your DHCP server to reserve an IP address for the CloudLink Gateway
appliance.
• Your DHCP server may automatically reallocate the same IP address to the CloudLink
Gateway appliance.
Consult your DHCP server documentation to learn more about the server’s IP address
allocation scheme
Connecting the Appliance
1. Connect the CloudLink Gateway to the LAN using port 1.
CloudLink Gateway User Guide 10Install and access the CloudLink Gateway
2. Apply power.
3. The CloudLink Gateway automatically accesses the Internet to download and install
any Software Updates. To learn more, see the Gateway Appliance Software Update
topic.
Warning:
If you have a Check Point "Security Gateway" firewall, unless special configuration
steps are taken, the CloudLink Gateway and client cannot register SIP TLS
(Transport Layer Security) through the firewall. To resolve this, the person in your
organization who manages the Check Point firewall should review the following two
Check Point issues:
• sip_tls_authentication Service does not traverse the Security Gateway
• Unable to connect to Skype application using port 5061 with pre-defined TCP
service
2.2 Gateway Appliance Software Update
Mitel recommends that you enable and schedule automatic updates for the Gateway
appliance in the CloudLink Gateway Portal. To learn more, see Configure Advanced
Settings and Options.
If you access the Gateway appliance while it is performing a software update, the
progress status is displayed. If the software update fails, you will be provided with
recovery options.
The Gateway appliance checks for, downloads, and installs software updates from Mitel
whenever it is powered on or an automatic update is scheduled. Software updates vary
in size and can be as large as 500-700 MB.
Downloading and installing software updates typically takes about 10 to 15 minutes. The
actual time that it takes to download the updates depends on your Internet connection
speed.
Note:
CloudLink Gateway is built on the CentOS operating system. The OS level updates
come from CentOS community update servers.
11 CloudLink Gateway User GuideInstall and access the CloudLink Gateway
Warning:
If you have a standalone platform with external Gateway, do NOT disconnect power
or the LAN cable until the update process has completed or within 15 minutes of
powering up the Gateway. Powering down or disconnecting the Gateway from the
network in the middle of an update can cause the update to fail and the Gateway to
not boot up properly.
Whenever the Gateway appliance is rebooted or restarted, you may see a brief display of
a Lost trunk connection to PBX message. This temporary issue should resolve itself.
When you connect your browser to the Gateway appliance, if the Gateway is still
downloading updates, you may see the System update in progress screen as shown
below.
If your browser loses connection to the Gateway during the update, you may see the
Lost Connection to Gateway screen as shown below:
CloudLink Gateway User Guide 12Install and access the CloudLink Gateway
If there is an error while downloading the update, you may see an Update Error screen
as shown below.
If you have a standalone platform with external Gateway and there are downloading
errors, you can take appropriate action as explained below:
• Retry should be attempted if the error message indicates a connection failure or
a problem that you have the ability to resolve. For example, if there is a firewall
configuration error, you should use the Retry option after resolving the error.
• Reboot should be attempted if retry fails to resolve the problem.
• Factory Reset can be attempted if you suspect the Gateway received a bad update
from Mitel or you received guidance from Mitel Support to do a Factory Reset.
If you have an SMBC platform with embedded Gateway and there are downloading
errors, an administrator can apply the Restart command to the Mitel-CloudLink Gateway
in the Software > Applications screen of the SMB Controller Manager admin console as
shown below.
If these errors persist, contact Mitel Partner Technical Support via a login at https://
www.mitel.com/en-ca/login.
13 CloudLink Gateway User GuideInstall and access the CloudLink Gateway
2.3 Access the CloudLink Gateway
To properly associate a Gateway with a new customer account on the CloudLink
platform, the CloudLink Gateway Portal must be accessed the first time as indicated
below.
• For standalone platforms, which have an external Gateway, the Portal must be
accessed the first time by connecting to the Gateway from the same LAN subnet.
• Details are in the Portal Access for Standalone Platforms section of this topic.
• For SMBC platforms, which have an embedded Gateway, the Portal must be
accessed the first time from the SMB Controller Manager.
• Details are in thePortal Access for SMBC Platforms section of this topic.
After a customer has been associated with a Gateway, you can access the CloudLink
Gateway Portal to manage customers in the following different ways:
• By connecting from the same LAN subnet to the Gateway at http://cloudlink.local/ (for
standalone platforms only)
• By accessing the Application configuration link in the SMB Controller Manager (for
SMBC platforms only)
• By accessing Mitel MiAccess at https://connect.mitel.com/
• By accessing the Gateway Portal directly at https://mitel.io/cloudlink/gateway
Note: Internet Explorer (IE) does not properly display pages in the CloudLink Gateway
Portal.
2.3.1 Update Progress
When you connect your browser to the Gateway appliance, if the Gateway is still
downloading updates, a 'system update in progress' message is displayed.
If your browser loses connection to the Gateway during an update, a 'Lost Connection to
Gateway' message is displayed.
If there is an error while downloading the update, an 'Update Error' message is
displayed.
If your Gateway is rebooted, you may see a brief display of a 'Lost trunk connection to
PBX' message.
For more detailed information, see the Gateway Appliance Software Update topic.
CloudLink Gateway User Guide 14Install and access the CloudLink Gateway
2.3.2 CloudLink Policy
To enable personnel to log into the CloudLink Gateway Portal via Mitel MiAccess, the
CloudLink policy must be assigned to individual users (or as part of a bundle) by a
Partner Administrator through the Mitel MiAccess user management portal. Please refer
to the MiAccess Admin manual for additional information.
2.3.3 Port information
The following table lists the ports that must be opened in the firewall when you configure
CloudLink Gateway and the purpose the ports serve.
Note:
In addition to the ports listed in the following table, each CloudLink application uses
ports to support the services provided by the CloudLink platform. Click the URL
specific to the application to view the port information for that application.
• Mitel One Web Application
• Mitel One Mobile Application
• MiVoice Office Web Application
• MiVoice Office Mobile Application
Ports Purpose
NTP 123 This port is used for clock synchronization between
networks using the following hosts:
• 0.mitel.pool.ntp.org
• 1.mitel.pool.ntp.org
• 2.mitel.pool.ntp.org
• 3.mitel.pool.ntp.org
15 CloudLink Gateway User GuideInstall and access the CloudLink Gateway
Ports Purpose
TCP 443 This port is used to connect REST APIs to the
following hosts:
• authentication.api.mitel.io
• notifications.api.mitel.io
• media.api.mitel.io
• presence.api.mitel.io
• admin.api.mitel.io
• tunnel.api.mitel.io
• download.mitel.io
• any host under *.ngrok.io
• any host under *.ngrok.com
TCP 5061 This port is used to connect SIP phones on Media
Services to the following hosts:
• media.us-east-1.us.mitel.io
• media.us-west-2.us.mitel.io
• media.eu-west-1.eu.mitel.io
• media.eu-central-1.eu.mitel.io
• media.ap-southeast-2.ap.mitel.io
Preferably, specify the hosts by using the wildcards
media.*.us.mitel.io, media.*.eu.mitel.io, and
media.*.ap.mitel.io.
UDP 3478 and UDP 3479 These ports are used to connect to the STUN service
at stun.mitel.io.
UDP 65336 to UDP 65534 These ports are automatically opened by the firewall
for incoming and outgoing RTP packets by pinhole
punching. This is Mitel’s approved and supported
deployment. If pin hole punching is not available or
has been disabled on the firewall, then you must
exercise your own due diligence with configuring and
testing with the ports listed.
CloudLink Gateway User Guide 16Install and access the CloudLink Gateway
Ports Purpose
TCP 19060, 19061, 5070, These ports are used for internal use only and must
5071, 5080, and 5081 not be used for any configurable service settings in
MiVoice Office 400 for either UDP or TCP.
Note:
CloudLink Gateway is built on the CentOS operating system. The OS level updates
come from CentOS community update servers.
2.3.4 Portal Access for Standalone Platforms
2.3.4.1 Associate Gateway with a Customer by Connecting
to Gateway
To associate an external Gateway with a customer account in the CloudLink platform, the
CloudLink Gateway Portal should be accessed by connecting a supported browser to the
Gateway at http://cloudlink.local/ or by entering the IP address of the gateway appliance
in the browser. This needs to be done from a computing device located on the same LAN
subnet as the CloudLink Gateway Portal. Unless the Gateway is currently being updated,
the browser redirects to the CloudLink Gateway Portal login page. In the login page,
click the MiAccess button. In the Mitel MiAccess login page that appears, enter your
MiAccess credentials and click the Login button. After a successful login, your name and
avatar are displayed in the upper-right corner of the interface.
Note:
The first time you connect to the Gateway (from the same LAN subnet), type the
http:// prefix explicitly in the browser's address bar as shown below:
http://cloudlink.local or http://ip.address.of.gateway
This is an important step that only needs to be done once. A browser normally stores
this information to make future connections to the Gateway.
You can use Apple Bonjour software to locate the Gateway when you connect from
the LAN. Apple Bonjour software, which is compatible with the CloudLink Gateway, is
a zero-configuration networking technology that locates devices such as printers and
17 CloudLink Gateway User GuideInstall and access the CloudLink Gateway
other computers, and the services that those devices provide on a local network subnet.
You can download and install Apple Bonjour Print Services for Windows at https://
support.apple.com/kb/dl999?locale=en_US.
2.3.5 Portal Access for SMBC Platforms
Associating an embedded Gateway with a new customer account on the CloudLink
platform must be done via the SMB Controller Manager. For instructions, see the Access
Application Configuration Link section of the Configure MiVO400 on SMBC Platform
topic.
2.3.6 Portal Access for All Platforms
The following two additional ways to access the CloudLink Gateway Portal apply to both
standalone platforms (with external Gateway) and SMBC platforms (with embedded
Gateway).
2.3.6.1 Access the CloudLink Gateway Portal via Mitel
MiAccess Portal
To perform maintenance on a customer account already associated with a Gateway,
access the CloudLink Gateway Portal by logging in to the Mitel MiAccess Portal using
your MiAccess credentials. In the MiAccess Portal home page, CloudLink Gateway
Portal will be listed on the left side of the site, if the CloudLink policy has been assigned
to you. Click CloudLink Gateway Portal. The Gateway Portal opens and the Partner
Dashboard is displayed.
CloudLink Gateway User Guide 18Install and access the CloudLink Gateway
2.3.6.2 Access the CloudLink Gateway Portal via Direct
Access
A Mitel Partner or an administrative user of a customer account can access the
CloudLink Gateway Portal directly at http://gateway.mitel.io/.
For information about logging in to the Gateway portal directly, see Log in to CloudLink
Gateway Portal.
2.4 Install the CloudLink Gateway in a VMware Virtual
Environment
This topic describes the equipment, network, and configuration considerations that
apply when setting up CloudLink Gateway on servers enabled with VMware® vSphere™
virtualization.
2.4.1 VMware Requirements
The CloudLink Gateway virtual appliance is supported in the following VMware
environments;
• ESXi 6.5 or later
• Fusion 5.x or later
• Workstation 9.x or later
• Player 5.x or later
19 CloudLink Gateway User GuideInstall and access the CloudLink Gateway
2.4.2 System Requirements
Disk Size 32 GB
CPU Core 1 Core
RAM 2 GB
Note:
• You must have VMware vCenter server installed in your machine to change the
network configuration of the gateway during the deployment.
• The CloudLink appliance and the MiVoice Office PBX must be installed on the
same virtual environment / LAN subnet. If this is not done, disable all SIP ALG
functions in the firewall to enable communication between these two components.
Additionally, ensure that port blocking is disabled.
• CloudLink Gateway does not support virtualization features related to application
migrations, for example vMotion.
2.4.3 Assigning IP Address
During the virtual deployment of CloudLink Gateway, the system assigns the initial
IP address through Dynamic Host Configuration Protocol (DHCP). Alternately, the
user can configure the initial IP address during the Open Virtualization Application
(OVA) deployment using the portal. The console displays the network address after the
deployment.
2.4.4 Deployment
You can deploy CloudLink Gateway in a VMware environment in any of the following
ways:
2.4.4.1 Deploy using VMware vSphere/vCenter
The following are the high-level steps to deploy CloudLinkGateway OVA using the
VMware vSphere Client to an ESXi host viavCenter Manager.
CloudLink Gateway User Guide 20Install and access the CloudLink Gateway
1. Log in to the VMware vSphere Client with your username and password.
2. From the vSphere Client Menu Bar, choose File > Deploy OVF Template.
3. In the OVA Wizard, select the Source of the OVF template file (OVA file extension)
a. URL
i. If the OVF template file is on the Internet or accessible through a web browser;
enter the URL of the location of the file.
b. Local File
i. If the OVF template file was downloaded to the local computer or to a network
share drive, click Browse to locate the file.
4. Click Next.
5. Under Name and Inventory Location, specify the name for the virtual machine and
click Next.
6. Under Deployment Configuration, select the desired hardware configuration profile
from the drop-down menu.
7. Click Next.
8. Under Storage, select the Datastore to use for the virtual machine. Click Next.
9. Set the virtual disk format to Thick Provisioned.
10. Under Network Mapping, allocate one or more virtual network interface card (vNIC) on
the destination network using the drop-down list. The options for mapping the vNICs
differ depending on the release version.
11. Configure the properties for the virtual machine.
12. Select Power on after deployment to automatically power on the virtual machine.
13. Click Finish to deploy the OVA.
2.4.4.2 Deploy using VMware Open Virtualization Format
Tool
Alternately, use the command ovftoolto deploy CloudLink Gateway in a VMware
environment through the VMware Open Virtualization Format Tool. The configuration
parameters such as static IP address, user name, and password can be specified when
deploying the OVA package to an ESXi host.
The following is an example of how to deploy CloudLink Gateway in a VMware
environment using the command.
# target host
# (replace values as needed for your environment)
ESXI_DATASTORE=datastore1
ESXI_USERNAME=root
21 CloudLink Gateway User GuideInstall and access the CloudLink Gateway
ESXI_PASSWORD=password
ESXI_HOST=198.51.100.10
# network settings for virtual CloudLink Gateway
# (replace values as needed for your environment)
DEPLOYMENT_IP=198.51.100.20
DEPLOYMENT_NETMASK=24
DEPLOYMENT_GATEWAY=198.51.100.1
DEPLOYMENT_DNS=198.51.100.1
DEPLOYMENT_HOST_NAME=cloudlink.domain.com
ovftool \
--acceptAllEulas \
--disableVerification \
--noSSLVerify \
--skipManifestCheck \
--X:injectOvfEnv \
--powerOn \
--prop:cl.hostname=${DEPLOYMENT_HOST_NAME} \
--prop:cl.ip0=${DEPLOYMENT_IP} \
--prop:cl.netmask0=${DEPLOYMENT_NETMASK} \
--prop:cl.gateway0=${DEPLOYMENT_GATEWAY} \
--prop:cl.dns0=${DEPLOYMENT_DNS} \
--datastore=${ESXI_DATASTORE} \
Mitel-CloudLink-Gateway-1.0.0.ova \
"vi://${ESXI_USERNAME}:${ESXI_PASSWORD}@${ESXI_HOST}/"
2.5 Replace a Gateway Appliance
If the CloudLink Gateway appliance was factory reset or replaced, it is required to re-link
the new Gateway appliance with the existing CloudLink Customer Account before it can
be fully operational.
Perform the following steps to replace and re-link a Gateway appliance.
1. Install the new Gateway appliance.
2. Access the new Gateway appliance.
CloudLink Gateway User Guide 22Install and access the CloudLink Gateway
3. In the Partner Dashboard page, the CloudLink Customer account associated with the
old CloudLink Gateway appliance will show the status as Lost Connection to Gateway.
Click the Customer account. The CloudLink Gateway Portal tries to establish a
connection with the old CloudLink Gateway appliance, and a page opens displaying
a Connection Failure error.
4. In the Connection Failure error page, select the check boxes against the two
confirmation questions, and click Link to new Gateway. A re-link confirmation panel
opens.
Note:
If you do not select both check boxes, the new CloudLink Gateway appliance will
not be linked to the CloudLink Customer account.
23 CloudLink Gateway User GuideInstall and access the CloudLink Gateway
5. In the box within the panel, type link, and click Link to new Gateway.
The CloudLink Gateway Portal attempts to establish a connection to the new
CloudLink Gateway appliance.
The new CloudLink Gateway appliance is linked to the CloudLink Customer account
when a successful connection is established, and the Sync page displays the
message PBX Synced.
CloudLink Gateway User Guide 24Install and access the CloudLink Gateway
6. In the Partner Dashboard, the status of the CloudLink Customer account changes
to Overview.
2.6 Console Menu for CloudLink Gateway
The Console menu in CloudLink Gateway allows commands to be run locally for the
physical and the virtual gateway. Functions such as Data Reset, Factory Reset, Enable/
Disable SSH access for Mitel support can be performed using these commands.
Data Reset
Data Reset allows you to reset the data that is stored on the appliance during
onboarding.
Factory Reset
25 CloudLink Gateway User GuideFactory Reset allows to reset the boot and root partitions to factory default. During a
factory reset process, the application reboots, starts the recovery system, and then
restores the boot and root partition. This process may take 15-20 minutes.
For virtual or SMBC deployments, redeploy the VAPP or SMBC blade to start from
factory default.
Enable/Disable SSH access
By default, SSH access is disabled. SSH will be requested only by Mitel support to
investigate customer issues. Selecting the SSH option enables SSH on the physical
gateway for 24 hours unless it is disabled manually within this time. When SSH is
enabled, a line of text is displayed above the Menu option indicating that SSH is enabled.
To exit the Menu and return to the home screen, press ALT+F1 for Windows and FN+F1
for MAC.
You can access these functionalities for different types of gateways.
• For physical gateway, perform the following steps:
1. Connect a keyboard and a monitor.
2. Press ATL+F2 for Windows and FN+F2 for MAC. A menu displaying options such
as Data Reset, Factory Reset, Enable SSH access for Mitel support and
Disable SSH access is displayed.
3. Select the function that you want to perform.
• For virtual gateway, perform the following steps:
1. From the VMware console, press ALT+F2 for Windows and FN+F2 for MAC.
A menu displaying options such as Data reset, Enable SSH access for Mitel
support and Disable SSH access is displayed.
2. Select the function that you want to perform.
• For SMBC, enabling or disabling SSH and IP address setting can be done from the
SMB Controller Manager.Onboard Customers 3
This chapter contains the following sections:
• Log in to CloudLink Gateway Portal
• Onboard Customers Using Navigation Bar or a Single Page
• Enter Customer Information
• Configure the Customer Site
• Enter PBX Information
• Connect or Sync the PBX
• Deploy the CloudLink App (optional)
• Configure Advanced Settings and Options
The topics listed below provide instructions for onboarding your customers, which is required
to enable customers to access CloudLink applications.
3.1 Log in to CloudLink Gateway Portal
A Mitel Partner or a user who has administrative rights over a user account can log in to
the CloudLink Gateway Portal directly through the URL https://gateway.mitel.io/.
To log in, a Mitel Partner must click the MiAccess button on the Gateway Portal
login screen. In the Mitel MiAccess login page, enter your MiAccess credentials and
click LOGIN to log in to the CloudLink Gateway Portal.
CloudLink Gateway User Guide 27Onboard Customers
To log in, an administrative user must enter the email id (specified in the account for the
user) as the user name and the password (specified by the user while registering the
account) as the password, and click Next to log in to the CloudLink Gateway Portal.
Note:
If a user’s email address is registered with multiple accounts, the system will identify
this (while you to log in) and prompt you to enter the Account ID of the account
(associated with the CloudLink application you want to log in to).
The CloudLink Gateway Portal opens and the Partner Dashboard is displayed. The
following image shows an example of the Partner Dashboard on page 3 when a Partner
or an administrative user logs in to the CloudLink Gateway Portal for the first time.
CloudLink Gateway User Guide 28Onboard Customers
3.2 Onboard Customers Using Navigation Bar or a Single
Page
You can onboard a customer in a step-by-step manner by clicking links in the navigation
bar or you can perform all steps from a single page by selecting the Overview option.
Some of the onboarding steps are different for the two supported platform types listed
below:
Standalone Platform with External Gateway on page 29
SMBC Platform with Embedded Gateway on page 30
Standalone Platform with External Gateway
The image below shows the onboarding steps for a standalone platform, which connects
an external Gateway to a MiVO400 PBX:
Onboarding a customer includes the following required and optional steps:
• Required
• Customer - Enter information about the customer including the mailing address and
admin contacts.
• Gateway-Enter information about the physical Gateway site or the virtual machine
and configure IP addresses to associate the Gateway with the CloudLink Platform.
• PBX - Enter information to configure the MiVoice Office PBX including the IP
address, CloudLink credentials, port number, and SIP trunk group credentials and
extension.
• Connect - Connect the PBX to the CloudLink Gateway and set the sync schedule.
• Optional
• Deployment - Deploy the CloudLink application associated with your PBX (for
example, Mitel One, and Mitel MiVoice Office).
• Advanced - Configure advanced settings that can be used for troubleshooting
issues, usually while working with Mitel Support.
29 CloudLink Gateway User GuideOnboard Customers
For standalone platforms, see Enter Customer Information for details about the next step
of the onboarding process (Customer).
SMBC Platform with Embedded Gateway
The image below shows the onboarding steps for an SMBC platform, which syncs an
embedded Gateway to a MiVO400 PBX:
Onboarding a customer includes the following required and optional steps:
• Required
• Customer - Enter information about the customer including the mailing address and
admin contacts.
• Gateway-Enter information about the physical Gateway site.
• Sync- Sync the CloudLink Gateway to the PBX.
• Optional
• Deployment - Deploy the CloudLink application associated with your PBX (for
example, Mitel One, and Mitel MiVoice Office).
• Advanced - Configure advanced settings that can be used for troubleshooting
issues, usually while working with Mitel Support.
For SMBC platforms, see Enter Customer Information for details about the next step of
the onboarding process (Customer).
3.3 Enter Customer Information
CloudLink Gateway User Guide 30Onboard Customers
Note:
For SMBC platforms, the Sync step is used instead of the PBX and Connect steps
shown above.
The Customer step of the onboarding process requires entering information about the
customer including defining domains and adding site administrators.
1. Enter the following information:
• Customer Information - Enter the customer's name and complete mailing
address (not necessarily the PBX location). Also be sure to select the most closely
associated value from the Business Type menu, which is used only as statistical
information to help Mitel better serve customers.
• Admin Contacts - Enter any number of contacts as site administrators to provide
these contacts with advanced privileges for managing CloudLink applications.
For example, in the Mitel One application, and MiVoice Office application, an
administrator can add, change, or delete other users from the account.
• Support Contacts - The Support Contacts for a customer account comprises
a Maintainer, Onsite Admin, or any Other contact added by the Partner user or
an administrative user of that account to whom all issue reports pertaining to that
account are sent.
• Maintainer: Maintains the system for the customer.
• Onsite Admin: Administrates the system from the site.
• Other: Any other user assigned to be a support contact for the customer
account.
When a customer reports an issue with a CloudLink application, an email is sent
to the Support Contacts. The Support Contacts are responsible for addressing
the issues reported by their customers and when needed, contact Mitel Partner
Technical Support via appropriate channels. To add a Support Contact, enter the
name and email address of the Maintainer, Onsite Admin, or any Other user as
shown in the following figure.
31 CloudLink Gateway User GuideOnboard Customers
Note:
It is mandatory to add at least one Maintainer and Onsite Admin while
onboarding a new customer. You can add as many Support Contacts as you
want.
2. Click Next to continue to configure the Gateway. Click Cancel to discard the changes
and return to the Partner dashboard. If you are a Partner, you can click Save and
Back to save the changes and return to the Partner dashboard.
See Configure the Customer Site for information about the next step of the onboarding
process (Gateway).
3.4 Configure the Customer Site
Note:
For SMBC platforms, the Sync step is used instead of the PBX and Connect steps
shown above.
The Gateway step of the customer onboarding process requires the following:
CloudLink Gateway User Guide 32Onboard Customers
For standalone and SMBC platforms, configure the customer's CloudLink Gateway site
by doing the following:
• In the Gateway Information area, enter the site name and complete address for the
physical location of the PBX if different from your business address (populated by
default).
Note:
The (preview) label associated with a country indicates that the country is recently
added to the list of countries that support complete deployment of the CloudLink
solution. If there are any issues, contact Mitel Partner Technical Support via
appropriate channels.
For standalone platforms, configure the Ethernet ports on the external Gateway
appliance or on the virtual machine by doing the following:
• In the Appliance Ethernet Configuration area, choose one of the following options.
You can configure your DHCP server to assign a fixed IP address to the CloudLink
Gateway or you can provide a static IP configuration. For more information about
these options, see the Assigning an IP Address section of the Install the CloudLink
Gateway Appliance topic.
• Select DHCP to enable your DHCP server to set the necessary IP addresses.
• Select Static to manually set the following IP addresses:
• IP Address (static IP address assigned to Port 1)
• Subnet Mask (subnet mask of the LAN to which Port 1 is connected)
• Default Gateway (IP address of the router that the CloudLink Gateway will use to
route IP traffic to the Internet)
• DNS Servers (IP addresses separated by commas with the primary DNS server
listed first)
For all platforms, click Save or Next.
For standalone platforms, see Enter PBX Information for details about the next step of
the onboarding process (PBX).
For SMBC platforms, see Connect or Sync the PBX for information about the next step of
the onboarding process (Sync).
33 CloudLink Gateway User GuideOnboard Customers
3.5 Enter PBX Information
The PBX step of the customer onboarding process requires entering information about
the PBX to begin establishing a connection between it and the CloudLink platform.
Note:
The PBX step is required for standalone platforms only. For SMBC platforms, go to
Connect or Sync the PBX for information about the Sync step (used instead of the
PBX and Connect steps shown above).
1. Enter the information described below:
• PBX Type - Make sure the model PBX (MiVoice Office 400) utilized by your
CloudLink account is selected.
• PBX Name - Enter any name (used as the PBX ID for your CloudLink applications).
• IP Address - Enter the IP address of the MiVoice Office 400 PBX.
• Port - Enter the port number if different than the default port number selected for the
CSTA service during Configure MiVO400 on Standalone Platform.
• CloudLink System Username - Enter the same username entered during Configure
MiVO400 on Standalone Platform.
• CloudLink System Password - Enter the same password entered during Configure
MiVO400 on Standalone Platform.
2. Click Save.
For both standalone and SMBC platforms, see Connect or Sync the PBX for details
about the next step of the onboarding process (Connect or Sync).
3.6 Connect or Sync the PBX
This step of the customer onboarding process is to connect or sync the Gateway to the
PBX.
Connect or Sync your MiVO400 PBX to the CloudLink Gateway using the instructions
below for your platform type:
CloudLink Gateway User Guide 34Onboard Customers
Standalone Platform with External Gateway on page 35
SMBC Platform with Embedded Gateway on page 35
Standalone Platform with External Gateway
1. When you see the Start PBX Connection dialog, click the green Connect button. A
"Connection successful" message should appear as shown below.
2. In the PBX Sync Schedule box, enter the desired number of minutes.
3. If an error message is displayed, see Troubleshoot Errors for information about
resolving an error.
4. Click Next.
SMBC Platform with Embedded Gateway
1. When you see the Sync PBX Data dialog, click the green Sync button. A "Sync
successful" message should appear as shown below. If this includes a warning
message about missing email addresses, click the view list of these users link to
identify the users who are missing an assigned email address in the PBX. Without an
35 CloudLink Gateway User GuideOnboard Customers
assigned email address, a user cannot register their Mitel One or Mitel MiVoice Office
applications.
2. If an error message is displayed, see Troubleshoot Errors for information about
resolving an error.
3. Click Next.
Note:
For PBX users who have already been imported into CloudLink, any change in the
user name made on the PBX will not be synced to CloudLink.
For both standalone SMBC platforms, see Deploy the CloudLink App for details about
the next step of the onboarding process (Mitel One or Mitel MiVoice Office).
3.7 Deploy the CloudLink App (optional)
This optional step of the customer onboarding process enables you to deploy the
CloudLink application.
CloudLink Gateway User Guide 36Onboard Customers
Note:
For SMBC platforms, the Sync step is used instead of the PBX and Connect steps
shown above.
Deploying the Mitel One or Mitel MiVoice Office apps require sending deployment emails.
Send Deployment Emails
To specify the users to whom deployment emails will be sent, use the Select Users
option (see the following figure).
Clicking this option displays the Eligible user list (see the following figure) which lists all
users who have a configured email address in the MiVoice Office 250 PBX. To specify
users to whom deployment emails (welcome emails) will be sent, select the checkbox
beside their name and then click Send Deployment Emails.
Note:
You cannot send deployment emails to eligible users who have the same email
address.
37 CloudLink Gateway User GuideOnboard Customers
For both platforms (standalone and SMBC), see Configure Advanced Settings and
Options for information about the next and last (optional) step of the onboarding process
(Advanced).
Finish building the Account
Users must click the Finish building your account button in the welcome email they
receive to register their information with Mitel and build an account to be able to log in
to the Mitel One application or MiVoice Office application. For more information, see
Register and Access the Mitel One Web Application or see the Register Your MiVoice
Office App topic in MiVoice Office documentation respectively.
Registered Users
To view a list of all users who have successfully completed building their user accounts,
click the Show Registered Users option. The Registered user list page opens (see the
following figure), listing the name, phone extension number, and the email address of all
registered users.
CloudLink Gateway User Guide 38Onboard Customers
For both platforms (standalone and SMBC), see Configure Advanced Settings and
Options for information about the next and last (optional) step of the onboarding process
(Advanced).
3.8 Configure Advanced Settings and Options
Note:
For SMBC platforms, the Sync step is used instead of the PBX and Connect steps
shown above.
This step of the customer onboarding process enables selecting advanced settings and
options that are useful for troubleshooting issues, especially when working with Mitel
Support.
Advanced Settings
You can define leading digits for the following types of calls to manage conflicts for
complex route selection plans.
• Inbound Digits - Define digits that will be used to route calls directed from CloudLink
applications to the PBX.
39 CloudLink Gateway User GuideOnboard Customers
• Outbound Digits - Define digits that will be used to route calls directed from the PBX
to CloudLink applications.
Automatic Update Schedule
When the Gateway installs an update, a short service outage can occur where users
may have trouble placing calls through the Gateway. It is recommended that you select
an automatic update time as shown below and click Save to minimize the impact of
the service outage. Note that updates are periodic, there may be no update when the
schedule calls for an update checkpoint, and not every update causes an outage.
Logs
Mitel product support may request logs from the Gateway if it is not connected to the
CloudLink platform. Use the Download Logs button to copy the logs to your browser so
you can provide them to Mitel support.
CloudLink Gateway User Guide 40Onboard Customers
Trace Calls
Mitel product support may request that you trace calls for a specific period of time during
which the Gateway can collect detailed information about your Voice Over IP (SIP) calls.
You can then download the traced call information to your browser so you can provide it
to Mitel support. This option is typically used for forensic analysis of degraded call quality.
System Options
If you have a standalone platform with an external Gateway, as a last resort, after
consulting with Mitel Support, you may need to use one of the System Options shown
below:
• Factory Default – Choose this option to reset the Gateway to the factory default
settings. The Gateway will need to be reprogrammed after choosing this option. If
needed, contact Mitel Support for guidance.
Note:
The Factory Default option is available only for the physical gateway; it is not
available for the virtual gateway.
• Reboot – Choose this option to reboot the Gateway and recover service if the
Gateway is not working correctly.
If you have an SMBC platform with an embedded Gateway, the System Options shown
above are not available. However, an administrator can apply the Restart command
to the Mitel-CloudLink Gateway in the Software > Applications screen of the SMB
Controller Manager admin console as shown below.
41 CloudLink Gateway User GuideSystem Version This section of the screen indicates when updates are available and enables you to apply the updates immediately without waiting for the next scheduled update checkpoint.
Configure a MiVoice Office 400 PBX                                                         4
   This chapter contains the following sections:
   •   Configure MiVO400 on Standalone Platform
   •   Configure MiVO400 on SMBC Platform

   The following deployments are supported when using a MiVoice Office 400 PBX on the
   CloudLink Platform.

   Supported Deployments

   • MiVoice Office 400 PBX on a standalone platform with an external gateway.

     • M470 is supported (M430 and M415 are not supported)
     • Virtual Appliance is supported
   • MiVoice Office 400 PBX on an SMBC platform with an embedded gateway.

   Prerequisites:

   • MiVoice Office 400 PBX Release 6.1 or later.
   • Requires current Software Assurance and end user licensing.
   • The CloudLink Gateway must be on the Master Node in an AIN (Advanced Intelligent
     Network) environment.
   • The "CloudLink Gateway for SMBC" is required for SMBC platforms.

       Note:

       CloudLink applications can be installed on a customer’s MiVoice Office 400 PBX along
       with most other applications except the MiCollab client.

   To find out if a customer deployment has been successfully completed or if more work is
   required, access the Partner Dashboard in the CloudLink Gateway Portal and view the status
   message for the desired customer.

   When the PBX configuration work has been completed, which includes all Customer
   Onboarding work, the CloudLink Gateway is automatically configured and there is no
   additional programming to do. Note that all changes made to the MiVoice Office PBX are
   propagated immediately to the CloudLink Platform.

CloudLink Gateway User Guide                                                                    43
You can also read