Sage 300 2020 Installation and Administration Guide - August 2019
←
→
Page content transcription
If your browser does not render page correctly, please read the page content below
Sage 300 2020
Installation and Administration Guide

August 2019
This is a publication of Sage Software, Inc.

© 2019 The Sage Group plc or its licensors. All rights reserved. Sage, Sage logos, and Sage
product and service names mentioned herein are the trademarks of The Sage Group plc or its
licensors. All other trademarks are the property of their respective owners.

Last updated: August 12, 2019
Contents

Chapter 1: Introduction
System Requirements ............................................................................................. 1–1
Network Configuration ............................................................................................ 1–2
   Typical Network Configurations ........................................................................... 1–3
Where To Now? ...................................................................................................... 1–5

Chapter 2: Installing Sage 300 Programs
Before You Begin.................................................................................................... 2–1
    Installation Considerations ................................................................................. 2–1
Using Sage 300 Sample Data ................................................................................... 2–3
Installing Sage 300 ................................................................................................ 2–4
    Installing the Programs ...................................................................................... 2–4
    Entering License Information .............................................................................. 2–6
Setting Up Workstations.......................................................................................... 2–8
    Workstation Setup Utility.................................................................................... 2–8
    Setting Up a Workstation ................................................................................... 2–9
Running Sage 300 Intelligence Reporting for the First Time ......................................... 2–9
Where To Now? .................................................................................................... 2–10

Chapter 3: Database Setup
Overview of Database Setup .................................................................................... 3–1
Creating System, Company, and Portal Databases ..................................................... 3–1
   Creating Microsoft SQL Server Databases ............................................................. 3–2
Setting Up Company and System Databases .............................................................. 3–9
   Setting Up a System Database ............................................................................ 3–9
   Assigning Company Colors ............................................................................... 3–12
   Setting Up a Company Database ....................................................................... 3–13
Setting Global Security Options .............................................................................. 3–15
Where To Now? .................................................................................................... 3–17

                                                                       Installation and Administration Guide          iii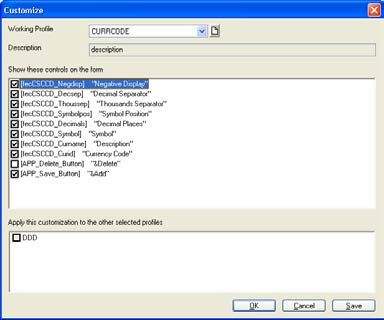
Chapter 4: Activating Sage 300
Before You Begin.................................................................................................... 4–1
Signing On to a New Company ................................................................................. 4–2
Creating the Company Profile .................................................................................. 4–4
    Entering Company Information ........................................................................... 4–5
Activating Your Data ............................................................................................... 4–8
Change the Administrator’s Password ..................................................................... 4–10
    Change the ADMIN Password ............................................................................ 4–11
Where To Now? .................................................................................................... 4–12

Chapter 5: Configuring Sage 300 Web Screens
Overview............................................................................................................... 5–1
Configuring Security for Web Screens ....................................................................... 5–2
Configuring the Portal Database ............................................................................... 5–3
   Configuring a Microsoft SQL Server Express Database............................................ 5–4
   Configuring English Windows to Display Chinese ................................................... 5–5
Setting Up a User Account for IIS and Windows Services............................................. 5–5
Starting the Sage 300 Web Screens ......................................................................... 5–6

Chapter 6: Performing Administrative Tasks
Add Users ............................................................................................................. 6–1
   Using Windows as the Authentication Method ....................................................... 6–3
Set Up Security Groups and Assign User Authorizations .............................................. 6–5
   Create Security Groups ...................................................................................... 6–5
   Authorizing Users .............................................................................................. 6–6
Create and Assign UI Profiles for Customized User Interface Forms .............................. 6–7
Set Up Customization Directories ........................................................................... 6–11
Remove Sage 300 Programs .................................................................................. 6–11

Chapter 7: Licensing Sage 300
Licensing Products and Users ................................................................................... 7–1
    LanPak Licenses ................................................................................................ 7–2
Creating a Temporary LanPak License ....................................................................... 7–2
Requesting Activation Codes .................................................................................... 7–4
Updating Your Sage 300 Licenses ............................................................................. 7–5
    Viewing License Information ............................................................................... 7–7
Monitoring LanPak Activity ...................................................................................... 7–7

iv   Sage 300
Chapter 1
                                                              Introduction
                   Read all chapters in this guide before you install or set up a new
                   installation of Sage 300.

                   This guide provides the information you need to:

                   •   Install Sage 300.

                   •   Set up databases for use with Sage 300.

                   •   Set Sage 300 security.

                   •   Set up Workstations to run Sage 300.

                   •   Activate your data for new accounting programs.

                   •   Configure the Sage 300 web screens.

                   •   Set up users and groups, and perform other administrative tasks.

                   •   Understand Sage 300 licensing.

                   The order of topics in this self-teaching guide matches the sequence of
                   tasks you would typically perform to install and set up Sage 300.
Integration with   To find out how to integrate Sage 300 with Sage CRM, see the Sage CRM
Sage CRM
                   Integration Guide.
Important!         This guide contains troubleshooting tips and technical information on
                   configuring supported operating systems and database engines for use
                   with Sage 300. However, this guide is not a replacement for a qualified
                   network or database administrator.

                   Depending on your purchase agreement, some features described
                   in this guide may not be available in your product.

System Requirements
                   Before you can install Sage 300, your hardware and your operating
                   system must be correctly configured and fully operational.

                   For a complete list of hardware and operating system requirements for
                   workstations and servers, see the Compatibility Guide:
                   https://support.na.sage.com/selfservice/viewdocument.do?externalId=26777

                                                        Installation and Administration Guide   1–1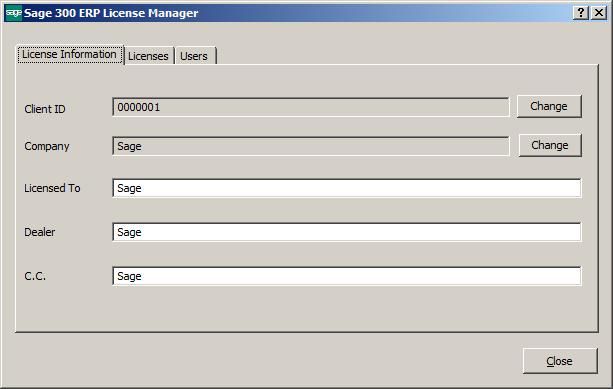
Network Configuration

Network Configuration
                  You can configure Sage 300 in a number of ways. The best configuration
                  for your company depends on the number of users who need to use Sage
                  300 programs and data concurrently, and your network setup.

                  Each network configuration contains the following components:

                  •     Server — The computer that hosts the Sage 300 data, and optionally,
                        Sage 300 programs.
                        In a small workgroup, a workstation may act as a server, providing
                        other workstations with access to Sage 300 data and programs.
                  •     Workstation — A computer that connects to a server to access Sage
                        300 programs and/or data. A workstation may:
                        −   Run the Sage 300 desktop.
                        −   Connect to Sage 300 via an Internet browser.
                        −   Connect to another workstation or server using Remote Desktop
                            Protocol (RDP).
                  •     Database Engine — The software used to create, retrieve, update,
                        and delete data from a database.
                        Sage 300 works with the Microsoft SQL Server database engine only.
                        Refer to the System Requirements section for supported versions.
                  •     Sage 300 Program Files — These include:
                        −   The Sage 300 System Manager.
                        −   Accounting applications, such as Accounts Receivable and Accounts
                            Payable.
                  •     Sage 300 Shared Data — This includes:
                        −   Site folder.
                        −   User folder.
                        −   Data.
                        −   Company folder.
                        −   License Files (*.lic).
                  •     Sage 300 Databases — In Sage 300, there are two types of
                        databases:

                        −   The System database stores information on users, passwords,
                            security groups, security settings, and currency for all the
                            companies that are linked to it.

                        −   The Company database contains information that is shared by all
                            the company’s accounting applications. This includes the company

1–2   Sage 300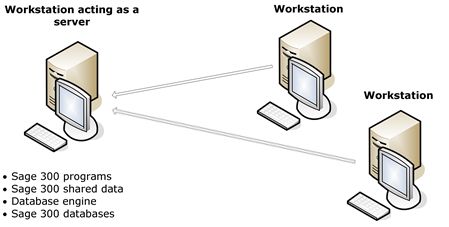
Network Configuration

              profile, fiscal calendar, optional field data, tax information for both
              sales and purchases, bank information, and all the accounting data
              for the company. Each company database must be linked to a
              system database.

Typical Network Configurations
       This section describes the most common network configurations,
       including:

       •   Single computer.

       •   Windows peer-to-peer network.

       •   Client-server network.

     Single “Standalone” Computer

       Installing on a single computer is the simplest configuration. All
       components are installed on one computer.

     Windows Peer-to-Peer Network

       A Windows peer-to-peer network allows the server and workstations to
       share resources. This type of network is good for small workgroups,
       consisting of two to five workstations networked together using Microsoft
       Windows Network. One of the workstations acts as a server, allowing
       other computers to access data stored on its hard drive.

       If more than two users require concurrent access to Sage 300 data or
       programs, the workstation acting as the server should be dedicated. You
       may encounter performance issues if you run Sage 300 on the server at
       the same time as other users are accessing Sage 300 from their
       workstations.

                                            Installation and Administration Guide   1–3
Network Configuration
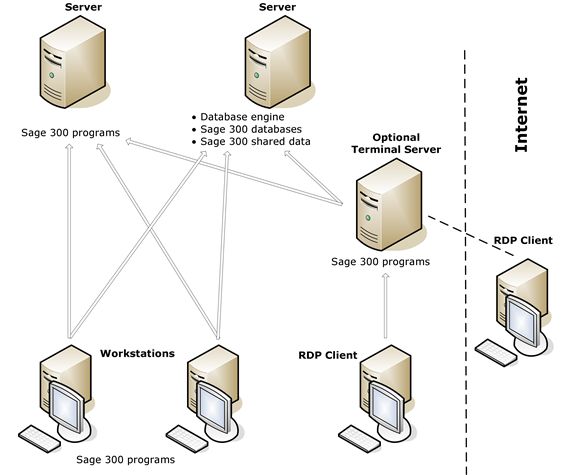
Client-Server Network
In a client-server configuration, Sage 300 programs and databases are on
one or more dedicated servers.
The optional Terminal Server may also reside on the same physical server.
Workstations may access programs as well as data from the server(s), or
may have Sage 300 programs installed locally for better performance.
Note:On each workstation that will run Sage 300 programs locally,
you must install System Manager and the accounting applications.
If you use Sage 300 Intelligence Reporting, note that:
• Databases must reside on a single server.
• If you use a Citrix server, there are some special considerations. For
more information, see the Sage 300 Intelligence Reporting Citrix
Installation Guide.
1–4 Sage 300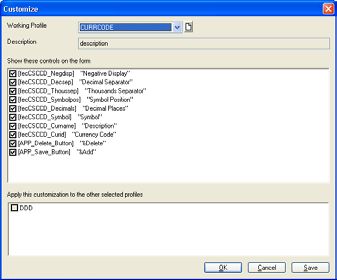
Where To Now?
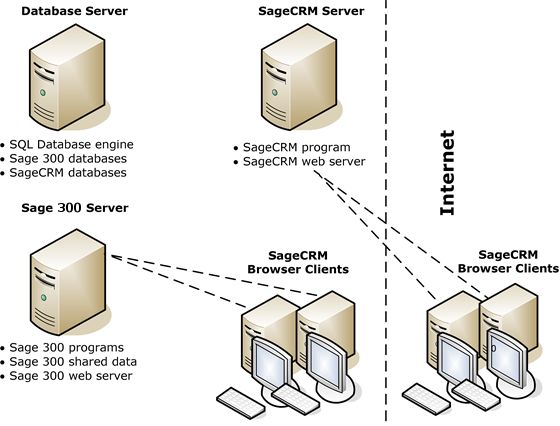
Sage 300 Integrated with Sage CRM
Similar to Sage 300, Sage CRM can be installed locally, or on a server, or
be deployed on the Web.
In the illustration below, we’ve shown the Sage 300 Web server and the
Sage CRM Web server on separate computers.
Note:The Sage 300 and Sage CRM Web server can reside on the
same computer. Typically, one database server stores both the
Sage CRM and Sage 300 data.
Recommendation For better security and performance, do not store shared data on the Web
server.
For more information about integrating Sage 300 with Sage CRM, see the
Sage CRM Integration Guide.
Where To Now?
You are now ready to install Sage 300.
Installation and Administration Guide 1–5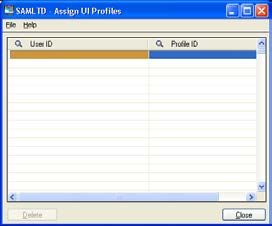
Chapter 2
                   Installing Sage 300 Programs
                      This Chapter explains how to install System Manager, Sage 300
                      accounting programs, and Sage 300 Intelligence Reporting.

Before You Begin
Understand the        Before proceeding, be sure you understand the different system
implications for
                      configurations and their implications for installing Sage 300:
your chosen
configuration
                      •   On a single workstation and on a network.

                      •   Over different operating systems.

                      Use the information in Chapter 1, “Introduction,” to help you determine
                      the configuration that best meets your company’s needs.
Make sure your        Also, make sure that the computer on which you are installing Sage 300
system meets
                      meets at least the minimum system requirements for the configuration
minimum
requirements          you choose. For up-to-date information on system requirements, see the
                      Compatibility Guide:
                      https://support.na.sage.com/selfservice/viewdocument.do?externalId=26
                      777
If you are
upgrading…                WARNING:   If you are upgrading an existing system to the current
                          version of Sage 300, use the instructions in the Sage 300 Upgrade
                          Guide to prepare for and upgrade to the current version.

         Installation Considerations
                      Read the following sections before you install Sage 300.

                   Considerations for Installing on a Windows Peer-to-Peer Network

                      Before installing or upgrading Sage 300 on a Windows Peer-to-Peer
                      network, be aware of the following special considerations:

                      •   Each workstation must be running Windows 7 or Windows 8.

                      •   A maximum of five users is supported when running in a peer-to-peer
                          environment.

                                                         Installation and Administration Guide   2–1
Before You Begin
• If more than two users require concurrent access to Sage 300 data or
programs, the workstation acting as the server should be dedicated.
You may encounter performance issues if you run Sage 300 on the
server at the same time as other users are accessing Sage 300 from
their workstations.
• On the workstation that will be acting as the server, share the Sage
300 Program and Shared Data folders, as follows:
− Share the Program and Shared Data folders.
− On each workstation, use Universal Naming Convention (UNC)
paths to connect to the shared folder. For example, \\server\share.
If you choose to map a drive letter to the shared folder on the
server, then in the Map Network Drive window, select the
Reconnect at Logon check box to create a persistent connection.
Considerations for 64-bit Windows Operating Systems
Sage 300 is a 32-bit program. When you create a data source for Sage
300, you must use the 32-bit version of the ODBC Administrator.
In 64-bit versions of supported Windows operating systems, you can find
the 32-bit ODBC Administrator in the following location:
C:\Windows\SysWOW64\odbcad32.exe.
Considerations for Installing the Sage 300 Web Screens
Sage 300 web screens bring the power of Sage 300 to your web browser,
providing a browser-based interface for Sage 300, with graphical
presentations of key financial data.
If you intend to install the Sage 300 web screens, you must first:
• Ensure that Microsoft’s Internet Information Services (IIS) is installed
on the server that will host the Sage 300 web screens.
If IIS is not installed, install it before you attempt to install the Sage
300 web screens.
2–2 Sage 300Using Sage 300 Sample Data
• When selecting Windows features, under World Wide Web Services’
Application Development Features, select the ASP, CGI, ISAPI
Extensions, and ISAPI Filters options, as shown here:
Using Sage 300 Sample Data
Sage 300 comes with two sample company databases that let users
experiment and become familiar with Sage 300 features before they work
with your company data. The two databases are:
• SAMINC. A single-currency database for a US company named
Sample Company Inc. It uses the US Payroll program.
• SAMLTD. A multicurrency database for a Canadian Company named
Sample Company Ltd. It uses the Canadian Payroll program.
Both databases contain data for the following accounting modules:
• General Ledger
• Accounts Receivable
• Accounts Payable
• Inventory Control
• Order Entry
• Purchase Orders
• Payroll (US or Canadian)
• Project and Job Costing
You can choose to install sample data when you install Sage 300.
Note: If you use Sage 300 Intelligence Reporting, sample data is
required for demonstration reports.
Installation and Administration Guide 2–3Installing Sage 300
Installing Sage 300
You install Sage 300 System Manager, System Manager Components, and
all Sage 300 accounting applications in one continuous process, consisting
of two phases:
1. Installing the programs.
2. Entering license information (unless you have already installed licenses
for this version).
Installing the Programs
1. Insert the Sage 300 installation DVD into your DVD drive.
If the installation screen does not appear automatically, go to the DVD
root directory (for example, d:\), and run LAUNCH.EXE.
A screen may appear prompting you to install one or more programs
and tools that are required by Sage 300.
2. On the installation screen, click View Pre-Installation Checklist. Print a
copy of the checklist and follow all steps before you continue.
3. On the installation screen, click Sage 300.
4. On the Sage 300 installation screen, click Sage 300.
5. On the Welcome screen, click Next.
6. Click the option to accept the license agreement, and then click Next.
7. Select the geographical region where you are installing the software,
and then click Next.
8. For the client information, enter your 7-digit or 10-digit client ID and
the company name to use for registration, and then click Next.
9. For the optional information, enter a contact person, your dealer, and
certified consultant, and then click Next.
10. Select the edition of Sage 300 you require, and then click Next.
11. Specify the names and locations of your program and data folders, and
then click Next.
Note: To use web screens, you must specify the full path for the
shared data folder (do not specify a mapped drive) and a local path
for the programs folder (do not specify a mapped drive or a UNC
path).
2–4 Sage 300Installing Sage 300
12. On the Select Features screen, select features and applications to
install, and then click Next.
Program Most of the applications require you to install others, and all of them
dependencies
require core System Manager files. The following list shows any
additional requirements in parentheses for each application:
• Bank Services (requires Tax Services, G/L Subledger Services).
• Accounts Payable (requires Bank Services, Tax Services, G/L
Subledger Services).
• Accounts Receivable (requires Bank Services, Tax Services,
G/L Subledger Services).
• Inventory Control (requires G/L Subledger Services).
• Order Entry (requires Accounts Receivable, Inventory Control, Tax
Services).
• Purchase Orders (requires Accounts Payable, Inventory Control,
Tax Services).
• Project and Job Costing (requires G/L Subledger Services, Accounts
Payable, Accounts Receivable, Tax Services).
• G/L Consolidations (requires General Ledger).
• Intercompany Transactions (requires General Ledger).
• Sage Intelligence Reporting (requires the Financials Suite).
• Payment Processing (requires Accounts Receivable, Order Entry,
and Sage Exchange).
13. On the next screen, in the Program Folder field, type the location on
the Start menu where you want Sage 300 to appear, then click Next.
14. Click Install.
Enter activation Once installation has finished, the Sage 300 License Manager appears if
codes
you have not already installed licenses for this version. Follow the
instructions in the next section to enter license information.
Installation and Administration Guide 2–5Installing Sage 300
Entering License Information
The License Information tab shows information entered during installation:
Note:Do not change the company name unless you need to
change the business entity to which the programs are registered.
If you change the company name, the licenses will appear
Unauthorized, until you apply for and enter new activation codes.
To enter Sage 300 license information:
1. If you have activation codes for your Sage 300 programs, click the
Licenses tab, then, for each Sage 300 program:
a. Double-click in the Serial Number column, and then enter the serial
number.
b. Double-click in the Activation Code column, and then enter the
activation code.
c. For subscription licenses, double-click in the Expiry Date column,
and then enter the expiry date.
If you don’t yet have activation codes, you can use the 30-day
temporary licenses created during installation, and record the
permanent code later, as described in Chapter 7, “Licensing Sage
300.”
2–6 Sage 300Installing Sage 300
2. If you installed Analysis Connector modules for Sage 300 Intelligence
Reporting, enter their activation codes on the Licenses tab.
Note: The Report Manager, Report Viewer, Analysis, and Connector
programs are not available with a 30-day license. You must have a
permanent license to use them. (Sage 300 comes with one free
Report Manager license.)
3. Click the Users tab.
Note: The system allows you to register only one LanPak license. If
a temporary LanPak license exists for this version, skip to step c,
and then follow the remaining instructions to enter your permanent
registration on the existing line.
a. Right-click the grid, and then select Insert from the menu that
appears. The new entry shows your current Sage 300 version and
edition.
b. In the new line, double-click the License Type column, and then
select LanPak from the list.
Do not select a database-specific entry!
c. Double-click in the Count column, and then type the total number
of users who require Sage 300 access for this installation. (The
count is the sum of existing users plus the new users for whom
you’re adding LanPak licenses.)
If you have a permanent license for this version, and you are asked
if you want to overwrite the existing license, click Yes.
The system immediately deletes any existing LanPak licenses.
d. Double-click in the Serial Number column, and then type the
LanPak serial number that Sage provided.
e. Double-click in the Activation Code column, and then type the
activation code that Sage provided.
If you don’t yet have an activation code, you can create a
temporary license by leaving the activation code blank.
f. Press Tab, or click elsewhere on the grid, to leave the field.
The system changes the Count to the purchased amount (if
necessary) and enters Activated in the Activation Code field.
LanPak
IMPORTANT: You must record at least one LanPak license to use
Sage 300.
Installation and Administration Guide 2–7Setting Up Workstations
For Sage 300 Intelligence Reporting, one Report Manager license for
one user is free with Sage 300. If you have additional licenses for
Report Manager and Report Viewer, enter their activation codes in the
Activation Code column.
4. Click Close.
5. Click Finish to close the Installation wizard.
Setting Up Workstations
Workstation Setup Utility
The Workstation Setup utility is a component of the System Manager
installation. It installs the components that a workstation requires to run
System Manager and accounting modules on a server.
You must run Workstation Setup on each workstation that will run Sage
300 programs from a server.
Note: You do not need to run Workstation Setup on a workstation
to use the Sage 300 web screens.
Do not run Workstation Setup if:
• The workstation will run Sage 300 programs locally.
In this case, install Sage 300 System Manager and the accounting
applications on the workstation, as described earlier in this chapter.
• The workstation is using Remote Desktop Protocols (RDP) to remotely
control another workstation or server.
In this case, install Remote Desktop Client on your remote computer.
Then, connect through a Terminal Server or directly to a workstation
or server that is configured for remote access.
Note: This guide does not include instructions for setting up
terminal services or RDP. Talk to your network administrator about
this option.
2–8 Sage 300Running Sage 300 Intelligence Reporting for the First Time
Setting Up a Workstation
1. Share your Sage 300 program folder, with at least the following
permissions for users:
− Read
− Read and Execute
2. Share your Sage 300 data folder, with Full Control permission for
users.
3. Create your system and company databases. For more information,
see Chapter 3, “Database Setup.”
4. On the workstation, run the Workstation Setup utility:
a. Locate the setup.exe file for the utility. By default, it is in the Sage
300 program folder on the server where you installed Sage 300:
\\\\WSSetup\setup.exe
b. Right-click setup.exe, and then click Run As Administrator.
5. Enter the paths for your shared program folder and data folder.
Running Sage 300 Intelligence Reporting for the
First Time
The first time you run Sage 300 Intelligence Reporting, you must log in as
the Windows administrator.
A user with Windows administrator privileges must register the ActiveX
component, BICore.exe, that Intelligence Reporting requires. To register
this component, open any Sage 300 Intelligence Reporting form. Once the
component is registered, other types of users can open these forms.
If you use workstation setup, you must also run Sage 300 Intelligence
Reporting workstation setup (located in BX66A\WSSetup) on every
workstation where you will view and use Intelligence Reporting screens.
Installation and Administration Guide 2–9Where To Now?
Where To Now?
New installation If you are installing Sage 300 for the first time, you must create and set
up system and company databases.
If you plan to use the Sage 300 web screens, you must also create a
portal database.
For information on setting up databases for Sage 300, see Chapter 3,
“Database Setup.”
Activating data Once you have set up company and system databases, you can activate
your data for the current version, as described in Chapter 4, “Activating
Sage 300.”
Configuring the If you installed the Sage 300 web screens, you need to configure them to
web screens
connect them to the portal database.
For information about configuring the Sage 300 web screens, see
Chapter 5, “Configuring Sage 300 Web Screens.”
Grace period for You can use temporary licenses for 30 days while you wait for your
temporary licenses
activation codes. However, you must enter activation codes before the
grace period ends, or you will no longer have access to Sage 300.
For instructions on updating your licenses, see Chapter 7, “Licensing Sage
300.”
Upgrading an If you are upgrading an existing system, refer to the Sage 300 Upgrade
existing system
Guide for steps on activating your data and for important information
about the conversion of your data, including additional steps you may
need to take before and after activation.
2–10 Sage 300Chapter 3
Database Setup
In this chapter, you’ll learn how to create your Sage 300 system,
company, and portal databases, and how to set global security options.
This chapter does not provide detailed instructions on how to install or
configure database software. See your database or network administrator
for detailed instructions and support.
To get the most recent list of supported database versions, see the
Compatibility Guide:
https://support.na.sage.com/selfservice/viewdocument.do?externalId=26
777
Overview of Database Setup
Before you can create a company in Sage 300, you must create system
and company databases using Microsoft SQL Server.
Portal database If you plan to use the Sage 300 web screens, you must also create a
portal database in Microsoft SQL format. Normally, you create the portal
database on the same server as your company database.
After creating the databases using your database software, you use the
Database Setup utility to set up the databases for Sage 300.
Creating System, Company, and Portal Databases
In Sage 300, there are three types of databases:
• System Database. Stores information on users, passwords, security
groups, security settings, and currency for all the companies that are
linked to it. You must create a system database before creating a
company database.
• Company Database. Contains information that is shared by all the
company’s accounting applications. This includes the company profile,
fiscal calendar, optional field data, tax information for both sales and
purchases, bank information, and all the accounting data for the
company. Each company database must be linked to a system
database. Multiple company databases can be linked to the same
system database.
Installation and Administration Guide 3–1Creating System, Company, and Portal Databases
• Portal Database. The portal database stores files used by the
Sage 300 web screens.
The portal database is shared by all companies in a Sage 300
installation, so you set up only one portal database.
Database ID Sage 300 uses a Database ID to identify databases. Each ID is a unique
code of uppercase characters, consisting of letters from A to Z, or
numbers from 0 to 9, or any combination of letters and numbers.
Note: The ID for system and company databases cannot be more
than six characters long. This restriction does not apply to portal
database IDs.
For simplicity, we recommend that the Database ID, the database, the
folder for the database, and the Data Source Name (DSN) be identical.
The sections that follow provide instructions for creating system,
company, and portal databases.
Creating Microsoft SQL Server Databases
Creating Databases in SQL Server Management Studio
1. On the server, On Windows’ Start menu, select Programs > Microsoft
SQL Server > SQL Server Management Studio.
The Connect to Server screen appears.
2. For Server type, select Database Engine.
3. Accept the Server name that is displayed (the name of the computer
you are currently working on).
4. For Authentication, we recommend that you use SQL Server
Authentication.
Important! You must use SQL Server authentication for the portal database.
Type in the database administrator’s Login name and Password.
5. Click Connect to open SQL Server Management Studio.
6. In the Object Explorer panel, expand the folder tree for the SQL
Server, and then expand the Databases folder tree.
7. Right-click Databases, and then select New Database… from the menu.
3–2 Sage 300Creating System, Company, and Portal Databases
The New Database window appears, as follows:
8. In the Database name field, type the 6-character name for the system
database.
9. In the Database files section:
a. In the Initial Size column, specify the amount of disk space that
SQL Server will initially reserve for the Sage 300 database. For new
databases, use the default value.
b. In the Autogrowth column, you can select whether the container
grows by a fixed percentage or by a fixed amount of disk. For new
databases, use the default value.
10. In the left pane, click Options.
Installation and Administration Guide 3–3Creating System, Company, and Portal Databases
a. For English-language support, use Latin1_general_bin or
Latin1_general_ci_as the collation method.
Collation method We recommend that you use a binary collation method, such as
Latin1_general_bin.
b. For Recovery Model, select Full.
11. Click OK.
Extended
Properties Warning: If you are setting extended properties for your database,
make sure you do not turn on the XACT_ABORT property. This
feature is not supported by Sage 300.
12. Repeat steps 7 to 11 to create your company database. In step 8, type
the 6-character name for the company database.
13. Repeat steps 7 to 11 to create your portal database. In step 8, type
the 6-character name for the portal database. (We recommend using
PORTAL as the name of your portal database.)
Creating and Assigning Database Rights to a SQL Login ID
A SQL Login ID is required to log in to a Sage 300 database. The ID is not
revealed to users; Sage 300 uses this ID internally when it connects a
user to the SQL Server.
Important! To improve the security of your system, you should use
a different SQL Login ID for the portal database than the SQL Login
ID specified for system and company databases.
3–4 Sage 300Creating System, Company, and Portal Databases
1. In SQL Management Server Studio, in the left-side Object Explorer
panel, expand the Security folder.
2. Right-click Logins and then click New Login… from the right-click
menu.
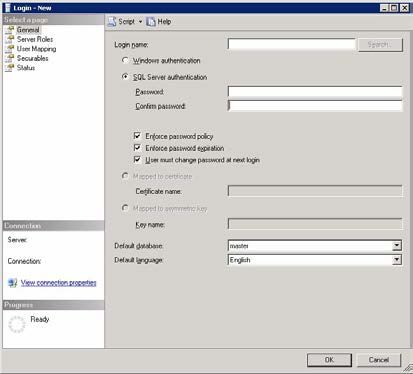
The New Login form appears, as follows:
3. In the Login name field, type a name for your new SQL Login ID.
4. Select SQL Server Authentication, and then type in a password, and
confirm it.
5. Click OK to save your changes.
In the Object Explorer, your new Login name appears within the
Logins folder.
6. Assign database rights to the new SQL Login ID.
a. In the Object Explorer, expand the Logins folder, and then double-
click the new Login name you created.
The Login Properties form appears.
b. In the left pane, click Server Role, and in the right pane, select
sysadmin.
c. In the left pane, click User Mapping.
d. In the Database column, select the system and company databases
you created.
e. Under Database role membership for, select db_owner.
f. Click OK to save your changes.
Installation and Administration Guide 3–5Creating System, Company, and Portal Databases
Creating ODBC Connections on Client Workstations
If you are using a DSN to connect to your SQL databases on the server,
on all client workstations, create an ODBC connection to your databases.
Important! If you do not create a Data Source (DSN) to connect to your databases,
Sage 300 can connect to the SQL Server directly using the server name
and default settings.
1. Open the ODBC Data Source Administrator.
Sage 300 is a 32-bit application. When you create a data source for
Sage 300, you must use the 32-bit version of the ODBC Administrator.
In 64-bit versions of supported Windows operating systems, you can
find the 32-bit ODBC Administrator in the following location:
C:\Windows\SysWOW64\odbcad32.exe.
2. Select the System DSN tab, and then click Add.
The Create New Data Source form appears:
3–6 Sage 300Creating System, Company, and Portal Databases
3. Select SQL Server Native Client 11, and then click Finish.
The Create A New Data Source To SQL Server form appears:
4. Enter the following information for the Data Source:
a. In the Name field, type the 6-character name of the system
database.
b. Type an optional description.
c. Select the database server from the list.
Note: When creating the DSN for a portal database, if you specify
a named instance of SQL Server, be sure to append the database
port number. For example, specify SERVER\INSTANCE,1433. (If
you use a nonstandard port, specify that number instead of 1433.)
5. Click Next. The following form appears:
Installation and Administration Guide 3–7Creating System, Company, and Portal Databases
6. Enter authentication information:
a. Select SQL Server authentication.
b. Select Connect To SQL Server To Obtain Default Settings For The
Additional Configuration Options.
c. In the Login ID field, type in the SQL Login ID and password that
you created in the previous section.
7. Click Next.
The following form appears:
8. Select the option Change The Default Database To, and then select
Database For This Connection. Leave the other fields at their default
values.
9. Click Next, and then Finish to create the ODBC data source.
10. Click Test Data Source to test the connection to the database.
Where To Now?
Now that you have created system and company databases in your
database management system, you need to set them up for use with
Sage 300, as described in the section “Setting Up Company and System
Databases,” later in this chapter.
If you set up a portal database, you need to configure it, as described in
Chapter 5, “Configuring Sage 300 Web Screens.”
3–8 Sage 300Setting Up Company and System Databases
Setting Up Company and System Databases
Use the Sage 300 Database Setup utility to configure your system and
company databases for use with Sage 300. The Database Setup utility is
installed with Sage 300 System Manager.
Important! Only the Sage 300 ADMIN user can use the Sage 300 Database Setup
utility, which allows the ADMIN user to:
• Add, edit, and delete system and company databases.
• Configure the Sage 300 web screens.
• Turn on security for a system database.
• Select advanced security settings, such as password options, that
apply to all users.
Setting Up a System Database
1. On the server, On Windows’ Start menu select All Programs >
Sage 300 > Database Setup.
The Sign-on form appears:
2. Sign in using the administrator (ADMIN) password.
Note: The default password is “admin.”
Change ADMIN After creating your databases and activating your applications,
password
change the ADMIN password to prevent unauthorized use of
Sage 300. It is important that other users do not have access to the
system administrator’s tasks.
Installation and Administration Guide 3–9Setting Up Company and System Databases
The Database Setup form appears:
Note: What you see may be different, depending on whether
sample data was installed, whether other Sage 300 databases have
already been created, and whether company colors have been
assigned.
3. Click New, or press the Insert key.
The New Database form appears:
4. In the Database ID field, enter the name of the DSN you created for
the system database.
Note: The Database ID always defaults to uppercase, and cannot
be changed after it is assigned.
5. For Database Category, select System.
6. Click OK.
3–10 Sage 300Setting Up Company and System Databases
7. Fill in the fields on the Edit Database Profile form that appears:
a. In the Description field, type a description for the database, using
up to 60 characters. The Database ID is displayed by default.
b. Click the Data Source option, and then select the data source name
from the Data Source field, or specify the server name for the
database in the Server field. (Only data sources you created on
your workstation appear in the list.)
Note that the names of the data sources must be consistent on all
workstations that use the same shared Data directories.
Remember, also, to type the name with the same capitalization
that you used to define it with the ODBC Administrator.
c. Enter the SQL Login ID that you created for all Sage 300 users.
Warning Make sure you enter the SQL Login ID correctly because you will
not be able to change it after you save the database profile.
d. Enter the Password for the Login ID you entered in the previous
field.
When users sign on to Sage 300, the System Manager verifies their
Sage 300 passwords, then logs onto SQL Server using the Login ID
and password specified here. Individual Sage 300 users do not
need Login IDs for SQL Server.
e. Enter the name of the database you created as the Sage 300
system database. Make sure you use the same capitalization that
you did when you defined it with the SQL Enterprise Manager.
Installation and Administration Guide 3–11Setting Up Company and System Databases
f. If you intend to limit user access to accounting data, select the
Enable Application Security option. (You can select this option only
for system databases, not for company databases.)
With security on, all access to application windows is then
controlled by Sage 300’s own security system. With security off,
Sage 300 still uses the SQL Server Login ID and Password to gain
access to the database, but it doesn’t restrict access to Sage 300
users.
g. Click OK.
Assigning Company Colors
If you use Sage 300 to manage multiple companies, you can assign a
unique color to each company. This color appears in a border around Sage
300 forms, making it easier to see which company's information you are
viewing and avoid data entry errors.
Colors assigned to companies appear on the Database Setup form:
To assign colors to companies, select the Assign Colors Automatically
option. Sage 300 assigns default colors to all companies for which you
have set up databases.
You can assign colors to all companies, or to as few or as many companies
as you like.
On the Edit Database Profile form, you can change the color assigned to a
specific company, or turn off the company color option for that company.
If you want to clear all colors, click the Clear All Colors button on the
Database Setup form.
3–12 Sage 300Setting Up Company and System Databases
Setting Up a Company Database
1. If Database Setup is not already running, On Windows’ Start menu,
select Programs > Sage 300 > Database Setup.
2. Sign in using the administrator (ADMIN) password.
The Database Setup form appears:
Note: What you see may be different, depending on whether
sample data was installed, whether other Sage 300 databases have
already been created, and whether company colors have been
assigned.
3. Click New, or press the Insert key.
The New Database form appears:
Installation and Administration Guide 3–13Setting Up Company and System Databases
4. In the Database ID field, enter the name of the DSN you created for
the company database.
Note: The Database ID always defaults to uppercase, and cannot
be changed after it is assigned.
5. For Database Category, select Company.
Note: For company databases, the Database ID will appear in the
title bar of windows that contain company data, such as Company
Profile, Fiscal Calendar, and Optional Tables.
6. Select the system database ID you created earlier.
7. Click OK.
8. Fill in the fields on the Edit Database Profile form that appears:
a. In the Description field, type a description for the database, using
up to 60 characters. The Database ID is displayed by default.
3–14 Sage 300Setting Global Security Options
b. Click the Data Source option, and then select the data source name
from the Data Source field, or specify the server name for the
database in the Server field. (Only data sources you created on
your workstation appear in the list.)
Note that the names of the data sources must be consistent on all
workstations that use the same shared Data directories.
Remember, also, to type the name with the same capitalization
that you used to define it with the ODBC Administrator.
c. Enter the SQL Login ID that you created for all Sage 300 users.
Warning Make sure you enter the SQL Login ID correctly because you will
not be able to change it after you save the database profile.
d. Enter the Password for the Login ID you entered in the previous
field.
e. Enter the name of the database you created as the Sage 300
company database. Make sure you use the same capitalization that
you did when you defined it with the SQL Enterprise Manager.
f. If you want to assign a color to the company, click the Select Color
button, and then select a color. This color appears in a border
around Sage 300 screens when you sign in to this company,
making it easier to see which company’s information you are
viewing and avoid data entry errors.
g. Click OK.
9. Click Exit to close Database Setup.
Setting Global Security Options
The Sage 300 System Administrator can set advanced global security
options, such as the length of passwords and how often they should
change.
The options you set affect both company and system databases.
To set global security options:
1. If Database Setup is not already running, On Windows’ Start menu,
select Programs > Sage 300 > Database Setup.
2. Sign in as ADMIN, and then click OK to open the Database Setup form.
The Database Setup form lists the system and company databases
that have been created.
Installation and Administration Guide 3–15Setting Global Security Options
3. Click the Security button.
The Advanced Security Settings form appears:
4. Select the following options as needed.
Important! Selections will apply to all Sage 300 databases listed on the Database
Setup form.
If application security is not turned on for your system database, or if
it is turned on but no password is required, the password settings on
the Advanced Security Settings form have no effect.
Require complex passwords. If a user enters a password that does
not include both letters and numbers, a “Password change is required”
message appears. When the user clicks OK, the Change Password form
opens.
Require passwords to change every [ ] days. Requires users to
change their passwords after a specified number of days. Enter a value
from 1 to 999.
Expired passwords If a password expires, users will receive a message that it has expired,
and the Change Password form will open.
Require minimum password length of [ ] characters. Requires
users to create passwords of a set length. Enter a value between 4 and
64 characters. If users enter a shorter password, they will receive the
message, “Password change is required.” When they click OK, the
Change Password form opens.
3–16 Sage 300Where To Now?
Lock out user after [ ] attempts. Enter the number of times a user
can enter an invalid password before they are locked out of the
system. When a user is locked out, they can wait for the lockout
period to expire before attempting to log in again, or the System
Administrator can clear the option, allowing the user to attempt to log
in again.
Enable locked-out user after [ ] minutes. Enter the number of
minutes between 1 and 30,000 in which a locked-out user can retry
their password.
Use time server. Synchronize you workstation’s time with a specified
server.
Note: If you restrict the hours a user can sign in to Sage 300, it is
important to use a time server to maintain this security.
5. Click OK to save your changes and return to the Database Setup form.
6. Click Exit to close Database Setup.
Where To Now?
You can now sign on to your new company, create the company profile,
and activate your data for the current version.
For information about activating your data, see Chapter 4, “Activating
Sage 300.”
If you set up a portal database (recall that you must use Microsoft SQL
Server — Express or full Edition, to create your portal database), you need
to configure it, as described in Chapter 5, “Configuring Sage 300 Web
Screens.”
Installation and Administration Guide 3–17Chapter 4
Activating Sage 300
Before you can use a new company or a new accounting application, you
must prepare your database for use with Sage 300. This process is called
activation.
This chapter describes activation and gives instructions for:
• Signing on to a new company.
• Creating the company profile.
• Activating your data for new accounting programs.
If you are If you are upgrading from an earlier version of Sage 300, you should refer
upgrading from an
to the Sage 300 Upgrade Guide, which provides specific instructions for
earlier version…
installing programs and activating data for existing Sage 300 systems.
You may need to perform additional procedures in a certain sequence
when upgrading from previous versions. Also, when you are upgrading,
you don’t need to perform some of the steps that are required for new
installations.
Set up system and You must create system and company databases using your database
company
software before you can set up the databases for use with Sage 300. The
databases, first
instructions in this chapter assume that you have created a system
database and a company database for the database engine you are using
with Sage 300. For information on setting up databases, see Chapter 3,
“Database Setup.”
Before You Begin
When you start Sage 300 with a new company database, you will need to
specify:
Number of periods • The number of fiscal periods your company uses.
in the fiscal
calendar Decide whether to use 12 or 13 periods in your fiscal year.
If you use 13 periods, decide which quarter will contain four fiscal
periods.
Functional currency • Your company’s functional currency — that is, the currency in which
your company keeps its books.
Installation and Administration Guide 4–1Signing On to a New Company
The functional currency applies to all Sage 300 applications for the
company (such as Accounts Receivable, Accounts Payable, and
Payroll).
If you use multicurrency accounting, you must also specify:
Default rate type − A default exchange rate type (for example, monthly average rate
or daily spot rate).
Determine the rate type your company uses most often to convert
amounts entered in another currency to the functional currency
− Your reporting currency, if the euro is your functional currency, and
you want to produce reports in both euro and your national
currency.
You must use the
Sage 300 Desktop Note:You must use the Desktop to activate all Sage 300 programs.
to activate You cannot activate programs in the Sage 300 web screens.
programs
Signing On to a New Company
New company When you sign on to a company, Sage 300 checks whether Administrative
Services and Common Services for the company are activated.
• If this is the first time you are using a new system database, Sage 300
prompts you to activate Administrative Services. The activation
process creates currency and security tables, installs standard
currency codes and rate types, and places the Administrative Services
icon on the Sage 300 desktop.
• The first time you open a new company, Sage 300 prompts you to
activate Common Services. When you activate Common Services, the
program creates tables to store company-wide information, displays
the Company Profile, and places the Common Services icon on the
Sage 300 desktop.
To sign on to a new company:
1. From the Windows Start menu, select All Programs > Sage 300 >
Sage 300. The Open Company form appears.
4–2 Sage 300Signing On to a New Company
Sign on with the 2. In the User ID field, type ADMIN. This is the ID for the system
ADMIN user ID
administrator, the only person authorized to set up a new company.
3. If you selected the option Enable Application Security when you set up
the system database, enter the system administrator’s password.
Company 4. From the Company list, select the name of the new company.
The list contains the names of all company databases you created for
Sage 300, as well as the names of sample companies, if you installed
sample data.
Session date 5. In the Session Date field, type the date of your work session (or accept
the default). This date will be the default Fiscal Year Starting Date
when you activate Common Services for the company.
If the system database is being used for the first time, the following
form appears:
6. Click Proceed to activate Administrative Services for the system
database.
The program displays messages showing that data is being activated.
Once Administrative Services has been created and initialized, the
program prompts you to enter the company’s fiscal year starting date
and proceed to activate Common Services, as shown here:
7. Type the starting date of your company’s current fiscal year in the
Fiscal Year Starting Date field, if it is different than the default date.
Sage 300 creates this fiscal year in your company calendar.
8. Click Proceed to activate Common Services for the company database.
Messages appear showing that tables are being created.
Installation and Administration Guide 4–3Creating the Company Profile
9. After Common Services has been created and initialized, the Common
Services Activation form appears, as follows:
The options on the Common Services Activation form belong to your
Company Profile. Follow the instructions in the next section to
complete the company profile.
If you click Cancel, you return to the Open Company form. When you
next start Sage 300 for this company, you are asked to activate
Common Services.
10. When you are satisfied with the company profile information, click OK.
Sage 300 places icons for Administrative Services and Common
Services on the company desktop.
Creating the Company Profile
This section describes the company profile information you enter when
you open a new company, such as the address and options for all the
Sage 300 applications used by your company. The Common Services
Activation form includes the following tabs:
• Address. Displays the database ID and the name of the company you
selected when you signed on. It includes fields for the address,
telephone and fax numbers, and contact name.
• Options. Contains fields for company-wide settings, such as the
number of fiscal periods in your fiscal year, and whether you use
multicurrency accounting.
4–4 Sage 300Creating the Company Profile
Entering Company Information
1. Fill in the fields on the Address tab, as follows:
You can change The address information you enter on this page also appears as the
defaulted contact
default in the Options form for each accounting application. You can
information in
subledgers change the contact, phone number, or fax number to identify a
person or position in the company for whom you are creating a
specific ledger system.
Doing Business As. Type the company’s name, exactly as you want
it to be on all reports, financial statements, customer statements, and
invoices. You can use up to 60 characters, including letters, digits,
symbols, and punctuation. The default entry is the description from
Database Setup.
Legal Name. Type the company’s legal name, if it is different from
the business name.
Address. Type the company’s address.
City. Type the name of the city where the company is located.
State/Province. Type the name of the state or province where the
company is located.
Zip/Postal Code. Type the company’s zip or postal code.
Country. Type the name of the country where the company is
located.
Contact. Type the name of a general contact person or position in the
company.
Format Phone Number. Select this option if the company’s phone
and fax numbers are 10 digits long and are formatted with standard
parentheses and hyphens, for example (555) 982-9800. Don’t select
the option if you use longer phone and fax numbers, or you need
additional punctuation.
Telephone / Fax Number. Type the company’s telephone and fax
numbers.
Except for the database ID, you can change any of the entries on this
tab at any time.
2. Fill in the fields on the Options tab, as follows:
Number of Fiscal Periods. In most cases, you select 12 periods if
your fiscal year is divided into calendar months, and 13 if your fiscal
year is divided into four-week periods.
Installation and Administration Guide 4–5You can also read