StarLeaf app
     User Guide
    08 September 2020
←
→
Page content transcription
If your browser does not render page correctly, please read the page content below
StarLeaf app
User Guide
08 September 2020
Contents
    Signing into the app                                                  6
     Minimum requirements                                                  6
         Computers and laptops                                             6
         Chromebook                                                        7
         Android phones and tablets                                        7
         iPhone and iPad                                                   7
     Localization                                                          7
     Mass-deploying StarLeaf with the MSI installer                        7
         Windows firewall behavior when using the MSI installer            8

    Joining a meeting                                                     9
     Joining from the app                                                  9
         Join with meeting ID                                             10
     Joining from a room system                                           10
     Pre-meeting audio and video options (app only)                       11
     Computer audio                                                       11
     Phone audio                                                          12
     Audio & video settings                                               12
     Meeting lobby behavior                                               12
     Virtual and blurred backgrounds                                      14

    Meeting controls                                                     15
     Icon Glossary                                                        15
     Spotlight meeting controls                                           16
     Mini call window                                                     16
     How to share your screen                                             16
     Switch between computer and phone audio                              16
     Mute controls                                                        17
     Keyboard shortcuts                                                   18
     Locking the meeting                                                  18
     Ending the meeting                                                   19
     Who is the meeting organizer?                                        19
     Who can use meeting controls?                                        19

    Making a call                                                        24
     How to make a call                                                   24
     Calling outside of your organization                                 26
     The Calls tab                                                        27
         Calls from outside of your organization                          28

    Call controls                                                        29

StarLeaf user guide, 08 September 2020                            Page 2 of 98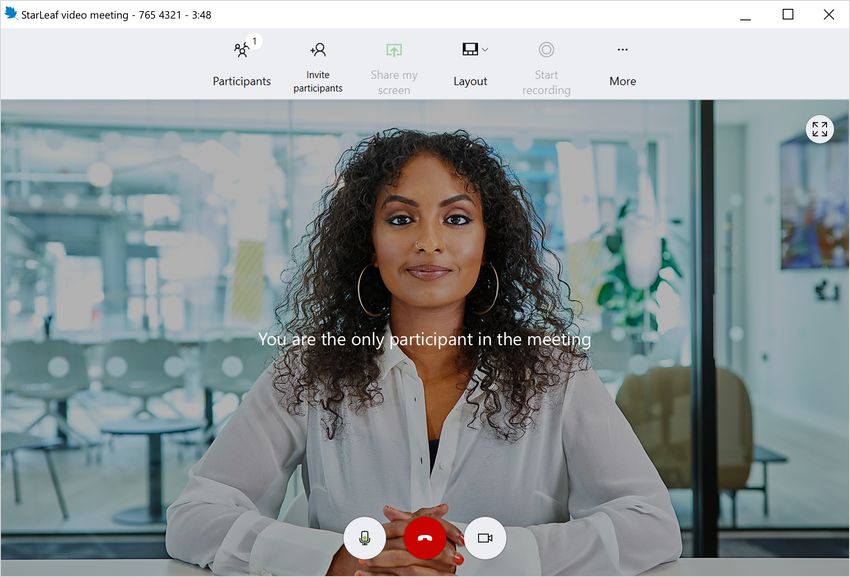
Icon glossary                                             29
     Keyboard shortcuts                                        30
     Mini call window                                          31
     How to share your screen                                  31

    Scheduling a meeting                                      32
    Share my screen                                           35
     Desktop                                                   35
           Change screen sharing                               36
           Stop screen sharing                                 37
     Android                                                   37
           How to stop sharing                                 41
     iOS                                                       42
           How to stop sharing                                 44

    Audio and video settings                                  46

    Creating a group                                          47
           About group privacy                                 47
           How to create a group                               47
           About group admins                                  48
           How to assign an admin                              49

    Sending messages                                          51
     About Chats                                               51
     How to send a message                                     51
     Message delivery status                                   52
     In-call chat                                              53
     Chat wallpaper                                            53
     How to use emojis                                         56
           Emojis on Mac                                       56
           Emojis on Windows                                   57
           Emojis on mobile                                    58

    File sharing                                              60
     How to share files                                        60
     How to view a shared file                                 61
     Supported file types and sizes                            62
     How to view your cloud storage                            62

    Calling a group                                           63
    Profile pictures and Do not disturb                       65
     About default profile pictures                            65
     How to customize your profile picture (desktop)           66

StarLeaf user guide, 08 September 2020                 Page 3 of 98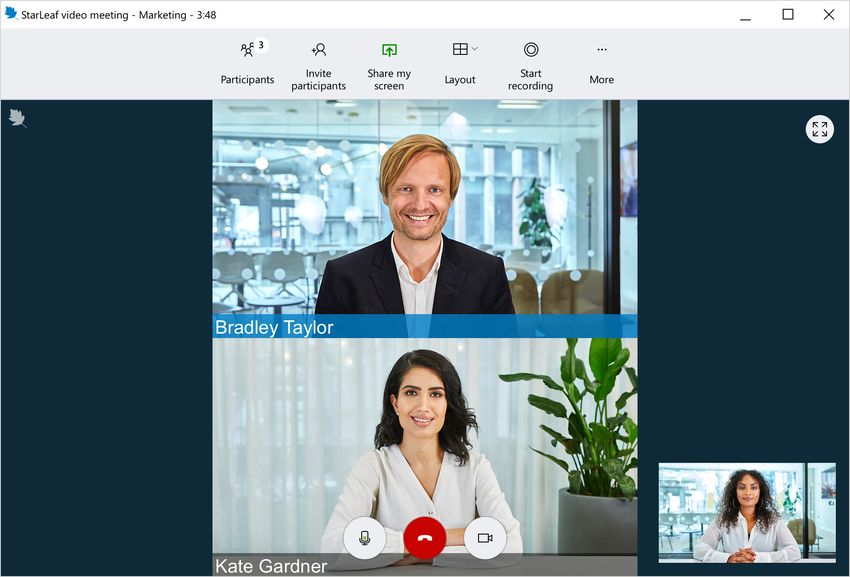
How to customize your profile picture (mobile)           66
     About online presence                                    67
         Active now                                           67
         In a call or meeting                                 68
         Do not disturb                                       68
         Offline presence                                     68
         Last seen                                            68
     Do not disturb                                           69
         How to set Do not disturb                            69
         How to end Do not disturb early                      71

    Creating favorites                                       72
    Using and securing voicemail                             73
     Recording a greeting                                     73
     Accessing voice and video mail messages                  74
     Securing your voicemail                                  75

    Invite to StarLeaf                                       76
    About permissions                                        78
     Permissions on iPhone and Android                        78
         Camera detection on Android                          78
     Permissions on macOS                                     79
     Permissions on macOS Catalina                            80

    About notifications                                      83
     Notifications on iOS and Android                         83
         Camera detection on Android                          84
     Notifications on Windows                                 85
         Red circle icon behavior                             85
     Notifications on Mac                                     86

    Troubleshooting StarLeaf app                             87
     Call quality issues                                      87
         Poor WiFi connection                                 87
         Insufficient bandwidth                               88
         Insufficient computer capability                     89
     Camera issues (desktop)                                  89
         Select the right camera                              89
         Troubleshooting camera issues                        91
     Receiving no video                                       91
     Microphone issues (desktop)                              91
         Select the right microphone                          92
         Troubleshooting microphone issues                    93

StarLeaf user guide, 08 September 2020                Page 4 of 98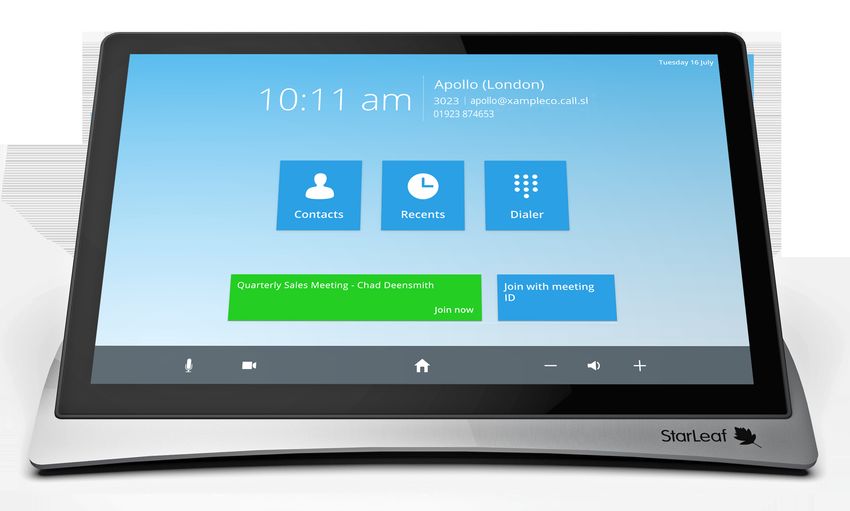
Speaker issues (desktop)                           93
     Poor lighting                                      94
     Screen flicker                                     94
     Permission issues                                  95
     Huawei phones                                      95
     Error messages and warnings                        95
     How to report an issue                             97
     Legal information                                  98
         Third party software acknowledgments           98
         Disclaimers and notices                        98

StarLeaf user guide, 08 September 2020          Page 5 of 98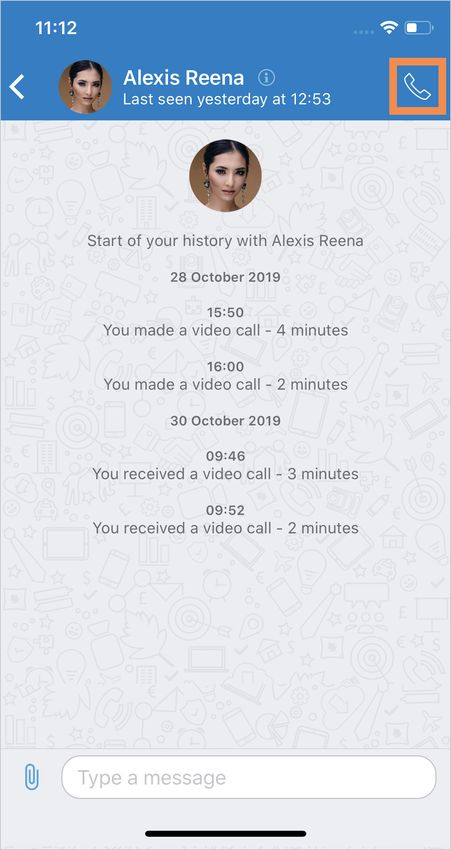
Signing into the app

 Signing into the app
 You can install StarLeaf on all of your devices by going to Downloads.

 1. Run StarLeaf on your phone, computer, or tablet and enter your email address.
 2. StarLeaf sends you an email containing your 6-digit one-time code.
 3. Type the code into the app and you are signed in on that device.

 Minimum requirements
 The StarLeaf app is available for:

 n   Windows 10, Windows 8.1, and Windows 7 Service Pack 1 (all require .NET framework 4.6
     or later)
 n   macOS 10.12 or later
 n   Chrome OS running Android 6.0 or later (Beta)
 n   iOS 11.0 or later
 n   Android 6.0 or later

 StarLeaf has the following minimum requirements and recommendations:

 Computers and laptops
 Operating system:

 n   Windows 10, Windows 8.1, and Windows 7 Service Pack 1 (all require .NET framework 4.6
     or later)
 n   macOS 10.12 or later

 Webcam: USB webcam or built-in camera (StarLeaf recommends the Logitech C920 or
 C922 1080p HD USB webcam)

StarLeaf user guide, 08 September 2020                                           Page 6 of 98
Signing into the app

 Processor: Intel Core 2 Duo or AMD Athlon X2 (StarLeaf recommends an Intel Core i5 or
 later). Content sharing and/or video functionality might be restricted with older, low
 voltage or ultra-mobile processors

 Memory: 2GB Ram or above

 Graphics card: DirectX10 compatible

 Internet connection: StarLeaf recommends download and upload speeds of 1.5 Mbp/s for
 High Definition video conferencing. Content sharing and/or video functionality might be
 restricted at speeds below 384kbps

 Chromebook
 Support for Chromebook is currently in Beta.

 Operating system: Chrome OS with Android 6.0 or later.

 Note: Some older Chromebooks do not include Android, so are unable to run StarLeaf

 Processor: Intel Core i5 or higher

 Android phones and tablets
 Operating system: Android 6.0 or later

 iPhone and iPad
 n   iPhone 5S or later
 n   iPad Air or later

 Operating system: iOS 11.0 or later

 Localization
 The StarLeaf app automatically detects the language settings of the device you are using
 (mobile or desktop) and applies the same language in the app. For example, if your
 iPhone language is set to French, the mobile StarLeaf app will set its language to French. If
 you change the language on your device, the app language will also change.

 To view the languages StarLeaf is currently available in, go to Localization of StarLeaf
 Portal, endpoints, and apps.

 StarLeaf is constantly working to provide more localization options but if your device's
 language is not yet available, the default language in the app will be English (US).

 Note: The language settings in the StarLeaf app are not affected by any changes made in
 StarLeaf Portal.

 Mass-deploying StarLeaf with the MSI installer
 StarLeaf provides an MSI installer, to mass-deploy StarLeaf for Windows to multiple end-
 users.

StarLeaf user guide, 08 September 2020                                             Page 7 of 98
Signing into the app

 1. Download the MSI file for Windows 7, 8, and 10 (all require .NET framework 4.6 or later).
    Do not install it by selecting the file.
 2. To install the MSI, run the following command as admin:
    msiexec /i StarLeaf-Installer-Windows.msi

 Note: Upgrades are carried out automatically by StarLeaf; there is no management
 overhead for the local users.

 Windows firewall behavior when using the MSI installer
 The StarLeaf MSI installer provides a machine-wide installation under the Windows
 Program Files directory. When a user logs in and launches StarLeaf, individual user settings
 are stored in files in the user’s local AppData folder. These include authentication tokens
 and preferred audio and video device.

 When the app is run for the first time following an installation using the MSI installer, the user
 may see a Windows firewall prompt. To avoid this firewall prompt, we recommend that
 the admin configures the Windows firewall to allow StarLeaf connections. As an example,
 this can be achieved by adding the following PowerShell script to Startup:

 Get-WmiObject Win32_UserProfile | Where-Object Special -eq $False | ForEach-Object -
 Process {
 $Name = "starleaf $($_.SID)"
 if (netsh advfirewall firewall show rule name="$Name" | Select-String "No rules match") {
 $Prog = "$($_.LocalPath)\AppData\Local\starleaf\starleaf"
 netsh advfirewall firewall add rule name="$Name" program="$Prog\1\starleafc.exe"
 protocol=ANY dir=in action=allow
 netsh advfirewall firewall add rule name="$Name" program="$Prog\2\starleafc.exe"
 protocol=ANY dir=in action=allow } }

 Contact StarLeaf Technical Support if you have any issues.

StarLeaf user guide, 08 September 2020                                                 Page 8 of 98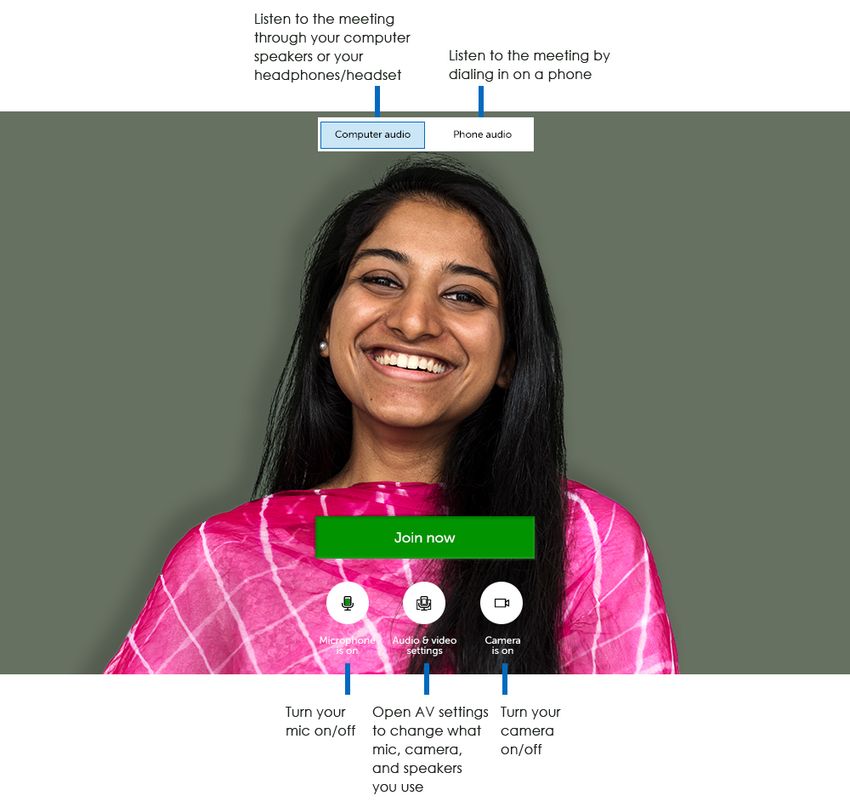
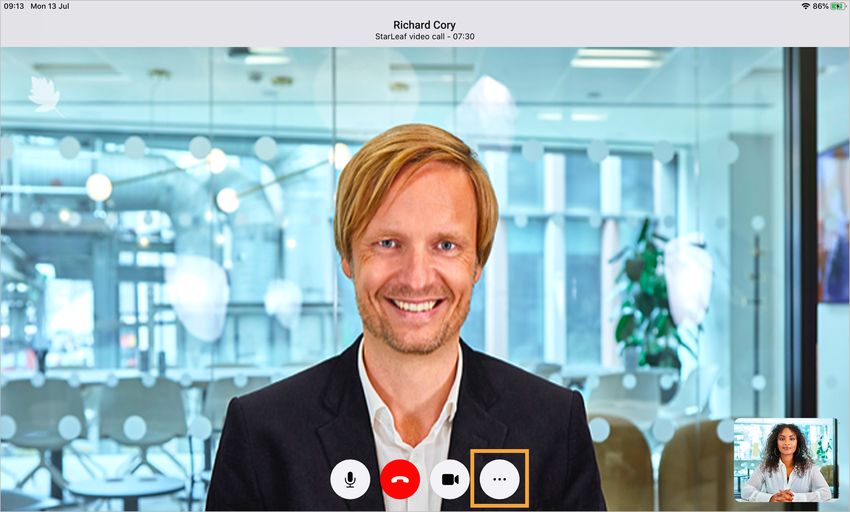
Joining a meeting

 Joining a meeting

 Join meetings on any device using the StarLeaf app or join from a room system.

 You can join scheduled meetings as soon as they are created, and for up to four weeks
 after the scheduled end time. This is especially useful if you want to join a meeting early to
 be prepared.

 On this page:

 n   Joining from the app (p9)
 n   Joining from a room system (p10)
 n   Pre-meeting audio and video options (app only) (p11)
 n   Meeting lobby behavior (p12)
 n   Virtual and blurred backgrounds (p14)

 Joining from the app
 The Today tab notifies you when a meeting begins or is due to begin. To join the meeting,
 click the green Join button.

StarLeaf user guide, 08 September 2020                                              Page 9 of 98
Joining a meeting

 Join with meeting ID
 If there is no Join button, participants can also join the meeting using the meeting ID (you
 may want to share the meeting ID with someone who did not receive an email invite, for
 example).

 To join with a meeting ID:

 1. Select Join with meeting ID.
 2. Enter the meeting ID:

 3. Click Join.

 Joining from a room system
 When you schedule a meeting, you can include a meeting room in the invite. Ten minutes
 before the meeting is due to start, the Join button lights up green on the room system
 touchscreen controller.

 Press this button to join the meeting.

 If the Join button does not light up green, you can use the meeting ID to join instead. The
 meeting ID is provided in every email invite and also visible in the meeting details in your
 app. To join from a room system:

StarLeaf user guide, 08 September 2020                                            Page 10 of 98
Joining a meeting

 1. Enter the meeting ID on the touchscreen controller using the keypad.

 2. Press the     icon.

 Pre-meeting audio and video options (app only)
 Before you enter a meeting, you see a screen that gives you time to check your audio
 and video settings before you select join now. On this screen you can:

 n   switch between computer audio and phone audio
 n   mute your microphone (so no one in the meeting can hear you)
 n   mute your camera (so no one in the meeting can see you)
 n   change the microphone, camera, and/or speakers that you use

 Computer audio
 If you choose to use computer audio, you will hear the meeting through your computer
 speakers or the headphones/headset that are connected to your computer.

 To switch between the computer speakers and any connected headphones/headset, go
 to Audio & video settings.

StarLeaf user guide, 08 September 2020                                         Page 11 of 98
Joining a meeting

 Phone audio
 If you choose to use phone audio instead of computer audio, a phone number and
 meeting ID are provided which you can use to dial in using a mobile or telephone. You still
 view the meeting on your computer.

 Phone audio is useful if you do not have a microphone in your computer, the meeting
 room you are in uses phone audio with a video screen, or your network connection is
 unstable (for example, if you are joining from a moving car).

 Audio & video settings
 Here, you can change the microphone, camera, and/or speakers you want to use on
 your computer during the meeting.

 To adjust your microphone levels, use the slider underneath Microphone. Increasing the
 level on the slider increases your transmitted volume.

 Click Play test sound to check that you have selected the right speakers or headset.

 Meeting lobby behavior
 If you are the first participant to join a meeting, or your organizer has set the meeting to
 only start when they join, you enter the meeting lobby:

StarLeaf user guide, 08 September 2020                                              Page 12 of 98
Joining a meeting

 The meeting lobby shows a full screen self-view and tells you whether:

 n   You are the only participant in the meeting
 n   You are waiting for the meeting organizer to join
 n   The meeting is locked

 You can adjust your Layout and AV settings while waiting in the meeting lobby.

 When another participant joins, you automatically leave the meeting lobby and the
 meeting starts:

StarLeaf user guide, 08 September 2020                                        Page 13 of 98
Joining a meeting

 Virtual and blurred backgrounds
 For some of your meetings (such as those that happen when you are working from
 home) you may want to obscure your background by either blurring it or replacing the
 background with something virtual.

 StarLeaf does not yet provide these features but you can change your background with
 tools such as:

 n   Snap Camera
 n   Chromacam

 Note: There is no relationship between StarLeaf and Snap Camera or Chromacam and
 users should verify that the privacy assurances of Snap Camera and Chromacam are
 sufficient to satisfy local legal requirements.

StarLeaf user guide, 08 September 2020                                       Page 14 of 98
Meeting controls

 Meeting controls
 The StarLeaf app has controls that you can use while remaining in a voice or video call.

 In-call controls are currently available in the desktop app only. On this page:

 n   Icon Glossary (p15)
 n   Mini call window (p16)
 n   How to share your screen (p16)
 n   Switch between computer and phone audio (p16)
 n   Mute controls (p17)
 n   Keyboard shortcuts (p18)
 n   Locking the meeting (p18)
 n   Ending the meeting (p19)
 n   Who is the meeting organizer? (p19)
 n   Who can use meeting controls? (p19)

 Icon Glossary
 The controls available in a meeting are shown and described below. For controls in a one-
 to-one call in the app, go to Call controls.

                       Select Participants to open the Participants panel. From here,
                       meeting participants can be added or removed. Permission to
                       manage the Participants panel differs depending on the type of
                       meeting you are in. See Who can use meeting controls? (p19)
                       below for further detail.

                       See below for more information on how to share your screen to
                       other participants using StarLeaf app for Windows or macOS

                       This is only enabled when the meeting has started or more than
                       one participant has joined.

                       Select layout to change how the video windows appear in the call.
                       To view the different video layouts available go to Meeting layouts.

                       In More you can switch between computer and phone audio, and
                       also access Audio & video settings (where you can configure the
                       camera, microphone, and speakers).

StarLeaf user guide, 08 September 2020                                             Page 15 of 98
Meeting controls
Enter and exit full-screen mode from here. This control is only
available on Windows devices. To switch between full screen
mode on other devices, double click on the video.
Spotlight meeting controls
For information on in-call meeting controls for Spotlight meetings, go to Spotlight
meetings.
Mini call window
Minimizing your meeting on a Windows or macOS device turns it into a mini call window:
You can click and drag on the video to move the call window around your screen.
Hover your cursor over the mini call window to access call controls such as microphone
and video mute. Click the maximize icon in the top-right to return the call window to its
normal size.
How to share your screen
You can share content to a call or meeting from any device. For more information, see
Share my screen.
Switch between computer and phone audio
When you are in a meeting, you can choose to switch between your computer and
phone audio if you are experiencing problems with one of them, for example. Select
More to view the audio options available.
StarLeaf user guide, 08 September 2020 Page 16 of 98Meeting controls If you select Phone audio, you will be provided with a dial-in number that you can call from your mobile or landline while viewing the meeting in your browser. Mute controls You can individually mute or unmute participants by selecting the mic icons beside their name in the participants panel. You can also choose to mute all participants or unmute all participants from options. StarLeaf user guide, 08 September 2020 Page 17 of 98
Meeting controls

 Note: In a scheduled meeting, all participants have access to these mute controls (if they
 are within the organization) and in an ad hoc meeting, only the person who initiated the
 meeting has these controls.

 Keyboard shortcuts
 When you are in a call or meeting, the following keyboard shortcuts for your microphone
 and camera are available:

  Turn microphone on / off

  Windows                                      Alt+A

  macOS                                        Shift+Command+A

  Turn camera on / off

  Windows                                      Alt+V

  macOS                                        Shift+Command+V

  Push-to-talk

  Press and hold the space bar to temporarily unmute your microphone

 Locking the meeting
 Locking a meeting prevents any more participants from joining the meeting. Those that
 attempt to join after a meeting has been locked see a screen telling them that the
 meeting is locked.

 To lock a meeting:

 1. Select Participants from the meeting controls panel.
 2. Select Options.
 3. Select Lock meeting.

 To unlock a meeting, follow steps 1 to 2 above and select Unlock meeting.

StarLeaf user guide, 08 September 2020                                          Page 18 of 98
Meeting controls

 Ending the meeting
 To end the current meeting for you and all other participants:

 1.   Select Participants from the meeting controls panel.
 2.   Select Options.
 3.   Select End meeting. A confirmation box opens.
 4.   Select End now.

 Who is the meeting organizer?
 This depends on the type of meeting.

 In a scheduled meeting: the user who originally scheduled the meeting and sent any
 invites.

 When using Meet Now: the user who started the meeting by selecting Group video
 meeting in a group or Start a meeting from the Today tab and invited others to join.

 In an ad hoc meeting: the user who created the meeting by adding another user(s) to an
 ongoing one-to-one call.

 In a Spotlight meeting: the user who originally scheduled the meeting and sent any invites.
 During the meeting, participants who are placed in spotlight will receive the same
 controls as the meeting organizer.

 Who can use meeting controls?
 Depending on the user and type of meeting, participants ' permissions and control vary
 according to scenarios below:

StarLeaf user guide, 08 September 2020                                          Page 19 of 98
Meeting controls

 StarLeaf users in the same organization as the
 meeting organizer
                                   Scheduled or Meet   Ad hoc
  Permissions                                                    Spotlight meeting
                                     Now meeting       meeting

  See the Participants panel             Yes             Yes            All

                                                                  Participants in
  Add participants                       Yes             Yes
                                                                  spotlight only

                                                                  Participants in
  Remove participants                    Yes             Yes
                                                                  spotlight only

                                                                  Participants in
  Mute individual participants           Yes             Yes
                                                                  spotlight only

  Unmute individual                                               Participants in
                                         Yes             Yes
  participants                                                    spotlight only

  Remove individual                                               Participants in
                                         Yes             Yes
  participants from the call                                      spotlight only

                                                                  Participants in
  Mute all participants                  Yes             Yes
                                                                  spotlight only

                                                                  Participants in
  Unmute all participants                Yes             Yes
                                                                  spotlight only

                                                                  Participants in
  Lock the meeting                       Yes             Yes
                                                                  spotlight only

                                                                  Participants in
  Unlock the meeting                     Yes             Yes
                                                                  spotlight only

                                                                  Participants in
  End the meeting for everyone           Yes             Yes
                                                                  spotlight only

                                                                  Participants in
  Record the meeting*                    Yes**          Yes**
                                                                  spotlight only

  Stop recording of the                                           Participants in
                                         Yes**          Yes**
  meeting                                                         spotlight only

  Spotlight meetings only:

  Move a participant into                                         Participants in
                                           -              -
  spotlight                                                       spotlight only

  Remove a participant from                                       Participants in
                                           -              -
  spotlight                                                       spotlight only

  Raise hand                               -              -            Yes

  Lower hand                               -              -            Yes

StarLeaf user guide, 08 September 2020                                 Page 20 of 98
Meeting controls
StarLeaf users in a different organization to the
meeting organizer
Scheduled or Meet Ad hoc
Permissions Spotlight meeting
Now meeting meeting
See the Participants panel No Yes All
Participants in
Add participants No Yes
spotlight only
Participants in
Remove participants No Yes
spotlight only
Participants in
Mute individual participants No Yes
spotlight only
Unmute individual Participants in
No Yes
participants spotlight only
Remove individual Participants in
No Yes
participants from the call spotlight only
Participants in
Mute all participants No Yes
spotlight only
Participants in
Unmute all participants No Yes
spotlight only
Participants in
Lock the meeting No Yes
spotlight only
Participants in
Unlock the meeting No Yes
spotlight only
Participants in
End the meeting for everyone No Yes
spotlight only
Participants in
Record the meeting* No Yes**
spotlight only
Stop recording of the Participants in
No Yes**
meeting spotlight only
Spotlight meetings only:
Move a participant into Participants in
- -
spotlight spotlight
Remove a participant from Participants in
- -
spotlight spotlight
Raise hand - - No
Lower hand - - No
StarLeaf user guide, 08 September 2020 Page 21 of 98Meeting controls
Guest Join users who have not yet signed into
StarLeaf
Scheduled or Meet Ad hoc
Permissions Spotlight meeting
Now meeting meeting
See the Participants panel Yes Yes All
Participants in
Add participants Yes Yes
spotlight only
Participants in
Remove participants Yes Yes
spotlight only
Participants in
Mute individual participants Yes Yes
spotlight only
Unmute individual Participants in
Yes Yes
participants spotlight only
Remove individual Participants in
Yes Yes
participants from the call spotlight only
Participants in
Mute all participants Yes Yes
spotlight only
Participants in
Unmute all participants Yes Yes
spotlight only
Participants in
Lock the meeting Yes Yes
spotlight only
Participants in
Unlock the meeting Yes Yes
spotlight only
Participants in
End the meeting for everyone Yes Yes
spotlight only
Participants in
Record the meeting* Yes** Yes**
spotlight only
Stop recording of the Participants in
Yes** Yes**
meeting spotlight only
Spotlight meetings only:
Move a participant into Participants in
- -
spotlight spotlight only
Remove a participant from Participants in
- -
spotlight spotlight only
Raise hand - - Yes
Lower hand - - Yes
StarLeaf user guide, 08 September 2020 Page 22 of 98Meeting controls For general information about this feature, go to Guest Join. *The recording solution is an optional extra. If enabled, only the meeting organizer can download and view the recording. To learn more about recording controls and permissions, go to StarLeaf Encore recording service. **This option may be disabled by the admin. StarLeaf user guide, 08 September 2020 Page 23 of 98
Making a call

 Making a call
 In this topic:

 n   How to make a call (p24)
 n   Calling outside of your organization (p26)
 n   The Calls tab (p27)

 How to make a call
 You can call any contact, or any group that you are a part of, in your organization:

 1. In the app, search for a contact or group by typing their name into the Search or dial
    box.
     On an iPhone, this box is at the top of the page:

 2. Select the contact or group and then the phone icon.

StarLeaf user guide, 08 September 2020                                          Page 24 of 98
Making a call
The Call options box appears.
StarLeaf user guide, 08 September 2020 Page 25 of 98Making a call
3. Select either Video call or Voice call.
Calling outside of your organization
You can also call a video address that is a series of letters, numbers, or symbols. The video
address might be known as a URI or it might be an IP address.
You might need to use such a video address when:
n You want to call third-party video-conferencing equipment such as Polycom, Lifesize,
Cisco, and Tandberg endpoints from the StarLeaf app
n You are trying to join a video conference on a third-party service such as BlueJeans
from the StarLeaf app
To call someone from the app using a video address:
1. Enter the video address in the Search or dial field in the app as shown below.
2. Select Make video call.
StarLeaf user guide, 08 September 2020 Page 26 of 98Making a call An IP address is shown in the example above. If you receive a URI as the video address, it may be in a similar format to 00000@xampleco.com. This can be entered in the same way as the IP address. The Calls tab The StarLeaf app has separate Calls and Chats tabs. Calls shows a history of calls between you and other users. The Calls list includes calls you have made, answered, and missed. The calls are arranged by time with the most recent appearing at the top of the list. The type of call (voice, video, etc.) is also specified underneath the contact or group's name. On the desktop app, select Calls from the list of options on the left-hand side to view your recent calls. On mobile devices, the Calls tab can be found at the bottom of the screen as shown below. StarLeaf user guide, 08 September 2020 Page 27 of 98
Making a call

 Note: Calls shows all recent calls in order of calling history. Chats shows all 1-to-1 and group
 chats in order of chatting history. Received calls do not affect the order of chats.

 Calls from outside of your organization
 If you receive a call from outside of your organization, the user's name and the type of call
 may be unknown. Instead, the caller's phone number may appear, as well as the
 geographical location the call is coming from. For example, see the call from London in
 the images above.

 In some cases, if you receive a video call from outside of your organization, a "caller ID"
 may appear, showing the name of the person, meeting room, or device they are calling
 from.

StarLeaf user guide, 08 September 2020                                              Page 28 of 98
Call controls

 Call controls
 The StarLeaf app has controls that you can use while remaining in a voice or video call.

 In-call controls are currently available in the desktop app only. On this page:

 n   Icon glossary (p29)
 n   Keyboard shortcuts (p30)
 n   Mini call window (p31)
 n   How to share your screen (p31)

 The controls available in a one-to-one call are shown and described below. For more
 information on meeting controls, go to Meeting controls.

 Icon glossary
                    You can send a message to a user or group while you are in a call with
                    them. They must be a StarLeaf user or a StarLeaf group, otherwise the
                    chat option is unavailable.

                    When you are in a call, select the Chat icon from the in-call features
                    at the top of the screen. This opens the chat panel to the left-hand
                    side, allowing you to send messages while remaining in the ongoing
                    call.

StarLeaf user guide, 08 September 2020                                             Page 29 of 98
Call controls
Add another person to the call by selecting Add participant. Enter
the name, number, email address or video address of the person you
wish to add to the call.
See below for more information on how to share your screen to other
participants using StarLeaf app for Windows or macOS
Transfer the call to another person. Enter a name, number, email
address or video address of the person you wish to transfer the call to.
Selecting this feature starts a call between you and the person you
wish to transfer the call to. You can then confirm to transfer the call
(this ends the call between you and the other users).
From AV Settings you can configure the camera, microphone, and
speakers. For more information about configuring your camera and
microphone, go to Audio and video settings
In More you can switch between computer and phone audio, and
also access Audio & video settings (where you can configure the
camera, microphone, and speakers).
Enter and exit full-screen mode from here. This control is only available
on Windows devices. To switch between full screen mode on other
devices, double click on the video.
Keyboard shortcuts
When you are in a call or meeting, the following keyboard shortcuts for your microphone
and camera are available:
Turn microphone on / off
Windows Alt+A
macOS Shift+Command+A
Turn camera on / off
StarLeaf user guide, 08 September 2020 Page 30 of 98Call controls Turn microphone on / off Windows Alt+V macOS Shift+Command+V Push-to-talk Press and hold the space bar to temporarily unmute your microphone Mini call window Minimizing your meeting on a Windows or macOS device turns it into a mini call window: You can click and drag on the video to move the call window around your screen. Hover your cursor over the mini call window to access call controls such as microphone and video mute. Click the maximize icon in the top-right to return the call window to its normal size. How to share your screen You can share content to a call or meeting from any device. For more information, see Share my screen. StarLeaf user guide, 08 September 2020 Page 31 of 98
Scheduling a meeting

 Scheduling a meeting
 When you schedule a meeting, you can choose when your meeting takes place and who
 attends. Your invitees then receive email invites to your meeting.

 To schedule a meeting, go to the Meetings tab and select Schedule. This is how it looks on
 an iPhone:

 You are then directed to the StarLeaf Portal in your browser where all meeting
 management takes place.

StarLeaf user guide, 08 September 2020                                            Page 32 of 98
Scheduling a meeting

 1. Go to Meetings > Schedule meeting. You can see the Schedule meeting page.

 2. Add the details you require for Title and Description. These are included in the meeting
    invites.
 3. Set the time and date for your meeting.
      l  Select a start and end time and date for your meeting
      l  Set a repeat if this meeting happens on a regular basis
      l  If your organization has purchased the recording solution, select Record meeting to
         record this meeting
 4. Add Participants by email address. Separate email addresses with commas. You can
    include anyone's email address. If participants do not already have StarLeaf, the 'invite'
    email describes how to sign up as a guest or join using a browser. The invite also
    describes how to join your conference from any other standards-based video
    conferencing equipment and includes PSTN (telephone) numbers for audio-only
    participants.
 5. If there are room systems in your organization, you can add one or more Meeting
    rooms. This means that your participants know which meeting rooms are in the
    meeting if they want to walk along to the nearest one.
 6. Advanced settings:
      l  Keep people on hold until: Use this setting to determine whether people are able
         to talk to each other before you join the meeting
      l  Time zone: If you are in a different time zone to the one displayed here, correct it.
         This ensures that everyone to whom you send an invite knows the correct time for
         your meeting

StarLeaf user guide, 08 September 2020                                           Page 33 of 98
Scheduling a meeting
l Layout : You can choose a layout for the meeting. Video layouts are described
later in this document
7. Click OK.
Note: If you are a Microsoft Outlook user, you can also schedule a meeting directly in
Outlook. To do so, you will need the StarLeaf Outlook add-in. For more information, refer
to the Knowledge Center.
StarLeaf user guide, 08 September 2020 Page 34 of 98Share my screen
Share my screen
You can share content into a meeting from any device:
n Desktop (p35)
n Android (p37)
n iOS (p42)
Desktop
You can share a specific screen or application when you are in a meeting or one-to-one
call, using StarLeaf for Windows or macOS.
1. Click Share my screen on the top toolbar.
2. Select a screen or application you want to share. Your content automatically starts
sharing.
While you are sharing, the Share my screen control turns green, and a mini toolbar
appears at the top of your screen.
If the content you are sharing is windowed, a green border appears around it:
StarLeaf user guide, 08 September 2020 Page 35 of 98Share my screen Change screen sharing To change the screen or application that you want to share: 1. Click the green sharing button on mini toolbar. StarLeaf user guide, 08 September 2020 Page 36 of 98
Share my screen

 2. Select a different screen or application. Your content automatically starts sharing.

 Stop screen sharing
 To stop screen sharing:

 1. Click Stop on the mini toolbar.

 Android
 To share your screen on an Android device:

StarLeaf user guide, 08 September 2020                                          Page 37 of 98
Share my screen

 1. Touch the more options button.

StarLeaf user guide, 08 September 2020     Page 38 of 98
Share my screen

 2. Select Share my screen.

 3. Your device may notify you that you are about to broadcast your screen. Touch Start
    now to start sharing your screen.

StarLeaf user guide, 08 September 2020                                       Page 39 of 98
Share my screen
Your screen is now shared to the call or meeting:
StarLeaf user guide, 08 September 2020 Page 40 of 98Share my screen How to stop sharing To stop sharing your screen: StarLeaf user guide, 08 September 2020 Page 41 of 98
Share my screen
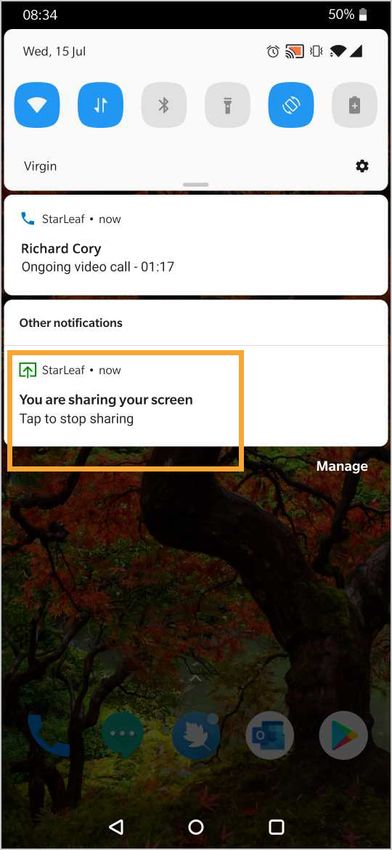
1. Open your mobile quick settings from the top of your screen:
2. Touch the StarLeaf sharing notification.
Your screen is no longer shared and you are redirected back to your call.
iOS
You can screen share on iOS devices running version 13.4 or later. To share your screen on
an iOS device:
StarLeaf user guide, 08 September 2020 Page 42 of 98Share my screen 1. Touch the more options button. 2. Select Share screen. StarLeaf user guide, 08 September 2020 Page 43 of 98
Share my screen

 3. Touch Start broadcast.

    Your screen is now shared to the call or meeting:

 How to stop sharing
 To stop sharing your screen:

StarLeaf user guide, 08 September 2020                    Page 44 of 98
Share my screen
1. Touch the broadcasting icon in the top right corner of the screen.
2. Select Stop.
Your screen stops sharing to the call or meeting.
StarLeaf user guide, 08 September 2020 Page 45 of 98Audio and video settings
Audio and video settings
You can configure the camera, microphone, and speakers settings in the desktop app.
These settings can still be accessed if you are in a call.
1. Go to your Account page in the desktop app.
2. Go to Audio & video settings.
3. Select the audio and video devices you want to use from the options available to you.
To adjust your microphone levels, use the slider underneath Microphone. Increasing
the level on the slider increases your transmitted volume.
Click Play test sound to check that you have selected the right speakers or headset.
StarLeaf user guide, 08 September 2020 Page 46 of 98Creating a group
Creating a group
You can create a group with one or more contacts in your organization. You can call,
send messages to, and start meetings with a group.
To learn more about groups, select a topic below.
n About group privacy (p47)
n How to create a group (p47)
n About group admins (p48)
n How to assign an admin (p49)
About group privacy
A group can be created by anyone and can be private or public.
A private group is only visible to people who are invited to join by the group admin. A
public group is visible to everyone in the organization and anyone can join without an
invitation.
Note: If a user leaves or is removed from a private group, the chat history and shared
content is no longer accessible or visible to that user.
How to create a group
1. From the app, select the add button. On an iPhone, this is at the top of the screen:
2. Choose New group.
3. Set the group details: Group name, Description (optional), Privacy , and Group avatar
(select the camera icon to change this).
Select Next.
StarLeaf user guide, 08 September 2020 Page 47 of 98Creating a group 4. Add users to your group by typing their name in to the search bar and selecting them. 5. When you have added the contacts you want, select Create group. About group admins If you create a group, you automatically become the admin of that group. StarLeaf user guide, 08 September 2020 Page 48 of 98
Creating a group

 Admins can add and remove people from a group. Admins can also choose to make
 anybody else in the group another admin. They can remove their own admin status as
 long as there is at least one other admin in the group.

 When an admin leaves a group

 In a group's information panel, members are listed in the order of when they originally
 joined or were added to the group. If a member leaves and rejoins, they regain their
 original position in the order.

 There must always be at least one admin in a group. If the only admin happens to leave a
 group, admin rights are automatically transferred to the member in the list who joined the
 group first. For example, if the group creator is the only admin in a group and leaves the
 group, the member who joined or was added to the group immediately after the creator
 automatically becomes the admin.

 How to assign an admin
 An admin of a group can promote another member to admin and also demote someone
 from admin.

 To promote a member to admin:

 1. Go to i, the information page of the group.
 2. Select the member you want to make admin.

StarLeaf user guide, 08 September 2020                                           Page 49 of 98
Creating a group

3. Select Make group admin.

 If you want to remove a member's admin status, take the same steps as above and select
 Demote from admin.

StarLeaf user guide, 08 September 2020                                      Page 50 of 98
Sending messages

 Sending messages
 On this page:

 n   About Chats (p51)
 n   How to send a message (p51)
 n   Message delivery status (p52)
 n   In-call chat (p53)
 n   Chat wallpaper (p53)
 n   How to use emojis (p56)

 About Chats
 The Chats tab is where you can find all your one-to-one and group conversations in the
 app. Chat conversations with the most recent activity in them are listed first.

 How to send a message
 You can send a message to any person or group in your organization and this will open a
 chat with them. Here is an example of how to start a chat with someone on your iPhone:

 1. In the app, search for a person or group by typing their name or email address into the
    Search or dial field.

StarLeaf user guide, 08 September 2020                                         Page 51 of 98
Sending messages
2. Type your message in the text field.
On a mobile device, select to send the message. Select Enter to add a new line.
On a desktop, select Enter to send the message. Select Shift + Enter to add a new line.
Message delivery status
When you send a message, the app lets you know the status of that message:
StarLeaf user guide, 08 September 2020 Page 52 of 98Sending messages
(3 dots) and the time at which The message has not reached the Cloud. You are
you sent the message not currently online
(one tick) and the time at The message has successfully reached the Cloud
which you sent the message and will be delivered to the recipient(s)
(eye) and the time at which The message has been read by all recipients
you sent the message
In-call chat
You can send a message to a user or group while you are in a call with them. They must be
a StarLeaf user or a StarLeaf group, otherwise the chat option is unavailable.
When you are in a call, select the Chat icon from the in-call features at the top of the
screen. This opens the chat panel to the left-hand side, allowing you to send messages
while remaining in the ongoing call.
Note: The in-call chat feature is currently available in the desktop app only.
Chat wallpaper
A background wallpaper is available in chat conversations.
StarLeaf user guide, 08 September 2020 Page 53 of 98Sending messages To change your wallpaper in the app: StarLeaf user guide, 08 September 2020 Page 54 of 98
Sending messages

 1. Go to Account > Chat wallpaper.

StarLeaf user guide, 08 September 2020       Page 55 of 98
Sending messages

 2. Select the wallpaper you wish to use or no wallpaper.

 How to use emojis
 The StarLeaf app supports the use of emojis on mobile devices and desktop (macOS and
 Windows 10 or later).

 Emojis on Mac
 On a Mac, select the emoji icon beside the type field in a chat to display the emoji
 viewer.

StarLeaf user guide, 08 September 2020                                          Page 56 of 98
Sending messages

 To close the emoji viewer, select Esc on your keyboard.

 Emojis on Windows
 Emojis only work on Windows version 10 or later. On a Windows desktop, you can display
 the emoji viewer using a keyboard shortcut while typing in a chat.

 Press the Windows key and the period or semicolon key together.

 The emoji viewer appears as shown below. In the app type field, the emoji may appear in
 black and white, but it will appear in color in the Chat when you select send.

StarLeaf user guide, 08 September 2020                                        Page 57 of 98
Sending messages

 To close the emoji viewer, select Esc on your keyboard.

 Emojis on mobile
 On most iOS and Android devices, there is a dedicated emoji key on the device's
 keyboard.

StarLeaf user guide, 08 September 2020                                       Page 58 of 98
Sending messages

 Note: If you have an iOS device and you cannot see the emoji key on your keyboard, it
 may not be added in your phone's settings. To add it, go to Settings > General > Keyboard
 > Keyboards

StarLeaf user guide, 08 September 2020                                        Page 59 of 98
File sharing

 File sharing
 File sharing allows you to send and receive all types of files such as images, videos, and
 documents in the StarLeaf app.
 To learn more about file sharing, select a topic below:

 n   How to share files (p60)
 n   How to view a shared file (p61)
 n   Supported file types and sizes (p62)
 n   How to view your cloud storage (p62)

 How to share files
 The example below shows how to share files in the StarLeaf app for iOS.

 1. From your StarLeaf app, go to Chats and select the person or group you wish to send a
    file to.
 2. Select the paperclip icon beside Type a message.
 3. Select either Camera, Photos, or Files to search for a file.

StarLeaf user guide, 08 September 2020                                             Page 60 of 98
File sharing 4. Select the file when you have located it. 5. Add a caption or message to your file (optional). 6. Select the send button. Your file is sent. Note: In desktop versions, it is possible to drag and drop a file into the type field How to view a shared file When you receive a file from another user in the StarLeaf app, it appears in your chat with that user (or group). StarLeaf user guide, 08 September 2020 Page 61 of 98
File sharing

 Select the cloud icon in the middle of the file to download and view it.

 Note: It is not yet possible to delete a shared file in the app

 Supported file types and sizes
 File sharing in the StarLeaf app supports all types of files - images (e.g. JPG, PNG, & GIF),
 videos (e.g. MP4, AVI) and documents (e.g. PDF, DOC, & DOCX).

 The maximum file size that can be shared is 1GB.

 As shown in the image above, file size and type are displayed on the image in the bottom
 left and right-hand corners.

 How to view your cloud storage
 To view your cloud storage allowance and usage:

 1. In the app, go to Account.
 2. Select Current plan.

 There are three headings under Your cloud storage:

 n   Allowance: the total storage allowance for your organization
 n   Remaining: the total storage remaining and available to use by your organization
 n   You are using: the storage amount that only you are using

StarLeaf user guide, 08 September 2020                                               Page 62 of 98
Calling a group

 Calling a group
 You can call a group instantly by using the Meet now feature.

 1. Search for a group by typing the name into the search or dial box (you can do this from
    the Favorites, Chat, or Calls tab).

 2. Select the group.
 3. In the group, select the Meet now icon as shown below.

 4. On a mobile device, select Meet now.

StarLeaf user guide, 08 September 2020                                         Page 63 of 98
Calling a group
On a desktop, select Start.
5. Other participants in your group can join the Meet now by going onto the group chat
and selecting Join.
StarLeaf user guide, 08 September 2020 Page 64 of 98Profile pictures and Do not disturb
Profile pictures and Do not disturb
You can customize your profile picture and set your online presence with StarLeaf app.
Select a topic below to learn more:
n About default profile pictures (p65)
n How to customize your profile picture (desktop) (p66)
n How to customize your profile picture (mobile) (p66)
n About online presence (p67)
n Do not disturb (p69)
About default profile pictures
When you first sign into StarLeaf app, create a group chat, or make a call, StarLeaf assigns
a default profile picture:
Another StarLeaf app user whom you can message. Signified by
the first initials of the user's first and last name
A group (public or private)
A voice call to, or from, an unknown number. This can be an
incoming, missed, or outgoing call
A call to, or from, a StarLeaf-registered room system in your
organization
A call to, or from, an external contact that is in your company
directory or in your personal contacts. This can be a video or voice
call, but you cannot message these contacts
A call to, or from, a unknown H.323/SIP/StarLeaf/Skype for Business
URI (one that is not in the company directory or in personal
contacts). For example, a StarLeaf app user in a different
organization, or an H.323 URI
A permanent meeting (a virtual meeting room that anyone can
dial into at any time)
StarLeaf user guide, 08 September 2020 Page 65 of 98Profile pictures and Do not disturb
How to customize your profile picture (desktop)
To upload, change, or remove your profile picture:
1. Go to the Account tab.
2. Click the camera icon at the top of the window.
3. Choose to:
l Select file from your file explorer and click Open
l Remove your current profile picture. A default profile picture replaces it.
How to customize your profile picture (mobile)
To upload, change, or remove your profile picture:
StarLeaf user guide, 08 September 2020 Page 66 of 98Profile pictures and Do not disturb
1. Go to the Account tab.
2. Touch the camera icon at the top of the screen.
3. Choose to:
l Take photo using your in-built camera
l Choose from files and upload a photo from your libraries
l Remove your current profile picture. A default profile picture replaces it.
About online presence
Presence information allows other app users to know whether you are currently online, in a
call, offline, or have Do not disturb set.
When a user is active in the app, a presence icon appears over their profile picture.
If there is no presence icon on their profile picture, then the user is offline. A user can
appear offline when they have not interacted with the keyboard or mouse for 120
seconds or they have locked their PC/Mac.
Active now
A green circle over a profile picture indicates that a user is currently active in the app and
available to call or chat.
On mobile devices, a user is active now while the app is open in the foreground of their
mobile device. In the desktop app, a user appears active now when they are active on
their desktop while the app is running.
StarLeaf user guide, 08 September 2020 Page 67 of 98Profile pictures and Do not disturb In a call or meeting An orange circle with a handset over a profile picture indicates that the user is currently in a call or meeting. This can be: n A one-to-one voice or video call that the user has made or answered from the app n An ad-hoc or scheduled meeting that the user has joined from the app Do not disturb A red circle over a profile picture indicates that the user has set Do not disturb on their app. As long as Do not disturb is set, the user does not receive notifications for calls, messages, or meetings. For more information, see How to set Do not disturb (p69). Offline presence When a user is offline, there is no presence icon over their profile picture. On mobile devices, a user appears offline when the app is closed or has been pushed to the background of their mobile device. On a desktop, a user appears offline when the app is closed or the user is inactive on their desktop even though the app is still running. Last seen When a user is offline, a Last seen message appears under their name in the chat. This shows the date or time the user was last online. StarLeaf user guide, 08 September 2020 Page 68 of 98
Profile pictures and Do not disturb

 Do not disturb
 You can set your online presence to Do not disturb from any device.

 When Do not disturb is set, all notifications for messages, calls, and meetings are disabled.

 Do not disturb can be set for 30 minutes, 1 hour, 2 hours, 8 hours, or Until... (a specific date
 and time chosen by the user).

 How to set Do not disturb
 To set Do not disturb from the app:

StarLeaf user guide, 08 September 2020                                                Page 69 of 98
Profile pictures and Do not disturb

 1. Select the bell icon from any screen.

 2. Choose a duration or Until...

 3. If you select Until... , choose a specific date and time and select Set . When Do not
    disturb is active, a red presence icon appears on your profile picture.

StarLeaf user guide, 08 September 2020                                           Page 70 of 98
Profile pictures and Do not disturb How to end Do not disturb early To end Do not disturb early, select the bell icon and choose End now. StarLeaf user guide, 08 September 2020 Page 71 of 98
Creating favorites

 Creating favorites
 You can star people, groups, room systems, and permanent meetings to appear in your
 Favorites. This allows you to access them quickly and easily.

 1. Search for a contact, group, room system or permanent meeting by typing its name
    into the Search or dial box at the top of the page.

 2. Select the        icon.

 3. Select the         icon. This will turn bold, indicating that the contact has been added
    to your Favorites.

 To remove a favorite, select the star so that it is no longer bold. The contact is removed
 from your Favorites.

StarLeaf user guide, 08 September 2020                                            Page 72 of 98
Using and securing voicemail
Using and securing voicemail
From the StarLeaf app you can access a voicemail system where you can:
n Record a personal greeting for your voice and video mail
n Access your voice and video mail messages
n Secure your voicemail by setting or changing your security PIN
Note: Video voicemail is disabled by default. To enable video voicemail for your
organization, contact your reseller or StarLeaf representative.
Recording a greeting
1. From your Account page in the app, select Record voicemail greeting. This starts a call
between you and the StarLeaf voicemail system.
2. Follow the system's audio instructions to record a personal voicemail greeting.
StarLeaf user guide, 08 September 2020 Page 73 of 98Using and securing voicemail Accessing voice and video mail messages When a person leaves you a voice or video mail, you receive a message in your chat window with them. This message prompts you to Call voicemail as shown in the image below: To listen to old or saved voice and video mail messages: 1. In the Search or dial box, type 2999. 2. Press Enter or select Call '2999'. This connects you to the voicemail system. StarLeaf user guide, 08 September 2020 Page 74 of 98
Using and securing voicemail

 3. Follow the audio instructions.

 Securing your voicemail
 If you are a StarLeaf user who joined before the Cloud 7.1 upgrade, you need to enter a
 security PIN when accessing your voicemail inbox. By default, this PIN is 0000 unless you
 have changed it.

 If you are a StarLeaf user who joined after the Cloud 7.1 upgrade, a PIN is not required by
 default.

 To ensure the security of your voice and video mail, you are advised to set a security PIN.
 To do this, go to your StarLeaf app and take the following steps:

 1. In the Search or dial box, type 2999.
 2. Press Enter or select Call '2999'. This connects you to the voicemail system.
 3. Follow the audio instructions.

 Tip: While you are in a call in the desktop app, you can access a drop-down keypad if you
 require it.

StarLeaf user guide, 08 September 2020                                              Page 75 of 98
Invite to StarLeaf

 Invite to StarLeaf
 You can invite others to join you on StarLeaf.

 1. Open StarLeaf.
 2. Go to the Chats tab.
 3. Select the plus icon
 4. Select Invite to StarLeaf.

    For mobile devices, follow the same steps above:

StarLeaf user guide, 08 September 2020                    Page 76 of 98
Invite to StarLeaf 5. Enter the email address of the person you wish to invite to StarLeaf and select Invite. You receive confirmation that your invite has been sent. The person you invite receives an email prompting them to download StarLeaf and get started: When one of your co-workers downloads and signs in to the app, they are automatically added as a user to your organization. Note: If the person you invite joins StarLeaf using an email address with a domain that StarLeaf does not recognize, StarLeaf will create a new organization for that email domain. The invitee becomes an admin for this organization account as they are the first person to use StarLeaf with this domain. For advanced information about your organization's account, go to About StarLeaf app for admins. StarLeaf user guide, 08 September 2020 Page 77 of 98
About permissions

 About permissions
 The StarLeaf app uses the camera, microphone, and screen recording (macOS) on your
 device. We recommend that you give permissions when prompted so that you can
 successfully make voice and video calls and share your screen while you are in a call.

 On this page:

 n   Permissions on iPhone and Android (p78)
 n   Camera detection on Android (p78)
 n   Permissions on macOS (p79)
 n   Permissions on macOS Catalina (p80)

 Permissions on iPhone and Android
 Launching the StarLeaf app prompts a permissions dialog for each the camera and
 microphone. On iPhone, select Continue to give permissions. On Android, select Give
 Permission.

 If you disable these permissions, on purpose or by mistake, you will not be able to make
 voice or video calls using StarLeaf. To re-enable, follow the steps below:

 iPhone:

 n   Go to iPhone Settings > Privacy > Camera and enable StarLeaf
 n   Go to iPhone Settings > Privacy > Microphone and enable StarLeaf

 Android:

 n   Go to Android Settings > Apps > StarLeaf > Permissions and enable Camera and
     Microphone

 Camera detection on Android
 On Android devices you may sometimes see a notification saying that StarLeaf has been
 detected using Camera, even when you are not in a call:

StarLeaf user guide, 08 September 2020                                          Page 78 of 98
About permissions StarLeaf app periodically scans for the presence and capabilities of a camera on your device, and when Android detects this scanning, it triggers that notification. StarLeaf never uses your camera when not in call with StarLeaf app. Permissions on macOS On macOS, there are similar permission requests to those on iOS and Android. Launching the StarLeaf app prompts a permissions dialog for each the camera and microphone. On these dialogs, select OK so that you can make voice and video calls. If you select Don’t Allow and then attempt to make or receive a voice or video call, StarLeaf app (version 2.18 or higher) will show you how to re-enable these permissions. If you are using an earlier StarLeaf app version, follow the steps below to re-enable access to the camera and/or microphone. 1. Go to System Preferences in the main Apple menu. 2. Select Security & Privacy. StarLeaf user guide, 08 September 2020 Page 79 of 98
About permissions

 3. Select Privacy.
 4. Select Camera or Microphone.
 5. Tick the box beside StarLeaf to enable permissions.

 6. Restart StarLeaf to activate the changes.

 Permissions on macOS Catalina
 If your Mac is operating with macOS Catalina, there is an additional permission you must
 grant if you want to share your screen while you are in a call. This is categorized under
 Screen Recording in macOS Catalina.

 To enable screen sharing in your app:

StarLeaf user guide, 08 September 2020                                          Page 80 of 98
About permissions

 1. Go to System Preferences in the main Apple menu.

 2. Select Security & Privacy.

 3. Select Privacy.
 4. Select Screen Recording.
 5. Tick the box beside StarLeaf to enable permissions.

StarLeaf user guide, 08 September 2020                        Page 81 of 98
About permissions

 6. Restart StarLeaf to activate the changes.

StarLeaf user guide, 08 September 2020              Page 82 of 98
About notifications

 About notifications
 StarLeaf supports notifications such as sounds, banners, and app badges across all devices
 (Windows, Mac, iOS, Android).

 Choose a topic below to learn more about notification behavior.

 n   Notifications on iOS and Android (p83)
 n   Camera detection on Android (p84)
 n   Notifications on Windows (p85)
 n   Notifications on Mac (p86)

 Notifications on iOS and Android
 On mobile devices StarLeaf supports push notifications and these are configurable
 through the device settings. For example, on the iPhone, these settings look like this:

 You can also mute notifications on a per-contact or per-group basis and then your device
 will not sound when you receive a new message from that contact or group.

 To mute a contact or group, go to the info page for that contact or group and choose
 Mute contact. On an Android device, this looks like this:

StarLeaf user guide, 08 September 2020                                            Page 83 of 98
About notifications

 Camera detection on Android
 On Android devices you may sometimes see a notification saying that StarLeaf has been
 detected using Camera, even when you are not in a call:

 StarLeaf app periodically scans for the presence and capabilities of a camera on your
 device, and when Android detects this scanning, it triggers that notification.

 StarLeaf never uses your camera when not in call with StarLeaf app.

StarLeaf user guide, 08 September 2020                                        Page 84 of 98
About notifications

 Notifications on Windows
 To customize StarLeaf banner or pop-up notifications on a Windows computer, go to
 Settings > Notifications and actions settings > StarLeaf

 Turn Show notification banners to off to prevent pop-up notifications from StarLeaf on your
 computer.

 Red circle icon behavior
 When you configure notifications as above, this does not affect the red circle icon that
 appears on top of the StarLeaf app in the Windows taskbar and system tray (see below).

 Taskbar

 System tray

 Note: If the red circle icon does not appear in your Taskbar and you would like it to, ensure
 that Use small taskbar buttons is turned off in your system settings.

StarLeaf user guide, 08 September 2020                                            Page 85 of 98
You can also read