Creator 3 Manual - Applied Streetview
←
→
Page content transcription
If your browser does not render page correctly, please read the page content below
Creator 3 Manual
Index
Introduction                                              4
     Creator 3 main features                              4
     Update from Creator 2 to Creator 3                   4
     What about previous Creator 2?                       4

Installation                                              6
     Speed it up                                          6

Additional Manuals                                        8

HOW-TO video                                              8

Licensing                                                 8

User Interface                                           10
     Language                                            10
     Interface                                           10
     Themes                                              11

Recommended Operating System                             12

Recommended Hardware                                     12

Projects & Tours                                         13

Folder Structure                                         14

Workflow                                                 16
     Project Management                                  17
     Project                                             18
     Map                                                 20
           Maps                                          22
           Maps - Custom map tiles                       22
           Maps - WMS                                    23
           Main Map menu                                 23
                 Display                                 25
                 POI                                     28
                 Roads                                   31
           Keyboard Shortcuts                            32
     Road Names                                          33
     Duplicate Remover                                   35
     Streetview - General                                39
     Streetview - Watermark                              40
     Streetview - Leveling                               42
     Streetview - Imagery                                44
     Player                                              47
           Preferences sub-tab                           47
                 Basic                                   47
                 Streetview                              50
                 Map                                     52
                       Radar-cone                        53
                 POI                                     54
                 Floors                                  55
                 Automatic rotation                      56
                 Expert                                  57

Version 2018-10-29                        Page 2 of 99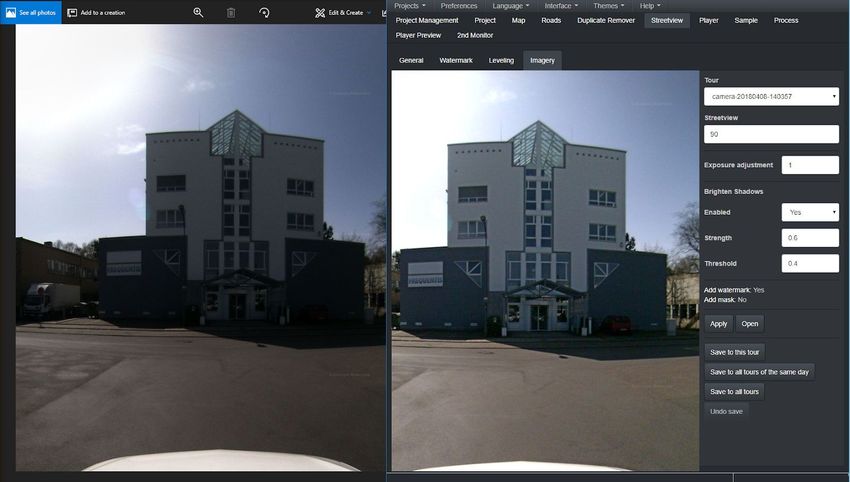
Arrows 57
Hotspots 58
Arrow label style 59
Hotspot label style 61
Preview sub-tab 64
Sample 65
Process 66
Web-Player 66
Android-Player 67
Instant Player 67
G-Publisher 67
Google Earth Pro 68
Streetviews Only 69
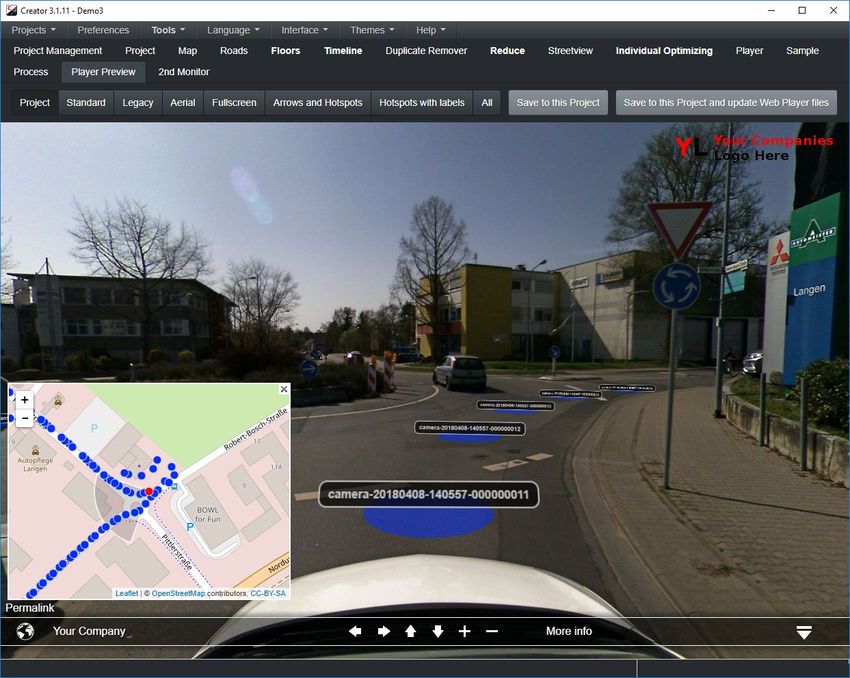
Player Preview 72
2nd Monitor 75
Advanced Features 76
Floors 76
Timeline 77
Reduce 79
Individual Optimizing 80
Map-tiles 81
Download using JTileDownloader 82
Tools 84
Geotag sources 84
Export 86
Fix a Tours .csv files 87
Install the player to a web-server 89
Embed the player into any page 90
Remove the 'krpano demo version' logo 91
Help 92
Help - About this PC 92
Preferences 93
Support 98
Version 2018-10-29 Page 3 of 99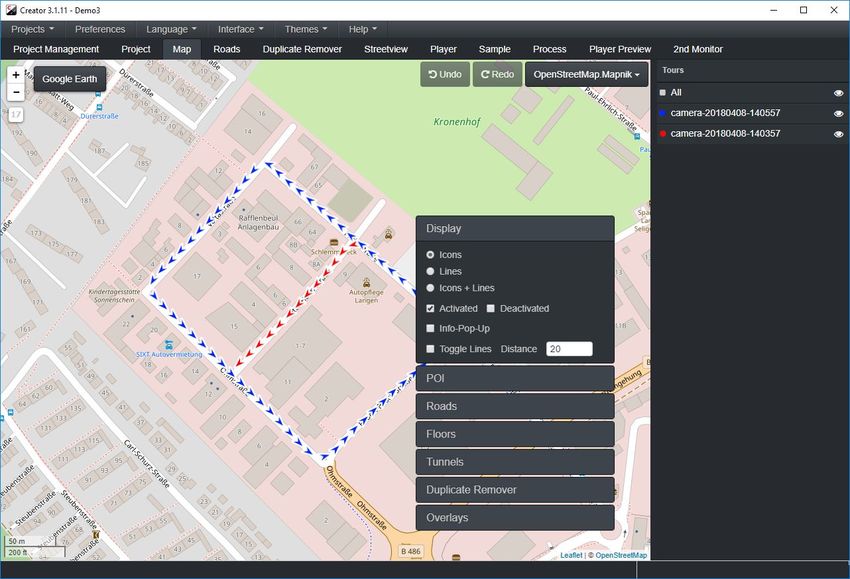
Introduction The Creator 3 Windows program processes footage recorded by Applied Streetview’s Original 360 Camera into streetviews and datasets for four players, Google Streetview and Google Earth Pro. It has been introduced in July 2018 to succeed the previous Creator 2 program. Creator 3 installs in parallel to an existing Creator 2. Creator 2 data and installation is not touched. Transferring a project from Creator 2 to 3 is a one-button operation. Creator 3 can be tested with all its features for 14 days for free. Creator 3 main features New stitcher. Twice as fast as Creator 2. Brighten Shadows. To improve dark image parts for better visibility. Instant Player (option). No lengthy processing, just a quick project configuration. Many improvements. To make Creator 3 work better, faster and more robust. Update from Creator 2 to Creator 3 Creator 3 installs in parallel to an existing Creator 2. Creator 2 data is not touched. You can continue using Creator 2 while testing Creator 3. Just not at the same time please. How to copy your projects from Creator 2 to Creator 3: Open Creator 2. Open the Project Management page. Click the Backup all projects button. This might need some time. Wait. Close Creator 2. Open Creator 3. Open the Project Management page. Click the Restore from backup file(s) button. Pick the file(s) just created. This might need some time. Wait. Continue working with Creator 3. Creator 3 backup files do not work with Creator 2. What about previous Creator 2? All customers that purchased a camera or a Creator 2 licence in May 2018 or later already should have received free Creator 3 licence(s). The latest Creator 2 release is 2.1.0. It continues to receive bug fixes. Downloads: Creator 2 Manual, Creator 2 program Version 2018-10-29 Page 4 of 99
Output Players: Web Player Project processed for the included, krpano-based streetview player. For the Internet or Intranet. Needs a LAMP server and a MySQL database. Data-sets for optional players: Android Player Project processed for the optional Android Player. Android Player works 100% offline, without Internet. Ideal for presentations, demos and tactical teams. Needs an Android tablet. 10” recommended. NEW Instant Player Project configured for the Instant Player. The Instant Player processes footage on-the-fly when requested. No processing by Creator at all, just a quick configuration. Needs a Windows 10 PC or Server with NVIDIA GTX 1080 graphics card and CUDA 8.2 NEW G-Publisher Upload your streetviews to Google streetview with G-Publisher. NEW Google Earth Pro See your project in Google Earth Pro. Streetviews A folder with leveled, watermarked, masked, geo-referenced, equirectangular, 8192 x 4096 pixel streteviews. For custom workflows. Version 2018-10-29 Page 5 of 99

Installation First download and install the CUDA 8.2 drivers. Do not use CUDA 9 or 10. https://developer.nvidia.com/cuda-80-ga2-download-archive Then download and install the newest Creator 3 program: http://updates.applied-streetview.com/creator3/newest.php?file=program Creator web-page: http://www.applied-streetview.com/programs/creator/ Speed it up Virus Scanners Deactivate any 3rd-party Virus-Scanner you might have installed for Creator, all folders it uses (including in and out) and the .jpg file format. Windows Defender Go to Start > Settings > Updates & Security > Windows Security > Virus & threat protection > Virus & threat protection settings > Add or remove exclusions. Exclude the Creator installation folder: C:\Program Files (x86)\Creator 3 Also the in and out folders for the data. Example: F:\in F:\out And the temporary data folder: C:\Users\USERNAME\AppData\Local\creator3\tmp Version 2018-10-29 Page 6 of 99
Exclude .jpg files and the Creator programs:

Version 2018-10-29                             Page 7 of 99
Additional Manuals Additional manuals are available at our website: http://www.applied-streetview.com/support/ HOW-TO video Shown automatically when you first open Creator. To be found in Help -> Video Licensing Creator will work for 14 days as a trial with all the features available. There are no limitations at all. Version 2018-10-29 Page 8 of 99
When starting Creator for the first time, the Register popup will be displayed. Fill it in and click the Register button. Creator will work for 2 weeks. Permanent activation key With the purchase of a camera you will get a permanent activation key for Creator. In the menu click Help -> Add activation key. Paste in the activation key and click the Register button. Additional activation keys are available. Contact us. Offline registration If your PC has no internet connection, instead of the Register button you will see a Register Offline button. Click the Register Offline button and follow the on-screen instructions. Menu - Help - License Details Shows the type of the licence or the end of the trial period. Evaluation Licence: Paid licence: A purchased Creator licence never expires. It is valid for the current main version of Creator. Example: Creator version number: 3.x.x. ”3” is the main version. Changes to x are covered by your licence. You licence continues to work indefinitely after a new main version has been released. Bug fixes are provided for one year after the release of a new main version. Menu - Help - Add activation key Opens the license Register popup. Use this to update your evaluation license to a purchased license or to replace a license. Version 2018-10-29 Page 9 of 99
User Interface
Language
English, French, Spanish, German, Arabic, Russian, Chinese, Romanian and Czech are
available.
Interface
Standard
Everything it needs to process a project.
Advanced
For more complex projects and experienced users.
Menu entries for Advanced Features have a bold font.
Main Window
Tools
Menu
Timeline
Reduce
Individual Optimizing
Preferences
For all projects -> Expert Mode
For all projects -> Troubleshooting
Version 2018-10-29 Page 10 of 99Themes Dark Light Recommended Operating System Windows 10. Version 2018-10-29 Page 11 of 99
64-bit, any language.

32-bit Windows is not supported and will not work.

Recommended Hardware
A must-have for production:
NVIDIA GTX 1080 graphics card with 8GB VRAM.

With the NVIDIA GTX 1080 graphics card, about 200.000 datasets can be processed within
24 hours.

Other components:
CPU with 4 cores and 8 threads, minimum 3.4 GHz.
16 GB RAM
250 GB SSD, or larger. For the Windows operating system.
Two 1 TB or 2 TB SSDs or HDDs for small data-sets.
Network drives (NAS) are recommended for larger data-sets.

Testing
You can try Creator with any 64-bit Windows 7, 8 or 10 PC with at least 4 GB RAM.
But processing will be very slow.
A NVIDIA graphics card with at least 4 GB VRAM and 8GB PC RAM will speed up
processing. For production we recommend the NVIDIA GTX 1080 graphics card with 8GB
VRAM.

Example Data
Download and unzip the Example Data footage to process it:
http://aplsv-new.s3.amazonaws.com/Demo3/in/Demo3.zip

Check out the Creator Video, Manual and Quick Starter Guide:
http://applied-streetview.com/programs/creator

Version 2018-10-29                                                    Page 12 of 99
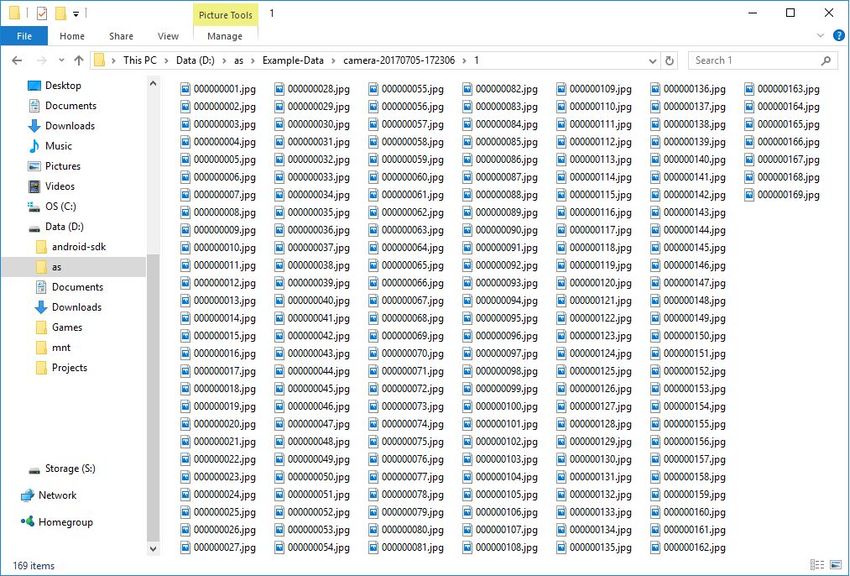
Projects & Tours What is a Project? To do any recording you first need to enter a Project name into the camera's Remote Control. The Remote Control creates a Project folder on the SSD. What is a tour? When you press the Start button on the camera's Remote Control a new Tour folder is created as a subfolder of the Project folder. Here you see the Example-Data Project folder. It has three Tour folders. The screenshot shows Tour folder camera-20170705-172306. Each Tour folder then has 7 sub-folders: 1 to 6 for the images and 7 for the log data. Version 2018-10-29 Page 13 of 99
Folder Structure The Creator needs the following Folder Structure on the processing PC to work: Create an empty in and out folder. Work is just an example parent folder, this could be any folder on any drive or NAS. Do not process directly from the SDD. Always copy the data to a PC first. Disconnect the SSD before starting processing. It will act as your backup copy. Make a backup copy of the recorded data for safekeeping. Copy the Project folder from the cameras SSD to the in folder. Creator saves its output to the out folder. It automatically creates the Project name (Example-Data) in the out folder. Version 2018-10-29 Page 14 of 99
You can have the in and out folder on the same HDD or SSD. Or on different drives. Or on network drives. Or mixed. The out folder should be a local drive for speed reasons. You need to set the in and out folders in Creator. Creator will ask you for the folders when necessary. Version 2018-10-29 Page 15 of 99
Workflow Just work through the tabs from left to right: Of course, at any time you can go back to a previous tab and apply changes. To enable additional tabs go to Menu - Interface and click Advanced. Advanced tabs appear as bold. Version 2018-10-29 Page 16 of 99
Project Management New project button Open a project folder with at least one tour folder to add. You can select and deselect tours in the pop-up. The Projects List For each project Creator shows: - Project name - Number of tours - Number of streetviews - Number of timelines Open button: Open the project. Backup button: Backup the project. The source photos are not included in the backup. Delete button: Delete the project from the Creator program. Photos are not deleted. Date modified The date of the last edit made to the project. Restore from a backup file button Restore a project from the project’s backup file. Backup all projects Backup all projects. The source photos are not included in the backup. Version 2018-10-29 Page 17 of 99
Project Edit project name Change the project name. Change project input path button Change the project’s input path, for when a projects folder has been moved on the HDD. Delete project button Delete the project from the Creator program. The source photos will not be deleted. Close project button To open another project or before shutting down the Creator program. The Tours list For each project Creator shows: Tour name Click a tour name to open it on the Map. The map will zoom in on the tour. Good to find a tour quickly on the map. Tour folder Where the tour’s source-data is. Edit icon: The tour folder can be changed individually. Timeline Timeline name. This column is visible only if a timeline has been assigned to a tour in the Timeline tab. Version 2018-10-29 Page 18 of 99
Streetviews Number of recorded data-sets. Active Number of active streetviews. Deactivated Number of deactivated streetviews. On the map tab you can deactivate streetviews to not process them. For example when a road has been recorded twice. Yaw, Pitch, Roll Settings from the Streetview -> Leveling tab. Exposure Setting from the Streetview -> Imagery tab. Timezone adjustment Setting from the Streetview -> General tab. To fix the local recording date and time in case the tablet was not set to the local time. Unnecessary if the tablet was set to the local time. Recording mode Recording Mode used when recording the streetviews. Either Interval, Distance or Manual. Move button Move the tour to a different project. Copy button Copy the tour to a different project. Delete button Deletes the tour from the project. The source photos are not deleted. Backup button Backup the tour. The source photos will not be backed up. Move All button Moves all tours to a different project. Copy All button Copies all tours to a different project. Add tours or project button Version 2018-10-29 Page 19 of 99
Add one or multiple tour folders to this project. E.g. when additional footage has been recorded months later. Import tour from tour backup file button Add a single tour from a tour’s backup file Import tours from a project backup files button Add one or more tours from a project’s backup file. Version 2018-10-29 Page 20 of 99
Map Right click on the Map for the context menu: Version 2018-10-29 Page 21 of 99
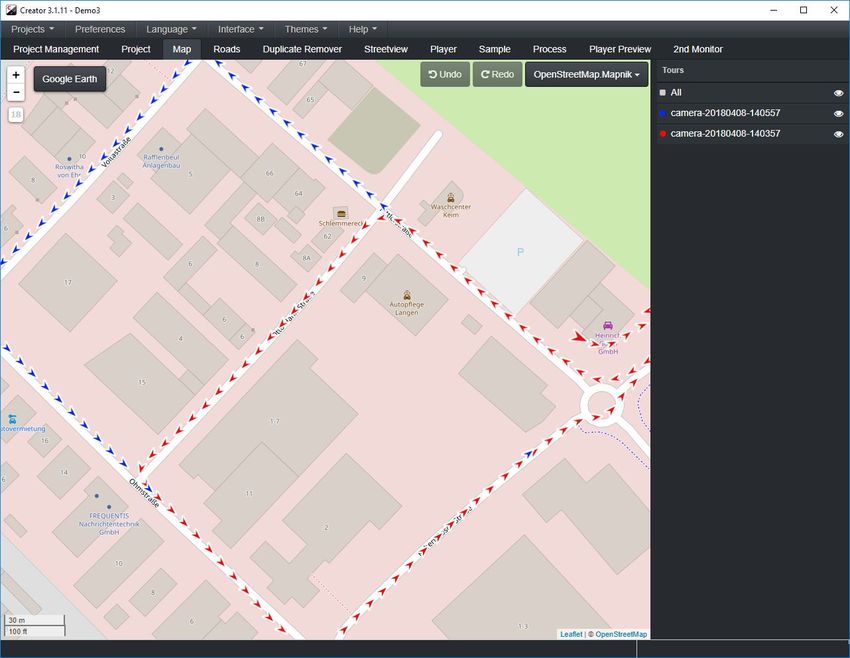
Maps
The Screenshot shows the OpenStreetMap.Mapnik map.
Select any online map provider from the dropdown list, or use your own custom set of
map-tiles.
Maps - Custom map tiles
To select your own custom map-tiles click on the first item in the list:
Your Company's map tiles. This opens the Custom map tiles popup.
Label, Url and Attribution properties can be adjusted in this popup.
The Url can point to either an online resource like:
http://www.your-company.com/map-tiles/{z}/{x}/{y}.png
or a local folder or NAS drive:
file://D:\folder\{z}\{x}\{y}.png
where {z} is the zoom level, and {x} and {y} are the coordinates of the top left corner of the tile
in web mercator projection.
Version 2018-10-29 Page 22 of 99Maps - WMS Add your own WMS layer. Web Mercator projection (3857, 900913, 3785) are supported. Other projections will not work. For easy testing the WMS Help button lists a few public WMS servers. Click them to load into the URL field. Then click the Get Layers button. Paste your WMS URL into the URL field and click on the Get Layers button. A list of all the available layers will appear in the Layers list section. Select a layer from the Layers list and click Apply. Main Map menu Right-click on the map to access it. Move the mouse outside the menu to close it. Version 2018-10-29 Page 23 of 99
Version 2018-10-29 Page 24 of 99
Display Icons Lines Both Show or hide active and deactivated streetview icons. Usually more footage than needed is recorded. Using the Duplicate Remover, Reduce (Interface -> Advanced), as well as manual deactivation on the map tab this can be reduced. The Map tab is where you can see what streetviews are active for processing. Version 2018-10-29 Page 25 of 99
Deactivated streetviews are shown in a
                                                different color.

                                                For this tour it is dark blue.

Info-Pop-Up

See the data for that streetview. See the default selection in the image below.

Version 2018-10-29 Page 26 of 99Configure button Customize what data to display using the pop-up Version 2018-10-29 Page 27 of 99
Toggle Lines When displaying streetviews as lines, do not draw a line between streetviews if distance between them is more than the set Distance. Version 2018-10-29 Page 28 of 99
POI Display Points Of Interest recorded using the POI tab in Remote Control. Black circles around a streetview icon indicate that it’s a POI. A label with the POI name is displayed to the right of the streetview icon. Additional POIs can be added to one or many selected streetviews icons using the Add POI to selected streetview(s) button or Ctrl+P. Version 2018-10-29 Page 29 of 99
Show POI left panel top section (Filter By): In this list all unique POI names are displayed. By default all POI are activated. Click on a POI name to deactivate it. Click again to activate. Multiple POI names can be deactivated at the same time. Show POI left panel bottom section (POI list): Click on a POI name to zoom into it on the map. The selected POI will have a red outline. If the POI was recorded in sticky mode, only 1 entry will be displayed in the list with the ability to zoom into the first and last streetviews of the sticky sequence by clicking on the First and Last buttons. Show all - Check all Filter by items. Hide all - Uncheck all Filter by items. Activate all POIs - Reset all automatically deactivated streetviews (this includes Duplicate Remover and Reduce), then deactivate all streetviews and activate only the streetviews containing a POI. This action will not overwrite manually activated or deactivated streetviews. Reset activated POIs - Reset all automatically deactivated streetviews (this includes Duplicate Remover and Reduce). This action will not overwrite manually activated or deactivated streetviews. Version 2018-10-29 Page 30 of 99
Roads Show Roads assigned in the Roads tab. Show all - Check all Road list items. Hide all - Uncheck all Road list items. Show Road names pop-up - Moving the mouse over a streetview will display the Road name instead of the Info-Pop-Up. Version 2018-10-29 Page 31 of 99
Keyboard Shortcuts
For the Map tab.
Icons
Key Function
Ctrl + z Undo
Ctrl + y Redo
Ctrl + a Select all visible icons (even outside the map)
Ctrl + q Deselect all visible icons (even outside the map)
Delete Deactivate selected icons
Insert Activate selected icons
Home Rotate selected icons right
End Rotate selected icons left
Page-Up Go to the next streetview
Page-Down Go to the previous streetview
Ctrl + l Line-up selected icons. From first to last selected icon.
Ctrl + P Assign a POI name to selected Streetview(s)
Ctrl + R Assign a Road name to selected Streetview(s)
Ctrl + F Assign a Floor name to selected Streetview(s)
Map
Key Function
4 arrows Move map up, down, left, right. Additional you can left-click
with the mouse, then hold and move the map.
Mouse-wheel Zoom in and out
+ Zoom in
- Zoom out
Select single icon
Click it with the mouse.
Select many icons
Select first icon with the mouse. Press and hold the Shift key.
Select last icon with the mouse.
Move one or many icons
Select, then move with the mouse.
Version 2018-10-29 Page 32 of 99Road Names Automatic The Get Road names from OpenStreetMap button assigns road names automatically from OpenStreetMap. Toggle Streetview status to display activated or deactivated streetviews. Manually Click on a cell in the Manual or Automatic column to edit its content. Manually assigned Road names will always overwrite automatically assigned Road names. Map tab: Select one or multiple streetviews on the map. Click CTRL+R, enter the Road name and click Save. Version 2018-10-29 Page 33 of 99
Preferred language
   ● Local language only - "name" value of the OSM road.
   ● Custom language - "name:language" value of the OSM road.
   ● Custom language, fallback to local if not specified - If "name:language" value does not
      exist use "name".

For
   ● Activated streetviews
   ● Deactivated streetviews

Mode
  ● Fill in - Only update empty values in streetviews
  ● Overwrite - Overwrite all existing geocoded values in streetviews

Maximum distance (m)
Maximum distance to the closest road to be considered for geocoding.

Get Road names from OpenStreetMap

Reset all automatically assigned values

Version 2018-10-29                                                        Page 34 of 99
Duplicate Remover Removes duplicate recordings from roads recorded more than once.. Options: Process selected timelines: (Visible only when there are timelines) Process only selected timelines. Press CTRL and then click on a timeline to select multiple timelines. Process selected tours: Process only tours selected from the list. Press CTRL and then click on a tour to select multiple tours. Version 2018-10-29 Page 35 of 99
Favor newer footage:
Add streetviews for new roads, and replace existing streetviews.

Version 2018-10-29                                                 Page 36 of 99
Favor existing footage: Keep existing streetviews, add streetviews for unrecorded roads: Remove by radius Remove all streetviews within x meters of this streetview. Remove by time calculated from speed / Remove by time But only if the streetview to be removed is at least x seconds newer or older than this streetview. Remove by time calculated from speed option This default option gives good results for most situations, to take care of huge speed differences. Depending on which value is bigger it uses either the calculated time or the Remove by time. Version 2018-10-29 Page 37 of 99
Remove by time Gives you total control for special situations. Consider Altitude By default the altitude is not used to determine what is or is not a duplicate. You will have to try a few times to find the optimum settings for your footage. These three options allow you to try again and again: Reset all streetviews Reset all streetviews deactivated by Duplicate Remover and Reduce. Check the Duplicate Remover results on the Map tab. You then can fine-tune this by manually activating or deactivating streetviews. Manual changes will be kept when running the Duplicate Remover again. By default, manual edits are set to overrule results from the Duplicate Remover. Version 2018-10-29 Page 38 of 99
Streetview - General
Copyright
This is written into the EXIF metadata of the equirectangular .jpg streetviews that have been
created.
Leveling
Always Global leveling - Use values set in the Leveling tab
Individual Optimizing (when available) - Use values set in the Individual Optimizing tab,
when available.
Project's input path
Path to this project's source folder.
Project's output path
Path to this project’s output folder.
Streetview-tiles output path
Path to the streetview-tiles output folder.
Allows you to save tiles directly to a USB-HDD for shipping to, for example, a datacenter.
Timezone adjustment
Creator automatically calculates the local time from
- the tour name, which includes the tablets time
- the camera’s log data, which has the GPS time.
In case the tablet time was not set to local time, you can adjust it here.
Version 2018-10-29 Page 39 of 99Streetview - Watermark Add watermarks to the streetview. The changes in this tab can be previewed in the Leveling tab. Add watermark Add watermarks to the resulting streetview. Text Watermark text. Font Watermark font name, font list is taken from C:\Windows\Fonts. Size Watermark text size. Opacity Watermark text opacity. Version 2018-10-29 Page 40 of 99
Number of watermarks horizontally
How many watermarks to place horizontally (left-right).

Number of watermarks vertically
How many watermarks to place vertically (up-down).

Add mask
A mask will cover the car’s rooftop.
It is a transparent PNG image overlaid on top of the streetview.
A sample mask can be found in
C:\Program Files (x86)\Creator\masks\example-car-roof-mask.png

Mask path
Path to the mask PNG image. Create your own mask file.

Version 2018-10-29                                                 Page 41 of 99
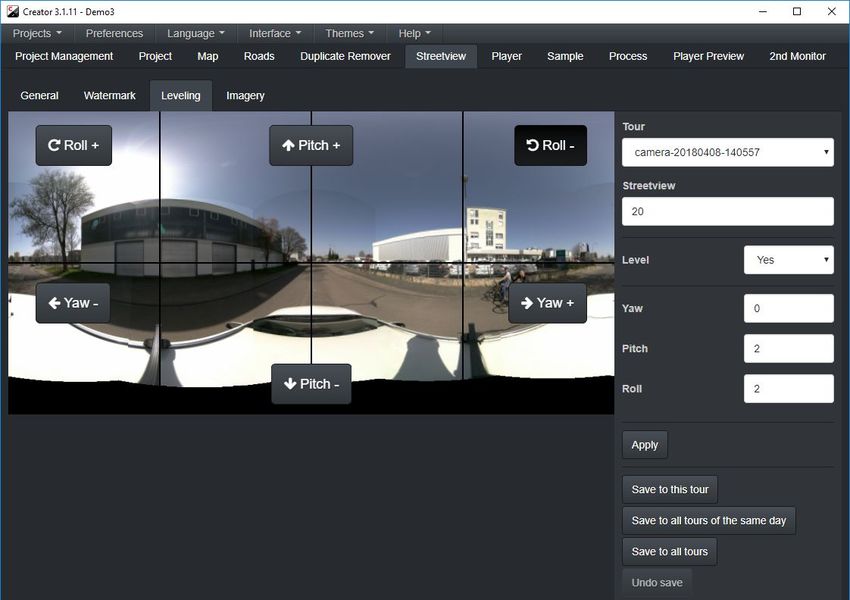
Streetview - Leveling Adjust for the angle between the camera on the cars rooftop and the leveling sensor inside the car. In a perfect world - the camera would be mounted 100% vertical. - the leveling sensor would be mounted 100% horizontal. - both would look forward, in the exact same direction. In the real world this does not happen. Because of this you need to adjust for the three angles between the camera and the sensor. Use the Pitch+, Pitch- and Roll+, Roll- buttons to adjust until the streetview looks leveled. Alternatively you can directly enter numerical values into the fields on the right. Check your findings with a few other streetviews of the same tour by entering a different number into the Streetview field. Version 2018-10-29 Page 42 of 99
Click the Save to this tour button to save the values to this tour only. Click the Save to all tours of the same day button to save the values to all tours recorded the same day as the current tour. Click the Save to all tours of the same timeline button to save the values to all the tours that have the same timeline as the current tour. (Not shown in the screenshot.) If the camera mount and the leveling device mount have not been removed from the car in between recordings, you can use the same settings for all tours from many different recording days. Click the Save to all tours of this project button to save the values to all tours of the project. You can see the Yaw, Pitch and Roll values of all tours at once on the Projects tab. It’s possible to undo any saved values by clicking on the Undo save button Level Yes: Level with the log values and the values from the Leveling tab. The most commonly used setting for straight streetviews. No: No leveling at all. Adjust: Use values from the Leveling tab only. Ignore the log data. Version 2018-10-29 Page 43 of 99
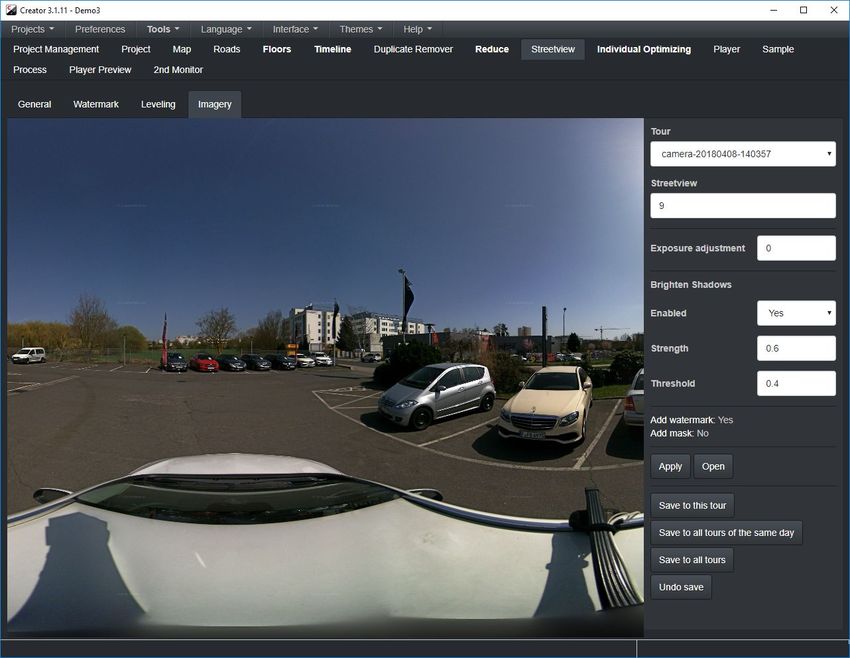
Streetview - Imagery Preview how the processed streetviews would look like exactly. Adjust the exposure and brighten shadows. Exposure adjustment Adjust image exposure. 0 do nothing, 5 maximum exposure. Default is 0. Brighten Shadows - Enabled Enabled automatic brightness adjustment for shadows. Brighten Shadows - Strength Amplifies dark pixels to the threshold level. Value between 0.1 and 1. Default is 0.6. Brighten Shadows - Threshold The automatic brightness adjustment will be applied to to areas where average brightness is less than the threshold. Value between 0.1 and 1. Default is 0.4. Version 2018-10-29 Page 44 of 99
Apply Update the image using the new values. Open Open the image with the default image viewer of your the operating system. Click the Save to this tour button to save the values to this tour only. Click the Save to all tours of the same day button to save the values to all tours recorded the same day as the current tour. Click the Save to all tours of the same timeline button to save the values to all the tours that have the same timeline as the current tour. (Not shown in the screenshot.) If the camera mount and the leveling device mount have not been removed from the car in between recordings, you can use the same settings for all tours from many different recording days. Click the Save to all tours of this project button to save the values to all tours of the project. Version 2018-10-29 Page 45 of 99
Compare An easy way to compare what two different sets of settings look like: 1. Set the initial values of Exposure and Brighten Shadows 2. Click Apply 3. Click Open. Do not close the Image Viewer. 4. Change the values in Creator. 5. Click Apply 6. Compare the Image Viewer window and Creator window side by side Version 2018-10-29 Page 46 of 99
Player Preferences sub-tab Set all the player preferences for the player.xml configuration file. Alternatively you can change this by editing the player.xml file in the player folder. Manual edits made to the player.xml file will not be shown here. Basic Pick Pick the start view from the Player sub-tab. Set manually Start Tour Start Streetview Start Viewing Direction left-right (degree) Start Viewing Direction up-down (degree) Start Zoom (degree) Version 2018-10-29 Page 47 of 99
Title
The project name will be suggested by default. You can overwrite it.

Left Menu text

Left Menu URL

Left Menu URL target

Right Menu text

Right Menu URL

Right Menu URL target

Permalink Text

Timeline label

Version 2018-10-29                                                     Page 48 of 99
Logo
Path to a logo image in PNG format to be displayed in the top right corner of the player.

Logo URL
Clicking on the logo will open the specified URL.

Map
Show/Hide Map

Permalink
Show/Hide Permalink

Menu
Show/Hide the Menu

Map Button
Show/Hide the Map button

Navigation mode
Arrows/Hotspots/Arrows and Hotspots

Version 2018-10-29                                                          Page 49 of 99
Streetview

View
Relative to Car/Forward

Mouse Control
Streetview style (recommended) / Old-school streetview style

Minimum zoom limit (degree)

Maximum zoom limit (degree)

Look down limit (degree)

Look up limit (degree)

Version 2018-10-29                                             Page 50 of 99
Show Arrow label
Mouse/None/Always

Clickable Arrow labels

Arrow labels from this column of the Streetview table
Road/Streetview/Description

Show Hotspot label
Mouse/None/Always

Clickable Hotspot labels

Hotspot label from this column of the Streetview table
Road/Streetview/Description

Version 2018-10-29                                       Page 51 of 99
Map Show Map Providers list Display a button in the top-right corner of the map. The viewer can switch to any of the map providers listed. The list can be edited manually in the /player/player.xml file. Map Provider Select any online base layer from the dropdown menu or define your own custom map tile set. Map View Start Streetview/Data Extent/Lat,Lon Map icon base-color Color of the default map icon Map icon selected Color of the selected map icon Map icon mouse-over Color of the map icon when the mouse cursor is on it Map marker scale (touch) Adjust marker scale on touchscreen devices Version 2018-10-29 Page 52 of 99
Radar-cone

Show Radar-cone
Show/Hide Radar-cone

Radar-cone size units
Units used to resize the Radar-cone. If percentage option is selected, the percentage refers to
the total map height.

Radar-cone size value
Radar-cone size value

Radar-cone stroke color
Color of the Radar-cone border

Radar-cone fill color
Color of the Radar-cone

Version 2018-10-29                                                         Page 53 of 99
POI Create a poi-list.php file in the player folder Show label for a POI None Do not display a label for the POI Streetview Use the streetview name as the label for the POI Road Use the road name as the label for the POI Show POI name Comment only Display the POI comment only Yes Display the POI name and the comment No Do not display the POI name In case you need to create a more advanced POIs file, set Interface to Advanced, then use Tools -> Export, for example in .csv format. You can then construct any kind of links easily with free Libre Office Calc or with MS Excel by chaining the desired values together. Version 2018-10-29 Page 54 of 99
Floors

Show floors
Show floors arrows and hotspots

Start floor
Default floor to start the Player with

Floor label

Next and previous Floors color

Floor does not exist in timeline message

Version 2018-10-29                         Page 55 of 99
Automatic rotation

Enabled

Wait time
Time in seconds before the rotation starts

Speed
Rotation speed

Direction
Automatically pan streetview either to the right or left

Horizon
Automatically pan streetview to match a specific horizon

Zoom to FOV

Click disables auto rotate

Version 2018-10-29                                         Page 56 of 99
Expert
Arrows

Show Arrows for nearby streetviews

Display nearby Arrows within this distance (meters)

Maximum number of nearby Arrows

Arrow image scale (mouse)

Arrow image scale (touch)

Next and previous Streetviews color

Nearby Streetviews color

Version 2018-10-29                                    Page 57 of 99
Hotspots

Camera height offset from ground level (meters)

Show nearby Hotspots

Display nearby Hotspots within this distance (meters)

Maximum number of nearby Hotspots

Hotspot width (pixels)

Hotspot color

Hotspot opacity

Version 2018-10-29                                      Page 58 of 99
Arrow label style

Font

Font size

Version 2018-10-29   Page 59 of 99
Bold

Show Background

Background color

Background alpha

Show Border

Border width

Border color

Round edge radius

Text color

Padding (Top Right Bottom Left)

Text align

Y offset

Version 2018-10-29                Page 60 of 99
Hotspot label style

Font

Font size

Version 2018-10-29    Page 61 of 99
Bold

Show Background

Background color

Background alpha

Show Border

Border width

Border color

Round edge radius

Text color

Padding (Top Right Bottom Left)

Text align

Y offset

Version 2018-10-29                Page 62 of 99
Default start zoom (degree)

Tiles path
The tiles-path URL should point to the streetviews-tiles folder uploaded to a web-server.
No \ at the end of the URL.

Maximum map zoom

Streetview map icon width

Streetview map icon height

Timeline error message

Version 2018-10-29                                                         Page 63 of 99
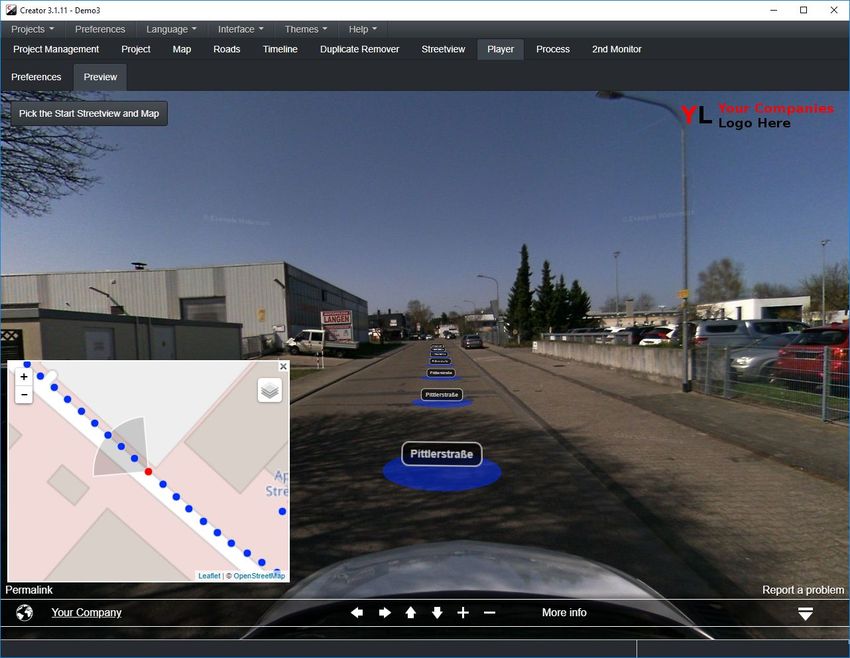
Preview sub-tab A preview of what the Player and the Streetview will look like. Adjust the direction and zoom of the streetview and the area and zoom of the map. Then click the Pick the Start Streetview and Map button to save the settings as the start-view for the player. You can go back and forth between Preferences and Preview until you are happy with the resulting player. Version 2018-10-29 Page 64 of 99
Sample Sample tab allows for temporary adjustments without changing the project. Very useful to create a project overview quickly. Start tour Start processing with this tour. Start streetview Start processing with this streetview. Step. Process every x-th data-set If the total number of active streetviews is 100.000 then: Step 1 will process all of the active streetviews: 100.000 streetviews. Step 10 will process 10% of the active streetviews only: 10.000 streetviews. Step 100 will process 1% of the active streetviews only: 1.000 streetviews. Step 1000 will process 0.1% of the active streetviews only: 100 streetviews. Step 10000 will process 0.01% of the active streetviews only: 10 streetviews. End tour End processing with this tour. End streetview End processing with this streetview of the tour. Number of data sets Calculated based on Start, Step, End and the streetviews active on the map tab only. Already existing output and eventual skip settings on the Process tab will not be considered. Version 2018-10-29 Page 65 of 99
Process Web-Player Creates a working web-player that you can install to a web-server. From X existing streetviews only: Do not create new streetviews. Create tiles from already existing streetviews only. Add local map tiles: If custom map tiles are set up in the map tab. Add backup If checked create a new project backup in player/backups folder. You also can create 8192 x 4096 pixel streetviews at the same time. Set Interface -> Advanced.Then tick the new option 8192 x 4096 pixel streetviews. Version 2018-10-29 Page 66 of 99
Android-Player Generate a ZIP archive that can be opened with the Android Player App. It works offline, without Internet connection. Add local map tiles: If custom map tiles are set up in the map tab. Add backup If checked create a new project backup in player/backups folder. Instant Player Generate a player that can be opened by the Instant Player program. Add local map tiles: If custom map tiles are set up in the map tab. Add backup If checked create a new project backup in instant-player/backups folder. G-Publisher Generate streetviews that can be opened by the G-Publisher program. Version 2018-10-29 Page 67 of 99
Add backup If checked create a new project backup in gp-player/backups folder. Google Earth Pro Generate a KML that can be opened by the Google Earth Pro program. Streetviews path The URL of the panoramas folder uploaded to a web-server. This will not work with local file paths. Add backup If checked create a new project backup in instant-player/backups folder. Version 2018-10-29 Page 68 of 99
Streetviews Only Generate 8192 x 4096 pixel Streetviews only. Use this mode for generating streeviews for our Photogram program or your own workflow. Process When starting to process, a pop-up appear and will summarize the settings. Click Start process or Cancel to make adjustments. Open Project's output folder Opens the generated project's output folder in the Windows Explorer. Save this project preferences as default Save these project preferences as the default for new projects. No need to enter the same settings again and again. Click Check to open the Preferences - For new projects window. Version 2018-10-29 Page 69 of 99
Version 2018-10-29 Page 70 of 99
During processing you can click the Stop processing button at any time. It might take a short time for the processing to stop, as processing is done in batches. See the log displayed below. Version 2018-10-29 Page 71 of 99
Player Preview With Interface set to Advanced: When the processing has finished, open the Player Preview tab to try the fully functioning player: You can easily check alternativer layouts using the Standard, Legacy, Aerial, Fullscreen, Arrows and Hotspots, Hotspots with labels, All buttons. Click Save to this Project to save the current Layout to your project. Please note that you will then need to re-create the Web Player on the Process tab. Make sure to set Web Player to Overwrite. Version 2018-10-29 Page 72 of 99
Standard Layouts: Project Shows the player according to the settings from the Player tab. Legacy Navigation mode - Arrows Base Layer - OpenStreetMap.Mapnik Map - Visible Permalink - Visible Menu - Visible Show Arrow label - Mouse Show Hotspot label - None Standard Navigation mode - Hotspots Base Layer - OpenStreetMap.Mapnik Map - Visible Permalink - Visible Menu - Visible Show Arrow label - Mouse Show Hotspot label - None Aerial Navigation mode - Hotspots Base Layer - HERE.satelliteDay Map - Visible Permalink - Visible Menu - Visible Show Arrow label - Mouse Show Hotspot label - None Fullscreen Navigation mode - Hotspots Base Layer - OpenStreetMap.Mapnik Map - Hidden Permalink - Hidden Menu - Hidden Show Arrow label - Mouse Show Hotspot label - None Version 2018-10-29 Page 73 of 99
Arrows and Hotspots
Navigation mode - Arrows and Hotspots
Base Layer - OpenStreetMap.Mapnik
Map - Visible
Permalink - Visible
Menu - Visible
Show Arrow label - Mouse
Show Hotspot label - None

Hotspots with labels
Navigation mode - Arrows and Hotspots
Base Layer - OpenStreetMap.Mapnik
Map - Visible
Permalink - Visible
Menu - Visible
Show Arrow label - Mouse
Show Hotspot label - Always

All
Navigation mode - Arrows and Hotspots
Base Layer - HERE.satelliteDay
Map - Visible
Permalink - Visible
Menu - Visible
Show Arrow label - Mouse
Show Hotspot label - Always

Save to this Project
Save the current Layout as the Web Player preferences for this project.

Version 2018-10-29                                                        Page 74 of 99
2nd Monitor
A second monitor is recommended for this feature.

Shows the streetviews. You can zoom in and out.

Great when moving streetviews manually on the Map tab.

If the streetview has already been processed, it will be displayed right away.
If not, it will be processed and displayed.

Version 2018-10-29                                                          Page 75 of 99
Advanced Features Only visible with Interface set to Advanced. Floors Only visible with Interface set to Advanced. Floor names are created from POIs Click on the Import Floor values from POI button to get the Floor names. For this feature to work, you need to assign Floor names as POIs while recording., using the Mark point with comment or Mark line with comment action in the Remote Control’s POI tab. Set the comment as the name of the Floor. Manually Click on a cell in the Floor column to edit its content. To assign a Floor name to a streetview from the Map tab: Select one or multiple streetviews, click CTRL+F, enter the Floor name and then Save. The order of the floors is important and should follow the original layout. An example of a valid order would be: -1, Ground floor, 1, 2, 3, 4, 5. Click on the Reverse table order to sort the table upside down. Drag and drop rows in the table to reorder. Version 2018-10-29 Page 76 of 99
Timeline Only visible with Interface set to Advanced. Record the same road or area multiple times to document change. It looks like this: http://players.applied-streetview.com/Timeline/ Create a few timeline labels, such as Before and After or dates like 2015 or 2016. Assign one or many tours to each timeline label. The user will then be able to pick the labels in the player. Example: http://players.applied-streetview.com/Timeline/ After assigning all tours to timeline labels you can use the Duplicate Remover to sort out duplicates in each timeline. Labels table Add label button Enter the timeline label into the text box to the left of the button, then click the button. Rename selected button Click on the checkbox next to the timeline that needs to be renamed, then enter the new timeline label into the text box to the left of the button and click the button. Delete selected button Click on the checkbox next to the timeline that needs to be deleted, then click the button. Note that multiple timelines can be selected at once. Tours table Apply label to selected tours button Version 2018-10-29 Page 77 of 99
In the drop down list to the left of the button, select the timeline to which the tours will be
assigned to, select the tours by clicking on the checkboxes next to them, then click the button
to assign them tours to the selected timeline.
To remove a tour from a timeline label select None in the drop down list.
Timeline list (Map tab)
Click a timeline label to zoom in on it.
Click a timeline eye icon to toggle visibility.
In this example, the 2016 timeline has been
hidden.
Hiding timelines is great when used with the Ctrl+A key-combination that selects streetviews
in all visible timelines.
Note that this list is displayed only when at least one tour is assigned to a timeline.
Version 2018-10-29 Page 78 of 99Reduce Only visible with Interface set to Advanced. To convert tours recorded in Interval Mode to Distance Mode. This greatly reduces the number of streetviews to process. By Distance Separate by meters between streetviews By Interval Separate by seconds between streetviews By Step Process every x-th streetview Process selected timelines: Visible only when there are timelines. Process only selected timelines. Press CTRL and then click on a timeline to select multiple timelines. Process selected tours: Process only tours selected from the list. Press CTRL and then click on a tour to select multiple tours. Start process Start processing Reset all streetviews Reset all streetviews deactivated by Duplicate Remover and Reduce. Version 2018-10-29 Page 79 of 99
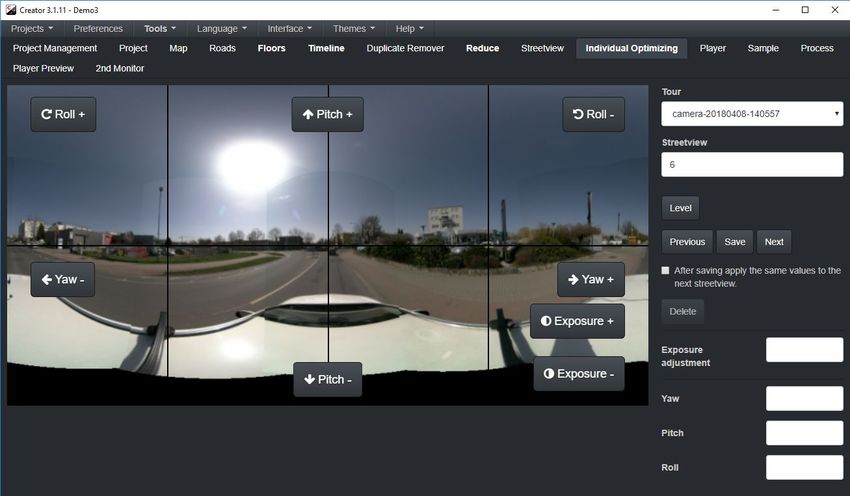
Individual Optimizing Only visible with Interface set to Advanced. The same as the Leveling tab, just different for individual streetviews. Version 2018-10-29 Page 80 of 99
Previous button: Go to the previous streetview. Does not save anything. Save button Save the individual adjustment options (Exposure Adjustment, Yaw, Pitch, Roll) to the current streetview. Load the next streetview and apply the same values. Next button: Go to the next streetview. Does not save anything. After saving, apply the same values to the next streetview. Delete Deletes the individual adjustment options (Exposure Adjustment, Yaw, Pitch, Roll) for the current streetview. To apply these individual settings, on the Streetview - General tab, Leveling must be set to Individual Optimizing (when available). Map-tiles There are many ways to get map-tiles suitable for the Creator program. As an example for the format we provide the “Langen2” map tiles as a .zip file to you: http://updates.applied-streetview.com/Remote-Control/Langen-OSM.zip (1.1 MB) Version 2018-10-29 Page 81 of 99
Map tiles format info:
http://wiki.openstreetmap.org/wiki/Slippy_map_tilenames
Download using JTileDownloader
For small areas you could just download the map-tiles.
One of the programs suitable for downloading map tiles is
JTileDownloader
http://wiki.openstreetmap.org/wiki/JTileDownloader
Run it on a Windows PC, not the tablet!

Version 2018-10-29                                          Page 82 of 99
Go to Main - Bounding Box (Lat/Lon) and click on Slippy Map chooser. This will open a new window and you will be able to choose the area for download. Choose the Tile Provider. Consider OpenCycleMap, since the other tile providers tend not to work. At least one zoom level is needed, zoom level 18 works well for recording by car. Choose the Output folder to download the map tiles, preferably a new folder, named e.g. "Town-name". When done copy the map-tiles directly to the tablet or to the SD card. Version 2018-10-29 Page 83 of 99
Tools In the Main menu. Geotag sources Geotag source images. In case you want to process the source images with a totally different software. Original sources (faster) Modify EXIF data of the original images Make a copy (slower) Copy images to Output folder and then modify EXIF data of the original images Output folder Set the output folder. Click the Start process button. The current project source images will be copied to output folder. The following EXIF data will be added: - Orientation - DateTimeOriginal - GPS:GPSDateStamp - GPS:GPSTimeStamp - GPS:GPSLatitude - GPS:GPSLatitudeRef - GPS:GPSLongitude - GPS:GPSLongitudeRef - GPS:GPSAltitude - GPS:GPSAltitudeRef - GPS:GPSImgDirection - GPS:GPSImgDirectionRef Version 2018-10-29 Page 84 of 99
-   Orientation
    -   FocalLength
    -   FNumber
    -   Make
    -   Model
    -   SerialNumber
    -   FocalPlaneXResolution
    -   FocalPlaneYResolution
    -   FocalPlaneResolutionUnit

Version 2018-10-29                 Page 85 of 99
Export Export the Creator data to use with a 3rd-party program. Output folder Where to save the exported data to. Streetview status Choose the status of exported streetviews: Activated (Default), Deactivated, All. Format Choose export format: CSV, GeoJSON, KML, Shape File Click Export button to export the data. Click Open Export folder to open the Output Folder in Explorer. WARNING: These formats are NOT suited for re-import into Creator. Instead, close the project and use the Backup option on the Project Management tab. Version 2018-10-29 Page 86 of 99
Fix a Tours .csv files Tour log-data is saved to the panoramas.csv and tracks.csv files in folder 7. In case these files are corrupt, Creator will refuse to add the project. Instead this pop-up will be displayed: Simply add the Project again, but this time deselect the corrupt tour. This allows you to continue your work with the remaining tours of the project. The missing tour can be added to the project after it has been fixed. Version 2018-10-29 Page 87 of 99
After manually fixing the corrupted .csv file(s) you can add the skipped tour. We recommend the free Libre Office Calc program for this. First make a backup copy of the file you are going to edit. When opening the .csv file with Libre Office Calc make sure to select all columns and set them to Text. This ensures no automatic formatting changes the values. Afterwards scroll through the data, find the problem line and edit it to look like all other lines. A few hints In panoramas.csv the numbers in the #0:imgID column must be in sequence. Duplicate entries in column #0:imgID are not allowed. Empty lines are not allowed. Save the file and add the tour to your project: Open the project in Creator. On the Project page press the Add tours to project button to add the fixed tour. Version 2018-10-29 Page 88 of 99
Install the player to a web-server There are 3 components: The player, the MySQL database and the streetview tiles folder. For production, you should install the player and the MySQL database to the same server, and the streetview tiles to a different server, or a cloud. For testing you can install all three to the same server. MySQL database Create a new MySQL database. Import the projectname/player/demo3.sql.zip file to it. Streetview Tiles Copy the projectname/streetview-tiles folder to the web-server or a cloud. Player Adjust the projectname\player\plugins\streetview\ajax\db.php file for the database access. Adjust the projectname/player/player.xml file for the streetview tiles. Edit the tilespath variable to point to the streetview-tiles folders URL. Example tilespath="http://www.yourcompany.com/projectname/streetview-tiles" Copy the projectname/player folder to the Apache web-server. More Info on the Player: http://updates.applied-streetview.com/player/Player_Quick_Installation_Manual.pdf Version 2018-10-29 Page 89 of 99
Embed the player into any page
It looks like on our website:
http://www.applied-streetview.com
First install the player as usual.
For this example, the player is installed to the “Demo” folder:
http://www.your-server.com/players/Demo/
In your page, add this code:
var settings = {};
settings.files_path = "//www.your-server.com/players/Demo3/";
settings.auth_enabled = +"0";
settings.permalink_anchor = "demo";
embedpano({swf: settings.files_path + "player.swf", xml: settings.files_path + "player.xml", target:"player",
html5:"prefer", vars: settings, passQueryParameters:true});
Adjust the URL.
Remove the line breaks from the code above for it to work.
Version 2018-10-29 Page 90 of 99Remove the 'krpano demo version' logo What it looks like: The krpano demo version watermark is visible in the: - Player -> Preview sub-tab - Player tab - All generated players Get a krpano license for 129 Euro from http://www.krpano.com/buy Then go to the menu Help -> krpano -> Add activation key. Paste your key into the field and click Add. If the key is valid you should see a confirmation message that the key is registered. Restart Creator. In Menu - krpano - License details you can check your krpano activation key details: Obviously you will see your own license information, the above is just an example. Version 2018-10-29 Page 91 of 99
Help Help - About this PC Click on Menu - Help - About this PC to display helpful information like Windows version, Computer Name, Processor, Memory, Free disk space, Graphics Card, CUDA versions, etc. Click on Copy to clipboard to copy the information about this PC to the clipboard, then paste and save it elsewhere. Version 2018-10-29 Page 92 of 99
Preferences
Menu - Preferences
- For all projects
Graphics Card
Folders
Map
Expert Mode
Troubleshooting
- For new projects
Map
Duplicate Remover
Watermark
Leveling
Player
Imaging
Process
New projects get their default values from the For new projects preferences.
You can then make project-specific changes in the project tabs.
Reset all preferences button
Resets all preferences for new and all projects to their defaults.
Menu - Preferences - For all projects - Graphics Card
Graphics Card found
Graphics cards installed to this PC.
Default Processor
Twice as fast as the AS-Processor. New in Creator 3.
A NVIDIA graphics card is needed. We recommend: NVIDIA GTX 1080 with 8GB VRAM.
Legacy graphic cards with 4GB VRAM that are known to work: NVIDIA GTX 960, 960M,
965M, 970, 980.
AS-Processor
Slightly better quality than the Default Processor. Half as fast as the Default Processor.
A NVIDIA graphics card is needed. We recommend: NVIDIA GTX 1080 with 8GB VRAM.
Legacy graphic cards with 4GB VRAM that are known to work: NVIDIA GTX 960, 960M,
965M, 970, 980.
Legacy Mode
Works with and without a graphics card, many graphics cards should be supported.
The Legacy Mode for streetview-tiles creation needs a krpano licence.
Version 2018-10-29 Page 93 of 99Enable graphics card
Speed up the processing of the Legacy Mode by enabling the graphics card, many
graphics cards should be supported.
Parallel processes
How many datasets to be processed in parallel by the Legacy Mode.
By default set to 1. You can manually increase up to the number of threads available.
Menu - Preferences - For all projects - Folders
Input path
At this location the Creator looks for the project source folder, when creating a new project.
You can switch it to any other location.
Output path
At this location the Creator automatically creates a project folder with the same name as the
project.
Then the sub-folders for the data are created: streetviews, streetview-tiles, player, map-tiles.
PTO path
All of the cameras .pto files should be copied to this location.
Temp path
For temporary files. To improve speed in legacy mode the path should be on a SSD or even a
RAM-disk.
Menu - Preferences - For all projects - Map
Zoom level to load all data-points
At this level all the data-sets are displayed on the map.
Contents of pop-up
Left list contains all the available fields, the list to the right contains the list of fields that are
displayed in the popup.
To add a value from the left list to the right list, click on an item in the left list then click >
button. To remove a value from the left list, click on an item in the right list then click > button to move all the items from the left list to the right list.
Click on Skip vig_optimize program and exposure adjustment In legacy mode skip the vig_optimize and exposure adjustment steps. Log command lines of external programs Log terminal output of external programs Log process time information In Legacy Mode log information about each processing step. AS-processor CUDA 8 options Additional command line arguments to pass to as-stitcher8.exe AS-tiler options Additional command line arguments to pass to as-tiler.exe Menu - Preferences - For all projects - Troubleshooting Fix Camera accidentally mounted looking backwards. Click again to undo. Show Tracks in the Map tab. Enabling this feature may slow down or crash Creator. When moving streetviews on the map, do not move Tracks data. This will stop the Duplicate Remover from working properly later on. After this feature is enabled, in the Map tab the tours list will have an additional column “tracks” to control track visibility. It is recommended to enable this feature on a larger zoom level, 16 and up. Check and deactivate all data-sets with missing .jpg files when processing. Click on Check ALL data-sets now to check now. If images are missing for any reason,this will deactivate the affected data-sets to insure the remaining data processes well. Version 2018-10-29 Page 95 of 99
Check and rotate all the data-sets with incorrect rotation when processing. Click on Check ALL data-sets now to check now. Sometimes users have a look at the source images and rotate them upright for a better view. Unfortunately some programs save these rotated source images without warning. This feature rotates the source images back to ensure that the data processes well. Use a specific PTO file By default, the .pto files name is taken from streetviews.csv 1:CamSN field. This option allows you to override this functionality and always use a specific .pto file. Version 2018-10-29 Page 96 of 99
Menu - Preferences - For new projects - Map
Duplicate Remover overruled by
- Manual activations - streetviews activated manually will override values set by
duplicate remover.
- Manual deactivations - streetviews deactivated manually will override values set by
duplicate remover.
Default Base Layer
Menu - Preferences - For new projects - Duplicate Remover
Default preferences for the Duplicate Remover tab.
Menu - Preferences - For new projects - Watermark
Default preferences for the Watermark tab.
Menu - Preferences - For new projects - Leveling
Default start streetview
Exposure adjustment
Default is 1.5. This makes all the images a bit brighter than the source images.
If you want no change, set it to 0.
Level
Yes: The most commonly used set-up.
Level with the log value and the values entered in the Levelling tab.
No: No leveling at all.
Adjust: Use values from the Levelling tab only. Ignore the log data.
Menu - Preferences - For new projects - Player
Default preferences for the Player Preferences tab.
Menu - Preferences - For new projects - Process
Default preferences for the Process Preferences tab.
Version 2018-10-29 Page 97 of 99You can also read