User Manual for the IMIS 2014-2020 Application Module - for Applicants to the Interreg V-A Hungary-Croatia - HU-HR CBC
←
→
Page content transcription
If your browser does not render page correctly, please read the page content below
User Manual
                        for
the IMIS 2014–2020 Application Module

                         for
    Applicants to the Interreg V-A Hungary-Croatia
         Cooperation Programme 2014-2020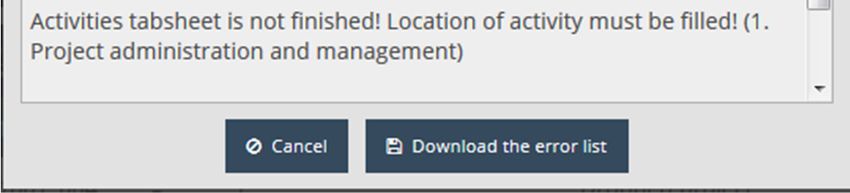
Table of Contents
1 Using this Manual ............................................................................................................................ 3
2 Technical Instructions...................................................................................................................... 3
2.1 Technical Requirements .......................................................................................................... 3
2.2 General Usage Rules ................................................................................................................ 3
2.3 Using Fields .............................................................................................................................. 4
3 How to Access IMIS 2014–2020 Front Office .................................................................................. 5
3.1 Logging In ................................................................................................................................ 5
3.2 The Menu ................................................................................................................................ 8
4 How to Prepare an Application ..................................................................................................... 10
4.1 General Data Tab ................................................................................................................... 10
4.2 Beneficiaries Tab ................................................................................................................... 11
4.3 Location of project impact Tab.............................................................................................. 17
4.4 Supporting stakeholders Tab................................................................................................. 18
4.5 Project Description Tab ......................................................................................................... 20
4.6 Indicators Tab ........................................................................................................................ 21
4.7 Activities Tab ......................................................................................................................... 25
4.8 Activity plan screen ............................................................................................................... 27
4.9 Information and publicity screen .......................................................................................... 28
4.10 Project Budget Tab ................................................................................................................ 29
4.10.1 Modify Budget by Beneficiary ....................................................................................... 30
4.10.2 Entering, Modifying and Deleting Budget Items ........................................................... 31
4.11 Sources of Funding Tab ......................................................................................................... 33
4.12 Payment forecast Tab............................................................................................................ 35
4.13 Project team Tab ................................................................................................................... 36
4.14 Infrastructure and Works Tab ............................................................................................... 37
4.15 Documents Tab...................................................................................................................... 40
4.15.1 Uploading files ............................................................................................................... 41
4.15.2 Creating a New Document ............................................................................................ 44
4.16 Saving Your Application ......................................................................................................... 44
5 Modifying, Viewing and Deleting Applications ............................................................................. 46
5.1 Viewing Applications ............................................................................................................. 46
5.2 Modifying Applications.......................................................................................................... 46
5.3 Deleting Applications............................................................................................................. 46
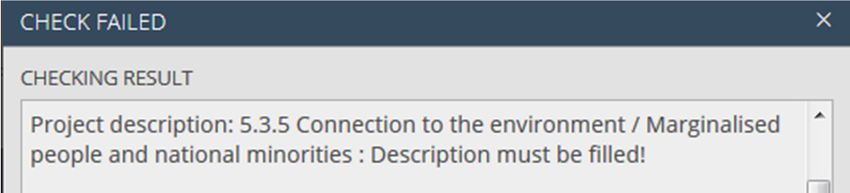
6 Generating Forms out of Applications .......................................................................................... 47
1
7   Submitting Applications ................................................................................................................ 48

                                                                                                                                             2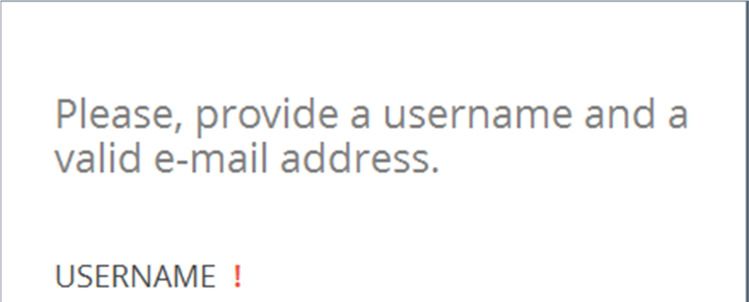
1 Using this Manual
The main aim of this User Manual is to provide guidance to applicants of the Interreg V-A Hungary-
Croatia Cooperation Programme on the use of the IMIS 2014–2020 Monitoring and Information
System. Applications can be submitted electronically through the IMIS 2014–2020 Front Office
Application module.

The Manual

    •   provides descriptions of how to fill in and submit applications, and
    •   provides practical and technical information about data entry.

Before starting your work, please:

    •   make sure that your computer meets the technical requirements (see the Technical
        Instructions chapter).
    •   study all chapters of the Manual and familiarise yourself with screen layouts and the logic of
        the system.

While filling in your application, please keep referring to the relevant chapters of the Manual.

2 Technical Instructions
This chapter informs you about the technical requirements, general usage terms and the use of fields
and buttons.

2.1 Technical Requirements
All client computers running IMIS 2014–2020 Application Front Office need to meet the following
technical requirements:

    •   Operating system: a desktop operating system is recommended (e.g.: Microsoft Windows).
    •   Resolution: 1280*768 or higher.
    •   Web browser: we recommend Mozilla Firefox 46.0.1 or newer, Google Chrome 50.0 or
        newer, or Internet Explorer 11.0 or newer.
    •   Allow cookies in your browser.
    •   PDF reader (e.g.: Adobe Reader).
    •   Word processor (e.g.: Microsoft Office) for opening DOC files.
    •   Internet connection.

2.2 General Usage Rules
    •   IMIS 2014–2020 is a web application; thus, any problem with the Internet connection may
        disrupt communication between the server and the client computer. If this happens, the
        screen goes grey and the following message is displayed: „Server connection lost, trying to
        reconnect…”. The session can be continued after the connection is restored, unless the
        timeout limit is reached. After a timeout, you will be required to log in again.

                                                                                                    3
•   If your session is inactive for 60 minutes (no data entry, no clicks etc.) the system terminates
        the connection between the server and the client for security purposes, and the following
        error message is displayed: „Session expired…”. In this case, press Esc and log in again.
    •   Please keep in mind that only one user may work on an application at any one time. Avoid
        parallel use (e.g. one person entering financial data, another person entering text at the
        same time). Parallel use may lead to errors and data losses.

2.3 Using Fields
The system uses several types of fields, which may have particular characteristics and require
different usage.

    •   Fields with a grey background – read-only fields, generally displaying values filled in
        automatically by the system, or values the applicant entered previously through another
        interface.

    •   Fields with a white background – normal entry fields.

    •   Fields with a white background and a red border – similar to normal entry fields, except
        these are mandatory fields. Fields that the user entered unexpected content into are also
        marked with a red border. In such cases, the validation message is displayed in a tooltip if the
        mouse is hovered above the field.

    •   Drop-down fields – these fields can be filled in using a predetermined set of values. Click on
        the arrow to open the drop-down list, and click on the chosen value.

                                                                                                      4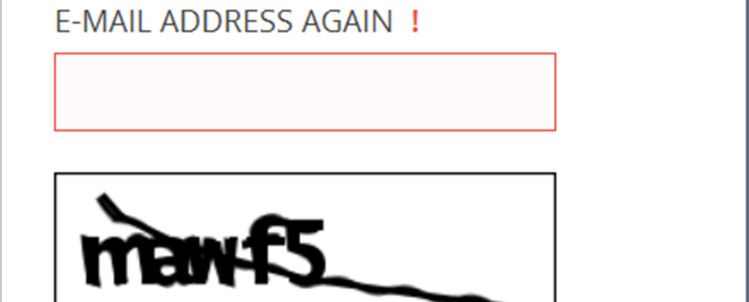
•       Date fields – enter dates using the accepted date format (day/month/year) or click on the
            calendar icon and select a day.

    •       Datasheets that open when clicking on a field – fields that need to be filled in using a new
            datasheet; on mouseover, their borders turn blue, and when clicked, a datasheet pops up.

3 How to Access IMIS 2014–2020 Front Office
Applications can be compiled and submitted using the Front Office Application module of IMIS 2014–
2020 Monitoring and Information System.

        •    Use the HU_IMIS_2014-2020_HUHR_APPLICATION link to access all screens of
             application Front Office in English in your web browser.
        •    The browser supported by the system is Mozilla Firefox.
        •    Working on the same application in multiple browser windows at the same time is not
             supported.
        •    There is no automatic background save feature in the module, but each screen has a
             Save button.
        •    You can use the Save feature to suspend the submission process at any point.

The following rules apply to using the module.

3.1 Logging In
•           Please click on the IMIS 2014-2020 link to access the screen shown below.

                                                                                                       5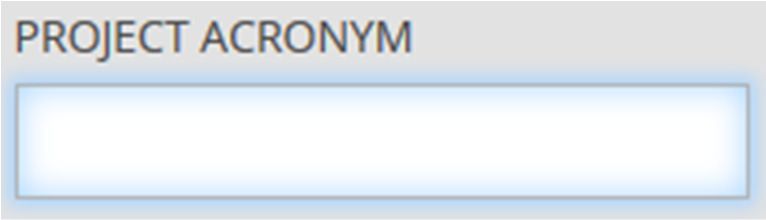
•   Please start registering by clicking on “Registration”. The following screen is displayed.

•   Enter your personal user name and supply a valid e-mail address, as well as a captcha. After
    filling in the fields, click on “Registration”. The system will send an automated message to the
    e-mail address you entered. The notification e-mail may take up to 5-10 minutes to arrive.

•   The message contains the information necessary for logging in, as well as your unique
    certificate. First, please click on “Download certificate”, then follow the steps shown.
•   Then add your certificate to your browser. You can do so in Firefox under “Options”/“Data
    Protection and Security”/“Certificates”. In the “View Certificates” window, on the “Your
    Certificates” tab, click “Import”, then “OK”.
•   Finally, log in through the IMIS 2014–2020 login screen using the previously chosen user
    name and the newly received temporary password. Click on “Sign in”. Attention: the
    password has limited validity; you need to log in within two hours. If the login is not
    completed within that time frame and your password expires, use the “Forget password”
    button on the login screen.
    The system will send a new temporary password to your e-mail address. You only need to
    enter your user name and the verification code.

                                                                                                  6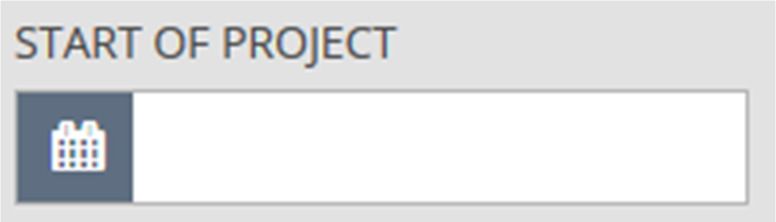
•   After logging in, you need to change your password (enter the temporary password supplied
    by the system again then enter your chosen new password twice). Your password needs to
    be at least 8 characters long, and it needs to contain lower-case and capital letters and
    numbers. You can change your password later at any time by clicking on “Change Password”
    in the Front Office home screen.

                                                                                           7
3.2 The Menu
After logging in successfully, the Front Office interface is displayed:

The menus on the left hand side of the screen are grouped into two categories:

    •   Application – use this menu item to start a new application, search previously entered or
        started applications or initiate other interactions related to your application.
            ◦ New – start assembling a new application here. Whenever you click New, the system
                sets up a new application. Before starting a new application, please always click on
                the Search menu item first to check whether you already have an initiated
                application. It is worth to drop the mistakenly started applications under Search
                menu point in order to avoid possible parallel filling in processes.
            ◦ Search – allows you to view all your applications. All applications are listed
                irrespective of their current state: submitted but not yet accepted, accepted,
                rejected, under preparation, or sent back for modifications.
    •   Personal Settings – use this menu item to initiate changes to your password and e-mail
        address.
            ◦ Change password – clicking on this menu item opens the password change screen.
            ◦ Change e-mail – clicking on this menu item opens the e-mail address change screen.

You can open and close the modules by clicking on the small arrow in front of the Application and
Personal settings menu items. Click on the vertical grey strip on the right hand side of the menu bar
in order to hide or unhide the menu bar and increase the space available for other content.

                                                                                                   8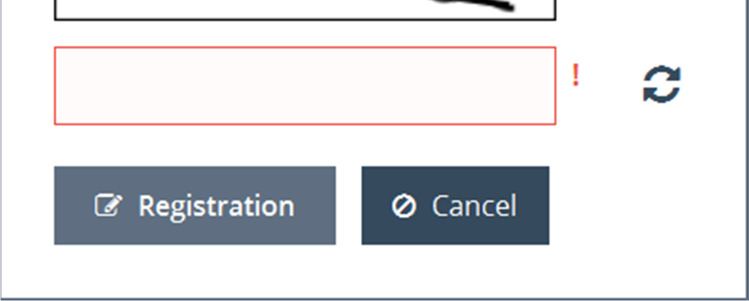
Click on the    icon in the top right corner to access the user manual, and click on the   icon (and
confirm your choice) to log out of the system.

                                                                                                  9
4 How to Prepare an Application
In order to initialise a new application, click on New under the Application menu. The system displays
the New application screen.
In the Call for Proposals Name drop-down menu, choose the call you wish to submit an application
for. Then make the appropriate choice in the Priority axis field and the Component field. Please study
the Guidelines for Applicants in order to make the correct choice. After filling in these fields, click on
the Start button in the top right corner to initialise the application, or click Cancel to abort.
4.1 General Data Tab
This interface allows you to enter the primary information about the application. The drop-down
Information reminder displays the application’s identifier and the Project acronym property.
10Click on the Project title and Project acronym fields to enter the Project title and the Project
acronym. The project’s title has to be expressive but short. The project’s abbreviated name acronym
cannot be longer than 30 characters. Later on, this will be used for identifying the project. Click on
the Save button to save the data entered.
Please check the Application FAQ for recommendations on how to create and what are the features
of a ‘good’ project Acronym.
Click on Define and enter the project duration in the pop-up window. Enter the starting date in the
Start of project field (click on to pick from a calendar), then enter planned ending date in the
End of project field. The planned length of the project is calculated automatically in the Duration (in
months) field. Click on the Save button to save the data entered. When planning the project duration
please consider that the minimum project duration is 4 months (1 trimester) and the maximum
duration (in months) can differ depending on the given component. (see details in Guidelines for
Applicants). It is recommended to plan full trimesters.
4.2 Beneficiaries Tab
The following features are available for handling administrative tasks related to the application’s
beneficiaries:
• New – enter a new beneficiary.
• Modify – modify an existing beneficiary.
• Delete – delete an existing beneficiary.
• Order – set the order of existing beneficiaries.
• View – view the data of an existing beneficiary.
11The list is empty by default; please start by entering the data of the beneficiaries. To do so, click on
New. This opens the beneficiary’s datasheet, in which you first need to fill in the Beneficiary data tab.
Please note, that the system requires to fill in all three sub-screens of the beneficiary datasheet in
one attempt therefore it is recommended to start filling in these sheets when all necessary data,
framed in red square on all three sheets, are available.
12The following data fields are displayed:
• Beneficiary ID – the beneficiary’s unique identifier generated by the system.
• Role in partnership – beneficiary type (LB, B1, B2, .., B7), automatically assigned by the
system (can be modified later using the Order feature).
• Official name (in original language) – please type in the official name of the beneficiary in
the original language.
• Official name (in English if exists) – please type in the official name of the beneficiary in
English. In case there is no official English name, please insert the official name in original
language into this cell as well.
• Abbreviated name – the beneficiary’s shortened name. This will be used for quick and
convenient identification.
• Country – please pick the beneficiary’s home country.
• Type of institution – please pick an institution type from the drop-down list.
• National tax number – please enter the beneficiary’s tax ID (this field can only be edited
after filling in the Address – Country field in the Official address section). The compulsory
format is different for each country:
o Hungary: 11 digits grouped as follows: (8-1-2)
o Croatia: maximum 11 digits
• Registry number – Please enter the beneficiary’s registration number.
• Community tax number– (OIB in HR) please enter the beneficiary’s community VAT number,
if applicable.
• Legal status – please pick a value from the drop-down list.(Please see GfA chapter 3.1.1.2. for
helping to identify the legal status.)
• Date of foundation – please enter or pick the date the institution was founded. Click on
to pick a date from a calendar. Please note that at least one year of operation counted
from the submission of the application is necessary in order to apply for the funds. See
details in GfA chapter 3.1.1.2.
• Founder organization – please enter the name of the founding organisation, if applicable.
• Website – please enter the beneficiary’s website, if applicable.
Fields related to the beneficiary’s official address in this tab:
• Address - Nuts III or equivalent – please pick one of the counties listed in the drop-down list.
• Address - postal code – please enter the postal code.
• Address - settlement – please enter the name of the settlement.
• Address - street – please enter the name of the street.
• Address - postal code – please enter the street number.
• Address - PO box – please enter the PO box, if applicable.
The Branch Office and Mailing Address sections can be controlled using checkboxes, which are
unselected by default. If the branch office address is the same as the official address, put a tick into
the „Please tick if the headquarters of the organization is registered in the prog. area!” checkbox. If
the branch office address is not the same as the official address, uncheck the „Please tick if the
headquarters of the organization is registered in the prog. area!” checkbox and enter the data of
the branch office as described in the part of the official address.
13For the eligibility of (Lead) Beneficiaries in view of location, please consult GfA chapter 3.1.1.3 Eligible
Lead Beneficiaries and Beneficiaries, Geographical location, before deciding if putting ticks are ok or
rather data should be filled in for the Branch office section.
If the mailing address is the same as the official address, leave the “Please tick if the mailing address
is the same as the official address!” checkbox selected. If the mailing address is not the same as the
official address, uncheck the „Please tick if the mailing address is the same as the official address!”
checkbox and enter the mailing address as described in the part on the official address.
After correctly filling in the fields in the Beneficiary data tab, click on the Legal represent./Contact
person tab. On this tab, you can enter information on the legal representative and the contact
person.
14The following fields are available:
• Title – please pick a value from the drop-down list.
• First name – please enter the first name of the legal representative.
• Middle name – please enter the middle name of the legal representative, if applicable.
• Last (family) name – please enter the family name of the legal representative.
• Suffix – please enter the suffix of the name of the legal representative, if applicable.
• Name – the system compiles the full name of the legal representative based on the data
supplied.
• Phone number – please pick one of the presets in the drop-down list, then enter the legal
representative’s phone number in the second field.
• Mobile phone number – please pick one of the presets in the drop-down list, then enter the
legal representative’s mobile phone number in the second field. Providing at least one phone
number is required.
• E-mail address – please enter the legal representative’s e-mail address.
• Position – please enter the position of the legal representative.
Contact person:
Please make sure that the data given here is precise since all official communication between the
programme bodies (Joint Secretariat, controllers etc.) and the organisation will be done through
the contact person. It is important that the person indicated here is actually involved in the
planning and implementation of the project, and can give relevant information to the JS if
15required. The person should be easily reached therefore pay special attention to give correct data
here. Please insert all DIRECT contact details of the contact person responsible for the project.
Avoid inserting general e-mail address like info@mail.com or telephone and fax numbers which
lead to e.g. a secretariat of a big organisation like dean’s office of a university.
If the legal representative also acts as the contact person, select the “Please tick if the contact
person is same as the legal representative!” checkbox. If the contact person is not the same as the
legal representative, uncheck the checkbox and enter the data of the contact person as described in
the “Legal representative” section.
After correctly filling in the fields in the Legal represent./Contact person screen, click on the Financial
capacity screen. Data on financial suitability can be entered here.
The following fields are available:
• Number of staff – please type in the number of employees working at the beneficiary in
general.
• Data in currency – please pick one of the values in the drop-down list according to the
currency you would like to use when entering values.
• Last closed budget year – please pick the last closed fiscal year of the partner.
• Last closed budget year annual revenue – please enter the annual revenue achieved in the
last closed fiscal year.
• Last closed budget year balance sheet total – please enter the balance sheet total achieved
in the last closed fiscal year.
• Last closed budget year result – please enter the financial result achieved in the last closed
fiscal year.
16• Awarded de minimis grant in current and the previous two financial year (EUR) – please
enter the amount of state aid received by the partner in the current financial year and the
previous two financial years, in euros.
After correctly filling in the fields in the Financial capacity tab, click on Save to save the beneficiary,
which you can view in the list on the Beneficiaries tab.
By selecting one item in the list, you can modify beneficiaries by clicking on Modify, view the data by
clicking on View, and delete beneficiaries by clicking on Delete and confirming your choice.
To add multiple beneficiaries to your application, repeat the above steps. If you reach the maximum
permitted number of beneficiaries (LB+7 Bs), the system warns you that you cannot add more
beneficiaries.
If you add multiple beneficiaries, you can set their order by clicking on the Order button, which
opens a separate interface.
4.3 Location of project impact Tab
This tab lets you to enter the locations of the project with the following options:
• New – creating a new location.
• Modify – modifying an existing location.
• Delete – deleting an existing location.
• View – viewing an existing location.
The list on the screen is empty by default, please start your work with entering a new location by
clicking on New. This opens the project location datasheet with the following fields:
• Beneficiary abbrevia. name – please choose a previously entered beneficiary from the drop-
down list.
• Role – filled in by default with the role of the selected beneficiary.
17• Country – please select a country from the drop-down list, where the project impact will be
realised by the given beneficiary.
• Nuts III or Equivalent – please select a county from the drop-down list, where the project
impact will be realised by the given beneficiary.
• Other – by ticking in the check-box, you cannot select a value for the Country and Nuts III or
Equivalent fields but you can explain in the textbox below entitled ‘Nuts V Settlement(s)’
where the project impact will be realised in other HU or HR counties by the given beneficiary.
• Nuts V Settlement(s) – please type in the settlement(s) where the project impact will be
realised by the given beneficiary.
After correctly filling in the fields on the datasheet, click on Save to save the data, or click on Cancel
to abort and return to the previous screen. Please enter every location of the expected project
impacts by following the above steps.
You can modify the item, by selecting it from the list on the Location of project impact tab and
clicking on Modify, delete the location by clicking on Delete and confirming your decision, or view the
data by clicking on View.
4.4 Supporting stakeholders Tab
Associated Partners as existed in the HU-HR (IPA) CBC Programme 2007-2013 are not expected to
join the implementation of projects financed from the Interreg V-A Hungary-Croatia Co-operation
Programme 2014-2020. Instead, if any supporting stakeholder or authority intends to express their
support to the project, this can be managed through signing a letter of support to the given
Beneficiary – and by filling in this tab of the electronic application.
You can administrate the supporting stakeholders on this screen with the following options:
• New – creating a new supporting stakeholder.
• Modify – modifying an existing supporting stakeholder.
• Delete – deleting an existing supporting stakeholder.
• View – viewing an existing supporting stakeholder.
18The list on the screen is empty by default, please start your work with entering a new supporting
stakeholder by clicking on New. This opens the supporting stakeholder’s datasheet with the following
fields
• Official name – please type in the official name of the supporting stakeholder.
• Registry number – please type in the registry number of the supporting stakeholder.
• National tax number – please type in the national tax number of the supporting stakeholder
(you can edit this field only after you chose a value for the Address - Country field).
• Community tax number – please type in the supporting stakeholder’s community tax
number.
• Address - Country – please, select a country from the drop-down list.
• Address - NUTS III or Equiv. – please, select a county from the drop-down list (you can edit
this field only after you chose a value for the Address - Country field).
• Address - Postal code – please type in the postal code.
• Address - City - please type in the city.
• Address - Street - please type in the street.
• Address - Number - please type in the street number.
• Address - Po Box - please type in the PO box.
• Website - please type in the website of the supporting stakeholder.
After correctly filling in the fields on the datasheet, click on Save to save the data, or click on Cancel
to abort and return to the previous screen. Please enter every supporting stakeholder (max 4) by
following the above steps.
You can modify an item, by selecting it from the list on the Supporting stakeholders tab and clicking
on Modify, delete the supporting stakeholder by clicking on Delete and confirming your decision, or
view the data by clicking on View.
194.5 Project Description Tab
You can enter the project’s description on this tab along various themes, using the following
functions:
• Modify – add/modify a description related to the theme in question.
To add a description, choose a theme, then click on Modify. The description’s datasheet opens,
containing the following fields:
• Key Aspect – title of the topic to cover, filled in automatically.
• Use the free text field to enter a detailed description of the theme in question.
• Guide – a field supplied by the system, containing instructions and max character limit.
Please be aware to fit into the max allowed character, avoiding fragment of description.
Please study the associated guides!
20Click on Save to save the data entered, or click on Cancel to abort data entry and return to the
previous tab. Repeat the above steps for each theme.
Core of the project:
Please pay special attention to the core of the project which means that all information given in
the sections of Activities, Indicators, Budget tables and Information and publicity, are coherent
with each other. Keep in mind that the information given in the Activities tab should be in
compliance also with the content of the fields under Project description tab and vice versa. It is
very important to make a clear connection between the activities planned, outputs and results
targeted and with the costs planned for each Beneficiaries.
4.6 Indicators Tab
This tab allows you to enter and maintain the indicators required for your application.
In order to have a clear picture about the content and programme requirements of the possible
indicators, please consult with the ‘Interpretation of Indicators’ document, which is part of the CfP
package.
The Priority axis and Component fields remind you which priority is selected.
21You can view the Programme level result indicator, Programme level output indicator, General
indicator, Horizontal indicator and Component specific indicator sections on the Indicators tab in the
following form.
To enter the Programme level result indicator, please click on any field of this section, which shows
you the indicator’s datasheet where you can fill in all cells related to the given programme level
result indicator.
Programme level output indicator, General indicator, Horizontal indicator, Component specific and
Project specific indicators can be filled in on the Indicators tab in the following form and you can
maintain them with the following options:
• New – creating a new indicator.
• Modify – modifying an existing indicator.
• Delete – deleting an existing indicator.
• View – viewing an existing indicator.
2223
To create a new indicator, after clicking on the New button, please follow the process described
above.

You can fill in the following fields on the indicator’s datasheet:

    •   Guide – guidelines for filling in the application.
    •   Programme level result indicator/Programme-level output indicator/General
        indicator/Horizontal Indicator/Component specific indicator – please choose the indicator
        from the drop-down list (in case of one type, the field is filled in automatically).
    •   Project specific indicator – please enter the name of the indicator.
    •   Unit – automatically filled by choosing an indicator (in case of a project specific indicator,
        please enter the measuring unit).
    •   Base value – please enter the starting value of the indicator, to maximum 6 decimal places.
    •   Target value – calculated value, the sum of target value(s) by the beneficiary/beneficiaries.
    •   Beneficiary – you can view the abbreviated name(s) of the previously entered
        beneficiary/beneficiaries, please, enter the target value relevant to the beneficiary.
    •   Type – in case of Project specific indicator, please select the type of indicator from the drop-
        down list.
    •   Target value relaised by LB/Bs… textbox – please describe the indicator, based on the
        request defined by the contracting authority.

In case of a Programme-level result indicator/Programme-level output indicator/General indicator/
Horizontal indicator/Component specific indicator the following screen is displayed:

In case of a Project specific indicator the following screen is displayed:

                                                                                                     24
After correctly filling in the fields, click on Save to save the data entered, or click on Cancel to abort
data entry and return to the previous tab. Please enter every desired indicator by following the steps
described above.
4.7 Activities Tab
This tab is for creating the list of planned project activities. The “Project administration and
management” and “Information and publicity” activities are entered by default; later on, all entered
activities are displayed in the list. The following maintenance functions are available:
• New – create a new activity.
• Modify – modify an existing activity.
• Delete – delete an existing activity.
• View – view the data of an existing activity.
25Please start your work by entering the data of the activities. To enter an activity pre-defined in the
application, please choose the activity and click on “Modify”. To add a new activity to the application,
please click on New which opens the activity datasheet with the following fields:
• Activity name – please enter the name of the activity.
• Location of the activity (including activities outside of the eligible area, if relevant) – please
enter the location of the activity.
• Detailed description – please enter the description of the planned activity.
• Estimated cost (EUR) – estimated cost, filled in automatically later, based on the sum of the
budget items which the activity is assigned to on the Project Budget tab.
• Direct target groups – please enter the direct target groups.
After correctly filling in the fields, click on Save to save the data entered, or click on Cancel to abort
data entry and return to the previous tab. Please enter every activity by following the steps described
above.
A maximum of 10 project activities can be created besides the two predefined activities, so it is
advised to group the similar type of activities of the beneficiaries and provide a clear description
about the content.
To modify an activity, select one from the list in the Activities tab and then click on Modify, to delete
an activity, click on Delete and confirm your choice (two activites cannot be deleted, by default), and
to view data, click on View.
Please be aware that already created activity names are used on other screens as well (e.g a budget
item is assigned to an activity in the beneficiary budget table), therefore the modification of the
given activity name or deleting a whole activity line at a later stage has to be checked on other
screens and should be reassigned by selecting the new or modified activity from the roll down menu
on the given screen.
In case the visibility of the Activities screen becomes difficult after filling in the first predefined
activity 1. Project administration and management first, try to extend the width of the description
column with moving the column separation line to the right.
264.8 Activity plan screen
This tab allows you to associate the activities added as described above with beneficiaries’ reporting
periods, essentially scheduling them. The application generates the combinations of the activities
and beneficiaries added, and list them on this screen.
Please use the checkboxes to assign the activities and beneficiaries to reporting periods.
Make sure that each activity is assigned to at least one reporting period and at least one beneficiary!
The Activity plan screen does not have a separate Save button. Once you are done with the screen,
continue work by clicking on the Information and publicity tab.
274.9 Information and publicity screen
Applicants need to declare how and by which beneficiary each information and publicity obligation
will be fulfilled. This screen is empty by default; later on, all entered activities are displayed in the list.
The following maintenance functions are available:
• New – create a new activity.
• Modify – modify an existing activity.
• Delete – delete an existing activity.
• View – view the data of an existing activity.
Please start your work by adding information and publicity activities. To do so, click on New. The
activity datasheet opens, containing the following fields:
• Type – please pick an activity type from the drop-down list.
• Communication Tool – please define the communication tool by entering a short but
descriptive name for it (e.g. opening conference, press conference, etc).
• Language – please pick one of the languages in the drop-down list or enter a language.
• Beneficiary – the abbreviated names of the previously entered beneficiaries are displayed
with checkboxes; please tick the beneficiary/beneficiaries that carry out the information or
publicity activity in question.
• Description – please enter the description of the information activity by providing all
important information about the given communication tool.
• Reporting period – the application’s reporting periods are displayed with checkboxes; please
select the reporting period(s) in which the given information activity will be carried out.
• Target group(s) – type of people to be reached by the given communication activity.
• Guide – a field filled in by the system based on the type selected, containing instructions on
how to correctly fill in the tab. Please pay attention to the minimum requirements of the
Programme related to the given type of communication as described in the Guide.
Please study the associated guides!
28After correctly filling in the fields, click on Save to save the data entered, or click on Cancel to abort
data entry and return to the previous tab. Please use the above steps to enter all information
activities.
After selecting an element from the list in the Information and publicity tab, you can click on Modify
to change the selected item, Delete to delete it (you will be prompted to confirm your choice) or
View to view the data.
4.10 Project Budget Tab
The Project budget tab allows you to enter a detailed budget plan.
The planned project budget needs to be entered separately for each beneficiary. The system
automatically compiles a project budget based on beneficiary-level data. Filling in the fields with a
red border is mandatory.
The Project budget screen is made up of two panels:
• The top table lists the beneficiaries participating in the application.
• The bottom table shows the information entered for the beneficiaries by budget line, and the
application sums up the planned expenditures for each beneficiary (in the Total cost line) and
for each cost line (in the Total budget (EUR) column).
294.10.1 Modify Budget by Beneficiary
In the top table, select a beneficiary participating in the application by clicking on its name; then click
on the Modify budget by beneficiary button. This opens a new Budget by beneficiary window, where
you can enter the planned expenditures for each budget line. The grey fields are filled out by the
system; only the white fields are editable. Click Save to exit.
304.10.2 Entering, Modifying and Deleting Budget Items
The budget table is structured on three levels:
1. Budget headings (1.Preparation cost, 2.Staff cost, 3.Office and administration, 4.Travel and
accommodation, 5. External expertise and services costs, 6.Equipment expenditure, 7.
Infrastructure and works
2. Budget lines (e.g. 2.1 Salary of staff - Calculation on Flat rate basis, 2.2 Salary of staff -
Calculation on Real cost basis, 4.1 Travel cost of project staff, 5.2 Studies, statistics,
databases and researches, 6.2 Equipment for general (office) use, 7.1 Construction,
reconstruction and renovation of buildings, works, infrastructure, etc.)
3. Budget items – budget items have to be entered by the applicants based on and being in line
with the separate excel budget table which is annex to the project proposal.
Planned costs except for lump-sum costs, flat rate staff costs and administrative costs have to be
added in one budget item. The amount of this only budget item inserted should be equal to the total
amount of the same budget line of the same Beneficiary planned in the separate excel budget table.
The most appropriate project activity should be assigned to the budget item by selecting it from the
roll down menu. Most appropriate activity can be considered the one which from among the items
included in the inserted summarised item covers the biggest amount of all.
It is very important that financial and content related data inserted into the IMIS budget tables are
totally in line with the separate excel project budget table, which should be also uploaded as Annex
to the application under the Documents tab within the dedicated folder named as 7. Project budget
table.
31Therefore it is highly recommended for the partnership to finalise the separate project budget
table first (including the Activities as well) and start inserting the data into IMIS Activities and
Budget per Beneficiaries tabs only after that.
Please note, that in case of discrepancy between the project budget visible on IMIS screens and that
of the separate excel budget table uploaded to the Documents folder as Annex, always the content
of the Budget by Beneficiary IMIS screens prevails.
To create this (third level) budget item sub-line, click on the New button of a (second level) Budget
line such as Travel cost of project staff. This opens a new ‘Budget by beneficiary’ window.
The following fields are shown:
• Role – filled in automatically with the category of the beneficiary.
• Beneficiary abbreviated name– the beneficiary’s shortened name.
• No. – number of the budget line the item was registered to.
• Budget line – name of the budget line the item is registered to.
• Guide – the guide that belongs to the budget line in question.
• Budget item no. – the number of the budget item within the subline in question.
• Name of the item – please enter the name of the item.
• Project activity – please choose an activity from the drop-down list.
• Unit – please enter the item’s unit of measure. Name of the unit should be ‘all in 1 item’ in
case the budget item is a summarised item of the several items planned within the separate
excel project budget table annexed to the application.
32• No. of units – please enter the number of units, specifying even two decimal places. Number
of units should be 1 in case of a summarised budget item.
• Unit price – please enter the unit price, specifying even six decimal places. Unit price should
be always equal to the total amount of the corresponding budget line.
• Amount – product of the number of units and the unit price which is calculated
automatically.
When you are done with entering an item and you wish to add it to the budget, leave this screen by
clicking on the Add button; otherwise, click Cancel.
Previously created budget sublines (items) can be modified or deleted using the Modify and Delete
buttons (confirmation is requested for deletions). You can always interrupt the process by clicking on
the Cancel button.
Please register all planned expenditures to all budget lines using the process described above.
Please enter the description for the budget sublines in the relevant white text-box on the Budget by
beneficiary screen in every case when a budget item is entered to the subline.
If you choose wage reporting based on actual costs, please choose subline 2.2, click on New and fill in
the fields as described above. Detailed description and cost planning should be done in the separate
excel budget tables.
Each and every beneficiary is entitled to have a lump sum of 1000 EUR in order to procure general
office equipment for project purposes, therefore please enter the 1000 EUR amount into the
dedicated cell (framed in red colour) under budget line 6.2.
Please pay special attention that the total amounts inserted into and calculated by the system is
crosschecked with the submitted separate excel project budget table on all levels: budget line,
budget heading, total beneficiary budget, total project budget!
In order to do that you can compare the Project budget summary table available in the system and
also in the separate excel project budget table.
Please note that IMIS screen data prevails in case of any discrepancy between the data available
on IMIS screens and the annexed separate excel project budget table.
4.11 Sources of Funding Tab
The top part of the Sources of funding screen contains the total budget of the partners participating
in the project by funding sources. You do not need to edit this area, as the system sums up all the
beneficiary-level information you previously entered.
33• EU contribution – the amount of European Union contribution by beneficiary and in total.
• National contribution – the amount of national contribution by beneficiary and in total.
• Own contribution – the amount of own contribution by beneficiary and in total.
• Total costs – all costs listed in the budget lines by beneficiary and in total.
• Total eligible cost expected – all expected and eligible by partner and in total.
The bottom part of the Sources of funding screen is empty by default. Here, if relevant, you can
enter/modify each partner’s
• Amount of eligible VAT – it is obligatory to insert!
• Extra own contribution
• Planned net revenues
• Funding from other sources.
In order to enter the planned VAT, please select the Amount of eligible VAT row by clicking on the
name, then open the Sources of funding datasheet screen by clicking on Modify and enter the
planned VAT for each partner. Click Save to exit.
Please note that VAT amount can be considerred eligible cost only if the given Beneficiary cannot
recover the VAT according to its VAT status. These Beneficiaries have to plan their costs in gross and
they have to fill in the relevant cell called ‘Amount of eligible VAT’ with the estimated VAT amount of
their project budget. If the cell is not filled in, the VAT is not approved, therefore can not be
reimbursed in the frame of the project.
34Please enter the extra contributions, revenues and funding from other sources (if relevant) following
the above description.
4.12 Payment forecast Tab
In the top table in this screen, enter the expected schedule of expenditures by beneficiary and
period. In the bottom table, the system offers the EU contribution amount if you stand on the given
cell with the mouse cursor- based on the amounts you enter into the top table. Please insert the
offered amount manually.
Please specify the expected expenditure of each beneficiary in each reporting period. The amounts
entered are automatically added up by the system, and the difference from the Total cost entered
into the project budget is displayed in the Difference column. If there is a difference between the
planned expenditure and the previously entered total budget, the following warning appears:
“Please eliminate the difference highlighted in red colour!”
354.13 Project team Tab
You can enter information on the employees working in the project on the Project team screen. You
have the following options to maintain the list of employees working in the project:
• New – create a new activity.
• Modify – modify an existing activity.
• Delete – delete an existing activity.
• View – view data of an existing activity.
To enter a new item, click New and enter the following data:
• No – number field.
• Beneficiary abbrev. name – please select the relevant beneficiary.
• Role – field filled automatically with the role of the selected beneficiary.
• Related project activity – please select an activity from the drop-down list.
• Position – please enter the position of the beneficiary.
• Job description – please enter the job description of the beneficiary.
After correctly filling in the fields, click on Save to save the data entered, or click on Cancel to abort
data entry and return to the previous tab. Please use the above steps to continue entering the
information.
36After selecting an element from the list in the Project team tab, you can click on Modify to change
the selected item, Delete to delete it (you will be prompted to confirm your choice) or View to view
the data.
4.14 Infrastructure and Works Tab
This tab allows you to administrate the project’s infrastructure environment, in case of an
investment the work locations, the permits necessary for project implementation and pieces of real
estate.
In the upper part of the screen you can enter the following data:
• All Settlements Affected By The Project by clicking on this field:
To save the data click on Save after filling the field, to cancel and return to the previous field, click on
Cancel.
• List of Underpinning Documents (E.G. Maps, Plans) Showing the Affected Area by clicking
on the field with the same name:
37To save the data click on Save after filling the field, to cancel and return to the previous field, click on
Cancel.
The lower part of the screen is empty by default, later all locations and permissions can be viewed in
the list. The following maintenance functions are available:
• New – enter a new location and permit.
• Modify – modify an existing location and permit.
• Delete – delete an existing location and permit.
• View – view the data of an existing location and permit.
Please start your work by adding a location. To do so, click on New in the Location of infrastructure
and works pane. This opens the Location of infrastructure and work datasheet window, which
contains the following fields:
• Beneficiary Name – please select a beneficiary.
• Role – filled in automatically by categorizing the selected beneficiary.
• Permit Required – please select whether a permit is needed.
• All Related Topographical (LOT) Numbers – please enter all relevant topographical lot
numbers (land registry numbers).
• Description – please enter the description of the planned re/construction and works activity
for the location.
38After correctly filling in these fields, click on Save to save the data entered, or click on Cancel to abort
data entry and return to the previous tab. Repeat the above steps for each location.
After selecting an element from the hit list in the Location of infrastructure and works tab and
clicking on Modify, you can change the selected item; click Delete to delete it (you will be prompted
to confirm your choice) or View to view the data.
Please continue your work by adding the permits. To do so, click on New in the Permits pane. The
Permit datasheet window opens, containing the following fields:
• Beneficiary Name – please select a beneficiary.
• Role – automatically filled with the category of the beneficiary.
• Type of permit – please select the type of the permit.
• Identification / Registry number of permit – please enter the permit’s unique identification
number.
• Date of request – please provide the date when the permit was requested.
• Date of receipt – please provide the date when the permit has been or is (expected) to be
received.
• Description – please enter the description for the permit.
After correctly filling in these fields, click on Save to save the data entered, or click on Cancel to abort
data entry and return to the previous tab. Repeat the above steps for each permit.
39After selecting an item from the list in the Permits section, then clicking on Modify you can modify
the selected item; click Delete to delete the permit (you will be prompted to confirm your choice) or
click View to view the data.
4.15 Documents Tab
The Documents tab contains a list of documents to be submitted with the application. You can
upload files here. The following maintenance functions are available:
• New – add a new folder (please avoid creating new folders, use the already available
document folders for uploading annexes of the application!)
• Modify – modify an existing document folder for uploading the requested annex.
• Delete – not active
• View – view an existing folder and uploaded documents in it.
If the submission of certain predefined documents is required for submitting an application, this
information is indicated in the “Mandatory” folder in the table. If such a folder was/folders were
defined, no application may be submitted until at least one document is uploaded into the folder(s).
Please make sure that all Mandatory documents (as described in the Guidelines for Applicants
chapter 4.2.1) are uploaded in the required form in order to avoid automatic rejection!
In case a Mandatory document is not relevant for your project (e.g. for a soft project annex 19/a.
Summary of ownership situation…, and annex 21. Construction plan… are not relevant), please
upload to the given folder a simple word document with the text ‘Not relevant for the present
project’ written on it.
404.15.1 Uploading files
Please start your work by uploading a file as a document. Select a folder in the hit list, then click on
Modify. This opens the Document datasheet window with two tabs: Main data, and Files.
The Main data tab displays general information on the folder and the required document.
The fields displayed on this tab contain information on the document (they are all read-only):
• Folder – the path of the folder the system uses for storing the document.
• Method of submission – the way the document was submitted.
• Document ID – the document’s identifier generated by the system.
• Date of preparation – date of creation.
• Type – the document’s type.
• Subject – the document’s subject.
• Prepared by (user id) – the ID (identifier) of the user who created it.
• Prepared by (user name) – the name of the user who created it.
• Channel – submission channel.
• Mandatory – documents that must be uploaded in a given folder.
• Description – the document’s description.
• Language Of the Document – the language the document is in.
• To be Submitted in original or copy – whether an original is required or not.
Under the Files tab you can manage the document upload itself:
At the top is a search area that you can use to filter the hit list using the following fields:
41• File name (id) – the file’s unique identifier.
• Type – the file’s extension format.
• Original file name – the file name.
• Sequence number – the file’s serial number.
The bottom part of the window offers the following file management options:
• Download – download the file.
• Upload – upload a new file.
• Delete – delete an existing file.
• Reorder – change the order of existing files.
Click on the Upload button, which opens the file uploading window. Choose the file to be uploaded,
then click on Open.
Note that the maximum file size is 30 MB per file. There is no limitation on the combined total size
of files.
Also note that you can also upload compressed files (such as .zip).
42You can also read