Making the Transition to Microsoft Windows 7 - Just the Basics! - Microsoft
←
→
Page content transcription
If your browser does not render page correctly, please read the page content below
Microsoft®

Making the Transition to
Microsoft Windows 7 –
Just the Basics!
© 2009 by CustomGuide, Inc. 1502 Nicollet Avenue South, Suite 1; Minneapolis, MN 55403
     This material is copyrighted and all rights are reserved by CustomGuide, Inc. No part of this publication may be reproduced,
     transmitted, transcribed, stored in a retrieval system, or translated into any language or computer language, in any form or by
     any means, electronic, mechanical, magnetic, optical, chemical, manual, or otherwise, without the prior written permission of
     CustomGuide, Inc.
     We make a sincere effort to ensure the accuracy of the material described herein; however, CustomGuide makes no warranty,
     expressed or implied, with respect to the quality, correctness, reliability, accuracy, or freedom from error of this document or the
     products it describes. Data used in examples and sample data files are intended to be fictional. Any resemblance to real
     persons or companies is entirely coincidental.
     The names of software products referred to in this manual are claimed as trademarks of their respective companies.
     CustomGuide is a registered trademark of CustomGuide, Inc.

2   © 2009 CustomGuide, Inc. / Bates College (October 2011)
Table of Contents
Welcome to Windows 7 ......................................................................................................................................... 4

 A Look at Windows 7 ............................................................................................................................................ 5

 What’s New in Windows 7 ..................................................................................................................................... 6

 Starting and Logging On to Windows 7 ................................................................................................................. 7

 Understanding the Windows 7 Screen .................................................................................................................. 8

 Understanding the Start Menu .............................................................................................................................. 9

 Using Help and Support ...................................................................................................................................... 11

 Logging Off or Locking Your Computer ............................................................................................................... 13

Working with a Window....................................................................................................................................... 15

 Understanding the Parts of a Program Window .................................................................................................. 16

 Understanding the Ribbon .................................................................................................................................. 17

 Understanding Parts of the Windows Explorer Window ...................................................................................... 18

 Using Windows Aero ........................................................................................................................................... 19

 Switching Between Windows .............................................................................................................................. 21

Working with Folders and Files .......................................................................................................................... 23

 Understanding What’s in Your Computer ............................................................................................................ 24

 Opening Drives, Folders, and Files ..................................................................................................................... 26

 Using Windows Explorer to Navigate Your Computer ........................................................................................ 27

 Using and Creating Libraries ............................................................................................................................... 29

 Modifying and Deleting Libraries ......................................................................................................................... 30

 Using Search ....................................................................................................................................................... 32

Working with the Taskbar and Desktop............................................................................................................. 34

 Customizing the Taskbar .................................................................................................................................... 35

 Resizing and Moving the Taskbar ....................................................................................................................... 36

 Using Jump Lists ................................................................................................................................................. 38

 Customizing the Start Menu ................................................................................................................................ 39

Extras, Tips, and Tricks ...................................................................................................................................... 41

 Snipping Tool ...................................................................................................................................................... 42

 Sticky Notes ........................................................................................................................................................ 43

 Working with Compressed Folders ..................................................................................................................... 44


                                                                                                                                      Bates College                       3
1
Welcome to & Notes:
Windows 7
A Look at Windows 7 .......................................... 5
Operating systems: a brief overview ......... 5
What’s New in Windows 7 .................................. 6
Starting and Logging On to Windows 7 ............ 7
Understanding the Windows 7 Screen .............. 8
Understanding the Start Menu ........................... 9
Using Help and Support ................................... 11
Search for help ........................................ 11
Browse for help ....................................... 11
Turning Off Your Computer ............................. 13
4 © 2009 CustomGuide, Inc. / Bates College (October 2011)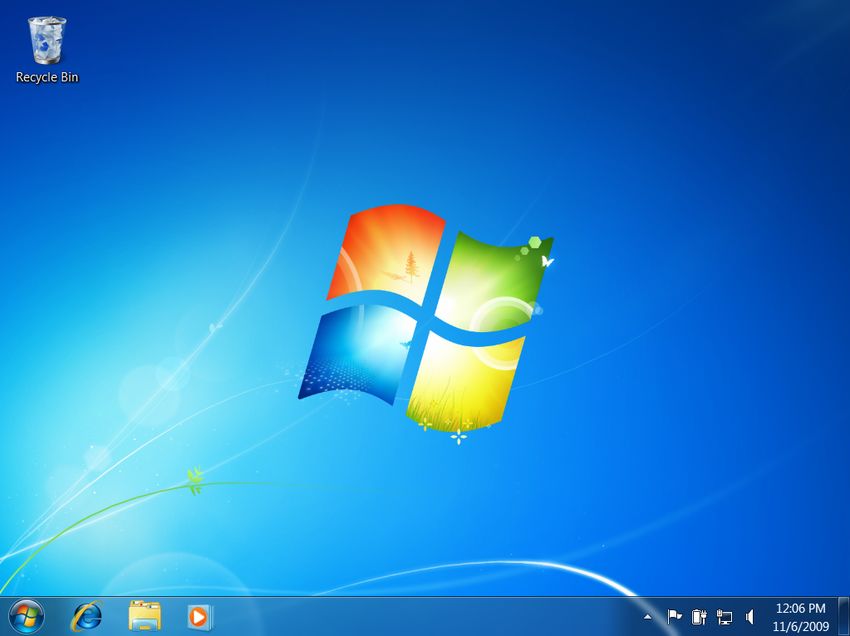
Welcome to Windows 7
A Look at Windows 7 Transitioning to Windows 7 – Just the Basics!
& Notes:
Welcome to Microsoft Windows 7, Microsoft’s newest
operating system.
Operating systems: a brief overview
Windows 7 is an operating system. Okay, so what’s an
operating system? An operating system is a software Table 1-1: Windows 7 Editions
program that controls and runs just about everything on
your computer, including: Home Includes dynamic usability features, such as
Premium easier desktop navigation, improved search
• Controls Your Computer’s Hardware features, and faster ways to start programs.
Windows controls the different devices on your HomeGroup networking, full system Backup
computer system. It’s what makes your printer print, and Restore, and an improved Media Center
what makes graphics and text appear on your are also included.
monitor, and what makes your mouse point and click.
(Actually, you make the mouse point and click, but Professional Offers the same features as Home Premium,
Windows is what puts the mouse pointer on the with additional features for business
screen and electronically connects it to your mouse.) computing, such as Windows XP Mode for
compatibility with Windows XP programs,
• Runs Your Computer’s Programs Domain Join for easier and more secure
Windows is what runs all your programs. Without connections to company networks, and the
Windows, your word processor, Web browser ability to backup and restore to a network.
(Internet), and games wouldn’t work. Windows lets
your programs talk to your hardware, so you can do Ultimate Offers the same features as Home Premium
things like print documents from your word processor and Professional, with additional features for
protecting data and devices with BitLocker,
on the printer.
and the option to work in the language of
• Organizes Files your choice.
Windows stores information in files and folders on
your computer’s hard disk, just as you store files and Enterprise Bates College utilizes the Enterprise edition
folders in a filing cabinet. of Microsoft Windows 7 within its computing
environment. Windows 7 Enterprise is not
Think of the operating system as an engineer who makes available to purchase through typical retail
sure all the parts of your computer—your hardware and consumer outlets. The Enterprise edition of
programs—work together. Operating systems have been Windows 7 provides additional features and
tools available to institutions and businesses
around for a long time; what makes Windows special is
to assist with the distribution and
its ability to make computer operations easy by using a management their deployment of Microsoft
graphical user interface. With Windows, all you have to Windows 7.
do is point and click to do something.
Bates College 5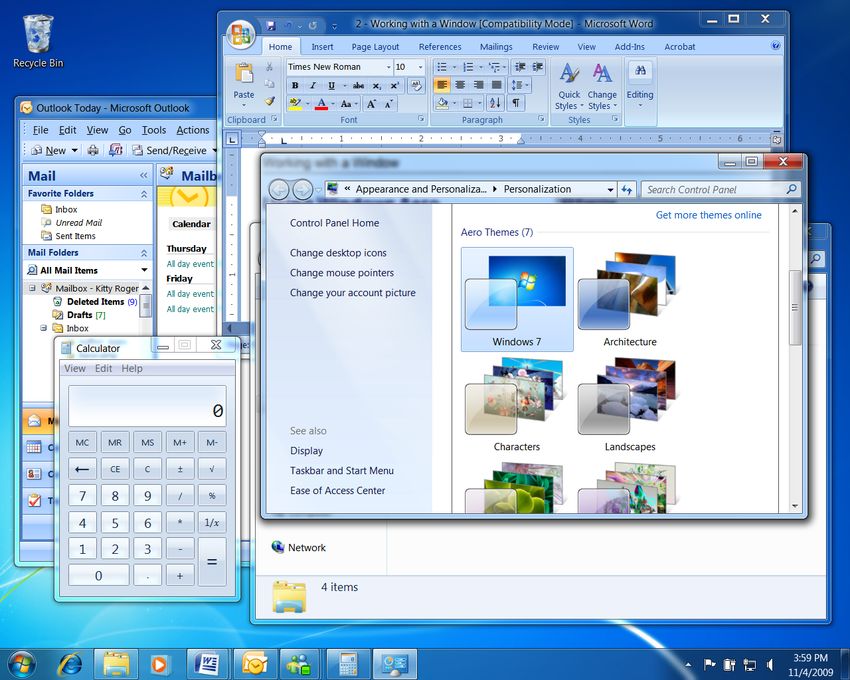
Welcome to Windows 7
What’s New in Windows 7 Transitioning to Windows 7 – Just the Basics!
& Notes:
Unlike Windows Vista, which introduced a large number
of new features, Windows 7 focuses mostly on improving
and enhancing these features to maximize usability. The
table below provides an overview of what to expect.
Tips
ü The features listed below are available in the Home
Premium, Professional, Ultimate and Enterprise
editions of Windows 7.
Table 1-2: What’s New in Windows 7
Aero updates The Windows Aero interface is back, with many new functions and features.
• Aero Peek: Want a quick peek at your desktop? Use Aero Peek to make all open windows
transparent.
• Aero Shake: Click a window’s Title bar and “shake” your mouse to temporarily minimize all open
windows except the active window. Shake again to revive all windows.
• Snap: Click and drag a window to the right or left of the screen to snap the window to either side of
the desktop. Click and drag a window to the top of the screen to maximize it.
Redesigned Taskbar The taskbar has been completely redesigned for Windows 7. Now you can pin your favorite programs and
files to the taskbar, rearrange taskbar buttons, and more.
Jump Lists Jump Lists contain shortcuts to popular program commands and recently used files. To open a Jump List
for a program, right-click the program icon on the taskbar or open the Start menu and click the program’s
list arrow. You can also customize a Jump List by pinning your own items to it.
Libraries A library gathers files from different locations on your computer and displays them as a single collection,
without moving them from where they’re stored. There are four default libraries in Windows 7:
Documents, Music, Pictures, and Videos.
Action Center Pop-ups, be gone! The Action Center in Windows 7 consolidates all messages from Windows
maintenance and security. Instead of bombarding you with pop-up balloons every time Windows requires
your attention, a simple Action Center icon will appear on the taskbar.
Search filters Search filters are now built right into the Search box in Windows Explorer, enabling you to fine-tune your
searches quickly and easily.
Sticky Notes Sticky Notes has been promoted from a gadget in Windows Vista to an application in Windows 7. Now
you can format a note’s text, change its color, and more.
Accessibility features The Ease of Access Center offers a variety of new settings and programs, including Magnifier, Narrator,
and On-Screen Keyboard.
6 © 2009 CustomGuide, Inc. / Bates College (October 2011)
Welcome to Windows 7
Starting and Logging On to Transitioning to Windows 7 – Just the Basics!
Windows 7 & Notes:
After taking off your jacket and grabbing a cup of coffee,
you probably begin your day by turning on your
computer.
1. Press + + .
This keystroke combination is a security measure
when you start using your computer.
The Welcome screen appears with the username and
password fields.
2. Enter your Bates username.
3. Enter your Bates password and press .
Tip: Remember that when you enter your
password, Windows will display •••••• to protect
your password.
Figure 1-1: The Welcome screen.
Bates College 7
Welcome to Windows 7
Understanding the Windows 7 Transitioning to Windows 7 – Just the Basics!
Screen & Notes:
When you log on to your computer, the screen shown
below appears. Called the desktop, this screen serves as a
surface for your work. When you open programs or
folders, they appear on the desktop. You can also store
items on the desktop, such as files, folders, and gadgets,
and arrange them however you want.
Recycle Bin: The Recycle Bin stores all the files you delete Notification area: This portion of the taskbar contains various
from your computer. The deleted files remain there and can notification icons related to Windows and your computer.
be retrieved until you empty the Recycle Bin. Action Center, Network and Volume icons appear in the
notification area by default, but you can customize this area
as needed.
Desktop: This is the large background area of the Windows Taskbar: The taskbar appears at the bottom of your screen.
screen. You can customize the appearance of the desktop Whenever you open a program, document, or folder, a button
with themes and slideshows, and you can even add for that window appears on the taskbar. You can use these
Windows Gadgets to the desktop for easy access. buttons to quickly view and switch between windows and you
can also pin frequently used items to the taskbar.
Show Desktop button: Click this button to minimize all Start button: The Start button opens the Start menu, where
windows and display the desktop. Point to this button to you search for files and programs, and open programs and
temporarily minimize all windows for a quick peek at documents. You can also use the Start menu to find files and
the desktop. change Windows settings.
8 © 2009 CustomGuide, Inc. / Bates College (October 2011)
Welcome to Windows 7
Understanding the Start Menu Transitioning to Windows 7 – Just the Basics!
& Notes:
When you want to start working on something, the Start
menu is the first place you will go. As the gateway to
your computer, use the Start menu to access your
computer’s programs, files, and settings.
The Start menu has three important parts:
• Left pane
The left pane displays a list of commonly used
programs. Click All Programs to view a complete list
of programs installed on your computer.
• Search box
Allows you to instantly search for files and programs
on your computer. It searches file names and contents
of files that match the search term. The left pane
displays search results as you type.
• Right pane
Commonly used folders are listed here, such as
Documents and Pictures. You can also access
computer settings and turn off the computer here.
View the Start menu
• Click the Start button on the taskbar or press the
< > key.
The Start menu appears.
Windows keeps track
of the programs you
use most often and
makes them available
here for easy access.
Simply click a program The right pane of the Start
icon to open it. menu gives you quick
access to your documents,
files, and system settings.
Click here to view a list
of all programs installed
on your computer.
Search box Shut down, sleep, or
lock your computer here.
Figure 1-2: The Start menu.
Bates College 9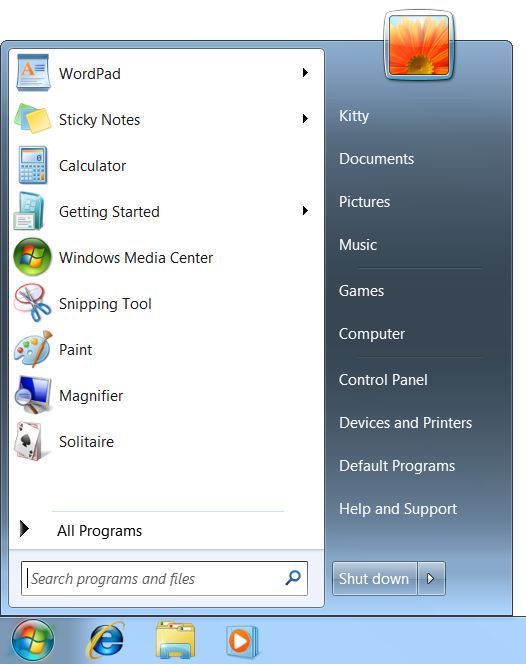
Welcome to Windows 7

Table 1-3: Items in the Start Menu

             Frequently Used        Gives you quick access to the programs you use most often. If a program doesn’t appear here you will
             Programs               have to look under “All Programs”.
Left pane

             All Programs           Gives you access to all the programs installed on your computer, although you may have to wade
                                    through several submenus in order to find the program you’re looking for.

             Search                 Search your computer for files, folders, or programs.

             User                   Open folders that contain items unique to your account, such as Contacts, Favorites, and My
                                    Documents.

             Documents              Opens the Documents library.

             Pictures               Opens the Pictures library.

             Music                  Opens the Music library.
Right pane

             Games                  Opens Games Explorer.

             Computer               Provides access to the drives, folders, and files on your computer.

             Control Panel          Opens the Control Panel.

             Devices and Printers   Manage the devices and printers connected to your computer.

             Default Programs       Modify the default programs that handle certain activities on your computer.

             Help and Support       Opens Windows Help.

             Shut down              Click the list arrow for other power options, including Log Off and Restart.

10             © 2009 CustomGuide, Inc. / Bates College (October 2011)
Welcome to Windows 7
Using Help and Support Help Desk Services
• Phone: (207) 786-8222, Extension 8222
When you don’t know how to do something in • E-Mail: helpdesk@bates.edu
Windows 7, look up your question in the Help and
• Web: http://www.bates.edu/help-desk
Support files. The Help and Support files can answer your
questions, offer tips, and provide help for all of the • Location: The George and Helen Ladd Library, Main
features in Windows 7. Level, Turn Right at the Reference Desk
Search for help
1. Click the Start button on the taskbar and select Help
and Support from the right pane.
The Help and Support window appears.
Other Ways to Open the Help and Support
Window:
Press . (This only works if no other
programs are open. Otherwise, will open the
Help files for another program.)
2. Type what you want to search for in the Search Help
box near the top of the window and press .
A list of results related to the help topics appears.
3. Click the topic that best matches the topic you’re
trying to learn more about.
Information regarding the selected topic is displayed.
Browse for help
Figure 1-3: The Windows Help and Support window.
If you’re not totally sure what you’re looking for,
browsing the Help files is a great way to learn more about
your computer.
Table 1-4: Help Buttons
1. Click the Start button on the taskbar and select Help Click here to move back to the
and Support from the right pane. Back
previous help topic.
The Help and Support window appears. Click here to move forward to
Forward
the next help topic.
There are three categories of help topics that you can
access from the Home page of Help and Support: Click here to return to the Help
Home
home page.
• How to get started with your computer: Help
topics include features that get you started with Click here to print the current
your computer, such as adding users, backing up Print
help topic.
files, and personalizing Windows.
Click here to browse for help
• Learn about Windows Basics: Includes topics Browse Help
using the Table of Contents.
on basic computer functions, such as hardware
(mouse and keyboard), overviews of the Windows Learn about
Click here to ask for help
desktop, and more. other
through Remote Assistance or
support
• Browse Help topics: Includes all help topics, expand your search.
options
organized by related category.
Click here to change how the
Options Help window works and is
displayed.
Bates College 11Welcome to Windows 7
2. Click a link to view and browse help topics.
Help and Support displays the help topics that you
can browse.
12 © 2009 CustomGuide, Inc. / Bates College (October 2011)Welcome to Windows 7
Logging Off or Locking Your Transitioning to Windows 7 – Just the Basics!
Computer & Notes:
When you are finished using your computer, it’s
important to logout or lock your computer (Windows
computers utilized within a public or departmental lab
environment should never be powered off. These
computers also do not provide the ability to lock your
desktop – if you will be leaving the computer unattended
for a period of time, please log off). This ensures that files
are saved correctly and your computer stays secure.
Logging off your computer
When you logoff your computer, all programs and
windows are closed and your Windows session is ended.
1. Click the Start button and click the Log off button in
the right pane of the Start menu.
Windows automatically closes any files or programs
that are open, and logs off the current individual
logged in to the computer.
Tip: Make sure all of your files are saved before Figure 1-4: The Shut down button menu in the right pane
you Log off, Shut down, or Restart your of the Start menu.
computer.
Locking your computer
To prevent unauthorized use of your computer, including
access to electronic information (documents, Table 1-5: Power Modes
spreadsheets, network/department folders; or programs
such as Banner), please lock your computer when Switch Allows you to work with several accounts on
User the computer at the same time.
stepping away.
Log Off This option appears only if your computer is
1. Manual Locking connected to a network. This option closes all
your programs and disconnects your computer
from the network, preparing your computer to
Press the + + keys. Select
be used by someone else
Lock this computer from the menu.
Lock Locks the computer so your password is
The computer enters lock mode. Access to your required to unlock it.
computer’s Desktop, files, and programs have been
secured and will require your Bates Network Restart Shuts down all programs and windows, shuts
Password to unlock the computer. down the computer, and restarts it again. Try
this if your computer is acting up.
2. Automatic Locking Sleep This is the default power setting. Keeps all
programs and files open on your desktop so you
After 10 minutes of inactivity, your computer’s can jump in where you left off.
screensaver will automatically start and lock access
Hibernate Hibernate goes one step further than sleep,
to your computer’s Desktop, files, and programs.
allowing you to keep programs and documents
Moving your mouse or pressing a key on the open while shutting off power completely.
keyboard will automatically prompt you for your Hibernate saves your desktop status to the hard
Bates Network Password to unlock the computer. disk which allows power to be turned off.
Shut Down Select this option to turn your computer off. It
saves your Windows settings and saves any
information stored in memory to the local disk.
Bates College 133. Unlocking
Press the + + keys. Enter
your Bates Network Password, and click the
button or press the enter key on your keyboard.
Tip: When the computer lock is engaged, no
files will be lost and no programs will be closed.
The lock essentially freezes the computer in the
state in which it is left.
Tip: The 10 minute screensaver timeout cannot be
adjusted. The automatic screensaver lock feature
cannot be disabled.
14 © 2009 CustomGuide, Inc. / Bates College (October 2011)2
Working & Notes:
with a
Window
Understanding the Parts of a Window ............ 16
Understanding the Ribbon ............................... 17
Tabs......................................................... 17
Groups ..................................................... 17
Buttons .................................................... 17
Understanding the Windows Explorer Window
............................................................................ 18
Using Windows Aero ........................................ 19
Aero Peek ................................................ 19
Aero Shake .............................................. 19
Snap ........................................................ 19
Switching Between Windows ........................... 21
Taskbar buttons ....................................... 21
Flip 3D ..................................................... 21
Jump to a window .................................... 22
Bates College 15Working with a Window
Understanding the Parts of a Transitioning to Windows 7 – Just the Basics!
Program Window & Notes:
Most windows have the same basic parts, whether they
are displaying a program, file, or folder.
• To open a program window, click the Start button,
select All Programs, and click the program you want
to open.
Take a look at the diagrams below for an overview of
these windows.
Parts of a Program Window
Title bar: Displays the name of the program or window, Ribbon: Controls what the program does. The commands
and the name of the document or file that’s being used. displayed on the Ribbon change from program to program, but
the Ribbon’s location doesn’t—it’s always perched at the top of
a window, right below the title bar.
Minimize button: Hides the window from your screen but Border: Click and drag a border or corner of a window to
still runs it in your computer’s memory, ready for quick use. change its size.
You can minimize a window you’re not using so that it is
still running but is hidden in the taskbar.
Maximize/Restore button: Depending on the size of the Zoom controls: Click and drag the zoom slider to zoom in or
window, this button toggles between maximize and restore. out of the document area.
Close button: Closes the window or program when you’re Status bar: Displays information about the document, window,
finished working with it, removing it from the screen and or program being used.
the computer’s memory.
16 © 2009 CustomGuide, Inc. / Bates College (October 2011)Working with a Window
Understanding the Ribbon Transitioning to Windows 7 – Just the Basics!
& Notes:
Many of the programs included with Windows 7 provide
easy access to commands via the ribbon, which replaces
the menus and toolbars found in previous versions of
Windows. The ribbon keeps commands visible while you
work instead of hiding them under menus or toolbars.
The ribbon is made up of three basic components:
Command tab
Tabs Program tab
Commands are organized into tabs on the ribbon. Each
tab contains a different set of commands. There are three
different types of tabs:
• Command tabs: These tabs appear by default
whenever you open a program.
• Program tabs: If you switch to a different authoring Group Button
mode or view, such as Print Preview, program tabs
replace the default command tabs that appear on the Figure 2-1: The ribbon as shown in WordPad.
ribbon.
Groups
The commands found on each tab are organized into
groups of related commands. For example, the Font group
contains commands used for formatting fonts.
Buttons
One way to issue a command is by clicking its button on
the ribbon. Buttons are the smallest element of the ribbon
and change color when clicked.
Tips
ü The ribbon shrinks or expands depending on your
screen resolution and the size of the program
window.
ü You can hide the ribbon so that only tab names
appear, giving you more room in the program
window. To do this, double-click the currently
displayed command tab. To display the ribbon again,
click any tab. Figure 2-2: Hiding the ribbon gives you more room in the
program window.
Bates College 17Working with a Window
Understanding Parts of the Transitioning to Windows 7 – Just the Basics!
Windows Explorer Window & Notes:
When you open a folder or library in Windows, Windows
Explorer appears. Windows Explorer makes it easy to
view and work with the drives, folders, and files on your
computer.
• Click the Start button and select All Programs →
Accessories → Windows Explorer from the menu.
The Windows Explorer window appears.
Other Way to Open Windows Explorer:
Click the Windows Explorer button on the
taskbar or press < > + .
Parts of the Windows 7 Explorer Window
Back/Forward buttons: Jump back/forward to locations Details pane: Displays common properties associated with the
you have previously visited. selected drive, library, folder, or file.
Address bar: As you navigate, the file path is shown in the Navigation pane: Displays the drives, libraries, and folders on
Address bar. Each location in the path is a link; click the your computer. Click the tiny arrow to the left of an item to
link to open it in the window. expand it, and then click the drive/folder you want to view.
Folder list: Displays the contents of the selected drive, Command bar: Here you can access common commands
library, or folder. Double-click an item to open it. related to the selected drive, library, folder, or file. Options
change according to the item that is selected.
18 © 2009 CustomGuide, Inc. / Bates College (October 2011)Working with a Window
Using Windows Aero
The Windows Aero user interface was introduced in
Windows Vista. It returns in Windows 7, but with many
new functions and features.
Aero Peek
Aero Peek is a handy new feature in Windows 7. It makes
windows temporarily transparent so you can view a
window or the desktop.
1. Point to the program on the taskbar that contains the
file or window you want to preview.
A thumbnail preview appears for each open file or
window.
2. Point to the thumbnail preview for the file or window
you want to reveal.
The file or window is enlarged and every other
open window is made transparent.
Other Ways to Activate Aero Peek:
Point to the Show Desktop button on the right
edge of the taskbar or press < > +
to take a quick “peek” at the desktop.
Tip: Depending on your taskbar settings, the
procedure for revealing a buried window might be
different from the one listed above.
Aero Shake
Another new Aero feature in Windows 7 is Aero Shake.
Aero Shake allows you to temporarily minimize all open
windows except the active window.
1. Point to the title bar of the active window.
2. Click and drag the window’s title bar quickly from
side to side, or “shake” it.
All open windows are minimized except for the
active window.
Tip: To revive all minimized windows, repeat the
steps above.
Snap Figure 2-3: Use Aero Peek to take a quick peek at an
Probably the most useful of the new Aero features, Snap open window or the desktop.
is a quick way to maximize, compare, and restore open
windows, simply by clicking and dragging.
• To Maximize an Open Window: Click and drag
the window’s title bar to the top of the screen, or
double-click the window’s title bar, or press < >
+ .
Bates College 19• To Compare Open Windows Side by Side:
Click and drag the window’s title bar to the left or
right side of the screen, or press < > + or
.
• To Restore a Maximized or Compared
Window: Click and drag the window’s title bar
toward the middle of the screen, or double-click
the window’s title bar, or use the < > + .
20 © 2009 CustomGuide, Inc. / Bates College (October 2011)Working with a Window
Switching Between Windows Transitioning to Windows 7 – Just the Basics!
& Notes:
You can have several programs or windows open and
running simultaneously, but you can only work in one
window at a time. The window you’re working with is
called the active window and always appears on top of
any other windows that you have open. If you think about
it, you do the same thing at your desk. When you want to
work on a piece of paper, you place it on top of
everything else.
Click a window thumbnail
Taskbar buttons to open the window.
All open windows are represented by taskbar buttons.
Switching between windows by clicking its taskbar button
is fast and easy.
• Click the window’s taskbar button to make it active.
The window becomes the active window.
Other Ways to Activate a Window:
Click any part of the window you want to make
active.
Tip: If several windows of the same type are
open, Windows will group them into one taskbar
Multiple open windows grouped
button to conserve space. For example, if you into one taskbar button have a
have several WordPad documents open, a Live “stacked” appearance.
Preview thumbnail-sized window appears when
you click on or point to the WordPad taskbar Figure 2-4: Working with taskbar buttons.
button.
Flip 3D
Flip 3D is a great way to quickly preview all your open
windows. Flip through the stack of windows until the
window you want to make active appears on top.
1. Press the < > + .
Flip 3D opens and the windows are shown in a stack.
2. Hold down the < > and press to cycle
through the windows.
A preview of the window appears as you cycle
through the stack.
Other Ways to Cycle through Flip 3D:
After starting Flip 3D, press the < > key while
rotating the mouse wheel.
3. Release < > to make the window in front of the
stack active. Or, click a window in the stack to make
it active.
Flip 3D closes and the window is displayed as the
active window on the desktop.
Bates College 21Tips
ü To keep Flip 3D open without holding down the
Windows logo key, press + < > + .
Use Tab, the mouse wheel, or arrow keys to cycle
through windows. Press to close Flip 3D.
Jump to a window
You can also jump to another open window using +
. This method displays a list and thumbnails of the
open windows on your computer.
1. Press + .
A list of the open windows appears. Each window is
represented by a thumbnail preview.
2. Hold down the key: press to cycle
forward through the windows; + to
cycle backward.
3. Release the key to make the selected window
active. Figure 2-5: Pressing + displays thumbnails
of all open windows.
The selected window is displayed as the active
window on the desktop.
Tips
ü Press + + to keep the list open
and use , the mouse wheel, or the arrow keys
to cycle through the windows. Press to
make the selected window active, press to
close without changing windows.
ü + and Flip 3D are especially useful
when you use programs that fill the entire computer
screen. When you can’t see the taskbar or any part of
another window, these methods are the only way you
can switch between programs and windows.
22 © 2009 CustomGuide, Inc. / Bates College (October 2011)3
Working & Notes:
with Folders
and Files
Understanding What’s in Your Computer ....... 24
Icons ........................................................ 24
Drives, folders, and files .......................... 24
Memory units ........................................... 25
Opening Drives, Folders and Files .................. 26
Using Windows Explorer to Navigate Your
Computer ........................................................... 27
Address bar ............................................. 27
Favorites .................................................. 27
Back and Forward buttons ...................... 28
Using and Creating Libraries ........................... 29
Open a library .......................................... 29
Create a new library ................................ 29
Modifying and Deleting Libraries..................... 30
Add a folder to a library ........................... 30
Remove a folder from a library ................ 30
Delete a library ........................................ 31
Using Search ..................................................... 32
Windows Explorer.................................... 32
Search filters............................................ 32
Start menu ............................................... 32
Bates College 23Working with Folders and Files
Understanding What’s in Your
Computer
Icons
Everything in the computer is represented by its own
picture, or icon.
A different icon represents each item, as shown in Table
Table 3-1: Common Icons
3-1: Common Icons. For example, the icons for disk
drives on your computer look similar, but have details that Drives are the devices that store folders and files.
distinguish them from each other. Folder icons almost Drives of different types have icons that indicate
always look like little manila folders. Drive the type of drive; for example, the hard disk drive
for your computer is indicated by the Windows
Files have more variety, because a different icon is used logo.
for each file type. This makes it easy for you to tell the
difference between documents, photos, and spreadsheets Folders are used to organize and contain files and
for example. are stored on drives. Folder views with large icons
allow you to see if a folder contains other folders
Drives, folders, and files Folder or files
To see what’s in a file cabinet, you simply open a drawer. Files are the items that you actually work with
You can view the information stored on your computer’s when you use your computer. Whether it is a
disk drives in much the same way—by opening the disk program or a document, the icon that represents a
drive you want to access. The contents of your computer File file indicates its type.
can basically be categorized into three types of items:
• Drives are like “drawers” that contain the folders on
your computer. A disk drive is the part of the
computer that reads and writes information to a disk,
whether it is a permanent hard disk like the one
inside your computer, or a removable compact disc
(CD). There are three main types of disk drives that
computers use to store their information, as shown in
the table below.
Table 3-2: Common Computer Drives
Table 3-2: Common Computer Drives
Drive type Drive Letter Description
C Local disks, or hard disks, hide permanently inside your computer. Your computer’s hard disk is
its main filing cabinet—where it stores its programs and files.
Local Disk
D or above Compact discs, or CD-ROMs, are like the audio discs you play in your stereo.
DVDs are similar to CDs, but they can hold six times more data.
CD-ROM, DVD, Blue-ray Discs (BD) are like DVDs, but with enormous capacity.
or BD-ROM
D or above There are also other types of drives, including network drives, removable drives, and external
drives. Network drives are drives that are available through the servers on a company’s network.
Other Drives Removable storage drives include CD and DVD drives, and USB flash drives. External hard
drives are like having another computer of storage space.
24 © 2009 CustomGuide, Inc. / Bates College (October 2011)Working with Folders and Files
• Folders contain other folders and files. Folders allow
you to keep related information in the same place. If
anything happens to a folder—if it is moved or
deleted, for example—everything contained in the
folder goes with it.
• Files are the “meat” of your computer: drives and Table 3-3: Common Types of Files
folders exist to store files. Files cannot contain other
Application or executable (.exe) files are the
files or folders. Table 3-3: Common Types of Files
programs that run on your computer. When
displays some of the common types of files you will you open a program, you are opening an
encounter. Application
(.exe) executable file.
There are two parts to every file: the file name and the file
extension. The file name distinguishes the file from other WordPad creates files of this type: this file
files. Typically, you give the file its name. type can hold basic formatting properties and
Rich Text objects like graphics: it’s not as advanced as a
The file extension tells Windows what type of file it is. Format Microsoft Word (.doc) file, but it’s not as
Windows uses this information to determine which type (.rtf) simple as a Notepad (.txt) file.
of icon is used for the file, and it also tells Windows
which program to use to open the file. The file extension Most photographs are JPEGs.
is assigned to the file by the program in which the file was
JPEG
created. For example, Notepad always adds the file
extension “.txt” to its files, so when you double-click a Shortcuts point to files and folders elsewhere
.txt file, Windows knows it has to open the file in on your computer so that you can quickly
Notepad. Shortcut open that file, folder, or program without
having to go to its actual location. All of the
Tips programs in the Start menu and some of the
ü By default, Windows 7 does not display file items on your desktop are actually shortcuts
that point to files located elsewhere on your
extensions. This can be changed by modifying
computer.
Windows folder settings.
Memory units
Just as liquids are measured in quarts and gallons,
computers save their information in units called bytes.
Computers use the metric system, so 1,000 bytes make up
a kilobyte and 1,000,000 (one million) bytes make up a
megabyte. Table 3-4: How Memory is Measured lists
memory units for computers.
Table 3-4: How Memory is Measured
Byte A byte is equivalent to a single character, such as the letter “J” or number “8”. A single character
Kilobyte A kilobyte is about 1,000 bytes (1,024 to be exact). A kilobyte is equivalent to a page 1,024 bytes
(K or KB) of double-spaced typing.
Megabyte A megabyte (MB) is about one million bytes. A megabyte is equivalent to an 1,048,576 bytes
(MB) average-length novel.
Gigabyte A gigabyte (GB) is about one billion bytes. A gigabyte is equivalent to the text in 1,000,000,000 bytes
(GB) several encyclopedia sets.
Terabyte A terabyte (GB) is about one trillion bytes. A terabyte is equivalent to the text in a 1,000,000,000,000 bytes
(TB) library.
Bates College 25Working with Folders and Files
Opening Drives, Folders, and Transitioning to Windows 7 – Just the Basics!
Files & Notes:
To work with items in your computer, you need to open
the drives, folders, and files where the data you want to
work with is stored.
Open drives, folders and files
1.) A computer
Since drives, folders, and files are located in different stores information
levels of your computer’s hierarchy, accessing each of on disks.
them is a little different:
• Drives: Click the Start button and select Computer
from the menu. Double-click a drive to open it. 2.) Information on a
disk is organized
Drives are places where data can be stored. This data and grouped into
folders.
is organized into folders and files. All the drives
available on your computer are shown in the
Computer window, so you can access any folder or 3.) A folder may
file on your computer from this location. contain several files
and subfolders.
Other Ways to Open Computer:
Press < > + or click the Windows Explorer
button on the taskbar and click Computer in the
Navigation pane. Figure 3-1: The hierarchy of storing information on a
computer.
• Folders: Click the Start button and select the folder
you want to open from the menu.
The folder window appears, displaying the folders
and files saved in the folder.
Other Ways to Open a Folder:
Click the Windows Explorer button on the
taskbar and select a drive and/or folder in the
Navigation pane.
• Files: Open the folder where the file is located and
then double-click the file icon.
The file is displayed in a compatible program.
26 © 2009 CustomGuide, Inc. / Bates College (October 2011)Working with Folders and Files
Using Windows Explorer to Transitioning to Windows 7 – Just the Basics!
Navigate Your Computer & Notes:
The process of opening drives and folders to find the file
you want to work with is called navigating. A path is the
sequence of drives and folders that are opened as you
navigate. The path includes the drive, followed by folders,
and the name of the file.
Click the arrow to the right
There are several controls that make it easy to navigate to of a link to view the folders
other locations on your computer. in the location.
Address bar
The Address bar is a great tool for navigation. Each
location in the path is a link; click the link to open its
location.
To… Do this...
Open a location on the …click its link in the Address bar.
file path…
Jump to a location’s …click its list arrow and select a
subfolders… folder from the list.
To view the file path …click an empty area of the
without links... Address bar or press + .
Tips
Figure 3-2: Use the Address Bar to navigate along
ü To open a common folder, such as Desktop or locations in the path.
Documents, simply type its name in the Address bar.
Favorites
Use the Favorites section in the Navigation pane to store Click the tiny arrow to expand or
collapse the selected folder.
your most commonly used folders and searches. Windows
7 includes three favorite locations by default:
• Desktop: Displays a list of shortcuts to the files and
programs you have saved to the desktop.
• Downloads: Displays a list of files that you have
downloaded or saved from the Internet.
• Recent Places: Displays a list of shortcuts to recently
used files, folders, and programs.
Figure 3-3: Favorites provides shortcuts to folders that are
used most often.
Bates College 27Working with Folders and Files
Back and Forward buttons
As you navigate your computer, Windows keeps track of Click the Forward button list
the locations you have visited. Move back or forward in arrow to see a list of recent
locations.
this list using the Back and Forward buttons.
• Click the Back or Forward button.
The contents of the location one step behind or ahead
on the path are displayed.
Tip: Click the Forward button list arrow to
open a list of recently visited locations.
Figure 3-4: Use the Back and Forward buttons to return to
locations you visited while navigating.
28 © 2009 CustomGuide, Inc. / Bates College (October 2011)Working with Folders and Files
Using and Creating Libraries
A library is a virtual folder that gathers files from the
locations you specify and displays these files as a single
collection. For example, you could specify that the
Documents library contain all .doc files from the My
Documents and Important Documents folders.
Open a library
Open a library just like you would any other folder.
1. Click the Windows Explorer button on the taskbar.
The Libraries window appears. Four libraries have Folder A Folder B
been created by default in Windows 7: Documents,
Music, Pictures, and Videos.
2. Double-click the library you want to view.
The contents of the library appear.
Other Ways to Open a Library:
Click the Start button and select a library from Pictures Library
the Start menu, or open any Windows Explorer
window, click Libraries in the Navigation pane,
and double-click the library you want to view.
Create a new library
You can create a new library that contains only the folders
you specify.
1. Click the Windows Explorer button on the taskbar.
The Libraries window appears. Figure 3-5: A library is a compilation of files from folders
you specify.
2. Click the New Library button on the command bar.
A new library icon appears.
Other Ways to Create a New Library:
Right-click Libraries in the Navigation pane or
an empty area in the Libraries window and select
New → Library from the contextual menu.
3. Type a name for the library and press .
The new library is created.
Figure 3-6: The Libraries window.
Bates College 29Working with Folders and Files
Modifying and Deleting
Libraries
You don’t always have to create a new library. Save time
by modifying an existing library’s criteria instead.
Locations link
Add a folder to a library
Libraries gather their content from the folders you
specify. You can include up to 50 folders in one library.
1. Open the library you want to add a folder to.
2. Click the Locations link in the Library pane.
The Library Locations window appears.
3. Click Add.
The Include Folder window appears. Here you need
to find and select the folder you want to include.
4. Navigate to and select the folder you want to include.
Figure 3-7: The Documents Library open in Windows
5. Click Include folder. Explorer.
The folder is now included in the library.
Tip: A network folder must be added to the index
or made available offline before it can be included
in a library.
Other Ways to Add a Folder to a Library:
Open or select the folder you want to add, click
the Include in Library button on the command
bar, and select the library you want to add it to.
Remove a folder from a library
If you delete an individual item from a library, it will also
be deleted from its original location. To remove an item
from a library without deleting it from its original
location, you have to remove the folder containing the
item.
1. Open the library containing the folder you wish to
remove.
2. Click the Locations link in the Library pane.
The Library Locations window appears.
3. Click the folder you want to remove, and click Figure 3-8: The Library Locations window.
Remove.
4. Click OK.
30 © 2009 CustomGuide, Inc. / Bates College (October 2011)Working with Files and Folders
Delete a library
If you decide you no longer need a library, delete it.
1. Click the Windows Explorer button on the taskbar.
The Libraries window appears.
2. Right-click the library you want to delete, and select
Delete from the contextual menu that appears.
The library is moved to the Recycle Bin.
Tip: Because libraries do not actually contain
files, deleting a library does not delete the files
that are stored there.
Bates College 31Working with Folders and Files
Using Search Transitioning to Windows 7 – Just the Basics!
& Notes:
It’s just as easy to misplace a folder or file on your
computer as it is to misplace your car keys—maybe even
easier! The Search feature is a powerful solution for
finding your lost folders and files.
Windows Explorer
If you have an idea regarding where the folder or file
you’re looking for is located, use the Search box in
Filter options
Windows Explorer. The Search box appears at the top of
Search box
every Windows Explorer window and searches the
contents, including subfolders, of that window for the text
that you type. If a file’s name, content, tags, or other
properties match the searched text, it will appear in the
search results.
1. Open the folder or library where the file you’re
looking for is located.
2. Type a keyword for the file in the Search box.
As you type, items that match the keyword become
highlighted.
Tip: Once the file you want appears, you can stop
typing: there is no need to press to
submit your search text.
Search filters
Figure 3-9: Search results appear highlighted.
You can quickly refine your searches in Windows 7 with
Search Filters. Use a search filter to display only those
files that meet the criteria you specify.
1. Click in the Search box.
A list of search filters appears.
Tip: The filters available will vary depending on
the contents of the folder.
2. Click the filter you want to use, and then specify the
filter criteria.
The contents of the folder are filtered.
Start menu
The Search box in the Start menu can also be used to
perform a search. Searching from the Start menu finds
files, folders, e-mails, and programs.
1. Click the Start button.
An insertion point appears in the Search box at the
bottom of the Start menu.
32 © 2009 CustomGuide, Inc. / Bates College (October 2011)Working with Folders and Files
2. Type a keyword in the Search box. Preview Pane
As you type, items that match the keyword appear in button
the Start menu.
Tip: Once the item you want appears, you can
stop typing: there is no need to press to
submit your search text.
Tips
ü To clear a search, click the Close button ( ) in the
Search box.
ü Use the Preview pane to preview your search results
without having to open the actual file. Click the
Preview Pane button on the command bar to display
the Preview pane.
ü Now you can save your searches and return to them
later. Click the Save search button on the command
bar, enter a name for the search, and click Save.
Figure 3-10: Use the Preview pane to preview search
results without having to open the actual file.
Bates College 334
Working & Notes:
with the
.
Taskbar and
Desktop
Customizing the Taskbar ................................. 35
Pin a program to the taskbar ................... 35
Rearrange icons on the taskbar .............. 35
Resizing and moving the Taskbar ................... 36
Resize the taskbar ................................... 36
Move the taskbar ..................................... 36
Hide the taskbar ...................................... 36
Using Jump Lists .............................................. 38
Open a program’s Jump List ................... 38
Pin items to a Jump List .......................... 38
Customizing the Start Menu ............................. 39
Customize the Start menu ....................... 39
Pin a program to the Start menu ............. 39
34 © 2009 CustomGuide, Inc. / Bates College (October 2011)Working with the Taskbar and Desktop
Customizing the Taskbar Transitioning to Windows 7 – Just the Basics!
& Notes:
Whenever you open a program, document, or folder, a
button for that window appears on the taskbar; the bar
that appears across the bottom of the screen.
The taskbar has been completely redesigned in Windows
7 to make it more useful. Now you can more with the
taskbar, such as pin your favorite programs to the taskbar
and rearrange the order of icons.
Pin a program to the taskbar Table 4-1: Main Parts of the Taskbar
In Windows 7 you can pin your favorite programs to the Start button When clicked, this opens the Start
taskbar for easy access. menu.
1. Open the program that you want to pin to the taskbar. Middle section All program icons are displayed
here. You can pin and rearrange
An icon for the program appears on the taskbar. program icons in this section.
2. Right-click the program icon on the taskbar. Notification area Contains the date/time and various
notification icons related to
The program’s Jump List appears. Windows and your computer.
Other Ways to Open a Program’s Jump List:
Point to the program icon on the taskbar and click Show Desktop button Point to/click this button to display
the Windows desktop.
and drag upward.
3. Select Pin this program to taskbar from the Jump
List.
The program is now pinned to the taskbar.
Other Ways to Pin a Program to the Taskbar:
Click the Start button, find the program you
want to pin, and click and drag the program icon
to the taskbar.
Tip: To unpin a program, right-click it and select
Unpin this program from taskbar. Show hidden
icons button
Rearrange icons on the taskbar
Figure 4-1: Click the Show hidden icons button in the
In Windows 7 you can change the order of icons on the notification area of the taskbar to view other icons
taskbar, simply by clicking and dragging. associated with your computer.
• Click and drag the program icon to another location
on the taskbar.
Show Desktop button: Point to
The overlapping of taskbar this button to take a quick “peek”
Start button: Click here to icons indicates the number of at the desktop. Click this button to
open the Start menu. windows open in a program. switch to the desktop.
Open programs have
a sheen to them.
Notification area: Includes the system
clock and icons that communicate the
Figure 4-2: The Windows 7 taskbar. status of certain programs, settings,
and connections.
Bates College 35Working with the Taskbar and Desktop
Resizing and Moving the Transitioning to Windows 7 – Just the Basics!
Taskbar & Notes:
The taskbar is the command center for Windows, which is
why it rests along the bottom of the desktop, ready for
use. Still, some people think the taskbar should be located
in a different location on the screen. Others don’t like
how the ever-present taskbar occupies valuable desktop
space, or wish the taskbar were larger so it could display
more icons and buttons.
Tips
ü Before you can resize and move the taskbar, you
must unlock it first. To unlock the taskbar, right-click
it and select Lock the taskbar.
Resize the taskbar
When the size of the taskbar is increased, it can display
more program and window icons.
1. Position the pointer over the top border of the taskbar
Figure 4-3: Click and drag to resize the taskbar.
until it changes to a .
When the pointer changes, the taskbar can be resized.
2. Click and drag the edge of the taskbar upwards.
The taskbar is resized so it can display two rows of
icons, rather than just one.
Move the taskbar
When the taskbar is unlocked, you can move the taskbar
to the top, left, right, or bottom of the desktop.
• Position the pointer over a blank area of the taskbar.
Click and drag the taskbar to the top, bottom, left, or
right side of the desktop.
The taskbar is moved accordingly.
Hide the taskbar
Figure 4-4: You can move the taskbar to the top, left,
If you don’t want the taskbar to take up valuable space on right, or bottom of the screen.
the desktop, you can hide it so that it only appears when
you need to use it.
1. Right-click a blank area of the taskbar and select
Properties from the contextual menu.
The Taskbar tab of the Taskbar and Start Menu
Properties dialog box appears. See Table 4-2:
Taskbar Appearance Properties for a description of
these properties.
36 © 2009 CustomGuide, Inc. / Bates College (October 2011)You can also read