FORTICLIENT & FORTICLIENT EMS - NEW FEATURES GUIDE - VERSION 6.2.0 - AWS
←
→
Page content transcription
If your browser does not render page correctly, please read the page content below
FortiClient & FortiClient EMS - New Features Guide
                    Version 6.2.0
FORTINET DOCUMENT LIBRARY
https://docs.fortinet.com

FORTINET VIDEO GUIDE
https://video.fortinet.com

FORTINET BLOG
https://blog.fortinet.com

CUSTOMER SERVICE & SUPPORT
https://support.fortinet.com

FORTINET TRAINING & CERTIFICATION PROGRAM
https://www.fortinet.com/support-and-training/training.html

NSE INSTITUTE
https://training.fortinet.com

FORTIGUARD CENTER
https://fortiguard.com/

END USER LICENSE AGREEMENT
https://www.fortinet.com/doc/legal/EULA.pdf

FEEDBACK
Email: techdoc@fortinet.com

June 01, 2020
FortiClient & FortiClient EMS 6.2.0 New Features Guide
04-620-548127-20200601
TABLE OF CONTENTS

           Expanding Fabric family                                                        4
             Dynamic endpoint grouping/tagging and EMS connector (endpoint compliance)    4
             Software Inventory logging to FortiAnalyzer                                  7
             Remote logging support for FortiClient (Linux)                               9
             Automated syncing of the FortiGate Web Filter profile                       12
           Advanced threats                                                              14
             Client handling for HTTPS (browser plugin) for Google Chrome browser        14
             FortiSandbox Cloud support                                                  15
             FortiSandbox support for FortiClient (macOS)                                17
             Cloud-based threat detection                                                20
           SOC adoption                                                                  23
             Vulnerability dashboard                                                     23
               Current Vulnerabilities Summary                                           23
               Top 10 Vulnerable Endpoints With High Risk Vulnerabilities                24
               Endpoint Scan Status                                                      25
               Top 10 Vulnerabilities                                                    26
           UX/Usability                                                                  28
             Endpoint policy                                                             28
           Other                                                                         30
             Free VPN client                                                             30
             CLI support for FortiClient (Linux)                                         31
                Endpoint control                                                         32
                AV scanning                                                              33
                Vulnerability scanning                                                   34
                FortiClient updates                                                      36
             Installer creation enhancements                                             38
             Administrator settings improvements                                         41
                Support for three types of administrators                                41
                Support for multiple LDAP servers                                        42
                Permission management based on administrator roles                       43
                Categorized and refined administrator permissions                        44
                Restricting login to trusted hosts                                       45
             Automatic license retrieval from FortiCare                                  46
             Renaming of FortiClient EMS                                                 48
             Automatic group assignment                                                  48
           Change log                                                                    50

FortiClient & FortiClient EMS 6.2.0 New Features Guide                                        3
Fortinet Technologies Inc.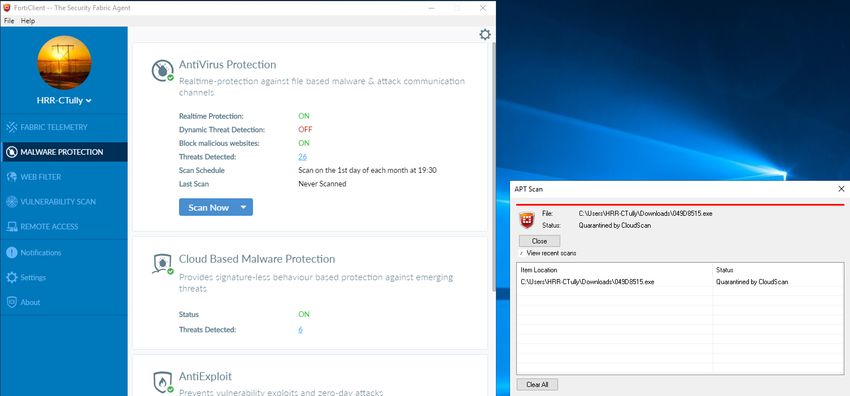
Expanding Fabric family

Dynamic endpoint grouping/tagging and EMS connector (endpoint
compliance)

   As part of the Security Fabric, you can now configure categorization rules on EMS to dynamically group/tag FortiClient
   Fabric Agent endpoints. You can then share these endpoint groups with FortiGate over the EMS connector. EMS
   dynamically updates these endpoint groups when host compliance or other events happen. You can combine the
   endpoint groups with FortiGate firewall policies to provide dynamic access control based on endpoint status.
   You can dynamically group endpoints by OS type, OS version, certificate, logged in domain, files, running
   applications/processes, registry keys, and more. When a FortiClient endpoint registers to EMS, EMS dynamically
   groups the endpoint based on the compliance verification rules.
   You can selectively block, allow, or captive portal display endpoint groups based on their real-time compliance statuses.
   You can configure EMS to send requests for tags to registered endpoints. Each endpoint responds by sending the
   values of matching tags to EMS in the endpoint control protocol keepalive messages. You can configure FortiGates to
   retrieve endpoint tags from EMS. You can use the tags in FortiGate firewall policies.
   This feature requires three main components:
    l   FortiClient (Windows, macOS, or Linux)
    l   EMS
    l   FortiGate
   This feature is new to 6.2.0 and requires that all components are running 6.2.0 or a newer version.

   To configure EMS for dynamic endpoint grouping:

   1. Create a profile:
      a. Go to Endpoint Profiles > Manage Profiles.
        b. Click Add.
        c. Configure the security features in the profile as desired.
        d. If you want the host tags to display on the FortiClient GUI, on the System Settings tab, enable Show Host
           Tag on FortiClient & FortiClient EMS GUI. By default, the FortiClient GUI does not display host tags.

   2. Create a policy:
      a. Go to Endpoint Policy > Manage Policies.
        b. Click Add.

FortiClient & FortiClient EMS 6.2.0 New Features Guide                                                                         4
Fortinet Technologies Inc.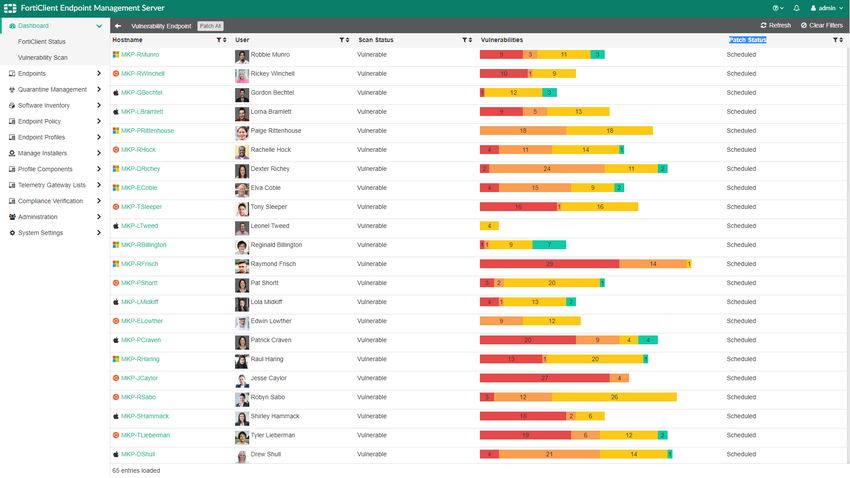
Expanding Fabric family

      c. Configure the new policy. Select the desired group or Active Directory organizational unit (OU), profile, and
         Telemetry gateway list.
   3. Create host verification rules:
      a. Go to Compliance Verification > Compliance Verification Rules.
       b. Click Add.
       c. Configure rules and tags as desired.
          For details on compliance verification rule types, see the EMS Administration Guide.

   To configure FortiOS for dynamic endpoint grouping:

   config user fsso
      edit "ems_name"
         set server 10.127.121.21
         set type fortiems
         set ssl enable
         set ssl-trusted-cert "Fortinet_CA"
         set group-poll-interval
      next
   end
   config user group
      edit "group_name"
         set group-type fsso-service
         set member "ems_group"
      next
   end

   In the above CLI sample, set ssl-trusted cert is optional. For this option to function, you must upload a
   certificate in System Settings > Server > EMS FSSO Settings.
   group-poll-interval is only available for FortiOS 6.2.2 and later versions. In FortiOS 6.2.0 and 6.2.1, you can go
   to Security Fabric > Fabric Connectors, open the EMS connector editing page, then click Apply & Refresh to fetch
   endpoint grouping data from EMS.

   To configure FortiClient for dynamic endpoint grouping:

   Ensure that FortiClient is registered to EMS. If FortiClient is not registered to EMS, manually enter the EMS IP address
   in the FortiClient GUI on the Fabric Telemetry tab. FortiClient receives the assigned Telemetry gateway list and
   registers to the FortiGate on the gateway list. FortiClient then sends the tags to EMS.

   To view the results:

   1. In EMS, go to Compliance Verification > Compliance Verification Rules to view all configured rules and tags.

FortiClient & FortiClient EMS 6.2.0 New Features Guide                                                                        5
Fortinet Technologies Inc.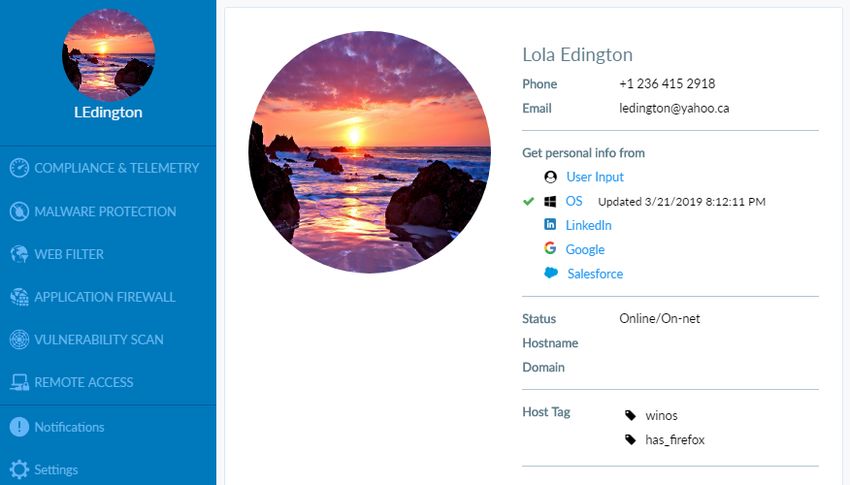
Expanding Fabric family

   2. Go to Compliance Verification > Host Tag Monitor to view all tags and the endpoints that are currently applicable.

   3. Go to Compliance Verification > Fabric Device Monitor to view connected FortiGates.

   4. View the endpoint details. You can see that host verification tags have been applied. In this example, the endpoint
      is running Firefox and has Windows 8.1 or 10 installed, and therefore has the has_firefox and winos tags applied
      according to the compliance verification rules.

   5. In the FortiOS CLI, run the diag debug authd fsso list command to view received endpoint tags:
       ----FSSO logons----
       IP: 10.127.131.102 User: LEDINGTON Groups: 6E813333919A475F9AA7C9B640A8B871+HAS_
            FIREFOX+WINOS Workstation: CHERRYWOOD
       IP: 10.127.131.108 User: DLAMBERSON Groups: F3C5191D4F6E47B996467A25AB12C4A4+HAS_FIREFOX
            Workstation: ALDERWOOD
       Total number of logons listed: 2, filtered: 0
       ----end of FSSO logons----
   6. Run the diag debug enable command, then the diag debug authd fsso server-status command
      to view the EMS that the FortiGate is connected to:

FortiClient & FortiClient EMS 6.2.0 New Features Guide                                                                      6
Fortinet Technologies Inc.
Expanding Fabric family

   7. Disable debug mode by running the diag debug disable command.
   8. View the tags that FortiClient sends on the avatar page in the FortiClient GUI.

   To create a dynamic firewall policy for the user group:

   You can now create a dynamic firewall policy in FortiOS for the user group. In this example, an IPv4 policy is created for
   the user group.
   1. In FortiOS, go to Policy & Objects > IPv4 Policy. Click Create New.
   2. In the Source field, click +. The Select Entries pane appears. On the User tab, select the user group configured
      above.
   3. Configure other options as desired. Click OK.
   4. Go to Policy & Objects > IPv4 Policy to ensure the policy was created and applied to the desired user group.
      FortiOS will update this policy when it receives updates from EMS.

Software Inventory logging to FortiAnalyzer

   FortiClient endpoints can now send Software Inventory logs to FortiAnalyzer for real time and historic logging and
   reporting.

FortiClient & FortiClient EMS 6.2.0 New Features Guide                                                                          7
Fortinet Technologies Inc.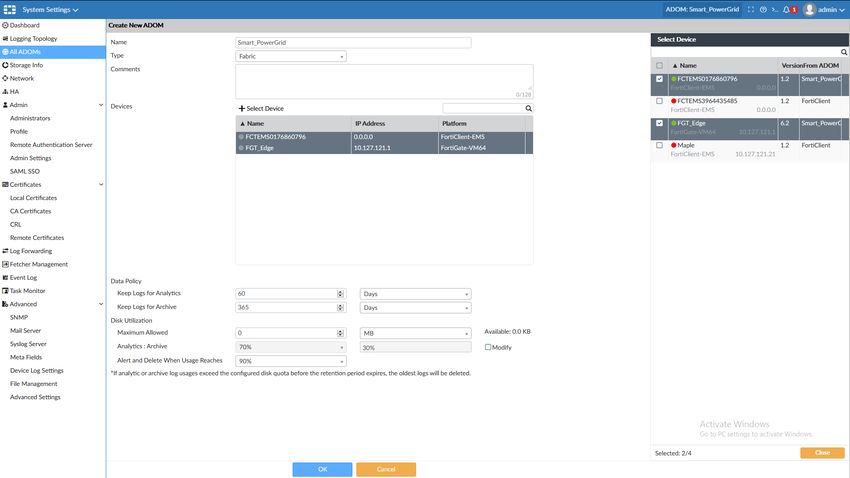
Expanding Fabric family

   FortiClient collects information on regular software installed on the endpoint and sends the information to EMS and
   FortiAnalyzer. FortiClient sends the Software Inventory information when it first registers to EMS and when it first sends
   data to FortiAnalyzer. If software changes occur on the endpoint, such as installing new software, updating existing
   software, or removing existing software, FortiClient sends an updated inventory to EMS and FortiAnalyzer.
   This feature requires the following configuration:
   1. In EMS, enable Send Software Inventory on an endpoint profile.
   2. If needed, create a Fabric ADOM in FortiAnalyzer.

   To configure the endpoint profile in EMS:

   1. In EMS, create a new endpoint profile or edit an existing profile.
   2. On the System Settings tab, enable Send Software Inventory.
   3. Save the profile.
   4. Ensure that the profile is used in the endpoint policy assigned to the desired group or OU.

   To create a Fabric ADOM in FortiAnalyzer:

   1. In FortiAnalyzer, go to System Settings > All ADOMs.
   2. Click Create New.
   3. From the Type dropdown list, select Fabric.
   4. Click + Select Device.
   5. Add at least one FortiGate and the EMS server that the FortiClient endpoint is registered to.
   6. Configure other options as desired.
   7. Click OK.

   8. After creation, switch to the newly created ADOM. Go to SOC, then go to the Monitors tab. The FortiClient
      Software Inventory option is available in the left pane.

FortiClient & FortiClient EMS 6.2.0 New Features Guide                                                                          8
Fortinet Technologies Inc.
Expanding Fabric family

   To view the results:

   1. In EMS, go to Software Inventory. You can view the Software Inventory by application or host.

   2. In FortiAnalyzer, in the Fabric ADOM created earlier, go to SOC > Monitors > FortiClient Software Inventory. You
      can view the data that endpoints sent to FortiAnalyzer.

Remote logging support for FortiClient (Linux)

   FortiClient (Linux) endpoints can now send logs to FortiAnalyzer for historical logging and reporting.
   The EMS administrator can provide a FortiAnalyzer's IP address in an endpoint profile. All endpoints registered to the
   EMS that have this endpoint profile applied send logs to the specified FortiAnalyzer. FortiClient (Linux) also sends
   vulnerability and antivirus (AV) scan results, the user avatar, and Telemetry messages to FortiAnalyzer. The logs and
   vulnerability scan results display in FortiView and Log View in FortiAnalyzer.
   This feature is new for FortiClient (Linux) 6.2.0, but is available for earlier versions of FortiClient (Windows) and
   FortiClient (macOS).

   To configure the endpoint profile in EMS:

   1. In EMS, go to Endpoint Profiles and select the desired endpoint profile.
   2. On the System Settings tab, enable Upload Logs to FortiAnalyzer/FortiManager.
   3. In the IP Address/Hostname field, enter the FortiAnalyzer's IP address. In this example, the FortiAnalyzer's IP
      address is 10.127.121.15.

FortiClient & FortiClient EMS 6.2.0 New Features Guide                                                                      9
Fortinet Technologies Inc.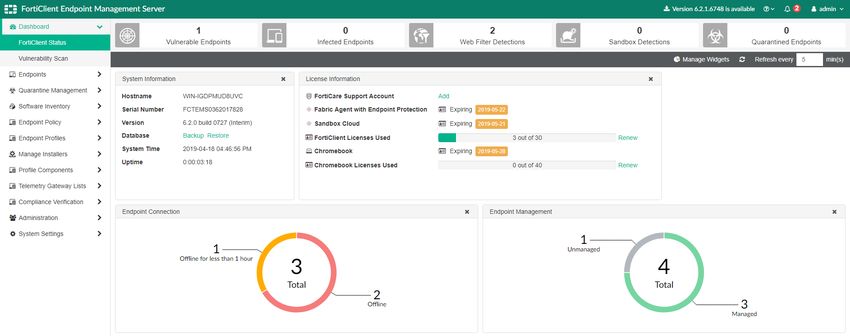
Expanding Fabric family

   4. Update other settings, such as Upload UTM Logs, Upload Vulnerability Logs, Log Generation Timeout, and so on,
      as desired.
   5. Save the profile.
   6. If the profile has not already been configured as part of an endpoint policy, go to Endpoint Policy and configure this
      profile as part of a policy that is assigned to an endpoint group. All endpoints in this group will now send logs to
      FortiAnalyzer. Endpoints only send logs to FortiAnalyzer as long as they are registered to EMS.
   When a vulnerability scan completes, FortiClient sends logs to FortiAnalyzer. You can review the logs in Log View or
   FortiView in FortiAnalyzer.

FortiClient & FortiClient EMS 6.2.0 New Features Guide                                                                         10
Fortinet Technologies Inc.
Expanding Fabric family FortiClient also sends vulnerability scan results to EMS. These display on the Vulnerability Events tab when viewing endpoint details. FortiClient & FortiClient EMS 6.2.0 New Features Guide 11 Fortinet Technologies Inc.
Expanding Fabric family

Automated syncing of the FortiGate Web Filter profile

   EMS 6.2.0 uses a new FortiOS API to import and sync Web Filter profiles from FortiGate.

                             FortiOS 6.2.0 no longer supports the endpoint compliance profile available in earlier versions
                             of FortiOS. EMS 6.2.0 can therefore only import Web Filter profiles from FortiGate and no
                             longer supports importing the compliance profile.

   To import a FortiGate Web Filter profile to EMS:

   1. In FortiOS 6.2.0, go to Security Profiles > Web Filter. Modify an existing Web Filter profile or create a new Web
      Filter profile to export to EMS.
   2. In EMS, go to Endpoint Profiles > Manage Profiles > Import > From FortiGate/FortiManager.
   3. On the Connect to FortiGate/FortiManager tab, provide the FortiGate IP address, the default port 8013, and the
      FortiGate username and password, then click Next.
   4. On the Preview and Select tab, select the profile selected or created in step 1. Click Next.
   5. On the Configure Synchronization tab, configure the synchronization frequency as desired. Click Import.
   6. After EMS has imported the profile from FortiGate, select the imported profile and confirm that the profile's Web
      Filter settings in FortiOS and in EMS are identical.
   7. In FortiOS, modify the Web Filter profile's settings. This example blocks the Finance and Banking site category.

FortiClient & FortiClient EMS 6.2.0 New Features Guide                                                                        12
Fortinet Technologies Inc.
Expanding Fabric family
8. After the synchronization interval configured in step 5, check the profile in EMS. EMS has received the profile
changes from FortiOS. The profile now blocks the Finance and Banking site category.
FortiClient & FortiClient EMS 6.2.0 New Features Guide 13
Fortinet Technologies Inc.Advanced threats
Client handling for HTTPS (browser plugin) for Google Chrome
browser
FortiClient now supports a Web Filter plugin that improves detection and enforcement of Web Filter rules on HTTPS
sites. The plugin is currently available on the Chrome browser for Windows endpoints and will be available for other
major browsers in future releases. There is currently no implementation for macOS or Linux platforms.
To enable the plugin for HTTPS web filtering:
1. In EMS, go to Endpoint Profiles > Manage Profiles. Create a new profile or edit an exiting profile.
2. On the Web Filter tab, enable Enable Web Browser Plugin for HTTPS Web Filtering. Click Save.
3. Create a new endpoint policy or edit an existing one to assign the profile to a group or OU. FortiClient receives the
profile changes with the next Telemetry communication.
4. In FortiClient on the endpoint, open the Chrome browser and go to chrome://extensions.
5. Install or enable the FortiClient WebFilter extension.
When the FortiClient WebFilter extension is not installed or enabled on an endpoint and the end user attempts to
browse to a webpage in Chrome, the following notification displays.
After enabling the extension, a FortiClient Web Filter icon appears on the right side of the URL address bar. Web Filter
rules function as configured.
You can view the Web Filter events on EMS. If configured, the Web Filter events are also sent to FortiAnalyzer.
FortiClient & FortiClient EMS 6.2.0 New Features Guide 14
Fortinet Technologies Inc.Advanced threats
FortiSandbox Cloud support
Licensed endpoints running FortiClient 6.2.0 can now use the FortiSandbox Cloud service for deep inspection of zero-
day threats.
Earlier versions of FortiClient supported sending files to FortiSandbox appliances. FortiClient 6.2.0 introduces support
for FortiSandbox Cloud. The EMS administrator can now configure FortiClient to use an on-premise FortiSandbox
appliance or point to FortiSandbox Cloud. To use this new feature, the following requirements must be met:
l FortiClient must be registered to EMS.
l The Sandbox Cloud license, newly introduced in FortiClient 6.2.0, must be configured on EMS. The Fabric Agent
license does not support this feature.
l The EMS administrator has configured the endpoint's assigned profile to use FortiSandbox Cloud as shown below.
Once FortiClient has received the profile from EMS, FortiClient displays the Sandbox Detection tab. FortiSandbox
Cloud support functions similarly to the existing FortiSandbox appliance support in earlier versions of FortiClient, except
FortiClient sends files to FortiSandbox Cloud instead of an on-premise FortiSandbox appliance.
As the end user goes about their daily activities, FortiClient monitors new files introduced to the system. When
FortiClient detects that a new file matches the monitored file type configured in EMS, the following occurs:
FortiClient & FortiClient EMS 6.2.0 New Features Guide 15
Fortinet Technologies Inc.Advanced threats
1. If enabled, FortiClient AV Real Time Protection (RTP) scans the file. Scanning uses signatures from FortiGuard
and FortiSandbox Cloud.
2. One of the following occurs:
a. AV RTP detects that the file is malicious. FortiClient quarantines or denies access to the file, depending on the
configuration from EMS.
b. AV RTP detects that the file is clean. The FortiClient Sandbox feature sends a checksum query to
FortiSandbox Cloud. If FortiSandbox Cloud processed the file recently, it quickly returns a verdict. If the file is
new to FortiSandbox Cloud, the FortiClient Sandbox feature uploads the file to FortiSandbox Cloud. The
FortiClient Sandbox feature queries the file from FortiSandbox Cloud until it receives a verdict or reaches a
timeout. Based on the received verdict, FortiClient quarantines or releases the file.
The FortiClient Sandbox Detection tab updates as FortiClient processes the file with FortiSandbox:
l If FortiSandbox Cloud returns a verdict that the file is clean, the Sandbox Detection tab shows the updated results,
and FortiClient does not send logs or results to EMS.
l If FortiSandbox Cloud returns a verdict that the file is not clean, the Sandbox Detection tab shows the updated
results, and FortiClient sends the results to EMS. You can view the results in EMS in Quarantine Management (if
FortiClient quarantined the file) or the Sandbox tab for the endpoint's endpoint details page.
Each endpoint can send a maximum of 300 files daily. If multiple files are submitted around the same time, FortiClient
sends one file to FortiSandbox Cloud, waits until it receives the verdict for that file, then sends the next file to
FortiSandbox Cloud.
The following shows the FortiClient GUI when used with FortiSandbox Cloud.
FortiClient & FortiClient EMS 6.2.0 New Features Guide 16
Fortinet Technologies Inc.Advanced threats
FortiSandbox support for FortiClient (macOS)
FortiClient (macOS) endpoints can now submit high-risk files to FortiSandbox for analysis. If FortiSandbox detects the
submitted file as malicious, then FortiClient quarantines the file. FortiClient (macOS) can submit files to on-premise
FortiSandbox appliances only, and cannot submit files to FortiSandbox Cloud.
The FortiClient (macOS) endpoint must be registered to EMS 6.2.0. The FortiSandbox server that FortiClient uses for
file submission must authorize EMS.
This feature currently has the following limitations:
l FortiClient (macOS) does not support real-time blocking the file being submitted to FortiSandbox. Therefore, the
Wait for FortiSandbox Results before Allowing File Access option does not apply to FortiClient (macOS). Only if
FortiSandbox detects the file as malicious does FortiClient (macOS) quarantine the file.
l FortiClient (macOS) does not automatically include files signed by Apple Inc. as files from trusted sources.
l FortiClient (macOS) does not submit Sandbox detection logs to FortiAnalyzer.
To configure FortiSandbox scanning for FortiClient (macOS):
1. In EMS, select the desired endpoint profile.
2. On the profile's Sandbox tab, enable Sandbox Detection.
3. Configure Server options:
a. Under FortiSandbox, select Appliance.
b. In the IP address/Hostname field, enter the FortiSandbox IP address.
c. Click Test Connection.
d. In FortiSandbox, go to Scan Input > Devices. Search for and authorize the EMS serial number. You can find
the EMS serial number in the System Information widget on the EMS dashboard.
e. EMS displays that FortiSandbox has authorized EMS. You can now configure the inspection mode. For
macOS, it is recommended to select All Supported Extensions.
4. Under File Submission Options, select All Web Downloads and All Email Downloads. FortiClient (macOS) only
supports submitting web and email downloads.
5. Under Remediation Actions, select Quarantine or Alert & Notify. The user can access the file after FortiClient
submits the file for analysis. FortiClient only quarantines the file if FortiSandbox analysis reports the file as
malicious.
6. Under Exceptions, exclude files from submission based on folder paths or filenames.
7. Click Save. EMS applies the profile changes to the endpoint with the next Telemetry communication.
After FortiClient (macOS) receives the Sandbox configuration from EMS, it can submit files for analysis to
FortiSandbox. In this example, FortiClient submits a clean file downloaded from a web browser to FortiSandbox.
FortiClient displays that one file has been submitted in the SUBMITTED tile. FortiClient waits for the results from
FortiSandbox. FortiClient receives the verdict from FortiSandbox that the file is not malicious, and displays that one file
has been detected as CLEAN .
FortiClient & FortiClient EMS 6.2.0 New Features Guide 17
Fortinet Technologies Inc.Advanced threats When FortiClient submits a malicious file to FortiSandbox and FortiSandbox detects it as malicious, FortiClient quarantines the file and displays the following dialog. FortiClient also displays that FortiSandbox has detected a zero-day file. FortiClient & FortiClient EMS 6.2.0 New Features Guide 18 Fortinet Technologies Inc.
Advanced threats

   The FortiSandbox administrator can see the quarantined file's details.

   The FortiClient user can see the file details in Malware Protection > Zero Day > Sandbox Quarantined Files.

FortiClient & FortiClient EMS 6.2.0 New Features Guide                                                           19
Fortinet Technologies Inc.
Advanced threats

   The EMS administrator can view the Sandbox event for the FortiClient endpoint.

Cloud-based threat detection

   FortiClient's outbreak protection service provides another layer of protection, where FortiClient initiates a real-time
   cloud lookup of Fortinet's Global Threat Intelligence database so it can detect and block emerging threats and continue
   to provide the latest protection measures to the endpoint.
   FortiClient 6.2.0's malware protection feature includes virus outbreak protection. For each new file downloaded to the
   endpoint, FortiClient calculates the SHA1 checksum, sends a query to FortiGuard, and temporarily blocks access to the
   file. If the result from the query indicates that the file is malicious, FortiClient quarantines the newly downloaded file or
   denies access to it.

   To configure cloud-based threat detection:

   1. In EMS, go to Endpoint Profiles > Manage Profiles. Create a new profile or edit an existing one. Enable Cloud
      Based Malware Detection and save the profile.
   2. Create a new endpoint policy or edit an existing one to assign the profile from step 1 to a group or OU.

FortiClient & FortiClient EMS 6.2.0 New Features Guide                                                                             20
Fortinet Technologies Inc.
Advanced threats
3. In FortiClient, connect to EMS. Once FortiClient receives the profile from EMS, go to the Malware Protection tab
to verify that cloud-based malware protection is enabled.
To test the configuration:
1. Download a malware file using a web browser. FortiClient detects and quarantines the file using cloud-based threat
detection.
2. To view more information for the quarantined file, click the number of Threats Detected on the Malware Protection
tab. Click the file name to review it.
3. You can also view information about the quarantined file in Quarantine Management > Files in EMS.
FortiClient & FortiClient EMS 6.2.0 New Features Guide 21
Fortinet Technologies Inc.Advanced threats 4. If configured, you can view the event on FortiAnalyzer. FortiClient & FortiClient EMS 6.2.0 New Features Guide 22 Fortinet Technologies Inc.
SOC adoption

Vulnerability dashboard

    The vulnerability scan dashboard has been improved to support drilldown charts that allow you to easily get more
    filtered endpoint information.
    In EMS, go to Dashboard > Vulnerability Scan. This page contains charts about connected endpoints' vulnerability scan
    information.

Current Vulnerabilities Summary

    Go to Dashboard > Vulnerability Scan > Current Vulnerabilities Summary. This chart categorizes vulnerabilities based
    on severity levels, represented in colored circles. It also categorizes vulnerabilities by the following types:
     l   Total
     l   Operating System
     l   Browser
     l   Microsoft Office
     l   Third Party App
     l   Service
     l   User Config
     l   Other

 FortiClient & FortiClient EMS 6.2.0 New Features Guide                                                                     23
 Fortinet Technologies Inc.
SOC adoption
Hovering the cursor over the colored circles highlights the circle. Clicking the severity level circle loads a detailed
vulnerability page filtered per severity. The detailed page contains the following information:
l Vulnerability Name
l FortiGuard ID
l CVE ID
l Category
l Affected Endpoints
l Patch Status: You can individually patch a vulnerability on an endpoint.
l Patch All: You can patch all displayed vulnerabilities.
Top 10 Vulnerable Endpoints With High Risk Vulnerabilities
Go to Dashboard > Vulnerability Scan > Top 10 Vulnerable Endpoints With High Risk Vulnerabilities. The bar graph
displays the top ten vulnerable endpoints and their vulnerabilities:
FortiClient & FortiClient EMS 6.2.0 New Features Guide 24
Fortinet Technologies Inc.SOC adoption
You can view all of an endpoint's vulnerabilities by clicking the endpoint name, or view only vulnerabilities of the desired
severity level by clicking the corresponding bar. The detailed page contains the following information:
l Vulnerability
l Category
l Severity
l Patch Status: You can patch the endpoint by clicking the Patch button.
Endpoint Scan Status
Go to Dashboard > Vulnerability Scan > Endpoint Scan Status. This chart categorizes endpoints into the following
types:
l Secured
l Vulnerable
l Scanning
l Unscanned
FortiClient & FortiClient EMS 6.2.0 New Features Guide 25
Fortinet Technologies Inc.SOC adoption
Clicking the Vulnerable section of the chart loads the list of endpoints affected with vulnerabilities. This page contains
the following information:
l Hostname
l User
l Scan Status
l Vulnerabilities: This is represented as a bar chart segmented per severity.
l Patch Status: You can individually patch a vulnerability on an endpoint.
l Patch All: You can patch all displayed vulnerabilities.
Top 10 Vulnerabilities
Go to Dashboard > Vulnerability Scan > Top 10 Vulnerabilities. This chart lists the top ten vulnerabilities and affected
endpoints.
FortiClient & FortiClient EMS 6.2.0 New Features Guide 26
Fortinet Technologies Inc.SOC adoption Clicking the vulnerability loads the FortiGuard page with detailed information about the vulnerability. Clicking the number of hosts affected displays the endpoints affected by this particular vulnerability. FortiClient & FortiClient EMS 6.2.0 New Features Guide 27 Fortinet Technologies Inc.
UX/Usability

Endpoint policy

   EMS now has an Endpoint Policy section for managing endpoint profile assignment. This dedicated policy page makes
   it simpler to provision endpoints. You can now create and manage endpoint policies to assign profiles and/or Telemetry
   gateway lists to domains, OUs, and workgroups. You can also create and manage Chromebook policies to assign
   profiles to Google domains.

   To add an endpoint policy for Windows, macOS, and Linux endpoints:

   1. In EMS, go to Endpoint Policy > Manage Policies. Click Add.
   2. In the Endpoint policy name field, enter the desired name.
   3. In the Endpoint domains field, select the desired domain(s) and/or OU(s).
   4. In the Endpoint workgroups field, select the desired workgroup(s).
   5. From the Endpoint profile dropdown list, select the desired profile.
   6. From the Telemetry gateway dropdown list, select the desired Telemetry gateway list.

   7. Save the policy. You can view the new policy on the Endpoint Policy page. You can view all policies on this page,
      as well as edit existing policies. EMS applies the policy (and its associated profile and Telemetry gateway list) to

FortiClient & FortiClient EMS 6.2.0 New Features Guide                                                                       28
Fortinet Technologies Inc.
UX/Usability
the selected domain(s), OU(s), and workgroup(s).
To add an endpoint policy for Chromebook endpoints:
You can configure Chromebook policies only if you have enabled EMS for Chromebooks Settings in System Settings
> Server.
1. In EMS, go to Chromebook Policy > Manage Policies. Click Add.
2. In the Chromebook policy name field, enter the desired name.
3. In the Google domains field, select the desired Google domain(s).
4. From the Chromebook profile dropdown list, select the desired Chromebook profile.
5. Save the policy. You can view the new policy on the Chromebook Policy page. You can view all Chromebook
policies on this page, as well as edit existing policies. EMS applies the policy (and its associated profile) to the
selected domain(s).
FortiClient & FortiClient EMS 6.2.0 New Features Guide 29
Fortinet Technologies Inc.Other Free VPN client For FortiGate administrators, a free version of FortiClient VPN is available which supports basic IPsec and SSL VPN and does not require registration with EMS. This version does not include central management, technical support, or some advanced features. Full-featured FortiClient 6.2.0 requires registration to EMS. Each endpoint registered with EMS requires a license seat on EMS. The FortiClient VPN installer differs from the installer for full-featured FortiClient. When the free VPN client is run for the first time, it displays a disclaimer. You cannot configure or create a VPN connection until you accept the disclaimer: Only the VPN feature is available. You can access the Settings, About, and Notifications pages from a toolbar. FortiClient & FortiClient EMS 6.2.0 New Features Guide 30 Fortinet Technologies Inc.
Other

    Configuring settings for a new VPN connection on the free VPN client resembles doing the same on a full FortiClient
    installation:

    You can establish a VPN connection from the homepage:

CLI support for FortiClient (Linux)

    FortiClient (Linux) now supports an installer targeted towards the headless version of Linux server. FortiClient (Linux)
    6.2.0 for servers (forticlient_server_6.2.0.0xxx) offers a command line interface and is intended to be used with the CLI-
    only (headless) installation. The same set of CLI commands also work with a FortiClient (Linux) GUI installation.
    The following summarizes the CLI commands available for FortiClient (Linux) 6.2.0:

 FortiClient & FortiClient EMS 6.2.0 New Features Guide                                                                          31
 Fortinet Technologies Inc.
Other
Endpoint control
FortiClient 6.2.0 must establish a Telemetry connection to EMS to receive license information. FortiClient features are
only enabled after connecting to EMS.
Usage
You can access endpoint control features through the epctrl CLI command. This command offers the end user the
ability to connect or disconnect from EMS and check the connection status. You can access usage information by using
the following commands:
jameslee@sunshine:~$ /opt/forticlient/epctrl -h
FortiClient Endpoint Control
Usage:
/opt/forticlient/epctrl -r|--register [-p|--port ]
/opt/forticlient/epctrl -u|--unregister
/opt/forticlient/epctrl -d|--details
Options:
-h --help Show the help screen
-r --register Register to an EMS using the IP address
-p --port EMS port
-u --unregister Unregister from the current EMS
-d --details Show telemetry details and status
Connecting to EMS
FortiClient can connect to EMS using the following commands. If EMS is listening on the default port, 8013, you do not
need to specify the port number. If EMs is listening on another port, such as 8444, you must specify the port number
with the EMS address. The example illustrates both use cases:
jameslee@sunshine:~$ /opt/forticlient/epctrl -r 172.17.60.251
Registering to EMS 172.17.60.251:8013.
jameslee@sunshine:~$ /opt/forticlient/epctrl -r 172.17.60.251 -p 8444
Registering to EMS 172.17.60.251:8444.
Endpoint control status
You can check FortiClient endpoint control status details with the -d argument. When FortiClient is connected to
EMS only, the command output is as follows:
jameslee@sunshine:~$ /opt/forticlient/epctrl -d
=====================================
FortiClient EMS Details
=====================================
IP: 172.17.60.251:8013
Host: DESKTOP-ID2CVUA
SN: FCTEMS3764894213
Status: Connected
FortiClient & FortiClient EMS 6.2.0 New Features Guide 32
Fortinet Technologies Inc.Other
If FortiClient is connected to EMS and notifying FortiGate, the endpoint control status displays the serial numbers and
hostnames of the EMS and FortiGates as follows:
jameslee@sunshine:~$ /opt/forticlient/epctrl -d
=====================================
FortiClient EMS Details
=====================================
IP: ems.fortinet.net:80
Host: DESKTOP-ID2CVUA
SN: FCTEMS3764894213
Status: Connected
=====================================
FortiGate Details
=====================================
IP: 172.17.60.40
Host: FGVM02TM18001119
SN: FGVM02TM18001119
Status: Connected
When FortiClient is not connected to EMS, the endpoint control status has no Telemetry data available as shown below:
jameslee@sunshine:~$ /opt/forticlient/epctrl -d
No telemetry data available.
Disconnecting from EMS
FortiClient can disconnect from EMS only if the configuration received from EMS allows it. You can disconnect using the
-u argument.
jameslee@sunshine:~$ /opt/forticlient/epctrl -u
Unregistering from EMS.
AV scanning
You may run an AV scan from the CLI on the entire file system or on a specified directory. You can only run an AV scan
as the root user. After completing an AV scan, FortiClient prints the scan results and detailed log file locations. You can
run the following command to run an AV scan, where is the directory to scan. You can perform a full scan by
inputting / in place of .
sudo /opt/forticlient/fmon -s /opt/forticlient/vir_sig/ -o /opt/forticlient/ --unit /op-
t/forticlient -d
The following shows an AV scan performed on the /var directory:
jameslee@sunshine:/var$ sudo /opt/forticlient/fmon -s /opt/forticlient/vir_sig/ -o /op-
t/forticlient/ --unit /opt/forticlient -d /var
Signature dir : /opt/forticlient/vir_sig/
Log dir : /opt/forticlient/
Fmon on daemon mode.
Dest dir : /var
CPU number : 1
Server port : 40140
AV Engine path : /opt/forticlient/libav.so
AV Signature path : /opt/forticlient/vir_sig/vir_high:/opt/forticlient/vir_sig/vir_sandbox_sig
Load AV signature success.
FortiClient & FortiClient EMS 6.2.0 New Features Guide 33
Fortinet Technologies Inc.Other
Scan : /var/spool/anacron/cron.daily
===> Scan : /var/spool/anacron/cron.weekly
===> Scan : /var/spool/anacron/cron.monthly
===> Scan : /var/crash/_usr_bin_gedit.1001.crash
===> Scan : /var/crash/_opt_forticlient_fmon.1000.crash
===> Scan : /var/backups/apt.extended_states.1.gz
===> Scan : /var/backups/shadow.bak
===> Scan : /var/backups/dpkg.statoverride.2.gz
===> Scan : /var/backups/passwd.bak
===> Scan : /var/backups/dpkg.diversions.1.gz
===> Scan : /var/backups/apt.extended_states.0
===> Scan : /var/backups/dpkg.arch.2.gz
===> Scan : /var/backups/alternatives.tar.1.gz
===> Scan : /var/backups/dpkg.arch.0
===> Scan : /var/backups/dpkg.status.1.gz
===> Scan : /var/backups/dpkg.statoverride.0
===> Scan : /var/backups/dpkg.arch.1.gz
===> Scan : /var/backups/gshadow.bak
===> Scan : /var/backups/dpkg.diversions.2.gz
===> Scan : /var/backups/alternatives.tar.2.gz
................................
................................
................................
-------------- scan_dispatch_worker finished -------------
Scan started at Mon Apr 22 14:43:45 2019
Found virus : EICAR_TEST_FILE
In file : /var/eicar.com
Action : Quarantine success
Quarantine file : /opt/forticlient/quarantine/eicar.com.1
--------------- Scan summary ---------------------
Total scan files : 10947
Found virus : 1
Worker crash : 0
Worker timeout : 0
--------------------------------------------------
Scan ended at Mon Apr 22 14:44:01 2019
Full results can be found in /opt/forticlient/Daemon - Mon Apr 22 14:43:45 2019.log
Vulnerability scanning
You can run a vulnerability scan from the CLI to check for vulnerable applications on the machine. You can only run a
vulnerability scan as the root user. After completing a vulnerability scan, FortiClient prints the number of vulnerabilities
present on the machine, their severity levels, and detailed log file locations. You can run a vulnerability scan by running
the following command:
jameslee@sunshine:/home/jameslee$ sudo /opt/forticlient/vulscan -v /opt/forticlient/vcm_sig/ -
c -o /var/log/forticlient/vcm_log/
[INFo} Distribution name is Ubuntu
[INFO] Distribution version is 18.04.1 LTS (Bionic Beaver)
[INFO] LoadVulSig
[INFO] Decryption success!
FortiClient & FortiClient EMS 6.2.0 New Features Guide 34
Fortinet Technologies Inc.Other [INFO] LoadFromDb [INFO] Total sig : 13163 [INFO] Signature version=1.38 [INFO] Engine version=2.0.0.22 [INFO] Build install list ................................ ................................ ................................ [INFO] Output directory: /var/log/forticlient/vcm_log/2019-04-18 18-45-42/ --------------- Scan summary --------------------- Critical : 7 High : 2 Medium : 7 Low : 0 -------------------------------------------------- You can patch existing vulnerabilities using FortiClient. FortiClient runs a vulnerability scan again after patching the vulnerabilities and prints the results. You can patch vulnerabilities as below: jameslee@sunshine:/home/jameslee$ sudo /opt/forticlient/vulscan -v /opt/forticlient/vcm_sig/ - c -o /var/log/forticlient/vcm_log/ -p [INFo} Distribution name is Ubuntu [INFO] Distribution version is 18.04.1 LTS (Bionic Beaver) [INFO] LoadVulSig [INFO] Decryption success! [INFO] LoadFromDb [INFO] Total sig : 13163 [INFO] Signature version=1.38 [INFO] Engine version=2.0.0.22 [INFO] Build install list ... Patching vid 55441 Hit:1 http://ca.archive.ubuntu.com/ubuntu bionic InRelease Get:2 http://ca.archive.ubuntu.com/ubuntu bionic-updates InRelease [88.7 kB] Get:3 http://security.ubuntu.com/ubuntu bionic-security InRelease [88.7 kB] Get:4 http://ca.archive.ubuntu.com/ubuntu bionic-backports InRelease [74.6 kB] Get:5 http://ca.archive.ubuntu.com/ubuntu bionic-updates/main amd64 DEP-11 Metadata [278 kB] Get:6 http://security.ubuntu.com/ubuntu bionic-security/main amd64 DEP-11 Metadata [9,364 B] Get:7 http://ca.archive.ubuntu.com/ubuntu bionic-updates/main DEP-11 48x48 Icons [66.7 kB] Get:8 http://ca.archive.ubuntu.com/ubuntu bionic-updates/main DEP-11 64x64 Icons [123 kB] Get:9 http://ca.archive.ubuntu.com/ubuntu bionic-updates/universe amd64 DEP-11 Metadata [222 kB] Get:10 http://security.ubuntu.com/ubuntu bionic-security/main DEP-11 48x48 Icons [7,788 B] Get:11 http://security.ubuntu.com/ubuntu bionic-security/universe amd64 DEP-11 Metadata [35.7 kB] Get:12 http://ca.archive.ubuntu.com/ubuntu bionic-updates/universe DEP-11 48x48 Icons [194 kB] Get:13 http://security.ubuntu.com/ubuntu bionic-security/universe DEP-11 48x48 Icons [16.4 kB] Get:14 http://security.ubuntu.com/ubuntu bionic-security/universe DEP-11 64x64 Icons [92.2 kB] Get:15 http://ca.archive.ubuntu.com/ubuntu bionic-updates/universe DEP-11 64x64 Icons [406 kB] Get:16 http://ca.archive.ubuntu.com/ubuntu bionic-updates/multiverse amd64 DEP-11 Metadata [2,468 B] Get:17 http://security.ubuntu.com/ubuntu bionic-security/multiverse amd64 DEP-11 Metadata [2,464 B] Get:18 http://ca.archive.ubuntu.com/ubuntu bionic-backports/universe amd64 DEP-11 Metadata [7,352 B] Fetched 1,716 kB in 3s (591 kB/s) Reading package lists... Done FortiClient & FortiClient EMS 6.2.0 New Features Guide 35 Fortinet Technologies Inc.
Other

    [INFO] install command is: apt-get -y install --only-upgrade firefox
    Reading package lists... Done
    Building dependency tree
    Reading state information... Done
    Suggested packages:
    fonts-lyx
    The following packages will be upgraded:
    firefox
    1 upgraded, 0 newly installed, 0 to remove and 315 not upgraded.
    Need to get 0 B/48.1 MB of archives.
    After this operation, 7,509 kB of additional disk space will be used.
     (Reading database ... 162206 files and directories currently installed.)
    Preparing to unpack .../firefox_66.0.3+build1-0ubuntu0.18.04.1_amd64.deb ...
    Unpacking firefox (66.0.3+build1-0ubuntu0.18.04.1) over (59.0.2+build1-0ubuntu1) ...
    Processing triggers for mime-support (3.60ubuntu1) ...
    Processing triggers for desktop-file-utils (0.23-1ubuntu3.18.04.1) ...
    Setting up firefox (66.0.3+build1-0ubuntu0.18.04.1) ...
    Installing new version of config file /etc/apparmor.d/usr.bin.firefox ...
    Please restart all running instances of firefox, or you will experience problems.
    Processing triggers for man-db (2.8.3-2) ...
    Processing triggers for gnome-menus (3.13.3-11ubuntu1) ...
    Processing triggers for hicolor-icon-theme (0.17-2) ...
    [INFO] query command is: dpkg-query --show firefox
    Package version found is 66.0.3+build1-0ubuntu0.18.04.1
    Patching vid 55442
    Hit:1 http://security.ubuntu.com/ubuntu bionic-security InRelease
    Hit:2 http://ca.archive.ubuntu.com/ubuntu bionic InRelease
    Hit:3 http://ca.archive.ubuntu.com/ubuntu bionic-updates InRelease
    Hit:4 http://ca.archive.ubuntu.com/ubuntu bionic-backports InRelease
    Reading package lists... Done
    ................................
    ................................
    ................................
    --------------- Scan summary ---------------------
    Critical : 0
    High : 0
    Medium : 0
    Low : 0
    --------------------------------------------------

FortiClient updates

    You can run a FortiClient update task from the CLI once FortiClient has connected to EMS and is licensed. The update
    task downloads the latest FortiClient engine and signatures. You can only run an update task as the root user. The
    command and its output are shown below:
    root@sunshine:/home/jameslee# /opt/forticlient/update
    ****************Update starting***************
    Sandbox test = 0
    Sandbox host to test = (null)
    log_level: 6
    Enable custom fds server :80 failover port: 8000 failover to fdg: 1 allow sw update: 0
    Updating FCTDATA: Update started forced update
    [INFO] Engine version=2.0.0.22
    [INFo} Distribution name is Ubuntu

 FortiClient & FortiClient EMS 6.2.0 New Features Guide                                                                    36
 Fortinet Technologies Inc.
Other
[INFO] Distribution version is 18.04.1 LTS (Bionic Beaver)
[INFO] LoadVulSig [INFO] Decryption success!
[INFO] LoadFromDb [INFO] Total sig : 13163
[INFO] Signature version=1.38
Getting current FortiClient Components information
current av engine version: 6.2.126
av engine id: 06002000FVEN04100-00006.00126-9999999999
current av main sig full version: 67.1895
av main sig id: 06002000FVDB04000-00067.01895-9999999999
current av ext sig full version: 67.1892
...
...
user jameslee, type:7, session:0, pid:6913
user = jameslee
sandbox server not configured.
Updating FCTDATA: Update finished
[INFO] Engine version=2.0.0.22
[INFo} Distribution name is Ubuntu
[INFO] Distribution version is 18.04.1 LTS (Bionic Beaver)
[INFO] LoadVulSig
[INFO] Decryption success!
[INFO] LoadFromDb
[INFO] Total sig : 13163
[INFO] Signature version=1.38
Downloading done ret = 0
root@sunshine:/home/jameslee#
Existing signature details
You can check details of the existing FortiClient engine and signatures by running the update task with the -d
argument:
jameslee@sunshine:/home/jameslee$ /opt/forticlient/update -d
=====================================
Engines
=====================================
AntiVirus: 6.2.00126
Vulnerability: 2.00022
=====================================
Signatures
=====================================
AntiVirus: 67.01895
AntiVirus Extended: 67.01892
Vulnerability: 1.00038
Sandbox: 3.00442
Update help
The update help option lists all options available for the update task. You can access this option as shown below:
jameslee@sunshine:~$ /opt/forticlient/update -h
FortiClient Update
FortiClient & FortiClient EMS 6.2.0 New Features Guide 37
Fortinet Technologies Inc.Other
Usage:
/opt/forticlient/update
/opt/forticlient/update -d
Options:
-h Show the help screen
-d Show engine and signature versions
Installer creation enhancements
The EMS installer wizard has been improved so that administrators can now create custom FortiClient installers in a
manner similar to the FortiClient Configurator Tool.
You can create deployment packages to deploy FortiClient to endpoints. Deployment packages include the FortiClient
installer, which determines the FortiClient release and patch to install on the endpoint, as well as which FortiClient
features are installed on the endpoint. Deployment packages can also include a Telemetry gateway list for connection
to a FortiGate.
Manage Installers > FortiClient Installers displays FortiClient installers available from FortiGuard and uploaded custom
FortiClient installers. These installers are available for selection when creating a FortiClient deployment package. EMS
automatically connects to FortiGuard to provide access to FortiClient installers that you can use with EMS profiles. If a
connection to FDN is not available, you must manually download FortiClient installers to use with EMS.
You can download FortiClient installers to use with EMS from Fortinet Customer Service & Support. This requires a
support account with a valid support contract. Download the Windows, macOS, or Linux installation file.
To add a custom FortiClient installer:
All uploaded Windows installers must be .msi or .zip files. All uploaded macOS installers must be .dmg files.
1. Download a FortiClient installer. You can also upload a previously customized installer.
2. Upload the custom installation files:
a. Go to Manage Installers > FortiClient Installers.
b. Click Add. The Add FortiClient Installer dialog displays.
c. Set the following options:
Name Enter a name for the set of installation files.
Upload Windows Installers Enable to upload FortiClient installers for the Windows operating system.
Windows 64-Bit Installer Click the Browse button to locate and select a custom 64-bit installer for
(ZIP or MSI) the Windows operating system.
Windows 32-Bit Installer Click the Browse button to locate and select a custom 32-bit installer for
(ZIP or MSI) the Windows operating system.
Upload Mac Installer Enable to upload a FortiClient installer for the macOS operating system.
Mac Installer (DMG) Click the Browse button to locate and select a custom installer for the
macOS operating system.
d. Click Upload. The custom installers are uploaded to EMS.
FortiClient & FortiClient EMS 6.2.0 New Features Guide 38
Fortinet Technologies Inc.Other
To add a FortiClient deployment package:
1. Go to Manage Installers > Deployment Packages.
2. Click Add.
3. On the Version tab, set the following options:
Installer Type Configure the deployment package to use an official FortiClient installer or a
custom FortiClient installer.
Release Select the FortiClient release version to install.
Patch Select the specific FortiClient patch version to install.
Keep updated to the latest Select to enable FortiClient to automatically update to the latest patch release
patch when FortiClient is installed on an endpoint.
4. On the General tab, set the following options:
Name Enter the FortiClient installer's name.
Notes (Optional) Enter any notes about the FortiClient installer.
5. Click Next. On the Features tab, set the following options:
Security Fabric Agent Enabled by default and cannot be disabled. Installs FortiClient with Telemetry
(Mandatory Feature) and Vulnerability Scan enabled.
Secure Access Architecture Enable to install FortiClient with SSL and IPsec VPN enabled. Disable to omit
Components SSL and IPsec VPN support from the FortiClient deployment package.
Advanced Persistent Threat Enable to install FortiClient with APT components enabled. Disable to omit
(APT) Components APT components from the FortiClient installer. Includes FortiSandbox
detection and quarantine features.
Additional Security Features Enable to select one, two, or all of the following features:
l AntiVirus
l Web Filtering
l Application Firewall
l Single Sign-On mobility agent
l Cloud Based Malware Outbreak Detection
Disable to exclude the features from the FortiClient installer.
6. Click Next. On the Advanced tab, set the following options:
Enable automatic Enable to configure FortiClient to automatically connect Telemetry to
registration EMS after FortiClient is installed on the endpoint. Disable to turn off this
feature and require endpoint users to manually connect Telemetry to EMS.
Enable desktop shortcut Enable to configure the FortiClient installer to create a desktop shortcut on the
endpoint.
Enable start menu shortcut Enable to configure the FortiClient installer to create a Start menu shortcut on
7. the endpoint.
FortiClient & FortiClient EMS 6.2.0 New Features Guide 39
Fortinet Technologies Inc.Other
Enable Installer ID Enable to configure an installer ID. Select an existing installer ID or enter a
new installer ID. If creating an installer ID, select a group path or create a new
group in the Group Path field. EMS automatically groups endpoints according
to installer ID group assignment rules.
This option is not available when the FortiClient installer selected or uploaded
in step 3 is a version prior to 6.0.0.
Enable Endpoint Profile Enable to select an endpoint profile to include in the installer. The profile is
applied to the endpoint once it has installed FortiClient. This option is
necessary if it is required to have certain security features enabled prior to
contact with EMS, or if users require VPN connection to connect to EMS.
8. Click Next. The Telemetry tab displays the hostname and IP address of the EMS server, which will manage
FortiClient once it is installed on the endpoint. Also configure the following option:
Enable telemetry connection Enable this option, and select the name of the gateway list to use. The
to Security Fabric gateway list defines the IP address for the FortiGate.
(FortiGate) If you have not created a gateway list, this option is not available.
9. Click Finish. The FortiClient installer is added to EMS and displays on the Manage Installers > Deployment
Packages pane.
The deployment package may include .exe (32-bit and 64-bit), .msi, and .dmg files depending on the configuration.
The following shows an example of a deployment package that includes .exe, .msi, and .dmg files. The end user
can download these files to install FortiClient on their machine with the desired configuration.
FortiClient & FortiClient EMS 6.2.0 New Features Guide 40
Fortinet Technologies Inc.Other
Administrator settings improvements
EMS 6.2.0 introduces five major improvements to administrator settings:
l Support for three types of administrators
l Support for multiple LDAP servers
l Permission management based on administrator roles
l Categorized and refined administrator permissions
l Restricting login to trusted hosts
Support for three types of administrators
Administrators can be one of three types of users:
User type Description
EMS Created in EMS. This includes the built-in "admin" user.
Windows Created by the local Windows system.
LDAP Imported from the domain server.
To create an EMS administrator:
1. Go to Administration > Administrators. Click Add.
2. Under User Source, select Create a new user. Click Next.
3. In the Username field, enter the desired username.
FortiClient & FortiClient EMS 6.2.0 New Features Guide 41
Fortinet Technologies Inc.Other
4. From the Role dropdown list, select the desired role. Click Next.
5. On the Password tab, create a password for the user. Click Save. Once you save the user, you can view the
created user on the Administration > Administrators pane. The Source is listed as EMS.
Support for multiple LDAP servers
You can configure multiple LDAP servers on EMS to import users from.
FortiClient & FortiClient EMS 6.2.0 New Features Guide 42
Fortinet Technologies Inc.Other
To configure an LDAP server:
1. Go to Administration > User Servers. Click Add.
2. Enter the domain credentials. Click Test. Once the test is successful, click Save.
In this example, after EMS imports the LDAP server successfully, the Administration > User Servers pane lists two
imported LDAP servers.
Permission management based on administrator roles
You can use administrator roles to manage permissions. There are four predefined roles configured with different
permissions:
Name Description
Super administrator Most privileged admin role. Complete access to all EMS permissions, including
modification, user permissions, approval, discovery, and deployment. Only built-
in role that has access to the Administration section of the GUI. Has access to all
configured Windows and LDAP servers and users and has the authority to
configure user privileges and permissions.
FortiClient & FortiClient EMS 6.2.0 New Features Guide 43
Fortinet Technologies Inc.Other
Name Description
The default admin account is configured as a Super Administrator and cannot be
changed to another admin role.
Standard administrator Includes all endpoint and policy permissions, and read-only permissions to
settings permissions.
Endpoint administrator Includes all endpoint permissions and read-only permissions to policy and
settings permissions.
Restricted administrator No permissions enabled.
You can also define a new role with customized permissions.
To define a custom admin role:
1. Go to Administration > Admin Roles. Click Add.
2. In the Name field, enter the desired name.
3. Select the desired permission checkboxes.
4. Click Save. The role appears on the Administration > Admin Roles pane.
Categorized and refined administrator permissions
When creating or modifying an admin role, all available permissions are categorized into endpoint, policy, and setting
permissions. Permissions for new features include permissions related to endpoint policies, host verification, quarantine
management, and software inventory.
You can click Click here to hide permissions that are not applicable to Chromebook management to view permissions
that only apply to Windows, macOS, and Linux endpoint management.
FortiClient & FortiClient EMS 6.2.0 New Features Guide 44
Fortinet Technologies Inc.Other
Restricting login to trusted hosts
With the Trusted Hosts feature, you can allow remote access to EMS only on defined trusted hosts. You can define a
trusted host using an IPv4 or IPv6 address or a fully qualified domain name (FQDN).
To define trusted hosts:
1. Go to Administration > Administrators.
2. Create a new administrator or modify an existing administrator.
FortiClient & FortiClient EMS 6.2.0 New Features Guide 45
Fortinet Technologies Inc.Other
3. Enable Restrict Login to Trusted Hosts.
4. In the Trusted Hosts field, enter an IPv4 or IPv6 address or an FQDN. If desired, you can enter multiple hosts
using the + button. The trusted host details appear on the administrator page.
Automatic license retrieval from FortiCare
When newly installed, EMS is not licensed, and FortiClient cannot connect to it. You must purchase a license through
FortiCare. You can use one of two methods to apply the newly acquired license on EMS:
l Provide the FortiCare account information on EMS
l Download the license from FortiCare and upload it to EMS. This method is the same as earlier versions of EMS.
You can also use this method in combination with providing the FortiCare account information on EMS.
When you provide the FortiCare account information on EMS, EMS retrieves the license file from FortiCare and applies
it locally. When the license expires, EMS contacts FortiCare during the grace period to check for a license renewal, and,
if available, downloads the new license.
To activate and retrieve the license from FortiCare:
1. Go to Administration > Configure License.
2. Under License Source, select FortiCare.
FortiClient & FortiClient EMS 6.2.0 New Features Guide 46
Fortinet Technologies Inc.You can also read