SmarTracks Diagnostics v.3.11 Installation Guide & User Manual - HUMOTION
←
→
Page content transcription
If your browser does not render page correctly, please read the page content below
SmarTracks Diagnostics v.3.11
Installation Guide & User Manual

                                   Version 1.0 (December 2018)
Contents
 1.     Safety Instructions                                                        1
      1.1.    Electronic Measuring Equipment                                       1
      1.2.    Timing Gates                                                         1
      1.3.    Charging the Measuring Device                                        2
      1.4.    Information on Disposal and Recycling                                2
 2.     Glossary of Technical Terms                                                3
 3.     Hardware                                                                   4
      3.1.    Sensor-Belt                                                          4
        3.1.1.      Sensor DX3.1                                                   4
        3.1.2.      Sensor DX3.5                                                   4
      3.2.    Timing Gates                                                         6
        3.2.1.      Timing Gates Mobile                                            6
        3.2.2.      Placement of the Timing Gates Mobile                           7
        3.2.3.      Timing Gates In-Ground                                         9
 4.     Software Installation                                                     10
      4.1.    How do I install the SmarTracks Diagnostics software?               10
      4.2.    How do I activate my SmarTracks Diagnostics license?                11
      4.3.    How do I change the language settings?                              12
 5.     Performing a Measurement                                                  13
      5.1.    How do I charge the sensor?                                         13
      5.2.    How do I enter a player’s name?                                     14
      5.3.    How do I start a new measurement?                                   15
      5.4.    How do I put on the sensor-belt?                                    18
      5.5.    How do I start multiple measurements simultaneously?                19
      5.6.    How do I know the sensor is measuring?                              19
      5.7.    How do I start a new assessment?                                    19
      5.8.    How do I remove an incorrectly performed test during measurement?   20
      5.9.    How do I change player during a measurement?                        20
      5.10.      How do I stop a measurement?                                     20
 6.     Data Analysis                                                             21
      6.1.    How do I upload the measurement data?                               21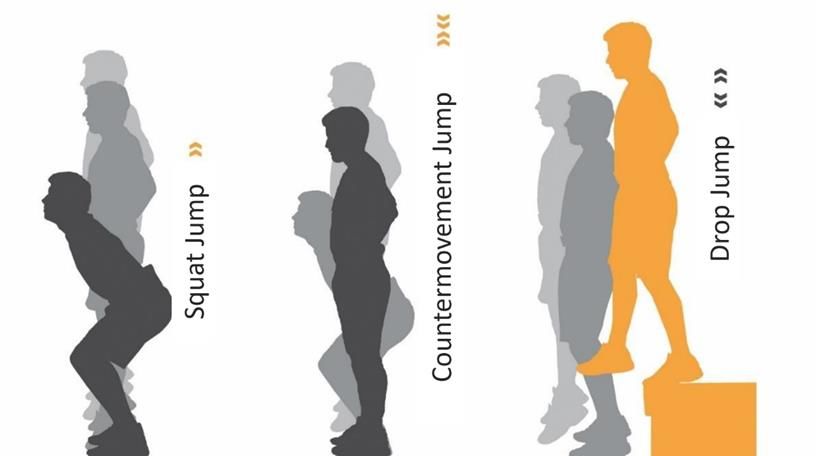
6.2. How do I stop/start the automatic upload of measurement data? 21
6.3. Where can I see the test results? 22
6.3.1. “Power/Jumps” tab 23
6.3.2. “Coordination/Tappings” tab 25
6.3.3. “Runnings” tab 27
6.4. How do I filter or select test results? 29
6.4.1. How do I filter results with the Filter menu? 29
6.4.2. How do I select specific test results? 29
6.4.3. How do I sort test results? 30
6.5. How do I edit test results? 30
6.5.1. How do I enter/change the jump type? 30
6.5.2. How do I enter/change the running exercise type? 31
6.5.3. How do I enter/change a player’s name or a team name after measurement? 31
6.5.4. How do I annotate a test result? 32
6.5.5. How do I delete test results? 32
6.6. How do I compare test results? 33
6.6.1. Comparing via the spider diagram 33
6.6.2. Comparing via Excel files 34
6.7. How do I export test results? 34
6.7.1. Exporting speed, endurance or COD test results 35
6.7.2. Exporting jumps, tapping and sprints test results 36
6.7.3. Printing the spider diagram 37
7. Assessments 38
7.1. Sprinting Ability 38
7.2. Endurance 40
7.3. Jumping Ability 41
7.3.1. Squat Jump (SJ) 42
7.3.2. Drop Jump (DJ) 42
7.3.3. Countermovement Jump (CMJ) 43
7.4. Tapping 43
7.5. Change of Direction (COD) 44
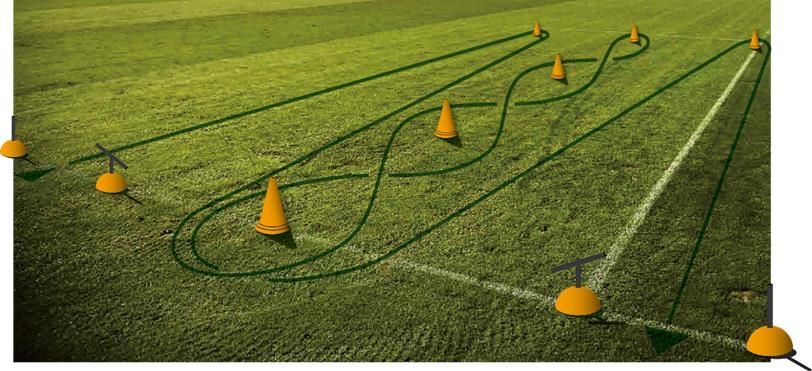
7.5.1. Illinois Agility Test (IAT) 44
7.5.2. Three Cone Drill (3CD) 46
7.5.3. Pro Agility Test (PAT) 47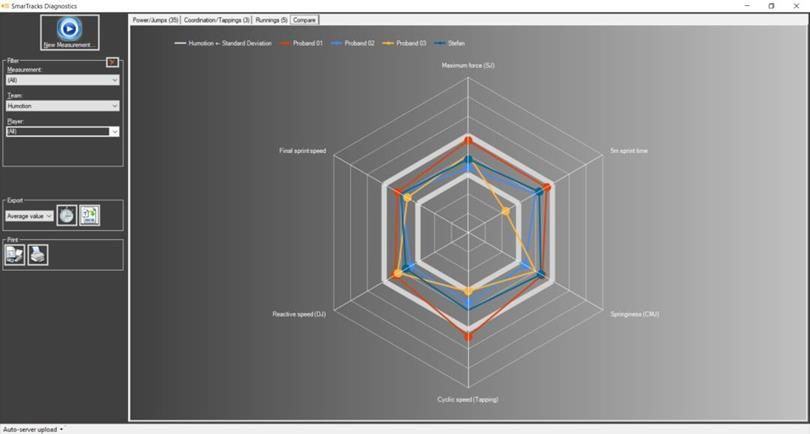
7.5.4.   Customized Change of Direction Test (Customized COD Test)   49
7.5.5.   Arrowhead Agility Test (AAT)                                50
1.     Safety Instructions

ATTENTION!

Before using your SmarTracks Diagnostics, read all instructions on handling the device and timing
gates, including the safety information.

1.1.        Electronic Measuring Equipment

Non-compliance with this safety information may result in a fire, electric shocks or other injuries, or
may lead to damage to the system components.

Do not drop the measuring equipment, and do not dismantle, open, break, bend, deform, drill through,
crush, burn or paint it. Do not heat in a microwave and do not insert foreign objects into the device.

When attaching the sensor to your computer, we recommend using the provided USB extension cable
to protect your computer from humidity and dirt. If you need to attach the sensor directly make sure
there is no moisture or dirt on the sensor! Do not try to dry the measuring equipment with an external
heat source such as a microwave or a hot air gun.

Never try to repair the measuring device yourself.

1.2.        Timing Gates

                             Timing gates for the sprint module contain powerful magnets. The mag-
                             netic field can damage e.g. mobile phones, TVs, laptops, computer hard
                             drives, credit cards, data media, mechanical clocks, hearing devices,
                             speakers, and the measuring sensor.

                             Therefore, these devices should never be kept in close proximity to the
                             timing gates. A minimum distance of 50 cm must be maintained. Do not
                             try to open the timing gates.

Always keep the SmarTracks sensor-belt and the sensor inside it at a sufficient safety distance from
the timing gates.

                                      SmarTracks Diagnostics v.3.11 Installation Guide & User Manual   1
ATTENTION!

                      Magnets may affect the function of pacemakers and implanted defibrillators.
                      If you have such devices fitted, keep them at a sufficient distance from the
                      magnets.

1.3.       Charging the Measuring Device

To charge the measuring device, always use the supplied USB cable with an adapter (power supply) or
a high-power USB port on another device which is compatible with the USB 2.0 standard. If you use
the adapter to charge the measuring device, ensure that the power supply is fully assembled before
connecting it to a plug socket. Then securely plug the adapter into the plug socket. Do not touch the
adapter with wet hands! Always use an approved power supply to charge your measuring device.

The adapter may become warm during normal use. Always ensure an adequate flow of air around the
adapter and handle it with care.

1.4.       Information on Disposal and Recycling

You must dispose of the measuring device properly according to the valid environmental directives
and legislation. Since the measuring device contains electronic components and a battery, the meas-
uring device may not be disposed of with normal domestic waste. If you want to dispose of your used
measuring device, you can consult your local authority regarding disposal and recycling options. The
battery is removed and taken for environmentally friendly recycling.

                                     SmarTracks Diagnostics v.3.11 Installation Guide & User Manual   2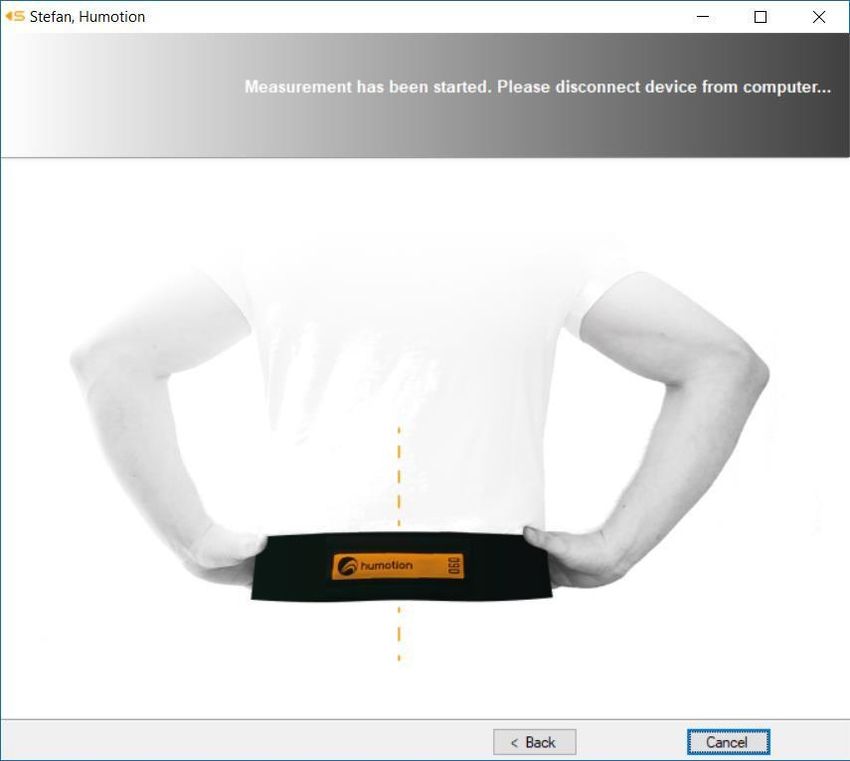
2.     Glossary of Technical Terms

Measurement     A measurement starts from the moment the sensor is disconnected from the
                computer and ends when the sensor is reconnected with the computer.

Assessment      An assessment is an evaluation of specific capacities of the athlete/player, such
                as change of direction, sprinting capacity, etc. Several assessments can be car-
                ried out during one measurement.

Test            A test is one specific action of an assessment, such as one jump, one run, etc.
                Several tests can be carried out during one assessment.

Measurement     Measurement data is the raw data measured by the sensor. This data can be
data            uploaded to a computer and analyzed by the SmarTracks Diagnostics software.

Test results    Test results are the analyzed data as they are displayed in the SmarTracks Diag-
                nostics software.

Measurement     The measurement window is the window shown during a measurement. It dis-
window          plays the measure events.

Measure event   A measure event is either the marking of an invalid attempt or changing player.
                The chronology of these events during a measurement is displayed in the meas-
                urement window.

COD             COD is the abbreviation for “Change of Direction”. SmarTracks can measure sev-
                eral types of assessments for the Change of Direction speed.

IAT             IAT is the abbreviation for “Illinois Agility Test”, a type of COD assessment.

PAT             PAT is the abbreviation for “Pro Agility Test”, a type of COD assessment

AAT             AAT is the abbreviation for “Arrowhead Agility Test”, a type of COD assessment.

                                  SmarTracks Diagnostics v.3.11 Installation Guide & User Manual    3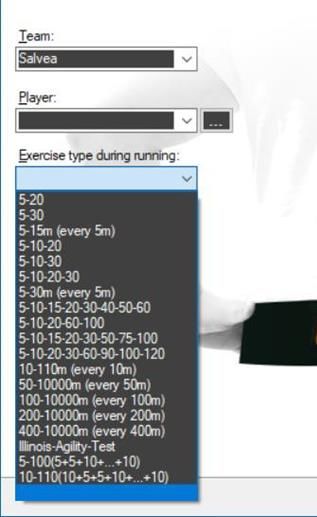
3.       Hardware

3.1.          Sensor-Belt

Depending on whether you have a DX3.1 sensor or a DX3.5 sensor, the sensor-belt consists of differ-
ent components.

3.1.1.             Sensor DX3.1

                                                                        The DX3.1 sensor-belt consists of a
                                                                        rectangular DX3.1 sensor and a sensor-
                                                                        belt.

                                                                        The sensor is connected to the belt with
                                                                        Velcro.

3.1.2.             Sensor DX3.5

                                                                The DX3.5 sensor-belt consists of a DX3.5 sen-
                                                                sor, a round clip, and a belt.

       Figure 1: DX3.5 Sensor with and without USB cap

                                                SmarTracks Diagnostics v.3.11 Installation Guide & User Manual   4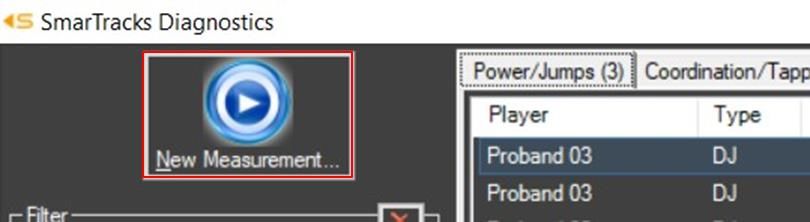
You can attach the sensor to the clip.
Figure 2: Clip (front) +
DX3.5 sensor with USB                  The clip can be attached to the belt with the
cap                                    black Velcro surface on the back (see figure 3
                                       and 4).

Figure 3: Clip (back) +
DX3.5 sensor with USB
cap

        Figure 4: DX3.5 Sensor + Clip attached to the belt

               SmarTracks Diagnostics v.3.11 Installation Guide & User Manual           5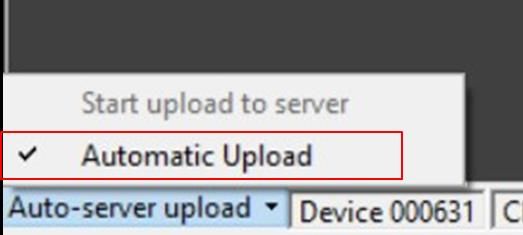
3.2.       Timing Gates

3.2.1.         Timing Gates Mobile

The Timing Gates Mobile can be placed everywhere to conduct performance tests. The gates do not
contain sensitive electronics and are tolerant against humidity and dirt.

To maintain the integrity of the integrated magnets, the magnetic rods (MCD’s) should be well pro-
tected from falling or other severe shocks at any time.

A mobile gate consists of two magnetic elements. A magnetic element consists of one cone and one
magnetic rod (MCD), which is to be stuck into the hole of the cone (see figure 2).

             Figure 1: Magnetic rod (MCD)                         Figure 2: Magnetic element
                                                                 (Cone + magnetic rod (MCD))

                                            SmarTracks Diagnostics v.3.11 Installation Guide & User Manual   6
3.2.2. Placement of the Timing Gates Mobile
IMPORTANT: When installing the Timing Gates Mobile, do not hold the sensor-belt too close to the
MCD’s.
One timing gate consists of two magnetic elements.
The distance between two elements of a timing gate should not be more than 1.25 m.
The distance between two timing gates should not be below 5 m to avoid the merging of the magnetic
fields that are generated by the gates.
≤1,25m
≥5,00m
≤1,25m
SmarTracks Diagnostics v.3.11 Installation Guide & User Manual 7Angled Timing Gates
The rod (MCD) can be set up straight (most common) or angled. The angled setup is done with the help
of an angled mount, which is stuck in the hole of the cone. Rotate the black MCD holder to a 45 degree
angle and insert the MCD with the Humotion logo on the high end. (see figure 3, 4 and 5).
Angled mounts are used for amplification or alignment of the magnetic field that is generated by our
timing gates. In practice, the application is useful for smaller athletes (e.g. children) or for certain tests
of Change of Direction (COD).
Figure 3: Angled mount Figure 4: Angled magnetic ele- Figure 5: Angled magnetic ele-
ment (Cone + angled mount + ment (Cone + angled mount +
magnetic rod (MCD)) magnetic rod (MCD))
IMPORTANT: The Humotion logo on the rods (MCD’s) should always face upwards. This applies for
both the straight and the angled setup.
You can either place both magnetic elements angled, both magnetic elements straight, or one angled
and one straight.
SmarTracks Diagnostics v.3.11 Installation Guide & User Manual 83.2.3. Timing Gates In-Ground
Timing Gates In-Ground are invisibly integrated into the running track. If you are not sure where the
timing gates are integrated in your track, please contact your track operator.
Figures 1 and 2 below illustrate a track setup where timing gates are integrated into the 100m sprint
lane (lane 9) and the 400m lane (lane 1).
In this example track, the Timing Gates In-
Ground are placed in the following intervals:
Lane 9: 0m-5m-10m-20m-30m-40m-60m-
80m-100m
Lane 1: 0m-50m-100m-150m-200m-250m-
300m-350m-400m
Figure 1: SmarTracks with Timing
Gates In-Ground – Exemplary Full
Track Setup by Polytan
Figure 2: SmarTracks with Timing
Gates In-Ground – Detail of Sprint
Lane Setup by Polytan
SmarTracks Diagnostics v.3.11 Installation Guide & User Manual 94. Software Installation
4.1. How do I install the SmarTracks Diagnostics software?
The SmarTracks Diagnostics software is either supplied on a USB stick, or you will be given access de-
tails for the Humotion download server.
Installation instructions when the
software is supplied on a USB stick:
STEP 1: Connect the supplied USB
stick.
STEP 2: Open the “SetupSmar-
Tracks.msi” file.
STEP 3: Select “Next” and follow the
rest of the instructions.
Installation instructions when the software is downloaded from the internet:
STEP 1: Download the setup file.
STEP 2: Depending on your operating system, you can get a notification screen about running an un-
recognized app. (Example shown with Windows 10, this may differ per operating system.)
STEP 3: Click “More
info”.
STEP 4: Click “Run
anyway” and follow
the rest of the in-
structions.
SmarTracks Diagnostics v.3.11 Installation Guide & User Manual 104.2. How do I activate my SmarTracks Diagnostics license?
To activate your license:
After installing SmarTracks Diagnostics, you
need to register the product by activating
your license.
STEP 1: Please enter your email address and
the license key provided to you by Humotion.
STEP 2: Click “Activate”.
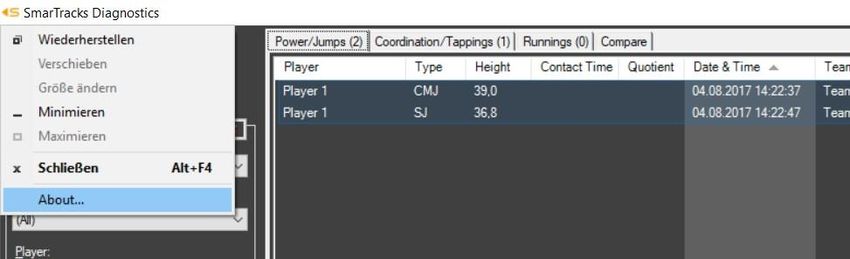
To deactivate your license:
STEP 1: Click on the logo in the upper left cor-
ner and choose “About...”.
STEP 2: Go to the License tab and click “Deac-
tivate”.
SmarTracks Diagnostics v.3.11 Installation Guide & User Manual 114.3. How do I change the language settings?
STEP 1: Click on the logo in the upper left corner and choose “About…”.
STEP 2: Select the language in the drop-down menu and click “OK”.
The changes will take effect after you restart SmarTracks Diagnostics.
SmarTracks Diagnostics v.3.11 Installation Guide & User Manual 125. Performing a Measurement
5.1. How do I charge the sensor?
STEP 1: Start the SmarTracks Diagnostics soft-
ware.
STEP 2: Connect the sensor to your PC using the
USB cable.
Figure 1: DX3.5 sensor + Clip + Attached USB cable
Figure 2: DX3.1 sensor + Belt + Attached USB cable
STEP 3: The device, as well as the
charge status of the battery, is dis-
played bottom left.
When the charge status reaches
4,20V, it is fully charged.
SmarTracks Diagnostics v.3.11 Installation Guide & User Manual 135.2. How do I enter a player’s name?
STEP 1: Start the SmarTracks Diagnostics software.
STEP 2: Connect the sensor to your PC using the USB cable.
NOTE: The data of the last measurement will be uploaded to our servers and analyzed by the
SmarTracks Diagnostics software by default.
If you do not wish SmarTracks Diagnostics to analyze the data of the last measurement, see
6.2. How do I stop the automatic upload of measurement results?
NOTE: It does not matter which sensor you connect to the PC, the names are saved centrally
on the software.
STEP 3: Click on “New Measurement”.
STEP 4: The window “Start New Measure-
ment” opens. Here you can:
▪ Enter a team name (obligatory)
▪ Enter a player‘s/athlete‘s name (ob-
ligatory)
You can enter one or several teams under
“Team”. The entries will be saved for future
measurements.
You can add one or several players to a team
by clicking on the small square box on the
right under “Player”. The entries will be saved
for future measurements.
SmarTracks Diagnostics v.3.11 Installation Guide & User Manual 14STEP 5:
▪ If you do not wish to perform a measurement immediately, press “Cancel”. The entered team
and player names are saved for future measurements.
▪ If you wish to perform a measurement immediately, see 5.3. How do I start a new measure-
ment?, STEP 4.
5.3. How do I start a new measurement?
STEP 1: Start the SmarTracks Diagnostics software.
STEP 2: Connect the sensor-belt to your PC using the USB cable.
NOTE: The data of the last measurement will be uploaded to our servers and analyzed by the
SmarTracks Diagnostics software by default.
If you do not wish SmarTracks Diagnostics to analyze the data of the last measurement, see
6.2. How do I stop/start the automatic upload of measurement results?
STEP 3: Click on the “New Measurement” button to
start a measurement.
STEP 4: The window “Start New Measurement” opens.
Here you can:
▪ Enter/select a team name (obligatory)
▪ Enter/select the first player‘s/athlete‘s name
(obligatory)
▪ Select the exercise type during running (op-
tional) (highly recommended if you only wish
to perform runs of one type). For more infor-
mation on the running type list, see 8.1. Sprint-
ing Ability.
▪ Gate option (optional)
▪ Select the magnetic hemisphere (obligatory)
SmarTracks Diagnostics v.3.11 Installation Guide & User Manual 15Gate option describes the options of timing gates: “Mobile”, “Integrated – Vertical” or “Integrated –
Horizontal”.
▪ If you are using SmarTracks Diagnostics with mo-
bile timing gates, select “Mobile”.
▪ If you are using SmarTracks with Timing Gates In-
Ground, select “Integrated – Vertical” or “Inte-
grated – Horizontal”, according to the alignment
of the integrated timing gates in your track. If you
are not sure how the gates in your track are
aligned, please contact your track operator.
In the magnetic hemisphere menu you have to select either North-
ern or Southern, depending on your location.
STEP 5: When everything is set, click “Next”.
STEP 6: Remove the USB cable from
the sensor-belt.
The sensor is now activated.
Do not press “Cancel”.
SmarTracks Diagnostics v.3.11 Installation Guide & User Manual 16STEP 7: A measurement window is
opened.
The window carries the name of
the player and team that were first
entered when starting the meas-
urement.
Here you can enter measure events,
such as a change of player or a de-
letion of an incorrectly performed
test.
The first measure event is always
“Changed player”, which shows the
time when the first player put on
the sensor-belt.
Do not press “Finish”.
STEP 8: The athlete can now put on the sensor-belt.
SmarTracks Diagnostics v.3.11 Installation Guide & User Manual 175.4. How do I put on the sensor-belt?
DX3.1 sensor
When putting on the sensor-belt make sure that it fits tight
and that the middle of the sensor (sometimes marked with a
black arrow) is aligned with the spine.
The sensor-belt should cross the L4/L5 vertebrae.
DX3.5 sensor
When putting on the DX3.5 sensor-belt, make sure the black
USB cap points upwards, and the sensor is aligned with the
spine.
The sensor-belt should cross the L4/L5 vertebrae.
The athlete can now start performing the assessments.
SmarTracks Diagnostics v.3.11 Installation Guide & User Manual 185.5. How do I start multiple measurements simultaneously?
To perform two or more measurements simultaneously, carry out the instructions under 6.2. How do
I start a new measurement? successively with each sensor-belt.
NOTE: Each sensor-belt has its own
measurement window. The win-
dow carries the name of the player
and team that were first entered
when starting the measurement.
5.6. How do I know the sensor is measuring?
During a measurement, the sensor shows a red blinking light.
The measurement is started from the moment the sensor is disconnected from the computer.
To stop the measurement, connect the sensor to the computer using the USB cable.
5.7. How do I start a new assessment?
If you want the same player to start a new assessment (e.g. first COD, then tapping), you do not need
to enter anything into the computer. The software automatically recognizes the different assessments.
The athlete can just start performing the new assessments.
SmarTracks Diagnostics v.3.11 Installation Guide & User Manual 195.8. How do I remove an incorrectly performed test during measurement?
We recommend to always evaluate the correct
execution of the test that has been performed.
If a test was performed incorrectly, click on “In-
valid Attempt” and it will not show up in the
test results. The athlete can immediately per-
form a new test.
5.9. How do I change player during a measurement?
STEP 1: Click the “Change Player” button.
STEP 2: Select the next player.
▪ If you registered the player before/
during starting the measurement, se-
lect the player from the drop-down
menu.
▪ If you did not register the player be-
fore/ during starting the measure-
ment, enter the player’s name in the
box manually. The player’s name will
not be saved for later measurements.
STEP 3: Hand over the sensor-belt.
5.10. How do I stop a measurement?
Reconnect the sensor-belt to the PC using the USB-cable. The measurement is now stopped.
SmarTracks Diagnostics v.3.11 Installation Guide & User Manual 206. Data Analysis
6.1. How do I upload the measurement data?
STEP 1: After completing the tests, reconnect the sensor-belt to your PC via the USB cable.
STEP 2: The data is analyzed automatically. The test results are displayed in the software.
6.2. How do I stop/start the automatic upload of measurement data?
The data of the last measurement will be uploaded to the Humotion servers and analyzed by the Smar-
Tracks Diagnostics software by default.
If you do not wish SmarTracks Diagnostics to analyze the data of the last measurement, you can disable
this function by doing the following:
STEP 1: Click on the “Auto-Server Upload”
button.
STEP 2: Click on the “Automatic Upload”
menu item.
The server upload and data analysis now stops. The measured data will be saved on your computer,
but will not be analyzed and displayed by the SmarTracks Diagnostics software.
To enable the automatic upload of measurement data again, click on the “Automatic upload” button.
SmarTracks Diagnostics v.3.11 Installation Guide & User Manual 216.3. Where can I see the test results?
After the measurement data has been uploaded unto the SmarTracks Diagnostics software, the test
results are automatically sorted over three tabs:
Power/Jumps Coordination/Tappings Runnings
Squat Jump (SJ) Tappings Speed
Drop Jump (DJ) Endurance
Countermovement Jump (CMJ) Change of direction
SmarTracks Diagnostics v.3.11 Installation Guide & User Manual 226.3.1. “Power/Jumps” tab
Under the “Power/Jumps” tab, you can find the test results for:
▪ Squat Jump
▪ Drop Jump
▪ Countermovement Jump
3
1
2
1 In the Filter menu, you can filter the test results you wish to view.
2 Statistical data of the selected player(s):
=
▪ For the Squat Jump (SJ) and Countermovement Jump (CMJ) you see the
▪ average, minimum and maximum jump height.
▪ For the Drop Jump (DJ) you see the
▪ average, minimum and maximum jump height
▪ ground contact time (“Drop Jump Contact Time”)
▪ reactive speed (“Drop Jump Quotient”).
SmarTracks Diagnostics v.3.11 Installation Guide & User Manual 233 In the Results table, the following results are shown:
Type Squat Jump (SJ), Drop Jump (DJ), or Countermovement Jump (CMJ).
Height Jump height [cm]
Contact time Ground contact time [ms]
(only for DJ) If the contact time exceeds 250ms, the contact time will be displayed in orange.
Quotient Reactive speed (jump time²/ground contact time) [s²/ms]
(only for DJ)
Speed Categorizes the test result according to:
Height>70: Ski jumper
height>60: Champions league
height>50: Premier league
height>40: Sprinter
height>30: Athlete
height>20: Endurance
height>10: Couch potato
height>1: Snail
Contact time > 250ms: No reactive force
SmarTracks Diagnostics v.3.11 Installation Guide & User Manual 246.3.2. “Coordination/Tappings” tab
In the “Coordination/Tappings” tab, you can find the test results for tappings.
1 3
2
4
1 In the Filter menu, you can filter the test results you wish to view.
2 The Statistical data shows you the average, minimum and maximum tap frequency of the se-
lected player(s).
SmarTracks Diagnostics v.3.11 Installation Guide & User Manual 253 In the Results table, the following results are shown:
Frequency Average number of contacts with the ground per second [Hz]
Duration Duration of tapping test
Max frequency Maximum number of contacts with the ground per second [Hz]
Count taps 6s Shows the number of taps in the first 6 seconds if duration was 6 seconds or more.
Count taps 15s Shows the number of taps in the first 15 seconds if duration was 15 seconds or more.
Type X or Y
4 The Chart shows the selected player’s tap frequency (Hz) for the duration of the test.
When you click on the chart, the chart shows each individual ground contact for the duration of the
test.
SmarTracks Diagnostics v.3.11 Installation Guide & User Manual 266.3.3. “Runnings” tab
In the “Runnings” tab, you can find the test results for speed, COD and endurance tests.
4
1
2
3 5
1 In the Filter menu, you can filter the test results you wish to view.
2 The Export menu allows you to export test results. For more information on exporting test
results, see 6.7 How do I export tests results?
3 The Statistical data shows you the following data of selected player(s):
▪ the average, minimum and maximum running time at each point [s]
▪ the speed at each point [km/h].
SmarTracks Diagnostics v.3.11 Installation Guide & User Manual 274 In the Results table, the following results are shown:
Cooper 8 min If the running time was 8 minutes or more, a Cooper value is shown here.
Cooper 12 min If the running time was 12 minutes or more, a Cooper value is shown here.
1./2./3./… Point Time when each respective point was reached [s]
Each point represents:
▪ When no running type exercise has been selected: a timing gate
▪ When a running type exercise has been selected: a measurement point
of the running type exercise
5 The Chart shows the selected player’s steps for the duration of the test. It shows
▪ at what point in time a step was made (orange stripe)
▪ at what point in time a timing gate was passed (blue column).
NOTE: If multiple players are selected, it only shows the chart of the player that was selected first.
SmarTracks Diagnostics v.3.11 Installation Guide & User Manual 286.4. How do I filter or select test results?
6.4.1. How do I filter results with the Filter menu?
In the upper right corner, there is a Filter menu, which allows you to filter results according to:
▪ Measurement: You can select “All” to view the results of all measurements made, or you can
select one specific measurement.
▪ Team: You can select one or all teams.
▪ Player: You can select all, one or more players.
In the “Power/Jumps” tab, you have additional filters in the Filter menu for:
▪ Jump type
▪ Speed category
In the “Runnings tab”, you have additional filters in the Filter menu for:
▪ Exercise type
▪ Run type
To clear all filters, click the red cross button in the top right corner of the filter menu.
6.4.2. How do I select specific test results?
▪ To select a specific test result, click on the test result.
▪ To select multiple test results simultaneously, hold the CTRL key and click the test results you
wish to select.
▪ To view all test results, right-click on any test results line, and click “Select all”.
The Statistical Data menu in the lower left corner shows you how many test results you have selected.
SmarTracks Diagnostics v.3.11 Installation Guide & User Manual 296.4.3. How do I sort test results?
To sort the test results, click on the table tab according to which you wish to sort the test results.
6.5. How do I edit test results?
STEP 1: Right-click on the test result line you
wish to edit.
STEP 2: Choose the item you wish to change
from the drop-down menu.
6.5.1. How do I enter/change the jump type?
STEP 1: Go to the “Power/Jumps” tab.
STEP 2: Double-click on the field you wish to
change under Type.
STEP 3: Choose the jump type from the drop-
down menu.
SmarTracks Diagnostics v.3.11 Installation Guide & User Manual 306.5.2. How do I enter/change the running exercise type?
STEP 1: Go to the “Runnings” tab.
STEP 2: Double-click on the field you wish to
change under Exercise.
STEP 3: Choose the exercise type from the
drop-down menu.
NOTE: You cannot manually enter the Cooper Test. The software automatically recognizes each run
that lasts for at least 8 or 12 minutes as a Cooper test and displays the Cooper value accordingly.
6.5.3. How do I enter/change a player’s name or a team name after meas-
urement?
STEP 1: Double-click on the name you wish to
change.
STEP 2:
▪ Option 1: Select a name from the
drop-down menu. (recommended)
▪ Option 2: Type a name in the empty
field and press ENTER.
NOTE: With option 2, the name will
not be saved for future measure-
ments.
SmarTracks Diagnostics v.3.11 Installation Guide & User Manual 316.5.4. How do I annotate a test result?
The comment section in each test result line
allows you to make notes for specific test re-
sults.
STEP 1: Go to the test result for which you
want to make notes.
STEP 2: Double-click on the field under Com-
ment.
STEP 3: Enter any notes or comments you
may have.
NOTE: You can sort test results according to comments.
6.5.5. How do I delete test results?
To delete test results in the SmarTracks Diagnostics software:
STEP 1: Right-click on the test result line you wish to delete.
STEP 2: Click “Delete…”.
SmarTracks Diagnostics v.3.11 Installation Guide & User Manual 326.6. How do I compare test results?
6.6.1. Comparing via the spider diagram
Under the “Compare” tab, you can see a spider diagram. This diagram allows you to compare the fol-
lowing results of different players:
▪ Maximum force (SJ)
▪ 5m sprint time
▪ Springiness (CMJ)
▪ Cyclic speed (Tapping)
▪ Reactive speed (DJ)
▪ Final sprint speed
STEP 1: Select the players you
wish to compare via the Filter
menu.
STEP 2: The results for the se-
lected players are shown in the
spider diagram.
SmarTracks Diagnostics v.3.11 Installation Guide & User Manual 336.6.2. Comparing via Excel files
With the export function, you can
create Excel files to compare:
▪ Speed, COD, Endurance
▪ Jumps, Tappings, Sprints
For more information on creating Excel files, see 6.7. How do I export test results?
6.7. How do I export test results?
You can export test results for personal storage, presentation or distribution from the SmarTracks
Diagnostics software.
You can only export test results via the “Runnings” tab or the “Compare” tab.
SmarTracks Diagnostics v.3.11 Installation Guide & User Manual 346.7.1. Exporting speed, endurance or COD test results
STEP 1: Go to the “Runnings” tab.
STEP 2: Filter the test results you wish to ex-
port using the Filter menu.
STEP 3: Go to the Export menu in the left col-
umn. Here you can select which data you
wish to export.
The drop-down menu shows three options:
▪ All values: Export all values per
player.
▪ Average values: Export only the aver-
age time per player.
▪ Best values: Export only the best time
per player.
STEP 4: Click one of the export buttons. There are three export buttons:
Export absolute time values of selected runs.
Export relative time values of selected runs.
Export absolute time values of selected runs.
The test results are exported to an Excel file.
STEP 5: Save the exported test results in the desired format, e.g. Excel, HTML, etc.
NOTE: If you want to do several exports, first save the exported file before starting a new export.
SmarTracks Diagnostics v.3.11 Installation Guide & User Manual 356.7.2. Exporting jumps, tapping and sprints test results
STEP 1: Go to the “Compare” tab.
STEP 2: Filter the test results you wish to export
using the Filter menu.
STEP 3: Go to the Export menu. Here you can se-
lect which data you wish to export.
The drop-down menu shows three options:
▪ All values: Export all values per player.
▪ Average values: Export only the average
time per player.
▪ Best values: Export only the best time
per player.
STEP 4: Click one of the export buttons. There are two export buttons:
Export key attributes of a measure- Export all attributes of a measurement.
ment.
The test results are exported to an Excel file.
STEP 5: Save the exported test results in the desired format, e.g. Excel, HTML, etc.
NOTE: If you want to do several exports, first save the exported file before starting a new export.
SmarTracks Diagnostics v.3.11 Installation Guide & User Manual 366.7.3. Printing the spider diagram
STEP 1: Go to the “Compare” tab
STEP 2: Filter the test results you wish to export
using the Filter menu.
STEP 3: Go to the Print menu in the left column.
You can preview the document by click-
ing on the “Print preview” button.
You can directly print the document by
clicking on the “Print chart” button.
SmarTracks Diagnostics v.3.11 Installation Guide & User Manual 377. Assessments
7.1. Sprinting Ability
An athlete’s sprinting ability is absolutely crucial in many types of sports, especially when it comes to
competition. With SmarTracks, you can record any distance depending on the number of timing gates.
When using Timing Gates Mobile, any number of timing gates can be placed along a given distance to
generate the desired split times.
Setting up the course field
▪ If you have SmarTracks Diagnostics with Timing Gates In-Ground, you can start at any gate.
▪ If you have SmarTracks Diagnostics with Timing Gates Mobile, we recommend starting at the
100m finish line or any other fixed point on your track. From there, place the mobile gates at
the desired intervals.
▪ The software has an option to select a sprint interval at the start of the measurement under
the drop-down menu “exercise type during running”. This is highly recommended if you only
wish to perform runs of one type.
If you do not select a sprint interval, the software will assign appropriate intervals automati-
cally. In both cases, the intervals can be changed manually after the data has been uploaded
to the SmarTracks Diagnostics software.
Selecting the sprint interval
▪ If you are using Timing Gates In-Ground, the “Exercise type during running” depends on the
integrated gate pattern of your track location. Since this setup can vary significantly, please
contact your track operator for more detailed information about the track.
▪ If you are using Timing Gates Mobile, please strictly adhere to the given intervals, since differ-
ences can lead to false measurement data.
SmarTracks Diagnostics v.3.11 Installation Guide & User Manual 38The intervals in our list are read as follows:
Interval list type 1: 5-20; 5-10-20; 5-10-20-60-100
This is a simple list of the respective intervals, which are always separated by a minus. It is important
to know that the 0m gate is never mentioned.
For example:
▪ 5-20: There is a timing gate at 0m, 5m and 20m.
▪ 5-10-20: There is a timing gate at 0m, 5m, 10m and 20m.
▪ 5-10-20-60-100: There is a timing gate at 0m, 5m, 10m, 20m, 60m and 100m.
Interval list type 2: 5-30m (every 5m); 10-110m (every 10m); 50-10000m (every 100m)
To avoid long lists of intervals, we summarize the intervals if the distance between stays equal, e.g.
every 10m. In this case, only the first and last measurement point are mentioned with the consistent
distance between each point following in brackets. It is important to know that the 0m gate is never
mentioned.
For example:
▪ 5-30m (every 5m): There is a timing gate 0m, 5m, 10m, 15m, 20m, 25m and 30m.
▪ 50-1000m (every 100m): There is a timing gate at 0m, 50m, 100m, 200m, 300m, etc.
Interval list type 3: 5-100m (5+5+10+...+10); 10-110m (10+5+5+10+...+10)
This kind of list is used if you have irregular gate patterns. You can see in the example that a few
gates are just 5m apart instead of 10m. The irregular gates will be listed with individual distance of
the interval and will be divided by '+'. The regular gates will be summarized by '...'. It is important
to know that the 0m gate is never mentioned.
For example:
▪ 5-100m (5+5+10+…+10): There is a timing gate at 0m, 5m, 10m, 20m, 30m, 40m, 50m, 60m,
70m, 80m, 90m, and 100m.
SmarTracks Diagnostics v.3.11 Installation Guide & User Manual 39Performing the test
▪ Mark the starting line 1 m in front of the first timing gate. The first timing gate corresponds to
the zero-measuring point.
▪ Before and after each test the athlete should stand still for at least 1 second.
Test results
The test results are shown under the “Runnings” tab.
7.2. Endurance
Cooper test
The Cooper Test is a test to determine aerobic endurance capacity. The aim of the test is to cover the
maximum distance possible in 12 minutes. Conducting this test on a standardized running track, i.e.
400 m lap outdoors or 200 m lap indoors, ensures the most comparable results.
Setting up the course field
▪ You cannot enter the Cooper test as an exercise type in the software. The software automati-
cally recognizes each run that lasts for at least 8 or 12 minutes as a Cooper test.
▪ If you have SmarTracks Diagnostics with Timing Gates In-Ground, you can start at any gate.
▪ If you have SmarTracks Diagnostics with Timing Gates Mobile, we recommend starting at the
100m finish line (see figure 7) or any other fixed point on your track. From there, place the
Timing Gates Mobile at stated intervals, e.g. every 100 m.
Performing the test
▪ The test starts from the start position, 1 m before a gate.
▪ Before and after each test there should be standing time of at least 1 second.
Test results
The test results are shown under the “Runnings” tab.
SmarTracks Diagnostics v.3.11 Installation Guide & User Manual 407.3. Jumping Ability
Explosively fast reactions and speed strength are among the most important physical requirements for
athletes. An athlete’s jumping ability can tell us a lot about the speed strength of his leg muscles.
Alongside other conditioning properties such as endurance and strength, speed strength is directly
performance-related. In the standard jump ability test, three different jumps – the Drop Jump (DJ),
Countermovement Jump (CMJ) and Squat Jump (SJ) – are performed several times in succession. The
general aim of all three jump types is to achieve the maximum jump height during a basic vertical jump.
Performing the test
▪ We recommend to execute the jump tests in the following order:
1. Squat Jump (SJ)
2. Drop Jump (DJ)
3. Countermovement Jump (CMJ)
In this order the data of the jumps is more distinct and can be better evaluated afterwards.
▪ Before and after each test there should be standing time of at least 1 second.
▪ These tests are performed without timing gates.
SmarTracks Diagnostics v.3.11 Installation Guide & User Manual 417.3.1. Squat Jump (SJ)
The Squat Jump is a vertical jump used purely to test the concentric strength in muscles used for jump-
ing. This jump is performed from the squat position without any countermovement. The upper body
is bent slightly forward, with the knees bent to around 90°. The individual’s hands are kept on their
hips throughout the jump. This is to lessen the effect of the arms, which could be used to boost height
while jumping.
The exercise consists of jumping up as high as possible from the rest position, without any counter-
movement when starting the jump. The jump height is normally lower than the jump height for the
Countermovement Jump.
Measuring parameters:
▪ Jump height [cm]
7.3.2. Drop Jump (DJ)
The Drop Jump is a vertical jump for testing concentric strength in muscles used for jumping, including
reactive strength. This jump is performed from a defined fall height. The individual’s hands are kept on
their hips throughout the jump. This is to lessen the effect of the arms, which could be used to boost
height while jumping.
When executing the Drop Jump the athlete steps down and falls from a box or platform. Upon landing,
he immediately jumps up as high as possible, keeping the ground time and horizontal movement to a
minimum.
Alongside the jump height, a brief contact time with the ground is also measured. A reactive strength
index (jump height divided by contact time) can then be calculated. The impact velocity and energy
input into the muscles used for jumping are altered by varying the fall height. The output (jump height
or the ratio of jump height and contact time on the ground) is maximized with optimal input (fall
height).
The fall height is usually raised in 15 or 20 cm (6” or 8”) steps and optimal height depends on the
athlete’s ability to absorb and transform the occurring forces. If the measured contact time exceeds
250 ms, the height should be decreased.
Measuring parameters:
▪ Jump height [cm]
▪ Ground contact time [ms]
▪ Efficiency ratio (jump time²/ground contact time) [s²/ms]
SmarTracks Diagnostics v.3.11 Installation Guide & User Manual 427.3.3. Countermovement Jump (CMJ)
The Countermovement Jump is a vertical jump for testing concentric strength in muscles used for
jumping. This jump is performed from a standing position with a downward countermovement. The
countermovement is a rapid downward movement to the start position of the Squat Jump. The indi-
vidual’s hands are kept on their hips throughout the jump. This is to lessen the effect of the arms,
which could be used to boost height while jumping.
The exercise consists of jumping up as high as possible from an upright position, after making a coun-
termovement when starting the jump. The jump height is normally greater than the jump height of the
Squat Jump.
Measuring parameters:
▪ Jump height [cm]
Test results
The test results are shown under the “Power/ Jumps” tab.
7.4. Tapping
The tapping test is a test to determine cyclical speed. It is especially suitable for spotting “speed talent”.
SmarTracks records the tapping frequency, i.e. the number of contacts with the ground per second,
measured in Hertz. Tapping performance depends on the ability to coordinate, as well as the individ-
ual’s level of strength. Frequencies above 12 Hz (contacts per seconds) are considered good. The num-
ber of ground contacts is also determined over 6 or 15 seconds.
Performing the test
▪ This test is performed without timing gates.
▪ Before and after each test the athlete should stand still for at least 1 second.
Test results
The test results are shown under the “Coordination/Tappings” tab.
SmarTracks Diagnostics v.3.11 Installation Guide & User Manual 437.5. Change of Direction (COD)
7.5.1. Illinois Agility Test (IAT)
The Illinois Agility Test (IAT) is used to test an athlete’s change of direction speed, i.e., his ability to
change directions rapidly. The athlete should start in an upright position and maneuver through the
represented course with maximum speed. The test should be conducted starting from both the left
and the right side, to fully evaluate the athlete’s ability.
Setting up the course field
▪ 6 cones and 2 Timing Gates are to be set up according to the figures below.
▪ Place one Timing Gate at the start, and one Timing Gate at the finish.
▪ For better measurement results, we advise that the two magnetic elements on the inside po-
sition be angled. For the use of angled mounts, see 3.2.1. Timing Gates Mobile.
Course field for Illinois Agility Test starting from the right. Course field for Illinois Agility Test starting from the left.
SmarTracks Diagnostics v.3.11 Installation Guide & User Manual 44Position and set-up of angled Timing Gates for the Illinois Agility Test
Timing Gate on the left Timing Gate on the right
Performing the test
▪ The player starts from the start position, 1 m before a timing gate.
▪ Before and after each test there should be standing time of at least 1 second.
Test results
The test results are shown under the “Runnings” tab.
SmarTracks Diagnostics v.3.11 Installation Guide & User Manual 457.5.2. Three Cone Drill (3CD)
The Three Cone Drill (3CD) is one of the most common tests of COD in American football. It is used as
part of player assessment in the NFL combine. Nevertheless, the 3CD is a suitable test for all sports
with high demands in COD, relatively short action periods and the necessity to maneuver in crowded
spaces.
Setting up the course field
Four magnetic elements are
set up at the start, each
1.2m apart. One cone (A) is
placed 5m from the starting
line. Another cone (B) is
placed 5m from cone A at a
90 degree angle. In between
cone A and cone B four mag-
netic elements are placed,
each 1.2m apart.
Performing the test
The athlete starts in a three-point position or upright with his hand and/or feet behind or on the
starting line. To ensure comparability, we recommend to define and use a standard position of your
choice and make use of the "comment" field in the results if you differ from your standard.
The athlete can then either start on a given command or on his own accord (after at least 1 second of
calm state).
The athlete runs to cone A, bends down and touches the ground with the right hand and turns over
his left shoulder. Then he turns and runs back to the starting line, bends down and touches that line
with his right hand and again turns over his left shoulder. Then he runs back to cone A and runs
around the outside of it (right shoulder inside), weaves inside cone B and then around the outside of
cone B (left shoulder inside). He runs back and around cone A (left shoulder inside) before finishing
by maximally accelerating and running through the gate past the starting line.
SmarTracks Diagnostics v.3.11 Installation Guide & User Manual 46▪ The player starts from the start position, 1 m before the timing gate.
▪ Before and after each test there should be standing time of at least 1 second.
Test results
The test results are shown under the “Runnings” tab.
7.5.3. Pro Agility Test (PAT)
The Pro Agility Test (PAT) consists of rapid directional changes in a linear plane. It is commonly used
as an assessment in American football, basketball, soccer, and most other field and court sports. This
test has also been referred to as the 5-10-5 shuttle. It is used as part of player assessment in the NFL
combine.
Setting up the course field
One magnetic gate consisting of two magnetic elements is set up at the starting line. The magnetic
elements are 1.2m apart. Two cones are placed 5m on each side from the starting line to mark the
turn-round-lines (1 and 2).
Performing the test
The athlete positions himself in a 3-point position on the starting line with feet shoulder width apart
and placed equally either side of the starting line.
The hand in contact with the floor during the 3-point position determines which direction the ath-
lete should travel. For example, if the athlete is going right, then he must start with his right hand on
the starting line, and vice versa. We recommend to standardize the starting direction to ensure com-
parability.
The test can also be conducted from an upright starting position. To ensure comparability, we recom-
mend to define and use a standard position of your choice and make use of the "comment" field in
the results if you differ from your standard.
SmarTracks Diagnostics v.3.11 Installation Guide & User Manual 47Example when starting with the right hand on the starting line:
The athlete starts the drill by accelerating maximally to the turn-around-line to his right. At the turn-
around-line the athlete touches it with his right foot and hand and then turns over his left shoulder.
Then he accelerates towards the opposite turn-around-line this time touching it with the left foot and
hand and turning over his right shoulder. The athlete then accelerates towards the starting line to
finish the test. On all turns the inside hand must never touch the ground.
▪ Before and after each test there should be standing time of at least 1 second.
Test results
The test results are shown under the “Runnings” tab.
SmarTracks Diagnostics v.3.11 Installation Guide & User Manual 487.5.4. Customized Change of Direction Test (Customized COD Test)
The Customized COD Test allows trainers and athletes to create tests as specific to their sport as pos-
sible. The only general requirement is a start point and a finish point. There is no pre-specified dis-
tance or running course.
Setting up the course field
This test will not be recognized automatically by the software. It has to be either chosen from the
drop-down menu “Exercise type during running” before the measurement is started or changed un-
der “Exercise” after the data was analyzed (Customized COD Test).
▪ A maximum of 2 gates can be set up for the Customized COD: either a gate for the start line
and a gate for the finish line, or a single gate, which serves as the start and finish line.
▪ The starting gate and the finish gate should be at a minimum distance of 5 meters from each
other.
▪ For comparability of test results, it is recommended to set up cones at points where the ath-
lete should turn/change direction.
Performing the test
▪ The athlete starts the Customized COD test 1m before the starting gate, and finishes the test
by running through the finish gate.
▪ A turn cannot take place within a range of 5 meters from a magnetic timing gate.
▪ The athlete needs to run forwards (not backwards or sideways) and cannot use any objects
(e.g. a ball)
▪ Before and after each test there should be standing time of at least 1 second.
We cannot guarantee correct data analysis if tests do not adhere to the above-mentioned guidelines.
Test results
The test results are shown under the “Runnings” tab.
SmarTracks Diagnostics v.3.11 Installation Guide & User Manual 497.5.5. Arrowhead Agility Test (AAT)
The Arrowhead Agility Test (AAT) is a simple but effective tool to assess an athlete's change of direc-
tion speed. Although appropriate for all team sports, it is typically used in soccer.
Setting up the course field
One magnetic gate consisting of two magnetic elements is set up at the starting line. The magnetic
elements are 1.2m apart. One cone (A) is placed 10m after the starting line, another one (C) 15m af-
ter the starting line. Two cones (B and D) are placed 5m on each side from the 10m cone (A), result-
ing in an arrow-shaped set up.
Performing the test – example
direction left (orange line)
The athlete starts in an upright
starting position, 1m in front of
the starting line.
The athlete then maximally ac-
celerates to cone A. He runs
around the cone, turning to the
left and accelerates to cone B,
this turning to the right and
starts accelerating to cone C.
Another right turn and the ath-
lete can accelerate back to the
finish line.
Since the test can and should be
conducted in two directions, it
should be decided beforehand
which direction the should turn
first at cone A. Consequently,
this needs to stay constant for
all athletes to ensure compara-
bility.
Test results
The test results are shown under the “Runnings” tab.
SmarTracks Diagnostics v.3.11 Installation Guide & User Manual 50You can also read