PIPELINE SOFTWARE GEOMX - NGS - BLOG | NANOSTRING
←
→
Page content transcription
If your browser does not render page correctly, please read the page content below
GeoMx - NGS
Pipeline Software
User Manual

FOR RESEARCH USE ONLY. Not for use in diagnostic procedures.
© 2021 NanoString Technologies, Inc. All rights reserved.

MAN-10118-03 for v2.2 SW FEB 2021

GeoMx-NGS Pipeline Software User Manual                        MAN-10118-03 for software v2.2
Table of Contents

Table of Contents

    GeoMx DSP NGS User Manual                                                               1
    Conventions                                                                             3
    GeoMx DSP Workflow                                                                      4
    Introduction to GeoMx NGS Pipeline                                                      6
     Input files needed                                                                     8
     Installation options for the GeoMx NGS Pipeline and GUI                                9
     Choosing the option that is right for you                                              9
     System requirements                                                                   11
    Installing the GeoMx NGS Pipeline                                                      12
     Installing on Linux or AWS server                                                     13
    Running GeoMx NGS Pipeline                                                             15
     Running the Pipeline using GUI on Windows or Mac                                      15
     Running the Pipeline on a server                                                      18
     Running the Pipeline using CLI on a Linux or AWS server                               19
    Appendix I: Setting up GeoMx NGS Pipeline on Amazon Web Services (AWS)                 21

2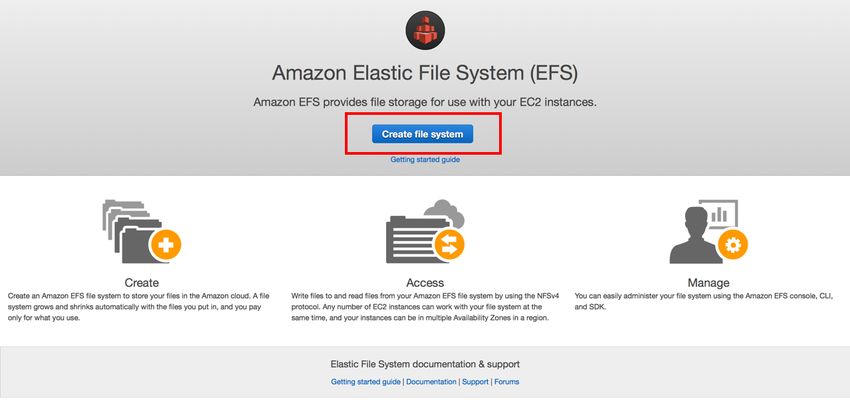
MAN-10118-03 for software v2.2                           GeoMx-NGS Pipeline Software User Manual
Conventions

Conventions
The following conventions are used throughout this manual and are described for your reference.
Bold text is typically used to highlight a specific button, keystroke, or menu option. It may also be
used to highlight important text or terms.
Blue underlined text is typically used to highlight links and/or references to other sections of the
manual. It may also be used to highlight references to other manuals or instructional material.

 The gray box indicates general information that may be useful for improving assay performance. These
 notes may clarify other instructions or provide guidance to improve the efficiency of the assay workflow.

       IMPORTANT: This symbol indicates important information that is critical to ensure a successful
      assay. Following these instructions may help improve the quality of your data.

       WARNING: This symbol indicates the potential for bodily injury or damage to the instrument if the
      instructions are not followed correctly. Always carefully read and follow the instructions
      accompanied by this symbol to avoid potential hazards.

                                                                                                             3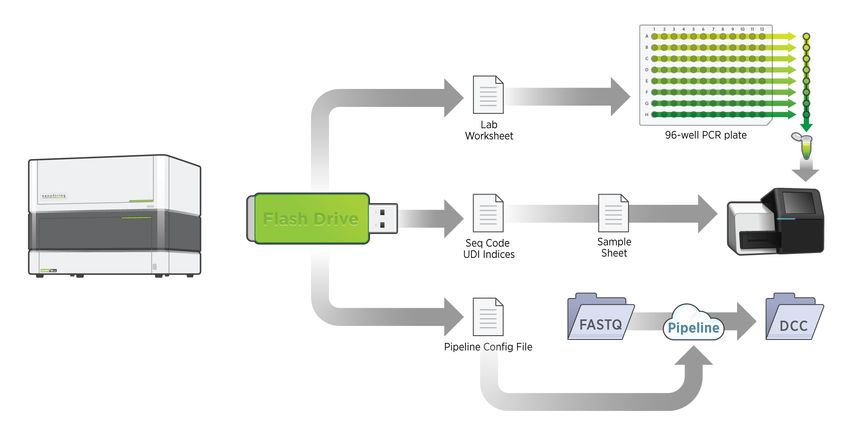
GeoMx-NGS Pipeline Software User Manual                           MAN-10118-03 for software v2.2
GeoMx DSP Workflow

GeoMx DSP Workflow

FOR NGS PLATFORMS

The GeoMx® Digital Spatial Profiling (DSP) technology is a novel platform developed by
NanoString. This product relies upon antibody or RNA probes coupled to photocleavable
oligonucleotide tags. After the hybridization of probes to slide-mounted tissue sections, the

4
MAN-10118-03 for software v2.2                        GeoMx-NGS Pipeline Software User Manual
GeoMx DSP Workflow

oligonucleotide tags are released from discrete regions of the tissue via UV exposure. Released
tags are quantitated in an Illumina NGS assay and counts are mapped back to tissue location,
yielding a spatially resolved digital profile of analyte abundance. The GeoMx DSP workflow
describes the process of accomplishing these steps.

l   Day 1: Slide Staining . During this phase, prepare slides and hybridize biological targets with
    UV- cleavable biological probes. For protein samples, label cell types of interest with
    fluorescent morphology markers.

l   Day 2: For RNA samples, label cell types of interest with fluorescent morphology markers,
    Process Slide on GeoMx DSP. Load prepared slides onto the GeoMx DSP instrument,
    enter identifying information for them, scan them to create fluorescent images, select regions
    of interest (ROIs), and then collect UV-cleaved oligos from these ROIs into the wells of a
    collection plate.

l   Day 3: Transfer the contents of the DSP collection to a PCR plate for Library Prep and
    Sequencing. The products will be pooled and purified, then sequenced on an Illumina NGS
    instrument.

l   Day 4: Process FASTQ sequencing files to DCC digitalcount files using NanoString's
    GeoMx NGS Pipeline software.

l   Day 5: Transfer the DCCs to the GeoMx DSP Data Analysis Suite and run platform and
    readout-specific quality control checks, perform data analysis, and generate analysis plots.

GEOMX DSP USER MANUALS AND OTHER USER DOCUMENTATION

l   All of the GeoMx DSP user documentation exists in the GeoMx DSP Online User Manual,
    accessible from the help icon on the GeoMx DSP Control Center and online at
    https://www.nanostring.com/geomx-online-user-manual.

l   PDF versions of GeoMx DSP documentation are also available for both nCounter and NGS
    readouts. The Slide Prep, Instrument, Readout, GeoMx NGS Pipeline (for NGS only),
    and Data Analysis user manuals are available for download from the GeoMx DSP Online
    User Manual (see above).

l   Illumina platform documentation can be found in their                respective manuals at
    https://support.illumina.com/.

                                                                                                  5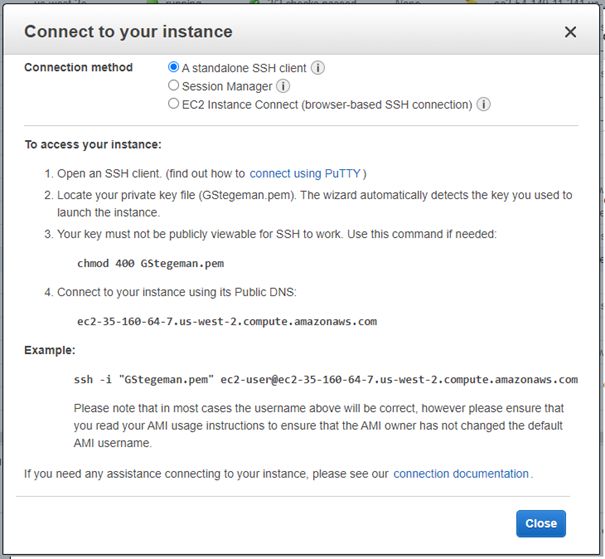
GeoMx-NGS Pipeline Software User Manual MAN-10118-03 for software v2.2
Intro GeoMx NGS Pipeline Software
Introduction to GeoMx NGS Pipeline
The GeoMx NGS Pipeline, developed by NanoString, is an essential part of the GeoMx NGS
workflow. The Pipeline processes RNA-sequencing files (FASTQ files) from Illumina sequencers
according to parameters defined in the Configuration File (which is generated from the GeoMx
DSP run). The Pipeline processes information from these files and outputs .dcc files, which can
then be uploaded to the GeoMx DSP system for data analysis.
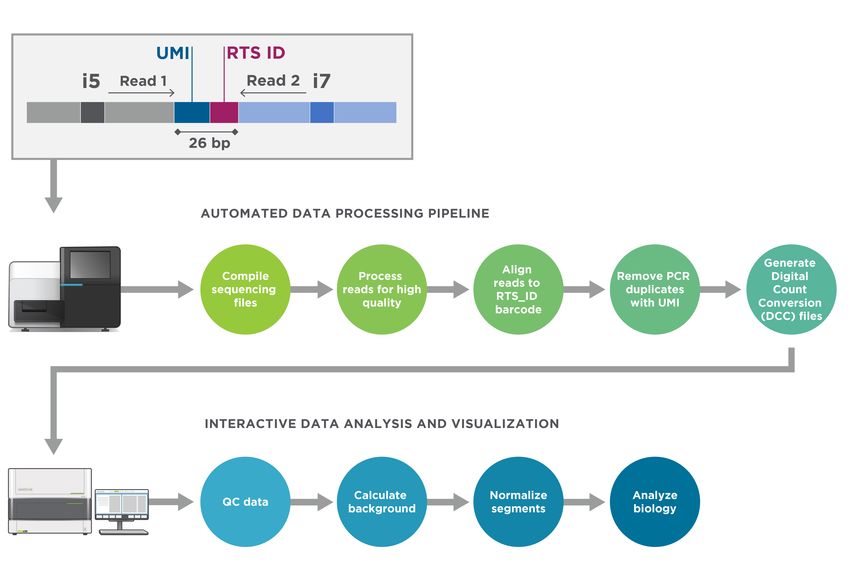
The Automated Data Processing Pipeline depicted here (see Figure 1) illustrates the steps
the Pipeline undertakes.
Figure 1: GeoMx NGS Pipeline pipeline of steps
6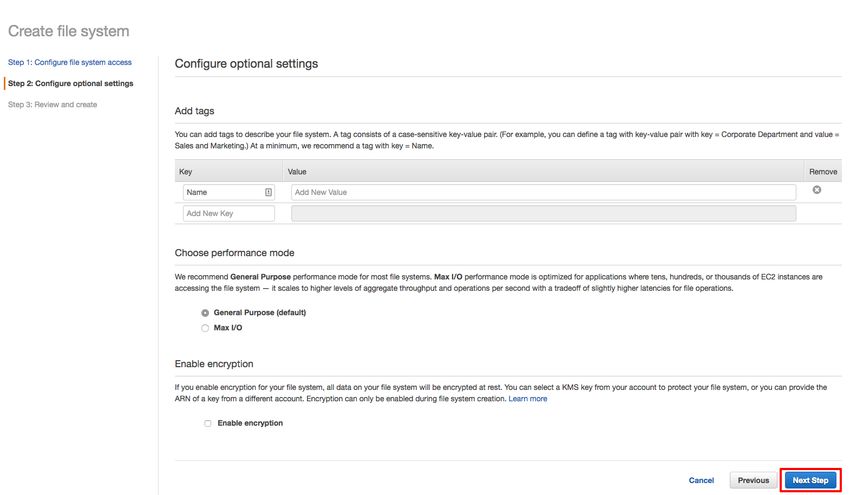
MAN-10118-03 for software v2.2                       GeoMx-NGS Pipeline Software User Manual
Intro GeoMx NGS Pipeline Software

Each photocleaved oligo in the GeoMx DSP collection plate contains a readout tag sequence
identifier (RTS ID) that identifies the target. It also includes a unique molecular identifier
(UMI), which allows for removal of PCR duplicates when converting reads to digital counts. Read 1
(SPR1) and Read 2 (SPR2) are binding sites for Illumina sequencing primers. The GeoMx Seq
Code primers that hybridize to SPR1 and SPR2 contain i5 or i7 indexing sequences as well as
P5 or P7 sequences for binding to Illumina flow cells. Depending on the sequencing platform
used, the i5 index will be read in either the forward (workflow A; MiSeq, HiSeq 2000/2500 or Nova
Seq) or reverse (Workflow B; MiniSeq, NextSeq, or HiSeq 3000/4000x) direction.
The GeoMx NGS Pipeline performs a series of actions to process the sequence reads to output
digital code counts. In the first step, the raw reads (raw sequencing FASTQ files) are selected for a
pipeline run. Next, the raw reads are processed for high quality, the adapters are removed
(resulting in trimmed reads), and the paired-end reads are merged (resulting in stitched reads).
In the third step, the reads are aligned to the RTS-ID barcodes, creating aligned reads. Then,
PCR duplicates are removed by matching on the Unique Molecular Index (UMI), resulting in
deduplicated reads. The Digital Count Conversion (DCC) file is created. These DCC files are
presented as a .zip file in a folder which you designate and can then be uploaded into the DSP
Control Center for study creation in the DSP Data Analysis Suite.

                                                                                                  7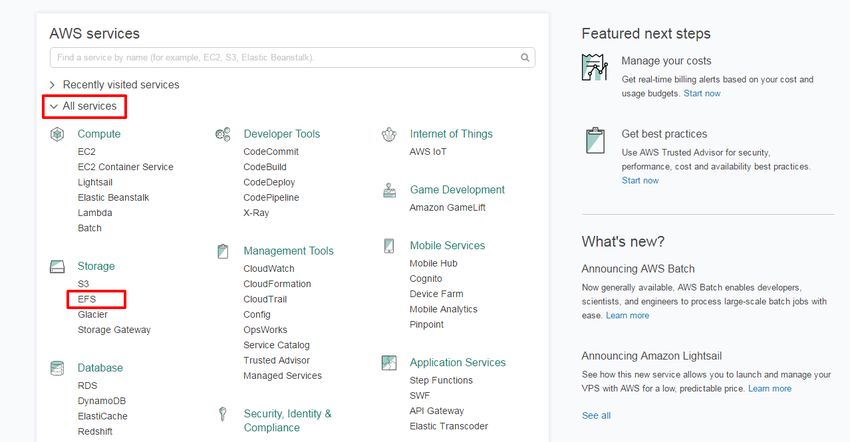
GeoMx-NGS Pipeline Software User Manual                                           MAN-10118-03 for software v2.2
Intro GeoMx NGS Pipeline Software

Input files needed
After your GeoMx DSP run (see the GeoMx-NGS DSP Instrument User Manual), you will
download one .ZIP file containing the following (see Figure 2).

l   The Seq Code UDI Indices, which is a digital file with sample information to input into the
    Illumina software.

l   The Lab Worksheet, which is an Excel spreadsheet to use for guidance in setting up the library.

l   The GeoMx NGS Pipeline Config file, which contains information relating to each well of the
    collection plate. This is the critical GeoMx DSP file to input into the GeoMx NGS Pipeline
    software.

                                          Figure 2: Output files from GeoMx run

After your Illumina NGS run (see the GeoMx-NGS Readout Library Prep User Manual),
you will download a group of FASTQ files, which contain the sequencing data relating to each well
of the collection plate. These are the critical Illumina NGS files to input into the Pipeline software.
Save these files in an accessible location for input to the GeoMx NGS Pipeline software.

    Do not modify FASTQ filenames from the Illumina FASTQ file naming conventions. If possible, retain the
    naming from the sample sheets exported from DSP, which incorporate the plate barcode.If the sample
    name portions of your filenames are modified from the default pipeline workflow, it is best to optionally
    use a sample ID translator file to point the pipeline to the correct input fastqs before beginning your NGS
    processing pipeline run.

8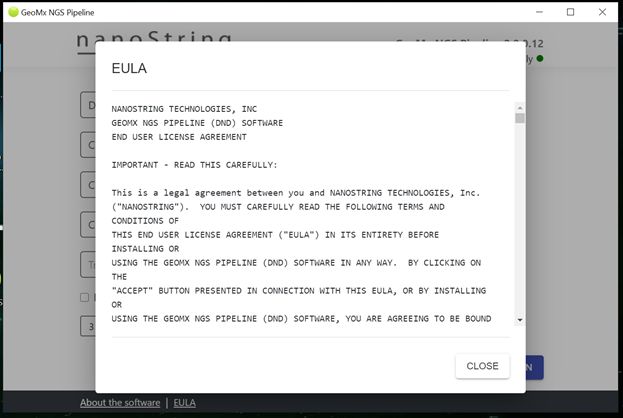
MAN-10118-03 for software v2.2                           GeoMx-NGS Pipeline Software User Manual
Intro GeoMx NGS Pipeline Software

Installation options for the GeoMx NGS Pipeline and GUI
The GeoMx NGS Pipeline software has two components to consider: the graphical user
interface (GUI) and the GeoMx Pipeline itself, usually run on either a Linux or Amazon Web
Services (AWS) server. Users have the option to use a command line interface (CLI) if they
choose not to use the GUI.
The following installation combinations are available:

         Operating System                   User Interface                Pipeline location
                                                                                Local
               Windows                            GUI
                                                                          Server (Linux/AWS)
                                                                                Local
                MacOS                             GUI
                                                                          Server (Linux/AWS)
                 Linux                            CLI                     Server (Linux/AWS)

Choosing the option that is right for you
Many users choose to install and run GeoMx NGS Pipeline on a server connected to their computer
which has adequate computing power. There are two ways you can do this: use the Windows or
MacOS GUI to submit jobs to a Linux server where you set up the Pipeline to run or remotely log in
to your server and run the Pipeline from the command line interface (CLI) on the server.
Alternatively, for smaller datasets or if you have a fast CPU and a lot of RAM, you can use the
Windows, Mac or Linux versions to process files locally on your computer.

AWS

l   While you will be billed for services used on AWS, depending on the amount of processing you
    need, these costs should be considerably less than buying your own hardware.

l   You will need to go through a one-time setup process to prepare an AWS environment for your
    data processing; see Appendix I: Setting up GeoMx NGS Pipeline on Amazon Web
    Services (AWS) on page 21.

l   You will need: AWS account setup, GeoMx NGS Pipeline installed on AWS virtual machine, a
    file transfer protocol client (FTP Client) software (such as WinSCP) or a way for your computer
    to communicate with and send your data to and from AWS.

                                                                                                9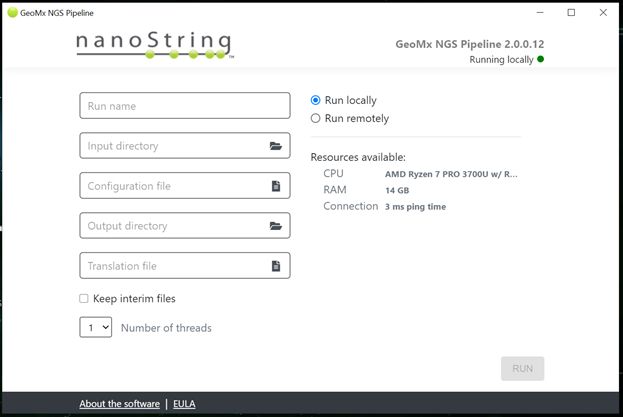
GeoMx-NGS Pipeline Software User Manual                            MAN-10118-03 for software v2.2
Intro GeoMx NGS Pipeline Software

Windows/MacOS GUI connected to Linux server

l   Connecting to a Linux server using the Windows or MacOS GUI provides a few advantages: it is
    easier for users who are not familiar with command line to submit their data for processing and it
    allows users to specify the amount of parallel processing threads for more control over the
    server.

l   You will need: a server with GeoMx NGS Pipeline installed. Users also need the Pipeline
    installed on their computers.

Remotely running on server using CLI

l   Using a remote connection to the server may be more convenient if the server already has direct
    access to your data.

l   You will need: Server needs GeoMx NGS Pipeline installed, need a way to remotely log in to
    server, server needs access to your data.

Running locally

l   For smaller datasets or if you have a fast CPU and a lot of RAM, you can use the Windows, Mac
    or Linux versions to process files locally on your computer. This may consume much of your
    system resources and we do not recommend planning to multitask while processing.

l   What you need for local processing: GeoMx NGS Pipeline installed and access to your data
    (copied to your computer).

10
MAN-10118-03 for software v2.2 GeoMx-NGS Pipeline Software User Manual
Intro GeoMx NGS Pipeline Software
System requirements
Local and remote Pipeline Memory
Interface OS CPU
runs location (GB)
Local or server Intel Core i5-4750
Windows GUI Windows 10 16
(Linux/AWS) 3.20 GHz
Local or server MacOS Catalina Intel Core i5 2.60
Mac GUI 16
(Linux/AWS) V.10.15.5 GHz
Linux Ubuntu AMD Phenom 8650
Linux CLI Server (Linux/AWS) 16
18.04 2.30 MHz
AWS instance type: AWS
CLI Server (AWS) AWS Ubuntu vCPU 4 16
t2.xlarge
If running locally:
Files should be available locally. The specifications below reflect needs of pipeline run and may be
impacted by other programs running on the same machine. These resources are adequate for runs
containing up to 96 segments/ROIs (with up to ~50 million reads per segment/ROI).
For Apple OS:
l Macbook pro with a CPU at 1.4 GHz processor or better
l 16 GB RAM
For Windows OS:
l Intel® Core™ i5-835OU @ 1.70GHZ 1.90 GHz
l 16 GB RAM
l 64-bit Operating System, x64-based processor
If running GeoMx pipeline on a Linux server or AWS instance (larger experiments):
Files should be available on the server. The specifications below reflect needs of pipeline run and
may be impacted by other programs running on the same server. These resources are adequate
for runs containing segments/ROIs exceeding ~50 million reads per segment/ROI.
Linux server:
l OS: Ubuntu 18 and up
l 16 GB RAM
l Adequate storage for data files via EBS, EFS or attached NAS. We recommend at least 2 GB
RAM per thread and at least 1 GB of available free memory.
11GeoMx-NGS Pipeline Software User Manual MAN-10118-03 for software v2.2
Installing GeoMx NGS Pipeline Software
Installing the GeoMx NGS Pipeline
1. Download the installation file.
2. Right-click on the installation file and select Extract Here.
3. Double-click on the resulting installer application .
l Follow the instructions in the Wizard to install the GeoMx
NGS Pipeline software.
l Read and accept the terms of GeoMx NGS Pipeline and
wait until the Pipeline sets up the environment.
l If you plan on running the Pipeline on your local computer,
Figure 3: User agreement
check the box GeoMxNGSPipeline Local Server.
4. Once the GeoMx NGS Pipeline software has been installed, open the application.
5. (Optional) If you plan on using a remote server for processing, you will first need to install
the GeoMx NGS Pipeline on your server. See Installing on Linux or AWS server on
page 13.
l Once installed, add the server in the UI by Figure 4: Adding a server
clicking new server , entering the Public
IPv4 address of the server (four integers separated by periods followed by :5000), then
clicking Add.
l Enter API server address, including port (insert your server name in lieu of the red text):
http://:5000
l In the main GeoMx NGS Pipeline menu, ensure the toggle Run locally is switched to Run
remotely, and the server you saved is selected from the adjacent dropdown menu (if not
already by default).
l For all GeoMx NGS Pipeline runs moving forward, you can click the gear icon and select the
server from server address drop down, click save, then move slider and run on the server.
Proceed to Running the Pipeline using GUI on Windows or Mac on page 15 .
12MAN-10118-03 for software v2.2 GeoMx-NGS Pipeline Software User Manual
Installing GeoMx NGS Pipeline Software
Installing on Linux or AWS server
Installation comes as zip archive which contains the following files:
l GeoMxNGSPipeline_Linux_2.0.0.15.sh (or similar) – this is the installation script
l GeoMxNGSPipeline.tgz – this is the installation package file
During the installation you will need to execute the installation script file. It will unpack API server
files to the proper location, update configuration, and start the service.
You will first need to have access to a Linux server with Ubuntu or Amazon Linux (ubuntu)
distributive as well as sudo user privileges on that server.
1. Use secure copy protocol (SCP) to copy installation files on the server. You can use
WinSCP or similar software. Unpack the installation zip archive and using SCP
(WinSCP) to copy GeoMxNGSPipeline_ Linux_ 2.0.0.15.sh (or similar) and
GeoMxNGSPipeline.tgz files to the home folder on the target server.
2. Using SSH client (PuTTY) connect to the server. Make sure you are connecting with user
who has sudo privileges on that server.
3. Sometime during SCP (secure copy) the execute (x) permission may be lost.
l To check this, navigate to your home folder (cd /home/ {your user name} ) and
execute the following command: ls - l or ll and check that you have execute or x
permissions for the GeoMxNGSPipeline_Linux_2.0.0.15.sh file.
l If the x permission is missing, you see something like this: -rw-rw-r— (which means no
one can execute this script and you will get permission denied error).
l Run the following command: sudo chmod +x GeoMxNGSPipeline_ Linux_
2.0.0.15.sh. This will add execute x permission and the permission set will look like this:
-rwxrwxr-x.
4. Run the installation script: sudo ./GeoMxNGSPipeline_Linux_2.0.0.15.sh.
The installation script will ask you to specify the port. You can either specify the port under
which the application will be running or leave the default port – 5000. To keep the default port,
click Enter.
If you already have installed GeoMxNGSPipeline API on this server and want to rerun the
installation, the system will ask you whether you would like to override existing settings and
whether you want to override folder mappings settings. In both cases type Y or y to confirm or
any other character to reject.
5. After installation, you need to check if the service is running and port you have specified during
13GeoMx-NGS Pipeline Software User Manual MAN-10118-03 for software v2.2
Installing GeoMx NGS Pipeline Software
installation is listening. To do this, run the following command: sudo netstat -tulpn. In
the output, check that port 5000 is listening by GeoMxNGSPipeline service.
IMPORTANT: Depending on which distributive you are using (Ubuntu or Amazon Linux) the
output of this command may be slightly different.
6. Configure folder mapping (optional). This step is required only if you plan to use the GUI to
connect to a remote server for running the pipeline.
l Folder mapping enables you to navigate to and view folders and folder contents on the
server you connect to.
l Folder mapping is discretionary, based on what you want to have visible in the GUI, and
most likely where the data resides (i.e., if fastq files are in your /home directory, then the
/home directory should be mapped).
l These particular lines provide examples of what the folder mapping could be, but should be
modified based on your environment, preference, and organizational habits.
To configure server folder mapping, you need to edit the runtimesettings.xml file. By default,
this file has mapping for home folder (/home). You will need to use one of Ubuntu Linux editing
tools like mcedit (part of mc), vi or nano, to edit server mappings.
In this example, we will be using mcedit. Type sudo mc to open Midnight Commander.
Navigate to the /var/GeoMxNGSPipeline folder and open runtime-settings.xml file: Under the
server_folders node, add folder mappings by adding/changing folder elements. Every folder
element has 2 attributes:
l path – physical path on the server (which can point also to mapped EFS volumes)
l name – the name of this mapping.
Also remove folder mappings which are incorrect. It is important to keep only valid folder
mappings. Otherwise, the GUI will report an error while trying to connect to the server. Hit F2
to save your edits. You don’t need to restart API server. The changes in runtime-
settings.xml will be processed automatically.
7. Finally, you can try to connect to newly installed API instance using GeoMxNGSPipeline GUI.
Proceed to Running the Pipeline using GUI on Windows or Mac on page 15 .
14MAN-10118-03 for software v2.2 GeoMx-NGS Pipeline Software User Manual
Running GeoMx NGS Pipeline Software
Running GeoMx NGS Pipeline
Running the Pipeline using GUI on Windows or Mac
1. Save your GeoMx NGS Pipeline
Config file (from the GeoMx DSP run)
to your computer. Save your FASTQ
files (from the Illumina NGS run) to your
computer and ensure they are not
compressed and in a common directory.
Figure 5: GeoMx NGS Pipeline run setup window
The pipeline is designed to handle FASTQs stored on a server to which there is direct access. If you
are using a VPN or local server for storage of FASTQ files and encounter errors, move files to a
direct access server to improve performance.
2. Open the GeoMx NGS Pipeline software.
3. Select Run locally or Run remotely, depending on what is appropriate for your workplace.
l The Resources available section lists the processing power of your local computer (if run
locally is selected) or server (if run remotely is selected).
l The Number of threads dropdown at the bottom of the window indicates the number of
parallel processes possible given the available resources. To run to process as fast as
available resources will allow, change this number to the maximum number of threads. The
default is set to 1.
l Use the gear icon or drop down folder next to Run on Server to select server.
4. Create an Run name (see Figure 5).
5. Browse to your Input directory - the folder housing your Illumina Raw Data (FASTQ) files
(GZ format).
6. Browse to the location of your Configuration file.
7. Browse to your Output directory - the location in which you would like the output files saved.
15GeoMx-NGS Pipeline Software User Manual MAN-10118-03 for software v2.2
Running GeoMx NGS Pipeline Software
8. (Optional) Browse to the Translation file (if applicable).
The Sample ID Translator File can be used as input when Fastq files have been named something
other than the defaults from the DSP. This file has two columns, one for the AOI list from the config
file, and the second column for FASTQ file root name. Thus, the software will have a key for
translating.
9. (Optional) Check the Create DCC metadata box, if desired.
The DCC metadata file as optional output will provide additional traceability from a pipeline run. This
file shows the relationships between files as they transition from Fastq to DCC for every AOI, and
unique MD5 checksums for identification. This can be helpful for submission/publication of data.
Keep in mind, producing this additional output will increase run execution time.
10. (Optional) Check the Keep interim files box, if desired.
11. Click Run.
12. Monitor the progress (see Figure 6).
l Click the Log , Error , Warning , or
Processing Parameters icon to view
the respective information.
l You may run the Pipeline on
sequencing runs that have not
concluded if your samples of interest
are done. If some FASTQ files are
Figure 6: GeoMx NGS Pipeline run monitoring window
missing or unrecognized, you will
receive a warning that the system did
not find FASTQ files for all samples
listed in the config file. You may proceed and generate “empty” DCC files (no counts for any
probes) for the ROIs/segments with missing sequence data. This allows you to continue
with your data analysis without needing to ensure all sequencing data is complete for all
samples. You can upload a set of DCC files later, but you will need to create a new study to
access the updated counts in Data Analysis.
13. When the process is complete, the status bar will read 100%. Click Done.
14. Open the output folder and locate the zipped DCC files subfolder. These files are ready to be
uploaded to the GeoMx DSP Data Analysis Suite.
16MAN-10118-03 for software v2.2 GeoMx-NGS Pipeline Software User Manual
Running GeoMx NGS Pipeline Software
IMPORTANT: Check DCC file sizes and summary.txt to ensure files were processed as
expected.
Proceed to the GeoMx-NGS Data Analysis User Manual.
17GeoMx-NGS Pipeline Software User Manual MAN-10118-03 for software v2.2
Running GeoMx NGS Pipeline Software
Running the Pipeline on a server
We suggest two ways to run GeoMx NGS Pipeline on a central server:
1. Connect remotely to the server and run the Pipeline from a command line interface on the
server. For this method, you need a way to remotely access the command line on the server
and then you can follow the CLI instructions below (see Running the Pipeline using CLI on
a Linux or AWS server on page 19).
2. Start GeoMx NGS Pipeline on a Linux server and submit the Pipeline processing jobs to it
through the GUI. Once the run has started, you can close your local GeoMx NGS Pipeline GUI
and the work will continue to process on the server. You will need to open the app again and
establish a connection to receive your output files. See Running the Pipeline using GUI on
Windows or Mac on page 15.
IMPORTANT: Submitting jobs from the GUI to a server may result in errors if there is already
a run processing on the server.
18MAN-10118-03 for software v2.2 GeoMx-NGS Pipeline Software User Manual
Running GeoMx NGS Pipeline Software
Running the Pipeline using CLI on a Linux or AWS server
The following steps are for running the Pipeline on a remote Linux server. You may choose to
use this if you are connecting to another computer running Linux for your Pipeline processing.
Running the Pipeline from the CLI is similar to running it from the GUI in that you need specify
three main options: the location of the config file, the location of the FASTQ files, and the
location of the output folder where you would like to receive your DCC files.
1. Ensure your files are copied to an acceptable location. You need the absolute path to the files
on the computer where the Pipeline will be run. If you are remotely connected to a server, the
file path must be accessible to the server.
The pipeline is designed to handle FASTQs stored on a server to which there is direct access. If you
are using a VPN or local server for storage of FASTQ files and encounter errors, move files to a
direct access server to improve performance.
2. Login to the server. If you are processing on a remote server, you need to run the command
from the server.
3. Create a dropoff folder on the server for your config file and your FASTQ files. Create an
output folder where you would like your DCCs saved.
4. Copy config and FASTQ files to server.
5. To be able to call this command from any place either restart your SSH session (logout and
login) or run the following command: export PATH=$PATH:/var/GeoMxNGSPipeline.
l In the event of a permissions error: if you already have installed GeoMxNGSPipeline API
on this server and you rerun the installation, you need to check the ownership and
permissions of the /var/tmp/.net/ subfolder. To do this, navigate to the above directory and
type ls -l or ll.
sudo chgrp -R ubuntu /var/tmp/.net/
sudo chown -R ubuntu /var/tmp/.net/
sudo chmod 777 /var/tmp/.net/
l The CLI processing usage command is as follows:
geomxngspipeline --in=INPUT_DIR_PATH --out=OUTPUT_DIR_PATH --
ini=INI_CONFIG_PATH [OPTIONS]
l A CLI usage example run command is as follows:
19GeoMx-NGS Pipeline Software User Manual MAN-10118-03 for software v2.2
Running GeoMx NGS Pipeline Software
geomxngspipeline --in=/mnt/efs/project1/FASTQ --
out=/mnt/efs/project1/results --ini=/mnt/efs/project1/project1_
config.ini --save-interim-files=true --threads=4
l To see all available run command arguments, please use the following help command:
geomxngspipeline --help
6. When you have DCC files and a summary.txt file ready, you may copy them from your server
to a local folder on your computer. Copy files using your usual method for interacting with your
server, such as via a shared network drive or using secure copy protocol (scp).
IMPORTANT: Check DCC file sizes and summary.txt to ensure files were processed as
expected.
Proceed to the GeoMx-NGS Data Analysis User Manual.
20MAN-10118-03 for software v2.2 GeoMx-NGS Pipeline Software User Manual
Setting up Amazon Web Services (AWS)
Appendix I: Setting up GeoMx NGS Pipeline on Amazon
Web Services (AWS)
SET UP AMAZON WEB SERVICES (AWS)
NanoString uses AWS with the GeoMx NGS Pipeline software to efficiently process the Illumina
FASTQ files and produce DCCs, which can be read by the GeoMx DSP Data Analysis Suite.
Set up your AWS account
Follow the AWS instructions below, which are borrowed heavily from:
https://docs.aws.amazon.com/AWSEC2/latest/UserGuide/get-set-up-for-amazon-ec2.html
SIGN UP FOR AWS
When you sign up for Amazon Web Services (AWS), your AWS account is automatically
signed up for all services in AWS, including Amazon EC2. You are charged only for the
services that you use. With Amazon EC2, you pay only for what you use. If you are a new
AWS customer, you can get started with Amazon EC2 for free. For more information, see
AWS Free Tier. If you have an AWS account already, skip to the next task. If you don't have
an AWS account, use the following procedure to create one.
To create an AWS account, open https://portal.aws.amazon.com/billing/signup and follow the
online instructions.
Part of the sign-up procedure involves receiving a phone call and entering a verification code
on the phone keypad. Note your AWS account number, because you'll need it for the next
task.
CREATE AN IDENTITY AND ACCESS MANAGEMENT (IAM) USER
Services in AWS, such as Amazon EC2, require that you provide credentials when you
access them, so that the service can determine whether you have permission to access its
resources. The console requires your password. You can create access keys for your AWS
account to access the command line interface or API. However, we don't recommend that you
access AWS using the credentials for your AWS account; we recommend that you use AWS
Identity and Access Management (IAM) instead. Create an IAM user, and then add the user to
an IAM group with administrative permissions or grant this user administrative permissions.
You can then access AWS using a special URL and the credentials for the IAM user. If you
signed up for AWS but have not created an IAM user for yourself, you can create one using
the IAM console. If you aren't familiar with using the console, see Working with the AWS
21GeoMx-NGS Pipeline Software User Manual MAN-10118-03 for software v2.2
Setting up Amazon Web Services (AWS)
Management Console for an overview.
To create an administrator user for yourself and add the user to an administrators
group (console)
1. Use your AWS account email address and password to sign in as the AWS account root
user to the IAM console at https://console.aws.amazon.com/iam/.
We strongly recommend that you adhere to the best practice of using the Administrator IAM
user below and securely lock away the root user credentials. Sign in as the root user only to
perform a few account and service management tasks.
2. In the navigation pane, choose Users and then choose Add user.
3. For User name, enter Administrator.
4. Select the check box next to AWS Management Console access. Then select Custom
password, and then enter your new password in the text box.
5. (Optional) By default, AWS requires the new user to create a new password when first
signing in. You can clear the check box next to User must create a new password at
next sign-in to allow the new user to reset their password after they sign in.
6. Choose Next: Permissions.
7. Under Set permissions, choose Add user to group.
8. Choose Create group.
9. In the Create group dialog box, for Group name enter Administrators.
10. Choose Filter policies, and then select AWS managed -job function to filter the table
contents.
11. In the policy list, select the check box for AdministratorAccess. Then choose Create
group.
You must activate IAM user and role access to Billing before you can use the
AdministratorAccess permissions to access the AWS Billing and Cost Management console. To
do this, follow the instructions in step 1 of the tutorial about delegating access to the billing
console.
12. Back in the list of groups, select the check box for your new group. Choose Refresh if
necessary to see the group in the list.
13. Choose Next: Tags.
22MAN-10118-03 for software v2.2 GeoMx-NGS Pipeline Software User Manual
Setting up Amazon Web Services (AWS)
14. (Optional) Add metadata to the user by attaching tags as key- value pairs. For more
information about using tags in IAM, see Tagging IAM Entities in the IAM User Guide.
15. Choose Next: Review to see the list of group memberships to be added to the new user.
When you are ready to proceed, choose Create user.
You can use this same process to create more groups and users and to give your users
access to your AWS account resources. To learn about using policies that restrict user
permissions to specific AWS resources, see Access Management and Example Policies.
To sign in as this new IAM user, sign out of the AWS console, then use the following URL,
where your_aws_account_id is your AWS account number without the hyphens (for example,
if your AWS account number is 1234-5678-9012, your AWS account ID is 123456789012):
https://your_aws_account_id.signin.aws.amazon.com/console/
Enter the IAM user name (not your email address) and password that you just created. When
you're signed in, the navigation bar displays "your_user_name @ your_aws_account_id".
If you don't want the URL for your sign-in page to contain your AWS account ID, you can
create an account alias. From the IAM console, choose Dashboard in the navigation pane.
From the dashboard, choose Customize and enter an alias such as your company name. To
sign in after you create an account alias, use the following URL:
https://your_account_alias.signin.aws.amazon.com/console/
To verify the sign-in link for IAM users for your account, open the IAM console and check
under IAM users sign-in link on the dashboard.
For more information about IAM, see IAM and Amazon EC2.
23GeoMx-NGS Pipeline Software User Manual MAN-10118-03 for software v2.2 Setting up Amazon Web Services (AWS) CREATE A KEY PAIR AWS uses public-key cryptography to secure the login information for your instance. A Linux instance has no password; you use a key pair to log in to your instance securely. You specify the name of the key pair when you launch your instance, then provide the private key when you log in using SSH. If you haven't created a key pair already, you can create one using the Amazon EC2 console. Note that if you plan to launch instances in multiple regions, you'll need to create a key pair in each region. For more information about regions, see Regions, Availability Zones, and Local Zones. To create a key pair 1. Sign in to AWS using the URL that you created in the previous section. 2. From the AWS dashboard, choose EC2 to open the Amazon EC2 console. 3. From the navigation bar, select a region for the key pair. You can select any region that's available to you, regardless of your location. However, key pairs are specific to a region; for example, if you plan to launch an instance in the US East (Ohio) Region, you must create a key pair for the instance in the US East (Ohio) Region. 4. In the navigation pane, under NETWORK & SECURITY , choose Key Pairs . The Figure 7: Select a navigation pane is on the left side of the region console. If you do not see the pane, it might be minimized; choose the arrow to expand the pane. You may have to scroll down to Figure 8: Key Pairs see the Key Pairs link. 5. Choose Create Key Pair. 6. Enter a name for the new key pair in the Key pair name field of the Create Key Pair dialog box, and then choose Create. Use a name that is easy for you to remember, such as your IAM user name, followed by -key-pair, plus the region name. For example, me-key-pair- useast2. 7. The private key file is automatically downloaded by your browser. The base file name is the name you specified as the name of your key pair, and the file name extension is .pem. Save the private key file in a safe place. 24
MAN-10118-03 for software v2.2                        GeoMx-NGS Pipeline Software User Manual
Setting up Amazon Web Services (AWS)

         IMPORTANT: This is the only chance for you to save the private key file. You'll need to
        provide the name of your key pair when you launch an instance and the corresponding
        private key each time you connect to the instance.

After you launch your instance, if you use Windows, we recommend you use the program
PuTTY to connect to your AWS EC2 Linux instance and convert your .pem to a .ppk file
using PuTTYgen (see below).
After you launch your instance, if you use MacOS or Linux, you can connect using secure
shell (ssh) from your terminal. Before connecting with SSH you will need to use the following
command to set the permissions of your private key file so that only you can read it:

               chmod 400 your_user_name-key-pair-region_name.pem

If you do not set these permissions, then you cannot connect to your instance using this key
pair. For more information, see Error: Unprotected Private Key File.
For more information, see Amazon EC2 Key Pairs.

                                                                                                   25
GeoMx-NGS Pipeline Software User Manual MAN-10118-03 for software v2.2
Setting up Amazon Web Services (AWS)
To prepare to connect to a Linux instance from Windows using PuTTY
1. Download and install PuTTY from http://www.chiark.greenend.org.uk/~sgtatham/putty/.
Be sure to install the entire suite.
2. Start PuTTYgen (for example, from the Start menu, choose All Programs > PuTTY >
PuTTYgen).
3. Under Type of key to generate ,
choose RSA.
Figure 9: Type of key to generate
4. Choose Load . By default, PuTTYgen
displays only files with the extension
.ppk. To locate your .pem file, select the Figure 10: Choose All Files
option to display files of all types.
5. Select the private key file that you created in the previous procedure and choose Open.
Choose OK to dismiss the confirmation dialog box.
6. Choose Save private key. PuTTYgen displays a warning about saving the key without a
passphrase. Choose Yes.
7. Specify the same name for the key that you used for the key pair. PuTTY automatically adds
the .ppk file extension.
26MAN-10118-03 for software v2.2 GeoMx-NGS Pipeline Software User Manual
Setting up Amazon Web Services (AWS)
CREATE A VIRTUAL PRIVATE CLOUD (VPC)
Amazon VPC enables you to launch AWS resources into a virtual network that you've
defined, known as a virtual private cloud (VPC). The newer EC2 instance types require that
you launch your instances in a VPC. If you have a default VPC, you can skip this section and
move to the next task, Create a Security Group. To determine whether you have a default
VPC, open the Amazon EC2 console and look for Default VPC under Account Attributes on
the dashboard. If you do not have a default VPC listed on the dashboard, you can create a
nondefault VPC using the steps below.
To create a nondefault VPC
1. Open the Amazon VPC console at https://console.aws.amazon.com/vpc/.
2. From the navigation bar, select a region for the VPC. VPCs are specific to a region, so you
should select the same region in which you created your key pair.
3. On the VPC dashboard, choose Launch VPC Wizard.
4. On the Step 1: Select a VPC Configuration page, ensure that VPC with a Single
Public Subnet is selected, and choose Select.
5. On the Step 2: VPC with a Single Public Subnet page, enter a friendly name for your
VPC in the VPC name field. Leave the other default configuration settings, and choose
Create VPC. On the confirmation page, choose OK.
For more information about VPCs, see the Amazon VPC User Guide.
27GeoMx-NGS Pipeline Software User Manual MAN-10118-03 for software v2.2
Setting up Amazon Web Services (AWS)
CREATE A SECURITY GROUP
Security groups act as a firewall for associated instances, controlling both inbound and
outbound traffic at the instance level. You must add rules to a security group that enable you to
connect to your instance from your IP address using SSH. You can also add rules that allow
inbound and outbound HTTP and HTTPS access from anywhere.
Note that if you plan to launch instances in multiple regions, you'll need to create a security
group in each region. For more information about regions, see Regions, Availability Zones,
and Local Zones.
Prerequisites
You'll need the public IPv4 address of your local computer. The security group editor in the
Amazon EC2 console can automatically detect the public IPv4 address for you. Alternatively,
you can use the search phrase "what is my IP address" in an Internet browser, or use the
following service: Check IP. If you are connecting through an Internet service provider (ISP) or
from behind a firewall without a static IP address, you need to find out the range of IP
addresses used by client computers.
To create a security group with least privilege
1. Open the Amazon EC2 console at https://console.aws.amazon.com/ec2/.
Alternatively, you can use the Amazon VPC console to create a security group. However, the
instructions in this procedure don't match the Amazon VPC console. Therefore, if you switched
to the Amazon VPC console in the previous section, either switch back to the Amazon EC2
console and use these instructions, or use the instructions in Set Up a Security Group for Your
VPC in the Amazon VPC Getting Started Guide.
28MAN-10118-03 for software v2.2 GeoMx-NGS Pipeline Software User Manual
Setting up Amazon Web Services (AWS)
2. From the navigation bar, select a region for the security group.
Security groups are specific to a region, so you should select the
same region in which you created your key pair.
Figure 11: Select a
region
3. Choose Security Groups in the navigation pane.
4. Choose Create Security Group.
5. Enter a name for the new security group and a description. Use a name that is easy for you
to remember, such as your IAM user name, followed by _SG_, plus the region name. For
example, me_SG_uswest2.
6. In the VPC list, select your VPC. If you have a default VPC, it's the one that is marked with
an asterisk (*).
7. On the Inbound tab, create the following rules (choose Add Rule for each new rule), and
then choose Create:
l Choose HTTP from the Type list, and make sure that Source is set to Anywhere
(0.0.0.0/0).
l Choose SSH from the Type list. In the Source box, choose My IP to automatically
populate the field with the public IPv4 address of your local computer. Alternatively,
choose Custom and specify the public IPv4 address of your computer or network in
CIDR notation. To specify an individual IP address in CIDR notation, add the routing
suffix /32, for example, 203.0.113.25/32. If your company allocates addresses from a
range, specify the entire range, such as 203.0.113.0/24.
IMPORTANT: For security reasons, we don't recommend that you allow SSH access
from all IPv4 addresses (0.0.0.0/0) to your instance, except for testing purposes and only
for a short time.
29GeoMx-NGS Pipeline Software User Manual MAN-10118-03 for software v2.2
Setting up Amazon Web Services (AWS)
For more information, see Amazon EC2 Security Groups for Linux Instances.
30MAN-10118-03 for software v2.2 GeoMx-NGS Pipeline Software User Manual
Setting up Amazon Web Services (AWS)
Launch an EC2-Instance
This is the cloud-based server on which you will be running the GeoMx NGS Pipeline software.
Follow the AWS instructions below, which are borrowed heavily from:
https://docs.aws.amazon.com/AWSEC2/latest/UserGuide/EC2_GetStarted.html
Launch an Instance
You can launch a Linux instance using the AWS Management Console as described in the
following procedure. This tutorial is intended to help you launch your first instance quickly, so it
doesn't cover all possible options. For more information about the advanced options, see
Launching an Instance.
1. Open the Amazon EC2 console at https://console.aws.amazon.com/ec2/.
2. From the console dashboard, choose Launch Instance.
3. The Choose an Amazon Machine Image (AMI) page displays a list of basic configurations,
called Amazon Machine Images (AMIs), that serve as templates for your instance. Select an
HVM version of Ubuntu 18.04. Notice that these AMIs are marked "Free tier eligible."
4. On the Choose an Instance Type page, you can select the hardware configuration of your
instance. Select the t3.xlarge type, which is selected by default. Notice that this instance type
is eligible for the free tier.
5. Choose Review and Launch to let the wizard complete the other configuration settings for
you.
6. On the Review Instance Launch page, under Security Groups, you'll see that the wizard
created and selected a security group for you. You can use this security group, or alternatively
you can select the security group that you created when getting set up using the following
steps:
l Choose Edit security groups.
l On the Configure Security Group page, ensure that Select an existing security group is
selected.
l Select your security group from the list of existing security groups, and then choose Review
and Launch.
7. On the Review Instance Launch page, choose Launch.
8. When prompted for a key pair, select Choose an existing key pair, then select the key pair
that you created when getting set up.
31GeoMx-NGS Pipeline Software User Manual MAN-10118-03 for software v2.2
Setting up Amazon Web Services (AWS)
Alternatively, you can create a new key pair. Select Create a new key pair, enter a name for
the key pair, and then choose Download Key Pair. This is the only chance for you to save the
private key file, so be sure to download it. Save the private key file in a safe place. You'll need
to provide the name of your key pair when you launch an instance and the corresponding
private key each time you connect to the instance.
IMPORTANT: Don't select the Proceed without a key pair option. If you launch your
instance without a key pair, then you can't connect to it.
When you are ready, select the acknowledgment check box, and then choose Launch
Instances.
9. A confirmation page lets you know that your instance is launching. Choose View Instances to
close the confirmation page and return to the console.
10. On the Instances screen, you can view the status of the launch. It takes a short time for an
instance to launch. When you launch an instance, its initial state is pending. After the instance
starts, its state changes to running and it receives a public DNS name. (If the Public DNS
(IPv4) column is hidden, choose Show/Hide Columns (the gear-shaped icon) in the top right
corner of the page and then select Public DNS (IPv4).)
11. It can take a few minutes for the instance to be ready so that you can connect to it. Check that
your instance has passed its status checks; you can view this information in the Status
Checks column.
l Instance specifics: t3.xlarge running Ubuntu 18.04
32MAN-10118-03 for software v2.2 GeoMx-NGS Pipeline Software User Manual
Setting up Amazon Web Services (AWS)
Connect to your instance
The instructions here use PuTTy to connect to the instance. Follow the AWS instructions below,
which are borrowed heavily from:
https://docs.aws.amazon.com/AWSEC2/latest/UserGuide/putty.html.
You need the .ppk file that you created for your private key. For more information, see Convert
Your Private Key Using PuTTYgen in the preceding section. If you receive an error while
attempting to connect to your instance, see Troubleshooting Connecting to Your Instance.
To connect to your instance using PuTTY
1. Start PuTTY (from the Start menu, choose All Programs, PuTTY, PuTTY).
2. In the Category pane, choose Session and complete the following fields:
l In the Host Name box (Public DNS): To connect using
your instance's public DNS, enter user_name@public_
dns_name
For information about how to get the public DNS name
or IPv6 address of the instance, see Get Information
About Your Instance. For user_ name, be sure to
specify the appropriate user name for your AMI. For
example: using Ubuntu, in which username would be
ubuntu. Otherwise, if username and root don't work, Figure 12: Putty configuration
check with the AMI provider. window
l Ensure that the Port value is 22.
l Under Connection type, select SSH.
3. (Optional) You can configure PuTTY to automatically send 'keepalive' data at regular intervals
to keep the session active. This is useful to avoid disconnecting from your instance due to
session inactivity. In the Category pane, choose Connection, and then enter the required
interval in the Seconds between keepalives field. For example, if your session disconnects
after 10 minutes of inactivity, enter 180 to configure PuTTY to send keepalive data every 3
minutes.
33GeoMx-NGS Pipeline Software User Manual MAN-10118-03 for software v2.2
Setting up Amazon Web Services (AWS)
4. In the Category pane, expand Connection , expand
SSH, and then choose Auth. Complete the following:
l Choose Browse.
l Select the .ppk file that you generated for your key pair
and choose Open.
l (Optional) If you plan to start this session again later,
you can save the session information for future use.
Under Category, choose Session, enter a name for Figure 13: Auth settings
the session in Saved Sessions , and then choose
Save.
l Choose Open.
5. If this is the first time you have connected to this instance, PuTTY displays a security alert
dialog box that asks whether you trust the host to which you are connecting.
l (Optional) Verify that the fingerprint in the security alert dialog box matches the fingerprint
that you previously obtained in (Optional) Get the Instance Fingerprint. If these fingerprints
don't match, someone might be attempting a "man-in-the-middle" attack. If they match,
continue to the next step.
l Choose Yes. A window opens and you are connected to your instance.
If you specified a passphrase when you converted your private key to PuTTY's format, you must
provide that passphrase when you log in to the instance.
If you receive an error while attempting to connect to your instance, see Troubleshooting
Connecting to Your Instance.
To connect to your instance on MacOS or Linux
You need your private key, the .pem file you downloaded and set the permissions for in “Create a
key pair” step 7. You need to know the path to this .pem file.
In the AWS console web portal in the EC2 menu, select your instance and then from “action”
select “connect". The connect menu will have instructions to connect to your instance.
Open your terminal or console and copy&paste or type in the ssh command. You will need to
specify the path to your .pem file if it is not in the current directory.
34MAN-10118-03 for software v2.2 GeoMx-NGS Pipeline Software User Manual
Setting up Amazon Web Services (AWS)
Figure 14: Connecting to an instance
35GeoMx-NGS Pipeline Software User Manual MAN-10118-03 for software v2.2
Setting up Amazon Web Services (AWS)
Setup an EFS Drive
This is the cloud-based storage location in which you will store data files. Follow the AWS
instructions below, which are borrowed heavily from: https://aws.amazon.com/getting-
started/tutorials/create-network-file-system/
Create a File System
You can easily create a highly available and scalable network file system from the Amazon EFS
console.
1. Open the AWS Management Console.
l Enter your user name and password
to get started.
l Find EFS under Storage, and click to
open the EFS Console.
Figure 15: AWS Services
2. In the Amazon EFS console, click Create
file system.
Figure 16: Create File System in EFS console
36MAN-10118-03 for software v2.2 GeoMx-NGS Pipeline Software User Manual
Setting up Amazon Web Services (AWS)
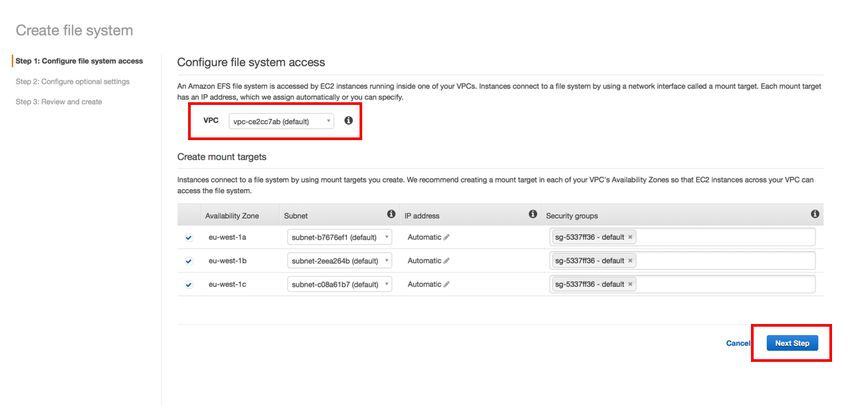
3. If the Default VPC is not selected in the
VPC dropdown field, select the dropdown
arrow and select the Default VPC. Accept
all the defaults in Step 1: Configure file
system access and click Next Step.
Figure 17: Configure file system access
4. Accept all the defaults in Step 2:
Configure optional settings and click
Next Step.
Figure 18: Configure optional settings
5. Accept all the defaults in Step 3: Review
and create and click Create File System.
Figure 19: Review and create
l Recommend selecting Max I/O in the “Choose performance mode” section
l You can name your EFS drive by selecting your EFS drive and tagging it. To do this: select
37GeoMx-NGS Pipeline Software User Manual MAN-10118-03 for software v2.2
Setting up Amazon Web Services (AWS)
your EFS drive, click Manage Tags, enter Name under Key and a unique identifier of your
choice under Value.
38You can also read