REN User Guide Copyright 2021 Railinc. All Rights Reserved - 7001 Weston Parkway, Suite 200
←
→
Page content transcription
If your browser does not render page correctly, please read the page content below

REN User Guide

       7001 Weston Parkway, Suite 200
         Cary, North Carolina 27513

© Copyright 2021 Railinc. All Rights Reserved.

           Last Updated: May 2021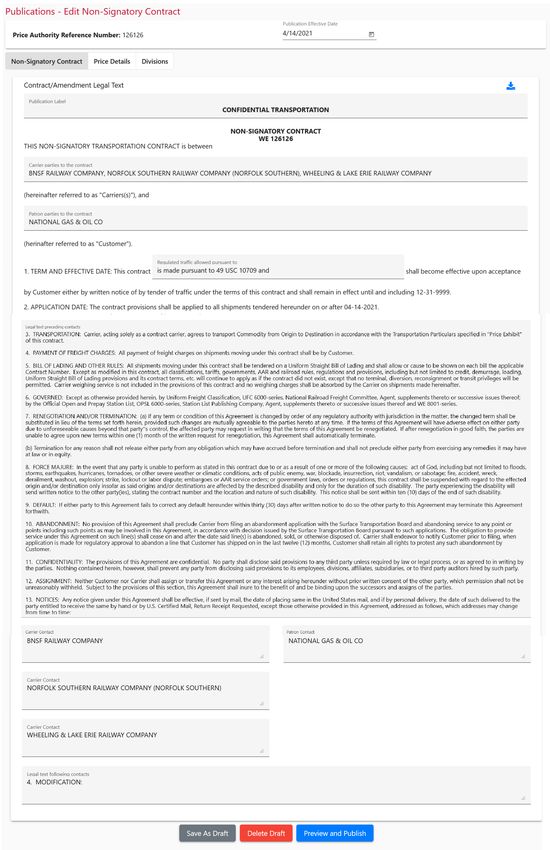
REN Web User Guide

Table of Contents
       Learning About the Rate EDI Network ....................................................................................... 5
         Overview ...................................................................................................................................... 5
         Rate Docket Status Codes ............................................................................................................ 6
         System Requirements................................................................................................................... 6
         Accessing the Railinc Customer Success Center ......................................................................... 6
       Getting Started ............................................................................................................................... 7
         Register to Use Railinc SSO ........................................................................................................ 7
         Requesting REN Access .............................................................................................................. 7
         Logging In.................................................................................................................................... 7
         Logging Out ................................................................................................................................. 8
         Navigation Menu ......................................................................................................................... 8
       Search............................................................................................................................................ 10
         Search REN Rates ...................................................................................................................... 10
         Rate Search History ................................................................................................................... 13
         Search Groups ............................................................................................................................ 14
         View Group Details ................................................................................................................... 16
       Rates .............................................................................................................................................. 20
         Create Rate Docket .................................................................................................................... 20
         Create From Template ............................................................................................................... 25
            Create or Delete Templates.................................................................................................... 25
         Upload Rate ............................................................................................................................... 27
         Draft Rates ................................................................................................................................. 29
         Validate Rates ............................................................................................................................ 32
         Transmit a Rate Docket.............................................................................................................. 32
         Export Rates ............................................................................................................................... 32
         Expire a Rate Docket ................................................................................................................. 33
         Clone a Rate Docket .................................................................................................................. 34
         Find Revision Impacts ............................................................................................................... 35
         Print a Rate Docket .................................................................................................................... 36
       Groups........................................................................................................................................... 37
         Create Commodity Group .......................................................................................................... 37
         Create Geography Group ........................................................................................................... 39
         Create Patron Group .................................................................................................................. 40
         Create Shipment Condition Group ............................................................................................. 42
         Draft Groups .............................................................................................................................. 44
         Validate Groups ......................................................................................................................... 46
         Transmit a Group ....................................................................................................................... 46
         View/Edit/Revise a Group ......................................................................................................... 47
         Expire Groups ............................................................................................................................ 48
         Clone a Group ............................................................................................................................ 49
         Find Revision Impacts for a Group ............................................................................................ 50
         Delete Groups ............................................................................................................................ 51
       Publications .................................................................................................................................. 52
         Current Publications................................................................................................................... 53
         Search Price Authorities............................................................................................................. 55
         Publications Templates .............................................................................................................. 58
            Master Templates................................................................................................................... 58

REN User Guide                                                             i                                                       Revised May 2021
REN Web User Guide

           Custom Templates ................................................................................................................. 59
           View/Edit a Draft Template ................................................................................................... 60
           Clone a Template ................................................................................................................... 61
           Download a Template ............................................................................................................ 62
           Activate a Template ............................................................................................................... 62
           Delete a Template .................................................................................................................. 63
         Carrier Contact ........................................................................................................................... 64
         Publish Rates.............................................................................................................................. 64
       Excel Spreadsheet Field Descriptions ........................................................................................ 67

REN User Guide                                                          ii                                                    Revised May 2021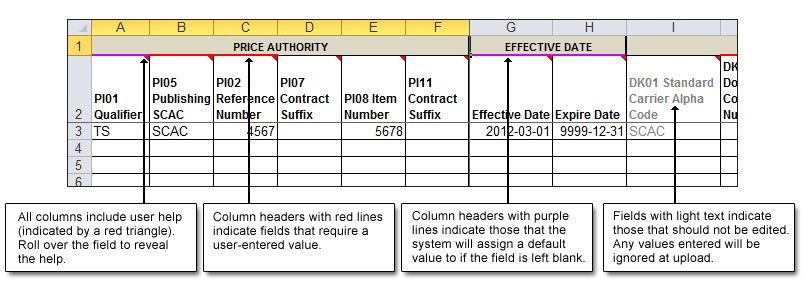
Learning About the Rate EDI Network                                                                                                  Overview

List of Exhibits
       Exhibit 1. User Roles and Tasks ...................................................................................................... 7
       Exhibit 2. REN Request Permission ................................................................................................ 7
       Exhibit 3. Railinc Welcome Page .................................................................................................... 8
       Exhibit 4. Railinc Launch Pad ......................................................................................................... 8
       Exhibit 5. Rates Menu...................................................................................................................... 9
       Exhibit 6. Manage Search Criteria ................................................................................................. 10
       Exhibit 7. Search REN Rates ......................................................................................................... 11
       Exhibit 8. Search Results ............................................................................................................... 12
       Exhibit 9. Rate Search History....................................................................................................... 13
       Exhibit 10. Group Search............................................................................................................... 14
       Exhibit 11. Group Search Results .................................................................................................. 15
       Exhibit 12. Group Details – Commodity ....................................................................................... 17
       Exhibit 13. Group Details – Geography......................................................................................... 17
       Exhibit 14. Group Details – Patron ................................................................................................ 18
       Exhibit 15. Group Details – Shipment Condition .......................................................................... 19
       Exhibit 16. Create Rate Docket ..................................................................................................... 20
       Exhibit 17. Rate Docket Fields and Descriptions .......................................................................... 22
       Exhibit 18. Action Buttons and Descriptions................................................................................. 25
       Exhibit 19. Rate Templates ............................................................................................................ 26
       Exhibit 20. Delete Template Confirmation .................................................................................... 27
       Exhibit 21. Upload Excel File........................................................................................................ 27
       Exhibit 22. Blank Template Excel File .......................................................................................... 28
       Exhibit 23. Rate Spreadsheet with Explanations ........................................................................... 29
       Exhibit 24. Draft Rates .................................................................................................................. 30
       Exhibit 25. Select Rates to Expire ................................................................................................. 33
       Exhibit 26. Rate Expire Pop-Up .................................................................................................... 34
       Exhibit 27. Select a Rate to Clone ................................................................................................. 34
       Exhibit 28. Select a Rate to Find Revision Impacts....................................................................... 35
       Exhibit 29. Find Revision Impacts Pop-Up ................................................................................... 35
       Exhibit 30. Complete Rate Docket in a Printable Format.............................................................. 36
       Exhibit 31. Create Commodity Group ........................................................................................... 37
       Exhibit 32. Commodity Group Fields and Descriptions ................................................................ 38
       Exhibit 33. Group Action Buttons and Descriptions ..................................................................... 39
       Exhibit 34. Create Geography Group ............................................................................................ 39
       Exhibit 35. Geography Group Fields and Descriptions ................................................................. 40
       Exhibit 36. Create Patron Group .................................................................................................... 41
       Exhibit 37. Patron Group Fields and Descriptions ........................................................................ 41
       Exhibit 38. Create Shipment Condition Group .............................................................................. 43
       Exhibit 39. Shipment Condition Group Fields and Descriptions................................................... 43
       Exhibit 40. Draft Groups................................................................................................................ 45
       Exhibit 41. Select Group(s) to Validate ......................................................................................... 46
       Exhibit 42. Select Group(s) to Transmit ........................................................................................ 47
       Exhibit 43. Group(s) Transmitted Successfully ............................................................................. 47
       Exhibit 44. Select Group to View/Edit/Revise .............................................................................. 47
       Exhibit 45. Group Revise Actions ................................................................................................. 48
       Exhibit 46. Select Group to Expire ................................................................................................ 49
       Exhibit 47. Group Expire ............................................................................................................... 49
       Exhibit 48. Select Groups to Clone................................................................................................ 50

REN User Guide                                                        3                                                    Revised May 2021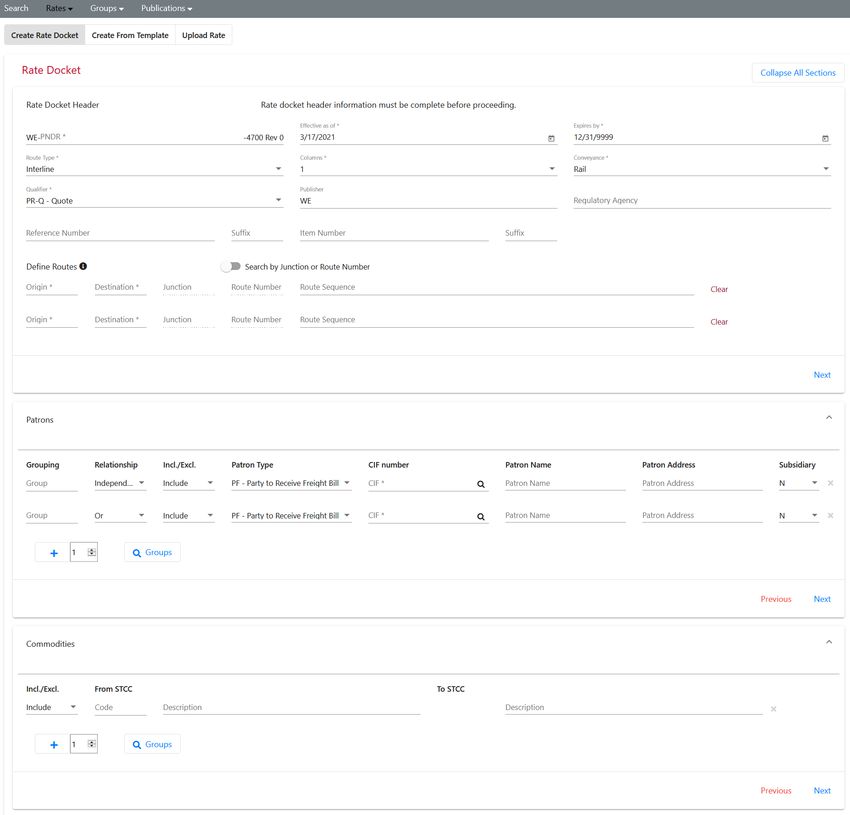
Learning About the Rate EDI Network                                                                                              Overview

       Exhibit 49. Group Revision - Find Impacted Publication Price Authorities.................................. 50
       Exhibit 50. Select Groups to Delete ............................................................................................... 51
       Exhibit 51. Delete Groups Confirmation ....................................................................................... 51
       Exhibit 52. Publication Types ........................................................................................................ 52
       Exhibit 53. Current Publications .................................................................................................... 53
       Exhibit 54. View Publication PDFs Pop-Up For Non-Signatory Publication ............................... 54
       Exhibit 55. Partial View of Price Detail – Non-Signatory Contract PDF ...................................... 54
       Exhibit 56. Price Authority Rates For a Selected Publication ....................................................... 54
       Exhibit 57. Search Price Authorities .............................................................................................. 55
       Exhibit 58. Search Price Authorities Fields and Descriptions ....................................................... 55
       Exhibit 59. Price Authorities Publications Search Results ............................................................ 56
       Exhibit 60. View Publication PDFs ............................................................................................... 57
       Exhibit 61. View Rates Associated With the Publication .............................................................. 58
       Exhibit 62. Publications – Master Templates ................................................................................ 59
       Exhibit 63. Publications – Custom Templates ............................................................................... 60
       Exhibit 64. Action Buttons for Draft Templates ............................................................................ 60
       Exhibit 65. Download Icon ............................................................................................................ 62
       Exhibit 66. Activate Template Pop-Up .......................................................................................... 63
       Exhibit 67. Delete Template Pop-Up ............................................................................................. 63
       Exhibit 68. Publications – Contact Information............................................................................. 64
       Exhibit 69. Publications – Edit Non-Signatory Contract Example ................................................ 65
       Exhibit 70. Preview and Publish Publication ................................................................................. 66
       Exhibit 71. Publication Complete Email........................................................................................ 66

REN User Guide                                                       4                                                  Revised May 2021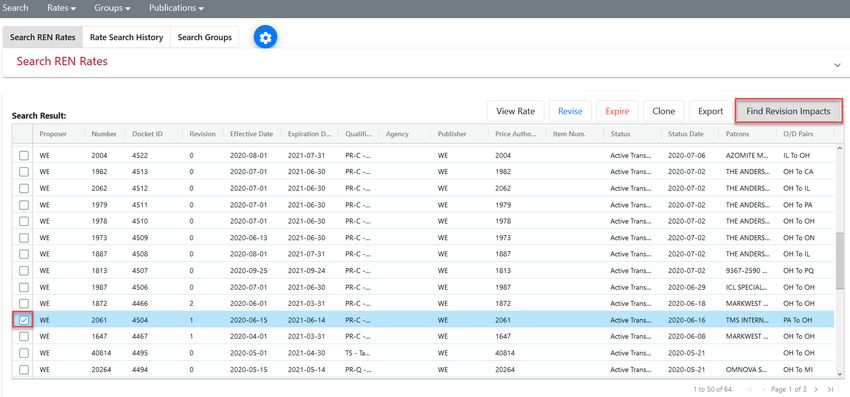
Learning About the Rate EDI Network                                                               Overview

Learning About the Rate EDI Network
Overview
       Rate EDI Network (REN)/Price Database (PRDB) are the price management systems for all
       North American railroads. Working together, these systems allow railroads to transmit price data
       between participants and with a centralized database.
       The REN/PRDB system streamlines existing industry practices and provides significant
       improvements in efficiency, timing and overall quality of price administration activities.
       REN/PRDB communicates price information using industry standard EDI messaging.
       REN is a web-based application for short lines, regional carriers, and Mexican carriers. It allows
       users to store, view, update, and publish their private and public prices. The application provides
       support for the mass expiration of prices and the capability to query prices stored in Railinc’s
       REN Central database (PRDB). The application allows railroads to use existing public groups. It
       additionally provides access to Industry Reference files, including Shipment Condition codes, all
       used to validate pricing data.
       REN allows users to limit the distribution of pricing data to only the roads participating in their
       routes, restricting access to private price information.
       The Rate EDI Network (REN) consists of the following basic functions:
       •   Price Distribution: A railroad creates, changes or expires a price and forwards it
           electronically to REN for distribution to the carriers in the route. REN builds and maintains a
           "footprint" (map to prices) of the price to enable future requests for that price to be routed to
           the proper source. After the footprint is constructed, the price is forwarded, unchanged, to
           each carrier that participates in the price. The price distribution function is built around EDI
           460, Price Distribution and Response Format.
       •   Price Receipt: Participating railroads receive prices in electronic format and store them with
           an in-house database for use in rating, settlement and billing.
       •   Price Request: Railroads request prices from other railroads. A requestor constructs a price
           request EDI transaction and sends it to REN. Using the price request data, REN checks its
           internal footprint to determine price sources. The request is forwarded, in its original form, to
           each of the identified sources.
       •   Price Response: Upon receipt of a price request from the central system, internal databases
           search for matches. These prices are returned to the central system. REN bundles responses
           from all price sources into a single response and forwards it to the requestor.
       •   Price Publication: Communicate finalized pricing documents through the new publishing
           features. Send contracts, amendments, tariffs and quotes.

REN User Guide                                       5                                     Revised May 2021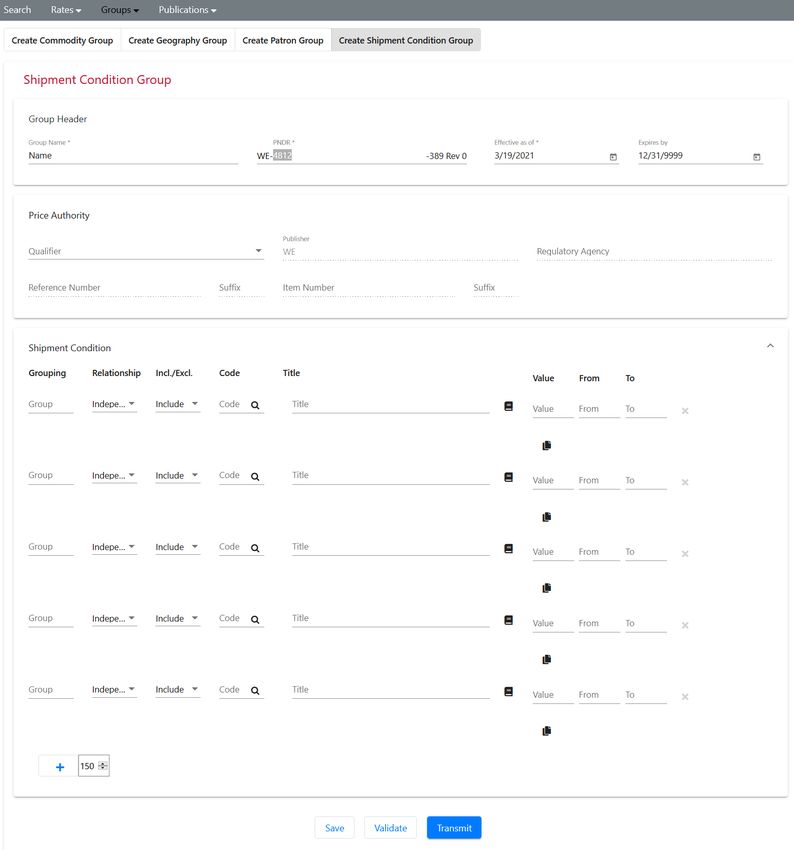
Learning About the Rate EDI Network                                               Rate Docket Status Codes

Rate Docket Status Codes
       The status of a rate docket changes during its lifecycle.

        Status Codes      Description

        Active            Once the docket is sent to REN, it is in Active Transmitted status. The transmitted
        Transmitted       docket has been validated by REN and is active.
        Expired on        The status of a successfully expired docket.
        REN

System Requirements
       For information about the system requirements of Railinc web applications and for information
       about downloading compatible web browsers and file viewers, refer to the Railinc UI Dictionary.

Accessing the Railinc Customer Success Center
       The Railinc Customer Success Center provides reliable, timely and high-level support for Railinc
       customers. Representatives are available to answer calls and respond to emails from 7:00 a.m. to
       7:00 p.m. Eastern time, Monday through Friday, and provide on-call support via pager for all
       other hours to ensure support 24 hours a day, 7 days a week. Contact us toll-free by phone at 877-
       RAILINC (1-877-724-5462) or send an email directly to csc@railinc.com.

REN User Guide                                        6                                        Revised May 2021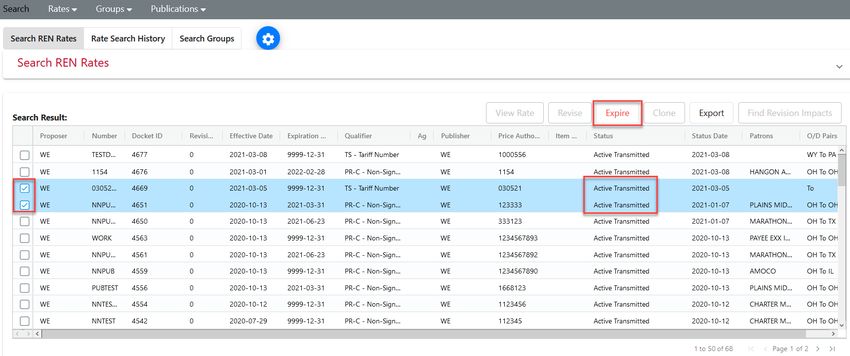
Getting Started                                                               Register to Use Railinc SSO

Getting Started
       Access the REN application by using Railinc’s Single Sign-On (SSO), a web application that
       provides convenient access to a variety of Railinc products. If you have an SSO login, go to the
       Railinc portal at https://public.railinc.com/ and log into SSO by selecting the Customer Login
       link in the top right corner. Enter your user ID and password in the fields and select Sign In.

Register to Use Railinc SSO
       Each REN user must register to use Railinc’s SSO. If you are not already registered for an SSO
       login, go to the Railinc portal at https://public.railinc.com/ and log into SSO by selecting the
       Customer Login link in the top right corner (Exhibit 4). Select the Create an account now link.
       Once you have completed SSO registration, log into SSO to request access to REN.

Requesting REN Access
       After you receive authorization to use Railinc’s SSO, you must request general access to REN by
       following the instructions in the Railinc Single Sign-On User Guide.
       Your level of access and authorization for REN is determined when you request access through
       Railinc’s SSO. Below is the list of REN roles. The user role you choose determines what
       functions you can perform.
       Exhibit 1. User Roles and Tasks
        Task                         Description
        REN Client Access (SCAC)     Allows user to manage rate and group dockets within their SCAC. This
                                     role is intended for Railinc customers only.
        REN Read Only Access         Allows user read-only access to REN within their SCAC.
        REN Company Admin            Allows user to grant REN permissions for users within their company.

       Upon receipt of your request in SSO as shown below, user roles are assigned by Railinc.

       Exhibit 2. REN Request Permission
       Picture will be added upon final release.

       Once you receive email notification of access to REN, you can log on and begin using REN.

Logging In
       Use the following procedure to log into REN:

       1. Open your internet browser and enter https://public.railinc.com to open the Railinc website.
       2. Select the Customer Login link in the upper right of the page. The Account Access page is
          displayed.

REN User Guide                                       7                                        Revised May 2021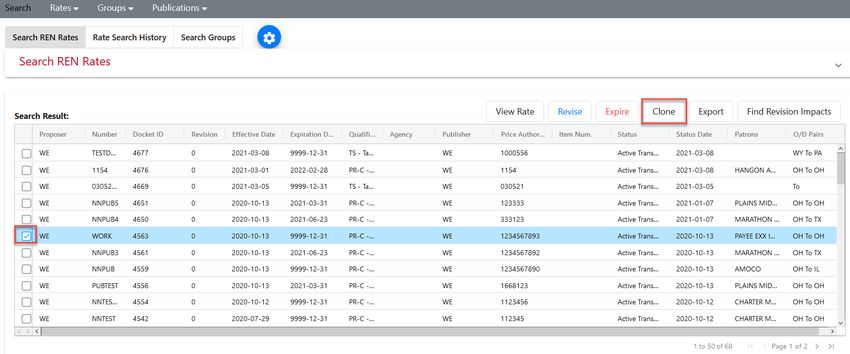
Getting Started                                                                           Logging Out

       Exhibit 3. Railinc Welcome Page

       3. Enter your User ID and Password. Select Sign In. The Railinc Launch Pad is displayed.
       Exhibit 4. Railinc Launch Pad

       4. In My Applications, select REN. The Search REN Rates page is displayed (Exhibit 7). The
          appearance of the home page may differ depending on assigned user access rights.
       5. If you work for multiple railroads, select a company from the drop-down list and choose
          Select.

Logging Out
       Select the Sign Out link in the top right to end a REN session.

Navigation Menu
       The REN navigational menu is located at the top of each page. It allows you to access and
       perform all the functions of the application.

REN User Guide                                     8                                   Revised May 2021
Getting Started Navigation Menu
Exhibit 5. Rates Menu
REN User Guide 9 Revised May 2021Search Search REN Rates
Search
Search REN Rates
Use the following procedure to search rates.
1. The Search REN Rates screen automatically displays when you log into REN (Exhibit 7).
2. To manage search criteria sections:
a. Select the blue wheel icon at the top. By default, all sections are available, but you have
the option to personalize the Search page by choosing the sections that you want visible
on your Search page.
b. Select Set as Default to automatically default to your chosen sections.
c. Select Apply.
Exhibit 6. Manage Search Criteria
3. Search by one or more of the Search criteria sections.
REN User Guide 10 Revised May 2021Search Search REN Rates
Exhibit 7. Search REN Rates
a. PNDR section: Enter the Proposer (SCAC). This field is the only required field and the
Search button will not be available until this field is entered. All other fields on the page
are optional. Enter either the Number or the Docket. The Latest Revision is selected as
the default or select All.
b. Price Authority section: Qualifier defaults to All Qualifiers or select a Qualifier from
the drop-down list. Enter the Publisher (exact SCAC of the Publishing Carrier), Issuer
ID, Reference Number, and/or Item Number. The Reference Number is the primary
key for price authorities and is a “Starts With” search feature (e.g., a search string of “12”
returns any results starting with “12”).
c. Patron section: Specify a patron identified by a CIF Number or Patron Name. As
needed, the magnifying glass provides access to the CIF look-up.
d. Commodity section: Choose to provide Individual STCCs or a STCC Range. In the
available fields, you may specify up to 3 STCCs or a range of STCCs.
e. Location section: Specify geographical location for Origin and Destination, enter City
and select State/Province. If specifying geography, both origin and destination city and
state/province are mandatory. When using the magnifying glass to access the City
Lookup, entering the SCAC is required.
f. Shipment Condition section: Enter up to 3 shipment conditions. Search results will
include rates where all specified condition codes and attributes exist. If necessary, select
the magnifying glass to access the Shipment Condition Lookup.
g. Route section: Use the toggle to search by Junction or Route Number. Specify the
Route (Origin, Destination and Route Sequence).
h. Effective Date section: The Status defaults to Active rates and can be changed. The
checkbox to Include Future Effective is available when Active is selected. Use the
default dates or change them as needed.
REN User Guide 11 Revised May 2021Search Search REN Rates
a. Query Name: Use this field to name your query. When a name is not entered, the system
will name the search by the timestamp of the when the search was initiated. See Rate
Search History for the list of your previous searches.
4. Select Search.
Exhibit 8. Search Results
5. The Search Results are displayed. The search criteria used is hidden but the page can be
expanded by selecting the down arrow in the upper right of the page.
6. REN provides the following options for the data:
a. To move a column, select the header title of a column with your mouse and move it to the
right or the left and drop it in the place where you want it to be.
b. To sort on a column, click on a column header and the Up arrow displays next to the title.
The column is sorted in ascending order. Click again on the title and the
Down arrow displays. The column is sorted in descending order. Click again and the sort
(and arrow) is removed.
c. To expand or reduce the width of a column, hover over the vertical divider between the
heading titles on the right of the column you want to resize until you see the cross hairs
that shows the column has been selected. Move the column to the right or left to
expand or reduce the column width.
d. Use the scroll bar on the right to scroll through all the REN rates and use the arrows in
the bottom right to click through multiple pages.
7. Select one or more rows to Expire and Export rates or select one row to use all available
action buttons.
a. Select View Rate to view the selected rate. Select Expand All Sections to view all
sections of the rate docket. This is screen is read-only and no editing can be done in these
sections.
b. Select Revise to edit the selected rate. See Exhibit 17 for more information about rate
docket fields and descriptions.
REN User Guide 12 Revised May 2021Search Rate Search History
c. Select Expire to expire the selected rate. See Expire a Rate Docket for details.
d. Select Clone to create a new rate based on the selected rate. See Clone a Rate Docket for
details.
e. Select Export to save data from one or more selected rows to a spreadsheet. See Export
Rates for details.
f. Select Find Revision Impacts to perform a check to see if existing rates are affected by
revisions. See Find Revision Impacts for details.
Rate Search History
Once a rate search has been run in REN, it is added to the Rate Search History tab of the Search
page. Use this to view the results of any of your previously run searches.
1. From the Search menu item, select the Rate Search History tab.
2. Select a query from the list by clicking the radio button.
Exhibit 9. Rate Search History
3. When a query is selected, the View Result button becomes available. Select View Result.
4. The search results from the query is displayed (Exhibit 8).
REN User Guide 13 Revised May 2021Search Search Groups
Search Groups
REN allows you to set up Group dockets, which are pre-filled data that can be used for your rates.
You can search for group dockets by: Commodity, Geography, Patron, Shipment Condition or
Any. Group dockets have the same status codes as rate dockets.
Use the following procedure to search groups:
1. Select the Search menu item and select the Search Groups tab. The Group Search page is
displayed.
Exhibit 10. Group Search
2. Group PNDR & Header section: Enter the Proposer (SCAC). This field is the only required
field. All other fields on the page are optional. Enter either the Number or the Docket.
Group Info section: Status defaults to All which includes both Active and Expired, but you
can filter on one. Use the default Effective as of, or the date as needed. The Latest Revision
is selected as the default or select All. Group Owner is selected to Mine as the default or
select All. The checkbox to Include Future Effective is available.
Group Type defaults to Any, but you can filter on four types: Commodity, Geography,
Patron, Shipment Condition. When a Group Type is selected, additional filtering fields
become available for each type.
a. Group Type - Commodity section (pictured above): Choose to provide Individual
STCCs or a STCC Range. In the available fields, you may specify up to 3 STCCs or a
range of STCCs.
b. Group Type - Geography section: Select the Origin Type from the drop-down list and
additional fields are available depending on the type selected, or additional filtering.
c. Group Type - Patron section: Specify a patron identified by a CIF Number or Patron
Name. As needed, the magnifying glass provides access to the CIF look-up.
d. Group Type - Shipment Condition section: Enter up to 3 shipment conditions. Search
results will include rates where all specified condition codes and attributes exist. If
necessary, select the magnifying glass to access the Shipment Condition Lookup.
3. Select Search.
REN User Guide 14 Revised May 2021Search Search Groups
Exhibit 11. Group Search Results
4. The Group Search results are displayed. The search criteria used is hidden but the page can
be expanded by selecting the down arrow in the upper right of the page.
5. REN provides the following options:
a. To move a column, select the header title of a column with your mouse and move it to the
right or the left and drop it in the place where you want it to be.
b. To filter on a column, select the three lines to the right of the header title of a column.
Then select filtering options from the drop-down list (pictures below).
c. To sort on a column, click on a column header and the Up arrow displays next to the title
(pictured above). The column is sorted in ascending order. Click again on the title and the
Down arrow displays. The column is sorted in descending order. Click again and the sort
(and arrow) is removed.
d. To expand or reduce the width of a column, hover over the vertical divider between the
heading titles on the right of the column you want to resize until you see the cross hairs
that shows the column has been selected. Move the column to the right or left to
expand or reduce the column width.
e. Use the scroll bar on the right to scroll through all records.
6. Select one row to use the available action buttons:
REN User Guide 15 Revised May 2021Search View Group Details
a. Select Revise to edit a selected group in the Active Transmitted status. See Revise a
Group Docket for details.
b. Select Expire to expire the selected Active Transmitted group. See Expire Groups for
details.
c. Select Clone to create a new group based on the selected group. See for Clone a Group
Docket details.
d. Select Find Revision Impacts to perform a check to see if existing groups are affected
by revisions. See Find Revision Impacts for a Group Docket for details.
View Group Details
Detail views from the Group Search vary depending on the type of group being viewed.
Use the following procedure to view group details:
1. Perform a group search selecting one or all of the group types (see Search Groups).
2. From the Group Search screen, select the Docket ID link of the group you want to view.
The details view from here is read-only and cannot be edited. To edit group dockets, use the
Revise button (see Revise a Group Docket).
3. Use the scroll bar on the right to scroll through all the Group Details in the pop-up window.
Below are examples of each type of detail screen.
a. Commodity: Exhibit 12
b. Geography: Exhibit 13
c. Patron: Exhibit 14
d. Shipment Condition: Exhibit 15
REN User Guide 16 Revised May 2021Search View Group Details
Exhibit 12. Group Details – Commodity
Exhibit 13. Group Details – Geography
REN User Guide 17 Revised May 2021Search View Group Details
Exhibit 14. Group Details – Patron
REN User Guide 18 Revised May 2021Search View Group Details
Exhibit 15. Group Details – Shipment Condition
4. Select the x in the top right to close the pop-up window.
REN User Guide 19 Revised May 2021Rates Create Rate Docket
Rates
REN provides three different ways to create rates:
• Entering information from scratch – Create Rate Docket
• Using a pre-filled template – Create From Template
• Uploading a spreadsheet of rates – Upload Rate
Create Rate Docket
Use the following procedure to create a rate docket:
1. From the main menu, select Rates > Create Rate Docket. The Rate Docket page is
displayed.
2. Select Expand All Sections in the top right to expand all sections of the form.
Exhibit 16. Create Rate Docket
REN User Guide 20 Revised May 2021Rates Create Rate Docket
3. Enter all required fields marked with an asterisk (*). Rate Docket Header and Define Routes
(Interline only) must be completed before the other sections are entered.
REN User Guide 21 Revised May 2021Rates Create Rate Docket
Exhibit 17. Rate Docket Fields and Descriptions
Field Description
* PNDR Enter a number that identifies the tariff or circular number.
Each rate docket is identified by the PDNR which uses four unique codes:
P = Proposer – The docket’s proposer, provided by REN
N = Number – The tariff or circular number that you will enter
D = Docket – A unique number assigned to the docket by REN
R = Revision – The number of revised versions of this docket, provided by REN
Header
* Effective as of Enter the 8-digit field in MM/DD/YYYY format. Defaults to current date and should be
current or past date.
* Expires by Enter the 8-digit field in MM/DD/YYYY format. Defaults to 12/31/9999, which means the
rate will remain effective indefinitely.
* Route Type Select Interline or Local. When Local is selected, the Define Routes section is
removed.
* Columns Specify the number of columns that the rate docket should have. Be sure to consider
any excess columns that should refer to any base columns.
* Conveyance Select the conveyance type, either Rail or Multimodal.
* Qualifier Select from the following Qualifiers:
CT – Contract Number
PR-C – Non-Signatory Contract
PR-Q – Quote
TS – Tariff Number (when selected, Patron section is unavailable)
Publisher Publisher (SCAC) is who will publish the rate. This defaults to the Proposer SCAC but
can be changed.
Regulatory This is the code for the State Regulatory Agency governing the contract.
Agency Code
Reference This is the price authority number used to connect the rates. It can be either the
Number Reference identification as defined for a particular Transaction Set, or as specified by
the Reference Identification Qualifier.
Reference This is used to identify the type of reference.
Number Suffix
Item Number The Item Number assigned in the tariff to specify rate or group of rates that apply to
one or more items in the shipment.
Item Number This is used to identify the type of item.
Suffix
* Route Code When Local is selected for Route Type, the Route Code fields are not visible. A Route
Code describes the carrier sequence and junctions (Rule 260 Code) on a particular
route. A typical Route Code looks like CR-UP-0010. (This particular code describes
the route CR-CHGO-CNW-FREMT-UP.)
In the Define Routes section, use the toggle to search by Junction or Route Number.
Use this section to specify the route by entering the Origin SCAC and the Destination
SCAC. Routes can be used within an origin-destination pair. Up to two routes can be
defined. Use the Clear link to remove a pair.
Patrons (up to 50)
Group 1-digit, numeric; enter a Group Number from 1 to 9. Format: Any number from 1 to 9.
Relationship Determines if this code works if combination with other indicated codes or should be
considered independently. Defaults to Independent or change to And or Or.
REN User Guide 22 Revised May 2021Rates Create Rate Docket
Field Description
Include/ Defaults to Include to indicate to that the item should be included. Select Exclude to
Exclude indicate that the item should be excluded from the rate docket.
Patron Type Select from the following types:
AP – Account of (Origin Party)
AQ – Account of (Destination Party)
BN – Beneficial Owner
C1 – In Car of Party #1
C9 – Contract Holder
CN – Consignee
PF – Party to Receive Freight Bill
SF – Ship From
SH – Shipper
UC – Ultimate Consignee
* CIF When TS – Tariff Number is selected for Qualifier, the Patron fields are not visible.
The CIF is the Customer Identification Number of the specific customer who qualifies
for this rate.
Patron Type Name of the patron.
Patron Address Address of the patron.
Subsidiary Defaults to N for No, but Y for Yes can be selected.
Commodities (up to 200)
Include/ Defaults to Include to indicate to that the item should be included. Select Exclude to
Exclude indicate that the item should be excluded from the rate docket.
From STCC A single STCC or the beginning STCC of a range of STCCs up to 7-digits can be
Code entered in this field. Enter all or part of the STCC and a drop-down list of matching
STCCs appears to select from. In most cases when the STCC is selected, the
Description will be automatically populated.
To STCC The ending STCC of a range of STCCs up to 7-digits can be entered in this field. Enter
Code all or part of the STCC and a drop-down list of matching STCCs appears to select from.
In most cases when the STCC is selected, the Description will be automatically
populated.
General/Specific Shipment Conditions (up to 150)
Column Available column numbers to select from is dependent on the number of Columns
selected in the Header. Select the Number assigned for differentiation within a
transaction set.
Group 1-digit, numeric; enter a Group Number from 1 to 9. Format: Any number from 1 to 9.
Relationship Determines if this code works if combination with other indicated codes or should be
considered independently. Defaults to Independent or change to And or Or.
Include/ Defaults to Include to indicate to that the item should be included. Select Exclude to
Exclude indicate that the item should be excluded from the rate docket.
Code This is a four-position Shipment Condition Code. It is set up to be an acronym of the
condition description to assist in recognition (e.g., ARCT is the code established for the
condition that qualifies AAR Car Types).
Use the magnifying glass icon to display the Condition Code look-up screen.
Use the book icon once a shipment condition code has been provided to display
condition code reference information for the provided code.
Title Description of the shipment condition code.
Value Value appropriate for the selected shipment condition.
From / To Use to specify a range of values appropriate for the selected shipment condition.
REN User Guide 23 Revised May 2021Rates Create Rate Docket
Field Description
Origin-Destination Geography (up to 150 pairs)
Include/ Defaults to Include to indicate to that the item should be included. Select Exclude to
Exclude indicate that the item should be excluded from the rate docket.
Origin/Dest Select the Origin/Dest Type of geography information. The two fields to the right will
Type change depending on the geography type selected.
Sw Dist Selecting the Switch Destination checkbox allows you to specify if switch districts
Checkbox should be included in the geography rate.
Rates
Column Number assigned for differentiation within a transaction set.
* Base/Excess Select either Base or Excess qualifier. When Base is selected, the rate application
type must also be specified. When Excess is selected, then the base column that the
excess column refers to must be specified.
Column When Base is selected in the previous column, this field allows you to select Min.
Application Charge, No Charge, or Rate.
When Excess is selected, then the base column that the excess column refers to must
be specified.
Alternation Code identifying the priority of rate application when two or more rates apply to a given
Code movement. When rate application includes two or more rates of the same value for this
element, individual carrier rules and procedures shall govern.
L = Indicates the L value will be applied only in the absence of a rate application by
any with this element indicating N or S.
N = Indicates the N value will be applied to the exclusion of all other rates with this
data element indicating other values.
S = Indicates the S value will be applied to the exclusion of all other rates except those
indicated as N. All S values will alternate.
Freight Amount Allows you to specify a freight rate which is charged at the rate specified by the rate
qualifier.
Currency Allows you to specify the currency for the freight rate (USD, CAD, or MXP).
Rate Qualifier Code qualifying how to extend charges or interpret value.
Change Allows you to select Increase, Decrease, or No Effect.
Minimum Code indicating the type of minimum weight or units applicable to a specific rate. The
Qualifier Code code also describes the interpretation and/or relationship of minimum weight and car
capacity percentage data elements for a specific rate.
Min. 1, Min. 2, % Threshold values that quantify the minimum qualification for a rate based on the
Capacity minimum qualifier weight type.
Min. Weight Used to select the weight type qualifier for an entered minimum weight.
Qualifier
Divisions
Division Type Code indicating the method by which a carrier’s divisional agreement is applied to a
shipment.
* Amount Number indicating the portion of freight rate revenue to be apportioned to an identified
Percent carrier.
Rate/Value Code qualifying how to extend charges or interpret value. This is only required for some
Qualifier division types.
REN User Guide 24 Revised May 2021Rates Create From Template
4. Use the Groups button in each type (Patrons, Commodities, Shipment Conditions and O-
D Geography) to add saved pre-entered Groups to the rates. See Create Commodity Group
for more information about setting up Groups.
5. To add lines in each type, use the arrow buttons to add or subtract from the amount, then
select the plus sign to add the extra lines.
6. Select from the available action buttons:
Exhibit 18. Action Buttons and Descriptions
Action Description
Save as Template Select Save as Template to save the new rate as a template (see Create From
Template).
Save as Draft Select Save as Draft to save the new rate as a draft (see Draft Rates).
Validate Select Validate to validate price data entries (see Validate Rates).
Transmit Select Transmit to transmit the created rate (see Transmit a Rate Docket).
Export Select Export to export the selected rate(s) (see Export Rates).
Create From Template
Create or Delete Templates
Use the following procedure to create a rate docket or a template from a template, or to delete one
or more templates:
1. From the main menu, select Rates > Create Rate Docket.
2. Select the Create From Template tab. The Rate Templates page is displayed.
REN User Guide 25 Revised May 2021Rates Create From Template
Exhibit 19. Rate Templates
2. To create rates and templates, select one checkbox and select Create Rate Using Selected
Template to create a new rate or a new template. The Rate Docket screen is displayed with
data pre-filled from the selected rate.
a. Make any necessary edits. Verify all required fields marked with an asterisk (*) are
entered.
b. Choose from the actions (Exhibit 18):
• Templates cannot be edited and saved with the same name. Use an existing template
to make a new template and delete the old template. To save this template as a
template, select Save as Template.
o Enter a template name with no special characters.
o Select Save.
• Select Save as Draft to save the template as a new draft rate docket (see Draft
Rates).
• Select Validate to validate price data entries (see Validate Rates).
• Select Transmit to transmit the data inputs from the template into a new created rate
(see Transmit a Rate Docket).
• Select Export to export the selected rate (see Export Rates).
3. To delete one or more templates, select one or more checkboxes and select Delete Selected
Templates.
REN User Guide 26 Revised May 2021Rates Upload Rate
Exhibit 20. Delete Template Confirmation
a. A confirmation pop-up box warns that you are about to delete one or more templates.
This action cannot be undone. To cancel, select the x in the top right to close the box,
otherwise, select Delete to confirm and the template is deleted.
b. When deleted, you’ll receive a confirmation message that the templates are deleted.
Upload Rate
Use the Upload Excel File feature to upload new rates into the system or to revise existing rates:
1. From the main menu, select Rates > Create Rate Docket.
2. Select the Upload Rate tab. The Upload Excel File page is displayed.
Exhibit 21. Upload Excel File
3. Use the template: Download the RateDocketTemplate.xls file by selecting it, and open or
save it to your computer. The template provides sample data in the first set of rows. Start
entering your data at line 19 (Exhibit 22).
REN User Guide 27 Revised May 2021Rates Upload Rate
Or
Use a previously downloaded rate docket file: Add data in the first white row at the bottom of
the existing docket data. Be aware that rate dockets that are uploaded back into REN and do
not contain any changes are treated as if they have been changed and new revision numbers
will be assigned to them.
Exhibit 22. Blank Template Excel File
See Excel Spreadsheet Field Descriptions for an explanation of the spreadsheet field names
and expected values. There are two reference documents that provide guidance and examples
– the Rate EDI Network Guidelines available from Washington Publishing and the Shipment
Condition Directory, available from Railinc.com under Resources > Shipment Conditions
File.
The system-generated spreadsheet has been formatted to assist users. The following describes
the color indicators on the spreadsheet:
• Roll your mouse over cells with red triangles in the right corner of column headers to
view contextual help in the worksheet.
• Required values that must be provided by the user for valid rate dockets are denoted by a
red line above the cell. The required values can either be populated on the spreadsheet or
after uploaded to REN Web.
• Required values with system defaults are denoted by a purple line above the field. These
values can be entered in on the spreadsheet if desired. If they are not entered, the system
will assign the system default upon upload.
• Cells with faded field headers should not be edited within the spreadsheet. These fields
are either system generated (e.g., Qualifier defaults to “TS” for Tariff) or can only be
edited in the REN application (e.g., group references can only be established in the
application, not in the spreadsheet).
The diagram below illustrates the points above:
REN User Guide 28 Revised May 2021Rates Draft Rates
Exhibit 23. Rate Spreadsheet with Explanations
4. Enter a name for the upload job in 35 characters or less in the Name Upload Job field.
5. Upload the excel file by selecting the Browse button. Select the .xls file from your computer.
6. Select the checkbox to be notified by email when the upload is complete. The email will be
sent to the email address associated with your Railinc Single Sign-On ID and includes a link
that takes you directly to the set of dockets to review.
7. Once the file to be uploaded appears in the field, select the Upload button.
8. The system provides a message to confirm the success of the upload.
9. Dockets uploaded are available as Draft Rates until reviewed and validation errors are
addressed for each docket. Once validated with no errors, rate dockets can be transmitted to
REN.
Draft Rates
Draft rates are rates that have not been published. Typically, a draft rate is a rate that is in the
process of being entered and may have errors that need to be fixed before it can be transmitted to
be published. Draft rates can be saved, viewed, edited, saved as a template, deleted, validated,
and/or exported to a spreadsheet.
Use the following procedure to view and manage draft rates:
1. From the main menu, select Rates > Draft Rates. The Draft Rates screen is displayed.
2. The default Draft Type filter for Draft Rates shows All types of drafts, but you can select
from Open, Open Valid, Open Invalid, REN Submission Error.
REN User Guide 29 Revised May 2021Rates Draft Rates
Exhibit 24. Draft Rates
3. REN provides the following options for the data:
• To move a column, select the header title of a column with your mouse and move it to the
right or the left and drop it in the place where you want it to be.
• To sort on a column, click on a column header and the Up arrow displays next to the title.
The column is sorted in ascending order. Click again on the title and the
Down arrow displays. The column is sorted in descending order. Click again and the sort
(and arrow) is removed.
• To expand or reduce the width of a column, hover over the vertical divider between the
heading titles on the right of the column you want to resize until you see the cross hairs
that shows the column has been selected. Move the column to the right or left to
expand or reduce the column width.
• Use the scroll bar on the right to scroll through all the REN rates and use the arrows in
the bottom right to click through multiple pages.
4. Select one or more rows to Delete, Validate or Transmit to REN rates or select one row to
use all available action buttons.
a. Select View/Edit to view and edit the selected rate.
• Select Expand All Sections to view all sections of the rate docket. Make any
necessary updates. See Exhibit 17 for field and description details.
b. Select Clone to create a new rate based on the selected rate. See Clone a Rate Docket for
details.
c. Select Delete to delete a draft rate.
• A pop-up window confirms you want to delete the draft rate. This action cannot be
undone. To delete, select OK, otherwise select Cancel.
REN User Guide 30 Revised May 2021Rates Draft Rates
5. Select Validate to validate a draft rate as the preliminary step before transmitting a REN
rate for publication. A draft rate must be open and valid to transmit to REN.
• When you receive a validation error:
1. Select View/Revise to view the details and fix the errors. Select the section with
the red circle icon and REN lists the errors in the section.
2. Find and fix errors. Scroll to the bottom of the page and select Validate. Repeat
this step until you receive a successful validation.
• When the draft rate successfully validates as pictured below, it can be transmitted
(see next step).
6. Open draft rates that have been successfully validated can be transmitted. Select Transmit to
transmit your valid draft rates to REN.
7. Select Export to save data from one of the selected rows to a spreadsheet. See Export Rates
for details.
REN User Guide 31 Revised May 2021Rates Validate Rates
Validate Rates
During the creation of a rate docket you can validate the accuracy of the data by using the
Validate button.
1. Select Validate to validate a rate as the preliminary step before transmitting a REN rate for
publication. A rate must be open and valid to transmit to REN.
a. When you receive one or more validation errors:
• Select the section with the red circle icon and REN lists the errors in the section.
• Fix the error(s).
• Scroll to the bottom of the page and select Validate. Repeat this step until you
receive a successful validation.
b. When the rate successfully validates it can be transmitted (see Transmit a Rate
Docket).
Transmit a Rate Docket
Contact the Railinc CSC at csc@railinc.com if you need to set up an FTP mailbox.
Use the following procedure to transmit rate docket information from any Rate Docket screen
(found searching for a rate or a rate template, or by selecting one or more Draft Rates).
1. All rates should be successfully validated prior to transmitting. See Validate Rates for details.
2. Select or open the rate(s) to transmit.
3. Select Transmit.
a. When there are any errors, an error message is displayed.
b. When successfully transmitted, the status of rate docket becomes Active Transmitted.
Export Rates
The Export button is available on several Rate screens in REN and allows you to download data
on one or more rates to an Excel spreadsheet.
REN User Guide 32 Revised May 2021Rates Expire a Rate Docket
1. Select one or more rates by clicking the checkbox in the first column on the left. Some
screens might provide a checkbox at the top of the column to select all rates listed.
2. Select Export.
3. Select Open with or Save File from the pop-up window to open or save the file to your
computer.
Expire a Rate Docket
Only rate dockets in Active Transmitted status can be expired. Use the following procedure to
expire Active Transmitted rate dockets:
1. See Search REN Rates to search for REN rates.
2. Select one or more rate dockets with a status of Active Transmitted and select the Expire
button.
Exhibit 25. Select Rates to Expire
3. The Rate Expire pop-up window displays. The Expires by date defaults to the current date,
but you can change the date using the calendar icon or entering it in MM/DD/YYYY format.
REN User Guide 33 Revised May 2021You can also read