Childcare Sage Manual Version 14.11b - (Childcare and Preschool Management System)
←
→
Page content transcription
If your browser does not render page correctly, please read the page content below
Childcare Sage Manual
 (Childcare and Preschool Management System)
                 Version 14.11b

www.ChildCareSage.com by B & I Computer Consultants, Inc. 2014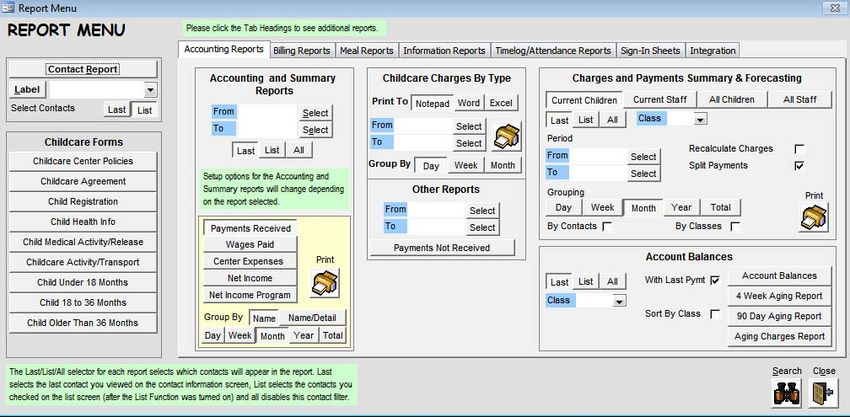
Introduction

The Childcare Sage is the most feature rich, easy to learn, and most affordable childcare management system available.
It is an easy to use system designed to save time and increase productivity for childcare administrators with any level of
computer skills or experience.

You can learn about the Childcare Sage and learn how to use the system from our website: www.childcaresage.com
Our website also includes introduction and training videos to help you learn our system. To watch the videos, go to our
website and click Resources from the menu along the top of the page. Click on any video to watch it on your computer.

Software Requirements:
a) Microsoft Windows XP or newer (Vista, 7, 8, 32 bit, 64 bit, etc.)
b) Microsoft Access 2002/XP or newer (2003, 2007, 2010, 2013, *32 bit only, etc)
(Access 2002/XP Runtime is provided with the Childcare Sage; Access 2003/2010/2013 Runtimes available by request.)

Hardware requirements:
The Childcare Sage system is comprised of the Childcare Sage and Timeclock programs. The minimum requirements are
based on which program you want to run on each computer, and the version of windows on that computer.
ChildCare Sage- any dual core or faster computer, 1GB or higher RAM (2GB for Windows vista/7/8)
TimeClock- pentium 4 or faster, 1GB or higher RAM (2GB for Windows vista/7/8)

Support Information:
Automated support options include:
1) complete manuals and user guides,
2) complete access to our user forums at www.childcaresage.com ,
3) online training videos on our Resources page at www.childcaresage.com ,
4) email support at support@bandisoftware.com ,

Live support options are available 9am to 5pm, Monday-Friday Eastern Time, and include:
5) toll free phone support at 866-842-7806,
6) phone support at 301-537-4754,
7) on-line support through GoToAssist and GoToMeeting.

ChildCare Sage Support includes helping you setup the ChildCare Sage on your computer and/or existing network as
long as you have a high-speed internet connection at each computer that you want to use the ChildCare Sage. Please
keep in mind that we can not help you set up a network at your center, and that all of the computers that you want to run
the ChildCare Sage on must be able to see each other.

To check if the computers can see each other for:
Windows XP: click the Start button in Windows, then My Network Places (left side), then View Workgroup Computers
Windows Vista/7: click the Start button in Windows, then Computer (right side), then Network (left side)
Windows 8: go into the desktop, click the Folder icon (bottom left), then click Network (left side)

Our systems interface with programs from Microsoft Office (Word, Excel, Outlook,) and other applications. We cannot
provide support for software that we did not create, even if our systems can interface and use that software. Please
direct all support questions about outside programs to the developers of those programs.

Transfer Information from another system:
We can transfer information from your current system into the Childcare Sage, as long as your data is in delimited text
files, excel spreadsheets, or Microsoft Access format.

System Functions Passwords: (all passwords are user settable)
Main Program                                          Timeclock
Default system password               system          Setup Timeclock                                          open
Post Batch Charges/Payments           post            Edit All Timesheets                                      open
Copy Batch Timesheets/Functions       post            Edit Child Timesheets Only                               child
Save Rates/Schedules (batch)          update          Edit Center Notes on Timeclock                           notes
Payroll System                        payroll         Edit Child Messages                                      messages
Default Admin password                ccs1411         Batch/List Functions                                     batch

                   ChildCare Sage By B & I Computer Consultants, Inc. (www.childcaresage.com)                                2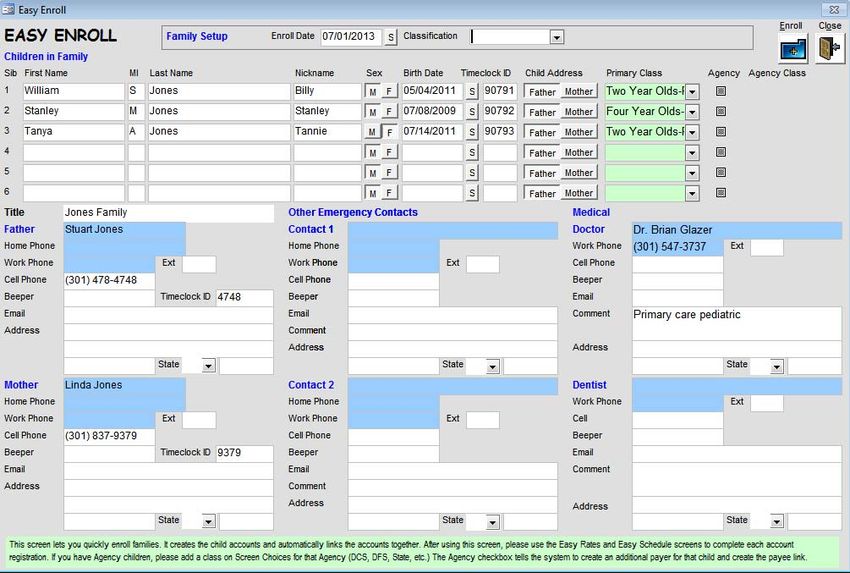
TABLE OF CONTENTS

Introduction                                        2    Utility Menu                                     42
         System Information                         2             Child/Staff Account Reset               42
         System Function Passwords                  2             Meal Rules                              43
Manual                                              4    Setup Menu                                       44
         Controls                                   4             Setup screen                            44
         Start screen                               4             Choices screen                          45
         Main Menu                                  4             Menu Choices screen                     47
Records                                             6             Meal Setup screen                       48
         Families screen                            6             Edit Merge Files screen                 48
         Contacts screen                           6              Emails Setup screen                     48
              Displaying Photos                     6             Batch Class Setup screen                49
              Selecting ID Numbers                  7             Chart of Schedules screen               49
              Family tab                            8             Schedule of Charges screen              50
              Center tab                            9             Charge Menu Setup screen                50
              Child tab                            10             Recurring Expenses screen               51
              Charges tab                          10    Search Guide                                     52
              Payments tab                         11    Time Use/Space % Calculation Guide               52
              Rates tab                            11    Childcare Sage Rates                             53
              Immunizations tab                    13             Setting Up Billing Rates Introduction   53
              Medical tab                          13             Setting Up Billing Rates step-by-step   54
              Emergency tab                        14             Rate Functions                          57
              Pickup tab                           14             Sample Rates                            60
              Attachments tab                      14    Tuition Direct (EFT & ACH Functionality)         63
         Add/Copy screen                           15             EFT Introduction                        63
         Timesheets screen                         16             Schedule Payments screen                64
         Find Contacts screen                      18             Review and Post Payments screen         65
         Contacts List screen                      19             EFT Returns                             65
         Appointment Calendar screen               20    Payroll                                          67
         Appointments screen                       21             Payroll Introduction                    67
         Appointment Reminder screen               21             Setting Up Tax Tables                   67
         Contact Journal                           22             Setting Up Deductions                   68
         Easy Enroll                               23             Setting Up Staff Payroll                69
         Batch Rates & Schedules                   24             Setting Up Staff Benefits               70
Child Billing Menu                                 25             Running Payroll                         71
         Easy Charge screen                        25             Batch Wages                             72
         Charge Accounts screen                    25             Batch Payroll                           72
         Batch Charges screen                      26             Edit Payroll                            73
         Barcode Charges screen                    27    Sample Reports                                   74
Child Payments Menu                                28
         Batch Payments Entry                      28
         Late Payments                             29
Timesheets Menu                                    30
         Batch Timesheets Entry                    30
         Batch Session Entry                       30
         Batch Schedule Entry                      31
         Batch Timesheets Functions                32
Reports Menu                                       33
Center Functions                                   37
         Daily Activities                          37
         Activity Planner                          37
         Center Journal                            38
         Center Ledger                             39
         Menu Planner Calendar                     40
         Batch Meal Entry                          41

                  ChildCare Sage By B & I Computer Consultants, Inc. (www.childcaresage.com)                   3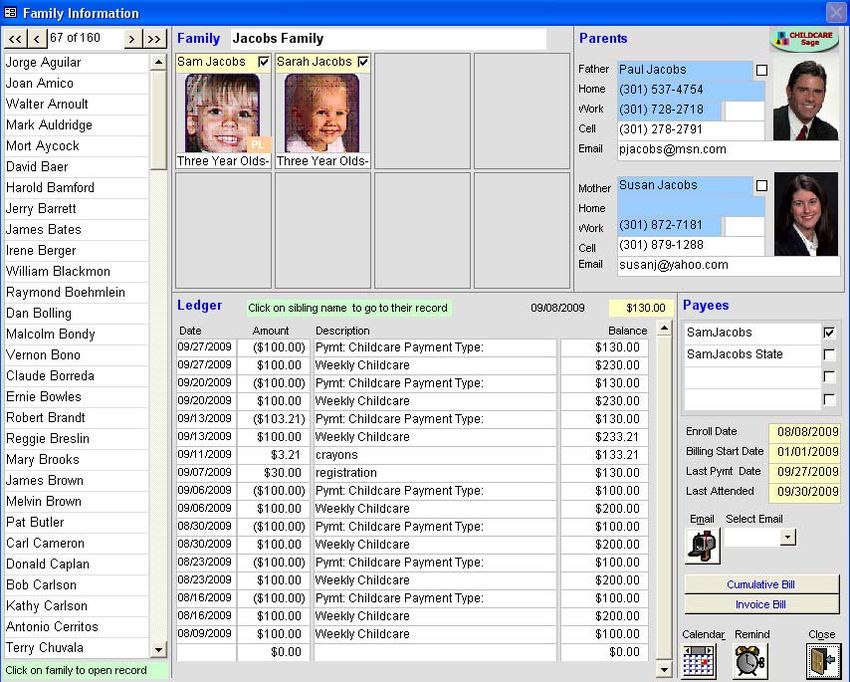
Childcare Sage Manual
Keyboard shortcuts:
Tab: move between fields and buttons
F6: switch panes (panes are sections of the screen separated by horizontal grey lines)
Alt + letter under button: click that button
Alt + down arrow: see combo box choices

Common Functions
Figure 1:

All Childcare Sage screens have a common menu at the top of the application window. The menu item functions are:
Save Settings: Saves resized screens. This is used for screens that display lists such as the contact list screen or batch
payment screens. To change the height on these screens, move the mouse over the lower blue border and drag the arrow
cursor down. Once you have resized the screen, click Save Settings. Save Settings only saves the height of the expanded
screen and will not work if you maximize the screen.
Undox: Un-does the last data change (undoes all changes since you started editing the current child/staff member.)
Need Assistance?: Opens the childcare sage web help page (the web page has online video tutorials and training videos,
tips, and answers to childcare sage questions.)

Childcare Sage Start screen
Figure 2:
                                   This is the first screen in the Childcare Sage. If the password system is enabled, you
                                   will be asked to enter one of the system passwords to start using the system. (You
                                   can set the passwords in the Passwords tab on the Setup screen opened from the
                                   Setup Menu.)
                                                                                        Figure 3:
                                      Start:    open the main menu
                                      Quit:     closes the Childcare Sage
                                                skips the online version and
                                                account lookup (click if your
                                                internet is down)
                                   The ChildCare Sage will automatically back itself up daily to your computer as long as
                                   you exit the system by clicking Quit. If you are opening the Childcare Sage for the first
                                   time only, you will also have the option to Load Sample Center Data.

Main Menu screen
Figure 4:

                   ChildCare Sage By B & I Computer Consultants, Inc. (www.childcaresage.com)                               4
This is the main menu in the Childcare Sage. From this menu, you can open all of the screens and functions in the
program. The Main Menu is broken into functional areas.

Records
Contacts: opens contact screen
Filter Records Menu: select which records to display (children/staff/families/etc.) (see figure 3a)
Families: displays family records for children only (siblings are shown together)
Easy Enroll: batch family enroll screen that automatically creates and links sibling account, payee accounts, and rates and
schedules in one step
Batch Rates and Schedules: batch copies rates and schedules into selectable groups of children and staff

Child and Staff Billing
Child Billing Menu: open the menu to batch charge accounts
Child Payments Menu: opens the menu to batch record payments
Update Ledger: recalculates account balances and ledger histories
Staff Payroll Menu: opens payroll menu to calculate staff wages, run payroll, and print tax reports

Timesheets
Timesheets Menu: opens the menu to batch enter timesheets
Timeclock Loader: load contacts and transfer timesheets between the Childcare Sage and the Timeclock
Reports: print accounting reports, informations reports, batch bills, and timesheet logs

Center Tasks
Center Functions: opens the menu for center functions including menus, activities, center ledger, and journals
Utilities Menu: opens the menu for utility functions including setup, backup, cleanup, etc
Setup Menu: opens the menu for system setup and journal editing

Filter Records Menu:
Figure 4a:
                                     Menu to filter which contacts (children/staff/payers/etc) are shown on the contact
                                     screen

                                     Enrolled Children: contacts with category Child
                                     Current Staff: contacts with category Staff
                                     Enrolled Children w/o Other Payer Accounts: child contacts excluding other payers
                                     on child accounts (state, vouchers, etc.)
                                     Enrolled Families w/o Other Payer Accounts: one child sibling per family excluding
                                     other payers on all sibling child accounts (state, vouchers, etc.)
                                     All Payer Accounts: one child sibling per family plus all payers on sibling child
                                     accounts

Help:
Figure 4b:
                                     The manuals and guides for the Childcare Sage are in Adobe Acrobat PDF format. If
                                     you don’t have Adobe Acrobat on your computer, please install it from the Childcare
                                     Sage CD, or download it from:
                                     http://www.adobe.com .

                                     The Drop In Manual covers functions unique to the Childcare Sage Drop In Center
                                     version.

                                     Help / Training Videos: opens the Childcare Sage Internet Help Site

                   ChildCare Sage By B & I Computer Consultants, Inc. (www.childcaresage.com)                              5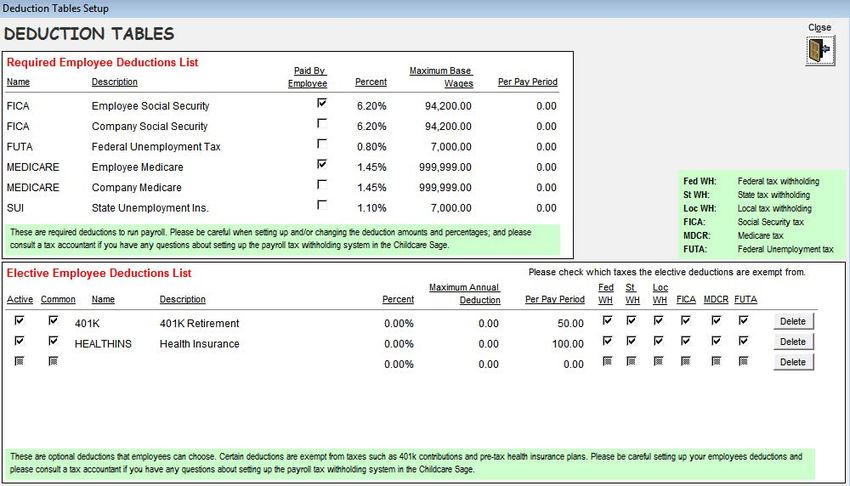
Records
Family Screen
Figure 5:
This screen shows family accounts in the
Childcare Sage. You can not enter or change
any information on this screen. To go to a
specific child on the contact information
screen, click the child’s picture or name in the
top center of the screen. To move between
families, select a family from the list on the
left side of this screen.
New children and staff can only be entered on
the contact information screen (figure 6).
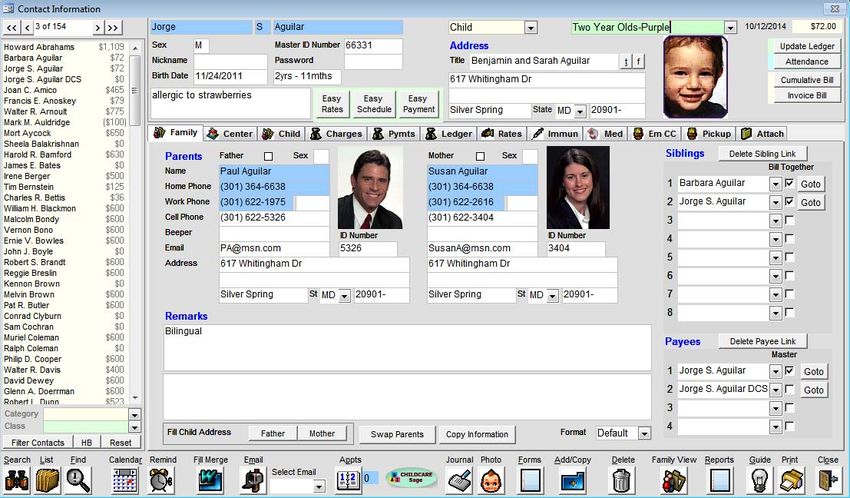
Contact Information screen
Figure 6:
This screen shows individual contact
information. Contacts are always ordered
alphabetically by lastname. There are record
selector buttons at the top left of the screen, a
contact selector list on the left side of the
screen, and command buttons on the top
right and along the bottom of the screen.
Using the Contact Selector:
The contact list on the left side of the screen shows all of the contacts and their current balances for the criteria or filter
chosen. (Clicking Filter Records Menu, then Enrolled Children on the main menu creates a filter to only show active
children, etc.) If applicable, the category and class for the current filter is shown at the bottom of the contact selector list.
You can change the filter to show any category and/or class by selecting the category and/or class that you want to see
and then clicking Filter Contacts. To turn off the filter and show all contacts, click Reset. Clicking HB hides the balances in
the contact selector (used when you want to show a parent their child’s record, but don’t want them to see family
balances.)
Taking and Selecting Photos:
Photos are not stored directly in the Childcare Sage. They are kept on your hard drive and imported when you open a
child’s screen. Because the photos must be imported and the photo areas are small, do the following when taking photos:
1) set your digital camera to the lowest resolution (640x480 vga),
ChildCare Sage By B & I Computer Consultants, Inc. (www.childcaresage.com) 6
2) try to zoom in onto the person’s face to create a head shot.

If you don’t have a digital camera at your center, we always recommend the kid type digital cameras from Vtech (about
$40.) They are low resolution, rugged, and have a flash. Any brand will work, but make sure it has a flash.

After you take the person’s picture, copy that picture file into the designated Childcare Sage photo folder (default folder is
c:\ccsage\ ). Your picture files should not be larger than 100kb each. If they are, the system will slow down significantly
when you move from contact to contact. If your files are larger, please use a photo editor to reduce the size of the
pictures. For future pictures, set your digital camera to the lowest resolution (640x480 vga).

Photos can be saved in .bmp or .jpg format. (Only .bmp images can be viewed in the Childcare Sage if Microsoft Word or
Microsoft Office is not installed on your computer. If Microsoft Word or Office are not installed on your computer, please
use a photo editor to save your photos in .bmp format.) Once the photo file is transferred to the photo folder, click the
photo area and select the file from the file selector box that appears. You can also click the Photo icon to select the
photos for the current contact from drop lists.

If your need to resize your photos, or convert your photos to a different format (.jpg -> .bmp, etc,) we suggest that you
download and install the free FastStone Photo Resizer from http://www.faststone.org/FSResizerDetail.htm .

The top selector buttons have the following functions:  next >> last contact

Update Ledger: updates the ledger for the current child/family
Attendance: (for category: child) opens the timesheet screen for the current child
Timesheet: (for category: staff) opens the timesheet screen for the current staff member
Cumulative Bill: prints a cumulative bill for the current contact from the account start date to the current date.
Invoice Bill: prints an invoice bill for the current contact for the current day/week/month depending on the default billing
period for that child set in the Rates tab.

The date and dollar amount (in yellow) at the top right is the account balance for the contact shown through the period in
the date. To update the balance, click Update Ledger on the main menu or on the contact screen, click Cumulative Bill or
Invoice Bill, or run an account balance report from the Report Menu.

Fill Child Address: (at the bottom of the family tab) copies the address information from the parent areas in the Family tab
to the account address next to the contact’s name. We recommend that you first fill in the parent’s addresses. You can
then copy the parent address into the child’s address by selecting which address you want to copy (Father/Mother) and
then clicking Fill...
Swap Parents: swaps the parents information (father->mother,mother->father. This is usually used after data conversions
to make sure that data is in the correct place.
Copy Information: lets you copy selected information from another contact into the current record (used to copy pickup
persons, charges, payments, etc from one contact to another.)

The bottom half of this screen is broken into tabs that display information about the contact. The tabs shown change
based on the yellow contact category selected at the top left of the screen.
Tabs visible for category: Child- child, charges, payments, ledger, rates, immunizations, medical, emergency pickup,
pickup, attachments
Tabs visible for category: Staff- staff, charges, payments, ledger, rates, certifications, attachments
Tabs visible for all categories- family, center (the schedule area in the center tab is only enabled for children, staff, and
waitlist.)

ID Numbers
ID numbers are the codes that children, parents, and pickup persons will use to sign children in/out, and that staff will use
to sign in/out. ID numbers must be numeric and can be any length from 1 to 5 digits. For child master id numbers, we
suggest the last 4 digits of the child’s home or parent’s cell phone plus a digit for each sibling (if there are 2 siblings and
the last 4 of the sibling’s home phone is 1234, make the master id numbers 12341 for sibling 1, and 12342 for sibling 2.)
For staff id numbers, we suggest the last 4 of the staff’s cell phone number. For parent and pickup person ID numbers, we
suggest the last 4 digits of that person’s cell phone number.

There are a total of 11 id numbers (master ID number, 2 parents, 4 pickup persons, and 4 emergency contacts) that can
be used in the timeclock sign in/out program for each child.

                    ChildCare Sage By B & I Computer Consultants, Inc. (www.childcaresage.com)                                   7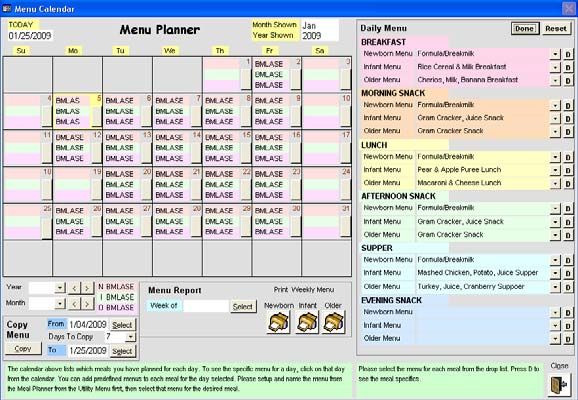
For staff with children that attend the center, you should setup 2 id numbers, one for the child and one for the staff
member. The reason for this is so the staff member can sign in/out for breaks without having to also sign their child in/out.

Family Tab (figure 6)

Siblings link

The siblings link combines the charges and payments for all of the siblings in a family into one family bill

Siblings can either be added initially via the Easy Enroll screen, or later using the Add/Copy function on the Contact
Information screen. You can add up to 8 siblings to a sibling link.

To manually add sibling accounts for children that are already entered into the ChildCare Sage:
   1) click Add/Copy at the bottom of the original child’s record (figure 7)
   2) click Add Sibling of Current Child
   3) change the name to the sibling’s name and select which information you want to copy at the bottom left
   4) click Add
   5) repeat steps 1-4 for all other siblings

The youngest child should always be the first sibling in the sibling link. The first sibling entered is also the master sibling
and their Title box text will be used on the combined balance reports and bills.

Payee links

Early versions of the Childcare Sage had an add-copay button and copay amount in the rates area for each child. The
system would simply track the copay charges and all payments on the account would be flagged with the payee. The
drawback to this was that the system couldn’t charge extra charges such as late payments, late pickups, registration fees,
etc to a specific payee. Because of this, the centers couldn’t give the parents a separate bill that included only the extra
charges and the copays. One solution could have been to mark each charge and payment with a payee. This would
require extra work whenever a charge or payment was entered and this method was also prone data entry mistakes.

We solved this problem with payee links. The payee links function allows up to 4 payers to pay a child’s bill, such as the
parents and the state. The function lets each account in the link have its own ledger and balance, and lets each account
use the child’s timesheet hours to calculate what that account or payer owes. Generally payee links are used for children
on subsidy, or if 2 parents want to split a child’s bill.

Before creating payee links, we recommend that you define a separate class (added to the list of classes that includes
infant, toddler, preschool, etc,) for each type of responsible party other than the parent (State, CIS, DCS, etc). You can
add new classes on the Screen Choices screen opened from the Setup Menu.

Payees can by added by:

A) automatically add the accounts when adding children on the Easy Enroll screen by checking Agency in the sibling row
and then selecting an agency class,

OR

B) manually add payee accounts for children that are already
entered into the ChildCare Sage:
    1) click Add/Copy at the bottom of the original child’s
        record
    2) click Add Payee for Current Child
    3) select the agency in the Class selector
    4) Select which information you want to copy at the bottom
        left
    5) click Add
repeat steps 1-5 for all other payees

Once the payee accounts are added and linked, change the rates in each payee account to what that party is responsible
for.
                    ChildCare Sage By B & I Computer Consultants, Inc. (www.childcaresage.com)                                    8
Center Information Tab
Figure 6a:

Enroll Date: when the child first started at the center
End Date: when the child withdrew from the center (leave blank until the child withdraws or leaves)

To track meals for children, check the Track Meals checkbox. The Timesheet Loader will automatically check off meals
that the child consumed while they were at the center. If you are not using the Timeclock, the Childcare Sage will also
check off meals that the child consumed when you transcribe the child’s timesheets on the batch timesheets screens. You
can also enter meal specifics manually on the attendance screen, or on the Batch Meal Entry screen.

For CACFP reimbursement, please select the child’s Tier. Tier reimbursement values are setup on the Choices screen
opened from the Setup Menu.

Portion Level and Meal Category are used for the food production reports to select how much food the current child eats.
The portion level is a percentage of the standard portion size set on the Menu Choices screen (this was created because
different children of the same age and class can eat different amounts of food for each meal.) The meal category selects
whether the child is a newborn/infant/older child.

The classifications are used to further categorize the child records. Some examples are the child’s race, level in the
program, etc. The Classification report in the Report Menu counts how many children are in each classification.

The bus run school information area displays directions to preschool/school from the childcare center for bus runs.

Schedule Setup

The ChildCare Sage can store an unlimited number of schedules for each contact (child/staff/waitlist) in the system. Each
schedule can cover a specific class/room for any date period (including open date, ongoing schedules.) Each account can
have 2 basic types of schedules: an account specific schedule (used for the current child/staff/etc only,) or a global
schedule from the Chart of Schedules (batch schedules.) Each schedule can also store up to 2 shifts per day. (If a child
comes before and after school, or if a staff member comes in the morning and comes back in the afternoon.)

All Account Specific Schedules must have a start date and an end date for when that schedule is in effect. (For example,
you can set up a schedule for a child for Monday and Tuesday in Room 2 and Wednesday and Thursday in Room 3 from
9/1/2012 to 12/31/2012, and you can setup a schedule for Room 3 from 1/1/2013 to 6/31/2013.) Global schedules from
the Chart of Schedules can be open, or can have effective dates assigned to them. Any dates entered for schedules
selected in the Chart of Schedules override any global date settings (in the master Chart of Schedules.)

Schedules in the Childcare Sage are used to forecast how many children or staff will be at the center for any day and
time, to create sign-in sheets, to run capacity and planning reports for future periods, and to charge accounts for selected
billing rate types. The arrive/leave time choices in the schedule setup screens are entered on the Screen Choices screen.

Schedule Setup: Copies existing schedules from other contacts into the current account.
Replace: deletes existing schedules and copies the selected schedules to the current child’s account
Add: adds the selected schedules to the current child’s account

Add New Schedule: Add new schedule
Exp: Edit the current schedule (figure 6d.1)
                    ChildCare Sage By B & I Computer Consultants, Inc. (www.childcaresage.com)                             9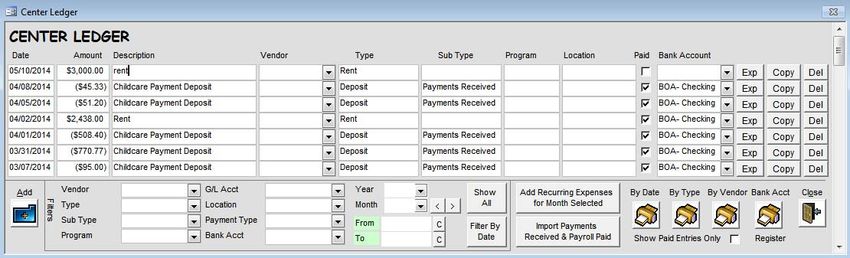
Del: Delete current schedule

Copy Schedule from Other Schedules: copies the days and hours from other children’s accounts
Copy Schedule from Rate Hours: copies the days and hours from the Rate Schedule hours in the rates tab into the
current schedule

Edit Schedule                         Easy Schedule
Figure 6a.1:                          Figure 6a.2:
                                                                The Easy Schedule screen lets you setup schedules for
                                                                the current contact. Each schedule must have a start
                                                                and end date and times for at least 1 day.

                                                                A,L: select the time from a graphical time selector
                                                                Save: save the schedule to the current contact’s
                                                                account

Quick Scheduling
Figure 6b:
                                      The Quick Scheduling screen is designed for centers who run a morning and
                                      afternoon program and want a quick monthly checklist for which children will be
                                      attending on each day. This function is standalone and does not affect any other
                                      part of the system. Simply click the checkbox for am/pm for each day the child will
                                      attend. When you are finished, click Record.

                                      Blank Schedule Chart: print an empty schedule chart for the current child
                                      Record: save the am/pm sessions selected
                                      Schedule Chart: print a completed schedule chart for the center

Child Tab
Figure 6c:
                                                                 The child tab (staff tab for staff) displays the user
                                                                 defined fields which are setup on the Choices screen
                                                                 opened from the Setup Menu. The childcare sage
                                                                 allows up to 60 user fields for children (12 checkbox,
                                                                 12 date, 12 currency, 12 text, and 12 combo text,) and
                                                                 another 60 user fields for staff. All of the fields are fully
                                                                 searchable on the Find Contacts screen, and can be
                                                                 included on the Contact Report opened from the
                                                                 Report Menu.

Charges Tab
Figure 6d:
                                                                 The charges tab lets you edit charges for the current
                                                                 account. You can add, change, or delete charges.

                                                                 Charge Menu: lets you select and add charges to the
                                                                 current account of the expense menu
                                                                 Add: goes to the first empty row in the charges list
                                                                 Delete: deletes the current charge row (the current row
                                                                 is the last one you clicked on)

                                                                 Payment ID: lets you link charges to payments (used to
                                                                 track whether specific charges were paid)

                   ChildCare Sage By B & I Computer Consultants, Inc. (www.childcaresage.com)                               10
Payments Tab
Figure 6e:
You can enter payments directly into this area.
Add: goes to the first empty row in the payments list
Delete: delete the current payment
Receipt: prints a receipt for the current payment
Separate Payments: lets you break up a payment by
program (cost center)
**** Tuition Direct: Please goto ReliaFund EFT
Easy Payments: lets you quickly enter a payment for the Easy Payment Figure 6e.1:
current account. Most of the screen is prefilled for today’s date
and the current account balance.
C: select the date from a calendar
Post: post the payment to the current account
Rates Tab
Figure 6f: The ChildCare Sage can store an unlimited number of
rates for each contact (child/staff) in the system. Each
rate automates a specific type of charge (tuition, late
pickup, registration, extra classes, stay and play, etc,)
for any date period (including open date, ongoing
rates,) and is either a global rate from the Schedule of
Charges (batch rates,) or an account specific rate (set
up and used for the current child/staff only.) Rates in
the system are used to charge accounts and can also
be used to forecast revenue for any date or range in
the future.
All Account Specific Rates must have a start date for when that rate is in effect (the end date is optional.) Global rates
from the Schedule of Charges can be open, or can have effective dates. Any dates entered into the start date and end
date columns of each contact’s Schedule of Charges Rates list override any preset start and end dates for that Schedule
of Charges rate.
Rates Setup
The Rates tab on the contact information screen shows you a list of rates for the current account. You can edit or add
rates by clicking the corresponding buttons.
Billing Start Date: the first date that the system can start charging the current child/staff account.
Default Billing Period: what time period the rates are based on. This can be different from how often the parent pays their
bill (ie: you can charge a parent $100 a week, but they can pay every 2 weeks.)
Discount Programs
The childcare sage uses global discount programs that are tied to the child’s record. With global discounts you don’t have
to enter any discounts for each rate, or have to re-apply discounts after you change rates. You can control which rates get
global discounts by checking the Apply Discounts checkbox in the appropriate rate setups. Most centers apply discounts
to childcare rates, but don’t apply them to late pickup or overtime rates. Discount Programs are setup on the choices
screen.
Discount Name: select the discount
ChildCare Sage By B & I Computer Consultants, Inc. (www.childcaresage.com) 11Order: what order do you want the discounts applied to the charges
Sequential: do you want the discounts to apply after each other, or to apply off of the original amount (ie: if I apply 2
sequential discounts to a $100 charge, 10% for siblings and another 20% for membership, sequential means, $10
discount for siblings and another $18 for membership. 10% off $100 and then 20% off of $90.)
Start: date the discount will start
End: date the discount will end
Rates Functions
There are 5 ways to add rates into an account:
1) Copy rates from another account
Account Specific Rates: copies all of the account specific rates from the selected contact into the current contact
Schedule of Charges: copies all of the schedule of charges rates from the selected contact into the current contact
Replace: deletes existing rate setups before copying the new ones into the current contact
Add To: adds the selected rate setups to the current contact
2) select Schedule of Charges Rates
3) Add New Rate Setup: opens the New Rates screen (figure 6i.1) to add Account Specific Rates to this account. Please
see the Rates section at the end of this manual for a step by step guide to setup rates
Figure 6f.1 Figure 6f.2:
4) Easy Rates: opens the Easy Rates/Wages screen to add common rate types to the current account
Easy Rates Figure 6f.3: Easy Wages Figure 6f.4:
The Easy Rates screen lets you setup common rates for The Easy Wages screen lets you setup common rates for
child accounts. Each rate must have a start date and an staff accounts. Each rate must have a start date and an
amount. Late Pickup Rates must also have a time that the amount. If you pay overtime, please enter the hourly rate for
center closes. overtime (time and a half, etc.)
C: select the date from a calendar C: select the date from a calendar
Save: save the rate to the current child’s account Save: save the rate to the current staff’s account
5) Build Rates/Charges: this is a graphical table used to backdate and rebuild fixed based rates for the history of the
account (figure 6i.5).
ChildCare Sage By B & I Computer Consultants, Inc. (www.childcaresage.com) 12Figure 6f.5:
The Build Rates screen moves you through setting up the rate history of the account. You start by selecting the Billing
Period, then entering the Billing Start Date (when you want the system to start charging the account), and then entering
the number of rate changes (how many times the rates on the child’s account changed.) Finally, you fill in the rates and
dates for the rate change history.
When you fill in the rate change history, each row has a rate and a date column. The date column is the last date that the
rate in that row was charged. Since the current rate is ongoing, there is no end date for the current rate. You can stop
charging the rates if the child left the center for a period of time by simply entering 0 into the rate column and entering the
date they returned into the date column.
After rebuilding and charging past charges, the system will automatically set up the Childcare Sage billing system to
charge the amount in the the current rate box.
ie: Figure 6f.6: ie: Figure 6f.7:
$100 from 1/1/08-3/8/07, then $100 from 1/1/08-3/8/08, then
$120 from 3/9/07-5/31/08, $120 from 3/9/08-5/31/08, then
then $150 from 6/1/08 to now.
$0 from 6/1/08-9/6/08, then
$180 from 9/7/08 to now.
Immunization Tab
Figure 6g:
This area keeps an immunization history for each child.
You can set up the immunizations system in the
Immunization tab of the Screen Choices screen
opened from the Setup Menu. The Expires column is the
date that the next immunization shot is due. As the child
finishes each immunization, check the immunization
complete.
Automatically Fill in Shot 1 Dates based on Birthdate:
automatically fills in Shot 1 and Expire dates for all
immunizations for a newborn.
Medical Information Tab
Figure 6h:
Displays medical information for the child, including
doctors, alergies, medical problems, illnesses and what
medical conditions the child is prone to. All of the labels
for illnesses and child prone to conditions can be setup
on the Screen Choices screen.
ChildCare Sage By B & I Computer Consultants, Inc. (www.childcaresage.com) 13Emergency Contact Tab
Figure 6i:
Displays the name and contact information for the child’s
emergency contacts.
The selector to the right of each emergency contact
listing lets you copy father/mother/pickup persons
contact information into the emergency contact listing.
To copy the information, select the source in the drop
box.
Pickup Person Tab
Figure 6j:
Displays the name, contact information, id numbers, and
photos for up to 4 additional authorized pickup persons.
If the contact you are entering has siblings in the
system, you should only enter the pickup person ID
numbers for 1 of the siblings (generally the youngest
child.)
Emergency Contact Tab
Figure 6k:
Displays the name and contact information for the child’s
doctor, dentist, and emergency contacts.
The selector to the right of each emergency contact
listing lets you copy father/mother/pickup persons
contact information into the emergency contact listing.
To copy the information, click the contact you want to
copy and then click Fill.
Attachments Tab
Figure 6l: Figure 6l.1:
ChildCare Sage By B & I Computer Consultants, Inc. (www.childcaresage.com) 14You can attach scanned documents and files to child records and open those documents from within a child’s records. To
attach files, simply copy the files into the designated files folder on your computer (selected on the System Setup screen
opened from the Setup Menu (c:\ccsage\ by default).) Next click Edit List, then click Add, and finally fill in attached file
information. You can select the file by clicking the … icon.
Contact Information Screen Command Icons
Search: opens the find contact screen (figure 11)
List: opens the Contact List screen (figure 12)
Calendar: opens the calendar screen
Remind: opens the appointment reminder screen if there are current appointments in the reminder queue.
Searching for a contact on the contact information screen:
Find: opens the find box Please refer to the search guide for search rules.
If a search is performed and contacts are filtered, a blue
F for filtered appears next to the arrow selectors.
Fill Merge: fills a table with most of the information for the current contact. (Microsoft Word accesses the filled table for
the mail merge feature. This feature is explained in the Contact List section.)
E-mail: opens the default e-mail program and prefills the e-mail address for the current contact and the subject and body
selected from the email selector.
Appts: opens the Appointments screen and displays the appointments for the current contact in reverse chronological
order (the box beside the Appts button counts how many future appointments are scheduled with the current contact)
Journal: opens the contact journal screen for the current contact
Format: selects whether the current account is the master child account, or a payer account. If Payer is selected, the
medical related, and pickup person tabs are hidden.
Add/Copy
The Add Contact screen lets you add new contacts or copy existing contacts. It also lets you add siblings for existing
children, and payers for existing child accounts. To add a new contact, select the type of contact from the top of the
screen (figure 7). Depending on your selection, different boxes and options open. In addition, the various copy selectors
will open and select depending on your choice.
Figure 7a: Add Child Figure 7b: Add Staff
Adds new Child record. You can copy information from Adds new staff record.
the current child (the record you are on,) by selecting the
copy option checkboxes at the bottom left.
ChildCare Sage By B & I Computer Consultants, Inc. (www.childcaresage.com) 15Figure 7c: Add Sibling Figure 7d: Add Payee
Adds sibling record to the current child (the record you Adds payee record for the current child (the record you
are on.) You can copy information from the current child are on.) You can copy select information from the current
by selecting the copy option checkboxes at the bottom child by selecting the copy option checkboxes at the
left. After you click Add, the new sibling is automatically bottom left. The name of the class selected is
linked to the current child. automatically added to the name on the new payee
record. After you click Add, the new payee record is
automatically linked to the current child.
Figure 7e: Add Other Figure 7f: Copy Contact
Adds new visitor, etc record. Copy the current record.
Delete: removes the current contact as well as all related contact information from the system. It is very important that
you understand that the delete button not only removes the contact’s information from the system, but also removes all of
the timesheets, charges, payments, contact journal records, and meal records for the current contact from the system.
Family: opens the family view screen for the current child (Figure 5)
Search Guide: displays the field search rules
Print: opens a contact profile report that includes all of the contact information including payments and immunizations
where applicable (the profile report is different depending on whether the contact is a child, staff member, or other.)
Child Timesheet screen (Child specific screen labels will change for Staff Paysheets)
Monthly Billing Timesheet
Figure 8:
The Child Timesheet screen graphically displays the
attendance timesheet for each day of the selected
month. If the billing period is monthly, the calendar
shows each day in the month (1-31). If the billing period
is weekly, all of the calendar weeks in the month are
shown. A calendar week goes from Sunday to Saturday.
For weekly billing periods, the first week may contain
days from the prior month, and the last week may
contain days from the next month.
The month at the top of the calendar is the month
shown. The buttons in each of the day boxes reflect a
count of the total number of hours attended for that day.
If you click on any of the hour count buttons on the
timesheet screen, the system lets you edit the arrive and
ChildCare Sage By B & I Computer Consultants, Inc. (www.childcaresage.com) 16Weekly Billing Timesheet leave time for the date clicked and the meals record for
Figure 9: that day if the Record Meals checkbox is checked for the
current contact on the Contact Information Screen.
The entry boxes next to the year and month labels at the
bottom left of the screen let you pick which year and
month you would like to see; the arrow buttons next to
the entry boxes let you move between the year and
month, respectively.
Charge Accounts
Lets you charge accounts for the current family (child
and siblings) for any period entered. This simply uses
the Charge Accounts (Batch Charges) screen for only
the current family and for the date period entered.
Print Bills
This area lets you select a period to print bills for the current contact. The Bill Period Selected selector lets you pick the
weeks you want to print the bill for.
Cumulative Bill: opens an account history bill grouped by the display selector (Monthly/Weekly) up to the To date showing
all charges and payments in separate columns. You can select weekly/monthly totals, or individual charges and payments
(if no dates are selected, the cumulative bill starts from the billing start date in the current contact’s Rates tab.)
Invoice Bill: opens an itemized quickbooks style bill for the current child for the period in the FROM and To dates showing
charges, and payments for the period on separate lines (if no dates are selected, the invoice bill calculates for the entire
month.) If you select a date in the calendar and click Invoice, the system will show an invoice bill for the day selected.
No day clicked/Done clicked Day clicked and Track Meals Day clicked and Track Meals
Figure 8a: checked- Figure 8b: not checked- Figure 8c:
Delete: deletes the current charge (to
select the current charge, click on any
box in that charge’s row) Copy Scheduled Hours: copies scheduled Attendance: prints the daily
hours for the day shown into the timesheet attendance report for the date
checkbox: charge is paid records for that day. selected showing the number of
children arriving, leaving, and in
Charge Menu: opens the charge menu each class for each hour for all
which lets you charge predefined charges scheduled attendance hours and
to the day shown. timesheet hours.
Record: store the added or edited daily Done: hide the time log box and
timesheet records. update the calendar.
Meals Area
Figure 8d:
To record a meal for the current child, check the checkbox to the left of the
meal name (BR, MS, LU, etc.) The meal’s time will automatically be set to the
current time. You can edit the meal time by typing directly into the meal time
box. Once a meal is checked, the F button to the right of the meal is enabled
(turns from grey to black). To enter what the child ate specifically during the
meal, click the F button, and the Meal Menu Selector will pop up (figure 10).
ChildCare Sage By B & I Computer Consultants, Inc. (www.childcaresage.com) 17Reset: clears the meal values for the current day
Print: prints the daily meals report
Meal Menu Selector
Figure 10:
To select the menu items consumed, simple click Pick to the left of the
food item. You can click any item and that item will be added to the Food
Consumed box at the bottom. You can also type directly into the Food
Consumed box. If an item the child ate is not on the menu, you should
add the item to the menu by going to Menu Choices on the Utility Screen.
Once you click Close, the food consumed will be recorded, and the Meal
name box for the meal you just clicked will be highlighted in Green. (The
Meal name box will only be highlighted in Green if there is a list of foods-
consumed for that meal.)
Find Contact screen
Figure 11:
You can search for contacts in the system via a
combination of any of the white boxes on the
find contacts screen. The system will search the
database for contacts matching the description.
If only one contact is found, that contact is
displayed on the contact information screen. If
more than one contact matches the criteria
selected, the Contact List (discussed below)
screen will come up and you will have the option
of choosing the contact you want to see, or you
can scroll through the contact list. Data can only
be entered on the find contact screen in the
white boxes. Please refer to the search guide
for search rules.
The User Fields areas at the bottom of the
screen only appear if the Category (left side,
half way down) is set to “Child” or “Staff”.
Children Only- Exclude Payees, etc: returns active children and excludes all payee links and non-child contacts.
Families Only- Exclude Siblings, Payees, etc: returns 1 contact per family by excluding all siblings except the first one
listed in the sibling links, and by excluding all payee links and non-child contacts. Used for mailing lists, labels, etc.
Payers Only- Exclude Siblings: returns 1 contact per family by excluding all siblings except the first one listed in the sibling
links, and all payee links for all siblings
Age Bracket Filter: searches for children who will be turning the selected age during the current week. This is used to find
children who’s rates will increase once they turn the selected age. After using this function, use the batch rates function to
change the rates for the children found.
Immunization Expire Date: searches for children who have immunizations expiring in the date period criteria entered.
Bill Owed: searches for children who have a balance matching the criteria entered.
Search: creates a filter based on your criteria and applies that filter to the database. If only one contact is found, that
contact is displayed on the contact information screen. If more than one contact is found, the Contact List screen displays
a list of all of the contacts found that match the criteria entered.
List: opens up the Contact List screen without applying any filters.
Search Guide: displays the field search rules
Reset: clears all criteria on the screen.
Close: goes back to the Contact Information screen
Saving Searches
ChildCare Sage By B & I Computer Consultants, Inc. (www.childcaresage.com) 18You can save searches and recall them at any time. To save a search, enter your criteria, enter a search name and click
Save. To recall a search, select the search from the Recall Search drop box.
Contact List screen
Figure 12:
The Contact List screen opens by either clicking the List button on the contact information screen, or if the criteria entered
on the Find Contacts screen returns more than one contact. The Childcare Sage has a list function that allows you to
individually select one/groups of contacts to use in batch functions, reports, emails, form letters, and labels. To turn on the
list function, click the Turn List Function On button at the top right. The list function lets you check or uncheck contacts
that will be included in the batch functions and reports. The list function is reset if you choose new search criteria on the
Find Contacts screen, or if you open and close the Find Contacts screen.
When the list function is off, the following options are available:
View Filtered Contacts: lets you scroll though the contact list on the contact information screen (to view all contacts; click
this button again or open and then close the Find Contacts screen.)
Goto Contact: opens the contact information screen for the contact to the left of the Goto Contact button
Report: opens the Report Menu screen
Search: opens the Find Contacts Screen
Close: goes back to the Contact Information screen
When the list function is turned on the following options are made available:
Fill Merge: fills the mail merge table with the names/addresses of the contacts on the contact list. After the table is filled, a
list of available mail merge letters appears (Figure 13.) You can select any of the letters that will automatically open in
Microsoft Word.
E-mail: opens the default e-mail program and prefills the e-mail addresses of the contacts in the contact list, and the email
subject and body of the email selected. (Emails sent to multiple recipients will automatically use the BCC line for email
addresses.)
Select All: selects all of the displayed contacts
Open Mail Merge Letter screen (To add more files to this screen, see the Childcare Sage User’s Guide)
Figure 13:
ChildCare Sage By B & I Computer Consultants, Inc. (www.childcaresage.com) 19Calendar screen
Figure 14:
The Childcare Sage has a built in appointment scheduling system to keep track of and remind you of parent conferences,
interviews, etc. The calendar screen graphically displays how many appointments you have for each day of the selected
month. The values next to the year and month labels under the calendar title specify which year and month is being
shown. The date in yellow at the top is the day being shown. The buttons in each of the day boxes reflect a count of the
total number of appointments for that day. A star next to the appointment count for any of the days shown means that you
have an appointment with the last contact viewed on that day. By clicking on any of the appointment count buttons on the
calendar screen, the appointments for that day will be displayed in the appointments list on the right half of the screen.
drop boxes next to the year and month labels at the bottom left of the screen set the calendar display
arrow buttons next to the entry boxes let you move between the year and month, respectively.
Month: displays all of the appointments for the month chosen on the appointments screen (figure 15)
Week (1..6): displays all of the appointments for the week chosen on the appointments screen (figure 15)
Enter: opens the appointment screen for the date in the date entry box
Close: goes back to the contact information screen.
Add: opens the expanded appointment entry screen to add a new appointment. The date for the new appointment will be
filled in with the date shown.
Delete: removes the appointment highlighted (to highlight an appointment, just click on any box in the appointment row
you want to delete)
Schedule: prints an hourly appointment schedule for the day shown
Print: opens the appointment list report
C: lets you graphically select dates (on the appointment list on the calendar screen, you must click C again after you
select a new date from the date selector screen.)
Exp (E): displays the current appointment in the expanded appointment screen
Goto (G): opens the contact information screen for the contact selected
Daily Ruler/Appointment Bar: the white and red bar visually shows when you have appointments scheduled for the current
day. Red means you have already scheduled an appointment during that time.
The ticks above the Appointment Bar let you easily add a new appointment on the Expanded Appointment (figure 16)
screen for the current day at the time clicked.
The ticks below the Appointment Bar let you change the time for an appointment. To change an appointment’s time, click
on the appointment time box you want to change, and then click a tick below the appointment bar.
ChildCare Sage By B & I Computer Consultants, Inc. (www.childcaresage.com) 20When an appointment date, time, or duration are entered or changed, the system performs a check to make sure there
are no overlapping appointments. If any are found, you are informed.
Appointments screen Expanded Appointment screen
Figure 15: Figure 15a:
The appointments screen shows a detailed listing of appointments. The appointments screen is opened when you click to
view a week or the month from the calendar screen, or if you to click the Appts button on the contact information screen
(this brings up all of the appointments in reverse chronological order for the current contact only.)
Appt with Last Contact Viewed: fills in the Contact box with the last contact viewed on the contact information screen
Calendar: is only visible if the appointments screen was opened from the calendar screen. If the calendar button is
clicked, the calendar screen is opened to the date formally viewed in it
All of the other buttons on the Appointments screen have the same function as the appointment list on the calendar
screen.
When an appointment date, time, or duration are entered or changed, the system performs a check to make sure there
are no overlapping appointments. If any are found, you are informed.
Appointment Reminder screen
Figure 16:
The appointment reminder screen appears before a scheduled appointment. This feature is activated on the Setup
screen. Depending on the settings on the Setup screen, the system checks for upcoming appointments on a selectable
interval. Appointments are checked by a selectable period in advance. (If the appointment reminder setup is: Check every
5 minutes with a 30 minute appointment warning, the system will check every 5 minutes for appointments between 30 and
35 minutes from the current time.)
C: lets you graphically select dates
Exp: displays the current appointment in the expanded appointment screen
Goto: opens the contact information screen for the contact selected
Postpone: adds the time in the box to the left of this button to the current appointment time.
Delete: removes the appointment highlighted
Close: goes back to the contact information screen with the current contact's information
ChildCare Sage By B & I Computer Consultants, Inc. (www.childcaresage.com) 21Contact Journal screen
Figure 17:
The Childcare Sage includes a contact journal system with 4 daily log types:
1) a journal log to enter progress reports, achievements, milestones, comments, etc ,
2) an event log to record accidents, illnesses, allergic reactions, comments, etc ,
3) a checklist log to track activities, meals, etc , and
4) a daily form log to track age specific information (diaper changes, meals, naps for infants, etc)
Each entry type can be printed out by date range, and events can be grouped (figure 17a.)
The contact journal is broken into sides. The left side contains the journal calendar which shows if you have journal logs,
event logs, or checklist logs entered for that day (the journal and checklist boxes show XX if they have entries, the events
box has event abbreviations.) When any of the calendar buttons are clicked, the right side of the screen shows the daily
log type clicked. The daily form appears in its own window.
Journal log (figure 17b)
You can type directly in the top journal area. After journals are entered, they can only be changed on the day they were
entered. You can add more to a locked journal at any time by clicking:
Add More to Locked Journal: opens the daily journal editor to add more to the daily log (figure 17b)
Event log (figure 17c)
You can click Add New Event (figure 18c) to enter new events. Event logs cannot be changed once they are entered.
Checklist log
Simply check off the desired checkboxes. Checklist logs can be edited at any time.
Daily Form log
Simply enter information in the desired area. Daily form logs can be edited at any time.
Done: updates the journal calendar to show the logs added.
Print: lets you print the selected log type for the period selected. You can also filter the event log report by the event type,
and you can selected whether you want events to be printed grouped by event type, or in chronological order.
Close: goes back to the contact screen.
ChildCare Sage By B & I Computer Consultants, Inc. (www.childcaresage.com) 22Figure 17a: Figure 17b:
Figure 17c:
Easy Enroll Screen
Figure 18:
To add children to the program, click Easy Enroll from the main menu. On this screen, you enter 1 family at a time with up
to 6 siblings. You can also enter parent and doctor information, if needed. For each sibling, you enter their birthdate and
their class. Once you click Enroll, the system will automatically create the accounts, link the siblings together, and assign
rates based on your predefined room rates (see the Batch Class Setup section in this manual.) To enter new families,
close this screen and come back into it.
To enroll children, you must enter at least the following:
1) child’s first and last name
2) child’s birthdate
3) child’s primary class (if applicable)
4) Timeclock ID for the children/parents if you want to use the ChildCare Sage Timeclock
ChildCare Sage By B & I Computer Consultants, Inc. (www.childcaresage.com) 23Batch Rates & Schedules Screen Batch Rates & Schedules Find Contacts
Figure 19: Figure 19a:
Search: opens the find contact screen (figure 19a) to filter the list on the left side of the Batch Rates & Schedules screen.
Select All: checks all of the listed contacts
Close: goes back to main menu
Copy Rates to Children/Staff lets you save the retrieved rates to the selected contacts.
Use Rates From:
Contact: load the existing rates from the selected contact
Schedule of Charges: load the rates from the schedule of charges entry selected
Replace Rates: clears the existing rates from the checked contacts accounts and copies the selected rates into it
Add Rates: adds the selected rate to the checked contacts accounts without deleting existing rates
Copy Schedule to Children/Staff lets you save the retrieved schedule to the contacts selected.
Load Schedule From:
Contact: load the existing schedules from the selected contact
Chart of Schedules: load the schedules from the chart of schedules entry selected
Replace Schedule: clears the existing schedules from the checked contacts accounts and copies the selected schedules
Add Schedule: adds the selected schedule to the checked contacts accounts without deleting existing schedules.
Copy Class Rates & Schedules to Children/Staff lets you save the retrieved schedule to the contacts selected.
Class: load the rates and schedules for the class selected (rates and schedules are setup on the Batch Class Setup
screen.
Replace Rates & Schedules: clears the existing rates and schedules from the checked contacts accounts and copies the
select class setup into it
Add Rates & Schedules: adds the selected class setup to the checked contacts accounts without deleting existing rates
and schedules.
ChildCare Sage By B & I Computer Consultants, Inc. (www.childcaresage.com) 24Child Billing
Figure 20:
Easy Charge: simplified batch charge accounts for children
Charge Accounts: batch charge accounts for children
Batch Charge Entry: batch chart entry of charges for children
Batch Charge List: batch charges for individual children / classes
Barcode Charges: batch charges for children by scanning items with a barcode
scanner
The Tuition Direct (EFT) Functions in the childcare sage let you schedule and post
ACH and Credit Card transactions to Reliafund:
Schedule Payments: schedule ACH and Credit Card Payments for child accounts
Post Payments: post selected ACH and Credit Card Payments to Reliafund
Charge for Returns: check for returned ACH echecks and charge for returned checks
Easy Charge:
Figure 21:
Easy Charge is a simplified version of the Batch Charges /
Charge Accounts screen. It lets you easily charge rates for
a selected period of time. To charge rates, fill in the bottom
of this screen left to right. If your center uses fixed rates
(charged regardless of attendance) and timesheet rates
(charged only if the child is at the center,) you would click
Calculate Charges at the beginning of the week/month for
the tuition/contracted rate, and then Calculate Timesheet
Based Charges Only at the end of the week/month for
additional charges such as late pickup, stay and plays, and
other hourly based charges.
Charge Period: what period do you want to charge for
Start Day: any day in the period you want to charge for
Calculate Charges: calculate charges for all child accounts for the time period entered using the rates in their account
Calculate TSB Charges Only: calculate charges for all child accounts for the time period entered using only the timesheet
based rates in their account
Show UnCharged Accounts: shows list of accounts that were not charged including last charge and payment, and balance
Post: record all charges shown to their respective accounts. No charges are applied to the accounts until they are posted.
The default password to post charges is: post
Charging Accounts:
Figure 22:
ChildCare Sage By B & I Computer Consultants, Inc. (www.childcaresage.com) 25You can also read