Introduction Admin/Clinical User Guide - V1.0 - Primary Care Sheffield
←
→
Page content transcription
If your browser does not render page correctly, please read the page content below

Introduction
                             Admin/Clinical
                               User Guide
                                  V1.0

Emis Web Introduction Admin /Clinical   Page 1 of 66   Created/updated date(November 2019)
Table of Contents

INTRODUCTION: ......................................................................................................................................................................... 5
OVERVIEW OF EMIS WEB ........................................................................................................................................................... 5
WHAT IS THE SPINE: ................................................................................................................................................................... 5
GOVERNANCE, SECURITY AND INFORMATION AUDITING: .......................................................................................................... 6
LOG ON TO EMIS WEB: ............................................................................................................................................................... 7
Option 1 – Manual User Name and Password Access: ........................................................................................... 7
Option 2 - NHS Smart Card Access: ....................................................................................................................... 8
NAVIGATING EMIS WEB AND THE HOMEPAGE ......................................................................................................................... 10
    Home Page .............................................................................................................................................................................. 10
    Configuring your homepage .................................................................................................................................................... 10
    Homepage links ....................................................................................................................................................................... 10
    Quick Launch Menu Pane ........................................................................................................................................................ 11
    Organisation Notepad pane .................................................................................................................................................... 11
    EMIS Support Latest News Pane .............................................................................................................................................. 11
    RSS Feed pane.......................................................................................................................................................................... 11
    Access modules using the EMIS button ................................................................................................................................... 12
    Access modules using the quick access toolbar ....................................................................................................................... 12
    Configure the quick access toolbar .......................................................................................................................................... 12
    Function Keys ........................................................................................................................................................................... 13
    Panic Button ............................................................................................................................................................................ 13
    Send a panic alert .................................................................................................................................................................... 13
PATIENT FIND AND THE PATIENT PRECIS BAR ........................................................................................................................... 14
     Finding a Patient ..................................................................................................................................................................... 14
     Search for patients using various methods: ............................................................................................................................ 14
     Precis Bar ................................................................................................................................................................................. 15
     Expand and collapse the patient précis ................................................................................................................................... 16
     View an address on a map ...................................................................................................................................................... 16
     View other patients in the same household ............................................................................................................................ 17
     Copy information from the patient précis to the clipboard ..................................................................................................... 17
     Managing patient warnings .................................................................................................................................................... 17
     Add a patient warning ............................................................................................................................................................. 17
     Edit a patient warning ............................................................................................................................................................. 18
     Remove a patient warning ...................................................................................................................................................... 18
     Clearing Patient Details from The patient précis ..................................................................................................................... 18
     To clear the currently selected patient .................................................................................................................................... 19
ACCESSING EXTERNAL LINKS AND SESSION MENU.................................................................................................................... 19
     Mentor Online ......................................................................................................................................................................... 19
     Patient UK................................................................................................................................................................................ 19
     NHS e-Referrals........................................................................................................................................................................ 19
     Changing your location............................................................................................................................................................ 20
     Changing your password ......................................................................................................................................................... 20
     EMIS Web Time out (some of this has changed due to an update with Identity Agent) ......................................................... 20
PATIENT CARE RECORD OVERVIEW .......................................................................................................................................... 20
     Summary ................................................................................................................................................................................. 20
     Consultations Screen ............................................................................................................................................................... 21
     Medication Screen ................................................................................................................................................................... 23
     Problems screen ...................................................................................................................................................................... 24
     Investigations Screen ............................................................................................................................................................... 25
     Care History Screen ................................................................................................................................................................. 27
     Diary Screen ............................................................................................................................................................................. 28
     Documents Screen ................................................................................................................................................................... 30

            Emis Web Introduction Admin /Clinical                                         Page 2 of 66                                 Created/updated date(November 2019)
Referrals screen ....................................................................................................................................................................... 31
APPOINTMENT OVERVIEW ....................................................................................................................................................... 32
    Navigate Appointment book ................................................................................................................................................... 32
    Appointment Book screen and ribbon ..................................................................................................................................... 33
    To Navigate the Appointment Book ........................................................................................................................................ 34
    Session Holder filter ................................................................................................................................................................. 34
    Book an appointment for the current patient ......................................................................................................................... 35
    Book an appointment for a different patient .......................................................................................................................... 35
    Book an appointment for an unregistered patient .................................................................................................................. 36
    Find and book an appointment ............................................................................................................................................... 36
    Slot properties ......................................................................................................................................................................... 39
    Mark a patient as arrived/ leaving from the Patient Appointments screen ............................................................................ 39
    Cancel an appointment ........................................................................................................................................................... 40
CONSULTATIONS (ADMIN)........................................................................................................................................................ 41
    Adding a New Consultation: .................................................................................................................................................... 41
    Consultation properties ........................................................................................................................................................... 41
    Complete the Consultation Properties screen ........................................................................................................................ 41
    New Consultation screen and ribbon ....................................................................................................................................... 42
    Different points of entry .......................................................................................................................................................... 42
    Add a quick note ...................................................................................................................................................................... 43
    Add data using a template ...................................................................................................................................................... 43
    Save a consultation ................................................................................................................................................................. 44
    Edit a consultation ................................................................................................................................................................... 44
COMMUNICATIONS WITHIN EMIS WEB .................................................................................................................................... 44
   Workflow Manager ................................................................................................................................................................. 44
   Tasks 45
   Tasks screen and ribbon .......................................................................................................................................................... 45
   Tasks icons and indicators ....................................................................................................................................................... 45
   Adding new tasks..................................................................................................................................................................... 47
   Add a patient task ................................................................................................................................................................... 47
   Add an admin task ................................................................................................................................................................... 47
   Change the owner of a task ..................................................................................................................................................... 48
   Add a note to a task ................................................................................................................................................................ 48
   View the history of a task ........................................................................................................................................................ 49
   Reply to a task ......................................................................................................................................................................... 49
   Forward a task ......................................................................................................................................................................... 50
   Complete a task ....................................................................................................................................................................... 50
   Delete a task ............................................................................................................................................................................ 51
   Archive a task .......................................................................................................................................................................... 51
   Print a task .............................................................................................................................................................................. 51
   Print a task list ......................................................................................................................................................................... 51
   Change the priority of a task ................................................................................................................................................... 51
   Outstanding and overdue tasks ............................................................................................................................................... 52
   Task escalation ........................................................................................................................................................................ 52
   Information governance notifications ..................................................................................................................................... 52
   Screen messaging .................................................................................................................................................................... 53
   Send a screen messages .......................................................................................................................................................... 53
   Reply to a screen message ...................................................................................................................................................... 55
   Discard the message................................................................................................................................................................ 55
CONSULTATIONS (CLINICAL) ..................................................................................................................................................... 55
    Configure the homepage to show appointments .................................................................................................................... 55
    Automatically open a consultation on Send in ........................................................................................................................ 55
    Consultation properties ........................................................................................................................................................... 56
    Complete the Consultation Properties screen ........................................................................................................................ 56
    New Consultation screen and ribbon ....................................................................................................................................... 57
    When Adding a New Consultation ........................................................................................................................................... 58
    Add Multiple Problems ............................................................................................................................................................ 59
    Add an Examination ................................................................................................................................................................ 59
    Add a quick note ...................................................................................................................................................................... 61

            Emis Web Introduction Admin /Clinical                                        Page 3 of 66                                 Created/updated date(November 2019)
Prescribing & Issuing Medication ............................................................................................................................................ 62
        Acute Medication .................................................................................................................................................................... 62
        Repeat Medication .................................................................................................................................................................. 62
        Complete the issue .................................................................................................................................................................. 63
        Add data using a template ...................................................................................................................................................... 63
        Save a consultation ................................................................................................................................................................. 64
        Edit a consultation ................................................................................................................................................................... 64
LOCKING YOUR SESSION, LOGGING OFF AND CLOSING EMIS WEB............................................................................................ 64
     Lock your session (no smartcard) ............................................................................................................................................ 64
     Lock your session (with smartcard) ......................................................................................................................................... 65
     Log off EMIS Web .................................................................................................................................................................... 65
     Close EMIS Web ....................................................................................................................................................................... 65
USER GUIDE DISCLAIMER: ........................................................................................................................................................ 65

            Emis Web Introduction Admin /Clinical                                       Page 4 of 66                                 Created/updated date(November 2019)
Introduction:
This user guide is aimed at providing each delegate with a basic introduction to Emis Web.
Delegates will still require specific role-based training within their organisation and this is highly recommended.
It is a legal responsibility to protect Patient confidentiality. The responsibility for safeguarding and using confidential
information appropriately rests with each organisation.
Overview of Emis Web
Emis solutions are in every major healthcare setting – from GP surgeries to high street pharmacies, community care, hospitals
and hospices. The diagram below provides you with an idea of how many different aspect of Emis Health there are.
What is the Spine:
The Spine consists of a number of integrated computer systems and databases that deal with different types of
information:
The aim of the Spine is to provide a national shared summary of patient information so that health professionals in
England can share data quickly and effectively and have access to up-to-date information.
Patient Demographic data: (name, address, date of birth): the Precis Bar appears when a patient
record is open and shows various details about the patient (if recorded).
Electronic Prescriptions (EPS):
o Enables the digital signing and electronic transmission of prescriptions directly to a dispenser of the
patient’s choice, with no need for a paper prescription.
o To produce electronic prescriptions, prescribers must:
Users must log on with their Smartcard
Prescribe using a valid Dictionary of Medicines and Devices (DM+D) code.
Prescribe by number not packs.
o To receive electronic prescriptions, patients must:
The patient must be registered on the spine, with full GMS status and have a valid NHS
number.
The patient should have a nominated Pharmacy.
Summary Care Record (SCR):
Emis Web Introduction Admin /Clinical Page 5 of 66 Created/updated date(November 2019)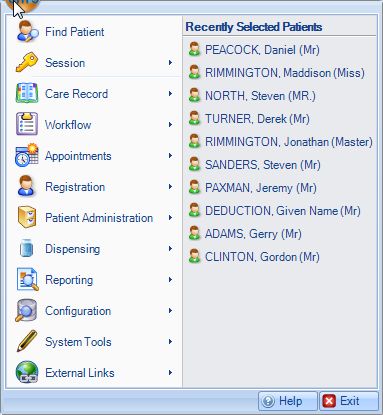
The Summary Care Record (SCR) is a summary of a patient's GP medical record uploaded to Spine
o
so that it can be accessed by any legitimate carer, regardless of the computer system they use.
o The circumstances when this is beneficial include when a patient is seen at a hospital or Out of
Hours unit or when a temporary resident is seen at a GP practice.
o The National N3 SPINE Care Record Service runs up and down the country and contains summary
care records and information from all clinical systems such as SystmOne, Emis Web, and other spine
linked clinical systems.
o When a patient is registered to GP Surgeries or Community Units
GP2GP Transfers:
NOTE: You must be logged on with your Smartcard to be able to perform a GP2GP transfer.
o Most of the GP2GP process is automated, meaning that very little user input is needed. The GP2GP
process takes place between the new organisation where the patient is registering (the requesting
organisation) and the patient's old organisation, where their medical records are stored (the
sending organisation).
o The GP2GP process is initialised at the point of patient registration. If the sending organisation is
enabled for GP2GP and the patient has a full GMS registration status from an organisation in
England, an automatic request for the patient record at the sending organisation is made and an
automatic extract will take place. This is a requirement of the clinical profession and meets the strict
legal and regulatory arrangement that, as soon as the patient is accepted by the
requesting organisation, they have assumed responsibility for the patient.
o This request is sent in the background during the registration process and is in the form of a 'GP2GP
Transfer Workflow task. The Workflow task will show the following details:
Patient Name: the patient’s name.
Action by Date: when the task must be actioned by.
Created by: who the task was created by.
Created Date: the date the task was created.
Governance, Security and Information Auditing:
Remember to Lock your PC (press either the Windows Key and or use the Ctrl+Alt+Delete then
Lock this Computer) if moving away from your desk/work area as leaving data visible to others is not appropriate
– reference to Information Governance and Clinical Security.
Log Off - If you are going out of the office/building for meetings or home visits etc., you should actually Log
off the system and your PC. (Think about the fact that you may not come back into the office depending on
the situation.)
Role-based access controls – what people can do on the system and the information that they can access
depends on their role and the type of activities they carry out. These are on your smartcard.
Smartcard:
o NEVER SHARE YOUR SMARTCARDS,
o Before you can start using your Smartcard, you must first activate it.
o The activation process involves using Emis Web to associate (or "match") your Smartcard with your
normal Emis Web user name and to confirm your employment role within your organisation.
****You only need to carry out the activation process once.
o YOU are responsible for your Smartcard!
NOTE: If you lose your Smartcard you must report it immediately to both the Helpdesk on 0345
140 8000 and your line manager.
o You will need to identify who your Password & System Administrators are within the service.
Audit Trails - All user activity on patient records in EMIS Web is auditable, even just selecting a patient and
viewing their record, and the log includes your name and role. You can't edit or delete audit trail entries.
Alerts – an alert is raised, then investigated if access to confidential Patient information may have been
inappropriate.
Emis Web Introduction Admin /Clinical Page 6 of 66 Created/updated date(November 2019)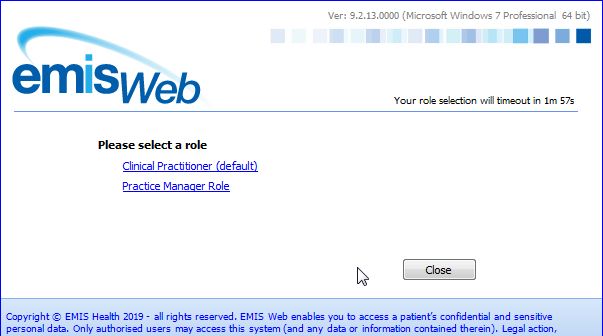
Log on to Emis Web:
Smartcards are used to protect the security and confidentiality of patient information in the NHS, by determining
who has access to a patient's record and which parts of that record they can see. This helps to prevent the system
being used maliciously to view and/or change patient care records, potentially causing patient harm. It is therefore
imperative that you keep your smartcard safe at all times and do not disclose your passcode to anyone.
Smartcards store security information about a user, and the user's role(s).
Your local RA administers the registration process and issues to each staff member:
A smartcard that stores security information and the user's role(s).
A unique passcode.
We recommend that you always log on to EMIS Web using a smartcard. You can access EMIS Web without a
smartcard, but if you do so, you can't use Spine functionality.
Two ways to log in:
Option 1 – Manual User Name and Password Access:
If you log on to EMIS Web without a smartcard you cannot use any Spine functionality.
On the desktop, double-click the EMIS Web icon.
o The EMIS Web logon screen is displayed.
o If you cannot log on, use the Status Page link to view any known issues with EMIS Web.
o In the Username field, type your username.
o In the Password field, type your password.
o Your organisation ID is automatically displayed in the Organisation ID field. If you want to log on using
an organisation ID other than your usual one for any reason, type the required organisation ID.
o Click Sign In, or press ENTER.
o On the Role Selection screen, select your role.
o You must select the correct role for the job you are going to be doing. If you select the wrong role, you
may not be able to access the areas of EMIS Web and/or the patients that you need. Your currently
selected role, your username and your currently selected location are all displayed in the Status bar at
the bottom of all EMIS Web screens and on the EMIS Web homepage.
Emis Web Introduction Admin /Clinical Page 7 of 66 Created/updated date(November 2019)Option 2 - NHS Smart Card Access:
No one should use the system without using their own smart card.
Using your Smart card will ensure that you are connected to the spine.
o Place your smartcard into the smartcard reader.
The Authenticate screen is displayed.
o Enter your passcode / pin
If you type your PIN incorrectly three consecutive times, your smartcard becomes invalid
and you must contact your practice manager or local system administrator.
o If required, on the Role Selection screen, select the appropriate role.
If you only have one role, that role is displayed by default.
o The Authenticate icon is displayed in the system tray at the bottom of the screen, to show that the
software is active and your smartcard is working.
On the desktop, double-click the EMIS Web icon.
o The EMIS Web homepage is displayed.
Synchronise a smartcard
All users will need to synchronise their smartcard when they log on to EMIS Web using a smartcard for the first
time. To log on to EMIS Web after your smartcard has been assigned to your EMIS Web account, you only need to
insert your smartcard, type your smartcard passcode (personal identification number (PIN)), and then double-click
the EMIS Web icon on the desktop.
Using your Smart card will ensure that you are connected to the spine.
o Place your smartcard into the smartcard reader.
The Authenticate screen is displayed.
o Enter your passcode / pin
If you type your PIN incorrectly three consecutive times, your smartcard becomes invalid
and you must contact your practice manager or local system administrator.
o If required, on the Role Selection screen, select the appropriate role.
If you only have one role, that role is displayed by default.
o The Authenticate icon is displayed in the system tray at the bottom of the screen, to show that the
software is active and your smartcard is working.
On the desktop, double-click the EMIS Web icon. The EMIS Web login screen is displayed, with a
warning message in red: 'Unable to retrieve smartcard user information'.
If you have not previously logged on to EMIS Web using your smartcard and the warning message is not
displayed, then you cannot synchronise your smartcard, for one of the following reasons:
o Your smartcard reader is faulty.
o If you have multiple smartcard readers attached to your computer, you will need to remove the
additional readers otherwise a conflict will occur.
Emis Web Introduction Admin /Clinical Page 8 of 66 Created/updated date(November 2019) In the Username field and the Password field, type your username and password configured.
In the Organisation ID field, type your organisation's CDB number Click Sign In.
o EMIS Web launches and the EMIS Web homepage is displayed, with a yellow bar message at the top
of the screen.
Example smartcard alert
o To synchronise your smartcard (i.e. assign your smartcard to your EMIS Web account), click the
message text in the yellow bar.
o On the Smartcard Association screen, type your smartcard passcode.
EMIS Web Associate smartcard screen
o Click Associate, and then remove the smartcard from the reader.
o Click Close EMIS Web.
Note: Although your smartcard is now synchronised with your EMIS Web account, the permissions from
the smartcard are not activated until you close EMIS Web and then log on again using the smartcard.
Emis Web Introduction Admin /Clinical Page 9 of 66 Created/updated date(November 2019)Navigating EMIS Web and the Homepage
Home Page
The homepage is the first page displayed when you access EMIS Web, the homepage is split in different sections, you
have a Quick Launch Menu, Organisation Notepad and Latest updates from Emis Now. Some of these
sections are configurable for each user.
Configuring your homepage
You can configure the homepage with your own personal preferences.
At the top right-hand corner of the homepage, click Configure Homepage.
On the Configure Homepage screen, to display appointments for a selected user/location on your
homepage, do the following:
o In the Appointments section, select Show Appointments on homepage.
o In the Session Holder field, click and then use the Find Session Holder screen to select the
required session holder or location. Highlight the required session holder/location and then click
OK.
Note: If your organisation has set up its appointment sessions by location rather than session holder, click the
Location tab to select a location.
To display shortcuts to EMIS Web modules on your homepage, do the following:
o In the Quick Launch Menu section, click Configure.
On the Customise Quick Launch Menu screen, select the required module(s), and then click
Add. Each selected module is moved to the right-hand pane.
Click OK. Each selected module is added to the Quick Launch Menu on your homepage.
To configure the RSS feed font size on your homepage, click and select Small, Medium or Large.
o If required, add your own RSS feed.
o Click OK.
The changes to your homepage are saved. Appointments for the selected user or location are displayed on the
homepage.
Homepage links
The following links are available from the homepage: Top right-hand side
Support Centre: use to access the EMIS Support Centre. From the Support Centre you can view training
resources and news, join community forum discussions and/or ask questions.
My Incidents: use to access the EMIS Health ECR Tracker. From the Tracker you can create new support
incidents and also track any outstanding support incidents. You can also sign up for major incident alert
emails.
EMIS Health: use to access the EMIS Health website.
Emis Web Introduction Admin /Clinical Page 10 of 66 Created/updated date(November 2019)Quick Launch Menu Pane
You can use the Quick Launch Menu pane on the left-hand side of the homepage to add shortcuts to the areas of
EMIS Web that you use most frequently. These shortcuts enable you to access the required area of the system in
one click.
At the top right-hand corner of the Quick Launch Menu pane, click .
o In the left-hand pane of the Customise Quick Launch Menu screen, select the required module(s),
and then click Add. Each selected module is moved to the right-hand pane.
NOTE: You can select multiple non-consecutive modules by holding down CTRL whilst selecting the required
modules. You can also select consecutive modules by selecting the first module, holding down SHIFT, and then
clicking the last module.
o Click OK. Each selected module is added to the Quick Launch Menu on your homepage.
Organisation Notepad pane
You can use the Organisation Notepad pane on the homepage to quickly send a message to all users in your
organisation; for example, to give details of a forthcoming meeting.
Warning: Messages can be seen by all users. If you share your organisation with other services, all services can see
your messages, so when you send a message you should indicate whether it refers to a specific service or the whole
organisation.
At the top right-hand corner of the Organisation Notepad pane, click .
o On the Notepad screen, type your message, and then click OK.
The message is displayed in the Organisation Notepad pane for all users.
NOTE: You can delete any of your own messages by selecting the message and then clicking .
EMIS Support Latest News Pane
Use the EMIS Support Latest News pane to view the latest news from EMIS Health. To view a full news article, click
its title link.
Note: When you access this screen for the first time, you are prompted to supply your email address.
RSS Feed pane
You can use the RSS Feed pane to add and view your favourite RSS feed directly from EMIS Web. RSS feeds enable
you to see when websites have added new content, without having to directly view the websites you have taken the
feed from. Websites that have an RSS feed will display the RSS feed icon .
To add a website to the list:
o Access the website that you want to add an RSS feed to.
o Locate and click the RSS feed icon . The RSS feed page for the website is displayed, showing the RSS
feed name and the link for subscribing to the RSS feed.
o Click Subscribe to this feed.
o On the Subscribe to this feed screen, click Subscribe.
The RSS feed is added to the Feeds tab, accessed from your Internet Explorer favourites option.
o Right-click the feed and select Properties.
o In the Address field on the Feed Properties screen, right-click the whole address URL and select Copy.
o Access the EMIS Web homepage.
o At the top right-hand corner of the RSS Feed pane, click .
o In the RSS Feed URL field on the Configure RSS Feed screen, right-click and select Paste.
o If you want to set the RSS feed for all EMIS Web users at your organisation, select Set as default RSS
feed for organisation.
o Click OK.
The RSS feed is added to the EMIS Web homepage.
Emis Web Introduction Admin /Clinical Page 11 of 66 Created/updated date(November 2019)Access modules using the EMIS button
You can use the EMIS button from any part of EMIS Web to quickly access any module. The EMIS button is
located in the top left-hand corner of the screen.
When you click the EMIS button, a menu is displayed, which you can use to select and access any of the modules.
You can also use the EMIS button menu to select any of the 10 patients selected most recently; these patients are
displayed in the right-hand pane of the menu.
Access modules using the quick access toolbar
The quick access toolbar is located across the top of the EMIS Web screen, beside the EMIS button. You can add
shortcuts to the areas of EMIS Web that you use most frequently to the quick access toolbar. You can then use
these shortcuts to access the required area of the system with one click.
The quick access toolbar has four default options, which you can't remove:
Default option Use to
Back Move back to the previously displayed screen.
Home Access the EMIS Web homepage.
Screen Messaging Access the Send Screen Message screen.
Patient Find Access the Patient Find screen.
Configure the quick access toolbar
Beside the quick access toolbar, Click and select Customise Quick Access Toolbar.
The Customise Quick Access Toolbar screen is displayed.
o In the left-hand pane, select the required module(s), and then click Add.
The selected module is moved to the right-hand pane.
You can select multiple non-consecutive modules by holding down CTRL whilst selecting
the required modules. You can also select consecutive modules by selecting the first module,
holding down SHIFT, and then clicking the last module.
Emis Web Introduction Admin /Clinical Page 12 of 66 Created/updated date(November 2019) Click OK.
The icon for each module that you selected is displayed on the quick access toolbar.
Function Keys
Function keys, or F keys, are located along the top of your keyboard and provide easy access to different parts of
the EMIS Web system. The Apendix at the end of the document has a strip listing the function keys and their uses.
Keystroke Function Use to
Formerly used to access EMIS Web Help, which is no longer available.
All EMIS Web support materials are now available in the EMIS Web support centre, which you
F1
can access by clicking the Support Centre link at the top right-hand side of the EMIS Web
homepage.
Access Workflow Manager. From Workflow Manager you can access
the following modules:
Tasks
Lab Reports
Registration
F2 Workflow Manager Medicine Management
GP2GP
Document Management
Referral Management
Test Requests
Report Management
F3 Summary Access the Summary screen within Care Record.
F4 Context Find Find data.
F5 Find Patient Select and change the current patient.
F6 Consultation History Access to Consultations within Care Record.
F7 Investigations Access the Investigations View Reports screen within Care Record.
F8 File Save/file data added to EMIS Web.
F9 Medication Access the Medication screen within Care Record.
Access to Appointment Quick View for the logged in session holder.
From here you can access the Appointment Book or send in a patient
F10 Appointments
as well as switch on privacy.
NOTE: Only available to users who are setup as a session holder.
F11 Investigations Access the Investigations Values View screen within Care Record.
F12 Protocol Launcher Access the Protocol Launcher screen.
Panic Button
A panic button is displayed in the top right-hand corner of every EMIS Web screen. In an emergency, you can
use the panic button to send an alert to all other PCs that are currently logged on to EMIS Web.
Panic Alerts should be used for any scenario relating to personal safety.
Send a panic alert
From any screen in EMIS Web, double-click the panic button .
o The icon is then displayed in blue and an alert is sent to each user who is currently logged
in. When a user has responded to the alert, the panic button is displayed in red again .
Respond to a panic alert
When a panic alert has been sent by another user, an alert will pop up on your screen.
Emis Web Introduction Admin /Clinical Page 13 of 66 Created/updated date(November 2019)
o If you intend to respond to the alert, click Respond.
The panic button on the sender's screen is displayed in red again and a further message is sent to the
other PCs, to inform them that you have responded.
If another user has responded before you, simply click close.
Patient Find and the Patient Precis Bar
Finding a Patient
When you search for and select a patient using Patient Find, the patient becomes the active patient, and their details
are displayed in the patient précis at the top of the EMIS Web screen. You can use the patient précis to view
information about the patient and to access other functions.
Use Patient Find (F5) or click on the Quick Access Toolbar to search for patients in EMIS Web.
Search for patients using various methods:
Search by patient information.
o Name
o EMIS number
Emis Web Introduction Admin /Clinical Page 14 of 66 Created/updated date(November 2019)o Date of birth
o NHS number
Search by address and contact details.
o House name/number
o Street
o Postcode
o Telephone number
Include patients outside your organisation.
Combine any of the above criteria to narrow down the search (for example, if searching for a patient with a
common name).
NOTE: The following conditions apply to the search results displayed when you search for patients:
If you search by full name for patients whose names are a subset of other parts of their name (for example,
Richard Richardson), these patients are displayed at the top of the list of search results.
The closest match (i.e. the item with the highest number of matching elements) is displayed at the top of the
list of search results, followed by the rest of the results.
You can search for patients using a partial match. For example, to find John John, type Jo Jo. The parts of the name
that match the search criteria are highlighted in the search results.
If you type 5 Chorley Road as search text and your records contain entries for both 5 Chorley Road and 5 New
Chorley Road, these addresses are displayed in the search results in the following order:
5 Chorley Road
5 New Chorley Road
The Patient Find screen consists of the following sections:
The search criteria fields are displayed in the top section of the screen.
Patient details are displayed in the lower section of the screen.
When you first access Patient Find, details of the patients who have been selected most recently are displayed in the
lower section of the screen, until you search for another patient.
Patient details in Patient Find are colour coded:
Active patients are displayed in black type.
Inactive patients are displayed in blue type.
Deceased patients are displayed in red type.
When you search for patients using the usual Patient Find function, archived patients are not included. If you want to
search for archived patients, access Patient Archive, and then use the Search option to access a version of Patient
Find that searches for archived patients only.
Depending on your role profile, you may not be able to access patient records that are flagged as sensitive by PDS
or covered by EMIS confidentiality policies.
Precis Bar
When you select a patient, the patient précis is displayed immediately below the ribbon on every EMIS Web screen
that you use. The patient précis displays the following information about the selected patient:
Patient status (active or inactive).
Name (including the patient's calling name).
Date of birth.
Gender.
NHS number (or EMIS number).
You can switch between displaying the patient's NHS number or EMIS number by right-clicking the patient
precis, and then selecting View NHS No. or View EMIS No. as required.
For Clinical Services organisations NHS number options are replaced by H&C number options.
Emis Web Introduction Admin /Clinical Page 15 of 66 Created/updated date(November 2019) Usual GP.
PDS status: blue icon for synchronised patients, red icon for non-synchronised patients.
Confidentiality icon , if appropriate.
Child Health Information System (CHIS) warning icons, if appropriate; for example, for child protection
issues.
You can copy the patient details displayed on the patient précis and save them to your PCs clipboard. When copied
to the clipboard you can then paste them to other software outside of EMIS Web.
The colour of the patient précis bar indicates the status of the selected patient.
Regular patient: blue.
Temporary patient: brown.
Deceased patient: red.
Inactive patient: grey.
Deceased temporary patient: red.
Inactive temporary patient: grey.
Expand and collapse the patient précis
You can double-click anywhere in the patient précis, or click at the left-hand side of the patient précis, to expand
it and view further information about the selected patient:
Address (including hyperlinks to Google Maps and other patients in the same household).
Contact information (telephone number(s)).
Practice information (patient type, patient number).
For organisations of any type other than General Medical Practice, the heading of this section is 'Patient
Information' rather than 'Practice Information'.
Patient warnings (including a Manage hyperlink that enables you to access the Manage Patient Warnings
screen), for example, to inform clinicians that a patient is hard of hearing or needs a particular test. CHIS
warning icons and descriptions are also displayed in this section, if appropriate.
Patient allergies: If an allergy is recorded more than once in a patient's record, it is only displayed once in the
patient précis, with a note stating 'See record for more information'.
Edit patient details (a hyperlink that enables you to access the patient's registration details) for example to
quickly update contact information.
QOF alerts, listing any QOF-related information missing from the patient's record (General Medical Practice
organisations only).
If appropriate, a note stating that the patient has one or more carers or is a carer.
Summary Care Record (SCR) consent information, if applicable.
To collapse the patient précis (i.e. restore it to its default size), double-click anywhere in the patient précis, or click
at the left-hand side of the patient précis.
View an address on a map
Access Patient Find.
o Click and then click Find Patient
o The Patient Find screen is displayed.
Select the required patient.
Expand the patient précis.
In the Address section, click Map.
The patient's address is displayed in Google Maps. The patient's address must have a Post Code.
o If you don't have a browser installed, a warning message is displayed.
Emis Web Introduction Admin /Clinical Page 16 of 66 Created/updated date(November 2019)View other patients in the same household
Access Patient Find.
o Click and then click Find Patient
o The Patient Find screen is displayed.
Select the required patient.
Expand the patient précis.
In the Address section, click Household.
The Patient Find screen is displayed, listing other patients in the same household/at the same address.
Copy information from the patient précis to the clipboard
Access Patient Find.
o Click and then click Find Patient
o The Patient Find screen is displayed.
Select the required patient.
Expand the patient précis.
To copy a single patient précis item, right-click the item and select Copy [item name] (e.g. Copy NHS
Number).
To copy more than one patient précis item:
o Right-click and select Copy Details.
o On the Copy Patient Details screen, use the following options to select the required items and
configure the copy order:
Select the box beside each item you want to copy, or select All to copy all patient précis
details.
Use the arrows to change the order of the selected items.
To copy all the selected items, click Copy to Clipboard.
To close the Copy Patient Details screen, click Close.
Managing patient warnings
You can use the patient précis to add, edit and remove patient warnings, and to specify when they are to be
displayed (i.e. what user actions will trigger the warnings).
Warnings are displayed when a user first performs one of the selected trigger actions; each warning is displayed
once only, no matter how many trigger actions you configure.
If more than one different patient warning is triggered for a patient, all the warnings are displayed on one screen as
the topmost item on the screen. You cannot access any underlying item, take any further action or select a different
patient until you check the warnings and close the warning message screen.
You can also manage patient warnings in Registration.
Add a patient warning
Access Patient Find.
o Click and then click Find Patient
o The Patient Find screen is displayed.
Select the required patient.
o Expand the patient précis.
o In the Warnings section, click Manage.
The Manage Patient Warnings screen is displayed, listing any existing warnings for the
selected patient.
o At the top of the screen, click Add.
In the Warning Message field on the Add Patient Warning screen, type the text of the
warning.
Emis Web Introduction Admin /Clinical Page 17 of 66 Created/updated date(November 2019) In the Trigger Points section, select the action(s) that you want to trigger the warning.
The warning is always displayed in the expanded patient précis by default.
If required, in the Sharing field, select Allow this warning to be viewed by other
organisations.
Click OK.
o On the Manage Patient Warnings screen, click Close.
o The warning is displayed whenever a user first performs one of the selected trigger actions.
Each warning is displayed once only, no matter how many trigger actions are configured. For example, if you select
Swap Patient and Add Drug as triggers, the warning is displayed when you swap to a patient, but is not displayed
again if you then go on to add a drug for that patient.
Edit a patient warning
You can't edit allergies and QOF alerts, because they are generated in other areas of EMIS Web.
Access Patient Find.
o Click and then click Find Patient
o The Patient Find screen is displayed.
Select the required patient.
Expand the patient précis.
In the Warnings section, click Manage.
The Manage Patient Warnings screen is displayed, listing any existing warnings for the selected patient.
In the list of warnings, click the warning that you want to edit.
At the top of the screen, click Edit.
o On the Edit Patient Warning screen:
If required, in the Warning Message field, edit the text of the warning.
If required, in the Trigger Points section, edit the required trigger points.
If required, in the Sharing field, select Allow this warning to be viewed by other
organisations.
Click OK.
On the Manage Patient Warnings screen, click Close.
o The warning settings are updated.
Remove a patient warning
Access Patient Find.
o Click and then click Find Patient, The Patient Find screen is displayed.
Select the required patient.
Expand the patient précis.
In the Warnings section, click Manage.
The Manage Patient Warnings screen is displayed, listing any existing warnings for the selected patient.
In the list of warnings, click the warning that you want to remove.
At the top of the screen, click Delete.
o On the confirmation message screen, click Yes.
On the Manage Patient Warnings screen, click Close.
o The warning is removed.
Clearing Patient Details from The patient précis
When sharing your screen for remote support purposes it is best practice to either have a Dummy patient
selected or if the problem is not relating to a specific patient, you can ‘clear current patient’ selected from
the Patient précis so that there are no patient details present on-screen when the support representative
connects to your machine.
Emis Web Introduction Admin /Clinical Page 18 of 66 Created/updated date(November 2019)To clear the currently selected patient
To clear the current patient, do one of the following:
Right-click the patient précis and select ‘Clear Current Patient’. OR
Click EMIS button, point to Session, and then click Clear Patient.
Accessing External links and Session Menu
Mentor Online
Mentor Online is the web-based version of the Mentor library: the electronic medical knowledge base designed and
developed by EMIS and Oxford University Press for use wherever doctors and other healthcare professionals
encounter patients.
Details of more than 2,000 diseases are stored within Mentor Online and the information is cross-referenced with
more than 25,000 commonly used medical terms.
Mentor Online also includes PIL. Many of the text articles also include direct links to relevant websites and email
addresses and, where available, links to MEDLINE references.
To access Mentor Online:
Click , point to External Links, and select Mentor Online or you can access from Care Record.
Logins and passwords
o You can use a generic login username emisweb and password emisweb, but if you do so,
no Mentor activity will be filed in your Personal Development Plan (PDP).
o If you need an individual login for Mentor, click the Contact us link and send us an email
(ps_webmaster@emishealth.com) with your CDB number (EMIS site number).
o If there are several users at your site who need logins, ask the practice manager or IT manager to
email this address requesting details for the whole practice.
o If you have transferred from EMIS LV or EMIS PCS, you can either use the generic username or
request an individual log in.
Patient UK
Patient UK is the definitive source of information for patients that is used by patients and healthcare professionals
alike.
Information is reliable, impartial, written and reviewed by independent GPs and is free to access; you do not need to
register. The website and its content are written in a clear, concise way, making difficult medical topics easy to
understand.
The site has almost 700 PILs on medical conditions, health and wellbeing information, more than 800 DILs on
medicines and drugs, and details of over 2,000 UK patient support and self-help groups. It includes an extensive
directory of UK websites on health, disease and related topics, as well as recommended books on health and disease
and a number of health related services. The information on the site is extensively cross-referenced and there are
links as appropriate to national charities and patient organisations.
To access Patient UK
Click , point to External Links, and select Patient UK.
NHS e-Referrals
This will take you to the NHS e-Referrals service homepage, but this will only work if you are logged in with a NHS
Smartcard. Specific training on NHS e-Referrals is available if your role requires this training.
Emis Web Introduction Admin /Clinical Page 19 of 66 Created/updated date(November 2019)You can also read