ORION HEALTH COMMUNICATE - SECURE COMMUNICATIONS ACROSS HEALTHCARE TRAINING PRESENTATION - SYNCRONYS
←
→
Page content transcription
If your browser does not render page correctly, please read the page content below

ORION HEALTH COMMUNICATE
SECURE COMMUNICATIONS ACROSS HEALTHCARE
TRAINING PRESENTATION

ADMINISTRATOR TRAINING STEPS
      •       Administrator sign in at https://management.orionhealthcloud.com
      •       Administrator sets up challenge questions
      •       Sign in to mailbox
      •       Orient to mailbox, create signature line
      •       Minimize mailbox
      •       Return to admin log in screen and log out / Click log in again & STOP
      •       Go to self-registration link
      •       Create the other boxes, including any shared boxes
      •       Return to admin screen and approve box(es)
      •       Check e-mail for shared box ID and password
      •       Log into shared box self-service center, set up challenge questions
      •       Log into shared mailbox and assign others permission to access it
      •       Create a signature line

Page 2 • 2015 © Orion Health™ group of companies                                 THINKING SOFTWARE FOR LIFE
FIRST TIME LOGIN
THESE INSTRUCTIONS ARE FOR ALL COMMUNICATE USERS

WHICH URL?
https://management.orionhealthcloud.com             https://dsm.orionhealthcloud.com

                First.Last
                                                                    First.Last
                                                                    ●●●●●●●●●

 First time login. Requesting new accounts.         Routine mailbox use. Setting up a “Shared”
 Account management. Password resets.               mailbox. User preferences.
 Challenge question set up, prior to mailbox use.
LOGGING IN FOR THE FIRST TIME
      Before you Begin:
      You will receive an email informing you that your request for a
      user account has been approved. The email will include your
      username and initial password.

      First time logging in:
      •      On the Account Management Portal Login page, enter your
             username and initial password.
      •      You will then be asked to change your password. As you
             meet the password requirements, the boxes will turn green.

      Password Requirements:
      •      expires every 90 days.
      •      must be between 8 and 12 characters long.
      •      must contain at least one and a maximum of 3 numeric
             characters.
      •      cannot contain the characters < > " ' ( )
      •      cannot contain your username.
      •      cannot contain your first or last name.

Page 5 • 2015 © Orion Health™ group of companies                          THINKING SOFTWARE FOR LIFE
ACCOUNT MAINTENANCE | MODIFY YOUR USER PROFILE

          Modify Your Information:
          •      From the Account Management Portal
                 menu, select Self Service Center > Edit
                 Your Profile.

          Change Your Password:
          •      From the Account Management Portal
                 menu, select Self Service Center >
                 Change Password.

          Change Your Challenge Responses:
          •      From the Account Management Portal
                 menu, select Self Service Center >
                 Challenge Response.

Page 6 • 2015 © Orion Health™ group of companies           THINKING SOFTWARE FOR LIFE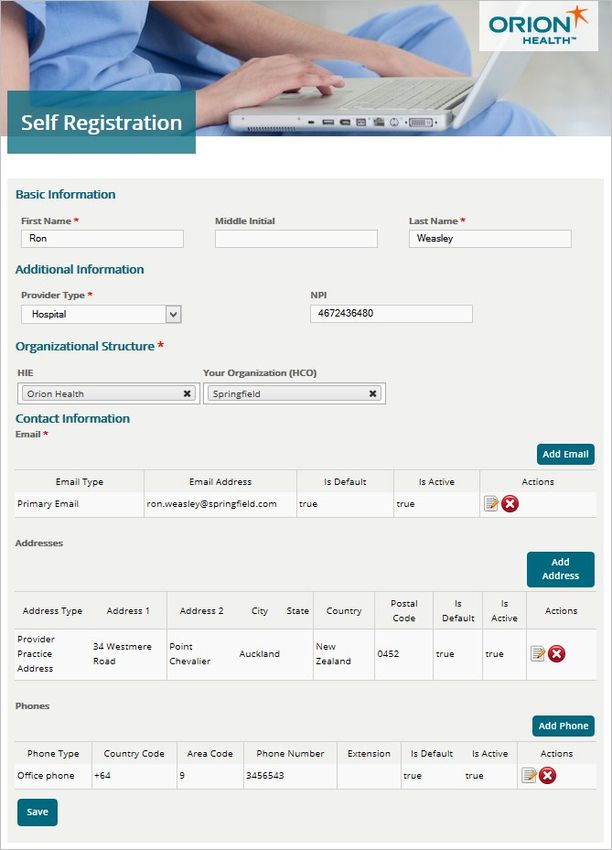
LOGGING IN FOR THE FIRST TIME
    First time logging in:
    1.      After changing your initial password, you
            can now login to your Management
            Portal account.
             – This is to manage your profile and
                 other users’ accounts if you are an
                 Administrator.
    2.      Click DSM Web (Webmail) to redirect to
            the login page for the Communicate Web
            Client.
             – Communicate Web is the email
                 platform where you will send/receive
                 your secure messages.
             – The login information is the same as
                 the updated information from your
                 Management Portal account.
             – https://dsm.orionhealthcloud.com/co
                 ncerto/Login.htm
Page 7 • 2015 © Orion Health™ group of companies        THINKING SOFTWARE FOR LIFE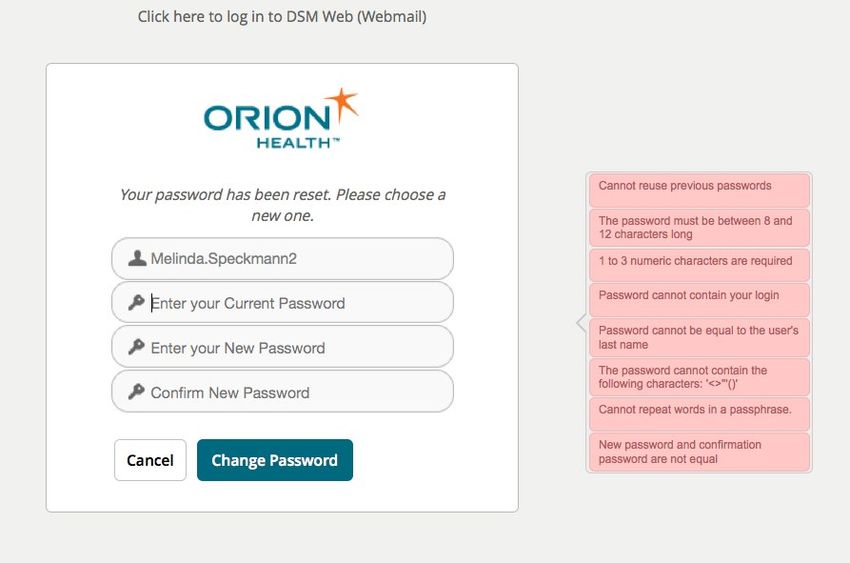
ACCOUNT MAINTENANCE | RESPONSES

  Purpose:
  This will allow the User to reset their Password
  without help from an Account Administrator.

  Set Up:
  1.     From the Account Management Portal menu,
         select Self Service Center > Challenge
         Response.
  2.     Select three questions and enter an answer
         for each question.
  3.     Click the Save button. The following message
         is displayed: Responses Successfully Saved

Page 8 • 2015 © Orion Health™ group of companies        THINKING SOFTWARE FOR LIFE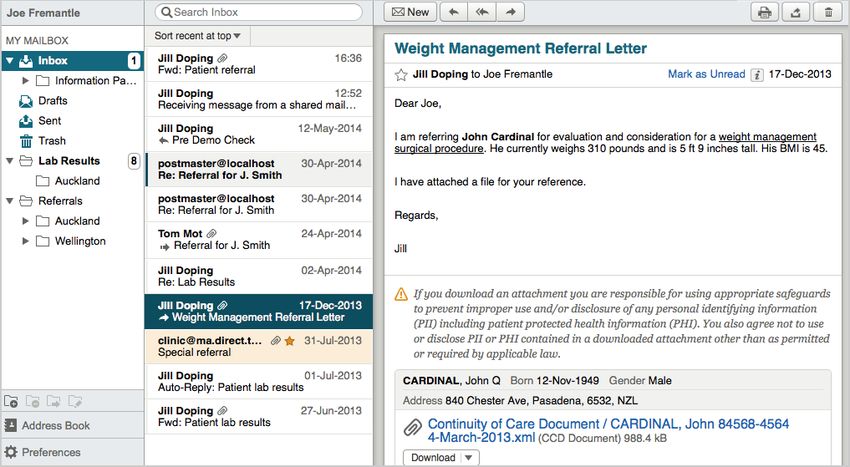
ACCOUNT MAINTENANCE | YOUR USER ACCOUNT

          How to Reset your Password IF you
          created Challenge Responses:
          1. On the Account Management Portal Login page,
             select Forgot your password?
          2. Enter your username, then click the Unlock
             Account button. Communicate will send you an
             email with instructions.
          3. Click the link in the email to answer your
             Challenge Response questions. Note that this link
             is only valid for 5 days.
          4. Click the Submit button. If you answered at least
             two out of the three questions correctly, you are
             requested to set a new password.

          How to Reset your Password IF you did
          not create Challenge Responses:
          •      Ask your Administrator to reset your Password.

Page 9 • 2015 © Orion Health™ group of companies                  THINKING SOFTWARE FOR LIFE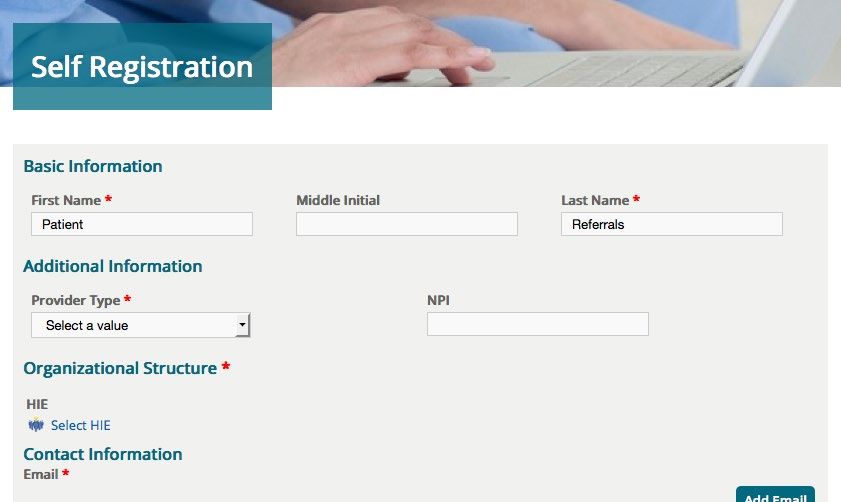
ORGANIZATION ADMINISTRATORS
COMMUNICATE WEB
REVIEW A USER ACCOUNT REQUEST

      Before you Begin:
      •      You must receive an email notification
             requesting a user account.

      Reviewing a User Request:
      1.     Log in to the Account Management Portal as an
             Organization Administrator.
      2.     Click Request Approval > In-Box.
      3.     From the Unclaimed Tasks (Candidate) pane,
             click the Add (+) icon to claim the user account
             request.
      4.     Click a request on the Claimed Tasks (Assigned)    Things to Note:
             pane.
      5.     Review the details on the Request Information      • Once you have claimed a request, no other
             page.                                                Administrator can review the Account Request.
      6.     Enter a reason for your decision, then click the   • The “Comments” section will be visible in the email
             Accept Request or Reject Request button.             sent to the user upon accepting/rejecting the request.

Page 11 • 2015 © Orion Health™ group of companies                                              THINKING SOFTWARE FOR LIFE
RESET A USER’S PASSWORD
Process:
1. In the Account Management Portal, select Access
Management > Manage User.
2. Search for the desired User by using at least one of the
following: Last name, Principal name, Organization, Email
Address, User Status or Role
3. Click on the Name of the User.
4. On the left pane, select Reset Password.
5. Select the Auto generate the password. User is not
required to enter a password checkbox. The Send the
password to the user via email. Requires an email
address checkbox is already selected for you.
6. Select the Save button. The following message is displayed:
User password is reset successfully
Page 12 • 2015 © Orion Health™ group of companies THINKING SOFTWARE FOR LIFEUNLOCK A USER’S ACCOUNT
Process:
1. In the Account Management Portal, select Access
Management > Manage User.
2. Search for the desired User by using at least one of the
following: Last name, Principal name, Organization,
Email Address, User Status or Role.
3. Click on the Name of the User.
4. If the user's account is LOCKED or DISABLED, click
the Enable button to unlock the user's account. The
following message is displayed: User enabled
successfully.
5. Finally, reset the user’s password by clicking Reset
Password.
Page 13 • 2015 © Orion Health™ group of companies THINKING SOFTWARE FOR LIFEUPDATE A USER’S ACCOUNT INFORMATION
Process:
1. In the Account Management Portal, select Access
Management > Manage User.
2. Search for the desired User by using at least one of
the following: Last name, Principal name,
Organization, Email Address, User Status or
Role.
3. Click on the Name of the User.
4. To edit the User’s User Information or
Organization Information, click on User Info to
the left.
5. Click Save at the bottom of the page.
6. To edit the User’s email address for notifications,
click on Contact Info.
7. Click the Edit Icon under Actions to edit the email
address.
8. Click Save in the window.
Page 14 • 2015 © Orion Health™ group of companies THINKING SOFTWARE FOR LIFESET UP A SHARED ACCOUNT FOR YOUR FACILITY
Purpose:
• With shared mailboxes you can assign all of your staff
to be linked to a “Facility Mailbox” that will allow
management by all for messages sent to that inbox.
– Example: Patients send messages to a Facility
Mailbox that all staff has access to.
Creation Process:
1. On the Account Management Portal page, click on the
Self-Registration link.
2. Complete the following fields. The asterisk ( * )
indicates a mandatory field.
– Create an account name for your site with the
format of . to fill in the first name
and last name fields.
• Example: Golden.Hospital, Patient.Referrals
– Enter your Email address as the Organization
Administrator to manage the account.
3. When complete, click Save.
4. Approve the Shared Account you just requested.
Page 15 • 2015 © Orion Health™ group of companies THINKING SOFTWARE FOR LIFESET UP A SHARED ACCOUNT FOR YOUR FACILITY
Set Up Process:
1. Once you have received the email with your initial login
information, go through initial password set up on the
Account Management Portal page.
2. Log on to Communicate Web.
3. On the Preferences screen, under Shared settings,
select the Share My Mailbox checkbox to enable
sharing.
4. In the Give Access To field, start typing the names of
the users you want to link to the shared mailbox.
Possible matches are displayed as you type.
5. Select a user from the list.
6. If you want to add additional users, click the Add user
link.
7. Click the Save button. Note that the shared settings will
not take effect until you save.
8. Verify with the Users that you authorized if they can
see the shared mailbox in their account.
9. To Remove a User, click the “X” next to their name in
the Shared settings to take away access.
Page 16 • 2015 © Orion Health™ group of companies THINKING SOFTWARE FOR LIFEDISABLE A WEBMAIL USER FOR YOUR HCO
Process:
1. From the Account Management Portal
menu, select Access Management >
Manage User.
2. Search for the desired user.
3. Click the Search button.
4. Select the user from the search results.
5. Click the Disable button at the bottom.
– The message User disabled
successfully is displayed, and the
Acct Status field changes to
DISABLED.
Page 17 • 2015 © Orion Health™ group of companies THINKING SOFTWARE FOR LIFEADMINISTRATION
REVIEW
Page 18 • 2015 © Orion Health™ group of companies THINKING SOFTWARE FOR LIFEWEBMAIL
ADMINISTRATION
https://management.orionhealthcloud.com
1. User Account Request 2. Administrator 3. Approval triggers an e-mail message to the address
(Self-Registration) for an approves User Account associated with the new account, providing the user name
individual’s mailbox and temporary password
4. User chooses a new password and sets up security 5. If the new box is a “Shared” mailbox, the Administrator
challenge questions in the “Self-service Center” before going completes the previous steps, logs in, and shares the box
to the Communicate Webmail log in screen with approved users in the preferences screen
Page 19 • 2015 © Orion Health™ group of companies THINKING SOFTWARE FOR LIFEWEBMAIL MAILBOX
https://dsm.orionhealthcloud.com
If the new box is a “Shared” mailbox, the Administrator
The password for the two log in
completes the previous steps, logs in, and shares the
screens should be in sync.
box with approved users in the preferences screen
Page 20 • 2015 © Orion Health™ group of companies THINKING SOFTWARE FOR LIFECOMMON HELP DESK
REUESTS
Page 21 • 2015 © Orion Health™ group of companies THINKING SOFTWARE FOR LIFECAN’T LOG IN
Possible issues –
• Which website are they logging into?
– https://management.orionhealthcloud.com
– https://dsm.orionhealthcloud.com
• Are the two in sync? Passwords should be set initially,
and subsequently reset, in the management site, then
use the new password to log into the mailbox.
• Is Caps Lock on?
• Too many bad attempts – Locked out/Inactive?
Page 22 • 2015 © Orion Health™ group of companies THINKING SOFTWARE FOR LIFECAN’T SET/RESET PASSWORD
• If they are using copy and paste of their initial password,
it may be adding a space or carriage return. Use the
“bird’s eye” to see what’s being pasted into the
password field.
• If their new password is being rejected, do they have too
many or two few numeric characters? It must have one,
two, or three numeric characters; four will cause the
password to be rejected.
• For resets, make sure they have set up their security
questions in the admin screen.
Page 23 • 2015 © Orion Health™ group of companies THINKING SOFTWARE FOR LIFEMESSAGES NOT BEING RECEIVED
• Ask them to send a screenshot via Direct, or at least provide the
sending and receiving addresses and the time the message was
sent.
• Get details for a ticket – was there an attachment? What kind?
• Report the details to NMHIC Help Desk personnel who will submit
the problem to Orion in a Support Tracker ticket. Send any
protected health information (PHI) to the NMHIC Help Desk via
Direct. NMHIC.HelpDesk@direct.nmhic.nmhic.org
Page 24 • 2015 © Orion Health™ group of companies THINKING SOFTWARE FOR LIFECAN’T FIND AN ADDRESS
• If it’s an address they’ll use often, encourage them to put
it into their personal address book.
• It’s a good opportunity to ask if they have access to other
lists that we can upload. There are minimum
requirements for uploading to our directory, and we can
send them a template spreadsheet with just a handful of
fields to fill out.
Page 25 • 2015 © Orion Health™ group of companies THINKING SOFTWARE FOR LIFEOTHER NUANCES
• If it’s a shared mailbox, to whom does the shared
box belong (whose address is listed for
notifications)? Are they logging into the shared
box, instead of accessing it through their own box?
That makes it difficult to keep all the passwords
straight.
• They may want to use an out of office reply to
state to senders that their message has been
received. (Set up in Preferences)
Page 26 • 2015 © Orion Health™ group of companies THINKING SOFTWARE FOR LIFEWhen the Help Desk needs help:
New Mexico Health Information Collaborative (NMHIC)
Health Information Exchange (HIE)
E-mail: Help@nmhic.org | On Call Phone: (505) 938-9999
Direct Secure Messaging: NMHIC.HelpDesk@direct.nmhic.nmhic.org
Response daily 8 am – 8 pm
Join us for helpful monthly webinars, 3rd Tuesdays at 11:30 amCOMMUNICATE USERS COMMUNICATE WEB
CREATING YOUR COMMUNICATE
ACCOUNT
THESE INSTRUCTIONS ARE FOR THE STANDARD USER ACCOUNT
REQUEST AN INDIVIDUAL ACCOUNT

      Before you Begin:
      • Ensure that your Healthcare Organization
         (HCO) has been set up with
         Communicate and that you know who the
         Administrator is in your Office.

      Requesting an Account:
      • On the Account Management Portal page,
         click on the Self-Registration link.

Page 30 • 2015 © Orion Health™ group of companies   THINKING SOFTWARE FOR LIFE
REQUEST AN INDIVIDUAL ACCOUNT
Requesting an Account:
1. Complete the following fields. The asterisk ( * ) indicates a
mandatory field.
2. When complete, click Save.
3. Contact your Organization Administrator to approve your
account request.
Things to Note:
• Your first and last name cannot contain any spaces, or
any of the following special characters. @ , ; # § ' [ ] ( ) _ .
• The NPI is required for Providers.
• Make sure you select the correct HIE and HCO, or else
your account will not be approved.
– HIE The network your Organization belongs to
– HCO The official name of your Organization
Page 31 • 2015 © Orion Health™ group of companies THINKING SOFTWARE FOR LIFEFIRST TIME LOGIN THESE INSTRUCTIONS ARE FOR ALL COMMUNICATE USERS
LOGGING IN FOR THE FIRST TIME
      Before you Begin:
      You will receive an email informing you that your request for a
      user account has been approved. The email will include your
      username and initial password.

      First time logging in:
      •      On the Account Management Portal Login page, enter your
             username and initial password.
      •      You will then be asked to change your password. As you
             meet the password requirements, the boxes will turn green.

      Password Requirements:
      •      expires every 90 days.
      •      must be between 8 and 12 characters long.
      •      must contain at least one and a maximum of 3 numeric
             characters.
      •      cannot contain the characters < > " ' ( )
      •      cannot contain your username.
      •      cannot contain your first or last name.

Page 33 • 2015 © Orion Health™ group of companies                         THINKING SOFTWARE FOR LIFE
LOGGING IN FOR THE FIRST TIME
First time logging in:
1. After changing your initial password, you
can now login to your Management
Portal account.
– This is to manage your profile and
other users’ accounts if you are an
Administrator.
2. Click DSM Web (Webmail) to redirect to
the login page for the Communicate Web
Client.
– Communicate Web is the email
platform where you will send/receive
your secure messages.
– The login information is the same as
the updated information from your
Management Portal account.
– https://dsm.orionhealthcloud.com/co
ncerto/Login.htm
Page 34 • 2015 © Orion Health™ group of companies THINKING SOFTWARE FOR LIFEACCOUNT MAINTENANCE | MODIFY YOUR USER PROFILE
Modify Your Information:
• From the Account Management Portal
menu, select Self Service Center > Edit
Your Profile.
Change Your Password:
• From the Account Management Portal
menu, select Self Service Center >
Change Password.
Change Your Challenge Responses:
• From the Account Management Portal
menu, select Self Service Center >
Challenge Response.
Page 35 • 2015 © Orion Health™ group of companies THINKING SOFTWARE FOR LIFEACCOUNT MAINTENANCE | RESPONSES
Purpose:
This will allow the User to reset their Password
without help from an Account Administrator.
Set Up:
1. From the Account Management Portal menu,
select Self Service Center > Challenge
Response.
2. Select three questions and enter an answer
for each question.
3. Click the Save button. The following message
is displayed: Responses Successfully Saved
Page 36 • 2015 © Orion Health™ group of companies THINKING SOFTWARE FOR LIFEACCOUNT MAINTENANCE | YOUR USER ACCOUNT
How to Reset your Password IF you
created Challenge Responses:
1. On the Account Management Portal Login page,
select Forgot your password?
2. Enter your username, then click the Unlock
Account button. Communicate will send you an
email with instructions.
3. Click the link in the email to answer your
Challenge Response questions. Note that this link
is only valid for 5 days.
4. Click the Submit button. If you answered at least
two out of the three questions correctly, you are
requested to set a new password.
How to Reset your Password IF you did
not create Challenge Responses:
• Ask your Administrator to reset your Password.
Page 37 • 2015 © Orion Health™ group of companies THINKING SOFTWARE FOR LIFECOMMUNICATE FEATURES THESE INSTRUCTIONS ARE FOR ALL COMMUNICATE USERS
COMMUNICATE FEATURES | WITH MESSAGES

       Receiving Messages:
       •      When you first log in to Communicate,
              the Inbox is shown by default. To view
              messages in other folders, select the
              wanted folder.
       •      Select the message in the list to view
              the message contents on the screen.

       Sent Messages:
       •      Sent Messages can be viewed by
              clicking Sent in the left hand directory
              under MY MAILBOX.

Page 39 • 2015 © Orion Health™ group of companies        THINKING SOFTWARE FOR LIFE
COMMUNICATE FEATURES | WORKING WITH MESSAGES
• To expand the message details panel, select the Message Details icon.
• The following table displays the name of each field on the message details panel, along with an explanation
of each field:
Page 40 • 2015 © Orion Health™ group of companies THINKING SOFTWARE FOR LIFECOMMUNICATE FEATURES | WITH MESSAGES
Compose a Reply to a Reply All to Forward a
Message Message a Message Message
Page 41 • 2015 © Orion Health™ group of companies THINKING SOFTWARE FOR LIFECOMMUNICATE FEATURES | MANAGING FOLDERS
Types of Folders:
• System Folders - Inbox, Drafts, Sent, and Trash.
System folders cannot be moved, renamed, or
deleted.
• User-defined Folders - Folders you have created
to organize your mail. Delete Folder
Process:
Create Folder
1. Click on the Folder Icon of interest.
a. If you want to delete a folder, be sure you have
the correct one selected.
Move Folder
b. If you are adding a folder, add the name and
select the Parent Folder.
c. If you want to move a folder, select the folder
you want to move to. Rename Folder
d. If you want to rename your folder, enter in the
new name.
2. Click the blue button to make your changes
permanent.
Page 42 • 2015 © Orion Health™ group of companies THINKING SOFTWARE FOR LIFECOMMUNICATE FEATURES | GLOBAL ADDRESS BOOK
What:
• Ability to search all Communicate
users within their HIE Network.
• The Global Address Book is also
referred to as the “Health Provider
Directory” (HPD).
• The HPD is maintained by the HIE
Admins.
Features:
• To/CC search field is set up to auto-
complete the search from the HPD
when looking for the direct address or
Provider Name.
• The Provider Search can search by
First Name, Last Name, Organization
and Specialty.
Page 43 • 2015 © Orion Health™ group of companies THINKING SOFTWARE FOR LIFECOMMUNICATE FEATURES | PERSONAL ADDRESS BOOKS
GLOBAL PERSONAL
Maintained by: HIE Administrators You
Includes: All Communicate Web Addresses of your choice
Addresses in your HIE Network
Visibility: All Communicate Web Users in Only You
your HIE Network
Distribution Must be done by the Ability to create your own
Groups: Organization or HIE custom distribution group to
Administrators send to
Page 44 • 2015 © Orion Health™ group of companies THINKING SOFTWARE FOR LIFECOMMUNICATE FEATURES | PERSONAL ADDRESS BOOK
Viewing a Contact:
1. Select the Address Book link at the
bottom of the left pane. The Address
Book screen is displayed.
2. Select the contact. The contact details
are displayed in the right pane.
Adding a Contact:
1. Select on the New drop-down button
and select the New Contact option.
2. The New Contact screen is displayed.
The mandatory fields are marked with
an asterisk (*).
3. Add the contact details.
4. Select the Save button.
NOTE: The Add Group link is to add a
contact to a group that you can create. See
next slide.
Page 45 • 2015 © Orion Health™ group of companies THINKING SOFTWARE FOR LIFECOMMUNICATE FEATURES | PERSONAL ADDRESS BOOK
Deleting a Contact:
1. Select the Address Book link at the bottom of the
left pane. The Address Book screen is displayed.
2. Select the contact from the Address Book.
3. Select the Delete button located at the top right
corner. A warning message is displayed.
– Select Confirm to delete the contact. The
contact is also deleted from its group.
– Select Cancel to cancel deletion.
Updating a Contact:
1. Select the Address Book link at the bottom of the
left pane. The Address Book screen is displayed.
2. Select the contact from the Address Book.
3. Select the Edit button. The Edit Contact screen is
displayed. The mandatory fields are marked with an
asterisk (*).
4. Update contact details and select the Save button.
NOTE: The name of the contact will populate
in the To/CC field of a new message.
Page 46 • 2015 © Orion Health™ group of companies THINKING SOFTWARE FOR LIFECOMMUNICATE FEATURES | PERSONAL ADDRESS BOOK
Purpose:
• A contact group enables you to maintain a list of email
addresses and provides an easy way to send an email
message to everyone in the group at once by addressing the
email to the contact group.
Viewing a Group:
1. Select the Address Book link at the bottom of the left pane.
The Address Book screen is displayed.
2. Select the contact group. The contact group details will be
displayed in the right pane.
Adding a Group:
1. Select on the New drop-down button and select the New
Group option. The New Group screen is displayed. The
mandatory fields are marked with an asterisk (*).
2. Add the contact group details.
– The contacts must be entries in your Personal Address
Book in order to add them to a group.
– Click the + to add more than one contact.
– You can also click on the delete icon to remove a
contact.
– NOTE: When adding/editing a contact, you can assign
a contact a group in the profile if the group exists.
3. Select the Save button.
Page 47 • 2015 © Orion Health™ group of companies THINKING SOFTWARE FOR LIFECOMMUNICATE FEATURES | ADDRESS BOOK
Deleting a Group:
1. Select the Address Book link at the bottom of the
left pane. The Address Book screen is displayed.
2. Select the Group from the Address Book.
3. Select the Delete button located at the top right
corner. A warning message is displayed.
– Select Confirm to delete the contact. The
contact is also deleted from its group.
– Select Cancel to cancel deletion.
Updating a Group:
1. Select the Address Book link at the bottom of the
left pane. The Address Book screen is displayed.
2. Select the Group from the Address Book.
3. Select the Edit button . The Edit Group screen is
displayed. The mandatory fields are marked with an
asterisk (*).
4. Update the contact group details.
5. Select the Save button.
NOTE: The name of the group will populate
in the To/CC field of a new message.
Page 48 • 2015 © Orion Health™ group of companies THINKING SOFTWARE FOR LIFECOMMUNICATE FEATURES | AUTHORIZING ANOTHER PERSON TO MANAGE YOUR
MAILBOX
Purpose:
• You can authorize another person to manage your
mailbox on your behalf. This includes visibility to all
of your messages as well as the ability to send and
manage messages on your behalf.
Process:
1. On the left pane in Communicate Web, select
Preferences.
2. On the Preferences screen, under Shared settings,
select the Share My Mailbox checkbox to enable
sharing.
3. In the Give Access To field, start typing the name of
the user you want to share your mailbox with.
Possible matches are displayed as you type.
4. Select a user from the list.
5. If you want to share your mailbox with additional
users, click the Add user link.
6. Click the Save button. Note that your shared settings
will not take effect until you save.
7. Verify with the User that you authorized if they can
see your mailbox in their account.
Page 49 • 2015 © Orion Health™ group of companies THINKING SOFTWARE FOR LIFECOMMUNICATE FEATURES | A SIGNATURE
Purpose:
• Communicate Web enables users to
automatically add a custom signature to all new,
reply, and forwarded messages. This helps to
identify the sender of the message. Message
signatures can include details such as credentials
and contact information.
Process:
1. Select the Preferences tab at the bottom of the
list of folders.
2. Select the Enable Signature checkbox to
enable the message signature.
3. Enter the message signature to be added
automatically when you send a message. You
can customize the font style and insert links
using the rich-text formatting buttons. Refer
to Rich-text Formatting for details.
4. Select the Save button.
Page 50 • 2015 © Orion Health™ group of companies THINKING SOFTWARE FOR LIFECOMMUNICATE FEATURES | ADDING A SIGNATURE
Please Note:
• Please don’t copy and paste content from
external sources into the signature editor.
This includes text and images.
• When composing a message from your
individual mailbox and you have enabled
signature in the preference screen, the
signature will be inserted in the message
automatically. However, if you are
composing a message from a mailbox you
were authorized to manage, you will have
to add your signature manually or select
the signature button from the rich-text
editor toolbar.
Page 51 • 2015 © Orion Health™ group of companies THINKING SOFTWARE FOR LIFECOMMUNICATE FEATURES | AUTO-FORWARDING MESSAGES YOU RECEIVE
Purpose:
• Communicate enables users to have all of their
messages automatically forwarded to other
email addresses. This ensures that messages
can be dealt with in a timely manner.
Function:
• When a message is auto-forwarded, a copy of the
message is left in the original recipient's Inbox. The
forwarded message will display the Auto-Forward
Received icon in the final recipient's Inbox folder.
The forwarded message will also display the Auto-
Forward Sent icon in the intermediary's Inbox folder.
• Auto-forwarded messages in the final recipient's
mailbox include a via label in the header of the open
message, specifying who last forwarded the
message.
Page 52 • 2015 © Orion Health™ group of companies THINKING SOFTWARE FOR LIFECOMMUNICATE FEATURES | MESSAGES YOU RECEIVE
Before you Begin:
• Ensure that you have created a contact group in your Personal Address Book.
Process to Enable:
1. Select the Preferences tab at the bottom of the list of folders.
2. Select the Enable Auto-forwarding checkbox to enable auto-forwarding.
3. Select the contact group.
4. Select the Save button.
Page 53 • 2015 © Orion Health™ group of companies THINKING SOFTWARE FOR LIFECOMMUNICATE FEATURES | OUT OF OFFICE AUTO-REPLY
Purpose:
• Communicate enables you to configure
an out of office or automatic reply
to respond to people who send you an
email message. This helps inform people
that you are not in the office or that your
response might be delayed. Automatic
Replies can include details, such as
alternate contact information.
Process to Enable:
1. Select the Preferences tab at the bottom
of the list of folders.
2. Select the Enable Auto-Reply checkbox
to enable the out of office auto-reply.
3. Enter the message to be sent when you
receive a message.
4. Select the Save button.
Page 54 • 2015 © Orion Health™ group of companies THINKING SOFTWARE FOR LIFECOMMUNICATE FEATURES | MESSAGE RULES
Purpose:
• Allows you to create rules to
automatically filter incoming messages
by content or address into a custom
folder.
Process to Enable:
1. Select the Preferences tab at the bottom of
the list of folders.
2. Define the Condition (See Chart)
3. Define the action to take when a message
meets a condition. For example, in the Move
to Folder field, select the folder to file the
message into when the condition matches.
(Example: The picture to the right shows that
any messages with the subject Referral,
should be move to the Referrals Folder.)
4. Select the Save button to save your
changes.
5. To add additional rules in the Message
Rules panel, select the Add Rule link.
Page 55 • 2015 © Orion Health™ group of companies THINKING SOFTWARE FOR LIFEYou can also read