Lumen IQ SIP Administrative guide - managing trunks
←
→
Page content transcription
If your browser does not render page correctly, please read the page content below
Lumen IQ SIP   ®

Administrative guide – managing trunks
January 2021
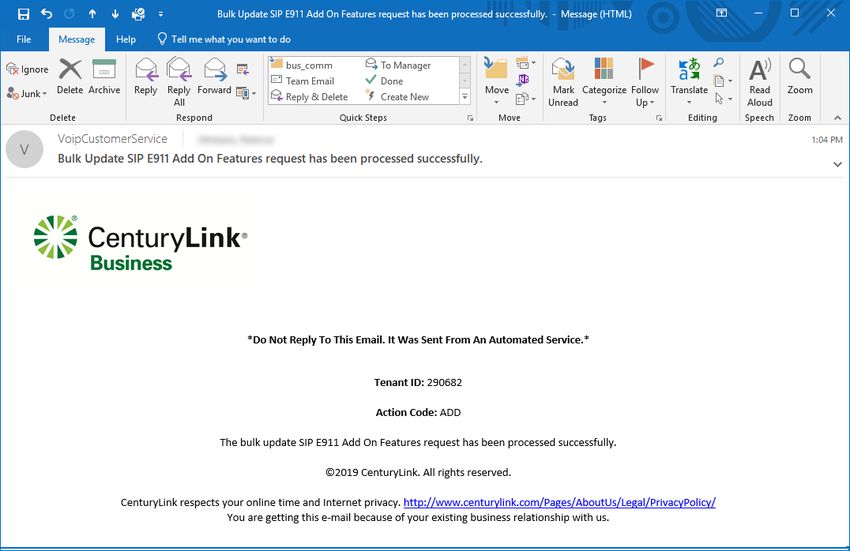
Table of contents

About this guide ....................................................................................................................................... 3
User Administration.................................................................................................................................. 4
   Bulk add/delete E911 add on feature..................................................................................................... 4
   Manually add/delete E911 add on feature.............................................................................................. 6
Trunk administration ................................................................................................................................ 7
   Manage trunks ..................................................................................................................................... 7
   Manage trunk features ........................................................................................................................ 15
   Manage trunk users ............................................................................................................................ 18
   Group 911 .......................................................................................................................................... 24
   Managing and editing user features..................................................................................................... 26
   Manage enterprise trunks ................................................................................................................... 29
Inventory ............................................................................................................................................... 37
   SIP trunking sessions ......................................................................................................................... 37
Help ...................................................................................................................................................... 39

                                                                                                                                                page 2 of 39
Services not available everywhere. Business customers only. Lumen may change, cancel or substitute products and services,
or vary them by service area at its sole discretion without notice. ©2021 Lumen Technologies. All Rights Reserved.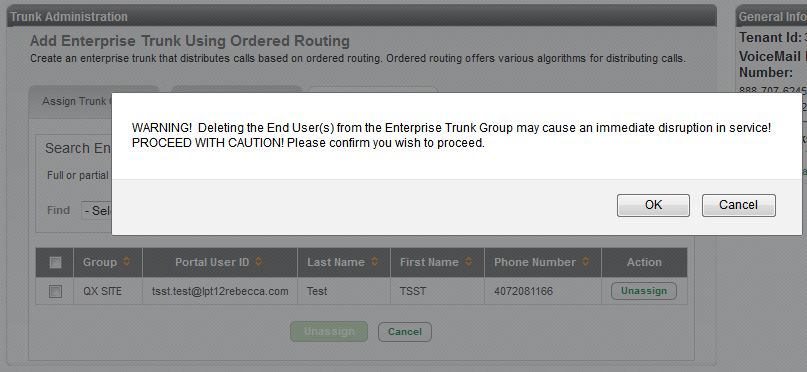
About this guide

                    The information contained within this user guide is specific to trunk administration features
                    and trunk management only. If you don’t have a trunk administration option on your main
                    menu, you don’t subscribe to that service.

                    For information pertaining to additional features and functionality within the administrator
                    portal, refer to the comprehensive administrator portal guide for full details.

                    A full copy of the portal guide can be found under help:

                                                                                                                            page 3 of 39
Services not available everywhere. Business customers only. Lumen may change, cancel or substitute products and services,
or vary them by service area at its sole discretion without notice. ©2021 Lumen Technologies. All Rights Reserved.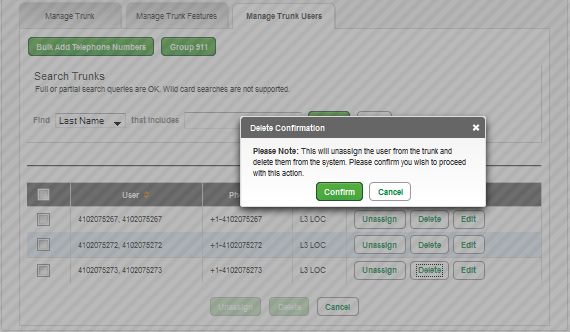
User Administration
The 911 address associated to each user, is based on the address associated to the group (site) they’re
built in. If you need to change an address, add a suite number or cubicle number, individual E911 add-on
licenses can be purchased to allow you to register unique addresses based on a user’s specific location.
This license can be assigned individually by seat or can be added or deleted in bulk.

Bulk add/delete E911 add on feature
    1. Click user administration from the main menu.
    2. Click bulk add/delete E911 add-on feature from the sub menu.
    3. Click the radio button based on the action you want to perform:
           • Add – assign E911 license to a user(s)
           • Delete – unassign E911 license from a user(s)
    4. In the email ID field, enter a valid email address; this address receives email notification for the
       success or failure of your bulk upload.

    5. Click the template file (Excel) hyperlink to download the bulk upload template spreadsheet.
    6. Enter all telephone numbers in column A that should be impacted by the bulk upload, 10-digits only,
       no punctuation such as “.” or “-“. Example: 2125551234, 2125559876, etc., name and save the
       document.

                                                                                                                            page 4 of 39
Services not available everywhere. Business customers only. Lumen may change, cancel or substitute products and services,
or vary them by service area at its sole discretion without notice. ©2021 Lumen Technologies. All Rights Reserved.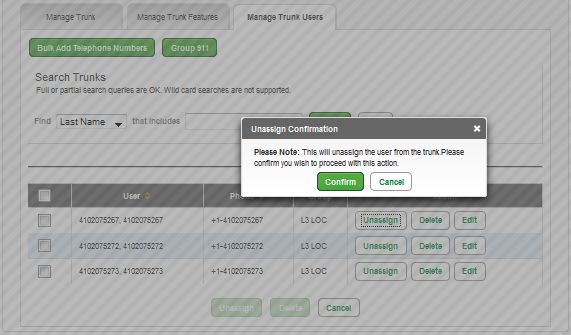
7. Click the input file browse button to locate the saved file based on your operating system.
    8. The uploaded file is indicated next to the browse button.
    9. Click the submit button.

    10. Receive notification that the request was successfully submitted and will be processed.

    11. An email is sent to the email address listed in the email ID field. If the upload failed, it’ll be noted
        within this email.

                                                                                                                            page 5 of 39
Services not available everywhere. Business customers only. Lumen may change, cancel or substitute products and services,
or vary them by service area at its sole discretion without notice. ©2021 Lumen Technologies. All Rights Reserved.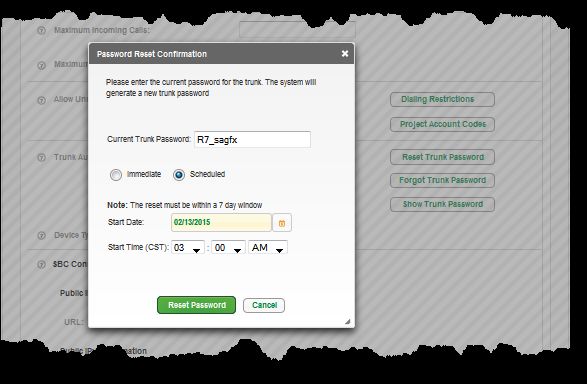
Manually add/delete E911 add on feature
Bulk add/delete E911 add-on feature allows you assign or unassign individual E911 licenses to several
users at a time, but this can also be done manually on a seat by seat basis.

    1. Click user administration from the main menu.
    2. Click manage users from the sub menu.
    3. Click the edit icon for the user you need to manage.

    4. Scroll down to locate available E911 inventory, this indicates whether you have available licenses
       to assign and how many. This number incrementally changes as licenses are assigned and
       unassigned.
    5. To add a license to the user, click the assign E911 for this user yes radio button, to unassign a
       license, click the no radio button.
    6. Click the save button.

                                                                                                                            page 6 of 39
Services not available everywhere. Business customers only. Lumen may change, cancel or substitute products and services,
or vary them by service area at its sole discretion without notice. ©2021 Lumen Technologies. All Rights Reserved.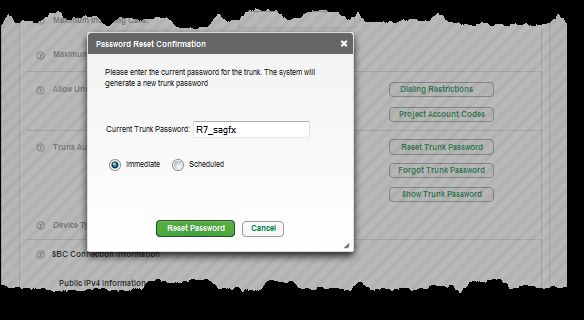
Trunk administration
Note: If you don’t have Lumen SIP trunking, you won’t see reference to this feature on the main menu in
your administrator portal.

Trunk administration functionality allows you to manage trunks within your enterprise or configure
collections of trunk groups via manage enterprise trunks. The options you have available within the trunk
administration menu vary based on the level of services you have purchased.

Manage trunks
Within manage trunks, you can move users from trunk group to trunk group, build users and
enable/disable features based on features available for the seat type.

    1. Click trunk administration from the main menu.
    2. Click manage trunks from the sub menu.
    3. All trunks within your enterprise are displayed.

                                                                                                                            page 7 of 39
Services not available everywhere. Business customers only. Lumen may change, cancel or substitute products and services,
or vary them by service area at its sole discretion without notice. ©2021 Lumen Technologies. All Rights Reserved.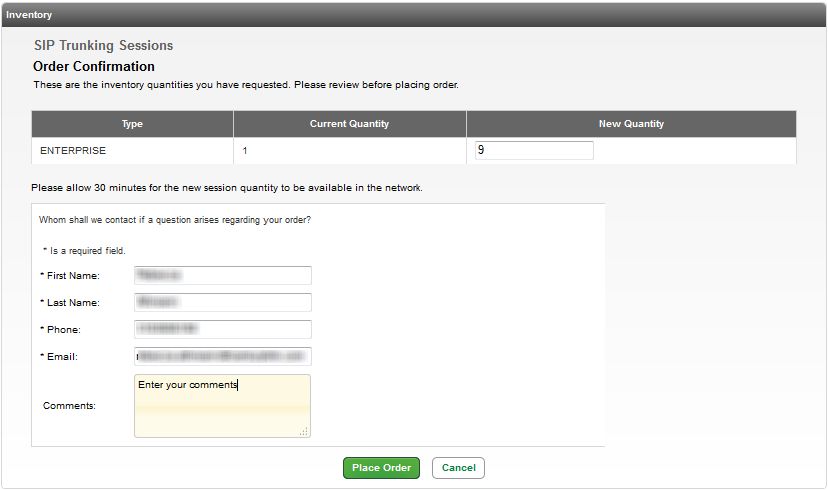
4. Scroll through your trunk groups or use the search trunks field to narrow your search.
    5. To review or configure a specific trunk group, click the edit button.

    6. All information pertaining to that trunk group will be provided on the manage trunk tab, including SBC
       connection information, IP address, pilot number, PBX device type, etc.
    7. To change any of the editable fields, enter the information in the appropriate field.
    8. As always, if you’re not sure what a feature is for, hover over the “?” for a brief description.

    9. After changes or modifications are made, always click save to enable your changes.

                                                                                                                            page 8 of 39
Services not available everywhere. Business customers only. Lumen may change, cancel or substitute products and services,
or vary them by service area at its sole discretion without notice. ©2021 Lumen Technologies. All Rights Reserved.
10. In the name field, enter a name to identify that trunk.
11. Total sessions on the tenant field is pre-calculated and static and is determined based on the
number of trunk sessions agreed to in your contract.
12. In the maximum trunk group sessions field, enter the number of trunks you want to use from your
total session amount – this number does not have to equal your Total Sessions in the enterprise.
13. In the maximum incoming calls field and the maximum outgoing calls field, enter the number of
calls you want supported on the incoming and outgoing trunk group.
14. Allow unscreened calls allows the trunk group to allow originating calls even, if the originator is not
a Lumen user – provided the originating trunk group can be identified via available signaling.
• Yes – enable this feature
• No – disable this feature
• Customer must own the numbers used for the unscreened calls feature
• For 911, the PBX must send a valid number from the trunk
page 9 of 39
Services not available everywhere. Business customers only. Lumen may change, cancel or substitute products and services,
or vary them by service area at its sole discretion without notice. ©2021 Lumen Technologies. All Rights Reserved.15. Define dialing restrictions or allow PAC/VPAC codes to be used with unscreened calls.
16. Click the dialing restrictions button.
17. In the dialing restrictions window, choose the dialing options you want to apply to unscreened calls
by selecting the check box or the radio buttons.
Note: Enable block of calls within a group prevents calling within a group, calls can
only be completed to numbers outside of the group.
18. To apply your settings, click the save button.
page 10 of 39
Services not available everywhere. Business customers only. Lumen may change, cancel or substitute products and services,
or vary them by service area at its sole discretion without notice. ©2021 Lumen Technologies. All Rights Reserved.19. Click the project account codes button to allow your PAC (project account codes) or VPAC
(verified project account codes) to be used for unscreened calls made from this trunk group
20. PAC and VPAC codes are ordered and managed under managed services – refer to the full
administrators guide under help from the main menu, for details on ordering and managing PAC and
VPAC codes.
21. Click the save button.
22. You can reset the password for your trunk group by clicking the reset trunk password button.
23. Click the confirm button to proceed with your password reset.
Note: Changing the trunk password needs to be coordinated, as you’ll also need to
change the password on your PBX/ATA in conjunction with your password reset.
Resetting the password causes an immediate disruption to your service!!
page 11 of 39
Services not available everywhere. Business customers only. Lumen may change, cancel or substitute products and services,
or vary them by service area at its sole discretion without notice. ©2021 Lumen Technologies. All Rights Reserved.24. To reset the password, you’ll be required to enter the current password in the current trunk
password field.
25. Click the immediate radio button to change the password immediately.
26. Click the save button.
27. To schedule your password reset, click the scheduled radio button.
28. Select the start date for the password reset by clicking the calendar icon.
29. From the start time dropdown boxes, select the time, including a.m. or p.m., that you want your
password reset to take effect.
30. Click the reset password button.
Note: An email will be sent to the email address of the primary administrator as indicated
under profile on the main menu.
page 12 of 39
Services not available everywhere. Business customers only. Lumen may change, cancel or substitute products and services,
or vary them by service area at its sole discretion without notice. ©2021 Lumen Technologies. All Rights Reserved.31. If you forget your trunk password, click the forgot trunk password button.
32. An email will be emailed to the primary administrator as listed under profile on the main menu.
33. Click the close button.
34. If you can’t remember or don’t have a record of your trunk password, click the show trunk
password button.
35. A warning box appears indicating that for security purposes, an email will be sent to the primary
administrator of the account.
36. Click yes to display the current password.
37. A window appears with the trunk password listed.
38. Make note of the password then click the close button.
page 13 of 39
Services not available everywhere. Business customers only. Lumen may change, cancel or substitute products and services,
or vary them by service area at its sole discretion without notice. ©2021 Lumen Technologies. All Rights Reserved.39. The device type section indicates the type of device you’re using to connect to the trunk group.
40. SBC connection information defines the session border controllers that manage traffic over your
trunk group.
41. The pilot user identifies the unique number that is associated to your trunk group. It defines various
characters of your trunk group such as AoR (address of record).
42. After all changes are made, click the save button.
page 14 of 39
Services not available everywhere. Business customers only. Lumen may change, cancel or substitute products and services,
or vary them by service area at its sole discretion without notice. ©2021 Lumen Technologies. All Rights Reserved.Manage trunk features
Manage trunk features gives you the ability to set up and define call forwarding treatments, as well as
treatments for when your trunk is unreachable.
1. Click the manage trunk features tab.
2. The default setting for call forwarding is none by default.
3. To enable call forwarding always to a phone number, click the forward to phone number/SIP
URI radio button.
4. An editable field is provided where you enter either a phone number or SIP URI.
5. Click the save button to enable call forwarding always to that destination.
6. If you have more than one trunk group, you can choose to call forward always to one of those trunk
groups.
Note: You’ll only be able to use this feature if you have more than one trunk group within
your enterprise
7. Click the reroute to trunk group radio button.
8. A dropdown box appears with a list of all trunk groups within your enterprise.
page 15 of 39
Services not available everywhere. Business customers only. Lumen may change, cancel or substitute products and services,
or vary them by service area at its sole discretion without notice. ©2021 Lumen Technologies. All Rights Reserved.9. Select the trunk group you wish to reroute calls to from that list.
10. Click the save button to enable call forwarding always to that trunk group.
11. The unreachable destination timeout feature allows you to define the number of seconds the
network should wait for a response to a SIP invite message.
Note: Forwarding will only be invoked if the internet goes down, or if the PBX does not
answer.
12. Click the unreachable destination timeout dropdown box.
13. Choose how many seconds, from 1-15, you want the system to wait for a response.
14. Click the save button.
page 16 of 39
Services not available everywhere. Business customers only. Lumen may change, cancel or substitute products and services,
or vary them by service area at its sole discretion without notice. ©2021 Lumen Technologies. All Rights Reserved.15. By default, the unreachable destination action is set to none.
16. To enable forwarding to a phone number when your trunk is unreachable, click the forward to
phone number/SIP URI radio button.
17. An editable field is provided where you enter either a phone number or SIP URI.
18. Click the save button to enable forwarding to that destination.
19. If you have more than one trunk group within your enterprise, you can choose to forward calls to
another trunk group if your trunk is unreachable.
Note: You’ll only be able to use this feature if you have more than one trunk group within
your enterprise
20. Click the reroute to trunk group radio button.
21. A dropdown box appears with a list of all trunk groups within your enterprise.
22. Select the trunk group you wish to reroute calls to from that list.
23. Click the save button to enable forwarding when your trunk group is unreachable, based on the
number of seconds set for the unreachable destination timeout setting.
page 17 of 39
Services not available everywhere. Business customers only. Lumen may change, cancel or substitute products and services,
or vary them by service area at its sole discretion without notice. ©2021 Lumen Technologies. All Rights Reserved.24. To disable both call forwarding always and call forwarding unreachable, these features must be
set to none.
25. When making setting changes, click the save button.
Note: These two features are not dependent on each other, and do not have to be
enabled at the same time.
Manage trunk users
Manage trunk users lets you define which users or phone numbers are assigned to each trunk group.
1. Click the manage trunk users tab.
2. To build and assign users to a trunk group, click the bulk add telephone numbers button.
page 18 of 39
Services not available everywhere. Business customers only. Lumen may change, cancel or substitute products and services,
or vary them by service area at its sole discretion without notice. ©2021 Lumen Technologies. All Rights Reserved.3. Select the appropriate domain from the user ID format dropdown box.
Note: There may be multiple domains listed within the dropdown box for you to select
from. Be sure to select the same domain as assigned to the pilot user at the bottom of
the manage trunk tab.
4. Select the seat type from the available seats dropdown box (available seat types will be based on
your available inventory).
5. Select the number(s) you wish to assign to the selected seat(s) from the available phone numbers
field.
6. Drag and drop the number(s) to the assign to trunk group field or use the arrows between the
fields.
7. Click the save button.
Drag and Drop
8. A window appears confirming that the seats are being processed.
9. An email will be sent to the primary administrator of record once processing is complete.
10. Click the OK button to return to the manage trunk users tab.
page 19 of 39
Services not available everywhere. Business customers only. Lumen may change, cancel or substitute products and services,
or vary them by service area at its sole discretion without notice. ©2021 Lumen Technologies. All Rights Reserved.11. Return to the manage trunk users tab and the additional seat(s) will be available to unassign,
delete or edit.
12. To unassign a user from a trunk group, click the unassign button.
13. An unassign confirmation window appears, click the confirm button if you want to proceed with
unassigning that user from the trunk group.
14. Reassign that user to another trunk group by following the previous process.
page 20 of 39
Services not available everywhere. Business customers only. Lumen may change, cancel or substitute products and services,
or vary them by service area at its sole discretion without notice. ©2021 Lumen Technologies. All Rights Reserved.15. To delete a user, click the delete button.
16. A delete confirmation window appears, click the confirm button if you want to proceed with the
deletion of that user.
17. This will delete this user from the trunk group.
18. Click the confirm button to continue.
19. Click the search button to display all users assigned to a trunk group.
20. To edit a user, click the edit button.
21. This allows you to customize the user information and enable/disable features.
page 21 of 39
Services not available everywhere. Business customers only. Lumen may change, cancel or substitute products and services,
or vary them by service area at its sole discretion without notice. ©2021 Lumen Technologies. All Rights Reserved.22. On the user settings tab, the first name/last name is prepopulated with the telephone number.
These fields are editable and can be changed appropriately based on the user.
23. Make any changes, such as seat type, by clicking on the dropdown box.
24. Enter the portal user ID information and select the appropriate domain from the dropdown box.
25. Generate a password by clicking the generate password button or enter and confirm a password
by typing in the appropriate fields.
Note: Only fields or features denoted with an “*” are required.
page 22 of 39
Services not available everywhere. Business customers only. Lumen may change, cancel or substitute products and services,
or vary them by service area at its sole discretion without notice. ©2021 Lumen Technologies. All Rights Reserved.26. Enter the email address in the email field; this is the email address that will receive notification when
this seat is built.
27. The time zone will be preselected based on the group, change it by clicking on the dropdown box if
necessary.
28. The default for assign E911 for this user is no. If this setting is not changed, the user will be using
the address registered to the trunk they’re assigned to.
29. If the user is mobile or is at a location other than where the trunk is registered, click the yes radio
button. Their e911 location can be managed and modified in the end user portal.
30. Enter the voicemail password in the voice mail PIN field.
31. Confirm the voicemail password in the confirm voice mail PIN field.
32. If escape to operator groups are pre-determined, select one for the user from the escape to
operator group dropdown box if necessary.
33. Once all information is populated, click the save button.
34. To easily move one user from one trunk group to another, click the edit trunk button. This will be
described next.
35. From the select trunk group dropdown box, select the trunk group you wish to move the user to.
36. This can be done in bulk under trunk administration --> manage trunks --> click edit for the trunk
you want to manage --> click the manage trunk users tab to manage/change multiple users from
one trunk group to another.
page 23 of 39
Services not available everywhere. Business customers only. Lumen may change, cancel or substitute products and services,
or vary them by service area at its sole discretion without notice. ©2021 Lumen Technologies. All Rights Reserved.37. Click the save button to confirm the move from one trunk group to another.
Group 911
Managing the 911 address of a trunk group is handled under managed services from the main menu. Or
do the following.
1. Click the manage trunk users tab.
2. Click the group 911 button.
3. You’ll be presented with a window stating you’re being redirected to the group caller ID options
under manage services.
4. Click the go button to proceed with your 911 modifications.
page 24 of 39
Services not available everywhere. Business customers only. Lumen may change, cancel or substitute products and services,
or vary them by service area at its sole discretion without notice. ©2021 Lumen Technologies. All Rights Reserved.5. Change the group you want to manage, by selecting the group from the select a group dropdown
box and click the get button.
6. Choose to make group settings such as non-emergency calls or blocking calling name for
external callers.
7. Click the save button to save any feature changes.
8. Click the update 911 information button to change the address that is registered with emergency
services.
9. For full details on how to manage 911 locations and submit registration changes, refer to the
administrator portal guide which can be found under help from the main menu.
10. The administrator portal guide is revised as portal enhancements are made and the revision date is
changed to correspond to each release date.
11. Always refer to your portal for the latest version of the guide.
page 25 of 39
Services not available everywhere. Business customers only. Lumen may change, cancel or substitute products and services,
or vary them by service area at its sole discretion without notice. ©2021 Lumen Technologies. All Rights Reserved.Managing and editing user features
Features can be enabled/disabled for various features and functions associated to your end users, based
on their seat type.
1. Click user administration from the main menu
2. Click manage users from the sub menu.
3. If you have multiple locations, select your location from the select a group dropdown box.
4. If you have several users in that group, use the search fields to narrow your search.
5. Click on edit for the user that you wish to manage.
12. Click the features and settings tab.
13. The type of features available to that user is based on the seat type.
14. If custom templates have been created, click the custom user template dropdown box and select
the template you wish to assign to this user, and click the apply template button (optional).
15. By default, all features for that seat type are enabled; the administrator can disable any feature, per
seat, by unchecking the check box for that feature.
16. Dial restrictions can also be changed based on the requirements of that user.
17. Enable block on nothing, all calls accepted is selected by default.
page 26 of 39
Services not available everywhere. Business customers only. Lumen may change, cancel or substitute products and services,
or vary them by service area at its sole discretion without notice. ©2021 Lumen Technologies. All Rights Reserved.18. To change that setting, click the radio button for the dial plan appropriate for that user or seat type.
19. Click the save button.
20. Click the phone settings tab.
21. Click the appropriate button to add physical device or business communicator softphone.
22. If you don’t have softphones in inventory, you’ll receive an error message that you need to order
more.
Note: For details on adding/deleting and managing Business Communicator, refer to the
administrator portal guide found under help from the main menu.
23. Make additional feature changes, including adding a receptionist PC console by clicking the yes
radio button next to assign a receptionist PC console for this user.
page 27 of 39
Services not available everywhere. Business customers only. Lumen may change, cancel or substitute products and services,
or vary them by service area at its sole discretion without notice. ©2021 Lumen Technologies. All Rights Reserved.24. You can only assign this feature if one is available within inventory.
25. Click the save button.
page 28 of 39
Services not available everywhere. Business customers only. Lumen may change, cancel or substitute products and services,
or vary them by service area at its sole discretion without notice. ©2021 Lumen Technologies. All Rights Reserved.Manage enterprise trunks
Manage enterprise trunks allows you to create and configure enterprise trunks, which are collections of
trunk groups. Enterprise trunk users can originate or terminate calls through any of the trunk groups
assigned to the enterprise trunk. Enterprise trunks provide routing flexibility and redundancy that is not
possible with a single trunk group.
1. Click trunk administration from the main menu.
2. Click manage enterprise trunks from the sub menu.
3. Click the add by weighted routing button.
4. Enter a name for your trunk group in the enterprise trunk name field.
5. From the dropdown boxes, select the maximum number of reroute attempts and maximum
number of reroute attempts within a priority from 1-3.
6. To activate a route exhaustion action, click the forward to phone number/SIP URL radio button.
7. This provides a field for you to input the 10-digit phone number, or SIP URL.
8. Click the search button to list the trunks within that group.
page 29 of 39
Services not available everywhere. Business customers only. Lumen may change, cancel or substitute products and services,
or vary them by service area at its sole discretion without notice. ©2021 Lumen Technologies. All Rights Reserved.9. All trunks within that group are listed in the available trunk group field.
10. To apply these routing options to the appropriate trunk group(s), select the trunk group from the
available trunk groups field, and drag and drop it to the assigned trunk groups field.
11. You can also highlight a trunk group in either field then use the arrow keys to move the group
between fields.
12. Click the save button.
Drag and Drop
page 30 of 39
Services not available everywhere. Business customers only. Lumen may change, cancel or substitute products and services,
or vary them by service area at its sole discretion without notice. ©2021 Lumen Technologies. All Rights Reserved.13. Click the assign priorities tab to distribute calls based on weighted routing.
14. Input a priority and weight in the appropriate field.
15. Hover over the “?” to read the parameters for priority and weight.
16. Click the save button.
17. To add users to a trunk group, click the add users tab.
18. Click the search button.
19. All available users are listed in the search results and end users field.
20. Drag and drop users from the search results and end users field to the users to be assigned
field.
21. You can also highlight a user in either field then move them between fields with the arrow keys.
22. Click the save button
Drag and Drop
page 31 of 39
Services not available everywhere. Business customers only. Lumen may change, cancel or substitute products and services,
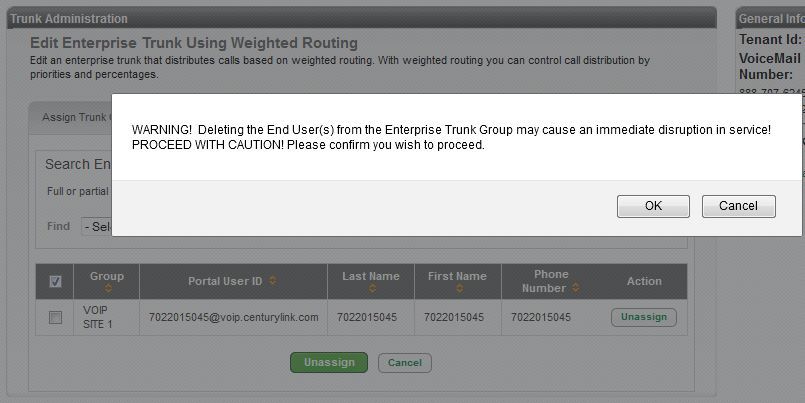
or vary them by service area at its sole discretion without notice. ©2021 Lumen Technologies. All Rights Reserved.23. Click the assigned users tab, individuals added within add users, are listed here.
24. To unassign a user, click the unassign button next to a specific user, or click the check box next to
multiple users, and click the unassign button at the bottom.
25. You receive a WARNING! indicating deleting a user may cause immediate disruption to service.
26. Click the OK button to proceed or click the cancel button.
27. Click the add by ordered routing button to create an enterprise trunk that distributes calls based on
various algorithms.
page 32 of 39
Services not available everywhere. Business customers only. Lumen may change, cancel or substitute products and services,
or vary them by service area at its sole discretion without notice. ©2021 Lumen Technologies. All Rights Reserved.28. Enter a name for your ordered route in the enterprise trunk name field.
29. Select the maximum number of reroute attempts from the dropdown box.
30. Select the routing option from the routing algorithm dropdown box; hover of the “?” for a
description of each option:
• Ordered load balancing – the trunk groups are ordered and the application server selects
each trunk group in turn following a round-robin algorithm
• Overflow – the trunk groups are ordered and the application server selects the first trunk
group
• Most idle – the application server selects the trunk group that has the fewest number of
current originating or terminating calls
• Least idle – the application server selects the trunk group that has the greatest number of
current originating or terminating calls
• Weighted overflow – each trunk group has a priority and a weight; starting with the trunk
groups that have the highest priority (the lowest numerical value), the application server
selects a trunk group at the priority according to a weighted random pick
31. Select none for the route exhaustion action or click the forward to phone number/SIP-URI radio
button and enter a valid number or SIP-URI in the field.
32. Click the search button.
33. Find the trunk you wish to apply these setting to in the available trunk group field.
34. Remember, if you have several trunks within your enterprise, you can narrow that search by utilizing
the search trunks field and search by trunk name, alias trunk name, or group. Enter your search or
partial search in the “that includes” field and click the search button.
35. Drag and drop the appropriate trunk groups from the available trunk groups field to the assigned
trunk groups field.
36. You can also highlight a trunk group in either field then move them between fields with the arrow keys.
37. Click the save button to save your settings and edit those changes at another time or click the save
and continue button to continue programming your trunk groups.
page 33 of 39
Services not available everywhere. Business customers only. Lumen may change, cancel or substitute products and services,
or vary them by service area at its sole discretion without notice. ©2021 Lumen Technologies. All Rights Reserved.Drag and Drop
38. From the add users tab, click the search button to populate the list of users in the search results
and end users field.
39. Drag and drop the appropriate users from the search results and end users field to the users to
be assigned field.
40. You can also highlight a user in either field then move them between fields with the arrow keys.
41. Click the save button.
page 34 of 39
Services not available everywhere. Business customers only. Lumen may change, cancel or substitute products and services,
or vary them by service area at its sole discretion without notice. ©2021 Lumen Technologies. All Rights Reserved.Drag and Drop
42. Click the assigned users tab.
43. The list of users assigned to that enterprise trunk ordered routing appears.
44. Click the unassign button to remove a user from the route.
page 35 of 39
Services not available everywhere. Business customers only. Lumen may change, cancel or substitute products and services,
or vary them by service area at its sole discretion without notice. ©2021 Lumen Technologies. All Rights Reserved.45. A warning message appears stating that deleting users from and enterprise trunk group may disrupt
service.
46. Click OK to continue with the unassignment or click the cancel button.
47. To unassign multiple users, click the check box in the column heading, or shift or ctrl-click to select
the check box next to specific users.
48. Once all users are selected, click the unassign button.
page 36 of 39
Services not available everywhere. Business customers only. Lumen may change, cancel or substitute products and services,
or vary them by service area at its sole discretion without notice. ©2021 Lumen Technologies. All Rights Reserved.Inventory
Note: If you don’t have Lumen SIP trunking you won’t see reference to SIP trunking
sessions within the inventory section. For full details on the remaining inventory options,
refer to the administrator portal guide.
SIP trunking sessions
SIP trunking sessions are synonymous with call paths. There are costs associated to adding sessions,
refer to your contract for session pricing. When increasing your SIP sessions, also keep in mind the speed
of your circuit. Overextending the number of sessions to exceed the capacity of your circuit, could be
impactful to your voice quality.
1. Click inventory from the main menu.
2. Click SIP trunking sessions from the sub menu.
3. Your current quantity of SIP sessions will be noted in the current quantity column.
page 37 of 39
Services not available everywhere. Business customers only. Lumen may change, cancel or substitute products and services,
or vary them by service area at its sole discretion without notice. ©2021 Lumen Technologies. All Rights Reserved.4. To modify the number of SIP Sessions, enter the new total in the new quantity field.
Note: The new quantity will be total sessions, not in addition to the current quantity.
5. Click the submit button.
6. The information on the order confirmation screen pre-populates with the primary administrator's
contact information.
7. Change information accordingly including any comments you wish to enter as pertains to this order.
8. An email confirming your order is sent to the email address entered in the email field. Another email
will be received when the order is completed.
9. Press the place order button.
10. You’ll receive an order confirmation including an order ID number.
11. Please allow at least 30 minutes for your order to process.
12. Click the back to SIP trunking sessions button.
page 38 of 39
Services not available everywhere. Business customers only. Lumen may change, cancel or substitute products and services,
or vary them by service area at its sole discretion without notice. ©2021 Lumen Technologies. All Rights Reserved.13. Return to SIP trunking sessions and observe your new quantity.
Help
Within help, you have access to various training tools and documents such as user guides, quick reference
guides and short training decks.
1. Click help from the main menu.
2. Within the help page, you’ll be able to find items such as training documentation and user
guides.
3. Click the desired link to launch self-help documentation.
4. This feature will be continually updated as new features become available or are enhanced.
page 39 of 39
Services not available everywhere. Business customers only. Lumen may change, cancel or substitute products and services,
or vary them by service area at its sole discretion without notice. ©2021 Lumen Technologies. All Rights Reserved.You can also read