I3ALLSYNC Wireless Presentation System - User Manual
←
→
Page content transcription
If your browser does not render page correctly, please read the page content below
i3ALLSYNC
Wireless Presentation System
        User Manual

            January 2019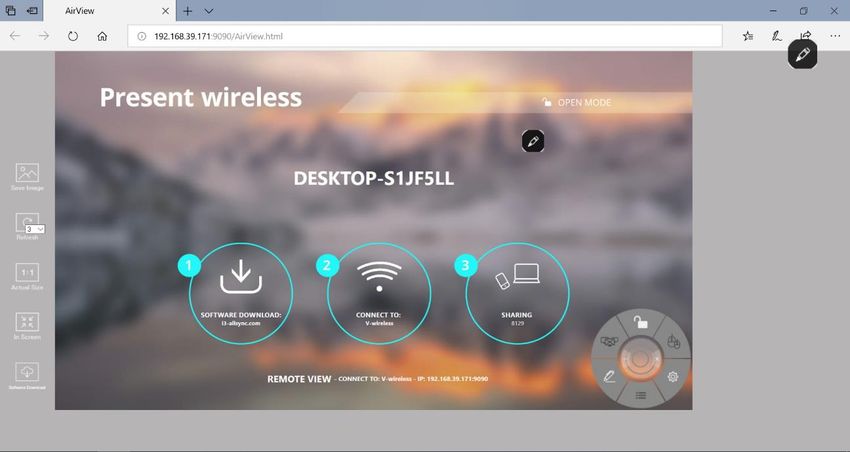
Table of Contents
Chapter 1: Product Introduction ................................................................................................................... 4
    1-1 Introduction .................................................................................................................................... 4
    1-2 Hardware Recommendation ........................................................................................................... 5
Chapter 2: Description of Functions ............................................................................................................. 6
    2-1 Using I3ALLSYNC ............................................................................................................................. 7
    2-2 I3ALLSYNC User Interface................................................................................................................ 8
         2-2-1 Action Short Cut (Control Panel).......................................................................................... 8
         2-2-2 Basic Mode and Conference Mode ................................................................................... 10
         2-2-3 Multi-screens (Windows Receiver only feature) ............................................................... 10
         2-2-4 Back Channel Control ......................................................................................................... 11
         2-2-5 i3ALLSYNC OSD Information .............................................................................................. 12
         2-2-6 Annotator ........................................................................................................................... 12
         2-2-7 I3ALLSYNC Share Settings .................................................................................................. 13
Chapter 3: I3ALLSYNC Transmitter Software and Applications ................................................................... 14
    3-1 I3ALLSYNC Windows Transmitter Software .................................................................................. 14
         3-1-1 Install I3ALLSYNC Windows software ................................................................................ 14
         3-1-2 Launch I3ALLSYNC Windows software .............................................................................. 15
         3-1-3 I3ALLSYNC Windows User Interface .................................................................................. 22
         3-1-5 Annotator ........................................................................................................................... 23
         3-1-6 Settings .............................................................................................................................. 23
            3-1-7 Conference Mode .............................................................................................................. 26
       3-2 I3ALLSYNC Mac Transmitter Software .......................................................................................... 30
            3-2-1 Install I3ALLSYNC Mac software ........................................................................................ 30
                 3-2-1-1 Settings for enabling touchback on your MacOS ................................................... 31
            3-2-2 Launch I3ALLSYNC Mac software ...................................................................................... 33
            3-2-3 I3ALLSYNC Mac User Interface .......................................................................................... 40
            3-2-5 Annotator ........................................................................................................................... 41
            3-2-6 Settings .............................................................................................................................. 41
            3-1-7 Conference Mode .............................................................................................................. 43
       3-3 I3ALLSYNC iOS Transmitter ........................................................................................................... 46
       3-4 i3ALLSYNC Android Transmitter Application ................................................................................. 48
            3-4-1 Download i3ALLSYNC Sender Android Transmitter Application ........................................ 48
            3-4-2 Start Using i3ALLSYNC Sender and I3ALLSYNC .................................................................. 49
            3-4-3 Control Panel on Notice Bar .............................................................................................. 51
            3-4-4 Settings .............................................................................................................................. 52
       3-5 i3ALLSYNC HDMI Transmitter........................................................................................................ 53

                                                                            2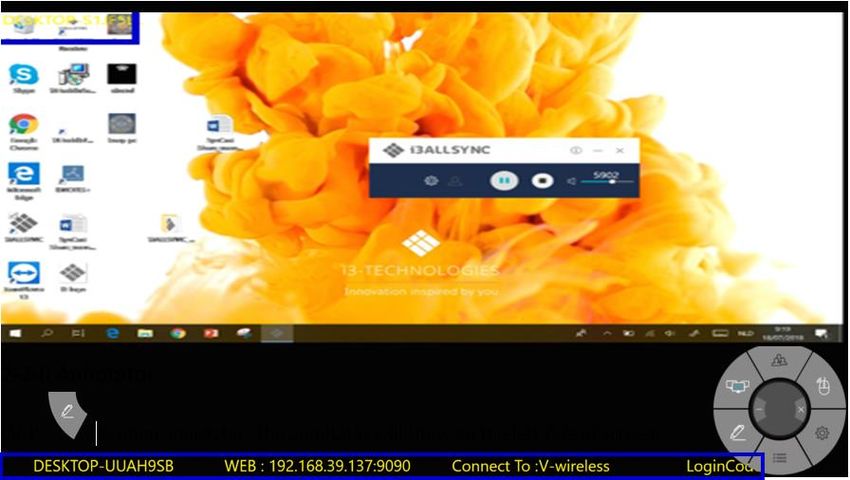
3-5-1 How to use the i3ALLSYNC HDMI transmitter ................................................................... 53
3-5-2 How to pair ........................................................................................................................ 54

                                                             3
Chapter 1: Product Introduction

Thank you for choosing the I3ALLSYNC Wireless Presentation Receiver System software.

1-1 Introduction
This I3ALLSYNC User Reference Guide provides a summary of how I3ALLSYNC works for users, including
an overview of an I3ALLSYNC system as well as steps for users to connect, share and control content on
an I3ALLSYNC wireless display using laptops, mobile devices and the display user interface. I3ALLSYNC will
improve meeting room efficiency, engagement, and productivity.

Key Features

(1) Connect with Windows, Mac, iOS and Android devices
(2) Screen mirroring the desktop, and apps, docs, images & videos file streaming
(3) Stream 1080p at 30fps or better with synchronized audio
(4) See changes on display in real time
(5) Display-side control with multi-touch support
(6) Share from multiple iPads and iPhones simultaneously
(7) Support 4 split screens mirroring.

(8) Multiple use models supported: Basic Mode Access; Conference Mode Access。

                                                    4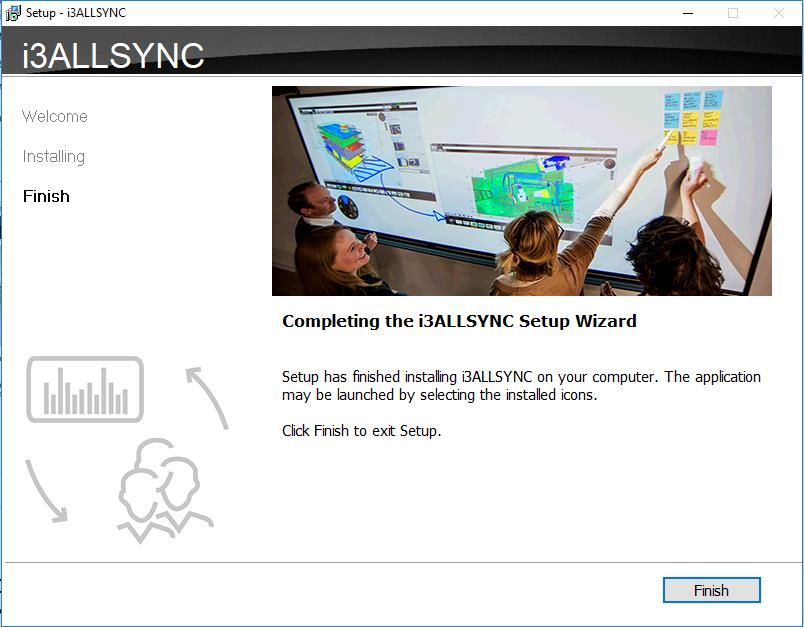
1-2 Hardware Recommendation
I3ALLSYNC Client/User Device – Technical Requirements

   Clients – laptops and mobile devices
                         Laptops & Tablet PCs           iPads, iPhones,&        Android Tablets &
                                                        iPods                   Phones
   Operating System      Windows 7 or newer             iOS version 8.0 or      Android 6.0 or newer
                         OSX 10.10 or newer             newer
   Minimum               Intel Core 2 Duo, 2.3GHz       iPad 3 / iPhone 5 or    Phones/Tablets with
   Required              2 GB RAM                       newer                   Android 6.0 or newer
   Recommended           Intel Core i5 with 2C4T,       iPad 3 / iPhone 5 or    Phone/Tablets
                         2.3GHz 6 GB RAM                newer                   supporting Android
                                                                                6.0 or newer

I3ALLSYNC Share Windows Software (server) – Technical Requirements

   Host Computer for I3ALLSYNC Windows Software
                    Windows 7, 8.1 or 10
    Operating
                    I3ALLSYNC Windows Software is not supported in a virtual machine (VM)
     System
                    environment or while using terminal services.
                      Processor       Intel Core i5 with 2C4T 2.3GHz or higher, or AMD equivalent.
                       Graphics       Direct X 11 or higher, Integrated Intel HD Graphics or Dedicated
    Minimum
                                      Graphics (i.e. AMD Radeon or NVIDIA GeForce)
    Required
                         RAM          4 GB
                       Network        Single NIC Card. Ethernet Connection

I3ALLSYNC Share Network Requirements

   Network and Internet Access
   When I3ALLSYNC is deployed into the existing network, the host PC and the clients require wired
   or wireless network connection with a minimum bandwidth of 20 Mbps. When running HD
   content, increase the minimum bandwidth to 50 Mbps. Like any network application, the overall
   performance would be depended on available bandwidth. Internet access is required to activate
   the I3ALLSYNC Windows Software (server) and install software updates for I3ALLSYNC Windows
   Software (server). Internet access is also required to install and update the I3ALLSYNC client apps
   for Windows, Mac, iOS, and Android.

                                                    5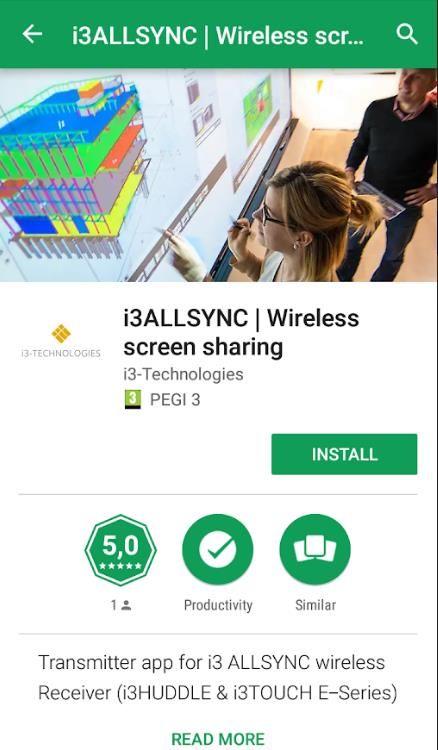
Chapter 2: Description of Functions
When you see the screen below, the I3ALLSYNC server is ready for connection. Choose in the sidebar
which operating system you are using to start the screensharing on your i3TOUCH, i3HUDDLE or i3SIXTY.

Receiver:
    Receiver            ICON                                    Description
 I3ALLSYNC                           The receiver server which receives and shows the shared screens
 (for Windows)                       from the transmitters.

Transmitters (Sender Clients):
   Transmitter          ICON                                    Description
 I3ALLSYNC                           The software shares the screen from PC or tablet to the receiver.
 (Windows)

 I3ALLSYNC                           The software shares the screen from Mac to the receiver.
 (Mac)

                                                  6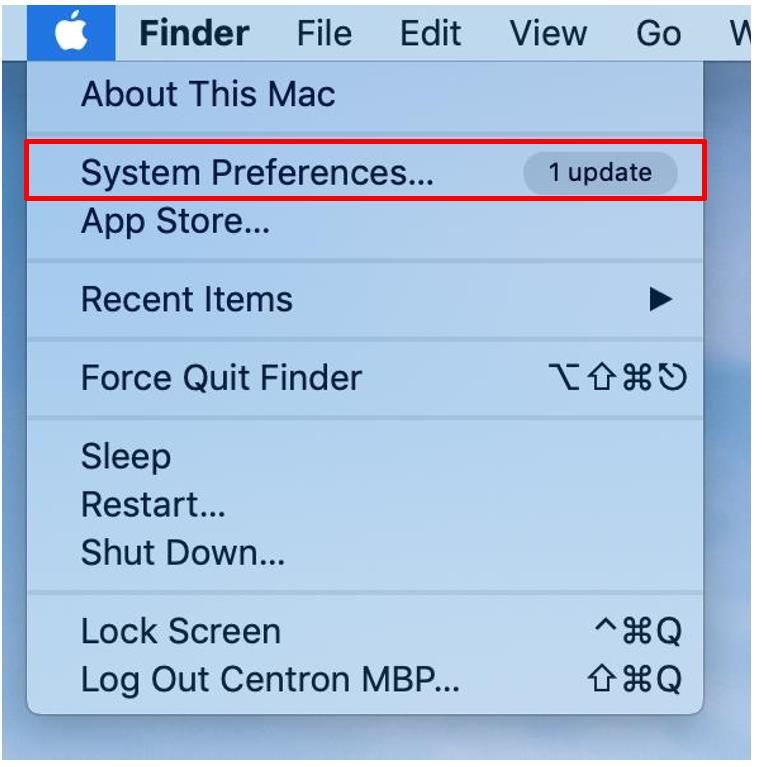
I3ALLSYNC                           The app mirrors the screen from phone or tablet to the receiver.
 Sender
 (Android)

 I3ALLSYNCDoc                        The app streams files from iPhone or iPad to the receiver. File
 (iOS)                               type: word, excel, ppt, photo, picture, video, webpage… etc.

2-1 Using I3ALLSYNC
Step2. Connect the Windows Platform to a dedicated router via LAN or Wi-Fi.

Step3. Launch the I3ALLSYNC
Step4. Allow access through the Windows Firewall.

                                                    7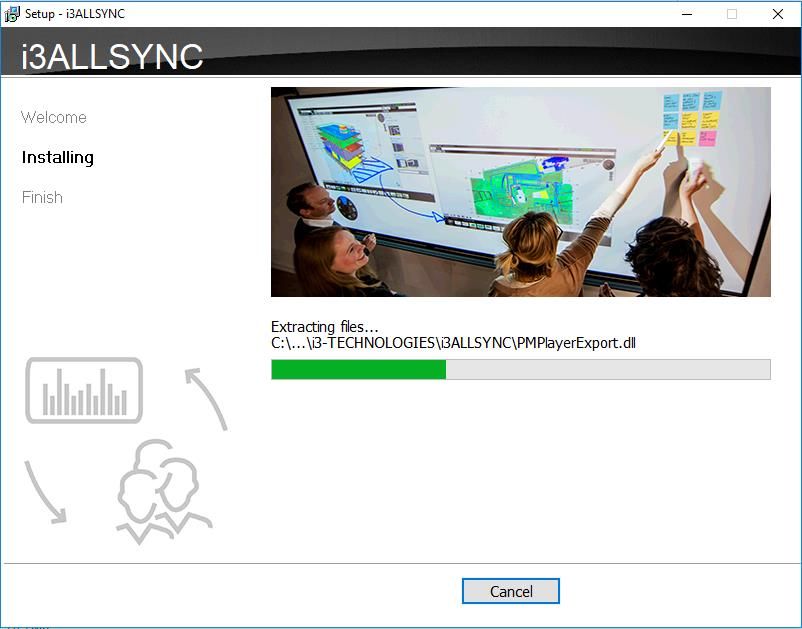
Now the I3ALLSYNC Share server is ready for connection.

2-2 I3ALLSYNC User Interface

             Item                                             Description
  Device Name                It will be identical to the Windows Computer Name.
  IP Address                 Received from another DHCP Server or configured manually to server.
  Connect To                 Show the upper AP router SSID via Wi-Fi connection.
                             Show “LAN” via LAN connection.
  LoginCode                  4 digits to ensure client connect to the correct receiver server.
  Software Download          Web link to download I3ALLSYNC Client Software and user guide
  Action Short Cut           The control panel and main functions of I3ALLSYNC.

2-2-1 Action Short Cut (Control Panel)

      Item                                               Description

                     Press the          to expand the action short cut pie.

                                                     8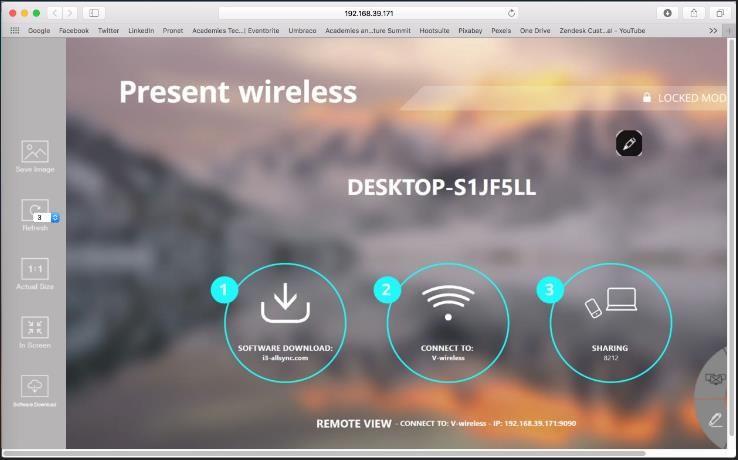
Enable / Disable the Conference Mode from receiver server.

Show clients’ screens preview on left or right bar in conference mode.

Enable/Disable Back Control from receiver to control the Windows / Mac clients.

Go to the settings window of I3ALLSYNC receiver server.

Stop all mirroring screens on the receiver.

Annotator, drawing on the screen and save to file.

Minimize I3ALLSYNC to the Windows Task bar.
Close I3ALLSYNC.

                                9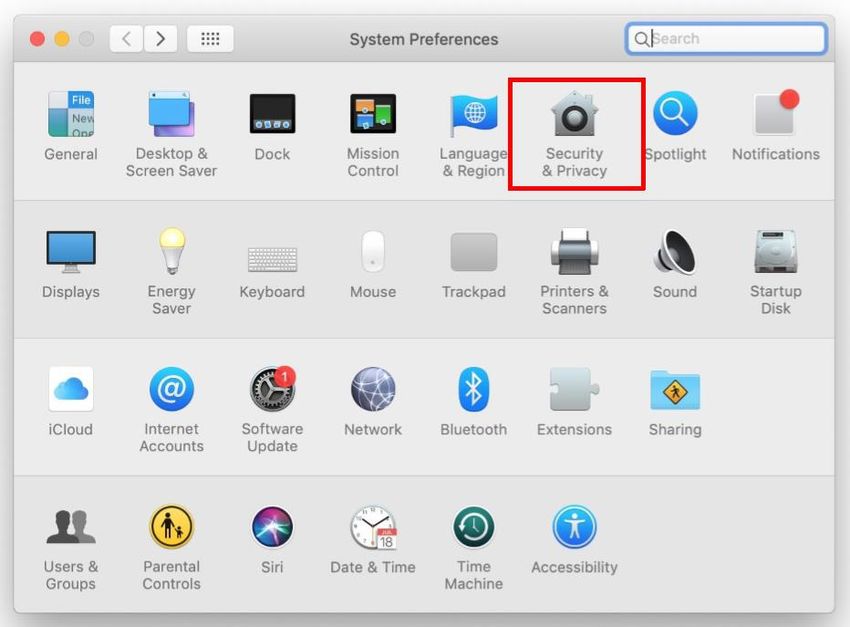
2-2-2 Basic Mode and Conference Mode
Basic Mode
All the clients with I3ALLSYNC transmitter software or app are free to share their screens once their
devices are connected to the I3ALLSYNC receiver server. The clients can share one after another in full
screen or in split-screen.
Conference Mode
A meeting control system that enables the meeting host as admin to organize the connected devices and
select which screen to share and stop. If the admin doesn’t choose the client which may not share the
screen. Admin have the initiative to manage the shared screens.

2-2-3 Multi-screens (Windows Receiver only feature)

The user guide for client’s transmitter device to connect to I3ALLSYNC receiver will be stated in Chapter
3 of this manual.

i3ALLSYNC Share supports multi-screens sharing feature:
(Streaming performance of multi-screens depends on CPU and GPU of hardware platform.)
 1 screen – full screen mirroring

View the Sharing Screens
When multiple screens are sharing, select the sharing screen, Zoom In and Close buttons appear on the
screen. When someone is sharing in full screen, move the mouse cursor or swipe on the touch panel
from bottom to the edge, Zoom Out button shows up. There is maximum of four screens that can be
shown at a time on your display.
         Zoom In -                           Zoom Out -                         Close -
         View in full screen                 Return to 4-split screen           Stop Sharing

                                                   10
Multi-screens in Conference Mode:
The meeting host as an admin who can select which screen to share and join in the split screens. Click
to let the screen preview bar show up. Or move the mouse cursor or swipe on the touch panel
from the left/right side to edge.
Select the client’s screen, the Play/Stop button appears.
Press “Play” to let the client shows full screen or join in the split screens. Press “Stop” to stop the client
showing there screen.
2-2-4 Back Channel Control
Back Channel Control feature enables the I3ALLSYNC receiver to interact with the I3ALLSYNC client.
Make a click on I3ALLSYNC receiver, I3ALLSYNC will do a same click on the client’s device.
Click to enable/disable Back Control from receiver to control the Windows/Mac client. Back
Channel Control only works when Windows/Mac client is in full screen mirroring.
112-2-5 i3ALLSYNC OSD Information
During mirroring, swipe on the touch panel from bottom to the edge (or move the mouse cursor,) the
system will show up the OSD connection information.
2-2-6 Annotator
Click to open annotator. The annotator floating menu will be shown on the left upper-corner of
12your screen. This application gives you the opportunity to take notes on the display while you’re sharing
your screen. When you’re done with taking notes, you can simply save and share your notes via several
options, like directly download as PDF, send it to your e-mail,…
2-2-7 I3ALLSYNC Share Settings
You have to restart the I3ALLSYNC to apply the changed settings. Restarting can be done after pressing
the ‘Apply’ button in de right-bottom corner of the settings screen.
Item Description
It will be identical to the Windows Computer Name.
Software Server Name Editable for customized name for the receiver, and only effective to the
clients’ recognition. Windows Computer Name remains the same.
Editable if the Login Code switch = ON (and not ‘Random’)
Login Code Enter the 4 digits number to appoint the Login Code. After you’ve done
this setting, the login code will always be these 4 digits.
Random = generate 4 digits randomly every time launch the software.
Login Code Switch ON = appoint 4 digits and remains the same.
OFF = no Login Code required.
ON = The last mirroring client will overwrite the other client.
Basic mode overwrite
OFF= The last mirroring client can’t overwrite the other client.
Set the period of Attendee List Preview update.
Attendee Preview
Only effective when Conference Mode enabled.
Log Output Click “Send To Desktop” to send the log file to desktop. Send this file to
13support team to analyze the software issue.
Version The I3ALLSYNC version. OTA Update is available.
Trial Version = Haven’t entered the serial number yet.
Serial Number
Activated Version = Show the serial number.
Trial Version = Expired Day of trial.
Expire On
Activated Version = Expired Day of OTA update effective.
OFF = Disable GPU hardware acceleration.
Hardware Decode
ON = Enable if the platform supports GPU hardware acceleration.
Chapter 3: I3ALLSYNC Transmitter Software and Applications
3-1 I3ALLSYNC Windows Transmitter Software
3-1-1 Install I3ALLSYNC Windows software
Go to: i3-allsync.com, to download the i3ALLSYNC transmitter application on your Windows device.
Follow the steps to complete the software installation.
We call it the transmitter software because you’ll send your screen from your Windows device to the
i3TOUCH, i3HUDDLE or your i3SIXTY, which will function as receiver.
143-1-2 Launch I3ALLSYNC Windows software
Step 1. Launch the I3ALLSYNC software, the pairing wizard window shows up.
Step 2. Pairing the I3ALLSYNC receiver and I3ALLSYNC transmitter.
I3ALLSYNC transmitter (= the i3ALLSYNC app on your laptop or smartphone) should connect to the same
network with the I3ALLSYNC receiver (=i3ALLSYNC on you i3TOUCH, i3HUDDLE or i3SIXTY). You can refer
to the information on standby screen of I3ALLSYNC receiver.
15Depending on the connection status, 3 types of pairing method.
Client connects to the router via Wi-Fi
Type A
I3ALLSYNC connects to the router via Wi-Fi or LAN
Client connects to the router via LAN
Type B
I3ALLSYNC connects to the router via LAN or Wi-Fi
Using HotSpot of the receiver device platform. (Need dedicated Wi-Fi module)
Type C
Client connects to I3ALLSYNC via Wi-Fi HotSpot of the receiver device directly.
General Pairing Steps
When the i3ALLSYNC Transmitter app on your device is already connected to the same network as
the receiver device (= your i3TOUCH, i3HUDDLE or i3SIXTY), then the I3ALLSYNC software can find
the receiver device. This means that you have to search for the device name between the search
results in your i3ALLSYNC Transmitter app on your laptop of smartphone. In this case, the receiver is
been called: DESKTOP-UUAH9SB)
1. Select the correct receiver device which you are going to share screen with.
2. Enter the Login Code. Press “Play” to start sharing screen.
16If you cannot find the device directly, here are some guides for different pairing methods.
Type A: Client connects to the router via Wi-Fi
1. Select the WiFi router and click the “Select” button. The right pane will expand.
2. Enter the Wi-Fi password of the router and click “OK”.
3. Select the correct receiver device which you are going share screen.
4. Enter the Login Code. Press “Play” to start sharing the screen.
17Item Description
Device/AP Around You. Select the router you want to connect to. The I3ALLSYNC
receiver should be located behind this router.
Find the receiver by IP.
Refresh the list if the Wi-Fi router or device if it doesn’t appear.
Select the saved pairing record and discard it.
Choose the router, click “Select” to connect.
Wi-Fi Enter the Wi-Fi password you set in Soft AP mode
Password
Device I3ALLSYNC receiver name will be located and shown here.
Under AP
Login Code Enter the Login Code if you see it on I3ALLSYNC receiver.
Save Save the pairing record in the client PC.
Start the screen mirroring.
Type B. Client connects to the router via LAN
1. Select the correct receiver device which you are going to share screen with.
2. Enter the Login Code. Press “Play” to start sharing screen.
18Item Description
Device/AP Around You, the I3ALLSYNC server will be located in the list.
Refresh the Wi-Fi List if the router didn’t appear.
Select Choose the server, click “Select” to connect and start screen mirroring.
19Type C. Using HotSpot of the receiver device platform (Soft AP mode)
1. Select the WiFi router and click the “Select” button. The right pane will expand.
2. Enter the Wi-Fi password of the router and click “OK”.
3. Select the correct receiver device which you are going share your screen with.
4. Enter the Login Code. Press “Play” to start sharing screen.
Item Description
Device/AP Around You. Select the router you want to connect to. The I3ALLSYNC
receiver should be located behind this router.
Find the receiver by IP.
Refresh the list if the Wi-Fi router or device if it doesn’t appear.
Select the saved pairing record and discard it.
Choose the router, click “Select” to connect.
Wi-Fi Enter the Wi-Fi password you set in Soft AP mode
Password
Device I3ALLSYNC receiver name will be located and shown here.
Under AP
Login Code Enter the Login Code if you see it on I3ALLSYNC receiver.
Save Save the pairing record in the client PC.
Start the screen mirroring.
Find by IP manually
In some cases, the client’s device and the receiver device are under the same network but not at the
20same level. Follow the steps below to find the receiver by IP address manually.
1. Click on , the right pane will expand.
2. Enter the IP* and login code. Press “Play” to start sharing screen.
*You can find the IP on your wireless presenting screen:
213-1-3 I3ALLSYNC Windows User Interface
Basic Mode — Main Panel
Item Description
Click to show the Version / Server IP / Server Name information
Minimize the I3ALLSYNC control panel
Close the I3ALLSYNC program
Launch the Document Share
Launch the Annotator
Launch the I3ALLSYNC setting
Launch the Conference Mode
22Press Play to start the screen mirroring.
Press Pause to pause the mirroring.
/
Stop the screen mirroring.
Audio Slide bar to control the audio volume.
Mute / Un-mute switch.
Login Code The login code typed for connecting to the receiver.
3-1-5 Annotator
Click on , the annotator floating menu will be shown on the left upper-corner of your screen. This
application gives you the opportunity to take notes on the display while you’re sharing your screen.
When you’re done with taking notes, you can simply save and share your notes via several options, like
directly download as PDF, send it to your e-mail,…
3-1-6 Settings
Click on to see the setting menu.
1. Display Mode
Mirror the current PC screen or share the extend screen.
232. Settings - I3ALLSYNC advanced settings
Item Function Description
Auto Adjust Resolution Apply the receiver output resolution to the transmitting PC.
Auto Save Settings Save these settings automatically.
PowerPoint Use HW encoding to get better mirroring performance.
Presentation Mode
Auto Play Start the screen mirroring automatically after connecting to the recwiver.
Language Select the I3ALLSYNC application language. (you need to restart to apply the
changes)
Attendee Preview Set the period of Attendee List Preview update.
Only effective when the Conference Mode is enabled.
FileShare
FileShare can stream files to iPhone/iPad from a specified folder of the PC.
Step 1. Select “Enable File Share”
Step 2. Enter 8 digits of number for the Pin Code
Step 3. Select Share Folder
Then, your iPhone/iPad can view the files in the folder.
Note: iPhone/iPad and the PC must connect to the same SynCast Share receiver.
243. Remote View
Remote View is a slideshow feature that clients can see the shared screen on the Receiver via the browser.
Good for clients faraway from display and take notes of the shared slides.
For a device which do not have installed the i3ALLSYNC software: they can also use the browser to see the
slide show in screen sharing. Enter the IP of the receiver and select Remote View. Then watch the shared
screen via browser temporarily.
254. Exit
Close the i3ALLSYNC software.
3-1-7 Conference Mode
Click on and enter the conference password to switch to Conference Mode.
The default password is “adminpwd”.
Conference Mode
Conference Mode is a meeting control system that enables the meeting host as admin to organize the
connected devices and select which screen may share and stop. Admin have the initiative to manage
which screen is shared or may be shared by the clients.
Admin’s Panel
Select a client to preview the screen.
Press Play button to let the selected client share his screen.
26Item Description
Click to show the Version / Server IP / Server Name / Radio Band
Minimize the I3ALLSYNC control panel
Close the I3ALLSYNC
User List All clients PC (Admin included) and the counted number is shown below.
Close the Conference Mode and back to the Basic Mode.
Launch the Document Share
27Launch the Annotator
Launch the I3ALLSYNC setting
Zoom In the split screen to the Full screen.
/
Zoom Out the full screen to the original split screen size.
Stop all clients’ screen mirroring.
Refresh the Admin Preview screen immediately.
Press Play to start the screen mirroring.
/ Press Play again to pause the mirroring.
Stop the screen mirroring.
Audio Slide bar to control the audio volume.
Mute / Un-mute switch.
Login Code The login code for connecting to the server.
Client’s Panel
“Play” button is not available in Conference mode if Admin doesn’t allow the client to share his
screen. Admin have the initiative to manage which screen is shared or may be shared by the
clients.
Manage Multi-Screens Mirroring (only possible on the i3HUDDLE)
I3ALLSYNC supports 4 split-screen mirroring function. Admin can use I3ALLSYNC Conference Mode panel
to manage max 4 clients mirroring on the I3ALLSYNC receiver.
1. Select a client and press Play button to share the client’s screen.
2. Add other clients to join in split screen.
3. Click or to Zoom In/Out the client’s screen.
Icon Function Description
Zoom In
If the client is mirroring in split screen, click to zoom it to full screen mirroring.
Zoom Out
If the client is mirroring in full screen, click to zoom out to the original split screen
size.
28Stop All
Stop all the mirroring screens, no matter how many split screens are mirroring.
Conference Mode Setting for Admin
Click to see the setting menu.
Item Description
Display Mode Mirror the current PC screen or share the extend screen. If there is another
monitor connecting with the PC, you can choose to play the extend monitor.
Disable Click to close the Conference Mode and to go back to the Basic Mode.
Conference Mode
Password Change Password: Modify the Conference Mode password
Management Reset Password: Reset the Conference Mode password to default “adminpwd”
Settings I3ALLSYNC advanced settings
Remote View Open the browser to see the shared screen on the receiver. (Slide show)
Exit Close the I3ALLSYNC software.
293-2 I3ALLSYNC Mac Transmitter Software
3-2-1 Install I3ALLSYNC Mac software
Go to: i3-allsync.com to install I3ALLSYNC application on your MacOS device. Follow the steps to
complete the software installation.
303-2-1-1 Settings for enabling touchback on your MacOS
These settings are necessary when you’re using MacOS 10.14 or newer:
311. Step 1: select “system preferences”
2. Step 2: select “Security & Privacy”
323. Select accessibility and enter admin’s password for opening the lock
4. Select the i3ALLSYNC application and unlock the app
3-2-2 Launch I3ALLSYNC Mac software
Step 1. Launch the I3ALLSYNC software, the pairing wizard window shows up.
33Step 2. Pairing one I3ALLSYNC to another I3ALLSYNC.
I3ALLSYNC transmitter (= the i3ALLSYNC app on your laptop or smartphone) should connect to the same
network with the I3ALLSYNC receiver (=i3ALLSYNC on you i3TOUCH or i3HUDDLE). You can refer to the
information on standby screen of I3ALLSYNC receiver.
Depending on the connection status, 3 types of pairing method.
Client connects to the router via Wi-Fi
Type A
I3ALLSYNC connects to the router via Wi-Fi or LAN
Client connects to the router via LAN
Type B
I3ALLSYNC connects to the router via LAN or Wi-Fi
Using HotSpot of the receiver device platform. (Need dedicated Wi-Fi module)
Type C
Client connects to I3ALLSYNC via Wi-Fi HotSpot of the receiver device directly.
General Pairing Steps
When client’s device is already connected to the same network with the receiver device. I3ALLSYNC
software can find the receiver device.
1. Select the correct receiver device which you are going to share your screen with.
2. Enter the Login Code. Press “Play” to start sharing screen.
34If you cannot find the device directly, here are some guides for different pairing methods.
Type A: Client connects to the router via Wi-Fi
1. Select the WiFi router and click the “Select” button. The right pane will expand.
2. Enter the Wi-Fi password of the router and click “OK”.
3. Select the correct receiver device which you are going to share your screen with.
4. Enter the Login Code. Press “Play” to start sharing the screen.
35Item Description
Device/AP Around You. Select the router you want to connect to. The I3ALLSYNC
receiver should be located behind this router.
Find the receiver by IP.
Refresh the list if the Wi-Fi router or device if it doesn’t appear.
Select the saved pairing record and discard it.
Choose the router, click “Select” to connect.
Wi-Fi Enter the Wi-Fi password you set in Soft AP mode
Password
Device I3ALLSYNC receiver name will be located and shown here.
Under AP
Login Code Enter the Login Code if you see it on I3ALLSYNC receiver.
Save Save the pairing record in the client PC.
Start the screen mirroring.
Type B. Client connects to the router via LAN
1. Select the correct receiver device which you are going share your screen with.
2. Enter the Login Code. Press “Play” to start sharing your screen.
36Item Description
Device/AP Around You, the I3ALLSYNC server will be located in the list.
Refresh the Wi-Fi List if the router didn’t appear.
Select Choose the server, click “Select” to connect and start screen mirroring.
37Type C. Using HotSpot of the receiver device platform (Soft AP mode)
1. Select the WiFi router and click the “Select” button. The right pane will expand now.
2. Enter the Wi-Fi password of the router and click “OK”.
3. Select the correct receiver device which you are going share your screen with.
4. Enter the Login Code and press “Play” to start sharing screen.
Item Description
Device/AP Around You. Select the router you want to connect to. The I3ALLSYNC
receiver should be located behind this router.
Find the receiver by IP.
Refresh the list if the Wi-Fi router or device if it doesn’t appear.
Select the saved pairing record and discard it.
Choose the router, click “Select” to connect.
Wi-Fi Enter the Wi-Fi password you set in Soft AP mode
Password
Device I3ALLSYNC receiver name will be located and shown here.
Under AP
Login Code Enter the Login Code if you see it on I3ALLSYNC receiver.
Save Save the pairing record in the client PC.
Start the screen mirroring.
38Find by IP manually
In some cases, the client’s device and the receiver device are under same network but not at the same
level. Follow the steps below to find the receiver by IP address manually.
1. Click , the right pane will expand.
2. Enter the IP and login code. Press “Play” to start sharing your screen.
393-2-3 I3ALLSYNC Mac User Interface
Basic Mode — Main Panel
Item Description
Click to show the Version / Server IP / Server Name information
Minimize the i3ALLSYNC control panel
Close the i3ALLSYNC program
Launch the Document Share
Launch the Annotator
Launch the i3ALLSYNC setting
Launch the Conference Mode
Press Play to start the screen mirroring.
Press Pause to pause the mirroring.
/
Stop the screen mirroring.
Audio Slide bar to control the audio volume.
Mute / Un-mute switch.
Login Code The login code typed for connecting to the receiver.
403-2-5 Annotator
Click , the annotator floating menu will be shown on the left upper-corner of your screen. This
application gives you the opportunity to take notes on the display while you’re sharing your screen.
When you’re done with taking notes, you can simply save and share your notes via several options, like
directly download as PDF, send it to your e-mail,…
3-2-6 Settings
Click to see the setting menu.
1. Display Mode
Mirror the current PC screen or share the extend screen. If there is another monitor connecting with
the PC, you can choose to play the extend monitor.
412. Settings - I3ALLSYNC advanced settings
Item Function Description
Auto Adjust Resolution Apply the receiver output resolution to the transmitting PC.
Auto Save Settings Save these settings automatically.
PowerPoint Use HW encoding to get better mirroring performance.
Presentation Mode
Auto Play Start the screen mirroring automatically after connecting to the recwiver.
Language Select the i3ALLSYNC application language. (Need to restart to apply the
changes)
Attendee Preview Set the period of Attendee List Preview update.
Only effective when Conference Mode enabled.
3. Remote View
Remote View is a slide show feature that clients can see the shared screen on the Receiver with browser.
Good for clients faraway from display and take notes of the shared slides.
42For client PCs doesn’t install the i3ALLSYNC software, they can also use the browser to see the slide show.
Enter the IP of the receiver and select Remote View. Then watch the shared screen via browser temporarily.
4. Exit
Close the I3ALLSYNC software.
3-1-7 Conference Mode
Click on and enter the conference password to switch to Conference Mode.
The default password is “adminpwd”.
Conference Mode
Conference Mode is a meeting control system that enables the meeting host as admin to organize the
connected devices and select which screen to share and stop. If the admin doesn’t choose the client
which may not share the screen. Admin have the initiative to manage the shared screens.
43Admin’s Panel
Select a client to preview the screen.
Press Play button to let the selected client to share the screen.
Item Description
Click to show the Version / Server IP / Server Name / Radio Band
Minimize the I3ALLSYNC control panel
Close the I3ALLSYNC
44User List All clients PC (Admin included) and the counted number is shown below.
Close the Conference Mode and back to the Basic Mode.
Launch the Document Share
Launch the Annotator
Launch the I3ALLSYNC setting
Zoom In the split screen to the Full screen.
/
Zoom Out the full screen to the original split screen size.
Stop all clients’ screen mirroring.
Refresh the Admin Preview screen immediately.
Press Play to start the screen mirroring.
Press Play again to pause the mirroring.
/
Stop the screen mirroring.
Audio Slide bar to control the audio volume.
Mute / Un-mute switch.
Login Code The login code typed for connecting to the server.
Client’s Panel
“Play” button is not available in Conference mode if Admin doesn’t allow the client to share his
screen. Admin have the initiative to manage which client can share there screen.
Manage Multi-Screens Mirroring
i3ALLSYNC Share supports 4 split-screen mirroring function. Admin can use i3ALLSYNC Conference Mode
panel to manage max 4 clients mirroring on the i3ALLSYNC receiver.
1. Select a client and press Play button to share the client’s screen.
2. Add other clients to join in split screen.
3. Click or to Zoom In/Out the client screen.
Icon Function Description
Zoom In
If the client is mirroring in split screen, click to zoom it to full screen mirroring.
45Zoom Out
If the client is mirroring in full screen, click to zoom out to the original split screen
size.
Stop All
Stop all the mirroring screens, no matter how many split screens are mirroring.
Conference Mode Setting for Admin
Click to see the setting menu.
Item Description
Display Mode Mirror the current PC screen or share the extend screen. If there is another
monitor connecting with the PC, you can choose to play the extend monitor.
Disable Click to close the Conference Mode to go back to the Basic Mode.
Conference Mode
Password Change Password: Modify the Conference Mode password
Management Reset Password: Reset the Conference Mode password to default “adminpwd”
Settings i3ALLSYNC advanced settings
Remote View Open the browser to see the shared screen on the receiver. (Slide show)
Exit Close the i3ALLSYNC software.
3-3 I3ALLSYNC iOS Transmitter
iPhone users are recommended to use Airplay for screen mirroring. This function is integrated in every
iPhone and do not have to be installed.
For iPhone X or later or iPad with iOS 12 or later: swipe down from the upper-right corner of the
screen, select ‘Airplay mirroring’ and enter the login code which can be found on your display in
step 3
46 For iPhone 8 or earlier or iOS 11 or earlier: swipe up from the bottom edge of your screen, select
‘Airplay mirroring’ and enter the login code which can be found on your display in step 3
473-4 i3ALLSYNC Android Transmitter Application
We call it the transmitter application because the screen of your android device will be mirrored on the
i3TOUCH, i3HUDDLE or i3SIXTY, which will function as receiver. As mentioned before, the i3ALLSYNC
Receivers application is already pre-installed on your i3TOUCH, i3HUDDLE or i3SIXTY.
3-4-1 Download i3ALLSYNC Sender Android Transmitter Application
Download I3ALLSYNC Transmitter app easily from Google PlayStore via the QR code on your receivers
screen or go to:i3-allsync.com. Your last option is to install the app with APK.
48Connect to the same network with the i3ALLSYNC receiver, before opening i3ALLSYNC transmitter.
3-4-2 Start Using i3ALLSYNC Sender and I3ALLSYNC
Run I3ALLSYNC transmitter app.
49Select the correct receiver device which you are going share your screen with.
Enter the Login Code. Press “Play” to start sharing screen.
Swipe from the top of the screen to show up the notice bar. Press play button to start sharing your
50screen. You can see your screen sharing on I3ALLSYNC Receiver.
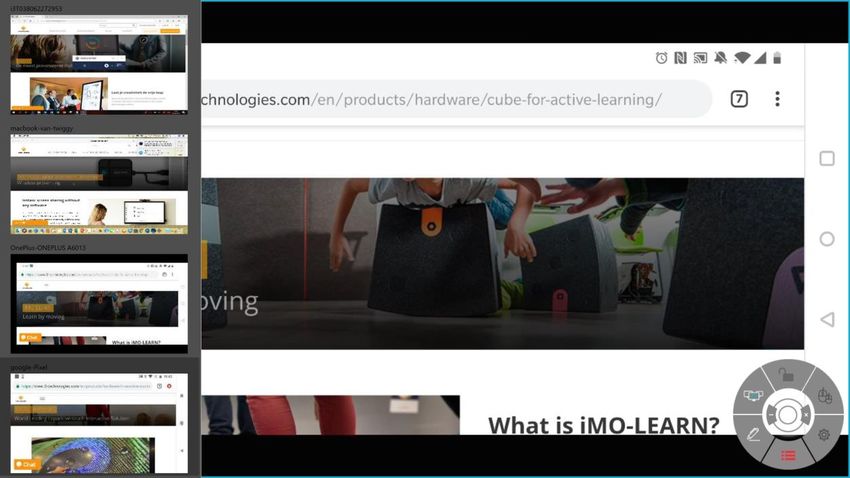
3-4-3 Control Panel on Notice Bar
Item Description
Icon on notice bar which indicates the app is running
Play / Stop sharing screen
/
Exit I3ALLSYNC Sender
Receiver Device The device name or receiver name of I3ALLSYNC Receiver
IP The IP address of the I3ALLSYNC Receiver device
Auto-Rotate
You can rotate your phone or tablet to vertically / horizontally, I3ALLSYNC Sender supports auto-rotation
of screen.
513-4-4 Settings
You can set up some configuration before you start sharing your screen
Click on to open the setting dialog window
Item Description
Hardware Select to enable hardware encoder, better streaming performance (default)
Software Select to use software encoder.
523-5 i3ALLSYNC HDMI Transmitter
3-5-1 How to use the i3ALLSYNC HDMI transmitter
1. Connect the i3ALLSYNC HDMI transmitter to your device
2. Activate the i3ALLSYNC app on your i3TOUCH, i3HUDDLE or i3SIXTY. When a constant green light
appears, the device is ready to mirror.
3. Press the main button to mirror, the main button will change into blue. When your main button is
blinking green, then your HDMI Transmitter is still making connection with your i3ALLSYNC
53Receiver on your i3TOUCH, i3HUDDLE or i3SIXTY. Wait for a constantly green main button.
3-5-2 How to pair
When u use the i3ALLSYNC HDMI transmitter for the first time, you have to do a little pairing process
before you can start screen sharing. But be aware that the pairing process only has to be done once.
After this process you can just connect the HDMI transmitter to your laptop, press the main button and
your screen will be mirrored.
1. Activate the i3ALLSYNC app on your i3TOUCH, i3HUDDLE or i3SIXTY
2. Open the ‘wheel menu’ in the lower right corner and select the “settings” icon .
Choose in the right upper corner the option “WiFi HDMI Tx Pairing” and follow the indicated
steps on your screen and as described below:
543. Press ‘next’
4. Press and hold down the main button for 4 seconds until the main button flashes white. Press
‘next’ when your main button is flashing white.
555. Enter the password of your WiFi network and click on ‘pairing’
566. Now your HDMI Transmitter and the i3ALLSYNC receiver will pair.
57After this procedure, the auto pairing is complete. Wait for a constantly green light, then press the main
button and your screen will be mirrored.
Please refer to our website for more information about the i3ALLSYNC HDMI transmitter and it’s manual:
https://www.i3-technologies.com/
58You can also read