SubwayPOS User Manual - Rev. 4.0 March 2014
←
→
Page content transcription
If your browser does not render page correctly, please read the page content below
SubwayPOS User      Rev. 4.0
                 March 2014

        Manual
SubwayPOS User Manual

Notices
The SubwayPOS® User Manual is confidential and is only for the use of SUBWAY® franchisees,
Development Agents, Field Consultants, and Operations Technology Leaders (OTL). Unauthorized use
of the information contained herein is strictly prohibited. No part of the content of the SubwayPOS®
User Manual may be copied or reproduced in any form or transmitted by any means without the written
permission of Doctor’s Associates Inc.
Updates, additions, and other revisions to the SubwayPOS® User Manual will be made, as necessary,
with each release of SubwayPOS® to reflect changes in features and functionality. Changes will be
posted on the SUBWAY PARTNERS® website; they also will be communicated, as appropriate,
through STS.
SUBWAY® is a registered trademark of Doctor’s Associates Inc. ©2014 Doctor’s Associates Inc. All
Rights Reserved.

Technical Support

Page ii                                                                           Rev. 4.0 April 2014
SubwayPOS User Manual

Contents
Home Screen................................................................................................................. 1
   Home Screen Key ............................................................................................................................1
   Status Bar ........................................................................................................................................2
   Log in Procedure..............................................................................................................................2
Time Keeping Functions ............................................................................................... 3
    Clocking In and Out .........................................................................................................................3
         Clocking In                                                                                                                             3
         Clocking Out                                                                                                                            3
         Printing or Saving                                                                                                                      3
    Reviewing/Editing Time Clock Entries .............................................................................................4
    Weekly Time Punch Report .............................................................................................................5
Support Screen ............................................................................................................. 7
Restaurant Functions ................................................................................................... 8
    Cash Control Screen........................................................................................................................8
    Operations Screen ...........................................................................................................................9
    Inventory Screen............................................................................................................................10
    Labor Screen .................................................................................................................................10
    Utilities Screen ...............................................................................................................................11
    Help Screen ...................................................................................................................................11
Ring Sales (Cash Register) Functions ........................................................................ 12
    Main Screen...................................................................................................................................13
    Breakfast Screen ...........................................................................................................................13
    Catering Screen .............................................................................................................................14
    Non-food Screen............................................................................................................................14
    POS Tasks Screen ........................................................................................................................15
    Entering Orders..............................................................................................................................16
         Applying Discounts                                                                                                                       16
         Item Correct                                                                                                                             17
         Adjusting Quantities                                                                                                                     18
         Saving and Recalling Orders                                                                                                              19
    Tendering Orders ...........................................................................................................................20
         Using Exact Cash                                                                                                                         20
         Using Credit Cards                                                                                                                       20
         Using Subway Cash Cards                                                                                                                  21
         Using Subway Reward Points Cards                                                                                                         21
         Catering Call Center Orders                                                                                                              22
         Using House Accounts                                                                                                                     22
         Tax Exempt Sales                                                                                                                         23
         Splitting Tenders                                                                                                                        23
    Managing Subway Cash/Reward Cards ........................................................................................29
         Selling a Subway Cash/Gift Card                                                                                                          29
         Issuing Reward Points                                                                                                                    30
         Checking Cash/Points on Card                                                                                                             31
         Transfering Cash/Points to another Card                                                                                                  32
    Reprinting Receipts........................................................................................................................33

Rev. 4.0 April 2014                                                                                                                         Page iii
SubwayPOS User Manual

Daily Tasks.................................................................................................................. 34
     Start Day ........................................................................................................................................34
           Cash In Drawer                                                                                                                              35
     Cash Drops ....................................................................................................................................36
     End Day .........................................................................................................................................36
     Determining Cashier Cash Handling..............................................................................................39
     Void Transactions ..........................................................................................................................40
     Refunds by Item .............................................................................................................................40
     Reprinting Receipts........................................................................................................................41
     Bread Credits .................................................................................................................................41
     Finished Waste ..............................................................................................................................42
     Paid Outs .......................................................................................................................................42
     Weekly Cash and Waste Tasks .....................................................................................................43
           Adjustments                                                                                                                                 43
           Entering Waste                                                                                                                              44
Inventory and Weekly Tasks....................................................................................... 45
    Creating a Physical Count Template .............................................................................................45
    Inventory Counts ............................................................................................................................46
          Print Count Sheet                                                                                                                      46
          New Count                                                                                                                              46
          View/Edit Count                                                                                                                        47
    Distributors and Stores ..................................................................................................................48
          Distributors                                                                                                                           48
          Stores                                                                                                                                 48
    Creating Delivery Templates..........................................................................................................49
          New Delivery Template from Invoice                                                                                                     49
          New Blank Delivery Template                                                                                                            50
          View/Edit Delivery Template                                                                                                            51
    Record Deliveries...........................................................................................................................52
          Record a Delivery Based on a Previous Delivery Invoice                                                                                 53
          Record a Delivery Based on a Template                                                                                                  54
          Record a Delivery Using a New Blank Form                                                                                               55
          View/Edit Delivery                                                                                                                     56
    Record Transfers ...........................................................................................................................57
          New Transfers                                                                                                                          57
          View/Edit Transfers                                                                                                                    58
    Operating Expenses ......................................................................................................................59
Managing Subway Weeks ........................................................................................... 60
   Subway Week Status .....................................................................................................................60
   Close and Transmit Subway Week ................................................................................................60
   Re-Open Subway Week ................................................................................................................61
Employee Maintenance............................................................................................... 62
   Employee Roles and Security Access ...........................................................................................62
         Change Employee Password                                                                                                            63
   Add an Employee...........................................................................................................................63
   Edit, Restrict, or Terminate an Employee ......................................................................................64
Reports ........................................................................................................................ 66
    Daily Reports .................................................................................................................................66
          Storewide Cash Report                                                                                                                    67
          Productivity Report                                                                                                                      68
Page iv                                                                                                                     Rev. 4.0 April 2014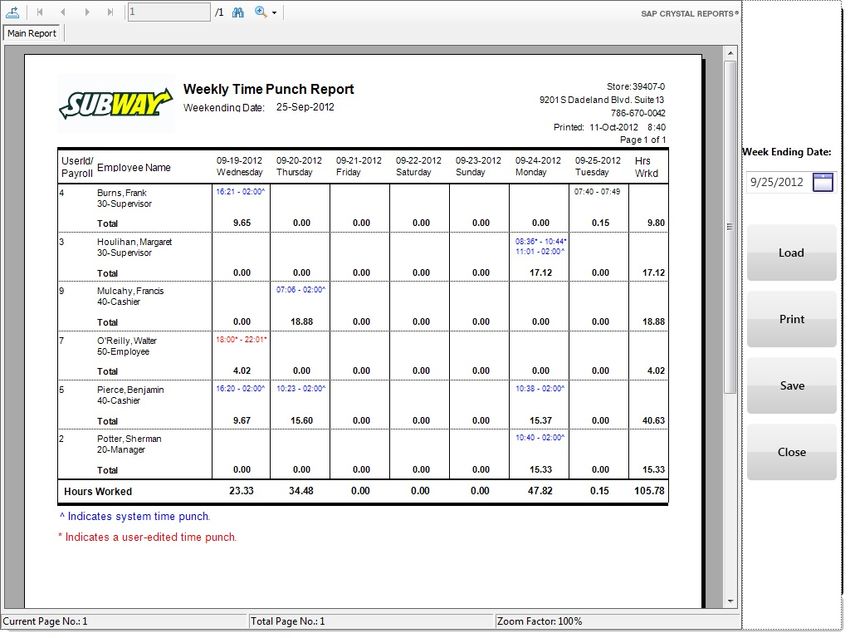
SubwayPOS User Manual

           EFT Report                                                                                                                              69
           Invoice Log Report                                                                                                                      70
           Inventory Movement Report                                                                                                               70
       Weekly Reports..............................................................................................................................71
           Weekly Inventory and Sales Report (WISR)                                                                                                72
           Control Sheet                                                                                                                           81
           Detail Sales and Units Itemization Report                                                                                               86
Creating House Accounts ........................................................................................... 90
Utilities........................................................................................................................ 91
     Setting Store Options .....................................................................................................................91
           Setting Store Hours                                                                                                                     92
     Exit to Windows .............................................................................................................................92
     Explore Archived Reports ..............................................................................................................92
     Reboot POS Machine ....................................................................................................................92
     Restart POS...................................................................................................................................93
     Rollback Menu Products ................................................................................................................93

Rev. 4.0 April 2014                                                                                                                        Page v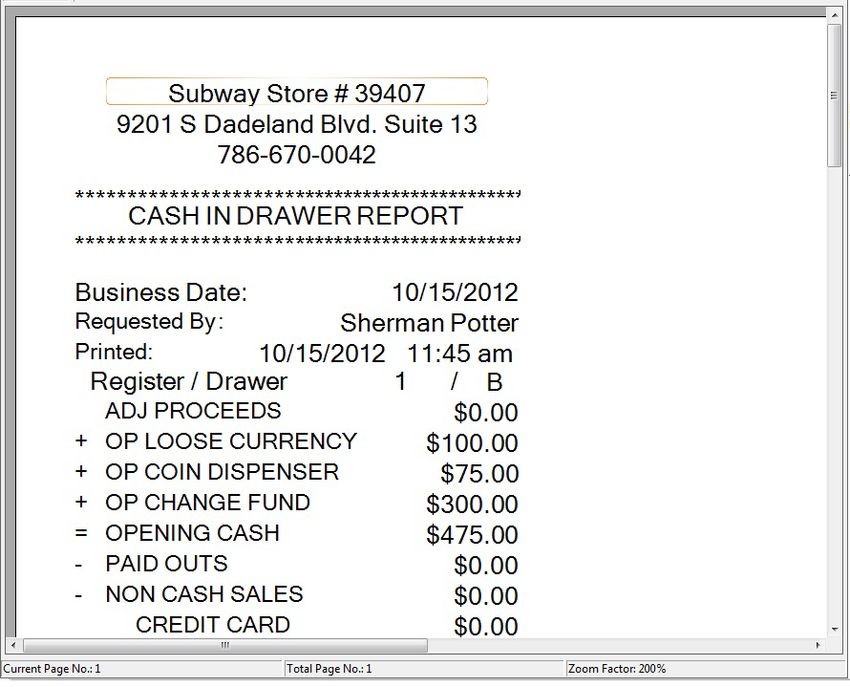

SubwayPOS User Manual

Home Screen
The home screen contains buttons for access to the POS system as well as restaurant functions (cash,
operations, labor, inventory, and utilities).

Home Screen Key
        The menu status line indicates whether the menu is up-to-date or if there is a menu ready for
        publishing.
        A message box displays any system messages from either POS or SubEx.

        The productivity pane shows the current productivity as well as the four-week average for the
        current day as well as week-to-date.
        The status bar appears at the bottom of almost all screens and contains the information
        described below.

Rev. 4.0 April 2014                                                                               Page 1
SubwayPOS User Manual
Status Bar
• The active screen title appears in the left of the status bar.
• The SubEx status indicator has the following options:
Indicates that POS is properly connected to SubEx and you can publish and transmit week
data.
Indicates that there is no communication between POS and SubEx; call the help desk
immediately for assistance.
• The store number indicates which store number for this POS. This is helpful anyone connecting
via Teamviewer to ensure they are connected to the right store.
• The business date indicates on which date all sales and inventory transactions are occurring; this
may be different than the system date.
• The system date and time indicates the current date and local time as configured by Windows.
Log in Procedure
To use most features, any user below the role of owner must be punched in. The only exception to this
is the support screen. See the following page for the procedure to punch in/out.
1. Press Time Punch, Ring Sales or
Restaurant Functions on the home
screen to initiate the log in procedure.
2. The log in screen opens.
3. Enter your user ID and password and press
Enter to complete the function.
If you are not an owner, a message appears
stating You need to clock in before
you may continue. Would you like to
clock in now? Answering Yes takes you
to the clock in screen. Answering No closes
the message and returns you to the home
screen.
Page 2 Rev. 4.0 April 2014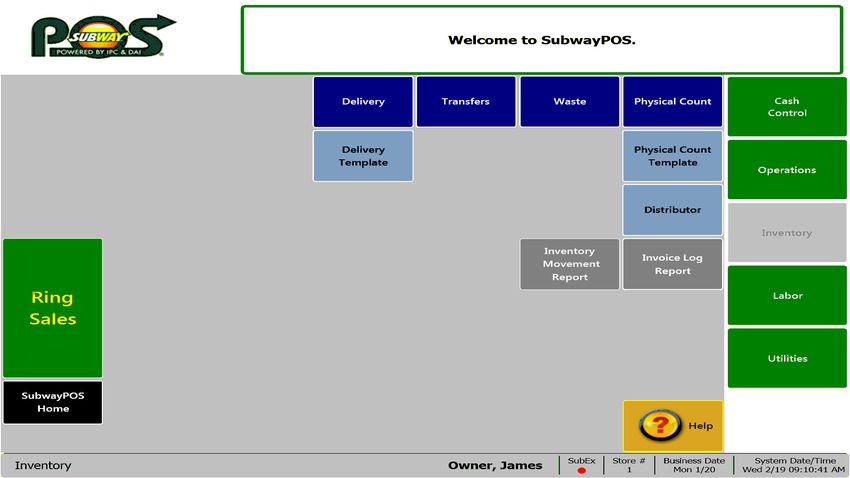
SubwayPOS User Manual

Time Keeping Functions
This section explains the clock in/out procedure as well as how to review and edit time punches and
generate weekly time clock reports for payroll.

Clocking In and Out
Records the time the employee punched in and the time the employee punched out. If an employee
has not clocked out by 2:00 AM, the system will automatically clock the employee out. If the restaurant
is Opened 24 Hours or After 2:00 AM, the system will also automatically clock him/her back In, if the
24-hour box is checked on the Store Hours screen.
Note     For details on how to activate/deactivate the 24 Hour function, see Store Options in this
         document.

Clocking In
1.   Press Time Punch on the home screen
     and log in. The clock in/clock out screen
     displays.
2.   Press Clock In. The clock in time appears
     as shown here.

Clocking Out
1.   Press Time Punch on the home screen
     and log in. The clock in/clock out screen
     displays.
2.   Press Clock Out to clock out. the clock out
     time appears below the last clock in time as
     shown here.

Printing or Saving
1.   Press Print to view the time punch report
     screen.
2.   Press Print again to send the report to the
     printer.
3.   Press Save to save the report as a file.
4.   Press Close to close the time punch report
     screen and Close again to return to the
     home screen.

Rev. 4.0 April 2014                                                                                  Page 3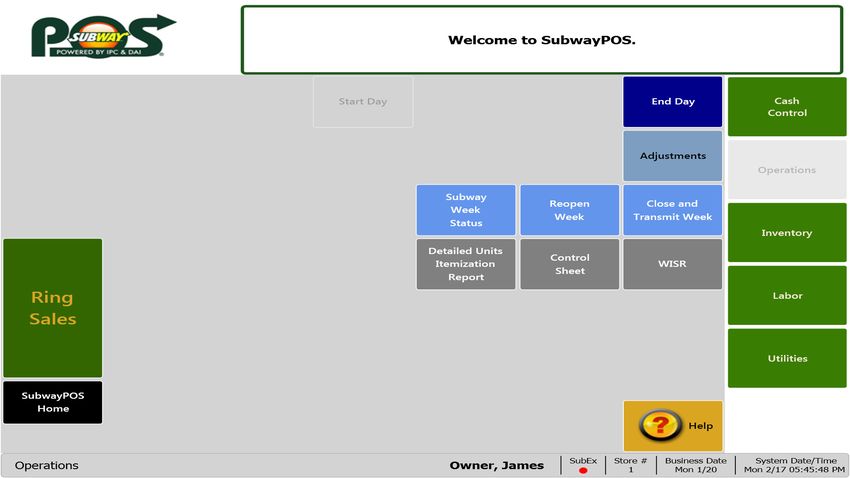
SubwayPOS User Manual

Reviewing/Editing Time Clock Entries
This function allows you to view and edit time punch data for any employee.
1.   Press Restaurant Functions on the home screen, log in, and press Labor.
2.   Press Time Clock Review.

3.   Use the Week Ending Date navigation bar to select the week ending date of the week to be
     reviewed.

4.   Press either View All Employees or press an employee and select the desired employee from
     the dropdown list.
5.   Find the employee and then the day with the punches that need to be edited. Press the punch to
     be edited.
6.   The time punch edit screen for the selected
     employee and date opens showing the
     selected time punch.
7.   Choose the clock in to be edited by selecting
     either the hour or the minutes in either the In
     or Out column.

Page 4                                                                            Rev. 4.0 April 2014
SubwayPOS User Manual
8. Use the up/down arrows to increase or
decrease the selected hour or minute value,
or use the on screen keypad or attached
keyboard. Time values are entered in 24-
hour format (e.g. 10:00 PM is entered as
22:00).
An entire line of Clock In/Clock Out values may be deleted by pressing Delete; or an entirely
new line added by pressing Add.
Note that the “total hours” worked by the selected employee for the selected day are displayed in
decimal fractions of an hour at the bottom of the screen; and that this value changes when the
time is edited. For example, 1 hour and 30 minutes is displayed as 1.50 hours, which is 1½ (or
1.50) hours.
9. When completed, press Save to save the changes, close the screen and return to the main Time
Punch Edit screen. Note that edits now appear in red with an asterisk (*) after each edited time.
10. Press Close to end this procedure and return to the main Labor screen.
Note For system clock outs and clock ins (if 24 hour box is checked in Store Options) at 2:00 AM,
these punches will appear with a blue background and a caret (^), like this 02:00 ^.
Weekly Time Punch Report
This report can be used to see which employees time punches, as well as the hours for any Business
Week selected that is available on the system.
1. Press Restaurant Functions on the
home screen, log in, press Labor, and
press the Weekly Time Punch Report
button. The Time Punch Report screen
opens, showing each employee’s time
punches for the business week (default is
current business week) with the total hours
the employees have logged each day.
2. The total number of hours worked (sum of all
employees’ time) is shown at the bottom of
the Hrs Wrkd column.
3. Use the calendar function Week Ending Date to select the week ending date for the report of a
week other than the current one, then press Load.
4. On the report screen, use the report screen toolbar to move through and/or zoom in on the report.
5. Press Print to print the report to a printer other than your receipt printer.
Rev. 4.0 April 2014 Page 5SubwayPOS User Manual
6. Press Save to save the report. A message providing the filename and location appears when the
report is saved.
7. Press Yes to view the saved file in Adobe Reader; or press No to continue.
8. Press Close to close the screen and return to the main Labor screen
Page 6 Rev. 4.0 April 2014SubwayPOS User Manual
Support Screen
The support screen provides the help desk phone number as well as important information required by
the help desk to assist you.
1. On the home screen, press Support
Screen.
2. Provide the help desk with any information
requested from this screen.
3. Press Close to exit this screen and return to
the home screen.
Rev. 4.0 April 2014 Page 7SubwayPOS User Manual
Restaurant Functions
Restaurant functions contain all screens used for SubwayPOS management not included in the ring
sales functionality. This section presents the following topics:
• Cash Control Screen
• Operations Screen
• Inventory Screen
• Labor Screen
• Utilities Screen
• Help Screen
Cash Control Screen
The Cash Control screen contains the functionality
to open and close the cash drawer, make cash
drops, record cash used from the register to make
local purchases and generate daily reports, each
as outlined in the sections below.
• is used to close the cash drawer against
further sales entries either at the end of a
shift or at the end of the day.
• is used to record the removal of excess cash
from the drawer to the safe.
• is used to open the cash drawer at the beginning of a shift, if the drawer was closed at the end of
the previous shift. It can also be used to record midday bread counts or cash-in-drawer checks
throughout the day.
• is used to record the use of cash from the drawer that is used to make local purchases.
• generates a report to show all non-cash electronic transactions during the day.
• generates a report to show all transactions and carrier usage information for the day.
Page 8 Rev. 4.0 April 2014SubwayPOS User Manual
Operations Screen
The Operations screen contains the functionality
to start and end the business day, make
adjustments to recorded information, manage the
subway weeks and generate reports, each as
outlined in the sections below.
• is used to start a business day.
• is used to end a business day.
• is used to edit previously created entries for:
• Cash in drawer
• Cash drops
• Close cash drawer
• Finish waste
• Paid outs
• Bread credits
• is used to view the status of the current and previous five weeks.
• is used to open the last closed business week only.
• is used to transmit the weekly sales and inventory report (WISR) to FWH.
• is used to close the current business week.
• generates a report showing what inventory units were used on any given business day.
• generates a report showing the key indicators for the business week.
• generates the weekly sales and inventory report.
Rev. 4.0 April 2014 Page 9SubwayPOS User Manual
Inventory Screen
The Inventory screen contains the functionality
used to Manage Inventory and Waste.
• is used to record deliveries from all suppliers
and distribution centers into the inventory
database.
• is used to record transfers between Subway
restaurants, both in and out.
• is used to record all waste not previously
recorded using bread credits or finished
waste.
• is used to record all inventory counts, regardless of frequency.
• is used to create or modify templates used for physical counts and waste.
• is used to create or modify distributors, suppliers and other Subway restaurants used in transfers.
Labor Screen
The labor screen contains the functionality used to
manage employee labor records.
• is used to enter new employees or modify
the records of existing employees.
• is used to review and edit employee time
punches.
• generates the employee time punch report
for a business week; this is normally used for
payroll.
• generates a report that shows restaurant productivity on an hourly basis for any given business
day.
Page 10 Rev. 4.0 April 2014SubwayPOS User Manual
Utilities Screen
The utilities screen contains functionality used to
manage restaurant data and deal with computer
tasks.
• Closes SubwayPOS and returns to the
Windows screen.
• is used to create and modify house
accounts.
• is used to record the weekly operating
expenses used in the WISR and Control
Sheet reports.
• is used to enter the restaurant number, address, phone and email; as well as to set the store
operating hours.
• is used to reboot the computer.
• is used to restart SubwayPOS without rebooting the computer.
• is to be used only if asked by the help desk personnel.
• is used to return the menu to the menu used before the last publishing.
Help Screen
The help screen provides access to this user
manual.
Rev. 4.0 April 2014 Page 11SubwayPOS User Manual
Ring Sales (Cash Register) Functions
The ring sales portion of SubwayPOS contains all functions required to place and accept payment for
orders, apply discounts, save and find orders, manage Subway cash cards (points and cash), reprint
receipts, enter finished waste and bread credits, void transactions and perform refunds.
1. Press Ring Sales on the home screen and
log in.
2. The ring sales functionality is divided into
five screens:
• The Main Screen is the default
screen displayed when you press Ring
Sales on the home screen and
contains food and drink items available
all day.
• The Breakfast Screen contains only breakfast food items and drinks.
• The Catering Screen contains all items associated with catering orders (platters, giant
subs, boxed lunches, etc.).
• The Extras
• Trays
• Non-food Screen contains all non-food related items available for sale in your restaurant;
particularly Subway Cash Cards and the Kid’s Toy Pak.
• The POS Tasks Screen provides access to tools you may use to do additional tasks not
part of the other four ring sales screens.
In addition to these brief descriptions of the available screens, this section also presents these major
topics:
• Entering Orders
• Tendering Orders
• Managing Subway Cash/Reward Cards
Page 12 Rev. 4.0 April 2014SubwayPOS User Manual
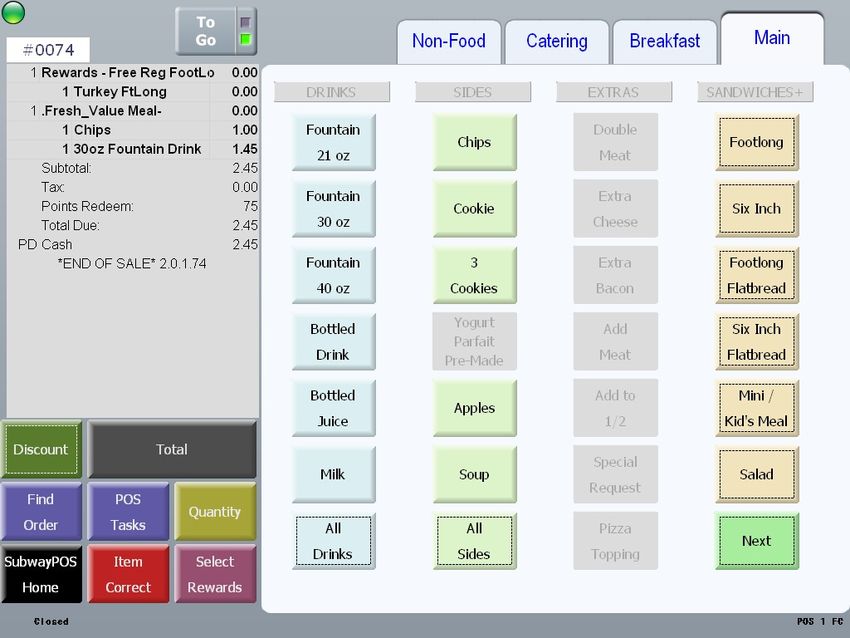
Main Screen
The main screen which contains all the items normally associated with being available all day is the
default screen when entering ring sales.
• The list of sandwich types is available under
the heading SANDWICHES+. Press Next
to see more sandwich type options. Press
Back to return to the previous menu.
• The list of extras is available under the
heading of EXTRAS. The list of extras is
active only after a sandwich has been
selected.
• The list of sides is available under the
heading of SIDES. Press All Sides to view
a complete selection of side options.
• The list of drinks is available under the
heading of DRINKS. Press All Drinks to
view a complete selection of drinks.
Breakfast Screen
The breakfast screen contains all Items associated with a Subway breakfast. Press the Breakfast tab
to change to the breakfast screen and note the following:
Press Next to see more breakfast sandwich type options. Press Back to return to the previous menu.
• The list of sandwich types available under
the heading OMELETS+.
• The list of extras available for breakfast
menu items.
• The list of sides available. Press All Sides
to view a complete menu of side options.
• The list of drinks available. Press All
Drinks to view the complete drink menu.
• The list of available extras is active only after
an omelet has been selected.
Rev. 4.0 April 2014 Page 13SubwayPOS User Manual
Catering Screen
The catering screen contains all items associated
with catering orders. Press the Catering tab to
change to the catering screen with the following
items available for catering:
• Party subs
• Platters
• Sides
• Drinks
• Extras
• Trays
Non-food Screen
The Non-food screen includes Subway Cash
Cards and Kid’s Pak Toy. Press the Non-Food tab
to change to the non-food screen and note the
following:
• The list of default Subway Cash Card values
are under the column heading CASH
CARDS.
• The Other Cash Card button is used for
an amount that isn’t listed to be added to a
card.
• The Kid Pak Toy and reusable bag are
under the column heading of OTHER.
Page 14 Rev. 4.0 April 2014SubwayPOS User Manual
POS Tasks Screen
The POS Tasks screen contains eight functions outlined below.
1. On the Ring Sales screen, press POS
Tasks.
2. On the POS tasks screen, press one of
these options:
• Press Recall Order to view all stored
orders.
• Press Reprint Receipt to print the
receipt from a previous order on the
same business day.
• Press Void Transaction to void a
previously complete transaction. This
function is available to manager and
above roles only.
• Press Refund by Item to Refund (a)
particular previously purchased item(s).
This function is available to manager
and above roles only.
• Press Sub Card Inquiry to determining the amount of money and points on a Subway
Cash Card.
• Press Sub Card Transfer to combine money and/or points on two different Subway Cash
Cards.
• Press Finished Waste to record wasted sales items. This function is available to manager
and above roles only.
• Press Bread Credits to record wasted carrier items (e.g. expired sub rolls). This function
is available to manager and above roles only.
Rev. 4.0 April 2014 Page 15SubwayPOS User Manual
Entering Orders
1. On one of the ring sales screens, press a
sandwich/carrier type.
2. Press Next for more sandwich options.
These options will vary depending on your
market.
3. Press the sandwich. POS adds the sandwich
to the ticket.
4. Select the requested extras.
5. Select any requested sides.
6. Select any requested drinks.
7. Press Total to open the tender screen and
complete the sale. Refer to the section on
tendering sales later in this document for
more details.
Applying Discounts
Discount buttons are not available unless the specific criteria associated with that discount are met. The
number and value of discounts applied is reported on the closing cash in drawer report and on the
storewide cash report.
1. After entering an order and before pressing
Total, press Discount. The main
discounts screen contains the most
frequently used discounts.
2. Press the Percent Off button to apply a
specific percentage discount to any given
item.
• To apply the discount, first select the
item, then press the appropriate
discount percent button.
• This process may be used multiple times, but only once per item on the order.
3. Press the Amount Off button to use discounts associated with coupons that provide a certain
amount of money off the order when specific criteria are met.
4. Press the Free Item button to view discounts that require a coupon indicating that the customer
receives the specified item at no charge, once all purchasing requirements have been met.
5. Press the Buy One, Get One button to view discounts that require a coupon indicating that the
customer receives the specified item at no charge when the same item of the same or lesser
value is purchased.
Page 16 Rev. 4.0 April 2014SubwayPOS User Manual
6. Press the Set Price button to view discounts that require a coupon indicating that the customer
receives the specified item at the specified price, once all purchasing requirements have been
met.
7. Press the Other button to view all other discounts/coupons not covered on the other discount
pages.
8. If necessary, press Cancel to close the discounts screen; then press Total. Note how the
various discounts are applied on the ticket.
9. Complete the tender to close the order.
Percent Off Any Item for Multiple Items in Same Order
1. Enter an order with at least five different Items, including multiples of at least one item, and select
the first item to be discounted; then press Discount.
2. Press the Percent Off navigation button; then select one of the discounts.
3. The discount is added to the ticket.
4. Now select another item and apply a second discount.
5. Select an item with multiples and apply another percent off discount, then press the Same Item
and Apply.
6. If necessary, press Cancel to close the discounts screen; then press Total. Note how the
various discounts are applied on the ticket.
7. Complete the tender to close the order.
Item Correct
Item correct is used to remove an item from the ticket before the sale is completed. The number of
times item correct is used, and the total value, is reported on the closing cash in drawer report and on
the storewide cash report.
1. Enter an order; then select the item to be removed from the order.
2. Press Item Correct and note that the item was removed from the order.
3. Complete the order and tender as required.
Rev. 4.0 April 2014 Page 17SubwayPOS User Manual
Adjusting Quantities
Quantity can be used to change the quantity of
any identical item, except extras. Each extra must
be selected again to add multiples to a single
sandwich.
1. Enter an order; then select (highlight) an
item on the on-screen ticket.
2. Press Quantity.
3. POS displays the Enter New Quantity
screen.
4. Select the new quantity (e.g. 2), then press
Enter.
5. Note the changes to the quantity and cost on
the ticket.
6. Complete the transaction by pressing Total
and tender.
Page 18 Rev. 4.0 April 2014SubwayPOS User Manual
Saving and Recalling Orders
All saved orders must be cashed out before the cash drawer can be closed.
1. Enter an order; then press Save Order.
2. On the save information screen , enter a
descriptor to identify your saved order using
the on-screen keyboard. You must use the
touch screen for the onscreen keyboard.
3. When completed, press Save.
Note Note that the on-screen ticket shows that
the order is stored; and that the button
has changed from Save Order to the
total number of orders currently in the
stored orders queue.
4. To recall any order, press the Saved
Orders button.
5. On the open orders recall screen, all orders
currently in the stored orders queue are
displayed.
6. Select the desired order; then press Recall
to re-open the ticket.
7. The recalled order opens as the active order
on the register with the tender screen active.
The order can be modified and tendered or
modified and saved again. There is no
Cancel button on this screen.
Rev. 4.0 April 2014 Page 19SubwayPOS User Manual
Tendering Orders
Tender methods available on SubwayPOS include
cash, credit card, Subway cash card, catering call
center, and house account. When the order is
completed, press Total to open the tender screen.
Using Exact Cash
1. Enter the customer’s order and apply all
discounts.
2. Press Total to go to the tender screen.
3. When the exact amount has been tendered
by the customer, press Cash (Exact).
4. Note that the receipt is now closed, showing
the amount paid as cash.
Using On-Screen Keypad
If a customer has presented a $10 bill and 38¢ change for payment of an order totaling $9.38, press
1 0 3 8 (no decimal), on the onscreen keypad and press Cash to complete the sale. Note that the
receipt is now closed, showing the amount paid as cash.
Cash Using the Speed Keys
1. If a customer has presented $30.00 for payment, press $20, then press $10.
2. If the customer’s order totals $22.89, the speed key immediately above the Cash (Exact) button
shows the next highest dollar amount ($23.00) over the sale amount. If $23.00 has been
presented by the customer, you can use the $23.00 button. Note that the receipt is now closed,
showing the amount paid as cash.
Using Credit Cards
1. If the customer has presented a credit card
for payment, press Credit Card.
2. When the Collect Card Information
screen appears, swipe the credit card
through the card reader. There are the three
different options for this screen:
• Manual Entry with Voice Authorization
• Manual Entry
• Cancel
Page 20 Rev. 4.0 April 2014SubwayPOS User Manual
Using Subway Cash Cards
1. If the customer has presented a Subway
cash card for payment, press Cash Card to
accept payment using the Subway cash
card.
2. When the Collect Card Information
screen appears, swipe the credit card
through the card reader.
3. The final sales receipt shows USD x.xx
Redeemed along with the remaining cash
balance and rewards balance.
Using Subway Reward Points Cards
1. If the customer has presented a Subway
Card and requested that only the points
portion on the card be used as payment,
press Select Rewards before pressing
Total.
2. When the Collect Card Information
screen appears, swipe the card through the
card reader.
3. When the Reward Points screen opens, note
that only certain items can be purchased
using points based on the total points
available on the card which is displayed on
the screen.
4. Press the buttons for items already on the
order, until completed or all available points
are used.
To pay for the entire order using points,
press each of the required buttons on the
reward points screen, until all items available
for point credits are included.
5. When finished, press OK.
6. Press Total and payment tender type. If the
customer wants to use a cash balance on
the same card, swipe the same card again.
Rev. 4.0 April 2014 Page 21SubwayPOS User Manual
7. Any items not covered by reward points will
be on the onscreen ticket with their extended
price. Collect the required payment and
complete the tender.
• Note that all items covered by points
have been reduced to $0.00 cost.
• The total number of points used is
shown on the receipt.
• If the entire order was covered by
points, the tender screen re-appears
without any options other than Done.
Catering Call Center Orders
1. If an order has been placed using the
catering call center, enter the order as
shown in the email or fax; then press More
Options.
2. Press Catering Call Center. The receipt
shows the amount prepaid to the catering
call center.
Using House Accounts
1. If a customer requests that the order be
charged to an existing house account, press
More Options.
2. Press the appropriate house account
(example: ). The receipt shows the
amount charged to the selected house
account for billing later.
Page 22 Rev. 4.0 April 2014SubwayPOS User Manual
Tax Exempt Sales
1. Enter the sale; then press Total.
2. On the tender screen, press Tax Exempt.
3. Enter the Name and Federal Tax ID
lines as these are required, then press
Save. Note that the tax amount on the ticket
now shows 0.00.
4. Press Total again and complete the tender
as required.
Splitting Tenders
Tenders can be split and paid for using the following combinations. Details for each follow.
• Subway Points and Cash
• Subway Points and Subway Cash Card
• Subway Points and a Credit Card
• Cash and a Credit Card
• Using Two (or more) Credit Cards
• Using Cash and Subway Cash Card
• Multiple Tenders
Subway Points and Cash
Note Subway points must be deducted first; press Select Rewards before pressing Total.
1. When the Collect Card Information
screen appears, swipe the card through the
card reader.
2. Press the buttons for items already on the
order, until completed or all available points
are used; then press OK.
3. The points reward(s) is added to the ticket
and press Total.
4. Enter the remaining cash amount tendered
using the speed keys, the onscreen keypad,
or Cash (Exact).
Rev. 4.0 April 2014 Page 23SubwayPOS User Manual
5. When the Collect Card Information screen appears again, swipe the card through the card
reader.
6. Subway points used, the cash tendered and the amount of change due to the customer are
printed on the receipt.
Subway Points and Subway Cash Card
Note Subway points must be deducted first; press Select Rewards before pressing Total.
1. When the Collect Card Information
screen appears, swipe the card through the
card reader.
2. Press the buttons for items already on the
order, until completed or all available points
are used; then press OK.
3. The points reward(s) is added to the on
screen ticket and press Total.
4. Press Cash Card.
5. When the Collect Card Information
screen appears, swipe the card through the
card reader.
6. Subway points used, and the amount of cash
used from the Subway Cash Card are
printed on the receipt.
Page 24 Rev. 4.0 April 2014SubwayPOS User Manual
Subway Points and a Credit Card
1. Subway points must be deducted first; press
Select Rewards before pressing Total.
2. When the Collect Card Information
screen appears, swipe the card through the
card reader.
3. Press the buttons for items already on the
order, until completed or all available points
are used; then press OK.
4. The points reward(s) is added to the on
screen ticket and press Total.
5. Press Credit Card.
6. When the Collect Card Information
screen appears, swipe the credit card
through the card reader.
7. The total Subway Points used and the
amount charged to the credit card as shown
on the receipt.
Rev. 4.0 April 2014 Page 25SubwayPOS User Manual
Cash and a Credit Card
1. After selecting, use one of the following:
• You can either enter the credit card
amount and press Credit Card, then
enter the cash amount to pay the
balance
…or…
• Enter the cash amount, press Cash,
then press Credit Card to pay the
balance
This example shows entering a cash
payment first then using a credit card to pay
the balance.
2. Press the appropriate speed key(s) for the
cash amount.
3. Press Credit Card.
4. When the Collect Card Information
screen appears, swipe the credit card
through the card reader. The amount of cash
and the amount charged to the credit card is
shown on the receipt.
Page 26 Rev. 4.0 April 2014SubwayPOS User Manual
Using Two (or more) Credit Cards
1. For the first credit card, enter the amount to
be charged to this credit card using the
onscreen keypad; then press Credit Card.
2. When the Collect Card Information
screen appears, swipe the credit card
through the card reader.
3. On the receipt, note the amount charged to
the first credit card and note the remaining
dollar amount still required to close the
transaction; then press Credit Card again.
4. When the Collect Card Information
screen appears, swipe a different credit card
through the card reader.
5. For the last credit card, swipe the new card
without entering any values to pay the
amount remaining on the bill.
6. The two (or more) different credit card
amounts tendered are shown on the receipt.
Rev. 4.0 April 2014 Page 27SubwayPOS User Manual
Using Cash and Subway Cash Card
1. After pressing Total, use one of the
following:
• Enter the Subway cash card amount
and press Cash Card, then enter the
cash amount;
or…
• Enter the cash amount, press Cash,
then press Cash Card for the
balance.
2. Press Cash Card.
3. When the Collect Card Information
screen appears, swipe the card through the
card reader. The amount of cash and the
amount charged to the cash card are shown
on the receipt.
Multiple Tenders
Multiple tenders is defined as three or more methods of payment used for one order. For example, first
use a Subway points card, then enter the cash used; then enter the amount to be paid with a Subway
cash card; finally pay the remaining amount using two different credit cards.
1. Subway points must be deducted first; press Select Rewards before pressing Total.
2. Select each of the required buttons on the reward points screen.
3. Select the buttons for items already on the order, until completed or all available points are used;
then press OK. Note that the buttons pressed have been added to the ticket and press Total.
4. On the receipt, note the points redeemed from the previous action and note the remaining dollar
amount still required to close the transaction; then press the appropriate speed key.
5. Using the on-screen keypad, enter the amount to be paid using the cash card; then press Cash
Card.
6. When the Collect Card Information screen appears, swipe the card through the card reader.
Note that the ticket now shows the amount of cash paid, the points used, the amount paid with a
Subway Cash Card and the remaining amount due.
Page 28 Rev. 4.0 April 2014SubwayPOS User Manual
7. Using the on-screen keypad, enter the amount to be paid using the first credit card; then press
Credit Card.
8. When the Collect Card Information screen appears, swipe the credit card through the card
reader. Note that the ticket now shows the amount of cash paid, the points used, the amount paid
with a Subway card, the amount paid with the first credit card and the new balance remaining;
then press Credit Card again.
9. For the last credit card, swipe the card without entering any values to pay the amount remaining
on the bill.
10. When the credit card information screen appears, swipe the next credit card through the card
reader. Note that all methods of payment for this transaction are shown on the receipt.
Managing Subway Cash/Reward Cards
As Subway cards can contain both money and points, and customers may have more than one card,
the following functionality allows you to determine the amount of cash and points on any card and to
combine the total points and cash from two or more different cards onto one. This section presents the
following topics:
• Selling a Subway Cash/Gift Card
• Issuing Reward Points
• Checking Cash/Points on Card
• Transfering Cash/Points to another Card
Selling a Subway Cash/Gift Card
Subway cash cards are sold and useable at all Subway restaurants. This procedure explains how to
load new or existing Subway cash cards.
1. Press the Non-Food tab on the Ring
Sales screen.
2. Press the value (for example $10 Cash
Card) for each card to be purchased.
3. Use Other Cash Card for any value not
displayed.
4. When completed, press Total.
5. After tendering the sale, the card reader activates and the Collect Card Information screen
appears with the value for the first card, if multiple cards were purchased.
6. For multiple cards, continue swiping new cards until completed.
7. When swiping a card, the card reader will repeat the Collect Card Information screen and
the amount for the next card. if the card swipe failed, it will read Swipe Card Again.
Rev. 4.0 April 2014 Page 29SubwayPOS User Manual
Issuing Reward Points
Any Subway restaurant, whether participating in the Subway Loyalty Rewards Program or not, can add
points to a card for purchases using the procedure below.
1. Press Ring Sales and log in, to open the
Ring Sales screen.
2. Ring in the customer’s order as required.
3. When completed, press Total to open the
tender screen.
4. On the tender screen, press Add Points to
add points to a new or existing cash card.
5. A message appears to swipe the cash card
or Key In Alias.
6. Complete the tender as required.
7. Points added will appear only on the printed
receipt.
Page 30 Rev. 4.0 April 2014SubwayPOS User Manual
Checking Cash/Points on Card
Use this procedure when a customer requests to have the amount of cash and/or points available on
their card(s) checked.
1. Press POS Tasks on the ring sales screen.
2. Press Sub Card Inquiry.
3. When the Swipe Subway Card message
appears, swipe the card.
4. After the request is processed, a report
screen appears and the information can be
sent to the receipt printer to be given to the
customer.
5. Press Print to print; or press Cancel to
close the screen.
Rev. 4.0 April 2014 Page 31SubwayPOS User Manual
Transfering Cash/Points to another Card
Customers may request the amount of cash and/or points moved from multiple cards to a single card.
1. Press POS Tasks on the Ring Sales
screen.
2. Press Sub Card Transfer.
3. When the “From” Subway Card
message appears, swipe the first card.
4. The “To” Subway Card message
appears, swipe the next card through the
card reader. All points and cash amounts are
now transferred to the second card; and the
first card is no longer active.
Page 32 Rev. 4.0 April 2014SubwayPOS User Manual
Reprinting Receipts
Reprinting receipts can be done only on the business day in which the order was rung. The business
day must be open to do this.
1. Press POS Tasks on the Ring Sales
screen.
2. Press Print Receipt.
3. Select the desired receipt from the left side
of the screen and verify that it is the correct
receipt on the right side of the screen.
4. Press Print to print the receipt on the
receipt printer.
Rev. 4.0 April 2014 Page 33SubwayPOS User Manual
Daily Tasks
This section presents the following topics:
• Start Day • Refunds by Item
• Cash Drops • Reprinting Receipts
• End Day • Bread Credits
• Determining Cashier Cash Handling • Finished Waste
• Void Transactions • Paid Outs
Start Day
Used by cashier level and above employees to start a business day that records all time punch,
inventory, sales, etc. during that date.
1. Press Restaurant Functions on the home screen, log in, and press Operations.
2. Press Start Day.
3. Validate business date displayed and press Yes, Start [date]; then press OK again on the
POS Opened Successfully message.
4. POS automatically detects the current terminal and drawer and displays a Cash-In screen
similar to the one shown here.
Page 34 Rev. 4.0 April 2014SubwayPOS User Manual
Cash In Drawer
Use the Cash In Drawer procedure to open a cash drawer.
1. On the Cash In screen, use the keypad to enter the values for each item as defined below
• Loose Currency: All bills and change in the drawer.
• Coin Dispenser: All coins in the coin dispenser only.
• Change Fund: All cash in the safe (bills and coins).
• Bread Count: All sub roll bread (including footlong =1, 6-inch= 0.50 and mini= 0.33).
• Flatbreads: All flatbread types (including footlong =1, 6-inch= 0.50 and mini= 0.33).
• Salad: All salad bowls.
• Muffin: All breakfast muffins.
• Pizza: All pizza bases.
• Other: All other carrier types combined (such as wraps, bagels, croissants, etc.).
2. Press Save when completed. You will be asked Are you sure you want to save the
Drawer Count with Total $xxx.xx? Press Yes to continue.
3. On report screens, press:
• Print to print a copy of the report.
• Save to save a copy of the report to
the hard drive.
• Close to exit.
Rev. 4.0 April 2014 Page 35SubwayPOS User Manual
Cash Drops
During the course of the day, cash must be removed from the cash drawer and placed in the safe for
deposit to the bank. This procedure records those movements so they can be tracked later.
1. Press Restaurant Functions on the
home screen, log in, and press Cash
Control.
2. Press Cash Drop.
3. On the cash drop screen, enter the amount
of the cash drop by using the keypad on the
screen or a keyboard attached to the POS.
4. Verify that you have entered the correct
amount and press Save to continue.
5. On report screens, press:
• Print to print a copy of the report.
• Save to save a copy of the report to
the hard drive.
• Close to exit.
End Day
Used by cashier and above employees to end a business day, after which no additional sales can be
made for that business date.
1. Press Restaurant Functions on the
home screen, log in, and press
Operations.
2. Press End Day.
3. If the cash drawer has not been closed, you
will be prompted to close it. Press Yes to
enter the close cash drawer procedure.
Selecting No will take you back to the main
Operations screen. If no cash drawer is
open, skip to Step 10.
4. Enter the amount of the cash drop and press
Save.
Page 36 Rev. 4.0 April 2014SubwayPOS User Manual
5. POS displays the cash drop report.
6. On report screens, press:
• Print to print a copy of the report.
• Save to save a copy of the report to
the hard drive.
• Close to exit.
7. On the Cash In Drawer screen, use the
keypad to enter the values for each item
below:
• Loose Currency: All bills and
change in the drawer.
• Coin Dispenser: All coins in the coin
dispenser only.
• Change Fund: All cash in the safe
(bills and coins).
• Bread Count: All sub roll type bread
(including footlong =1, 6-inch= 0.50
and mini= 0.33).
• Flatbreads: All Flatbread types (including footlong =1, 6-inch= 0.50 and mini= 0.33).
• Salad: All salad bowls.
• Muffin: All breakfast muffins.
• Pizza: All pizza bases.
• Other: All other carrier types combined (such as wraps, bagels, croissants, etc.).
8. Press Save when completed. You will be asked Are you sure you want to save this
Drawer Count with Total Starting $xxx.xx? Press Yes to continue.
9. On the Cash in Drawer Report screen press Close to continue.
10. In the Close Cash Drawer confirmation message box displays the question Would you like
to close the drawer?; press Yes to continue and then press Ok on the Cash Out
Successful Message to complete this procedure.
11. One of two end day screens appears. If the
day is being closed early (more than 2 hours
before closing hour as entered in Store
Hours under Store Options the screen with
Are you certain that you are done
with operations for Today? appears
with a 10-second countdown timer. Validate
the business date displayed and press Yes,
close today’s operations.
Rev. 4.0 April 2014 Page 37SubwayPOS User Manual
12. Otherwise, the screen with End Day will
CLOSE the day for: … appears and the
button Yes, close October 15 (or
whatever the actual business date is).
13. Press Ok on the SubwayPOS has been
closed. message.
14. Press Print or Save on the storewide cash
control report, if required; then press Close
to return to the operations screen.
15. Upgrades to SubwayPOS may run
automatically during the end day procedure.
An upgrade notification window appears
during the upgrade process. Do not close
any windows that appear during this
process. SubwayPOS will automatically
close to the desktop, followed by a black
window for a few short moments.
16. More screens may appear while the notification screen is up. These screens are making backups
of your existing installation of SubwayPOS, and will be used in an emergency situation to revert
you to the previous build.
17. When the installation completes, it will leave the system back at the Windows desktop.
18. You can then launch SubwayPOS again.
Page 38 Rev. 4.0 April 2014SubwayPOS User Manual
Determining Cashier Cash Handling
Use the following procedures to determine discrepancies in cash overage/shortage, excessive item
corrections, voids, refunds and/or discounts.
1. Press Restaurant Functions on the
home screen, log in, and press
Operations.
2. Press Adjustments.
3. Select the date of the discrepancy; then
press Drawer A.
4. Press the Cash & Bread Count Close
line; then press edit.
5. Without making any changes, press done on
the Cash In Drawer screen, followed by
answering yes to Are you sure you want to
save this Drawer Count with Total Starting
$xxx.xx.
6. Print or Save the Cash In Drawer report;
then close the report.
7. Repeat Steps 2-6 for each additional drawer
(drawer B and C).
8. Compare each of the reports to find the shift
where the discrepancy occurred.
Rev. 4.0 April 2014 Page 39SubwayPOS User Manual
Void Transactions
Void transactions can be performed on credit card, Subway card or cash orders and are only available
for current day. Once the business day is closed, this function can no longer be used for that day’s
transactions.
If a credit card or Subway card transaction is voided, it will be removed from the batch before the batch
is sent to Bank of America Merchant Services (BAMS) for settlement (settlement time is 2 AM local time
each day). The card need not be present in order to void a transaction.
1. Press Ring Sales on the home screen, log
in, and press POS Tasks.
2. Press Void Transaction.
3. Press the desired transaction from the list on
the left.
4. Check on the right-hand pane to ensure that
this is the correct order.
5. Press Select.
6. The receipt prints showing all the items on
that transaction as void, indicating the form
of payment at the bottom (cash, credit card,
Subway card, etc.).
Refunds by Item
Refunds are done on an Item-by-Item basis. They can be used to refund any sale item for cash.
1. Press Ring Sales on the home screen,
log in, and press POS Tasks.
2. Press Refund by Item.
3. The onscreen ticket displays Registering
Refunds.
4. Press the items to be refunded.
5. Press Total and provide the customer with
the cash amount.
Page 40 Rev. 4.0 April 2014SubwayPOS User Manual
Reprinting Receipts
Reprinting receipts can be done only on the business day in which the order was rung. The business
day must be open to do this.
1. From the home screen, press Ring Sales,
log in, and press POS Tasks.
2. Press Print Receipt.
3. Press the desired receipt from the left side of
the screen and verify that it is the correct
receipt on the right side of the screen.
4. Press OK to print the receipt on the receipt
printer.
Bread Credits
Bread credits are used to register carriers that were damaged or expired. This includes stale or
damaged breads, salad plates, etc. The actual delivery cost is used for report calculations.
Bread credits can only be entered for the current day, before the business day has been closed. To
enter for a previous day, see the section of this document on waste.
The dollar amounts shown next to each carrier type are not used in any report calculations.
1. Press Ring Sales on the home screen, log
in, and press POS Tasks.
2. Press Bread Credits.
3. The onscreen receipt shows Registering
Bread Credits.
4. Press the carrier types to be credited and
enter the quantity for each.
5. Press Total to complete the transaction. Waste/bread credits will not affect movement values on
the WISR, but will be reflected in the variance amounts.
Note Finished waste can only be entered for the current day, before the business day has been
closed. To enter for a previous day, see the section of this document on waste.
Rev. 4.0 April 2014 Page 41SubwayPOS User Manual
Finished Waste
Finished waste records a wasted menu item including the bread, protein and extras added to a carrier.
1. Press Ring Sales on the home screen; log
in, and press POS Tasks.
2. Press Finished Waste.
3. Note that the onscreen receipt shows
“Registering Waste”.
4. Enter the wasted item(s) as it was prepared.
5. Press Total and the transaction completes.
Finished waste will not affect movement
values on the WISR, but will be reflected in
the variance amounts.
Paid Outs
The paid out function is used to record a cash amount taken from the register and the purpose for
which it was used.
1. Press Restaurant Functions on the
home screen, Log in, and press Cash
Control.
2. Press Paid Outs.
3. Using the onscreen keyboard, enter the
amount paid and then a paid out comment.
Press Save to save the entry and open the
cash drawer to pay the amount out.
4. On report screens, press:
• Print to print a copy of the report.
• Save to save a copy of the report to
the hard drive.
• Close to exit.
5. Press Close to exit and return to the cash
control screen.
Page 42 Rev. 4.0 April 2014You can also read