NAVIGATION SYSTEM OWNER'S MANUAL - Mazda Motor Corporation
←
→
Page content transcription
If your browser does not render page correctly, please read the page content below
NAVIGATION SYSTEM
                                     OWNER'S MANUAL

M A Z D A M O T O R CO R P O R AT I O N
©2019 Mazda Motor Corporation
          January 2019 (Print1)
Table of contents

1 Warnings and Safety information......................... 4

2 Getting started ................................................. 5
  2.1 Before using the navigation system.................................... 5
  2.2 Navigation menu ........................................................... 7
  2.3 Buttons and other controls on the screen........................... 9
       2.3.1 Using keyboards................................................................... 9
       2.3.2 Commander Switch Operation............................................ 10
  2.4 Map screen ................................................................. 12
       2.4.1 Navigating on the map ...................................................... 12
       2.4.2 Position markers ................................................................ 13
             2.4.2.1 Selected map location (Cursor) and selected map
                      object .................................................................. 13
       2.4.3 Objects on the map ........................................................... 13
             2.4.3.1 Streets and roads .................................................. 13
             2.4.3.2 Turn preview and Next street .................................. 14
             2.4.3.3 Lane information and Signposts ............................. 16
             2.4.3.4 Junction view......................................................... 17
             2.4.3.5 Motorway exit information .................................... 17
             2.4.3.6 Elements of the active route ................................... 18
       2.4.4 Manipulating the map........................................................ 19
       2.4.5 Checking the details of the current position (Where Am I?) .... 21
  2.5 Voice Recognition......................................................... 22
       2.5.1 Voice command list............................................................ 24

3 On-road navigation ........................................ 25
  3.1 Selecting the destination of a route ................................ 25
       3.1.1 Entering an address or a part of the address......................... 26
             3.1.1.1 Entering an address ............................................... 26
       3.1.2 Selecting the destination from the POI (point of interest)...... 30
             3.1.2.1 Quick search for a POI (point of interest)................. 30
             3.1.2.2 Searching for Help nearby ...................................... 34
             3.1.2.3 Searching for a POI (point of interest) by category.... 36
             3.1.2.4 Searching for a POI (point of interest) by name........ 39
       3.1.3 Selecting a map location as the destination ......................... 42
       3.1.4 Selecting the destination from your Favourites ..................... 44
       3.1.5 Selecting a recent destination from the History .................... 45
       3.1.6 Entering the coordinate of the destination ........................... 48

                                              2
3.1.7 Free word search (OneBox search)....................................... 50
  3.2 Checking route parameters and accessing route related
      functions..................................................................... 53
  3.3 Modifying the route...................................................... 54
       3.3.1 Selecting a new destination when already having a route:
             New Route, Waypoint or Final Destination .......................... 54
       3.3.2 Editing the list of destinations (Edit Route) .......................... 55
       3.3.3 Checking route alternatives when planning the route ........... 56
       3.3.4 Changing the road types used in route planning .................. 58
  3.4 Saving a location as a Favourite destination ..................... 60
       3.4.1 Editing the details of a Favourite destination ........................ 61

4 Reference Guide.............................................. 62
  4.1 Concepts .................................................................... 62
       4.1.1   Smart Zoom ..................................................................... 62
       4.1.2   Route calculation and recalculation .................................... 62
       4.1.3   Speed limit warning (Only some countries and regions)........ 64
       4.1.4   Traffic information in route planning (Only some countries
               and regions)...................................................................... 65
               4.1.4.1 Past traffic information........................................... 65
               4.1.4.2 Real-time traffic information (TMC)........................ 66
  4.2 Settings menu ............................................................. 70
       4.2.1   Guidance Settings.............................................................. 71
       4.2.2   Warnings Settings............................................................... 71
       4.2.3   Traffic Settings ................................................................... 72
       4.2.4   Route Settings ................................................................... 73
       4.2.5   Map Settings ..................................................................... 75
       4.2.6   Visual Guidance settings .................................................... 77

5 Glossary......................................................... 78

6 End-User Terms............................................... 80

                                                3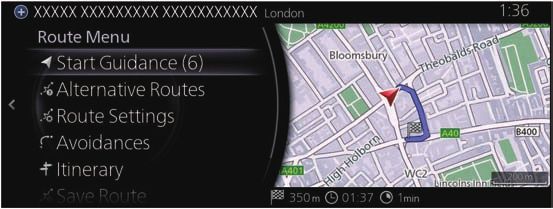
1 Warnings and Safety information
The navigation system guides you to your destination using the GNSS
(GPS+GLONASS) receiver. The navigation system does not transmit your
GNSS position and you cannot be tracked.
It is important that you look at the display only when it is safe to
do so. If you are the driver of the vehicle, we recommend that you
operate the navigation system before you start your journey. Plan
the route before your departure and stop if you need to change the
route.
Drive the vehicle according to the road signs and the road shape. If you
deviate from the recommended route, the navigation system changes the
instructions accordingly.
For more information, consult the End-User Terms (page 80).

                                     4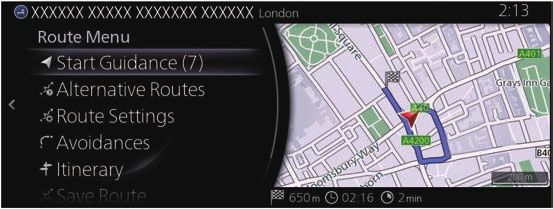
2 Getting started
                                                                           1
2.1 Before using the navigation system
                                                                           2
To use the navigation system, the SD card containing the map information
needs to be inserted in the SD card slot.
                                                                           3
                   SD card slot

                                                                           4

                                                                           5

                                                                           6
                          The location of the SD card slot differs
                          depending on the vehicle model.

                                        5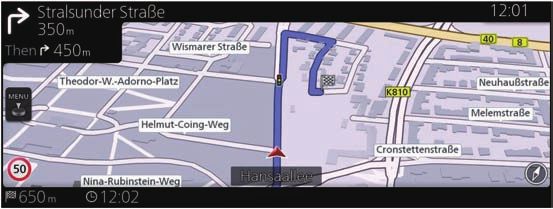
When inserting the SD card, never move the slider on the side of the SD card
to the LOCK position. If the slider is set to LOCK, the SD card cannot be read
and the navigation system will not operate.

This SD card is valid for use in only one vehicle. Never use it in another
vehicle. If the SD card is used first in one vehicle and then in another, the
navigation system for either one of the vehicles may become inoperable.

SD card/map updates
Map and data stored on the SD card can only be modified using the special
Mazda Toolbox application. All details concerning the Mazda Toolbox
application and the method for updating the maps can be found on your
local Mazda website. We strongly recommend that you make a backup copy
of the SD card data using the Mazda Toolbox application before starting
the map updating process. If a problem occurs while updating the SD card
update, it could result in the loss of all the content on the card (such as map
data, software, additional services).
The only way to restore lost data is to use the Mazda Toolbox application and
the copy of the SD card made beforehand.

 Insert and remove the SD card with the ignition switched off.

                                        6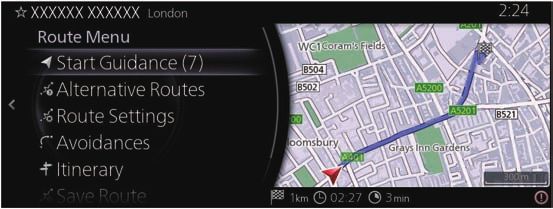
2.2 Navigation menu
                                                                               1
You can reach all parts of the navigation system from the Navigation menu.
Press the commander knob with the map screen open to display the
navigation menu.                                                               2

                                                                               3

                                                                               4

                                                                               5

                                                                               6

You have the following options:
• Add Destination:
  Select your destination by entering an address or selecting a POI (point
  of interest), a location on the map or one of your Favourite destinations.
  You can also look up your recent destinations from the Smart History
  by entering the coordinates. If an Internet connection is available, Local
  Search can be of further help to find your destination.
• Cancel Route:
  Cancels waypoint/route.
• Route Options:
  Changes and displays information regarding the set routes.
• Split Screen:
  Switches the operation target to the right screen when 2 screens are
  displayed.
• Map View:
  The map view mode can be changed (2D/2D North up/3D).

                                      7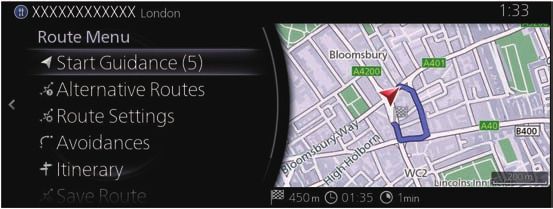
• Travel Information:
  Displays facility/services and traffic information.
• Navigation Settings:
  Switches to the Settings screen where you change navigation settings.
• Mute Guidance:
  Enables or disables voice guidance.

Some functions are not available depending on some countries and
regions.

                                     8
2.3 Buttons and other controls on the screen
                                                                               1
2.3.1 Using keyboards

You only need to enter letters or numbers when you cannot avoid it. You        2
can switch between various keyboard layouts, for example English, Greek or
numerical.

          Task                                Instruction
                                                                               3
 Correcting your entry     Select    to remove the unneeded character(s).
 on the keyboard                                                               4
 Entering a space, for     Select   .
 example between a                                                             5
 first name and a family
 name or in multi-word
 street names                                                                  6
 Entering upper and        When entering a text, the first character appears
 lower case letters        in upper case while the rest of the text is in
                           lower case.
                           Select    to enter an upper case letter or select
                           twice to turn on Caps Lock. Select again and
                           lower case letters return.
 Finalising the keyboard   Select    .
 entry                     • Accepting the suggested search result
                           • Saving your input
                           • Opening the list of search results
 Switching the             Select    .
 displayed language        Select the language you want to use.

                                        9
2.3.2 Commander Switch Operation
The commander switch can be used to switch to each function and to
operate each function.
Set the palm of your hand on the commander knob so that your fingers can
touch each of the switches.
You can switch the screens without having to look down at your hand.
For safety reasons, some operations are disabled while driving the vehicle.
The shape of the switches varies depending on the vehicle model.
No. Item Explanation
1 Commander knob (selection):
Rotate or tilt the commander knob to choose the function
you want to use.
2 Commander knob (select):
Press the commander knob to select the function you want
to use.
3 Entertainment button:
The audio source screen last used is displayed.
10No. Item Explanation
1
4 Volume knob:
Adjust the volume by turning the volume knob.
If you adjust the volume during a voice guidance, the 2
volume of the voice guidance changes.
5 Favourites button: 3
Displays the favourites screen. Press and hold the button to
store items in favourites.
6 Home button:
4
Displays the home screen.
7 Back button:
5
Returns to previous screen.
8 Navigation button:
6
Displays the navigation screen.
112.4 Map screen
2.4.1 Navigating on the map
The data fields are different when you are navigating an active route and
when you have no specified destination (the burgundy line is not displayed).
Field Description
Shows the speed limit of the current road if the
map contains it.
*On some vehicles,
the speed limit of the
current road is not
indicated in the centre
display, only the active
driving display.
Shows the distance you need to travel on the
route before reaching your final destination.
Shows the estimated arrival time at the final
destination of the route.
If the navigation system is capable of receiving
live traffic information, the calculation takes into
account traffic delays affecting your route.
This estimation can be inaccurate at times.
Some functions are not available depending on some countries and
regions.
122.4.2 Position markers
1
2.4.2.1 Selected map location (Cursor) and selected map object
You can mark a map location in the following ways:
• Select the map during route guidance.
2
• Select the map when asked so that the destination can be confirmed after
the search is completed. 3
• Select the destination from the map. (page 42)
When a map location is selected, the Cursor appears at the selected point on 4
the map. A symbol with a combined crosshair and red circle is displayed
for easy visibility of any map scale size. 5
The location of the Cursor can be used as the destination of the route.
You can search for a POI (point of interest), or you can save it as one of your 6
Favourites destinations.
You can also select some of the objects on the map. You can then get
information about this object or use it as a route point.
Some functions are not available depending on some countries and
regions.
2.4.3 Objects on the map
2.4.3.1 Streets and roads
The navigation system shows the roads in different widths and colours so
that they can be easily identified. A motorway will be thicker and a different
colour than a small street.
132.4.3.2 Turn preview and Next street
When navigating a route, the top section of the Map screen shows
information about the next manoeuvre, street or town.
There is an area at the top left part of screen which indicates the next
operation. Displays both the event type (such as turning, detouring, exiting
expressways) and the distance from the current position.
When the next event approaches, the second event is displayed using a small
icon. If there is no second event, only the next event is displayed.
Most of these icons are very intuitive. The same symbols are used in both
fields:
Icon Description
Turn left.
Turn right.
Turn back.
Bear right.
Turn sharp left.
Keep left.
Continue straight in the intersection.
14Icon Description
1
Go left/right on the roundabout,
3rd exit (next manoeuvre).
Enter motorway.
2
3
Exit motorway.
Board ferry.
4
Leave ferry.
5
Approaching a waypoint. 6
Approaching the destination.
152.4.3.3 Lane information and Signposts
When navigating on multilane roads, it is important to take the appropriate
lane in order to follow the recommended route. If lane information is
available in the map data, the navigation system displays the lanes and their
directions using small arrows at the bottom of the map. Highlighted arrows
represent the lanes and direction you need to take.
Lane guidance is provided constantly if there is map information. Signposts
are displayed at the top of the map. The colour and style of the signposts are
similar to the real ones you see above road or by the roadside. They show the
available destinations and the number of the road the lane leads to.
When navigating a route, only the signpost that points to the lane(s) to be
taken is displayed in bright colours; all others are darker. All signposts and
lane guidance arrows are displayed in vivid colours while driving (when there
is no recommended route).
162.4.3.4 Junction view
If you are approaching a motorway exit or a complex intersection and
1
the needed information exists, the map is replaced with a 3D view of the
junction. The optimum driving lane is indicated by an arrow, and road signs 2
are displayed as additional information at the top of the screen.
3
4
5
2.4.3.5 Motorway exit information 6
You may need a petrol station or a restaurant during your journey. This
function displays on the side panel when driving on a motorway.
Select any of them to display the exit area on the map. You can now easily
add this exit as a waypoint to your route if needed.
There are two types of settings for displaying the next expressway exit; one
which constantly displays the next expressway exit while travelling on an
expressway, or the other which displays the next expressway exit only when
the menu panel is open.
You can change the settings in Visual Guidance settings (page 77).
172.4.3.6 Elements of the active route
The navigation system shows the route in the following way:
Symbol Name Description
Current car If there is a road close by, a Red-coloured
position marker arrow symbol moves to the road which is
the closest.
Waypoint An intermediate destination of the route
(intermediate before reaching the final destination.
destination)
Destination (end The final destination of the route.
point)
Route colour The route always stands out with its colour
— on the map, both in daytime and in
nighttime mode.
Streets and You can choose whether you want to use
roads that are or avoid certain road types (page 73).
excluded from the However, when the navigation system
— navigation cannot avoid such roads, the route will
include them and it will show them in
a colour that is different from the route
colour.
Streets and roads Road segments may be affected by traffic
that are affected by events received. These streets and roads
— traffic events are displayed in an alternate colour, and
small symbols displayed along the route
show the type of traffic event.
Some functions are not available depending on some countries and
regions.
182.4.4 Manipulating the map
1
You can scroll a map and zoom-in/zoom-out of it using the commander
knob while the screen is not displaying a menu.
2
3
4
5
Action Commander Description
operation 6
Scrolling Tilt (left/right/ You can move the map in any direction.
the map up/down)
Zooming in Rotate Changes how much of the map is
and out clockwise/Rotate displayed on the screen.
counterclockwise The navigation system uses high-quality
vector maps that let you examine the
map at various zoom levels, always with
optimised content.
Map scaling has a limit in 3D map view
mode. If you zoom out further, the map
switches to 2D view mode.
Open/close Open: Push The option menu is displayed on the
Close: lower part of the screen.
Hides the displayed option menu if the
button/Tilt (left)
option menu has been displayed.
Select Push Press the commander knob to set
destination the cursor’s location as the new
destination. The route is automatically
calculated.
19Action Commander Description
operation
Return to button Returns the map to its original GPS
normal position. Automatic map rotation is
navigation also re-enabled.
The cursor disappears and navigation
continues.
Perspective Rotate You can change the angle of
angle mode clockwise/Rotate perspective on a map.
counterclockwise Selects Rotate Map or Tilt Map .
202.4.5 Checking the details of the current position (Where Am I?)
1
This screen contains information about the current position (or about the last
known position if GPS reception is not available).
2
3
4
5
You can access this screen from the map in one of the following ways:
1. Press the commander knob with the map screen open to display the
menu, and select “Travel Information”. 6
2. Select “Where Am I?”.
212.5 Voice Recognition
The shape of the switches differs depending on the vehicle model.
No. Item Explanation
1 Talk/Pick-up button:
When the button is pressed, the voice recognition top
screen is displayed and the voice recognition is activated.
(While voice guidance is being announced)
Press the button to skip the voice guidance.
2 Hang-up button:
Press the button to end the voice recognition.
Voice recognition activation
When the talk/pick-up button on the audio remote control switch is pressed,
the voice recognition top screen is displayed.
While Apple CarPlay™ or Android Auto™ is connected, Siri® or Android
Auto™ voice recognition is activated, but Mazda Connect voice recognition
is not activated.
Commands usable at any time
“Help” - Can be used to check for usable voice commands.
“Back” - Returns to the previous screen. When a voice command is spoken
while on the telephone number input screen, the content that was previously
input is deleted.
“Cancel” - The voice recognition is ended.
22Ending voice recognition
Do any one of the following operations: 1
• Press the hang-up button.
• Press and hold the talk/Pick-up button.
• Say the word, “Cancel”. 2
Convenient operating tips for using the voice recognition function
Examples of effective voice commands in various categories are displayed on 3
the voice recognition top screen.
It would be convenient to know these usable voice commands in advance.
4
5
6
• The voice commands indicated in this manual are some examples of
usable voice commands.
• When the Barge-In setting is on, voice commands can be made even
while the voice guidance is being announced.
For details on Barge-In, refer to the Settings section in the Mazda
Connect Owner’s Manual.
To prevent mistaken voice recognition, be aware of the following points:
• Speaking in a slightly louder voice will improve voice recognition, but an
excessively loud voice is unnecessary. Try to speak in a slightly louder voice
than when talking to other passengers in the vehicle.
• You do not need to speak slowly. Speak at a normal speed.
• Speak clearly, without pausing between words or numbers.
• Voice commands other than those specified, cannot be recognized. Speak
in the wording specified by the voice commands.
• It is not necessary to face the microphone or approach it. Speak the voice
commands while maintaining a safe driving position.
• Make sure that the air flow from the air conditioner is not blowing on the
microphone.
23• When making voice commands during a voice guidance, speak in a slightly
louder voice. But, an excessively loud voice is unnecessary.
• If the voice recognition is poor with the guidance volume set to high, set
the Barge-In to OFF.
2.5.1 Voice command list
Some voice command examples corresponding to the voice recognition
function
The specified name and number are put into the {}.
Common
• Back
• Help (You can listen to help guidance at each screen.)
• {Line Number} (You can select the line number on the screen.)
• Next Page
• Previous Page
• Cancel
Navigation
• Go Home
• Address Search
• Show Previous Destinations
• Cancel Route
• Delete Destination
• Show/Hide {POI category name}
• Find {POI Category}
• POI Categories
243 On-road navigation
1
You can set up your route in different ways:
If you need a route for immediate navigation, you can select the destination
and start navigating to it right away (normal navigation).
2
You can plan routes with multiple destinations. Select the first destination.
Then select a second destination and add it to your route to create a multi- 3
point route. You can add as many destinations to your route as you like.
3.1 Selecting the destination of a route 4
The navigation system offers you several ways of choosing your destination:
• Enter a full address or a part of an address (page 26). 5
• Select a POI (point of interest) from a database as your destination
(page 30).
• Searches the destination from the map (page 42). 6
• Use a previously saved Favourite destination (page 44).
• Select a location from the History of previously used destinations
(page 45).
• Enter the coordinate of the destination (page 48).
• Free word search (OneBox search) (page 50).
There are other convenient functions.
253.1.1 Entering an address or a part of the address
If you know at least a part of the address, it is the quickest way to select the
destination of the route.
Using the same screen, you can find an address by entering:
• Destination address
If an address or part of a facility name is input, a search candidate list
including the input characters is displayed. The greater the number of
characters input the more the list is refined.
3.1.1.1 Entering an address
To enter an address as the destination, do as follows:
1. Press the commander knob with the map screen open to display the
menu and select “Search” from “Add Destination”.
2. Select “Address Entry”.
3. By default, the navigation system proposes the country and town
where you are. If needed, select “Country, State/Province”, enter the
first few letters of the country name on the keyboard, and select one
country from the list of results.
264. If needed, select a new town:
a. Select “Town”. 1
b. Start entering the name of the town on the keyboard.
c. Find the town you need:
• The most likely town name is always shown in the input field. To 2
accept it, select .
• If the desired name does not show up, the names that match the 3
string appear in a list after entering a couple of characters. Select
the town from the list.
4
5
6
275. Enter the specific street and house number:
a. Select “House No./Street/Postcode”.
b. Start entering the street name on the keyboard.
c. Find the street you need:
• The most likely street name is always shown in the input field. To
accept it, select .
• If the desired name does not show up, the names that match the
string appear in a list after entering a couple of characters. Select
the street from the list.
286. The selected location is shown on the map.
The system transitions to the next screen by selecting “Navigate Here”, 1
or it returns to the previous screen by tilting the commander knob to
the left. The destination can be changed to anywhere on the map by
tilting the commander knob to the right and using the cursor. 2
3
4
5
6
• “Places Nearby”: You can search for POI (point of interest) around the
selected location.
• “Add to Favourites”: The selected location can be registered to Favourites.
7. Navigation starts if “Start Guidance” is selected, or after 10 seconds of
no user interaction.
Additionally, the route can be revised by selecting other options.
293.1.2 Selecting the destination from the POI (point of interest)
You can select your destination from the POI (point of interest) included with
the navigation system.
Using the same screen, you can find a POI (point of interest) in different
ways:
• You can quickly find a nearby POI (point of interest) by its name using the
Quick search feature.
• You can find frequently searched types of POI (point of interest) with only a
few screen selects using the Preset search feature.
• You can search for a POI (point of interest) by its category.
• You can search for a POI (point of interest) by its name.
3.1.2.1 Quick search for a POI (point of interest)
If the name for a POI (point of interest) is input, a search candidate list is
displayed. One destination among the candidates can be selected.
• Along the recommended route if it exists or
• Around your current location if there is no destination given.
Start the Quick search function:
1. Press the commander knob with the map screen open to display the
menu, and select “Add Destination”.
2. Select “More Categories” under “POI Categories”.
3. Select “Search”.
304. Using the keyboard, enter the name of the POI (point of interest).
1
2
3
4
5
If an address or part of a facility name is input, a search candidate list
including the input characters is displayed. The greater the number of 6
characters input the more the list is refined.
5. After entering a few letters, select to open the list of POI (point of
interest) with names containing the entered character sequence.
316. Tilt the commander knob to the right and display the option panel to
reorder the list from “Sort By” and to limit the area from “Search Area”.
Search Area:
• You can search the area around your current position by selecting
“Nearby”. (The result list will be ordered by the distance from this
position.)
• Select “In a Town” to search for a place within a selected town. (The
result list will be ordered by the distance from the centre of the
selected town.)
• Select “Along Route” to search along the active route, and not
around a given point. This is useful when you search for a later
stopover that results in a minimal detour only, such as searching
for upcoming petrol stations or restaurants. (The result list will be
ordered by the length of the necessary detour.)
• You can search the area around the final destination by selecting “At
Destination”. (The result list will be ordered by the distance from this
position.)
• You can search the area around the next waypoint by selecting “At
Next Waypoint”. (The result list will be ordered by the distance from
this position.)
7. Select a destination from the list.
328. The selected location is shown on the map.
The system transitions to the next screen by selecting “Navigate Here”, 1
or it returns to the previous screen by tilting the commander knob to
the left. The destination can be changed to anywhere on the map by
tilting the commander knob to the right and using the cursor. 2
3
4
5
6
• “Places Nearby”: You can search for POI (point of interest) around the
selected location.
• “Add to Favourites”: The selected location can be registered to Favourites.
9. Navigation starts if “Start Guidance” is selected, or after 10 seconds of
no user interaction.
Additionally, the route can be revised by selecting other options.
333.1.2.2 Searching for Help nearby
The Preset search feature lets you quickly find the most frequently selected
types of Places.
1. Press the commander knob with the map screen open to display the
menu, and select “Travel Information”.
2. Select “Help Nearby”.
3. Preset search categories appear, all for searching around the current
position (or around the last known position if the current position is
not available):
4. Tilt the commander knob to the right to display the local menu. Select
any of the quick search items to get an instant list of Places.
345. Select a destination from the list.
6. The selected location is shown on the map. 1
The system transitions to the next screen by selecting “Navigate Here”,
or it returns to the previous screen by tilting the commander knob to
the left. The destination can be changed to anywhere on the map by 2
tilting the commander knob to the right and using the cursor.
3
4
5
6
• “Places Nearby”: You can search for POI (point of interest) around the
selected location.
• “Add to Favourites”: The selected location can be registered to Favourites.
7. Navigation starts if “Start Guidance” is selected, or after 10 seconds of
no user interaction.
Additionally, the route can be revised by selecting other options.
353.1.2.3 Searching for a POI (point of interest) by category
You can search for Places of Interest by their categories and subcategories.
1. Press the commander knob with the map screen open to display the
menu, and select “Add Destination”.
2. Displays a list of recently searched POI categories in “POI Categories”.
If any category from the list is selected, go to Step 5.
3. If the desired category is not listed, select “More Categories”.
4. Select one of the main Place categories (e.g. Accommodation) to list
all Places around the selected location or along the route.
365. Tilt the commander knob to the right and display the option panel to
reorder the list from “Sort By” and to limit the area from “Search Area”. 1
(page 32)
2
3
4
5
6
6. Select a destination from the list.
7. The selected location is shown on the map.
The system transitions to the next screen by selecting “Navigate Here”,
or it returns to the previous screen by tilting the commander knob to
the left. The destination can be changed to anywhere on the map by
tilting the commander knob to the right and using the cursor.
37• “Places Nearby”: You can search for POI (point of interest) around the
selected location.
• “Add to Favourites”: The selected location can be registered to Favourites.
8. Navigation starts if “Start Guidance” is selected, or after 10 seconds of
no user interaction.
Additionally, the route can be revised by selecting other options.
383.1.2.4 Searching for a POI (point of interest) by name
You can search for Places of Interest by their names. You can search around
1
different locations or along your route in the whole Place database or in one
Place category or subcategory only. 2
1. Press the commander knob with the map screen open to display the
menu, and select “Add Destination”.
2. Select “More Categories” under “POI Categories”. 3
4
5
6
3. Select “Search”.
4. Using the keyboard, start entering the name of the Place.
5. After entering a few letters, select to open the list of Places with
names containing the entered character sequence.
396. Tilt the commander knob to the right and display the option panel to
reorder the list from “Sort By” and to limit the area from “Search Area”.
(page 32)
7. Select a destination from the list.
8. The selected location is shown on the map.
The system transitions to the next screen by selecting “Navigate Here”,
or it returns to the previous screen by tilting the commander knob to
the left. The destination can be changed to anywhere on the map by
tilting the commander knob to the right and using the cursor.
• “Places Nearby”: You can search for POI (point of interest) around the
selected location.
• “Add to Favourites”: The selected location can be registered to Favourites.
409. Navigation starts if “Start Guidance” is selected, or after 10 seconds of
no user interaction. 1
Additionally, the route can be revised by selecting other options.
2
3
4
5
6
413.1.3 Selecting a map location as the destination
1. Tilt the commander knob to the left or right, or up or down on the
current location display screen with the menu closed. The cursor is
displayed.
2. Drag the cursor and release it at the desired point.
3. Press the commander knob.
424. The selected location is shown on the map.
The system transitions to the next screen by selecting “Navigate Here”, 1
or it returns to the previous screen by tilting the commander knob
to the left. By selecting the location displayed on the screen, you can
change the destination to anywhere on the map. 2
3
4
5
6
• “Places Nearby”: You can search for POI (point of interest) around the
selected location.
• “Add to Favourites”: The selected location can be registered to Favourites.
5. Navigation starts if “Start Guidance” is selected, or after 10 seconds of
no user interaction.
Additionally, the route can be revised by selecting other options.
433.1.4 Selecting the destination from your Favourites
1. Press the commander knob with the map screen open to display the
menu, and select “Add Destination”.
2. Select “More Favourites”.
When “More Favourites” is selected, the screen transfers to the
Favourites screen. Select your registered favourite.
3. Navigation starts if “Start Guidance” is selected, or after 10 seconds of
no user interaction.
Additionally, the route can be revised by selecting other options.
443.1.5 Selecting a recent destination from the History
1
1. Press the commander knob with the map screen open to display the
menu, and select “Add Destination”.
2. Displays a list of recent destinations in “Recent Destinations”. 2
3
4
5
6
453. Select “More Recent Destinations” to display a list of recently searched
destinations. Tilt the commander knob to the right and select “Sort”
to rearrange the display order based on “Relevance”, “Time”, “Name”,
“Distance”, and “Frequency”.
4. Select a destination from the list.
465. The selected location is shown on the map.
The system transitions to the next screen by selecting “Navigate Here”, 1
or it returns to the previous screen by tilting the commander knob to
the left. The destination can be changed to anywhere on the map by
tilting the commander knob to the right and using the cursor. 2
3
4
5
6
• “Places Nearby”: You can search for POI (point of interest) around the
selected location.
• “Add to Favourites”: The selected location can be registered to Favourites.
6. Navigation starts if “Start Guidance” is selected, or after 10 seconds of
no user interaction.
Additionally, the route can be revised by selecting other options.
473.1.6 Entering the coordinate of the destination
You can also select a destination by entering its coordinate as follows:
1. Press the commander knob with the map screen open to display the
menu and select “Search” from “Add Destination”.
2. Select “Coordinates Entry”.
3. Input the latitude and longitude coordinates.
4. When finished, select .
485. The selected location is shown on the map.
The system transitions to the next screen by selecting “Navigate Here”, 1
or it returns to the previous screen by tilting the commander knob to
the left. The destination can be changed to anywhere on the map by
tilting the commander knob to the right and using the cursor. 2
3
4
5
6
• “Places Nearby”: You can search for POI (point of interest) around the
selected location.
• “Add to Favourites”: The selected location can be registered to Favourites.
6. Navigation starts if “Start Guidance” is selected, or after 10 seconds of
no user interaction.
Additionally, the route can be revised by selecting other options.
493.1.7 Free word search (OneBox search)
A destination can be searched using random free words in combination
with an address, location name, post number, telephone number, latitude/
longitude, road name, or town name.
There are some functional limitations to the free word search. (Such as POI
(point of interest) + road name is not supported)
It functions when the search results can be set as a destination.
1. Press the commander knob with the map screen open to display the
menu and select “Search” from “Add Destination”.
2. Input a keyword to be searched and select to open the search
result list.
503. Tilt the commander knob to the right and display the option panel to
reorder the list from “Sort By” and to limit the area from “Search Area”. 1
(page 32)
2
3
4
4. The selected location is shown on the map.
5
The system transitions to the next screen by selecting “Navigate Here”,
or it returns to the previous screen by tilting the commander knob to 6
the left. The destination can be changed to anywhere on the map by
tilting the commander knob to the right and using the cursor.
• “Places Nearby”: You can search for POI (point of interest) around the
selected location.
• “Add to Favourites”: The selected location can be registered to Favourites.
515. Navigation starts if “Start Guidance” is selected, or after 10 seconds of
no user interaction.
Additionally, the route can be revised by selecting other options.
523.2 Checking route parameters and accessing route related
functions 1
You can check different parameters of the route recommended by the
navigation system. 2
1. Press the commander knob with the map screen open to display the
menu, and select “Route Options”.
2. The following pieces of information are displayed:
3
• The name and/or address of the destination.
• The total time of the route.
• The total length of the route.
4
5
6
3. You have the following options on this screen (for detailed instructions
on how to use them, see the next chapter):
• Select “Cancel Route” to delete the active route.
• Select “Alternative Routes” to display available alternative routes.
• Select “Route Settings” to change route calculations.
• Select “Edit Route” to edit the route.
• Select “Avoidances” to bypass a part of the route.
• Select “Itinerary” to display the entire route on the map.
There are other convenient functions.
533.3 Modifying the route
When navigation is already started, there are several ways to modify the
active route. The following sections show some of those options.
3.3.1 Selecting a new destination when already having a route:
New Route, Waypoint or Final Destination
If you already have a recommended route and you select a new destination
as described in the above sections, the application will ask you whether to
start a new route, add a new waypoint (intermediate destination) to the
route or append the newly selected destination at the end of the current
route.
• Select “New Route” to plan a new route to the newly selected location. The
previous destination and waypoint(s) are deleted.
• Select “Add to Current Route” to add the newly selected location as an
intermediate destination to your route. The other destinations of the route
remain intact. Note: the new waypoint is placed among destinations to
keep the route optimal. To decide where a waypoint to appear, use the Edit
Route feature.
• Select “Add to Current Route” and add the waypoint to the bottom of the
displayed list to set a new destination.
543.3.2 Editing the list of destinations (Edit Route)
1
You can edit the route by modifying the list of destinations.
1. Press the commander knob with the map screen open to display the
menu, and select “Route Options”. 2
2. Select “Edit Route”.
3
4
5
3. Edit the destination or waypoint. 6
“Add Waypoint”: Add the new destination or waypoint.
4. Select the destination or waypoint to display the menu.
“Move”: Move the selected destination or waypoint up or down one
place at a time.
“Replace”: Search for a location to replace the selected destination or
waypoint.
“Remove”: Delete the selected destination or waypoint from the list.
553.3.3 Checking route alternatives when planning the route
You can select from different route alternatives or change the route planning
method after you have selected a new destination.
1. Press the commander knob with the map screen open to display the
menu, and select “Route Options”.
2. Select “Alternative Routes”.
3. The four route alternatives are displayed next to the selected route
planning method. Select one to view it on the map.
564. Tilt the commander knob to the right to check route details.
1
2
3
4
5. Select one route alternative or tilt the commander knob to the left to
return to the previous screen.
The navigation system recalculates the route. The deep blue line now
5
shows the new recommended route.
6
573.3.4 Changing the road types used in route planning
To recalculate the active route with different road type preferences, do as
follows. These changes can also be made in Settings (page 73).
1. Press the commander knob with the map screen open to display the
menu, and select “Navigation Settings”.
2. Select “Route Settings”.
3. Select any of the listed road types to modify the route. If needed, scroll
the list for all road types. You have the following options (their order
depends on the selected vehicle type):
• “Allow Motorways” - You might need to avoid motorways if you
are towing another vehicle.
• “Allow Period-Charge Toll Roads” - Charge roads are pay roads
where you can purchase a pass or vignette to use the road for a
longer period of time. They can be enabled or disabled separately
from toll roads.
• “Allow Per-use Toll Roads” - The navigation system includes toll
roads (pay roads where there is a per-use charge) in the routes by
default. If you disable toll roads, the navigation system plans the
best toll-free route.
• “Allow Border Crossing” - A border crossing may be a shorter
route depending on the route. For this function, you can select
whether or not to cross a border when planning the route.
• “Allow Carpool / HOV Lanes” - Setting in which routes with
carpool lanes can be created or not created.
• “Allow Unpaved Roads” - The navigation system excludes unpaved
roads by default: unpaved roads can be in a bad condition and
usually you cannot reach the speed limit on them.
• “Allow 4WD Tracks” - If this option is checked special 4WD tracks
are considered during route calculation.
58• “Allow Ferries” - The navigation system includes ferries in a
planned route by default. However, a map does not necessarily 1
contain information about the accessibility of temporary ferries.
You might also need to pay a fare on ferries.
• “Allow Car Shuttle Trains” - Car shuttle train lines considered 2
during route calculation. Car shuttle train lines are usually
operated between places not easily accessible on conventional
roads. 3
• “Allow Roads That Need Permits” - Roads and areas that require
special permit are considered during route calculation.
• “Allow Seasonally Restricted Roads” - Roads with seasonal
4
restrictions are considered during route calculation.
4. The route has already been recalculated. Tilt the commander knob to 5
the left to return to the map screen.
6
Some functions are not available depending on some countries and
regions.
593.4 Saving a location as a Favourite destination
You can add any location to Favourites, the list of frequently used
destinations. Planning a route to one of the Favourite destinations is
described on page 44.
1. Select a destination as described before. It can be an address, a Place,
any location on the map, a previously used destination from History,
etc.
2. A searched destination can be registered to Favourites by selecting
“Add to Favourites” on the verification screen of the destination search
results.
603.4.1 Editing the details of a Favourite destination
1
You can select a location that you have already saved as a Favourite and edit
its details. Adding a location to the list of Favourite destinations is described
on page 60. 2
1. Press the Favourites button on the commander switch.
2. Go to Options and Select the Navigation tab from the list “All”.
3. The list of Favourite destinations is displayed. 3
4
5
6
The following functions can be used by selecting Edit Navigation
Favourite.
Reorder Favourites.
Rename Favourites.
Edit Home → Change Home location
Edit Work → Change Work location
Delete Favourite(s)
614 Reference Guide
4.1 Concepts
4.1.1 Smart Zoom
Smart Zoom provides much more than just a usual automatic zoom feature:
• While following a route: when approaching a turn, it will zoom in and
raise the view angle to let you easily recognise your manoeuvre at the next
junction. If the next turn is at a distance, it will zoom out and lower the
view angle to be flat so you can see the road in front of you.
• While driving without an active route: Smart Zoom will zoom in if you
drive slowly and zoom out when you drive at high speed.
• Automatic Zoom Setting Off: Turns the Smart Zoom off.
4.1.2 Route calculation and recalculation
The navigation system calculates the route based on your preferences:
• Route planning methods:
• “Fast” : Gives a quick route if you can travel at or near the speed
limit on all roads.
• “Short” : Gives a route that has the smallest total distance of all
possible routes.
• “Economical” : This method combines the merits of the Fast and
Short routes: The navigation system makes a calculation for the
Fast route, but it also includes other roads in the calculation in
consideration of fuel economy.
• “Easy” : Results in a route with fewer turns and no difficult
manouvres. With this option, you can make the navigation system
take, for example, the motorway instead of a series of smaller
roads or streets.
62• Road type used for route plan:
• Allow Motorways 1
• Allow Period-Charge Toll Roads
• Allow Per-Use Toll Roads
• Allow Border Crossing 2
• Allow Carpool / HOV Lanes
• Allow Unpaved Roads
• Allow 4WD Tracks 3
• Allow Ferries
• Allow Car Shuttle Trains
• Allow Roads That Need Permits
4
• Allow Seasonally Restricted Roads
If data exists and the setting is valid, route calculation takes into account 5
historical traffic data for the given day of week and time of day (page 65).
If the setting for Traffic Settings is valid, Real-time Traffic events are taken into
account and the route is largely modified. 6
The navigation system automatically recalculates the route if you deviate from
the proposed itinerary or if a newly received Traffic event concerns a part of
the recommended route.
For further information about Route Settings, see page 73.
Some functions are not available depending on some countries and
regions.
634.1.3 Speed limit warning (Only some countries and regions)
Maps may contain information about the speed limits of the roads. The
navigation system is able to warn you if you exceed the current limit. This
information may not be available for your region (ask your local dealer), or
may not be fully correct for all roads on the map.
Except vehicles with Active Driving Display (Windshield type)
The speed warning can be set from the Warnings Settings (page 71).
Setting can be selected using “Warnings Settings” → “Speeding”:
• Audio and Visuals warning: You will hear a warning beep with visuals if you
exceed the speed limit by a certain percentage.
• Visual Alerts: If you exceed the speed limit on a road, the speed limit for
the current road is shown on the map or on the active driving display.
You can also choose to see the speed limit sign on the map all the time.
Vehicles with Active Driving Display (Windshield type)
1. Select the “Settings” on the home screen to display the Settings screen.
2. Select the “Active Driving Display” menu.
3. Select the “Speed Limit Alert” on the screen to select the item you
would like to change.
644.1.4 Traffic information in route planning (Only some countries and
regions) 1
The recommended route is not always the same between two points. Offline
historical traffic information (historical speed information or traffic patterns) 2
can be taken into account in the route calculation based on the time of day
and the day of week whenever suitable data exists. In addition, real-time
traffic information can help you avoid current traffic events like temporary 3
road closures or a traffic jam caused by an accident. Both functions are
subject to data availability.
It is necessary to set the following to display traffic information on the map. 4
1. Press the commander knob with the map screen open to display the
menu, and select “Traffic Settings” from “Navigation Settings”.
2. Set either “Flow and Icons”, “Flows Only”, or “Icons Only” in “Show 5
Traffic Information”.
A 2D map is displayed with road segments coloured by the density of the
traffic in the given period. The current information is shown when you open
6
the screen. Modify the day of week and the time of day to see the desired
period.
4.1.4.1 Past traffic information
If map data for past traffic information exists and the setting is valid, the
navigation system can use it when planning a route. In normal cases, these
statistics help you avoid usual traffic jams on the given day of week in the
given hour but in some cases like on public holidays that fall on normal
weekdays, they can be misleading. You can disable this feature in Traffic
Settings (page 72).
654.1.4.2 Real-time traffic information (TMC)
TMC (Traffic Message Channel) can provide you with the real-time status of
the traffic. Route calculation can avoid road blocks or unexpected traffic jams
caused by an accident.
This feature is available only if your hardware supports TMC.
TMC is a specific application of the FM Radio Data System (RDS) used for
broadcasting real-time traffic information.
Using traffic information is enabled by default in Mazda navigation system.
TMC is not a global service. It may not be available in your country or
region. Ask your local dealer for coverage details.
The Mazda navigation system may contain the TMC receiver that is needed
to receive Traffic events. Ask your local dealer.
If public Traffic data is broadcast at your location, Mazda navigation system
automatically takes into account the traffic events received. You do not
need to set anything in the programme. The receiver will automatically
search the FM radio stations for TMC data, and the decoded information
will immediately be used in route planning. When Mazda navigation system
receives traffic information that may affect your route, the programme will
warn you that it is recalculating the route, and navigation will continue with a
new route that is optimal considering the most up-to-date traffic conditions.
To fine-tune this recalculation, you can set the minimum delay that can
trigger a route recalculation, or you can instruct Mazda navigation system to
have you confirm the new recommended route before it takes effect. You can
do these in Traffic Settings (page 72).
Road segments affected by traffic events are displayed with an alternate
colour on the map, and small symbols above the road show the nature of the
event:
66(When checking details of traffic events from the Traffic Event list screen)
1. Press the commander knob with the map screen open to display the 1
menu and select “Traffic” from “Travel Information”. The Traffic Event list
is displayed.
2
3
4
5
2. A list limited to each type of event can be displayed from the displayed
option panel by tilting the commander knob to the right.
6
3. Select the Traffic Event which you want to check for detailed
information from the list and select “Traffic Event Information”.
Detailed information for the event is displayed.
674. In addition, you can set how the system should consider a route search
for each event from the “Event Status”.
Event Status:
• “Automatically Handle”: Can take into consideration how the
estimated time of arrival will be affected by avoiding an event, and
determines whether or not to avoid it automatically.
• “Avoid Event”: Searches for a route to avoid an event.
• “Ignore Event”: Does not consider a route avoiding an event.
(When checking details of traffic events from the map screen)
1. Tilt the commander knob to the left or right, or up or down on the current
location display screen with the menu closed. The cursor is displayed.
2. Set the cursor on the Traffic Event which you want to check for detailed
information and press the commander knob to open the menu.
683. When “Location Information” is selected, detailed information for an
event is displayed. 1
2
3
4
5
6
694.2 Settings menu
You can configure the programme settings, and modify the behaviour of the
navigation system. Press the commander knob with the map screen open to
display the menu, and select “Navigation Settings”.
Setting Item Description
Split Screen You can select navigation information displayed on the
side panel.
Map Settings You can fine-tune the appearance of the Map screen.
Adjust the map view to your needs, show or hide 3D
buildings, and manage POI (point of interest) display
settings (which POI to show on map).
Guidance A guidance-related setting is available during route
Settings guidance.
Warnings A setting related to warnings is available.
Settings
Route Settings Refer to Changing the road types used in route
planning (page 58).
Traffic Settings A setting for traffic information is available.
Some functions are not available depending on some countries and
regions.
704.2.1 Guidance Settings
1
Setting Item Description
Guidance Volume The guidance audio volume can be changed 2
during route guidance.
3
4.2.2 Warnings Settings
Warning and alert settings are available.
4
Setting Item Description
Speed Limit The speed limit warning display can be changed. 5
*Except vehicles “Always”: Constantly displayed
with Active “When speeding”: Displays only when vehicle speed
Driving Display exceeds speed limit 6
(Windshield type)
Speeding The following alert types are available:
“Visual Alerts”: Only display
“Audio and Visual”: Both sound and display
“None”: No display and sound
*If the guidance volume is set to 0, the speed
limit notification is also 0 because it is part of the
guidance.
Speed Cameras The speed camera warning setting can be changed.
(High Vigilance “Visual Alerts”: Only display
Area*) “Audio and Visual”: Both sound and display
*Only France “None”: No display and sound
Warn for The speed camera warning conditions can be
Cameras changed.
“Always”: Constantly displayed
“When Speeding”: Displays only when vehicle speed
exceeds speed limit
Some functions are not available depending on some countries and
regions.
71You can also read